The u-trak hole should be 80mm exact (and then the back side opened up with a file a little to accommodate the taper) if you are doing a straight flush mount. This can really only be done with a router as there are no hole saws that I have found at this size.. Plus a hole saw will not make a very good hole, and part of this will be visible without the trim ring installed.
If you are using the trim ring, a 3.25" hole saw cut hole will work fine. However, with the trim ring on, the distance from the bottom of the trim ring to the top of the trackball base is NOT 3/4", it is about 9/16".. so you either use 1/2" material for your CP and the trim ring sits just a little low on the ball, or you use 3/4" and rout out the underside to recess the whole trackball base about 3/16". Of course if you do this you are going to have to be super accurate when setting your brass inserts to hold the bolts to mount it as you will have less than an eighth of an inch between the bottom of the hole and the surface of your CP.
I chose to flush mount, but it was a challenge to get it perfect. First I used the trim ring to draw the exact hole I wanted. Then I used a jig saw to cut it out, going about 1/8" inside the line. Then I took a scrap of 3/4" wood, cut a 3-1/4" hole in it, then placed the trim ring in the hole with some very thin shims (cardboard or paper folded up) to center it, then clamped that piece to the CP with the trim ring clamped between the scrap and the CP. When I flipped the CP over, I now had a perfect guide for a flush trim bit. I routed the hole using that plastic trim ring as the guide for the bearing on the flush trim bit and ended up with a perfect hole. I used a file on the back side of the CP to open the hole a little and taper it, being careful not to hit the top 1/8". When all was said and done, my hole is exact and the U-trak fits perfect. I carefully trimmed my graphics overlay to the hole, and it came out REALLY nice.
Here is a pic after I cut the hole

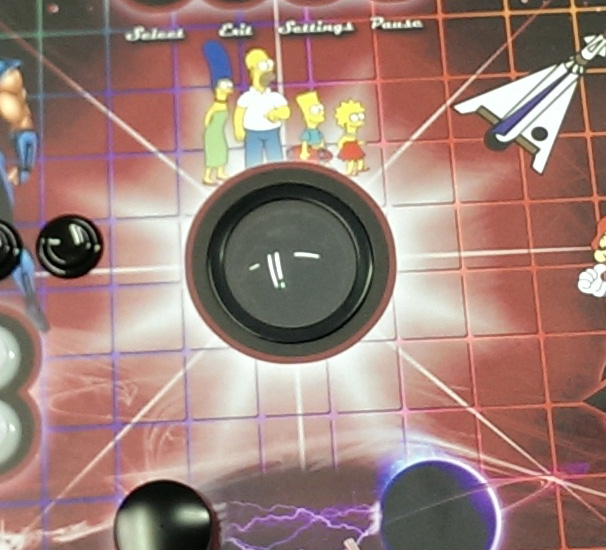
And the finished product


 Home
Home Help
Help Search
 Login
Login Register

 Send this topic
 Print
Print Topic: Control Panel template - See anything that should be changed before I cut? (Read 3268 times)


