Main Restorations Software Audio/Jukebox/MP3 Everything Else Buy/Sell/Trade
Project Announcements Monitor/Video GroovyMAME Merit/JVL Touchscreen Meet Up Retail Vendors
Driving & Racing Woodworking Software Support Forums Consoles Project Arcade Reviews
Automated Projects Artwork Frontend Support Forums Pinball Forum Discussion Old Boards
Raspberry Pi & Dev Board controls.dat Linux Miscellaneous Arcade Wiki Discussion Old Archives
Lightguns Arcade1Up Try the site in https mode Site News

Unread posts | New Replies | Recent posts | Rules | Chatroom | Wiki | File Repository | RSS | Submit news


Author Topic: Nostalgia - Done and delivered!  (Read 17295 times)

0 Members and 1 Guest are viewing this topic.

dkersten

  • Trade Count: (0)
  • Full Member
  • ***
  • Offline Offline
  • Posts: 1472
  • Last login:March 12, 2024, 11:47:30 am
  • If you are gonna do it, do it right..
Nostalgia - Done and delivered!
« on: July 11, 2014, 06:57:26 pm »
Well, I ordered all the parts for my next cab, a single player cab for my parents, titled: Nostalgia.

The day after I got my tankstick and had it set up on my dining room table, my parents (67 and 72 years old) came over for my daughter's b-day and I couldn't pull them off it longer than to sing happy birthday.  This was before I even had my first pre-fab cabinet, the one I sold to my brother (along with that tankstick).  Now that my personal cab is done, I will get one built for them. 

Theme-wise I am shooting for some mix of a classic "pac man like" arcade look with some 50's type jukebox style.  I have no idea if I can pull it off.  When I asked my dad what he wanted for a theme, he said "This all makes me 'remember when', so go with something like that."  I decided "Nostalgia" fits, so I am running with it.  Of course, it is a mame cab with modern technology (LCD, RGB lit buttons, trackball), so I can go slim and will likely do something close to what I did on my first one, maybe close off the sides a little more so I have more room for artwork. 

I am using one servostik and 7 player buttons, even though they will probably never use more than 3 buttons.  There are still plenty of grandkids who come to visit, so I will probably have some of the shmups, vs fighters, and maybe even some nes and snes (mostly Mario) stuff on there, and I wanted to make sure I have enough buttons.  I will throw side buttons on so I can add a couple pinball games for the heck of it.  4 service buttons, 2 player buttons, and 2 credit buttons round it out.  Mostly RGB with an ipac ultimate to control it all.  Also a utrak trackball with the RGB lights.. I would have done just solid color non lit buttons, but my mom LOVES the lit trackball on mine, so if I was going to do that, I might as well add a few more lights.. Plus this way only the buttons they will use will be lit, and that will help.

I figured the servo stik so they can play the 4 way games better but have the 8 way game options without them having to know about switching the restrictor around.  Chances are they will play pac man mostly, but they wanted it to be able to do other things, more for bragging rights, lol. 

I will probably do a base of black with yellow t-molding and yellow and red artwork, but I might go with yellow base and red t-molding, I will decide after the art is done.  That will be the biggest challenge, I have to come up with a lot of art, and it will mostly have to be hand drawn.. I can't just take some stock art and throw some extra stuff in it like my first one..

Anyway, I will post pics and all that once I have something more to show.  This is far from revolutionary, but it should be fun nevertheless.  I tried to convince them to go with a vertical monitor and only the ultra classic games, but they want to play golden tee too, lol, so a 27" it is..


UPDATES:  Details are below, but here is the current state of the artwork, layout, and state of construction:


Slippyblade

  • Trade Count: (+2)
  • Full Member
  • ***
  • Offline Offline
  • Posts: 3167
  • Last login:November 16, 2023, 11:39:51 am
  • And to the death god we say, "Not today!"
Re: Nostalgia
« Reply #1 on: July 11, 2014, 09:10:35 pm »
Your parents rock.   :applaud:

dkersten

  • Trade Count: (0)
  • Full Member
  • ***
  • Offline Offline
  • Posts: 1472
  • Last login:March 12, 2024, 11:47:30 am
  • If you are gonna do it, do it right..
Re: Nostalgia
« Reply #2 on: July 17, 2014, 02:20:13 pm »
OK, Parts are starting to show up, picking up wood today, but still have a TON of decisions to make.

I just drew up my idea for a marquee, and I think I like the retro style of something like the old coke machines.. bold colors, chrome strips, and script fonts..  But I want to go primarily black and yellow, with some red thrown in for accent.  I will incorporate some pac-man art into the side art to tie it together.  I have no idea if I can pull this off in a way that doesn't clash too bad.  I am totally mixing eras here, but I think it will come out pretty cool.

I am going to paint a base of black for the cab, and I haven't decided on red or yellow t-molding yet.. I got the yellow in, and I like it, but red with all that yellow might work out really well too.

Here is the first draft of my marquee:


I would LOVE some feedback.

Here is more of a traditional red version while keeping a splash of yellow. 

yamatetsu

  • Trade Count: (0)
  • Full Member
  • ***
  • Offline Offline
  • Posts: 2697
  • Last login:Today at 04:51:14 am
  • Just because.
Re: Nostalgia
« Reply #3 on: July 17, 2014, 02:44:43 pm »
I like the second one more. If you put a light behind it, the "Nostalgia" will really pop,
while in the first one everything BUT the "Nostalgia" will pop.
Depends on which effect you want to achieve.
I'd just print both and put a light behind them to see which one fits.
Remember to use a darker red as the light will make it lighter.
                  

dkersten

  • Trade Count: (0)
  • Full Member
  • ***
  • Offline Offline
  • Posts: 1472
  • Last login:March 12, 2024, 11:47:30 am
  • If you are gonna do it, do it right..
Re: Nostalgia
« Reply #4 on: July 17, 2014, 02:50:22 pm »
Actually my folks don't want it backlit.. lol.. so the yellow with a gloss clear laminate would probably pop more.  I do like the red one a little better by itself, but when I think about it on a sea of black and yellow, it won't really go well.  At least that is my line of thought right now.  But I posted both to get opinions to see if that thinking will be swayed..

yamatetsu

  • Trade Count: (0)
  • Full Member
  • ***
  • Offline Offline
  • Posts: 2697
  • Last login:Today at 04:51:14 am
  • Just because.
Re: Nostalgia
« Reply #5 on: July 17, 2014, 03:05:34 pm »
Sooo ... What about the red one and a sea of black and red then  ;D
                  

dkersten

  • Trade Count: (0)
  • Full Member
  • ***
  • Offline Offline
  • Posts: 1472
  • Last login:March 12, 2024, 11:47:30 am
  • If you are gonna do it, do it right..
Re: Nostalgia
« Reply #6 on: July 17, 2014, 03:10:08 pm »
Just not sure if I incorporate some of the pac man side art how it would go with a primarily red background..

I'll give it a shot though..

yamatetsu

  • Trade Count: (0)
  • Full Member
  • ***
  • Offline Offline
  • Posts: 2697
  • Last login:Today at 04:51:14 am
  • Just because.
Re: Nostalgia
« Reply #7 on: July 17, 2014, 03:20:12 pm »
Something like yellow sides / red front perhaps ?
                  

Rick

  • Trade Count: (+1)
  • Full Member
  • ***
  • Offline Offline
  • Posts: 2787
  • Last login:May 09, 2023, 01:16:55 pm
  • Bartop, Cocktail and Pinball Arcade Cabinets
    • Gameroom Designs Canada
Re: Nostalgia
« Reply #8 on: July 17, 2014, 03:32:42 pm »
Sticking with the nostalgic theme (which I LOVE) why not incorporate something like this?


Nothing like a classic car motif, although I have no clue as to how you might pull this off...

dkersten

  • Trade Count: (0)
  • Full Member
  • ***
  • Offline Offline
  • Posts: 1472
  • Last login:March 12, 2024, 11:47:30 am
  • If you are gonna do it, do it right..
Re: Nostalgia
« Reply #9 on: July 17, 2014, 04:27:37 pm »
I like the idea of something with the flames, but it wouldn't really be to my parent's tastes, even as a "retro hod rod" type theme.. Maybe I will have to tackle something like that for my race cab build though.. pretty badass..  8)

I have a couple ideas that I will work on later today and tomorrow.. Not sure how it will come out, but the best way to find out is to try it..

dkersten

  • Trade Count: (0)
  • Full Member
  • ***
  • Offline Offline
  • Posts: 1472
  • Last login:March 12, 2024, 11:47:30 am
  • If you are gonna do it, do it right..
Re: Nostalgia
« Reply #10 on: July 17, 2014, 07:11:36 pm »
Here is a fairly rough draft of a side in red.  I am still way into the early stages of this, and I haven't filled any details in, let alone decided on the overall layout or anything.. Not sure I want that much red in it, and if so, I might go with a darker red.. starting to feel really orange after looking at it for too long..

yamatetsu

  • Trade Count: (0)
  • Full Member
  • ***
  • Offline Offline
  • Posts: 2697
  • Last login:Today at 04:51:14 am
  • Just because.
Re: Nostalgia
« Reply #11 on: July 18, 2014, 03:28:59 am »
My interpretation. Although to be honest, the chrome bars don't really fit to the 'flat' style of the other graphics.


Le Chuck

  • Saint, make a poll!
  • Wiki Contributor
  • Trade Count: (+6)
  • Full Member
  • ***
  • Offline Offline
  • Posts: 5509
  • Last login:April 14, 2024, 06:01:28 pm
  • <insert personal text here>
Re: Nostalgia
« Reply #12 on: July 18, 2014, 07:50:04 am »
If you're doing some classic Pac Man on the sides but not doing the exact original I'd take a design cue from Mrs. Pac-man and do the lines with curved rather than angular corners.  Also stroke the color bars with another color to give it a bit of pop. 

The three bars underneath the main graphic don't look good with the raised and shadowed effect, but the bars themselves will look good.  The way they are rounded off should be the same for all the other bars.  It looks a bit unseemed right now. 

dkersten

  • Trade Count: (0)
  • Full Member
  • ***
  • Offline Offline
  • Posts: 1472
  • Last login:March 12, 2024, 11:47:30 am
  • If you are gonna do it, do it right..
Re: Nostalgia
« Reply #13 on: July 18, 2014, 10:21:40 am »
I think the striping is way too thick.. it works in the marquee because it is fairly subtle but still stands out.  The problem with the sides is the sheer size of the real estate.  I just don't want a massive sea of red. 

I am worried about any lines that follow the cabinet lines.  In just 48 inches on my CP for my first cab, the vinyl stretched enough during application to be off by over 1/8th of an inch, and since the buttons had the outlines, those outlines are very obviously off.  I wouldn't want to apply a 68" long graphic and end up a quarter or half inch off and have a curve that follows the edge look way off.  The straight lines along the back should be easy enough to keep straight, but I want it to run off the front without any lines following.

I have a couple ideas I will try..

I agree that the "flat" arcade graphics with the "3d" looking chrome bars don't go together well.. Still working on that one.. I know there is a way to integrate the two..

dkersten

  • Trade Count: (0)
  • Full Member
  • ***
  • Offline Offline
  • Posts: 1472
  • Last login:March 12, 2024, 11:47:30 am
  • If you are gonna do it, do it right..
Re: Nostalgia
« Reply #14 on: July 18, 2014, 11:23:56 am »
OK, I like this one WAY better.. I might try to do something in the top section, but I haven't figured out what might work yet.. WAY more of the theme I did on the marquee with a little of the arcade thing thrown in. 


dkersten

  • Trade Count: (0)
  • Full Member
  • ***
  • Offline Offline
  • Posts: 1472
  • Last login:March 12, 2024, 11:47:30 am
  • If you are gonna do it, do it right..
Re: Nostalgia
« Reply #15 on: July 18, 2014, 11:30:07 am »
And I just ordered chrome t-molding.. yellow or red just wouldn't work here, and chrome will fit it to a T (pardon the pun)..

yamatetsu

  • Trade Count: (0)
  • Full Member
  • ***
  • Offline Offline
  • Posts: 2697
  • Last login:Today at 04:51:14 am
  • Just because.
Re: Nostalgia
« Reply #16 on: July 18, 2014, 08:04:15 pm »
 :applaud: That's the way to go. The upper section definitely needs something though.

An idea :


yotsuya

  • Trade Count: (+21)
  • Full Member
  • ***
  • Offline Offline
  • Posts: 19955
  • Last login:Today at 02:02:53 am
  • 2014 UCA Winner, 2014, 2015, 2016 ZapCon Winner
    • forum.arcadecontrols.com/index.php/topic,137636.msg1420628.html
Re: Nostalgia
« Reply #17 on: July 18, 2014, 11:52:12 pm »
OK, I like this one WAY better.. I might try to do something in the top section, but I haven't figured out what might work yet.. WAY more of the theme I did on the marquee with a little of the arcade thing thrown in. 


I like this one. Don't worry about plastering every inch with characters.  :cheers:
***Build what you dig, bro. Build what you dig.***

dkersten

  • Trade Count: (0)
  • Full Member
  • ***
  • Offline Offline
  • Posts: 1472
  • Last login:March 12, 2024, 11:47:30 am
  • If you are gonna do it, do it right..
Re: Nostalgia
« Reply #18 on: July 19, 2014, 12:29:06 pm »
I don't have it here at home with me, but I added a contour line in the top part that makes it look like part of the panel is recessed slightly, and I am happy with it, so that is all I will add to that. 

Now I need to get the CP artwork done, and get that side printed full size so I can transfer it to wood and start cutting.  With the curve I can't just draw it out on the wood, I need a template.  I might even hit my buddy up for use of his cnc router and bring the scale drawing and see how it works out.. Pinning him down is the tough part, he is one of those guys who is always super busy.  Took him 3 months to get me a title for a truck I bought from him.. lol.

dkersten

  • Trade Count: (0)
  • Full Member
  • ***
  • Offline Offline
  • Posts: 1472
  • Last login:March 12, 2024, 11:47:30 am
  • If you are gonna do it, do it right..
Re: Nostalgia
« Reply #19 on: July 25, 2014, 01:05:58 pm »
Got the basic CP layout done.  Single servostik, decided to go with 6 instead of 7 buttons, mostly since nearly all games played will likely never even require more than 3, so a seventh is just overkill and doesn't look right.  The other 3 are for "just in case".  Stuck to the one player setup because I can't think of a game my parents will play that supports a second player simultaneously, and this way they are centered on the screen while playing and not off to the left.  I went with the straight button layout from slagcoin for the cleaner layout (will match art better I think) and realistically, 95% of the time they will be playing pacman. 

The bottom part is so big because the CP will wrap down and I needed room for the art.  The bottom edge of the CP surface will actually be about 3 inches up from the bottom of this pic. 

The 4 buttons on the left are P1, P2, coin1, coin2.  I was going to hide the coin 1 and 2 buttons, but they balance with the other 4 buttons so I left them up top.  The 4 on the right are admin buttons.  I might make the setup a shift function just to keep them from accidentally getting into it (key the unshifted to do nothing), but I like having a select button to launch games instead of using the P1, and a pause button is always good, as is a dedicated exit button.  I don't like using shift functions to multipurpose buttons, particularly when people who are not very tech saavy (ie can't remember how to use their remote for their tv) are going to be using this.  If I made exit and pause shifted functions of other buttons, I would be getting a call about once a month to ask how to get out of a game again..  I thought about doing the admin buttons with smaller buttons, but this way the size balances out and keeps it from looking too "frankenpanel"

The service buttons and the credit buttons will be black.  I might change that to red considering I decided to go red with the art, but either way I am not lighting those up.  The credit buttons are the chrome trimmed with rgb in the centers so they can blink and all that in the games.  The buttons 1-6 are all rgb lit as is the trackball.  I will also add side buttons so I can throw a few pinball games on there just for fun, and those will be lit too.

All I have left to do with this is print it at full scale (it is 26.5" wide, 12" deep for actual CP top) so I can set it at the right height and make sure I like the feel of the layout.  I hope to knock out the art today as well, then finalize the art by next Monday and get it to the printer.

Unfortunately I have some work to do this weekend both at my office and for some friends, so while I hope to get started cutting wood, I probably won't make much headway.


dkersten

  • Trade Count: (0)
  • Full Member
  • ***
  • Offline Offline
  • Posts: 1472
  • Last login:March 12, 2024, 11:47:30 am
  • If you are gonna do it, do it right..
Re: Nostalgia
« Reply #20 on: July 28, 2014, 07:18:58 pm »
I made a little progress this weekend, but then I ended up helping some friends paint their house and had to work pretty much all day Sunday doing some server rack maintenance and swapping out the entire power system of my rack.  By the time I got home Sunday night I was only ready to sit in front of the tv and veg out, not make any more dust.

But I did manage to get the template for the side cut out based on the full scale printing of the side I designed in Illustrator.  Then I rough cut the two sides from the 3/4 inch MDF.  I am ready to use the router to clean them up and get them exact, which I might do tonight.


I tweaked the CP layout a little more and art is just about done.  I tweaked the colors a little on the marquee and sides.  Here is the art as it stands (since I used my own webserver to host pics, it updated a couple up above with the tweaks).  I might as well edit the first post too to include final art as I go.

Marquee:


Control Panel - keep in mind the bottom ~3" is wrapped down the front of the cabinet.  I centered the buttons and reconfigured based on that layout.  Aesthetically it looks far better than having the buttons off center, and because it is a "one player at a time" setup, this way the player is centered on the screen regardless of if using the joystick or trackball:


And side art (mirrored on the other side):


Again would love feedback on the art before I finalize it and send it off to be printed.  Aside from a Tim McGraw concert tomorrow night, I intend to work pretty hard on this the next couple weeks.  A buddy wants a cabinet now, and he is out showing off what I already built and might have a couple more lined up for me.. lol.  So I want to get this one in the bag before September hits.

Slippyblade

  • Trade Count: (+2)
  • Full Member
  • ***
  • Offline Offline
  • Posts: 3167
  • Last login:November 16, 2023, 11:39:51 am
  • And to the death god we say, "Not today!"
Re: Nostalgia
« Reply #21 on: July 28, 2014, 08:11:38 pm »
I don't know if it's been mentioned yet but this artwork has a VERY 50's diner vibe to it.  I'm liking it, reminds me of a diner I used to work in as a teen.

ViriiGuy

  • Trade Count: (0)
  • Full Member
  • ***
  • Offline Offline
  • Posts: 199
  • Last login:January 08, 2020, 12:30:46 pm
  • Terminus clone build in progress.
Re: Nostalgia
« Reply #22 on: July 28, 2014, 11:13:12 pm »
It looks great!

One thing I noticed, you have two credit buttons and two start buttons. If it is a single player, you will only need one of each. :)

dkersten

  • Trade Count: (0)
  • Full Member
  • ***
  • Offline Offline
  • Posts: 1472
  • Last login:March 12, 2024, 11:47:30 am
  • If you are gonna do it, do it right..
Re: Nostalgia
« Reply #23 on: July 28, 2014, 11:45:29 pm »
It looks great!

One thing I noticed, you have two credit buttons and two start buttons. If it is a single player, you will only need one of each. :)
Thanks!

MOST games that they will play will be 2 player capable, but none are simultaneous 2 player, so while only one set of controls is necessary, I will need 2 start and 2 credit unless I want to add shift functions, and I really don't want anything more complicated than pushing a single button. 

yamatetsu

  • Trade Count: (0)
  • Full Member
  • ***
  • Offline Offline
  • Posts: 2697
  • Last login:Today at 04:51:14 am
  • Just because.
Re: Nostalgia
« Reply #24 on: July 29, 2014, 01:52:20 am »
Wow ! The artwork certainly has come a long way from the initial concept. This just looks great.

I especially like the consistent way the chrome bars are done (same pattern on the side, same pattern on the front).

One very minor thing about the CP : How about coloring the button texts in the marquee's yellow ? Would be slightly more
consistent in regard to the marquee and it would also set the text a bit more apart from the chrome bars next to it.
                  

jaharr01

  • Trade Count: (+1)
  • Full Member
  • ***
  • Offline Offline
  • Posts: 805
  • Last login:August 27, 2020, 06:28:16 am
  • Try and fail, but don't fail to try
Re: Nostalgia
« Reply #25 on: July 29, 2014, 03:57:00 am »
I love that retro art deco look. you know what would look really cool is if you used  plain base baseboard molding. around the base instead of the printed relief molding on the vinyl. they sell it dirt cheap and some matching chair rail with some thin chrome t molding. Painted red that thing would look awesome.

rtkiii

  • Trade Count: (0)
  • Full Member
  • ***
  • Offline Offline
  • Posts: 288
  • Last login:March 16, 2022, 02:55:49 pm
  • Ready to Build! Not building? Making Movies!
    • RTKIII Productions YouTube Channel
Re: Nostalgia
« Reply #26 on: July 29, 2014, 09:29:29 am »
I dig the side art with the transparent game behind the characters.  that is slick.

dkersten

  • Trade Count: (0)
  • Full Member
  • ***
  • Offline Offline
  • Posts: 1472
  • Last login:March 12, 2024, 11:47:30 am
  • If you are gonna do it, do it right..
Re: Nostalgia
« Reply #27 on: July 29, 2014, 10:23:23 am »
One very minor thing about the CP : How about coloring the button texts in the marquee's yellow ? Would be slightly more
consistent in regard to the marquee and it would also set the text a bit more apart from the chrome bars next to it.
That's a good point and one I am struggling with.. usually the dark red with the chrome is highlighted with a cream or white lettering and pinstriping, and while I have the whole black and yellow striping going on, I sort of like the white as a contrast, at least in small amounts.  Plus the white for smaller lettering will be more legible I think.  But then the theme does have the yellow lettering, so I am not 100% yet.  I will mess more with it today, and hopefully get the basic layout for the FE put together to tie it all up.  I need to get art out soon.

dkersten

  • Trade Count: (0)
  • Full Member
  • ***
  • Offline Offline
  • Posts: 1472
  • Last login:March 12, 2024, 11:47:30 am
  • If you are gonna do it, do it right..
Re: Nostalgia
« Reply #28 on: July 30, 2014, 08:51:59 pm »
First draft of the FE layout (Mala).  I am not 100% on it yet, although the basic design is what I was after.. I might tweak the "display" part, and I think I will go with a cream colored backdrop on the text with some generic typeface font to make it look like it is an old machine with a mechanical display for the game choice.. maybe something more like an old jukebox..

Having issues with the computer and mala.. it crashes if I try to go into the mame config from mala, and I can't figure out why.  Mame was giving me problems too until I switched the video to direct draw instead of d3d, but I am not happy with that.  So I am thinking I might throw a graphics card in it, even though the intel g33 chipset should be more than sufficient.. it supports all the directx stuff from what I can tell, but it is not working right.  Clean windows 7 64 bit install and the latest driver straight from Intel, so who knows what is up with it... frustrating.

Anyway, here is a capture of the layout.  I only have pacman set up so far, so no other games on the list.  I am not quite to the point where I can start getting roms and art loaded up, I just threw this together to see how the layout looked.  Would love some feedback.

Still no progress on the cab, but maybe tonight.  Still tired from the concert last night, lol. 


I did order red buttons for the CP for the admin and credit buttons.  Oh, and I changed the font on the CP to yellow instead of white..  definitely goes better. 

dkersten

  • Trade Count: (0)
  • Full Member
  • ***
  • Offline Offline
  • Posts: 1472
  • Last login:March 12, 2024, 11:47:30 am
  • If you are gonna do it, do it right..
Re: Nostalgia
« Reply #29 on: August 01, 2014, 08:13:05 pm »
Wasn't happy with that layout, so here is the new one.  I only wish I could add an HLSL filter to the oval area.. looking for that retro futuristic tv look.  Again only got one game in the list, so the list doesn't have the games above and below the selected game, but it looks good with that impact label font..

yamatetsu

  • Trade Count: (0)
  • Full Member
  • ***
  • Offline Offline
  • Posts: 2697
  • Last login:Today at 04:51:14 am
  • Just because.
Re: Nostalgia
« Reply #30 on: August 02, 2014, 01:05:01 am »
Sorry to say it, but the first draft fits way better.

In the second one, the gray 'noise' background in the oval is just jarring. That doesn't fit at all.
The logo looks like it's slapped on just for the sake of being there and it also looks like the oval is going to push it off the screen the moment
you look away  ;D

Also, the turn knob is off center to the right, with the little arrow pointing to the right and thus emphasizing it. The idea behind the text box is
good, but you are using that Nostalgia-font all over the cab and then have one place where you use another. Not a deal-breaker, but it's inconsistent.

I would use the initial draft, move the game selection box a bit to the left and center that turn knob to the chrome 'buttons'.

Here's something to compare the overall look :


One small thing : You might want to apply the color gradient you used in that layout to the marquee and possibly to the CP, again for the sake of consistency  ;)
                  

dkersten

  • Trade Count: (0)
  • Full Member
  • ***
  • Offline Offline
  • Posts: 1472
  • Last login:March 12, 2024, 11:47:30 am
  • If you are gonna do it, do it right..
Re: Nostalgia
« Reply #31 on: August 02, 2014, 07:52:10 pm »
Thanks for the feedback  :).  I will make some adjustments before it goes to print on Monday.  The first draft of the layout was WAY too big with the game list, and my inspiration for the layout is actually closer to the second than the first.  The "snow" idea was better in my head, so I will rethink that.  The first one I threw the pattern behind the snaps just because I didn't want it to be black, but overall when it is on a 27" screen it just wasn't right.  I might swap the list back to the left and move the oval to the right again because it does line up better with the round trackball in the CP.  I just eyed the knob and buttons when moving them, I still need to throw up some guides and get them perfect, lol.

dkersten

  • Trade Count: (0)
  • Full Member
  • ***
  • Offline Offline
  • Posts: 1472
  • Last login:March 12, 2024, 11:47:30 am
  • If you are gonna do it, do it right..
Re: Nostalgia
« Reply #32 on: August 02, 2014, 08:32:04 pm »
OK, I spent about 5 more hours in the shop today, 2 hours last night.  Here is the play by play:

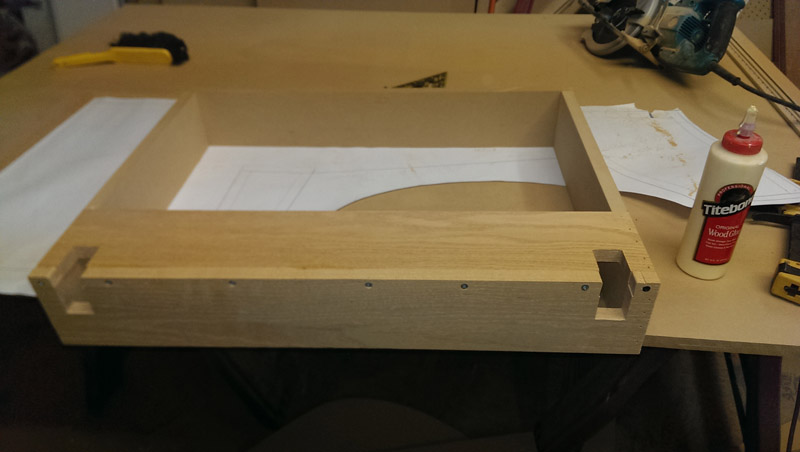
First I layed out the structure for the top on the scale printout of the side.  If I could offer any advice to anyone building a cab from scratch, it would be to draw as much out on a side with a computer (I use illustrator, but anything that allows you to draw to scale) and get it printed out on a large format printer.  I am lucky enough to have access to one at work, but office depot, kinkos, staples, and a bunch of places offer printing services for technical drawings and it isn't that expensive.

I had already added the key measurements and lines on the drawing, but I hadn't taken the time to draw the full dimensions of the wood, so I did this first.  This gave me a great template to make each piece.  It was especially helpful on the angles. 

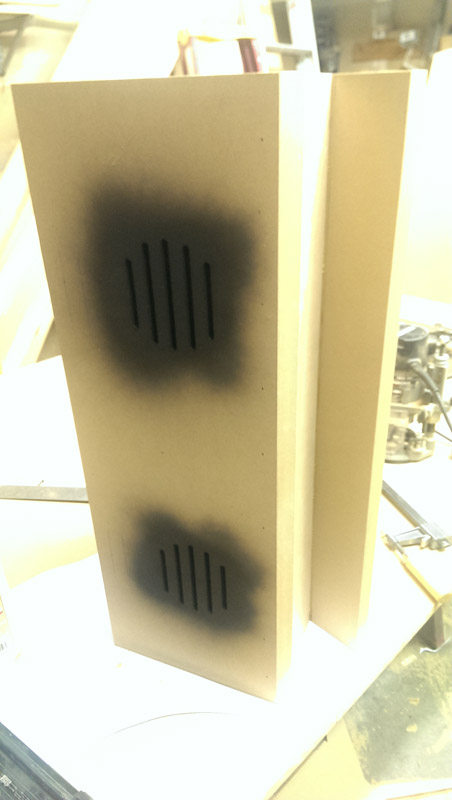
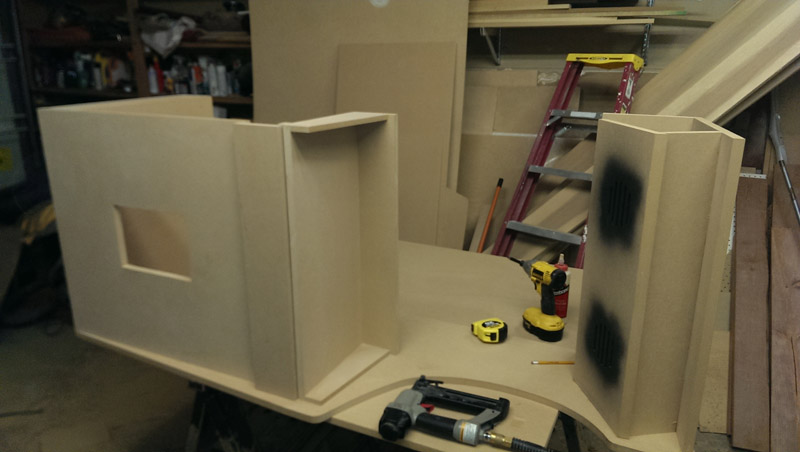
I did the top structure first, the board that goes above the monitor with the speakers in it, the marquee light box (although I wasn't going to light this one, it would be a super easy matter to do), the top of the cab, and a piece in back just for structure.  I got the 4 pieces cut, routed the speaker grill in, and started putting it together.


Then I lined it up on the drawing after gluing and nailing it together and it lined up pretty perfectly! You can't really see my lines I drew, but that's because the piece covered all the lines :)


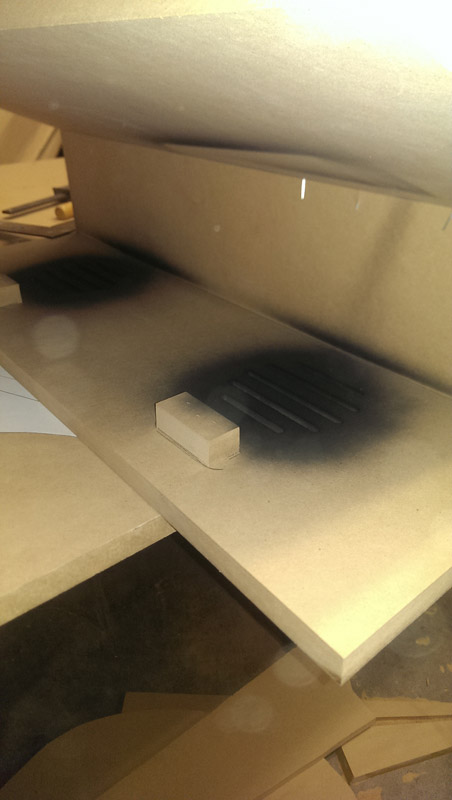
I have seen a LOT of people using the same 2.1 Logitech speakers I used on my last cab and am using on this one.  Here is the method I used to mount them:  First I cut small blocks of MDF that are about 2" wide and just a little over an inch deep with about a 5 degree bevel on them (cut with a miter saw).  I lined up the speakers, marked it, and glued and nailed the blocks in place.  (yes, I missed with a few brad nails, just ignore them, they will never be seen and I was in a hurry, lol)

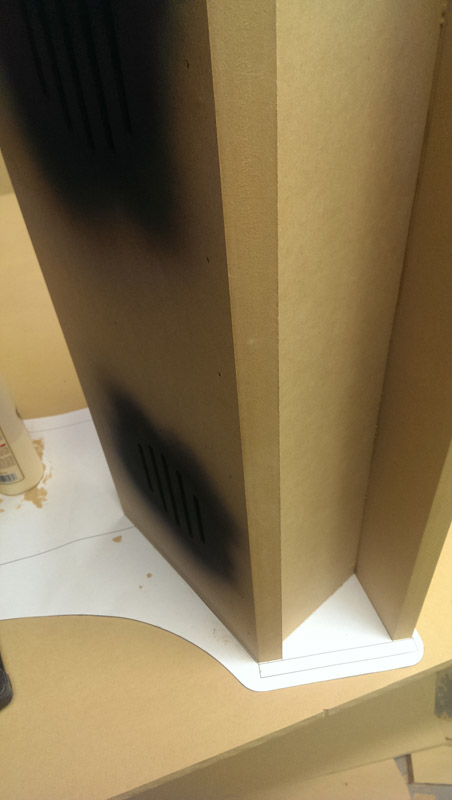
You can see I painted a little from behind to get the paint in the grill slots, this will help a lot later.
So here is a speaker next to the block:

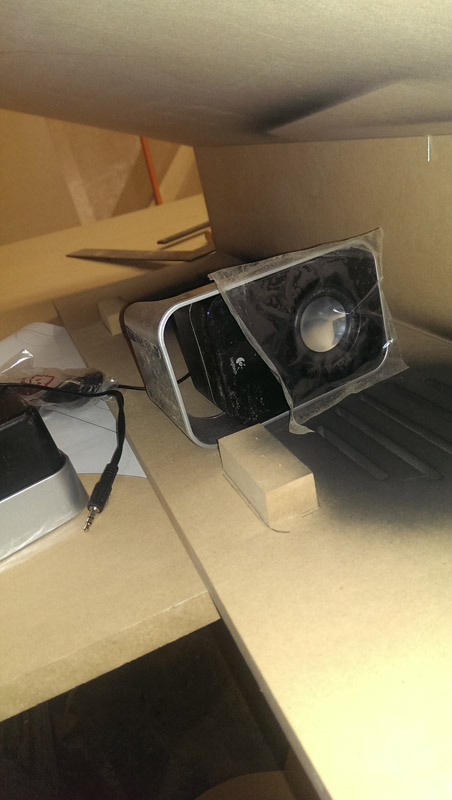
And here is how it looks when I press fit the speaker on:

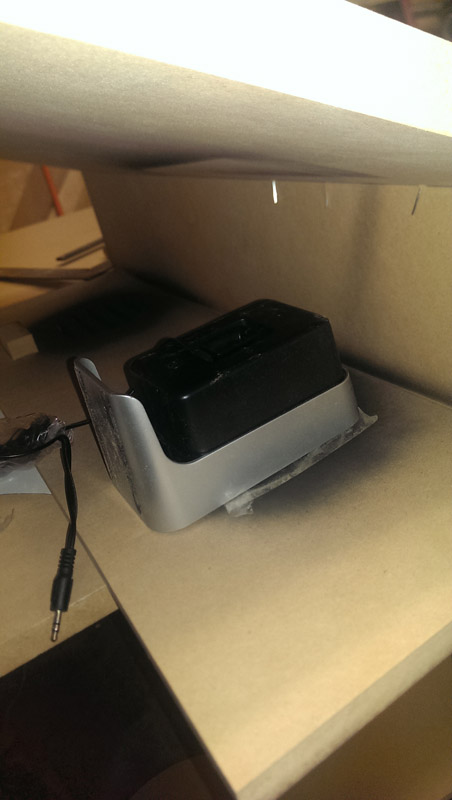
Since this will sit upright, the friction fit is good enough, but if I wanted to make sure they never came off even in transport I would just add one screw to each and they would be permanently mounted. 

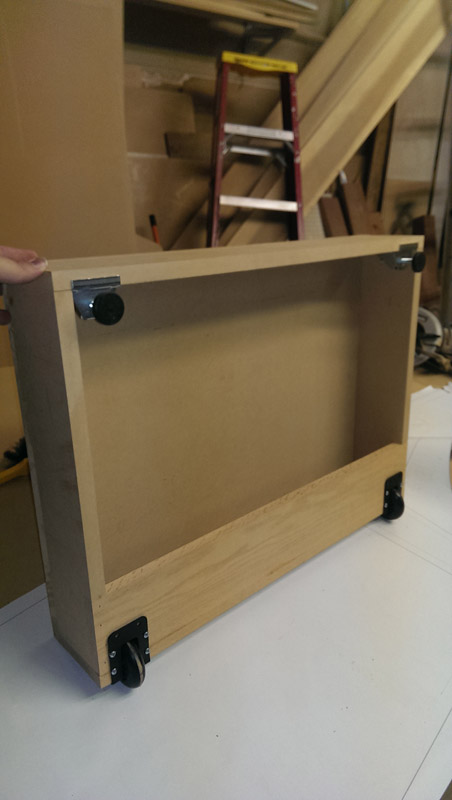
This morning I got started on the base.  I am using corner casters this time, with adjustable feet in front.  So where the casters are, I wanted it to be stronger since this is where the weight will be in transport, and it can take some good shocks.  Oak, glue, and screws is about as strong a joint as you can get, and the corner made of oak could take a truck driving over it without breaking, so it should be strong enough to last.  I cut the slots for the wheels on the table saw with a miter gauge, then cut the tabs out with the jigsaw.  I had to open them a little more for the axels of the casters.


The top of the base doubles as the shelf the computer will sit on.


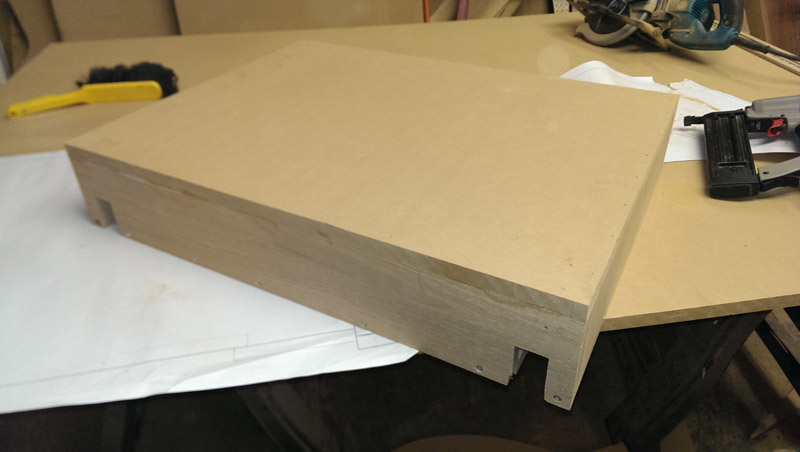
Wheels and feet are installed. 


Now I cut the front of the lower cab out, and mounted it to the base.  But I had to decide on the service door.  My mom didn't care about a coin door, but I didn't want to do art on the front, and needed some kind of service door anyway, so I said screw it and cut the hole for the coin door.  I will order it up and just take the hit (it is not in the budget).  You just can't have an arcade cabinet without a coin door.  The ones from x-arcade are $50 shipped and work with quarters.. I have found just the fronts without the mech for about $40-50, but heck it's the same price and you get the mech too, so I might as well.. If I could find a blank door I could stick a credit light on for $20-30 shipped I would do that in a second.
Anyway I went ahead and cut the hole for that.


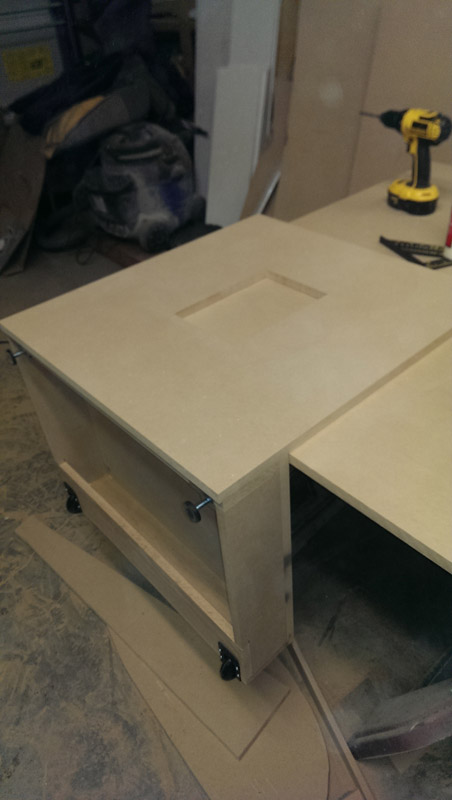
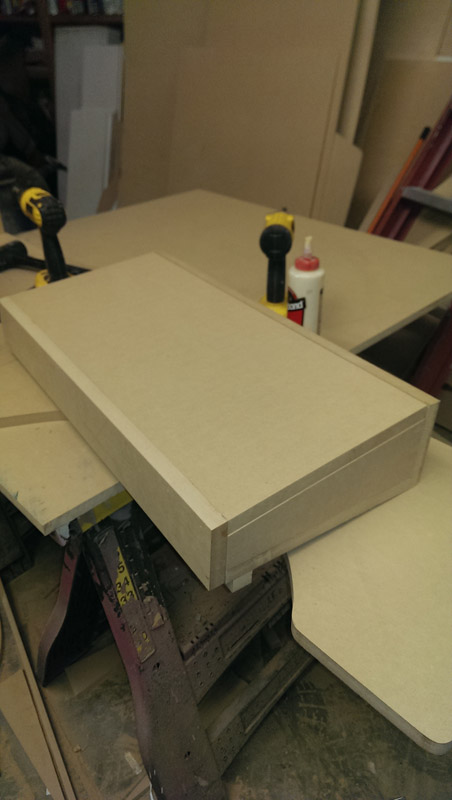
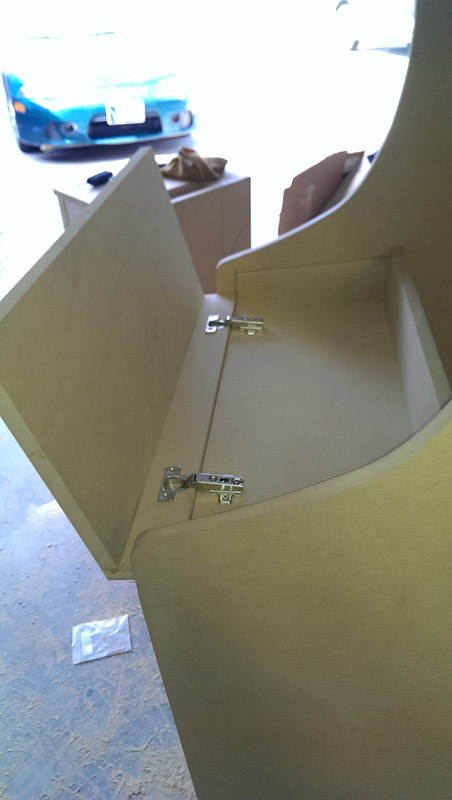
Next I worked on the CP since it was easier to do it now rather than after the base was installed in the cab.  The CP top and front is about an eighth inch narrower than the base.

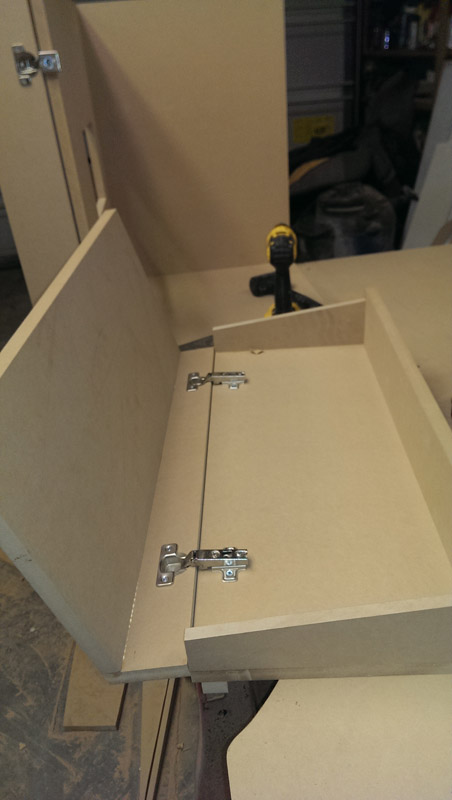
And here is how it opens!


so with that done, I went ahead and started laying it all out on a side.  Got the base and front lined up and glued and nailed.  Then I got the CP base laid out and used that to get the keyboard door mounted and mocked up


Once that was all glued and nailed in, I got the top section lined up and mounted.


The next step took a while.  My "bench" was just a couple sawhorses with the remaining MDF as a surface.  It isn't perfectly level, so with the different sections all mounted to the one side, the other side wasn't going to just line up perfectly, and the thing is you have to glue it all at once.  Furthermore, the sides are all curves and angles, and NOTHING just squares up to them.. This is where using battens would have been superior.  Although things lined up pretty close on their own, I needed it to be perfect or it would be noticeable once it was all together.  This was tricky but eventually I got my marks all set up and was able to glue it up and brad nail it to hold while the glue set. 

So here it is, standing up and ready for the last couple parts before paint (keyboard door is off for paint, too much of a pain to remount it just for a pic, lol.)  :


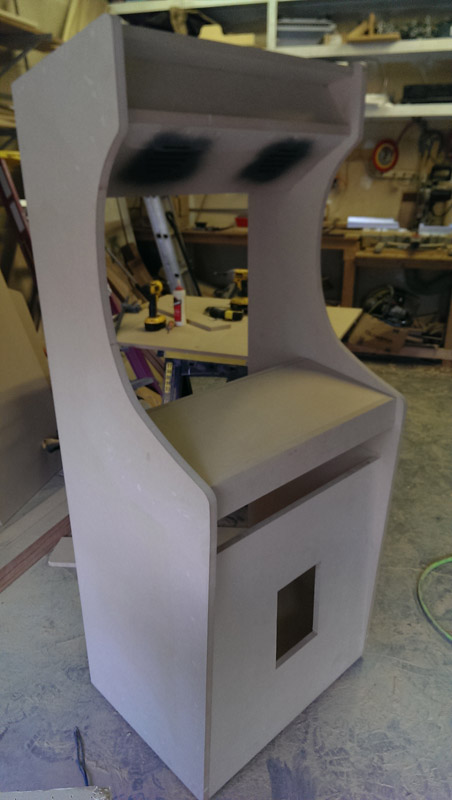
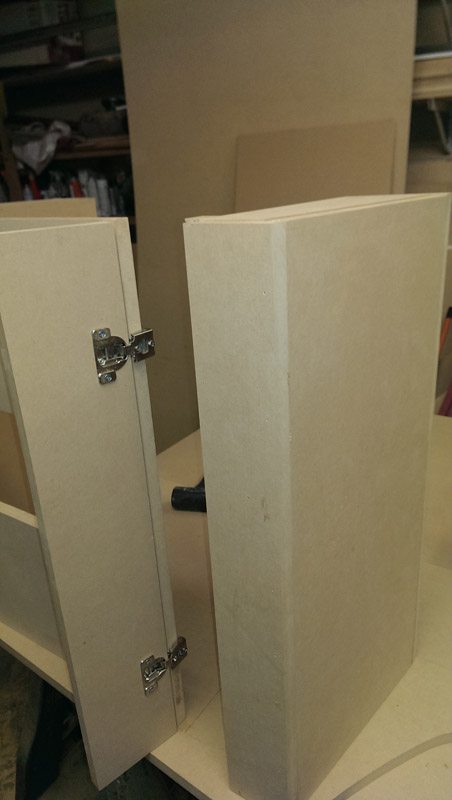
And here it is with the CP hinged open.  I am VERY happy with this mechanism.. it is super simple, super stable, and looks good.


So the heat got to me and my girlfriend got an unexpected weekend off, so I am taking the night off, but tomorrow I will tackle the marquee mount, the bezel and monitor mount, the keyboard shelf and slides, and the back.  I should also be able to get a coat of primer on it.  Sides won't need paint, just primer because they are getting totally covered in vinyl, so I am just going rattle can this time.  The setup and cleanup with the gun is overkill for the small areas, and I was very unhappy with the 2 month cure time on the latex paint.  Mine is almost fully cured after 2 months, and it pisses me off, lol. 

Xiaou2

  • Trade Count: (+1)
  • Full Member
  • ***
  • Offline Offline
  • Posts: 4098
  • Last login:November 12, 2023, 05:41:19 pm
  • NOM NOM NOM
Re: Nostalgia
« Reply #33 on: August 02, 2014, 08:49:51 pm »
IMO, the red is a bit harsh on the eye.  Might really clash with deco.  (which is another consideration.. of where its to be put)

 Im thinking a nice Teal (Blue green)  that you usually see on classic cars, and other older classic stuff.

 That goes good with pink...  and so a Ms. Pacman  theme might even be better.

 Though, I suggest changing color palettes to match.. if you are going to use stock art.   Otherwise, colors might Pop too much, and stick out as if they dont belong.

 Another thing..  is the lack of crasftman ship.   The 50s era went balls out for ornate detail.   Look at the furniture.  Ball gripping tallons, Curvy wood accenets.    And the cars..   Ornate detail trim, chrome plated to be shinny as a mirror.

 If you choose to stick with the gold.. at very least, I would use actual goal leaf.   Fake painted gold looks gaudy.  Even pretty much the same for faked silver.   Tacky.

 The display artwork.. has some issues too.  Not really digging any of the designs.   Might want to do a little more digging through various images of things from that era, and see if you cant clip together a more accurate and more visually appealing artwork layout.

yotsuya

  • Trade Count: (+21)
  • Full Member
  • ***
  • Offline Offline
  • Posts: 19955
  • Last login:Today at 02:02:53 am
  • 2014 UCA Winner, 2014, 2015, 2016 ZapCon Winner
    • forum.arcadecontrols.com/index.php/topic,137636.msg1420628.html
Re: Nostalgia
« Reply #34 on: August 02, 2014, 10:08:13 pm »
Don't worry, Dave, he's just trolling you. He does that from time to time.

I think it looks good. ---steaming pile of meadow muffin---, if you're going for 50s authenticity, make sure you use lead paint and line that sucker with asbestos.  :lol
***Build what you dig, bro. Build what you dig.***

dkersten

  • Trade Count: (0)
  • Full Member
  • ***
  • Offline Offline
  • Posts: 1472
  • Last login:March 12, 2024, 11:47:30 am
  • If you are gonna do it, do it right..
Re: Nostalgia
« Reply #35 on: August 02, 2014, 10:47:03 pm »
Don't worry, Dave, he's just trolling you. He does that from time to time.

I think it looks good. ---steaming pile of meadow muffin---, if you're going for 50s authenticity, make sure you use lead paint and line that sucker with asbestos.  :lol
Oh I am not worried about X2, we are having some nice spirited conversations in other threads, so I am well aware.

lol, I already ordered my asbestos sheets and dammit, if I have to melt some old tire weights, I am GONNA have leaded paint in there, especially on the buttons and joystick where the grandkids can get good exposure to it..

dkersten

  • Trade Count: (0)
  • Full Member
  • ***
  • Offline Offline
  • Posts: 1472
  • Last login:March 12, 2024, 11:47:30 am
  • If you are gonna do it, do it right..
Re: Nostalgia
« Reply #36 on: August 02, 2014, 11:24:09 pm »
IMO, the red is a bit harsh on the eye.  Might really clash with deco.  (which is another consideration.. of where its to be put)

 Im thinking a nice Teal (Blue green)  that you usually see on classic cars, and other older classic stuff.
yeah but that isn't really the theme I was looking for... I wanted to go red, yellow, and black.  I ended up dropping a lot of the yellow, but the last thing I want to do is start in with another color like teal.. And personally I am not a fan of Teal, even on a nice 50's classic car. 

Quote
That goes good with pink...  and so a Ms. Pacman  theme might even be better.
If I were doing a 50's deco Ms. Pacman, then it could work..

Quote
Though, I suggest changing color palettes to match.. if you are going to use stock art.   Otherwise, colors might Pop too much, and stick out as if they dont belong.
The only stock art I am using (aside from images in the FE for each game) is the pacman and ghost characters on the side.. the rest is all original and drawn from scratch.  And the character colors don't clash with the red theme.  I do want them to pop out though, the red, chrome, and even the pinstripes are all the "base" of the art, the "canvas" if you will, and the characters and the game are the real reason the cabinet exists to begin with. 

Quote
Another thing..  is the lack of crasftman ship.   The 50s era went balls out for ornate detail.   Look at the furniture.  Ball gripping tallons, Curvy wood accenets.    And the cars..   Ornate detail trim, chrome plated to be shinny as a mirror.

 If you choose to stick with the gold.. at very least, I would use actual goal leaf.   Fake painted gold looks gaudy.  Even pretty much the same for faked silver.   Tacky.
Since I am not looking for the 50's era craftsmanship, I don't need to worry about that.  This is a 70's arcade inspired cab (with that size of footprint) with a "nostalgia" theme.. but since this is for my parents, they are huge fans of the late 50's era, so I wanted to mix that in.  Google image search "nostalgia electrics".. it is a company that makes retro inspired kitchen appliances, and it is more or less my inspiration here. 

as for the chrome, I considered getting a hold of some actual chrome trim, and someone even suggested using real trim for the "3d" areas of the art.. but in the end the budget dictated how far I am going to go with it. 

Quote
The display artwork.. has some issues too.  Not really digging any of the designs.   Might want to do a little more digging through various images of things from that era, and see if you cant clip together a more accurate and more visually appealing artwork layout.
I am not "clipping" together anything.. Like I said, aside from the pac man and ghost, this is 100% hand drawn in photoshop by myself.  Considering I am not a very artistic person and I am only self taught in everything I do, I think it is coming out pretty well.  But regardless of that, I thank you for your feedback.  And I am not trolling you here.  I love positive criticism as much as anyone else, and I have a ton of appreciation for all the positive feedback here, it keeps me striving to do more and push to do more that normally I would consider "good enough".  But I also appreciate negative feedback.  It allows me to look at my work from a different perspective and see places I can improve. 

Believe me, there is nothing you could say about this that would upset me or make me feel bad or anything like that.  There is only three people who have to be happy with it - my mom, my dad, and me.  And I am already pretty happy with it, lol.  Heck, try writing a book once and then put it out there for others to critique.. you spend countless hours writing hundreds of pages, hundreds of thousands of words, and then someone who has never written anything longer than an email starts picking it apart.. talk about having to have thick skin, lol.  Thankfully 99% of the feedback I had was positive, and the rest actually inspired me to go back and refine the book.  Lately I have been wanting to get back to writing, but now I have 3 more people literally throwing money at me to build them a cabinet.  And I just got my g25 setup so I am itching to start building a sit down race cab for myself.. and one of my friends is pushing me to start selling more, so I could be busy with this for a while, lol.  Doesn't leave much time for other hobbies. 

Slippyblade

  • Trade Count: (+2)
  • Full Member
  • ***
  • Offline Offline
  • Posts: 3167
  • Last login:November 16, 2023, 11:39:51 am
  • And to the death god we say, "Not today!"
Re: Nostalgia
« Reply #37 on: August 03, 2014, 12:34:25 am »
Holy crap!  I just looked up that Nostalgia Electrics company.  I want one of those hot dog toasters!!!!

Hot Dog Toaster

Speed Racer

  • Trade Count: (0)
  • Full Member
  • ***
  • Offline Offline
  • Posts: 101
  • Last login:March 14, 2018, 11:06:09 pm
Re: Nostalgia
« Reply #38 on: August 03, 2014, 06:28:02 pm »
Don't worry, Dave, he's just trolling you. He does that from time to time.

I think it looks good. ---steaming pile of meadow muffin---, if you're going for 50s authenticity, make sure you use lead paint and line that sucker with asbestos.  :lol
Oh I am not worried about X2, we are having some nice spirited conversations in other threads, so I am well aware.

lol, I already ordered my asbestos sheets and dammit, if I have to melt some old tire weights, I am GONNA have leaded paint in there, especially on the buttons and joystick where the grandkids can get good exposure to it..

If you really want authentic 50s you should find one of these bad boys for the screen... the "Radiation King"


Jokes aside, I think you are on the right track with your cab and artwork. I really like the combination of the 70s style cab with 50s style art theme  :applaud:

dkersten

  • Trade Count: (0)
  • Full Member
  • ***
  • Offline Offline
  • Posts: 1472
  • Last login:March 12, 2024, 11:47:30 am
  • If you are gonna do it, do it right..
Re: Nostalgia
« Reply #39 on: August 04, 2014, 12:56:20 am »
It is amazing how one day you can work for a few hours and see tons of progress, but others you work twice as much and it doesn't feel like you make much at all.  Details take the time I guess.

Today I worked on details mostly.  At least things that took time to do.  I started with the control panel.  Because it doesn't have any edges showing to grab and open it up, I needed a way to do that.  I didn't want any kind of handle or hole to use as a pull, so I needed a way to lift it from the inside.  Well, after a little thought, a stove bolt in a metal sleeve would do nicely.  So I picked up a 6" bolt and a metal sleeve when I went to get paint and keyboard slides.  I cut a small piece of wood, drilled a hole in it on the drill press, slid the sleeve in, and then placed it in the right hand back corner of the CP housing, then drilled it out, glued and nailed it in, and there you go.  I had to chop the bolt down a little to keep it from protruding too far under the CP and potentially get in the way of the keyboard, but that was easy enough.  I used a couple nuts to retain it, and now I can just reach inside the keyboard drawer area, press the bolt up, and the CP pops up enough to easily open it up.  Then just because I had it lying around, I used a Blum soft close damper so when I close the CP it doesn't bang down. 
Here is a composite pic of the damper, the top of the bolt in the CP housing, and a shot of the bolt head under the CP.

In retrospect, I should have mounted it at a slight angle back to match the angle of the CP.  As it is, it does just barely catch the edge of the CP top, but it works well enough..  Still super happy with it.  Unless someone knows it is there, they would never figure out how to get into the CP.

I then went on to the monitor mount and bezel.  If you ever looked at my first cabinet project post, you would see how I did this, I made it nearly identical with only a couple minor changes.  Why change what works?  This time around I used a 45 degree bevel on the outer bezel, and made the inner bezel about 1/8" narrower.  On my cab, the inner bezel is super tight because of the paint, I made the tolerances too close.  This time I adjusted for it.  Here is a pic of the back of the mount, and a pic of the front with all installed.  The front bezel is glued in to the cab, and has the brass threaded inserts to allow the inner bezel/mount to screw to it from behind.  This allows me to take the entire mount out very easily yet is rock solid inside.  I did it this way because you never know when you might have to replace the monitor, and if the one I used is no longer available, dimensions will change and I will end up making another mount.  If the mount is built in, I would have to have a removable bezel instead, and in my mind that is more work since it is the most visible piece in the entire cab. 


Then it was on to the marquee holder.  I used the same technique as on my first one:  1/2" x 1/2" poplar with a kerf cut into it the thickness of the plexi.  In this case, the thin plexi from Lowes is exactly the width of my thin kerf tablesaw blade (3/16) so it fits perfect.  A little tight once art is installed, but still fits nice.  The bottom and sides is glued and pin nailed in place, and the top just friction fits so you can change it if you need to.  Again, I made it able to be backlit but they don't want it lit up so I won't add the LED lights.  If I want to down the road, 10 minutes and $20 in parts and it is done.  I never turn mine on unless I have guests anyway, so I am OK with this.


I added a little more structure to the back, cut the slot for the t-molding, and went ahead and started priming.  Got a coat of primer on the main cab and the monitor mount and keyboard cover.  I still have to cut a keyboard shelf and mount it, which is about 20 mins worth of work but I need to lose my "work bench" to do it since I am about out of 3/4" mdf.  I will do it later this week so I can at least hit it with some flat black before it goes in.  I also have to cut the back covers and cut in some venting, but that is detail work that can be done any time.  I got 3 coats of primer on the bezel edges so they are nicely sealed up.  Tomorrow after it is very dry, I will sand it a final time and if it is smooth I will be ready to paint the semigloss black.  if not, I will hit it with one more coat of primer.  Sides will be sanded and should be sealed enough for artwork to go on, but if it doesn't feel smooth after sanding I will hit it with another coat too.  I would rather go to bed with the comfort of knowing the art won't start to peel in a year because I left it too porous than cut corners to save a day and $10 worth of primer. 


I started working on the CP top, but ran out of steam.  I think I sweated about 20 lbs off today, lol.  It was only 95 degrees again, but the humidity was higher than normal and it got to me a few times.  I keep thinking that one day I will put A/C in my shop, but I normally don't use it much in the summer, and the dust would probably wipe out a wall mounted A/C unit in about a month.  I still might try to tackle it one day, but not this season.  It is nicely heated in the winter, and this weather will only be around another month or two.

I reinforced the CP top and just have to put the big roundover on the front corner now (Got a big 3/4" radius roundover bit that will be perfect) and then I am ready to drill holes.  It is simple enough that I would be wiring it by Wednesday if I had the art done.  My goal is to be pretty much ready to assemble by next Sunday night.  Might not work out because my girlfriend is throwing a party for my bday next Saturday, and if it is anything like last year, I will be too hungover Sunday to make any serious progress.  But I might make some decent progress this week and get ahead, who knows.