Main Restorations Software Audio/Jukebox/MP3 Everything Else Buy/Sell/Trade
Project Announcements Monitor/Video GroovyMAME Merit/JVL Touchscreen Meet Up Retail Vendors
Driving & Racing Woodworking Software Support Forums Consoles Project Arcade Reviews
Automated Projects Artwork Frontend Support Forums Pinball Forum Discussion Old Boards
Raspberry Pi & Dev Board controls.dat Linux Miscellaneous Arcade Wiki Discussion Old Archives
Lightguns Arcade1Up Try the site in https mode Site News

Unread posts | New Replies | Recent posts | Rules | Chatroom | Wiki | File Repository | RSS | Submit news


Author Topic: My build  (Read 22016 times)

0 Members and 1 Guest are viewing this topic.

dkersten

  • Trade Count: (0)
  • Full Member
  • ***
  • Offline Offline
  • Posts: 1472
  • Last login:March 12, 2024, 11:47:30 am
  • If you are gonna do it, do it right..
My build
« on: June 18, 2014, 01:12:00 pm »
OK, so I introduced myself in another thread, here is the thread for my build. 

I kind of went overboard, although not as badly as I could have.  I think things are pretty well thought out based on a lot of hours of research.  Unfortunately it took nearly two weeks to get access to post here so I ended up just making decisions without being able to get any feedback first. 

Cabinet:
It is nearly complete.  I based it loosely off of profile of the Xtension cab I already had because I liked the profile of that one.  It is about 6 inches wider and about 5 inches taller though, and I adjusted the height of the control panel to fit me perfectly.  I decided to put the speakers at the top to keep the sound focused on the player as opposed to shooting them out the sides which would carry through most of the house.  I bought a cheap 2.1 Logitech speaker set and the subwoofer will go in the lower part of the cab.  I settled on Black for the main color with red t-molding.  Nothing really original here but it fits my game room better than say, black with blue.  Plus the red graphics I had drawn up were what caught my kid's eyes better, and the red allowed me to do more colors in the art where the blue would have looked weird having other colors mixed in.  I added the coin door (ordered from xgaming) just for fun, since I will have a "hidden" button for credits under the CP.  I fit a 27" LCD in it, which I like because I can keep the cab shallower than if I put a CRT in it (although the 26" crt arcade monitors are very tempting).  I am not trying to keep this original looking, just like a modern "retro" arcade cabinet.  The construction is all MDF with the base frame for the casters made of oak and the delicate frame for the marquee out of some maple just because smaller pieces like that required the durability of a hardwood (and I had scraps lying around that were perfect).

The monitor is secured from behind with threaded inserts and held in the mount with t-nuts and regular 1/4" bolts.  It is amazing how light the 27" screen is.. technology is a wonderful thing.  All put together I think it looks fantastic.  I could (and still can) opt for a plexi front, but I don't like the glare that it adds, so I opted to just have the LCD bare in the front.  My only concern is it is next to the dart board and if it takes a stray dart I will be buying a new screen.  But it is a chance I am willing to take because up close it looks friggin nice.  If I decide to add light guns in the future I will need to modify it with a slot for the sensors, but that is something pretty easy to do.

The control panel is probably overkill, although I think I kept it pretty simple for a universal controller.  It is 48" x 18" and set up for 4 players.  The p3 and p4 have j-sticks with 4 buttons each.  P1 and P2 have U360's with the front mount restrictors in case I really want to have those defined corners for pacman.  I was going to go with the servo sticks so I could switch automatically from 4way to 8way as games were launched, but after reading a review on the u360 I couldn't resist trying them out.  I couldn't find bat tops in the 4 colors I wanted (green, yellow, red, and blue), so I opted for ball tops.  I did find a company selling aluminum bat tops so if I hate the balls I will swap them out.  I added a trackball (went with ultimarc's flush mount with the pearl ball so I can light it).  Went with the spintrak for spinner and bought a 6" wheel so I could play a few racing games.  Unlike most CP's I have seen, I opted to put the spinner up front so when the wheel is on it is more comfortable.  After printing a full scale mockup and setting it up at the exact height I will have it, I ended up moving the spinner to the left so it doesn't interfere with the trackball. 

I spent quite a bit of time with the scale drawing figuring out the best possible ergonomic layout to fit my needs, and I am confident it will work out.  Once that was settled I got the art finished for the CP and marquee, and Brad has already printed and shipped them.  For buttons I went with GGG's electric Ice II with RGB drive II led's.  I will control it all with an ipac ultimate.  The LED's posed a challenge because they are not terminated.  Yesterday I plugged the ipac into my computer and crimped on the 1x4p DuPont connector to the LED and set up the software.  It threw me off because something wasn't right and the intensity controls were backwards in LEDblinky.  I emailed Andy about it and he suggested the "high current" output was enabled, and sure enough, that was the problem.  Once that was off in the ipac, the LED's function perfectly.  The main reason I went with the GGG buttons over the Ultimarc buttons was cost.  GGG is nearly $3 less per button, and with 30 lit buttons, that is a lot of difference in money.  Granted, the time it will take to crimp on 120 of those tiny 2.54mm female ends and slide them into the DuPont connectors would probably be worth the extra money, but I already have the product so I will deal with it.  It did cost me a few dollars on Amazon to get the crimp ends, and I even bought a tool although a pinning crimper I already had works better. 

Tonight I will be building the base for the CP and possibly starting to transfer the button layout to the CP itself.  I have a 42" plotter here at the office so I can print the layout to scale and use it as a template, so when the art arrives it *should* line up perfectly.  We will see if all this planning works out.

I struggled with a theme, mostly because I am not very good at originality and creativity.  I looked at hundreds of control panels before drawing this one up, and opted to use my limited Illustrator and Photoshop skills to do my own art.  I think it came out pretty cool, although elements were copied from other control panels out there.  I guess I look at it this way:  There is very little true originality in the world, and the best you can do any more is to take elements you already like and put a new twist on them.  Perhaps my theme is not even much of a twist, but I managed to avoid adding "cade" to the name, lol.  In my mind that is a win.  Plus my kids LOVE the art, and that is more important to me than originality.  So I settled on "Dave's Time Machine".. I was just gonna call it "the time machine" but I do a lot of entertaining at home and I want it to be clear that I didn't just buy some arcade that is called "the time machine", I built this, from the ground up, and it deserves to have my name on it.  Maybe I am little vain that way, haha.

I will try to post some images here.  And I will continue to update as things happen, which will *hopefully* be very soon.  If only I had 40 hours in a day so I could get more done and still get the sleep I need to function.  I have been burning my candle at both ends on this and my ability to crunch numbers has taken a hit.  I nearly ended up with a couple marquee graphics that wouldn't fit, but thankfully Brad hadn't printed them yet before I could revise - for the third time.  I have a huge party coming up on the 4th of July and want this and a couple other projects to be finished so I have a LOT of work ahead of me.  I hope to have the majority of the CP done by the end of the weekend as well as paint on the cab.  If I can get that far I can probably start configuring the software for lighting early next week. 

yotsuya

  • Trade Count: (+21)
  • Full Member
  • ***
  • Offline Offline
  • Posts: 19960
  • Last login:Yesterday at 09:55:43 pm
  • 2014 UCA Winner, 2014, 2015, 2016 ZapCon Winner
    • forum.arcadecontrols.com/index.php/topic,137636.msg1420628.html
Re: My build
« Reply #1 on: June 18, 2014, 01:31:00 pm »
I actually think "The Time Machine" sounds really good.  :cheers:
***Build what you dig, bro. Build what you dig.***

johnndeanna

  • Trade Count: (0)
  • Full Member
  • ***
  • Offline Offline
  • Posts: 58
  • Last login:October 24, 2015, 10:12:47 pm
    • New cab for the back porch
Re: My build
« Reply #2 on: June 18, 2014, 01:37:36 pm »
Sounds nice, although some pics would really help. Everyone likes to look at pics LOL Good luck with the remainder of the build.

dkersten

  • Trade Count: (0)
  • Full Member
  • ***
  • Offline Offline
  • Posts: 1472
  • Last login:March 12, 2024, 11:47:30 am
  • If you are gonna do it, do it right..
Re: My build
« Reply #3 on: June 18, 2014, 02:23:56 pm »
OK, here are pics.. had to shrink them down a little and get them uploaded to my webserver. 

Here is the CP art.  I stole the background from deviant art and recolored it to fit the red motif.  Then I added a grid pattern that has a color spectrum that matches each player color.  P1 is blue, so the joystick arrows glow blue, the grid is blue, and I tried to stick blue art near that area.  P2 is red, P3 is green, and P4 is yellow. 


Here is the layout, if anyone is interested in it as a starting point for a project, here is a link to the vector image to precise scale: www.davidakersten.com/Photos/dave/control%20panel.pdf


Here is the marquee with the Time Machine logo:


Here are some construction pics of the cab:
The template for the sides.  I used this to route out the sides so they were exact.  The sides were made of 3/4" mdf, the template out of 1/2"


Here is the speaker panel that is above the monitor.  I didn't want to just cut holes and stick some car audio speaker grills over the holes, so I routed out the grills and painted the insides with flat black.  Came out pretty well.  The blocks actually fit the base of the Logitech speakers so they slide over and are held very firmly in place over the grills.


Here I drew out the design for the top of the cab with the light box for the marquee and structure to hold it all together.  This was vital to getting all the angles perfect.  I had forgotten to round off the corners on the template for the side too, so I did so here and matched it to the other side.  The t-molding should wrap over these just fine.  Hopefully, lol.


Started assembly.  You can see the oak frame on the bottom for the casters.  I have worked with MDF for many years, and found that wood glue and some brad nails to hold it until the glue dries is stronger than anything else.  MDF is REALLY strong on the flat surfaces.  It is actually a form of paper, so it is strong on the flat surfaces and weak on the edges.  Glue makes a stronger bond than the wood itself so if I have to take apart a glued seam that dried already, the MDF will actually break off, usually on the flat side, not the edge.  So I had no problem gluing and nailing this together.


The cab is taking shape and with the CP template on it you have an idea of the overall picture.  The CP hangs 10" over each side, but I will have "wings" on the back part that make it blend together better to make it look like it belongs and not like it just is a cabinet with an oversized CP bolted to it.  The CP has to be built independently because it can't fit through the door with it attached to the cab.


Another pic of the cab at this stage.


OK, so here is the monitor bezel and mount all in place.  The bezel is just 3/4 mdf with a quarter round bead, routed out to be perfectly rectangular.  This was tricky because the MDF gets thin on the edges (about 3/4") and the router bit wanted to bounce pretty bad.. I had to shave a 1/16th at a time before I got it perfect.  It is angled on top and bottom to match up to the cab perfectly.  The mount plate sits behind it and is bolted in with brass inserts.  The plate itself is held together with t-nuts so the monitor can be mounted in the cab from the rear and bolted in and out of the mount easily.  If I ever had to change monitors I would just make a new mount.  The mount has a ~1/2" reveal all the way around and is routed with a recess so there is only 1/4" of a lip to the monitor screen.


Here it is with the screen in place.


Here are a couple images of the mount from behind:


Here is the marquee mount after I trimmed the light box and got it all assembled:


Here is a pic of the back.  There will be 2-  1/4" Masonite panels covering the back, both easily removed for service.  I might hinge the bottom one since I will likely need access to the PC more often.  There is a keyboard drawer under the control panel with full extension 22" slides.

Here is the keyboard slides from the front.  The panel, hinges, and drawer are all out and ready for paint in this pic.


Here is the best pic I have of the work to date.  The holes on the CP platform are to screw in the hinges for the keyboard cover.  I have already cut the slot for the t-molding, added a hole for wires to go from the CP to the inside of the cab, and filled all nail holes and sanded it all down.  It is ready for primer tonight, and if I have time I might even spray a first coat of black, but probably not since I really want to start on the CP base.


That is all I have on me today, I will post more as I go.


spoot

  • Trade Count: (+1)
  • Full Member
  • ***
  • Offline Offline
  • Posts: 688
  • Last login:June 15, 2015, 10:36:18 am
  • Destroyer of electronics
Re: My build
« Reply #4 on: June 18, 2014, 04:46:04 pm »
Cab is nice and clean.   But do you want player 2 knocking King Kong's junk?   :P

PL1

  • Global Moderator
  • Trade Count: (+1)
  • Full Member
  • *****
  • Online Online
  • Posts: 9667
  • Last login:Today at 03:02:37 pm
  • Designated spam hunter
Re: My build
« Reply #5 on: June 18, 2014, 05:25:05 pm »
do you want player 2 knocking King Kong's junk?   :P
If you turn it upside down, it almost looks like DK learned one of Chaos' special moves from Primal Rage. (hold buttons 2+3 then down, right, up, left :duckhunt)


Scott
« Last Edit: June 18, 2014, 05:35:06 pm by PL1 »

InfantSorrow

  • Trade Count: (0)
  • Full Member
  • ***
  • Offline Offline
  • Posts: 71
  • Last login:August 13, 2017, 02:53:22 pm
  • Scrumtrulescent!
Re: My build
« Reply #6 on: June 18, 2014, 06:11:41 pm »
Nice looking cab DK! You've come to the right place young padawan lol

Need to finish up my first one myself.  Need to coat it now, another trade I need to learn.
I've already decided I'm not going to roller paint it, I want a baby bottom finish! from what I've read a high pressure low volume gravity spray gun and air compressor gives the best finish. Already have an air compressor anyways.

Stick with my main man Scotty, Yotsuya, BobA and the guys.. they'll take you all the way in.
Let me begin phase 2 of my plan... or is it phase 3? I don't know phases.

dkersten

  • Trade Count: (0)
  • Full Member
  • ***
  • Offline Offline
  • Posts: 1472
  • Last login:March 12, 2024, 11:47:30 am
  • If you are gonna do it, do it right..
Re: My build
« Reply #7 on: June 18, 2014, 07:07:05 pm »
Nice looking cab DK! You've come to the right place young padawan lol

Need to finish up my first one myself.  Need to coat it now, another trade I need to learn.
I've already decided I'm not going to roller paint it, I want a baby bottom finish! from what I've read a high pressure low volume gravity spray gun and air compressor gives the best finish. Already have an air compressor anyways.

Stick with my main man Scotty, Yotsuya, BobA and the guys.. they'll take you all the way in.
Thanks!  I have a few HVLP guns (suction fed, not gravity) but they won't spray latex unless I thin the hell out of it.  This is a turbine fed unit.  I use it for spraying laquer.  I did get great results using an electric HVLP (wagner) with a pretty big nozzle, but again I had to REALLY thin the latex down.  I did this for my kitchen cabinets, sprayed a semi-gloss, and it came out about as good as I could expect.  Floetrol latex thinner really helps it settle before it dries too, aiding in the smoothing process.

But the thinning is a pain and slows dry times WAY down.  I think I did like 5 coats on my kitchen cabinets, each was very thin and there are places I should have done a few more just to make it perfect.  For this cab I am going to go with a semigloss black and shoot it with just a plain old wagner power painter.  I expect a little texture even though I will add some of the floetrol to it (probably just like a 5% mix), but that is OK, it is actually the look I am going for.. If I wait until the first coat is very dry and then hit it all with some 220 sandpaper I think it will smooth out even more.  I will wait to see how the first coat comes out.

jaharr01

  • Trade Count: (+1)
  • Full Member
  • ***
  • Offline Offline
  • Posts: 806
  • Last login:March 26, 2025, 01:48:10 pm
  • Try and fail, but don't fail to try
Re: My build
« Reply #8 on: June 18, 2014, 08:20:07 pm »
I was noticing that it looks like you used a nail gun or a fine staple gun to put it together. Unless you super careful it will move on you when you move it around and maybe pull apart. If it were me I would put some drywall screws in the side and putty the holes over. You may have done this and I couldn't see them.

                                 Jay

yotsuya

  • Trade Count: (+21)
  • Full Member
  • ***
  • Offline Offline
  • Posts: 19960
  • Last login:Yesterday at 09:55:43 pm
  • 2014 UCA Winner, 2014, 2015, 2016 ZapCon Winner
    • forum.arcadecontrols.com/index.php/topic,137636.msg1420628.html
Re: My build
« Reply #9 on: June 19, 2014, 12:24:48 am »
You know what would look good? You control panel with NO characters on it. Can you post a version like that for us to see?
***Build what you dig, bro. Build what you dig.***

ChanceKJ

  • Trade Count: (0)
  • Full Member
  • ***
  • Offline Offline
  • Posts: 3229
  • Last login:August 07, 2021, 02:52:06 pm
Re: My build
« Reply #10 on: June 19, 2014, 02:15:48 am »
...so I can print the layout to scale and use it as a template, so when the art arrives it *should* line up perfectly.  We will see if all this planning works out.

That's usually the case. As long as you didn't change any dimensions on the template, or try to modify the scale of the art when printing on the plotter you should get it to the millimeter.

You know what would look good? You control panel with NO characters on it. Can you post a version like that for us to see?

Quiet you! I actually kinda like this one. A little busy. But not bad. And if he likes it, he likes it.  You're such a hater. :D

I was noticing that it looks like you used a nail gun or a fine staple gun to put it together. Unless you super careful it will move on you when you move it around and maybe pull apart. If it were me I would put some drywall screws in the side and putty the holes over. You may have done this and I couldn't see them.

I agree with this 100%. Screws/filler > Nails,  get yourself a countersink with a pilot bit for the size of screw your gonna use. Makes one hell of a difference. Couple passes with the wood filler and sandpaper you'll never notice there were screws. Unless Jay's right and you went all ninja with them already. I do notice the Dewalt drill in some of the pics.  :)

jaharr01

  • Trade Count: (+1)
  • Full Member
  • ***
  • Offline Offline
  • Posts: 806
  • Last login:March 26, 2025, 01:48:10 pm
  • Try and fail, but don't fail to try
Re: My build
« Reply #11 on: June 19, 2014, 02:43:40 am »
Btw I do really like ur cab.Especially the rounded area around the bezel. it looks really good.  :applaud: It's a very clean looking build
Jay

dkersten

  • Trade Count: (0)
  • Full Member
  • ***
  • Offline Offline
  • Posts: 1472
  • Last login:March 12, 2024, 11:47:30 am
  • If you are gonna do it, do it right..
Re: My build
« Reply #12 on: June 19, 2014, 02:53:55 am »
I was noticing that it looks like you used a nail gun or a fine staple gun to put it together. Unless you super careful it will move on you when you move it around and maybe pull apart. If it were me I would put some drywall screws in the side and putty the holes over. You may have done this and I couldn't see them.

                                 Jay
Honestly, I've built mdf enclosures for 3500+ watt subwoofer systems that could make the windshield of a car flex over an inch and the glue seams have never once failed on me. I have taken a sledge hammer to a 3 way glued mdf joint and broken the mdf before the joint failed. I fully trust glue alone. The brad nails just keep it together until the glue dries. In my opinion, the only way screws would improve the structure would be with hardwood cleats in the joints that the mdf is screwed to.  There are no stress points that need that kind of strength though. If this were going in a public arcade, I might overbuild it a little more, but I am confident in my methods and design.

I did screw up one joint though.. I let it move before tacking it and it's off by a full 16th of an inch. It frustrates me to have a mistake like that. But it is hidden and won't greatly affect anything so I let it slide. It's funny how we can point out every tiny flaw in our own work.  this is far from perfect, but I am paying enough attention to detail that most people could never find a flaw.


jaharr01

  • Trade Count: (+1)
  • Full Member
  • ***
  • Offline Offline
  • Posts: 806
  • Last login:March 26, 2025, 01:48:10 pm
  • Try and fail, but don't fail to try
Re: My build
« Reply #13 on: June 19, 2014, 03:09:37 am »
Yes if it is glued well it will be fine. I didn't realize you had glued all the joints. I wouldn't worry about being off a 1/16. I think you will like your big widescreen monitor, I really like my widescreen monitor. All that cool artwork in mame puts beautiful bezels on the screen. Great work though. As far as your artwork, that is up to you. It depends what your taste is. Some like them less busy , some like them a bit more. busy. Are you putting vinyl down the sides?

             Jay

InfantSorrow

  • Trade Count: (0)
  • Full Member
  • ***
  • Offline Offline
  • Posts: 71
  • Last login:August 13, 2017, 02:53:22 pm
  • Scrumtrulescent!
Re: My build
« Reply #14 on: June 19, 2014, 04:11:16 am »
Quote
Thanks!  I have a few HVLP guns (suction fed, not gravity) but they won't spray latex unless I thin the hell out of it.

Okay tell me something Dave Bowman, I have a little air compressor that can only run at 6.7 CFM. The HVLP gravity guns I'm looking at state on the packacing 5 - 10 average CFM requirement. Am I still good to go or should I be looking at an air compressor with higher CFM.
What would it mean for the spray job if I am at the lower range of this requirement?

Let me begin phase 2 of my plan... or is it phase 3? I don't know phases.

jaharr01

  • Trade Count: (+1)
  • Full Member
  • ***
  • Offline Offline
  • Posts: 806
  • Last login:March 26, 2025, 01:48:10 pm
  • Try and fail, but don't fail to try
Re: My build
« Reply #15 on: June 19, 2014, 07:58:45 am »
If you did use it the flow would be poor. Probably would need a larger one it would run constantly. You might be okay if you went slow and didn't use latex but i'd go to like harbor freight or lowes and get a better one.

dkersten

  • Trade Count: (0)
  • Full Member
  • ***
  • Offline Offline
  • Posts: 1472
  • Last login:March 12, 2024, 11:47:30 am
  • If you are gonna do it, do it right..
Re: My build
« Reply #16 on: June 19, 2014, 10:22:30 am »
I am far from being an expert, but in my experience with HVLP I would agree that your compressor probably won't handle it except in short bursts.  For latex you will have to bump the pressure a little, which will end up giving you more air volume so you will easily be pushing 10+ cfm.  You will be dialing your pressure down quite a bit with a  regulator, so even a small tank will give you 30-60 seconds of full flow, maybe even more before the pressure drops to where you aren't getting that much flow any more and relying on the compressor to provide it, so if you have a large tank you will probably be OK. 

I built a bathroom a few months ago for my brother and when I got the drywall work done, I had to texture, but my portable compressor is tiny - great for nailguns and so quiet you could run it right next to you all day, but anything requiring constant flow doesn't last more than 20 seconds before pressure drops way down.  So I borrowed a friend's little porter cable pancake compressor and made a T connector so I could run off both at the same time.  It worked GREAT and I got the flow I needed to texture the entire room without stopping. 

Frankly though, shooting latex with air is so damn finicky, before I would invest a penny into a gun, I would rent a small airless unit and use that.  Any pro grade airless paint sprayer is going to put latex on as smooth as it can go.  Add the floetrol and whatever orange peel texture you get from spraying will smooth out on it's own.  The key though is to not overdo it. 

I fought my little wagner power painter last night and it was so damn frustrating.  First it was clogging the plunger and slowing down the flow, then it would get an air bubble and spit all over my cab, which means brushing it out.  In my frustration I would clean the plunger and then rush to get the paint on before it started doing that again and I had some spots where I put it on a little too heavy.  Plus the flow was so high it was hard to get enough paint on the edges of the MDF where it soaks it up like a sponge.  I ended up doing a lot of brush work.  After I sand it will be all good, but I am dreading doing the final coat because I can't sand it.  It makes a strong case for either shooting 3 or 4 super thin coats or just spray painting the thing and using a semi-gloss laquer as a top coat.  I have done that in the past and it works REALLY well.  But I really don't want to do that, I just want to spray 2 coats and be done.  Not sure I will get my wish though. 

dkersten

  • Trade Count: (0)
  • Full Member
  • ***
  • Offline Offline
  • Posts: 1472
  • Last login:March 12, 2024, 11:47:30 am
  • If you are gonna do it, do it right..
Re: My build
« Reply #17 on: June 19, 2014, 10:23:32 am »
Okay tell me something Dave Bowman,
Am I missing an inside joke here?

dkersten

  • Trade Count: (0)
  • Full Member
  • ***
  • Offline Offline
  • Posts: 1472
  • Last login:March 12, 2024, 11:47:30 am
  • If you are gonna do it, do it right..
Re: My build
« Reply #18 on: June 19, 2014, 10:26:06 am »
Cab is nice and clean.   But do you want player 2 knocking King Kong's junk?   :P
lol, now I keep looking at that.. the art is already on the way though, so too late.. Oh well, I can make jokes when playing against friends now "Hey, quit fondling his sack"..

yotsuya

  • Trade Count: (+21)
  • Full Member
  • ***
  • Offline Offline
  • Posts: 19960
  • Last login:Yesterday at 09:55:43 pm
  • 2014 UCA Winner, 2014, 2015, 2016 ZapCon Winner
    • forum.arcadecontrols.com/index.php/topic,137636.msg1420628.html
Re: My build
« Reply #19 on: June 19, 2014, 10:32:05 am »
You know what would look good? You control panel with NO characters on it. Can you post a version like that for us to see?
Quiet you! I actually kinda like this one. A little busy. But not bad. And if he likes it, he likes it.  You're such a hater. :D

Who's hating? I asked him as nicely as possible. I'd like to see it without any characters on it. Are we giving feedback or stroking egos here?
***Build what you dig, bro. Build what you dig.***

dkersten

  • Trade Count: (0)
  • Full Member
  • ***
  • Offline Offline
  • Posts: 1472
  • Last login:March 12, 2024, 11:47:30 am
  • If you are gonna do it, do it right..
Re: My build
« Reply #20 on: June 19, 2014, 10:35:13 am »
You know what would look good? You control panel with NO characters on it. Can you post a version like that for us to see?
At first that was what I had.. actually just the background in blue instead of red.  Then I saw a CP I really liked and it had the characters and the colored grid, so I did my own twist on that..

Here it is without the characters..


yotsuya

  • Trade Count: (+21)
  • Full Member
  • ***
  • Offline Offline
  • Posts: 19960
  • Last login:Yesterday at 09:55:43 pm
  • 2014 UCA Winner, 2014, 2015, 2016 ZapCon Winner
    • forum.arcadecontrols.com/index.php/topic,137636.msg1420628.html
Re: My build
« Reply #21 on: June 19, 2014, 10:38:22 am »
Wow. Honest feedback -  I like that one better. But that's me.
***Build what you dig, bro. Build what you dig.***

InfantSorrow

  • Trade Count: (0)
  • Full Member
  • ***
  • Offline Offline
  • Posts: 71
  • Last login:August 13, 2017, 02:53:22 pm
  • Scrumtrulescent!
Re: My build
« Reply #22 on: June 19, 2014, 10:43:13 am »
@ dave & jahar

well, this is the finish i am going for. This guy used lacquer and HVLP


Isn't that beautiful.
Now you are telling me that I don't have the tools to achieve this... I'm terribly vexed lol
It is something I shall have to remedy then, isn't it.

I can't use harbor freight or Lowes though I'm not in the states. Give me a spec on a compressor to achieve such results.
tank volume (liters/gallons), CFM requirement.

I shall not rest until I achieve baby bottom uniformity on my cade ---by the flying spaghetti monster's hairy nether regions!---!
Let me begin phase 2 of my plan... or is it phase 3? I don't know phases.

dkersten

  • Trade Count: (0)
  • Full Member
  • ***
  • Offline Offline
  • Posts: 1472
  • Last login:March 12, 2024, 11:47:30 am
  • If you are gonna do it, do it right..
Re: My build
« Reply #23 on: June 19, 2014, 11:08:55 am »
So last night was nothing but frustration and roadblocks..

First I got my t-molding in and discovered a horrible mistake.  I went by the diagram on GGG's (and t-molding.com's) website instead of re-reading the text when I picked up my slot cutting blade an got the 3/32.. so the slot is too big.  When I bought the blade I was in a hurry and going off of memory, and I quickly double checked the site and saw the picture that clearly shows the slot at 3/32.. So thankfully I came up with a way to fill the gap in fairly easily and it holds the t-molding VERY tightly.  I used strips of sandpaper folded in half with the sandpaper side out, put it halfway in the slot and push the t-molding in.. so problem solved but it almost caused me to start over from scratch.. 

Then my shop was a mess and I REALLY wanted to just get a coat of primer on the cab and work on the CP base, so I pushed some junk out of the way and threw up a couple drop cloths and I really should have taken a couple hours to clean and organize first.  It was a pain in the butt to get all the angles on the cab while painting.

Then my gun was giving me all sorts of grief.  I should have taken the time to pull it apart and re-oil it as it has been sitting for about 9 months.  But I rushed it and paid for it.  The plunger on the gun which is basically a miniature high pressure pump kept gumming up with the primer and would stop plunging all the way, resulting in about 1/4 the flow and pressure.  Each time it would take me 20 minutes to disassemble, clean, and reassemble the gun.  After the third time I threw out the oil it came with and grabbed some 3-in-1 and oiled the sh!t out of it.  Then I dialed the flow down to about half, and after that it was spraying nicely.  But this was after I had to use the brush to clean up some spots.  That is the other thing about that gun, if it runs low and you get even a tiny bit of air in the pickup, it will spit a big ole gob of paint out, and I did that three times, screwing up my nice clean and smooth wet paint.  brushing it out cleans it up but even with the best brushes you get brush marks.  So I will be doing some sanding tonight to get it back to smooth.  No big deal really because I needed to sand at least once after paint anyway.. MDF is made from wood pulp and so fibers are in all directions.. water based paint makes these fibers swell, so after the first coat you should always let it dry and then sand it to smooth out the fibers.  Usually by the second coat it is better, but even so I might need to sand once more..

Once I was done with the primer and all cleaned up, I was exhausted.  I have been working on this for about 4-6 hours each day, plus going to work.  And I have other projects I am working on as well, and my brain is about to shut down.  But I REALLY wanted to make progress, and I pushed forward and got my second wind. 

I got the base for the CP done and pretty much ready for primer.  I still have a couple holes to drill for the credit buttons that will be hidden underneath, and I might tack in a couple gussets for reinforcing the piece that will support the hinge for the CP, but it is pretty much ready to go.  By the end of the night I was making small mistakes, and nearly shot a brad through my hand, lol.  It caught about 1/16th of an inch of the edge of the MDF and stopped just short of my hand.  Unfortunately it left a gouge where it can be seen on the finished cab, so I filled and sanded and filled again and let it dry overnight.  The angles were a challenge but I nailed it perfectly without having to make any new pieces.  I am quite proud of that. 

Here are some pics: 
Cab and parts all primed up


CP Base pics:


CP base on the cab:


I am going to build "wings" that go from the back edge of the CP base to the back of the cab so it completes the look and doesn't make the CP look like it was just tacked on to the cab.  Even with those the CP is huge, but I think it will look good when it is done. 

dkersten

  • Trade Count: (0)
  • Full Member
  • ***
  • Offline Offline
  • Posts: 1472
  • Last login:March 12, 2024, 11:47:30 am
  • If you are gonna do it, do it right..
Re: My build
« Reply #24 on: June 19, 2014, 11:35:40 am »
@ dave & jahar

well, this is the finish i am going for. This guy used lacquer and HVLP
Yeah, if you lay down the paint fairly smooth and then coat with laquer you will get a fantastic finish.  Do a flat black if you are going to do laquer or the laquer probably won't stick to the paint..

Painting with a compressor based gun is a pain in the butt IMHO.  You need to regulate the pressure very well, you really should filter the air with both a decent filter for oil and debris and a water filter to remove any moisture.  After 15 or 20 minutes of the compressor running you will be shooting hot air which will change the way the paint lays down.  When I did that texture in my brother's bathroom I thought the hoses were going to melt they got so hot!. 

If you are going to spray laquer, use a catalyzed laquer and a turbine based HVLP sprayer.  You can usually get one for around $120 that will work good enough for small projects.  the air flow is constant and there is no dicking around with pressure.  You don't have to filter it because it doesn't get compressed and create condensation.  Rockler has one for like $100 I think if you can do mail order.  The catalyzed laquer has to usually be mixed at the paint store you get it from (a specialty paint shop should have it) and you get about 45 days to use it before it goes bad.  But it goes on really well if you cut it with some smoothing agents and you can sand in about 15 minutes after applying, and after 24 hours it is a VERY hard surface.  There are also catalyzed varnishes you an get that work even better, but you have to mix those right before shooting and clean your gun really well as soon as you are done. 

As for the paint, I still say see if you can rent a professional grade airless.  The setup is a pain for such a small project, but the results can't be beat.  Even a 3000 psi home depot sprayer can't atomize the paint well enough to get a perfectly smooth coat, but a decent professional airless unit will make it look like you know what you are doing..

Unless you have a larger 2, 3, or 5 hp compressor, you probably won't find one that can do more than 6 or 7 cfm.  But, if you still insist on using your compressor, get yourself a halfway decent HVLP gun, get the biggest orifice you can, a bottle of Floetrol, and experiment with it.. cleanup is no big deal, so you can play around with some scrap lumber and figure out if you can make it work.  The problem is that latex is so thick it doesn't atomize with air very well.  This leads to larger particles of paint spraying out and that means "orange peel" texture.  The floetrol will not just thin the paint down so it will spray easier, it will also give it time to smooth out once it is down on the wood.  For BEST results, lay the cab down on a side and paint the one side and let it sit until dry, then flip over and shoot the other side.  Gravity will settle it out as smooth as it can get.  And just spray enough on to get the surface all looking "wet"..

Oh, and DON'T FORGET to put a regulator on your compressor line, preferably one that you can have at the gun that you can tweak.. The first gun I ever got I plugged into the air line and the can bulged out and nearly exploded.. Oops..


ChanceKJ

  • Trade Count: (0)
  • Full Member
  • ***
  • Offline Offline
  • Posts: 3229
  • Last login:August 07, 2021, 02:52:06 pm
Re: My build
« Reply #25 on: June 19, 2014, 08:04:21 pm »
You know what would look good? You control panel with NO characters on it. Can you post a version like that for us to see?
Quiet you! I actually kinda like this one. A little busy. But not bad. And if he likes it, he likes it.  You're such a hater. :D

Who's hating? I asked him as nicely as possible. I'd like to see it without any characters on it. Are we giving feedback or stroking egos here?

...   Hater.

yotsuya

  • Trade Count: (+21)
  • Full Member
  • ***
  • Offline Offline
  • Posts: 19960
  • Last login:Yesterday at 09:55:43 pm
  • 2014 UCA Winner, 2014, 2015, 2016 ZapCon Winner
    • forum.arcadecontrols.com/index.php/topic,137636.msg1420628.html
Re: My build
« Reply #26 on: June 19, 2014, 08:11:03 pm »
On a serious note, I really dislike when that term gets used on people who provide honest opinions. I forgot, some of us all all about the gold star and "That's OK, buddy, you did your best". Meh. Honest feedback only makes things better. But here you go.


Haters gonna hate, strokers gonna stroke.
***Build what you dig, bro. Build what you dig.***

ChanceKJ

  • Trade Count: (0)
  • Full Member
  • ***
  • Offline Offline
  • Posts: 3229
  • Last login:August 07, 2021, 02:52:06 pm
Re: My build
« Reply #27 on: June 19, 2014, 09:02:28 pm »
I feel like I need to make that gold star smaller and change it black in Photoshop ;D

Haha, :) all good fun. I'm going to stop derailing this thread now.

Promise.

dkersten

  • Trade Count: (0)
  • Full Member
  • ***
  • Offline Offline
  • Posts: 1472
  • Last login:March 12, 2024, 11:47:30 am
  • If you are gonna do it, do it right..
Re: My build
« Reply #28 on: June 20, 2014, 01:33:32 am »
I have no issues with feedback, good or bad. I thought it was an honest opinion , but then I'm new here and I don't know the history yet.  Everyone has an opinion and a taste when it comes to art. If I had 3 or 4 cabs, I would go a completely different route on artwork. I might do one more down the road, but even that is questionable. I appreciate the super clean look, but the colorful art that really pops out and represents the piece is what always catches my eye. So I went that way. Not everyone is gonna like my choices. I'm ok with that.

Got the CP all the way to primer tonight. Pics in the morning, I need sleep.

yotsuya

  • Trade Count: (+21)
  • Full Member
  • ***
  • Offline Offline
  • Posts: 19960
  • Last login:Yesterday at 09:55:43 pm
  • 2014 UCA Winner, 2014, 2015, 2016 ZapCon Winner
    • forum.arcadecontrols.com/index.php/topic,137636.msg1420628.html
Re: My build
« Reply #29 on: June 20, 2014, 01:36:02 am »
I have no issues with feedback, good or bad. I thought it was an honest opinion , but then I'm new here and I don't know the history yet.  Everyone has an opinion and a taste when it comes to art. If I had 3 or 4 cabs, I would go a completely different route on artwork. I might do one more down the road, but even that is questionable. I appreciate the super clean look, but the colorful art that really pops out and represents the piece is what always catches my eye. So I went that way. Not everyone is gonna like my choices. I'm ok with that.

Got the CP all the way to primer tonight. Pics in the morning, I need sleep.

I'm glad you saw it as a simple question and an honest opinion. Your cab, your rules.  :cheers:
***Build what you dig, bro. Build what you dig.***

dkersten

  • Trade Count: (0)
  • Full Member
  • ***
  • Offline Offline
  • Posts: 1472
  • Last login:March 12, 2024, 11:47:30 am
  • If you are gonna do it, do it right..
Re: My build
« Reply #30 on: June 20, 2014, 10:43:46 am »
Control panel is just about ready for art, which will hopefully be here today.  I will have my *proper* slot cutting bit today, so I will cut the slot for the t-molding, sand once more to 320, wipe down, and ready to apply the art.  Then it is time for buttons.

However, I ran into a snag yesterday.  I got the I-Pac Ultimate I/O board all configured on the PC that will run this cab, and I got one of the GGG RGB-Drive II LEDs pinned and plugged in and working.  It seemed very bright until I put it in the Electric Ice 2 button when I was severely underwhelmed.  So since the Ipac UIO has resistors for the LED's already, I shorted out the resistors on the RGB-Drive LED and it did get a bit brighter.  Not too much really, but at least it is more, and I am hoping that once it is against the darker background in a darker room than my office, the button will light up a little better.  So I looked back at posts here and saw the one where they said they have the version of the LEDs without the resistors on the board and with the 4 pin connector already attached.  That would save me about 5 hours of crimping the tiny 2.54mm connectors to make them plug into the Ipac UIO, and they would be marginally brighter, so I sent off an email to see if I can get 30 of them shipped asap and send back the others.  The irony is that I went with the GGG buttons and LED's because they were about $2 cheaper per button, but by the time I pay the difference and the shipping I will be into these for about the same as the Ultimarc buttons that are designed to go with the controller.  This is what I get for trying to get this all done as fast as possible. 

So what this means is that I can get my CP wired, but I have to account for being able to pull switches and install LED's AFTER the fact, and then wire them up.  I already have what I need to extend any of them that need extending, but it will be at least a week before I see them so even if I get everything else done this weekend and early next week I will be looking at quite a few hours of more work when they come in.  I still have a couple days of work out on my deck (one of my other projects) to get done before my annual 4th of July party, so once again I find myself under the gun to get a ton of stuff done with little time to do it.  I am already working until 11 pm each night and I am completely exhausted and ready for a break and to enjoy some of the fruits of my labor...

Anyway, here is the CP right now:


Oh, and I went ahead and pulled the trigger on the foot pedals...  I might have to at least get some modifications done to the cab internally before I can put those in when they get here, which will likely be over a week.  The oak frame for the casters is in the way, so I will have to cut that out and brace it internally to compensate for the structural change and make room for the pedal mechanism. 

zanna5910

  • Trade Count: (0)
  • Full Member
  • ***
  • Offline Offline
  • Posts: 181
  • Last login:August 05, 2024, 10:37:36 am
  • I want to build my own arcade controls!
Re: My build
« Reply #31 on: June 20, 2014, 01:24:24 pm »
One thing to confirm/consider/test before you final mount that TV:

Do you ever need to use the remote to access any menus or do you have an easy way to access the TV menus?  Will your TV and TV power settings survive a power outage?  IR or a small pinhole usually works.

I say this because if I lose power to my house and my tv, i have to open everything up to reset the power settings to wake on VGA because they are not saved thru the power outage.  Its a hassle.  Need to drill a pinhole or something to easily access my TV menus...

Hope that helps.

dkersten

  • Trade Count: (0)
  • Full Member
  • ***
  • Offline Offline
  • Posts: 1472
  • Last login:March 12, 2024, 11:47:30 am
  • If you are gonna do it, do it right..
Re: My build
« Reply #32 on: June 20, 2014, 05:22:24 pm »
Good call.. I can access the power and menu from behind, but I failed to test if the monitor retained the power state in a power outage..  I will have to check that tonight and come up with something if it doesn't.  It is a cheap monitor after all ($180 on Amazon.. 27" Acer 1080p), so it wouldn't surprise me.  Thing is though I have yet to run into an LCD that didn't maintain power state, so I never even considered it.  Thanks!

I mentioned it above, but after I already built the bezel and mount I remembered that I was intending to put light guns on, so if (or rather when) I do that I will need to modify the bezel for that.  The upside is I could easily just route a simple slot for it above the monitor and flush mount it in.. The hardest part would be managing dust since I won't haul it back to the shop for that, as well as touching up paint.. Neither is impossible, but both are a pain in the butt..  If I had a sensor sitting here I would just do it now and install it, but since I have to drop the $200+ before I will have one on hand, I will just have to wait. 

Same issue with pedals, so I am trying to get exact dimensions today so I can cut the hole before paint goes on..

This is all just the price I pay for having to knock this all out in a couple weeks..

InfantSorrow

  • Trade Count: (0)
  • Full Member
  • ***
  • Offline Offline
  • Posts: 71
  • Last login:August 13, 2017, 02:53:22 pm
  • Scrumtrulescent!
Re: My build
« Reply #33 on: June 21, 2014, 06:14:16 pm »
@ Dave

You are an old pro at this stuff lol Looking good. What front end will you be running on this?

Anyways, some feedback on my baby bottom finish endeavors.

I went back to the department store I got the original air compressor 2 hp, 7 cfm compressor from and they allowed me to swap it our for a 3hp, 14 cfm one! The old one I bought 2 months ago but I never got round to using it, still had everything in the original packaging. So they allowed me to still swap it out even though it was way outside the 14 day return policy.
At least I scored something there :)

Anyways, I hooked up the HVLP spray guns to this and man o man.. was it beautiful lol I sprayed a couple of off cuts with primer and then a satin black lacquer paint and it came out glorious!

Thanks for all the input guys, really appreciate it.
Let me begin phase 2 of my plan... or is it phase 3? I don't know phases.

dkersten

  • Trade Count: (0)
  • Full Member
  • ***
  • Offline Offline
  • Posts: 1472
  • Last login:March 12, 2024, 11:47:30 am
  • If you are gonna do it, do it right..
Re: My build
« Reply #34 on: June 23, 2014, 01:48:29 pm »
What a weekend.. I put in about 25 hours on the project, and I am exhausted.  But I am 95% of the way to the finish line.

I got my replacement LED's ordered which will hopefully be in by Thursday.  I also ordered the pedals, but that is a secondary project and not part of the main goal, so I will deal with that when it comes in. 

Friday night I prepped my workspace better for painting (hung the vis-clean, cleaned up some dust, etc), finished sanding and sealing the CP, and sanded the primered cab down to 220, and finished building the base for the CP.  Saturday I got a late start and got the "wings" for the cab built, which I revised 3 times before I was finished.  They really complete the look of the cab with the CP mounted, although I have not taken any pics with them installed yet (still waiting on paint to cure more).  I waited all day for graphics to show up and while waiting I painted the first coat on everything, which turned out pretty darn good.

At 5:00 the mailman finally showed up and I unboxed the graphics..  It was like Christmas.  But I had plans to go to dinner so I had to stop.  The local drag strip had an NHRA event that I really wanted to attend too, but rain moved in so I decided to skip it and go home and start applying graphics.  Next thing I knew it was 11:30 pm and my back was hurting too much to continue wiring.  Plus my girlfriend was getting bored waiting for me to spend a little time with her.  So I went and shot a second coat of paint and then called it a night.

Sunday I rolled out of bed by 10 am and sat down to wire.  I really should have gone to a good paint store and bought a better brand of paint because I had forgotten that Home Depot (Behr) takes a couple weeks to fully cure.  The paint went on REALLY nice though, but it has slowed me down having to really treat it as if it is still wet.  I would have had the thing in place and functioning last night if it weren't so tacky still. 

I finished the wiring and got the CP mounted to the base, ground out some clearance issues, and got things dialed in there.  I got the marquee lighting in place and then got the monitor installed.  I applied the graphics to he marquee and hooked it up to see how it looks.  I am not all that happy with the blacks and even the darker areas of the marquee.. the solid black is fairly "speckled", and the darker areas of the color make a harsh transition from red to gray, and it doesn't look good at all.  Plus the lighting is a little too bright.  I think just taping over half the LED's will work.. I tried dialing the voltage down but they just went out.. so I will think of something on that.  Otherwise it looks great.

Tonight I will drill bolt holes to mount the CP to the cab, finish a few details on the cab, mount the back panels on the cab, and maybe go ahead and move it into place in my gameroom.  The tacky paint is the only thing slowing me down right now.  I have a TON of software work to do still, including working out the lighting to do what I want, but that is something that will work over time.  The hardest part there will be working out the LEDBlinky software to do what I want.  Right now all I can get it to do is flash the colors the buttons are supposed to be when you scroll to a game.  Granted I only have one LED button working right now and the trackball, but even launching the game didn't work, just the flash to show what the game will be and then it goes dead again.. I need to figure out how to light all the buttons to "default" colors when you launch MaLa, and stay that way until you start a game, then light the buttons that are in use with the appropriate colors. 

I also need to find or print up some "people" graphics to stick on my player 1-4 buttons (since I went with the Electric Ice buttons).

Complaints:
In working with this stuff I have some feedback on each item.  First, the GGG Electric Ice II buttons.. Not bad but they feel cheap.  The universal mount on the bottom leaves a lot to be desired and doesn't hold the switch very well.  I ended up cutting off the leaf side for many of my buttons (which sucks because the acrylic plastic doesn't cut well, more or less just explodes making it dangerous to cut).  The cheap basic buttons I got from Ultimarc hold the switch way better, although tolerances seem a little too tight and a couple of those buttons stick a little.  Overall I just wasn't all that impressed with the GGG buttons and switches.  I think part of the problem is the basic GGG switch.  The Ultimarc switch fits better even in the GGG buttons, and just feels more solid.

The U360 joysticks feel really loose to me, and the throw, even with the top mounted restrictors, is really long.  I think I might try doubling up the springs, they just feel way too loose to me.  I don't feel like they could take much abuse either, but maybe that is just the feeling I get from the loose joystick.  I love the ability to program it for each game, and just in the testing I did, q-bert was 100 times easier to play than with a standard 8-way, so I think I will end up liking it.  The Ultimarc website shows the u360 with different dimensions than the j-stik, but they are the exact same plate and the j-stik dimensions there are correct, the dimensions for the u360 are wrong by a few millimeters.  Not a big deal but if I were having my holes cut via cnc it could be a problem.

Ultimarc Pre-Wired harnesses.  Avoid these.. at all costs.  They caused way more problems than time they saved.  The crimps were horrible and looked like someone did them with a needlenose and not a proper crimper.  Half the connections were bad and had to be redone, and those I didn't redo added up to a ton of resistance because they are weak.  I metered the ground harness and got 273 ohms of resistance at the halfway point, and nothing after that because the connection was severed at that point.  After fixing it all I get about 30 ohms of resistance from the board to the furthest point.  Complete waste of time and money. 

Pics:
Here is a pic of the cab with the CP base and one of the "wings" installed, all in primer ready to paint


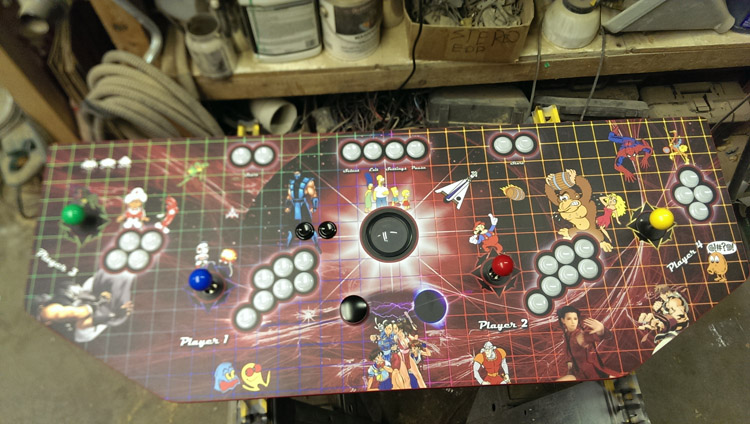
CP after graphics and t-molding, and then back side after buttons are all mounted for the first time


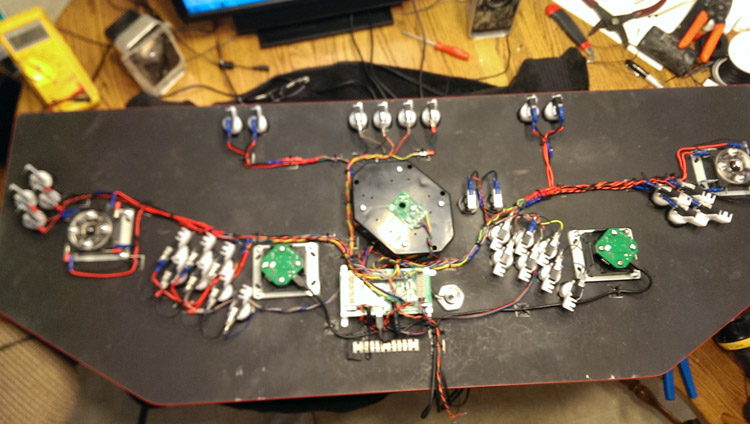
Getting started on wiring CP


Wiring is done (for now, will have a whole lot more wires with the LEDs later this week) Tried to keep it clean, considering I had to use the ipac ultimate harness, it came out OK.


2nd coat of paint is on..


CP with everything put together (with and without wheel on spinner)


Monitor mounted, Marquee installed, CP in place, just a few more items to mount, some t-molding to put on, and a little more wiring and she is ready to fire up!


dkersten

  • Trade Count: (0)
  • Full Member
  • ***
  • Offline Offline
  • Posts: 1472
  • Last login:March 12, 2024, 11:47:30 am
  • If you are gonna do it, do it right..
Re: My build
« Reply #35 on: June 23, 2014, 02:00:32 pm »
@ Dave

You are an old pro at this stuff lol Looking good. What front end will you be running on this?
Thank You! 

I am running MaLa.  I like the flexibility, and so far, even though I run 3 different emulators (mame, daphne, and demul), I can do it all in the same lists without having to choose an emulator first.  I will post some screens of it after I get it fired up... Nothing crazy but clean and it works with the theme. 

Regarding the finish, here is what you get by sanding the primer to 220 grit and then spraying 2 coats of Behr semigloss interior with a Wagner Powerpainter plus, thinned about 20% with Floetrol.

Kind of hard to get a good shot of how smooth it is.. There is a little orangepeel texture there, but for the most part it is pretty darn smooth.  I think I would have to thin the paint more and lay it flat and let dry for 24 hours for it to be any smoother. 

When I did my kitchen cabinets I used Pittsburg Paint in a semigloss enamel, and it went on about as good but was cured enough to handle easily within 24 hours and cured to a hard finish in about a week.  This Behr brand was still tacky to the touch even after 48 hours.  It is so soft that I could put fingerprints in it.  Not happy about that.  I will probably move it into place tonight and assemble it carefully and just tell my kids that I will string them up by their toenails if they ding or scratch it.  It should be nice and hard by the time my 4th of July party rolls around.  And I do expect some dings and scratches eventually, I just don't want them in the first couple weeks..

spoot

  • Trade Count: (+1)
  • Full Member
  • ***
  • Offline Offline
  • Posts: 688
  • Last login:June 15, 2015, 10:36:18 am
  • Destroyer of electronics
Re: My build
« Reply #36 on: June 23, 2014, 02:08:04 pm »
Cab is nice and clean.   But do you want player 2 knocking King Kong's junk?   :P
lol, now I keep looking at that.. the art is already on the way though, so too late.. Oh well, I can make jokes when playing against friends now "Hey, quit fondling his sack"..

Hehe, you're welcome.   :laugh:   And it's the "Fierce Punch" too.....poor Kong and his dong.   :cheers:

dkersten

  • Trade Count: (0)
  • Full Member
  • ***
  • Offline Offline
  • Posts: 1472
  • Last login:March 12, 2024, 11:47:30 am
  • If you are gonna do it, do it right..
Re: My build
« Reply #37 on: June 23, 2014, 02:52:59 pm »
Will your TV and TV power settings survive a power outage?
I confirmed that the LCD panel retains power state.. unplug it and plug it back in and it comes back to "on".. so no need for a front control.  I can always access it from behind if I need to, but that is going to be 6 screws to get to.. but I shouldn't ever need to.  No need for menu since it autoadjusts to other resolutions, and most of everything is set to 1600x900 anyway.

Thanks again for pointing that one out though, One of the many things I hadn't thought of. 

InfantSorrow

  • Trade Count: (0)
  • Full Member
  • ***
  • Offline Offline
  • Posts: 71
  • Last login:August 13, 2017, 02:53:22 pm
  • Scrumtrulescent!
Re: My build
« Reply #38 on: June 23, 2014, 03:01:59 pm »
@ Dave

Thats the finish I'm going for and by god i'm going to get it!
Would this floetrol work with the lacquer paint I have?

PS. Would any of you philanthropists out there send me a router bit for cutting a 1.5mm groove in 16mm MDF and some T-molding?
---goshdarn--- this stuff is hard to come by here! Point me in the right direction guys lol Where can I order this online?
Let me begin phase 2 of my plan... or is it phase 3? I don't know phases.

dkersten

  • Trade Count: (0)
  • Full Member
  • ***
  • Offline Offline
  • Posts: 1472
  • Last login:March 12, 2024, 11:47:30 am
  • If you are gonna do it, do it right..
Re: My build
« Reply #39 on: June 23, 2014, 03:05:13 pm »
No, for laquer based you would use some other thinning agent.  I have some but the label fell off a couple years ago and I don't remember what it is called.  I got it at a professional paint supply place.  Floetrol is latex based so only works with water based paints.