Main Restorations Software Audio/Jukebox/MP3 Everything Else Buy/Sell/Trade
Project Announcements Monitor/Video GroovyMAME Merit/JVL Touchscreen Meet Up Retail Vendors
Driving & Racing Woodworking Software Support Forums Consoles Project Arcade Reviews
Automated Projects Artwork Frontend Support Forums Pinball Forum Discussion Old Boards
Raspberry Pi & Dev Board controls.dat Linux Miscellaneous Arcade Wiki Discussion Old Archives
Lightguns Arcade1Up Try the site in https mode Site News

Unread posts | New Replies | Recent posts | Rules | Chatroom | Wiki | File Repository | RSS | Submit news


Author Topic: Control Panel template - See anything that should be changed before I cut?  (Read 2848 times)

0 Members and 1 Guest are viewing this topic.

HighScoreDan

  • Trade Count: (0)
  • Full Member
  • ***
  • Offline Offline
  • Posts: 12
  • Last login:August 19, 2014, 12:28:16 pm
  • I want to build my own arcade controls!
It's almost cuttin' time!  ;D

I'll be making a 2 player control panel and thought it might be best to post a picture of my cut template.  It's crude, but hopefully it makes sense.  My joysticks will be Mag-Stik Plus', and I've tossed around the idea of adding a spinner--but I don't think I will.  Here is the template I've created:


Right now I'm unsure whether or not I should move Player 1/2 and the trackball down about an inch, or whether it'll be fine where it's at.  I plan to put my exit button on the top of the cabinet (it'll be tucked away, but easy to hit when I want to back out of a game), but are there any other admin buttons that I should consider?

PL1

  • Global Moderator
  • Trade Count: (+1)
  • Full Member
  • *****
  • Offline Offline
  • Posts: 9677
  • Last login:Today at 02:47:06 am
  • Designated spam hunter
Two things to consider:

1. How are you handling admin buttons like exit and pause?  Have you configured all the emulators you plan on using to ensure you can do what you want to do with what you currently have?

2. Not so sure about the cup holders.  At a minimum, consider moving the coin and start buttons further away from the cup holders to reduce the odds of bumping/sloshing your drink and spills getting into the art and controls.    :hissy:


Scott
« Last Edit: June 25, 2014, 05:18:54 pm by PL1 »

HighScoreDan

  • Trade Count: (0)
  • Full Member
  • ***
  • Offline Offline
  • Posts: 12
  • Last login:August 19, 2014, 12:28:16 pm
  • I want to build my own arcade controls!
Thanks for the reply, Scott.  I'm not going to have pause, so that one is okay--but I'm kind of on the fence with exit.  My current idea is to get it off the control panel completely.  It's a black cabinet and I was going to wire a black button in the middle of the cab (right above the marquee).  This is entirely out of site, but easy to reach for.  I'm going to give that a whirl, and if that doesn't work then I'll probably make exit some sort of a combo press.

I'm really on the fence with the drink holders too.  I have a few arcade cabinets now, and we're always setting drinks down all over the place--it's a huge pain in the ass.  I found some really tight fitting cup holders (http://www.amazon.com/gp/product/B00911UWSE/ref=oh_details_o03_s00_i00?ie=UTF8&psc=1) that I think will do a good job of controlling spills/can shaking.  Still, you raise a good point.  The control panel will also slope toward me, so maybe the convenience isn't quite worth it.  Would love to hear from anybody who has added one of these (and whether or not it was regretted).

ChanceKJ

  • Trade Count: (0)
  • Full Member
  • ***
  • Offline Offline
  • Posts: 3229
  • Last login:August 07, 2021, 02:52:06 pm
Building your house on a mountain of sand with those cup holders. Especially if you were to build with MDF.  Bet it would look cool. But make sure you use sippy cups. Omitting them might be your best option, unless your that kinda guy who won't let anyone else but yourself eat/drink in your car.

I printed out my button arrangement for P1/2 on my CP and modified it a couple times to make sure it was comfortable to the hand.

DaveMMR

  • Trade Count: (0)
  • Full Member
  • ***
  • Offline Offline
  • Posts: 3244
  • Last login:April 28, 2025, 11:33:13 am
Ditch the cup holders, put a small table nearby.

Otherwise everything looks solid. I'm of the opinion you don't really need pause/exit on the CP, though if you plan on people playing your cab without you babysitting them, you will appreciate a small, cheap, unassuming little red button that takes them out of the game. You'll get less questions if that exit button doesn't look like the others.

HighScoreDan

  • Trade Count: (0)
  • Full Member
  • ***
  • Offline Offline
  • Posts: 12
  • Last login:August 19, 2014, 12:28:16 pm
  • I want to build my own arcade controls!
Alright, well as great as it'd be I suppose I should take the unanimous advice I am receiving.  So, the cup holders are gone!  I'm thinking about pushing the P1/Coin buttons to the side where the edge of the cup holder was (I'll make a new template tomorrow).  Now it looks like I have a lot of dead space on the panel.  I am okay with that, as I don't want it to be too cluttered; but I can't help feel like maybe I'm underutilizing my space.

PL1

  • Global Moderator
  • Trade Count: (+1)
  • Full Member
  • *****
  • Offline Offline
  • Posts: 9677
  • Last login:Today at 02:47:06 am
  • Designated spam hunter
If you're planning on using the IPac shifted functions instead of dedicated admin buttons, you might want to keep P1 Start within easy reach.

A cardboard/hardboard test panel will let you know if your layout works for you.


Scott

RandyT

  • Trade Count: (+14)
  • Full Member
  • ***
  • Offline Offline
  • Posts: 7016
  • Last login:Yesterday at 02:26:33 pm
  • Friends don't let friends hack keyboards.
    • GroovyGameGear.com

I'd double check the spacing on your buttons.  It looks like they will be touching, if not interfering with each other.

PL1

  • Global Moderator
  • Trade Count: (+1)
  • Full Member
  • *****
  • Offline Offline
  • Posts: 9677
  • Last login:Today at 02:47:06 am
  • Designated spam hunter
Good call, Randy.

Slagcoin FTW.


Scott

HighScoreDan

  • Trade Count: (0)
  • Full Member
  • ***
  • Offline Offline
  • Posts: 12
  • Last login:August 19, 2014, 12:28:16 pm
  • I want to build my own arcade controls!
Thanks for the heads up on that.  My layout is actually from copied directly off slag coin, but it does look pretty tight.  I'm going to cut it on cardboard this morning to see how it looks/feels.

lamprey

  • Trade Count: (+3)
  • Full Member
  • ***
  • Offline Offline
  • Posts: 636
  • Last login:January 17, 2019, 07:03:11 pm
Good call, Randy.

Slagcoin FTW.
Scott
I get that this slagcoin is just showing templates that have come before. But, I just don't get why people use the templates where the upper row of buttons is sifted to the right from the loser row. That seems so unintuitive to the natural angle of the hand.

To the OP, yeah check the spacing on the buttons. Also, is your trackball really that big? I thought most where 3"...?

HighScoreDan

  • Trade Count: (0)
  • Full Member
  • ***
  • Offline Offline
  • Posts: 12
  • Last login:August 19, 2014, 12:28:16 pm
  • I want to build my own arcade controls!
Good call, Randy.

Slagcoin FTW.
Scott
I get that this slagcoin is just showing templates that have come before. But, I just don't get why people use the templates where the upper row of buttons is sifted to the right from the loser row. That seems so unintuitive to the natural angle of the hand.

To the OP, yeah check the spacing on the buttons. Also, is your trackball really that big? I thought most where 3"...?

Yeah, it's pretty snug:


I actually kind of like it, but I'm more scared of being off a half mm on the cut and ruining the board.  I think I'll put a little more space between the buttons.  I'll look at the slag coin templates again to see if anything jumps out as more appealing, too.

The trackball measurement that I got is from the Ultimarc website to install the U-Trak trackball.  I'll double check the site, but I believe that's what the installation called for.

EMDB

  • Trade Count: (0)
  • Full Member
  • ***
  • Offline Offline
  • Posts: 865
  • Last login:September 05, 2023, 09:18:51 am
  • Project RetroCade
The Exit button is not to shutdown the cabinet but to exit the emulator to get back to your frontend. I myself defined 4 possible admin buttons. I now use Exit, Pause, Mute and Shift. I use shift-Player1 to bypass inserting an actual coin, Shift joystick up /down to control the volume and Shift - Button 7 of player 1 to shut down the cabinet. I used slagcoin layout and came to this layout / button spacing:


RandyT

  • Trade Count: (+14)
  • Full Member
  • ***
  • Offline Offline
  • Posts: 7016
  • Last login:Yesterday at 02:26:33 pm
  • Friends don't let friends hack keyboards.
    • GroovyGameGear.com
Also keep in mind when doing mock-ups that cardboard is way more forgiving than a solid panel.  Plastics, over time, can deform when subjected to any type of heat and pressure.  It's always good to make sure buttons have a little "breathing room" and are centered in the holes to help prevent problems down the road. 

A typical button will need at least 1.3" on centers of the holes (the original layout appears to be ~.025 shy of that).  Some arcade games space them out quite a bit more, but I don't recall any where the spacing is this tight.  It's always a good idea to lay out a pattern which is right for you, rather than rely on things found on the web, which may not be especially well thought out.

I tend to prefer a layout like the one EMDB shows, which has somewhere between .125 and .180 between the bezels.

HighScoreDan

  • Trade Count: (0)
  • Full Member
  • ***
  • Offline Offline
  • Posts: 12
  • Last login:August 19, 2014, 12:28:16 pm
  • I want to build my own arcade controls!
Great advice here, I'm glad I made my post.  I've been playing with a few things and thought I'd post the update.  This is much tried and true, so I think it should work without too much issue.  Still, if anybody notices anything please let me know.

I would still like to know, though -- has anybody mounted the U-Trak trackball?  If so, is the 3.25" hole correct?  I believe it to be, but would like to confirm with somebody who's installed one if possible.

« Last Edit: June 27, 2014, 11:02:23 am by HighScoreDan »

dkersten

  • Trade Count: (0)
  • Full Member
  • ***
  • Offline Offline
  • Posts: 1472
  • Last login:March 12, 2024, 11:47:30 am
  • If you are gonna do it, do it right..
The u-trak hole should be 80mm exact (and then the back side opened up with a file a little to accommodate the taper) if you are doing a straight flush mount.  This can really only be done with a router as there are no hole saws that I have found at this size.. Plus a hole saw will not make a very good hole, and part of this will be visible without the trim ring installed. 

If you are using the trim ring, a 3.25" hole saw cut hole will work fine.  However, with the trim ring on, the distance from the bottom of the trim ring to the top of the trackball base is NOT 3/4", it is about 9/16".. so you either use 1/2" material for your CP and the trim ring sits just a little low on the ball, or you use 3/4" and rout out the underside to recess the whole trackball base about 3/16".  Of course if you do this you are going to have to be super accurate when setting your brass inserts to hold the bolts to mount it as you will have less than an eighth of an inch between the bottom of the hole and the surface of your CP. 

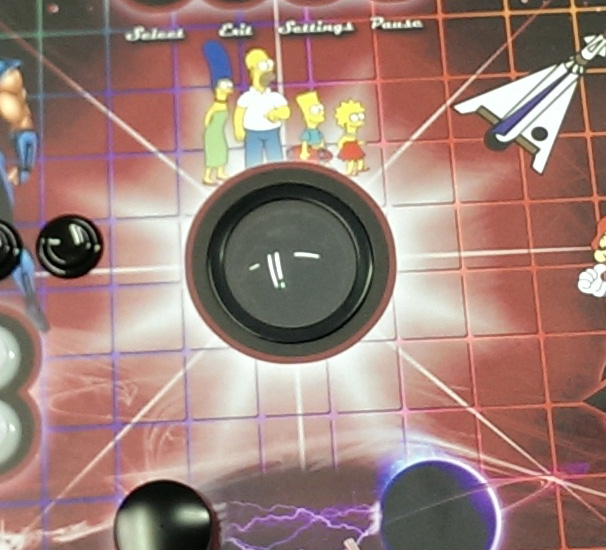
I chose to flush mount, but it was a challenge to get it perfect.  First I used the trim ring to draw the exact hole I wanted.  Then I used a jig saw to cut it out, going about 1/8" inside the line.  Then I took a scrap of 3/4" wood, cut a 3-1/4" hole in it, then placed the trim ring in the hole with some very thin shims (cardboard or paper folded up) to center it, then clamped that piece to the CP with the trim ring clamped between the scrap and the CP.  When I flipped the CP over, I now had a perfect guide for a flush trim bit.  I routed the hole using that plastic trim ring as the guide for the bearing on the flush trim bit and ended up with a perfect hole.  I used a file on the back side of the CP to open the hole a little and taper it, being careful not to hit the top 1/8".  When all was said and done, my hole is exact and the U-trak fits perfect.  I carefully trimmed my graphics overlay to the hole, and it came out REALLY nice.

Here is a pic after I cut the hole


And the finished product

big10p

  • Trade Count: (0)
  • Full Member
  • ***
  • Offline Offline
  • Posts: 698
  • Last login:May 01, 2023, 01:46:23 pm
  • Mmmm, arcade classics!
Personally, I wouldn't bother with a separate button to exit back to the frontend. Just use an existing button combo. e.g. I've just set MAME to exit when 1P and 2P buttons are pressed, simultaneously.

yotsuya

  • Trade Count: (+21)
  • Full Member
  • ***
  • Offline Offline
  • Posts: 19960
  • Last login:August 08, 2025, 09:49:26 pm
  • 2014 UCA Winner, 2014, 2015, 2016 ZapCon Winner
    • forum.arcadecontrols.com/index.php/topic,137636.msg1420628.html
Personally, I wouldn't bother with a separate button to exit back to the frontend. Just use an existing button combo. e.g. I've just set MAME to exit when 1P and 2P buttons are pressed, simultaneously.

Agreed.
***Build what you dig, bro. Build what you dig.***

dkersten

  • Trade Count: (0)
  • Full Member
  • ***
  • Offline Offline
  • Posts: 1472
  • Last login:March 12, 2024, 11:47:30 am
  • If you are gonna do it, do it right..
I actually like a dedicated exit button.. it keeps me from having to explain to everyone how to exit a game.. "exit" is pretty intuitive and seldom needs explaining, "Hit this button and hold it and then hit that one to exit" not only requires explanation, but usually a reminder or two.. "OK, what two buttons do I hit to get out?"  But if you want a minimalist CP, shift functions are your friend.. I use a shift for credit 3 and 4 since I didn't feel the need to have 4 credit buttons, nor did I have the room on my iPac.. But I love my dedicated select, exit, settings, and pause buttons..

Drnick

  • Trade Count: (+2)
  • Full Member
  • ***
  • Offline Offline
  • Posts: 1642
  • Last login:June 21, 2024, 03:32:31 pm
  • Plodding Through Life
I actually like a dedicated exit button.. it keeps me from having to explain to everyone how to exit a game.. "exit" is pretty intuitive and seldom needs explaining, "Hit this button and hold it and then hit that one to exit" not only requires explanation, but usually a reminder or two.. "OK, what two buttons do I hit to get out?"  But if you want a minimalist CP, shift functions are your friend.. I use a shift for credit 3 and 4 since I didn't feel the need to have 4 credit buttons, nor did I have the room on my iPac.. But I love my dedicated select, exit, settings, and pause buttons..

I gotta agree with this,  I started my machine off with no admin buttons and using the hold P1 Start & Coin1  to exit method. Others just couldn't get their heads round it and would go how do I exit again  :banghead: :banghead:  I ended up getting some small 12mm buttons Green for start and Red for Exit.  It just made life so much simpler within Hyperspin, P1 start can also be used to start though.

spoot

  • Trade Count: (+1)
  • Full Member
  • ***
  • Offline Offline
  • Posts: 688
  • Last login:June 15, 2015, 10:36:18 am
  • Destroyer of electronics
Personally, I wouldn't bother with a separate button to exit back to the frontend. Just use an existing button combo. e.g. I've just set MAME to exit when 1P and 2P buttons are pressed, simultaneously.

Which has caused me headaches when two people continue at the same time......