Main Restorations Software Audio/Jukebox/MP3 Everything Else Buy/Sell/Trade
Project Announcements Monitor/Video GroovyMAME Merit/JVL Touchscreen Meet Up Retail Vendors
Driving & Racing Woodworking Software Support Forums Consoles Project Arcade Reviews
Automated Projects Artwork Frontend Support Forums Pinball Forum Discussion Old Boards
Raspberry Pi & Dev Board controls.dat Linux Miscellaneous Arcade Wiki Discussion Old Archives
Lightguns Arcade1Up Try the site in https mode Site News

Unread posts | New Replies | Recent posts | Rules | Chatroom | Wiki | File Repository | RSS | Submit news


Author Topic: R-Pod MkII Racing Simulator: Now VR Enabled  (Read 113091 times)

0 Members and 1 Guest are viewing this topic.

SpaceHedgehog

  • Trade Count: (0)
  • Full Member
  • ***
  • Offline Offline
  • Posts: 937
  • Last login:October 29, 2024, 02:02:07 pm
  • Almost done ...
Re: R-Pod MkII Racing Simulator, Vewlix style : Phase 5 - The dashboard
« Reply #280 on: May 25, 2014, 05:57:13 pm »
Top after filler:


Top after sanding:


Bottom after filler:


Bottom after sanding:


Still a little bit to do but the vinyl is going on tomorrow and I'll permanently apply the side panels. Hurrah, then it's on to the dashboard proper.
Click a pic for a video tour 

Superfrog

  • Trade Count: (0)
  • Full Member
  • ***
  • Offline Offline
  • Posts: 393
  • Last login:June 28, 2022, 10:39:08 am
    • My YouTube Channel
Re: R-Pod MkII Racing Simulator, Vewlix style : Phase 5 - The dashboard
« Reply #281 on: May 25, 2014, 06:11:44 pm »
It's a MASTERPIECE  :notworthy:

I also never seen before a project setup in stages  :dizzy:
Normally you build and paint and setup the whole thing at once, but seeing every piece at the time finished is refreshing  :cheers:

I'm still holding on  :censored: :censored:

 :notworthy:

SpaceHedgehog

  • Trade Count: (0)
  • Full Member
  • ***
  • Offline Offline
  • Posts: 937
  • Last login:October 29, 2024, 02:02:07 pm
  • Almost done ...
Re: R-Pod MkII Racing Simulator, Vewlix style : Phase 5 - The dashboard
« Reply #282 on: May 26, 2014, 01:47:43 am »
Cheers superfrog  :cheers:

I knew it was going to be a fairly complicated build so I thought to break it down into multiple parts rather than just go at it as a single build. It put a bit of structure around the process and made sure I didn't end up with too many pieces lying around unassembled. The phases do overlap as you can see, particularly where they are dependent (e.g. front section / dashboard). The only thing which was completely stand alone was the shifter pod.

I've been committed to taking and posting as many pictures of progress as I can but have dispensed with about half of them, concentrating on what is visual progress. I wanted to capture the whole build and remind myself later of the effort which went into it!
« Last Edit: May 26, 2014, 01:49:57 am by SpaceHedgehog »
Click a pic for a video tour 

SpaceHedgehog

  • Trade Count: (0)
  • Full Member
  • ***
  • Offline Offline
  • Posts: 937
  • Last login:October 29, 2024, 02:02:07 pm
  • Almost done ...
Re: R-Pod MkII Racing Simulator, Vewlix style : Phase 5 - The dashboard
« Reply #283 on: May 26, 2014, 06:12:15 am »
With the remaining filler sanded down ad a few extra spots re-done, it was time to apply the vinyl. Two hands are better than one for larger, more complex  surfaces. Before starting, it goes without saying that the area should be inspected very carefully for debris. Typically, I will is a duster and then brush with my hands.

Line the vinyl up and push it firmly around the first edge. It's a very important step to ensure there are no bubbles. All the places where I've applied previously haven't developed any. Note: 90 decree angles are very difficult and typicaly I will try and avoid that or use a light chamfer to help it along.

Step 1: line the vinyl up and negotiate the first edge:
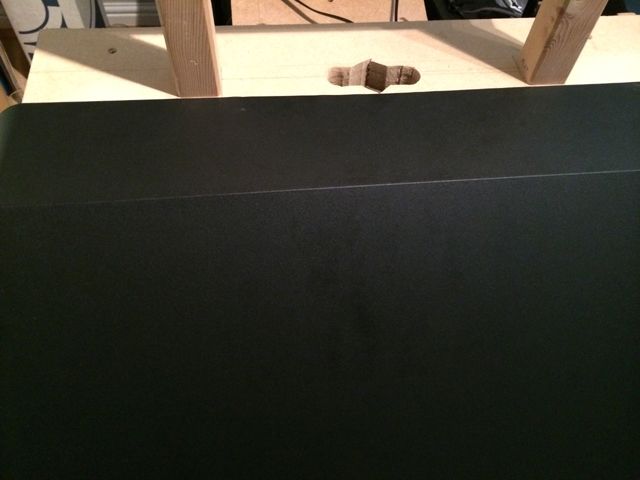


Step 2: carefully draw back the backing paper and smooth the vinyl on:
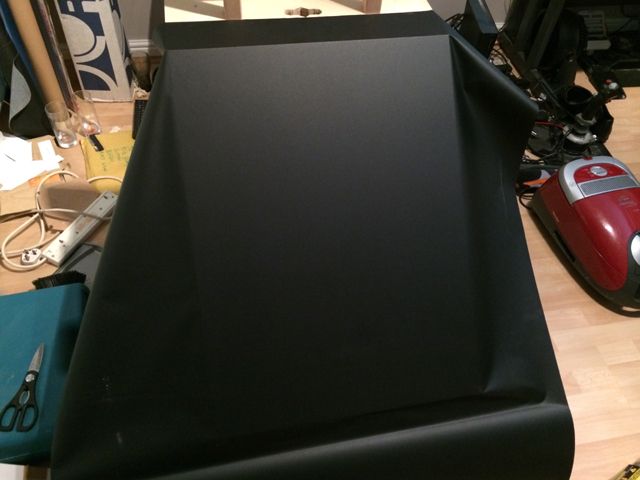


Step 3: continue to cover the piece, ensuring to press firmly around any remaining edges:
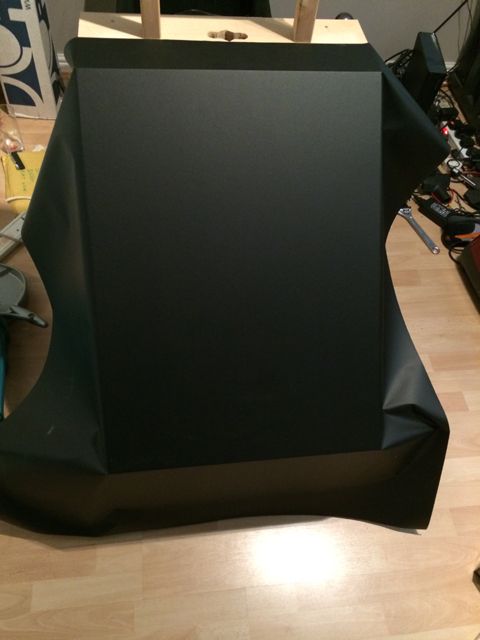


Step 4: rough trim excess to allow the final trim to be easier:
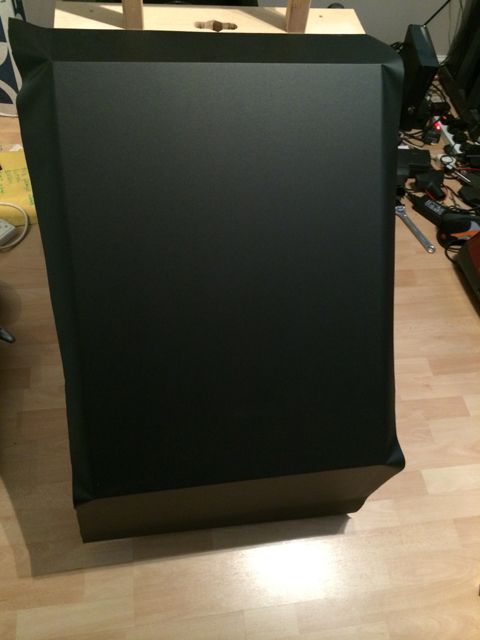


Step 5: get the tools ready, a decent flat length of wood strip and a sharp knife:
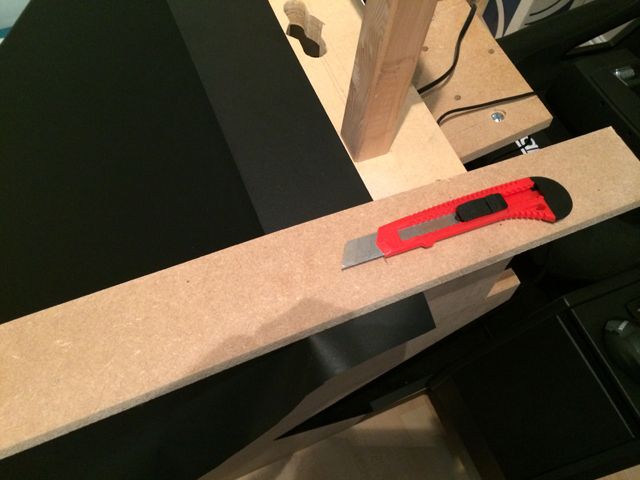


Step 6: work in sections to make the process easier:
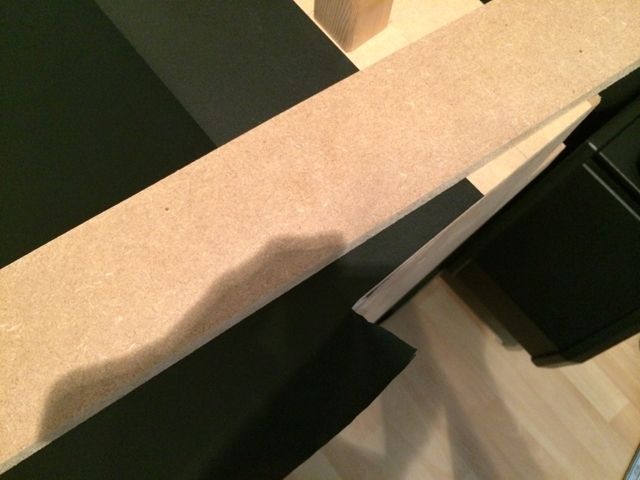


Step 7: complete all the sides:
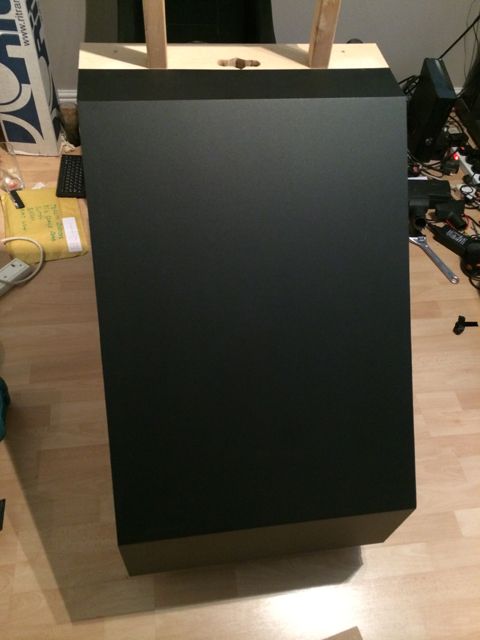


On close inspection, it looks to have gone on very well with no bumps or air bubbles.

Click a pic for a video tour 

emphatic

  • Trade Count: (0)
  • Full Member
  • ***
  • Offline Offline
  • Posts: 2017
  • Last login:Yesterday at 12:04:51 pm
  • -"Suck it, Donny!" -"No, YOU suck it.... more".
    • Emphatic's Video Game Collection
Re: R-Pod MkII Racing Simulator, Vewlix style : Phase 5 - The dashboard
« Reply #284 on: May 26, 2014, 06:59:13 am »
Nice work, I'm useless with it comes to applying overlays etc. :cheers:

SpaceHedgehog

  • Trade Count: (0)
  • Full Member
  • ***
  • Offline Offline
  • Posts: 937
  • Last login:October 29, 2024, 02:02:07 pm
  • Almost done ...
Re: R-Pod MkII Racing Simulator, Vewlix style : Phase 5 - The dashboard
« Reply #285 on: May 26, 2014, 08:14:10 am »
Vinyl can be a bit difficult to work with sometimes, especially the thin stuff. This is thicker which seems to help.

I've painted the outside face of the front to ensure that no MDF is visible should there be any gap:


The left side piece is now in place with the wiring for the LEDs fed through the dash section. Close-up of the fit:


Profile:


It's looking decidedly meaner imho.

Click a pic for a video tour 

SpaceHedgehog

  • Trade Count: (0)
  • Full Member
  • ***
  • Offline Offline
  • Posts: 937
  • Last login:October 29, 2024, 02:02:07 pm
  • Almost done ...
Re: R-Pod MkII Racing Simulator, Vewlix style : Front section complete
« Reply #286 on: May 26, 2014, 09:53:12 am »
Second side has been attached:


The dashboard will fit over the top section. I've made it nice and wide so I can fit lots of switches and extra bits:


Still deciding whether to attach the grille. I quite like plain ...

« Last Edit: May 26, 2014, 09:55:31 am by SpaceHedgehog »
Click a pic for a video tour 

PL1

  • Global Moderator
  • Trade Count: (+1)
  • Full Member
  • *****
  • Offline Offline
  • Posts: 9672
  • Last login:Today at 01:42:41 am
  • Designated spam hunter
Re: R-Pod MkII Racing Simulator, Vewlix style : Front section complete
« Reply #287 on: May 26, 2014, 10:45:02 am »
Impressive as always, SH.   :notworthy:


Meant to ask this much earlier, but am I the only one that keeps expecting to see SH install a second tow loop to balance/compliment the existing one?   :dunno


Scott

Superfrog

  • Trade Count: (0)
  • Full Member
  • ***
  • Offline Offline
  • Posts: 393
  • Last login:June 28, 2022, 10:39:08 am
    • My YouTube Channel
Re: R-Pod MkII Racing Simulator, Vewlix style : Front section complete
« Reply #288 on: May 26, 2014, 11:22:13 am »
Only thing I miss is good looking headlights  :cheers:

I'm very jealous about this very nice project, and even dear to think about the budget  :dizzy:

Your the  :burgerking:

SpaceHedgehog

  • Trade Count: (0)
  • Full Member
  • ***
  • Offline Offline
  • Posts: 937
  • Last login:October 29, 2024, 02:02:07 pm
  • Almost done ...
Re: R-Pod MkII Racing Simulator, Vewlix style : Front section complete
« Reply #289 on: May 26, 2014, 12:12:57 pm »
I was debating this myself Scott - not that it looks at all like a car (a vehicle of some description, maybe), I've gone with one as this is what is typically fitted. It's also an asymmetrical build so that clinched it for me.

Not quite headlights Superfrog but some progress on that front.

I bought one of these to control the lighting:


Completed the lighting for the wiring (hot glue gun will be used to make all the wiring secure):


Side:


Top (this will be masked considerably by the monitor hood so only a thin slice of light comes through - can you slice light?):


Nose:


It looks like a solaruim in there ... best get some tanning lotion ...

Edit: Wheel back on ... back in business


Excuse me while I go vrooom vrooom ...
« Last Edit: May 26, 2014, 02:32:01 pm by SpaceHedgehog »
Click a pic for a video tour 

emphatic

  • Trade Count: (0)
  • Full Member
  • ***
  • Offline Offline
  • Posts: 2017
  • Last login:Yesterday at 12:04:51 pm
  • -"Suck it, Donny!" -"No, YOU suck it.... more".
    • Emphatic's Video Game Collection
Re: R-Pod MkII Racing Simulator, Vewlix style : Front section complete
« Reply #290 on: May 26, 2014, 02:39:39 pm »
Excuse me while I go vrooom vrooom ...

You're so worth it! :cheers: Holy cow.

Superfrog

  • Trade Count: (0)
  • Full Member
  • ***
  • Offline Offline
  • Posts: 393
  • Last login:June 28, 2022, 10:39:08 am
    • My YouTube Channel
Re: R-Pod MkII Racing Simulator, Vewlix style : Front section complete
« Reply #291 on: May 26, 2014, 03:20:43 pm »
I would say, don't vroom to long because I wanna see the dashboard coming along  :cheers: :cheers: :laugh2:

Hop you drive pole positions with this beauty  :cheers:

Minwah

  • Trade Count: (+3)
  • Full Member
  • ***
  • Offline Offline
  • Posts: 7662
  • Last login:January 18, 2019, 05:03:20 am
    • MAMEWAH
Re: R-Pod MkII Racing Simulator, Vewlix style : Front section complete
« Reply #292 on: May 26, 2014, 05:58:48 pm »
Great project, looks really good, well done! :applaud:

Look forward to seeing it done.

SpaceHedgehog

  • Trade Count: (0)
  • Full Member
  • ***
  • Offline Offline
  • Posts: 937
  • Last login:October 29, 2024, 02:02:07 pm
  • Almost done ...
Re: R-Pod MkII Racing Simulator, Vewlix style : Front section complete
« Reply #293 on: May 27, 2014, 08:10:00 am »
Thanks  :cheers:

Yes, I am continuing on the dashboard now Superfrog!

Started on the dashboard top panel. This is what I call a 4 hour piece of wood.

Cutouts to allow the piece to slot in:


Beveling on the front face:


Extra depth to avoid the CSW wheel base interfering with the panel:


Curved around the CSW base to ensure it's visible:


The whole piece will be covered in leather material. The back will be hidden by the monitor hood.

Click a pic for a video tour 

SpaceHedgehog

  • Trade Count: (0)
  • Full Member
  • ***
  • Offline Offline
  • Posts: 937
  • Last login:October 29, 2024, 02:02:07 pm
  • Almost done ...
Re: R-Pod MkII Racing Simulator, Vewlix style : Front section complete
« Reply #294 on: May 27, 2014, 11:18:51 am »
Without a doubt, the most difficult part of the whole build, upholstering the dash ... It took about 2 hours to get this on. I almost gave up, twice. The staples will be hidden by the monitor cover.

Fully covered:


I'll need to epoxy the material to the edges.

In place:


Click a pic for a video tour 

emphatic

  • Trade Count: (0)
  • Full Member
  • ***
  • Offline Offline
  • Posts: 2017
  • Last login:Yesterday at 12:04:51 pm
  • -"Suck it, Donny!" -"No, YOU suck it.... more".
    • Emphatic's Video Game Collection
Re: R-Pod MkII Racing Simulator, Vewlix style : Front section complete
« Reply #295 on: May 27, 2014, 11:38:49 am »
 :applaud: Looks great. No chance it'll come loose (the epoxy'd bits), right? :cheers:

SpaceHedgehog

  • Trade Count: (0)
  • Full Member
  • ***
  • Offline Offline
  • Posts: 937
  • Last login:October 29, 2024, 02:02:07 pm
  • Almost done ...
Re: R-Pod MkII Racing Simulator, Vewlix style : Front section complete
« Reply #296 on: May 27, 2014, 12:14:20 pm »
Cheers  :cheers:  The underside is staple city, just the edges glued with epoxy. I used the same stuff on the top of the shifter pod panel and it's holding really solidly. The carpet spray glue didn't hold it so I had to redo with epoxy.
Click a pic for a video tour 

ChanceKJ

  • Trade Count: (0)
  • Full Member
  • ***
  • Offline Offline
  • Posts: 3229
  • Last login:August 07, 2021, 02:52:06 pm
Re: R-Pod MkII Racing Simulator, Vewlix style : Front section complete
« Reply #297 on: May 27, 2014, 08:02:09 pm »
*SHUDDER* upholstering something with epoxy. You sir are a braver man than I.  Looks really good, definitely a well thought out attack at covering it.  :applaud:

SpaceHedgehog

  • Trade Count: (0)
  • Full Member
  • ***
  • Offline Offline
  • Posts: 937
  • Last login:October 29, 2024, 02:02:07 pm
  • Almost done ...
Re: R-Pod MkII Racing Simulator, Vewlix style : Front section complete
« Reply #298 on: May 28, 2014, 03:18:15 am »
Thanks ChanceKJ. Yes, I completely underestimated the difficulty behind covering the panel. The epoxy is holding things nice and firmly at the edges. No chance of it lifting.


Also just purchased the Derek Speare Designs P1 which I'll de-case and fit to the dashboard panel:

« Last Edit: May 28, 2014, 03:30:46 am by SpaceHedgehog »
Click a pic for a video tour 

SpaceHedgehog

  • Trade Count: (0)
  • Full Member
  • ***
  • Offline Offline
  • Posts: 937
  • Last login:October 29, 2024, 02:02:07 pm
  • Almost done ...
Re: R-Pod MkII Racing Simulator, Vewlix style : Front section complete
« Reply #299 on: May 28, 2014, 10:54:29 am »
Most of this morning was spent finishing off the dash top plate and designing the dash panel. I also rough cut one of the sides for the monitor hood. It still needs quite a bit of work yet:


I made a template for the dash panel which took much longer than expected and then cut both of them out:


The lower part will have a vinyl R-Pod logo:


And will be covered in real carbon fibre:


Click a pic for a video tour 

BadMouth

  • Trade Count: (+6)
  • Full Member
  • ***
  • Offline Offline
  • Posts: 9272
  • Last login:Yesterday at 09:59:14 pm
  • ...
Re: R-Pod MkII Racing Simulator, Vewlix style : Front section complete
« Reply #300 on: May 28, 2014, 11:42:51 am »
It's coming together nicely!
(as expected)

SpaceHedgehog

  • Trade Count: (0)
  • Full Member
  • ***
  • Offline Offline
  • Posts: 937
  • Last login:October 29, 2024, 02:02:07 pm
  • Almost done ...
Re: R-Pod MkII Racing Simulator, Vewlix style : Front section complete
« Reply #301 on: May 28, 2014, 12:46:52 pm »
Thanks BadMouth  :)

I've finished the side pieces for the monitor hood, there's only a limited amount you can do with a cover:


They need a little bit more work before filling, sanding and painting ...
Click a pic for a video tour 

SpaceHedgehog

  • Trade Count: (0)
  • Full Member
  • ***
  • Offline Offline
  • Posts: 937
  • Last login:October 29, 2024, 02:02:07 pm
  • Almost done ...
Re: R-Pod MkII Racing Simulator, Vewlix style : Front section complete
« Reply #302 on: May 29, 2014, 06:04:21 am »
I've cut the internal rests for the monitor hood panels. I'll use 6mm MDF for the remaining parts:


I'll also need to cut some braces for the insides as the material is thin and I want to add some strength to the structure.
« Last Edit: May 29, 2014, 06:33:14 am by SpaceHedgehog »
Click a pic for a video tour 

SpaceHedgehog

  • Trade Count: (0)
  • Full Member
  • ***
  • Offline Offline
  • Posts: 937
  • Last login:October 29, 2024, 02:02:07 pm
  • Almost done ...
Re: R-Pod MkII Racing Simulator, Vewlix style : Front section complete
« Reply #303 on: May 29, 2014, 08:33:30 am »
Taking my time as usual (also suffering with a detox after finding I have an intolerance to coffee - have given up for the last 5 days and am suffering badly :( funny coloured tongue and mild shakes ).

Made the first panel for the top. This has an access hole for TrackIR cabling (can't stand seeing cables - let's make a feature out of it):


I'll be making an enclosure for the top where the transmitter will sit.

Split convoluted sheathing to connect the two:


Click a pic for a video tour 

emphatic

  • Trade Count: (0)
  • Full Member
  • ***
  • Offline Offline
  • Posts: 2017
  • Last login:Yesterday at 12:04:51 pm
  • -"Suck it, Donny!" -"No, YOU suck it.... more".
    • Emphatic's Video Game Collection
Re: R-Pod MkII Racing Simulator, Vewlix style : Front section complete
« Reply #304 on: May 29, 2014, 09:52:45 am »
Personally, I think that kind of cable management is (if not uglier than) as ugly as the actual cables. I think it'd look very slick if you used some kind of low profile wall type cable management and run it tight against the back of your screen. :cheers:


SpaceHedgehog

  • Trade Count: (0)
  • Full Member
  • ***
  • Offline Offline
  • Posts: 937
  • Last login:October 29, 2024, 02:02:07 pm
  • Almost done ...
Re: R-Pod MkII Racing Simulator, Vewlix style : Front section complete
« Reply #305 on: May 29, 2014, 10:18:00 am »
It'd be difficult to get it all snug to the monitor as it would have to go around a square bit! I'm quite taken with the sheathing tbh - it'll look better once the top box is in-place. Too late now anyway, all the pieces are cut :)


Now to start assembling ...
Click a pic for a video tour 

SpaceHedgehog

  • Trade Count: (0)
  • Full Member
  • ***
  • Offline Offline
  • Posts: 937
  • Last login:October 29, 2024, 02:02:07 pm
  • Almost done ...
Re: R-Pod MkII Racing Simulator, Vewlix style : Front section complete
« Reply #306 on: May 29, 2014, 11:01:02 am »
Glue time. Epoxy and wood glue down the sides for good measure:


Welcome to my table of mess btw.
Click a pic for a video tour 

SpaceHedgehog

  • Trade Count: (0)
  • Full Member
  • ***
  • Offline Offline
  • Posts: 937
  • Last login:October 29, 2024, 02:02:07 pm
  • Almost done ...
Re: R-Pod MkII Racing Simulator, Vewlix style : Front section complete
« Reply #307 on: May 29, 2014, 01:59:02 pm »
With all the focus on the front and the dash, I'd completely forgotten about the right side panel for the seat base:


I'd redone it all a couple of weeks ago and forgotten about it (there have been bits lying around all over the place). I got around to cutting the mesh, acrylic artwork and backing board:


Just loose assembled at the moment. I'll get the hot glue gun out and then glue and screw it together:


Edit: Odd, final picture wasn't showing ...
« Last Edit: May 29, 2014, 02:12:34 pm by SpaceHedgehog »
Click a pic for a video tour 

SpaceHedgehog

  • Trade Count: (0)
  • Full Member
  • ***
  • Offline Offline
  • Posts: 937
  • Last login:October 29, 2024, 02:02:07 pm
  • Almost done ...
Re: R-Pod MkII Racing Simulator, Vewlix style : Front section complete
« Reply #308 on: May 29, 2014, 03:08:57 pm »
Well, my deadline to finish this cab was today - looks like I've missed it but still have 3 days to go before work beckons. I know I won't get to finish the dashboard layout as I've only just ordered the DSD button box. Hopefully I can set everything up so I just have that to do and stop boring you all with all these updates :)

Finished attaching the outer 2 pieces of the monitor hood:


Looks like I was a little off with the top piece. Nothing that a bit of filler can't resolve:


« Last Edit: May 29, 2014, 03:24:10 pm by SpaceHedgehog »
Click a pic for a video tour 

SpaceHedgehog

  • Trade Count: (0)
  • Full Member
  • ***
  • Offline Offline
  • Posts: 937
  • Last login:October 29, 2024, 02:02:07 pm
  • Almost done ...
Re: R-Pod MkII Racing Simulator, Vewlix style : Front section complete
« Reply #309 on: May 29, 2014, 06:17:32 pm »
Test fit (it's just hanging off the posts at the moment so isn't lined up perfectly):


I've left room to fit an aluminium bar at the bottom but I cant' help thinking it needs something to perk it up a little - I've bought another sheet of acrylic for a small r-pod logo cutout panel (new Batman pictures in the background :) ):


« Last Edit: May 29, 2014, 06:23:57 pm by SpaceHedgehog »
Click a pic for a video tour 

SpaceHedgehog

  • Trade Count: (0)
  • Full Member
  • ***
  • Offline Offline
  • Posts: 937
  • Last login:October 29, 2024, 02:02:07 pm
  • Almost done ...
Re: R-Pod MkII Racing Simulator, Vewlix style : Front section complete
« Reply #310 on: May 30, 2014, 03:20:34 am »
As the main rig build is drawing to a conclusion (as is my holiday), today I will be taking a diversion and start on the accessories:

1. Amp and fan unit:

Shelf 1 - Amplifier
Shelf 2 - Fan
Cable cavity - Hide all the unsightly cables and power strips

2. Mouse and keyboard unit

Shelf 1: Cavity for shoes
Shelf 2: Mouse surface and recess for cup
Keyboard mount - haven't finalised the design on this yet

3. Accessory wall plate

Headphone hook
Hat hook
Glove shelf

The hooks / shelves will be similar to something I made for my PC:

Take some coat hangers and bend them to shape:


Make a backing board and insert the wire into it:


Attach it to the wall:


« Last Edit: May 30, 2014, 03:27:19 am by SpaceHedgehog »
Click a pic for a video tour 

SpaceHedgehog

  • Trade Count: (0)
  • Full Member
  • ***
  • Offline Offline
  • Posts: 937
  • Last login:October 29, 2024, 02:02:07 pm
  • Almost done ...
Re: R-Pod MkII Racing Simulator, Vewlix style : Front section complete
« Reply #311 on: May 30, 2014, 05:28:10 am »
Measured, cut and flush trimmed 8 side panels for the amp and keyboard/mouse racks:


Click a pic for a video tour 

SpaceHedgehog

  • Trade Count: (0)
  • Full Member
  • ***
  • Offline Offline
  • Posts: 937
  • Last login:October 29, 2024, 02:02:07 pm
  • Almost done ...
Re: R-Pod MkII Racing Simulator, Vewlix style : Front section complete
« Reply #312 on: May 30, 2014, 06:33:53 am »
The first side piece for the amp unit has been cut. I don't want to go too fancy with this, the rig needs to be the centrepiece really. A hole has been cut in the side for some interest and also to allow air to circulate.

Rough cut:


Flush trimmed:


Click a pic for a video tour 

SpaceHedgehog

  • Trade Count: (0)
  • Full Member
  • ***
  • Offline Offline
  • Posts: 937
  • Last login:October 29, 2024, 02:02:07 pm
  • Almost done ...
Re: R-Pod MkII Racing Simulator, Vewlix style : Phase 6 - Accessories
« Reply #313 on: May 30, 2014, 07:23:39 am »
The 4 side pieces have been cloned. Time for some food ...


Click a pic for a video tour 

SpaceHedgehog

  • Trade Count: (0)
  • Full Member
  • ***
  • Offline Offline
  • Posts: 937
  • Last login:October 29, 2024, 02:02:07 pm
  • Almost done ...
Re: R-Pod MkII Racing Simulator, Vewlix style : Phase 6 - Accessories
« Reply #314 on: May 30, 2014, 08:53:24 am »
Panels attached together (double width like everything else) and beveled:


Close-up:


Click a pic for a video tour 

Superfrog

  • Trade Count: (0)
  • Full Member
  • ***
  • Offline Offline
  • Posts: 393
  • Last login:June 28, 2022, 10:39:08 am
    • My YouTube Channel
Re: R-Pod MkII Racing Simulator, Vewlix style : Phase 6 - Accessories
« Reply #315 on: May 30, 2014, 12:43:25 pm »
That's a LOT of wood  :dizzy:

ChanceKJ

  • Trade Count: (0)
  • Full Member
  • ***
  • Offline Offline
  • Posts: 3229
  • Last login:August 07, 2021, 02:52:06 pm
Re: R-Pod MkII Racing Simulator, Vewlix style : Phase 6 - Accessories
« Reply #316 on: May 30, 2014, 01:00:21 pm »
That's a LOT of wood  :dizzy:

Boom, Phrasing.

SpaceHedgehog

  • Trade Count: (0)
  • Full Member
  • ***
  • Offline Offline
  • Posts: 937
  • Last login:October 29, 2024, 02:02:07 pm
  • Almost done ...
Re: R-Pod MkII Racing Simulator, Vewlix style : Phase 6 - Accessories
« Reply #317 on: May 30, 2014, 02:06:30 pm »
I need more wood  ;)

Made some shelves and blanking plates:


Click a pic for a video tour 

SpaceHedgehog

  • Trade Count: (0)
  • Full Member
  • ***
  • Offline Offline
  • Posts: 937
  • Last login:October 29, 2024, 02:02:07 pm
  • Almost done ...
Re: R-Pod MkII Racing Simulator, Vewlix style : Phase 6 - Accessories
« Reply #318 on: May 30, 2014, 05:00:07 pm »
Finished cutting all the pieces and have screwed the frame together. The blanking panes are just stuck on with tape for now:


Click a pic for a video tour 

ChanceKJ

  • Trade Count: (0)
  • Full Member
  • ***
  • Offline Offline
  • Posts: 3229
  • Last login:August 07, 2021, 02:52:06 pm
Re: R-Pod MkII Racing Simulator, Vewlix style : Phase 6 - Accessories
« Reply #319 on: May 31, 2014, 12:21:40 am »
Tell me, is the fan to provide a realistic wind hitting your face as you drive open top vehicles? Cause I mean, that's practically all your missing here.......  :P