Update!
I am going to be using a Griffin PowerMate USB knob to control the volume on the jukebox (I know people have been having lots of problems from what I read). I hope I can get it to work every time on bootup otherwise my wife will never use this thing. I plan to mount it on the center of the front face in between the touchscreen and the marquee - shocker!
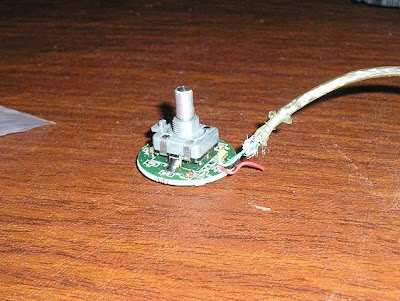
I am really only interested in the aluminum knob (and not the base where the blue LED is located) as well as the circuit board on the inside. As you can see from this picture, there is not much to the volume knob and it is actually quite small without the casing:
In order to remove the guts I had to kind of rip apart the knob and I'm going to have to solder a new USB cable to the 4 connector points on the circuit board. I've never soldered anything in my life but I guess I'll cross that bridge when I get to it.
The circuit board is going to fit in the hole I drilled out behind the Plexiglas (as shown in a previous post). I am going to have to drill out the Plexiglas a little more for the axle to fit through. In addition, in order to get the knob to lay properly I had to create a 1/8" spacer which I made out of some scrap black Plexiglas.
The first thing I did was find a spare washer that was slightly smaller than the diameter of the volume knob and glue it to some scrap Plexiglas (with the protective paper still on) using some contact cement. Next, I used a saw to cut the Plexiglas as close to the washer as I could and then I sanded it down with some 100 grit sandpaper until the Plexiglas was the same size as the washer. I'm just following mountain's lead here.


Once I was finished sanding, I was able to remove the washer from the Plexiglas with a utility knife. The protective paper came right off. Before calling the spacer "finished" I had to drill a small hole for the volume knob's keyway to fit in otherwise the bottom of the spacer would not be able to lie flush with the top of the circuit board.


You can see why I had to drill the second hole in the next shot. It was easy to lay out following mountain's instructions - I put the spacer in place before drilling the second hole and then rubbed it back and forth against the keyway - then I just centered my drill bit where the scratch was made and the hole came out perfect.


The next step will be drilling out the Plexiglas on the front panel and using some acrylic glue to bond the spacer to the front. I am going to do a few other things in the mean time though - I need the front of the jukebox to remain flat in order to cut the t-molding slots (among other things). This is what is will look like once it is installed though:

As you can see in the final shot below, once the volume knob is in place, it will be raised by about 1/16" off of the Plexiglas on the front panel which will allow it to turn without rubbing. Perfect!

I don't know what I'm going to do if I can't get the powermate to operate properly. Maybe the solution is to put the computer to sleep instead of turning it off when it isn't in use. I really don't know. The whole design is based on being able to use this knob. I'm also a bit nervous that I left enough room for the circuit board and the monitor to sit in place properly. It is a tight fit in there!
More later!


 Home
Home Help
Help Search
 Login
Login Register

 Send this topic
 Print
Print Topic: Someone call the cops! I stole a Jukebox!! MAGNETS??? [03.05.2009] (Read 86363 times)


