Main Restorations Software Audio/Jukebox/MP3 Everything Else Buy/Sell/Trade
Project Announcements Monitor/Video GroovyMAME Merit/JVL Touchscreen Meet Up Retail Vendors
Driving & Racing Woodworking Software Support Forums Consoles Project Arcade Reviews
Automated Projects Artwork Frontend Support Forums Pinball Forum Discussion Old Boards
Raspberry Pi & Dev Board controls.dat Linux Miscellaneous Arcade Wiki Discussion Old Archives
Lightguns Arcade1Up Try the site in https mode Site News

Unread posts | New Replies | Recent posts | Rules | Chatroom | Wiki | File Repository | RSS | Submit news


Author Topic: R-Pod MkII Racing Simulator: Now VR Enabled  (Read 93615 times)

0 Members and 1 Guest are viewing this topic.

SpaceHedgehog

  • Trade Count: (0)
  • Full Member
  • ***
  • Offline Offline
  • Posts: 937
  • Last login:February 06, 2023, 12:10:24 pm
  • Almost done ...
R-Pod MkII Racing Simulator: Now VR Enabled
« on: March 08, 2014, 04:48:37 pm »
Current state of the build:


Main build log starts ...

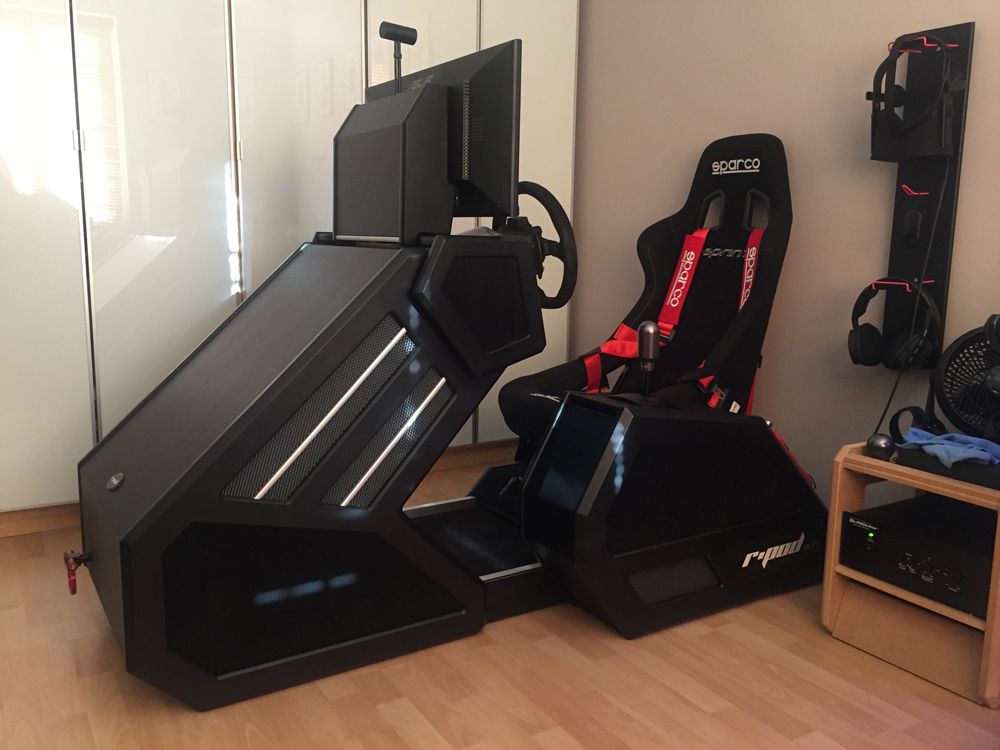
After my existing arcade and console cabinet builds, my previous racing setup was looking a little unprofessional, so I've decided to build a new one, something more in keeping with the design of everything else in my room. I’ve been working on this for approximately 4 weeks now and I reckon it will take around 12 to complete.

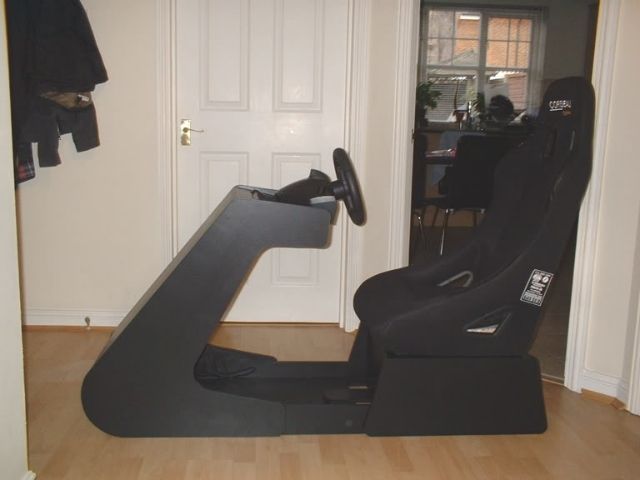
This is what my current racing setup looks like:


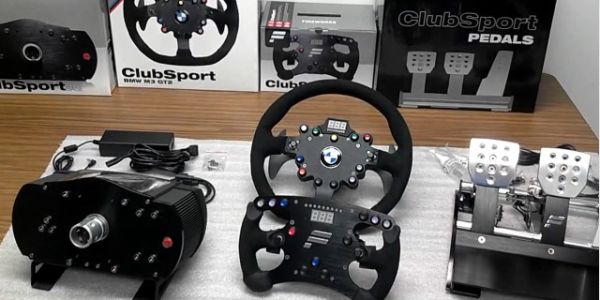
First job was to acquire some new equipment. I’ve gone for the Fanatec ClubSport series kit. This includes the pedal set, wheel base with detachable rims and an H-pattern/Sequential shifter.


This will be configured to use Simvibe which takes telemetry data out of the Simulation software and uses transducers to simulate various effects. It works extremely well.

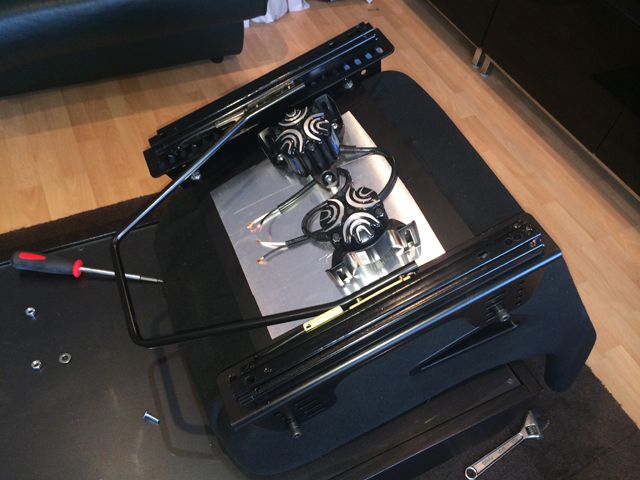
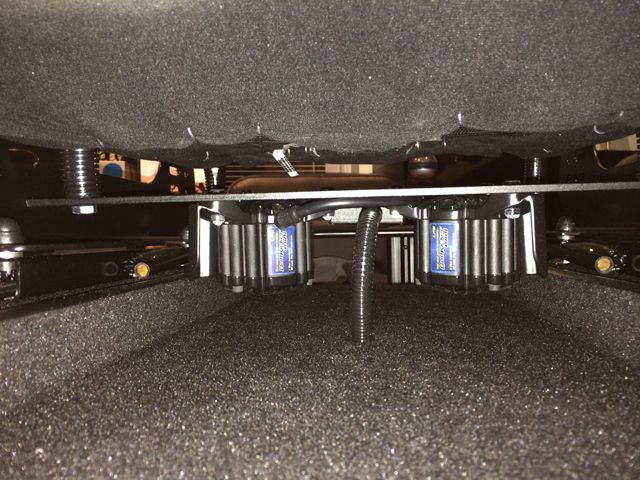
The first challenge was to figure out how to mount the transducers to my new seat (there will be more attached to the pedals and underneath the shifter):


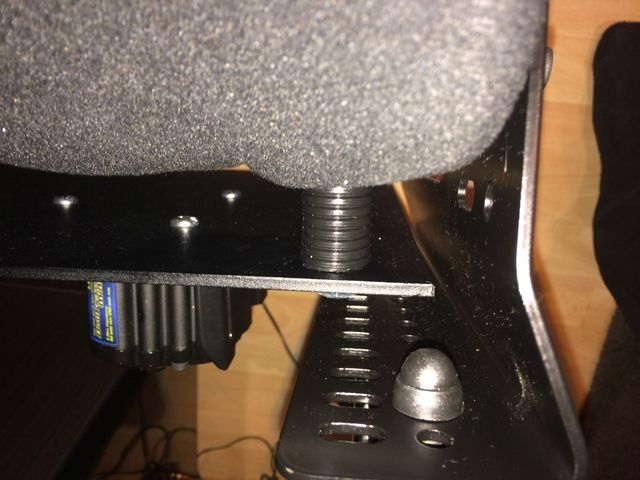
I used some 4mm aluminium plate and drilled some holes and bolted it directly underneath the seat. This transmits the vibrations very efficiently throughout the steel frame:


I tidied things up a bit by using some split convoluted cable sheathing to hide the bolts:


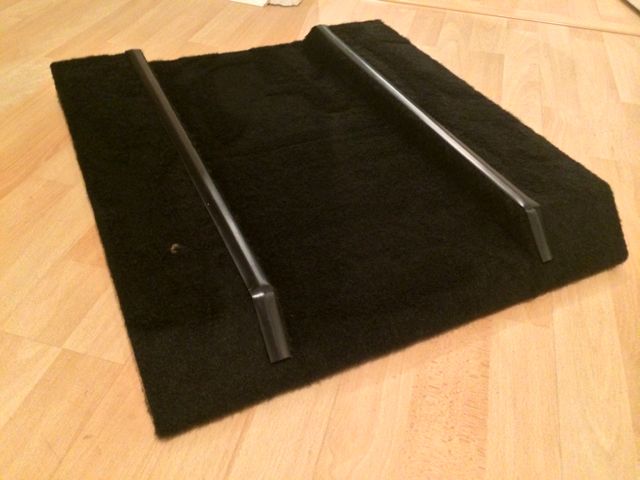
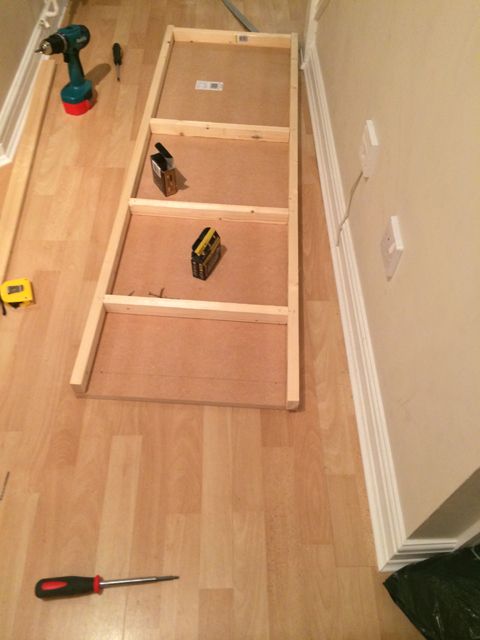
Next stop was the seat base. A simple construction with risers to allow room for the transducers:


This was then covered in automotive carpet with some T-Molding applied around some of the edges:


The speaker cable from the transducers is wired into a small project box:


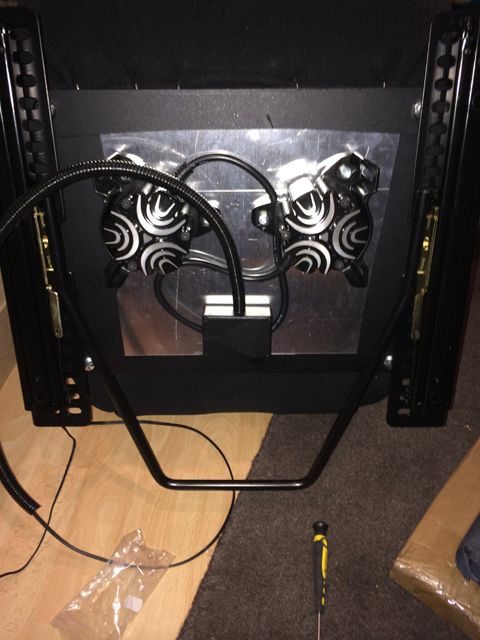
The remaining speaker cable is fed through some smaller convoluted sheathing through the seat base:


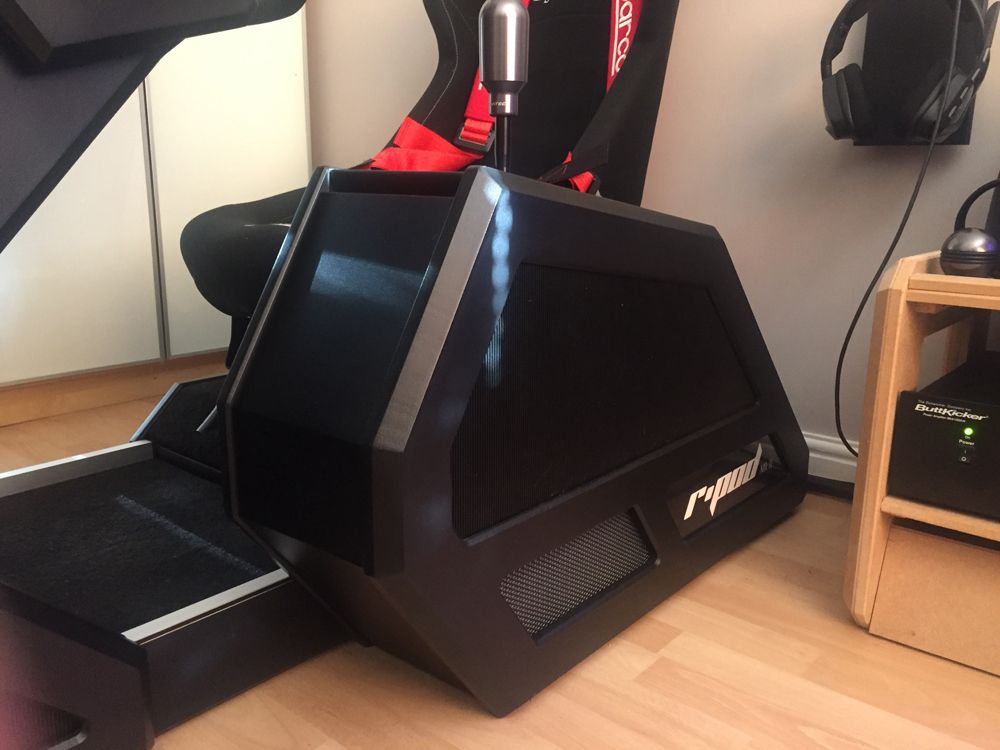
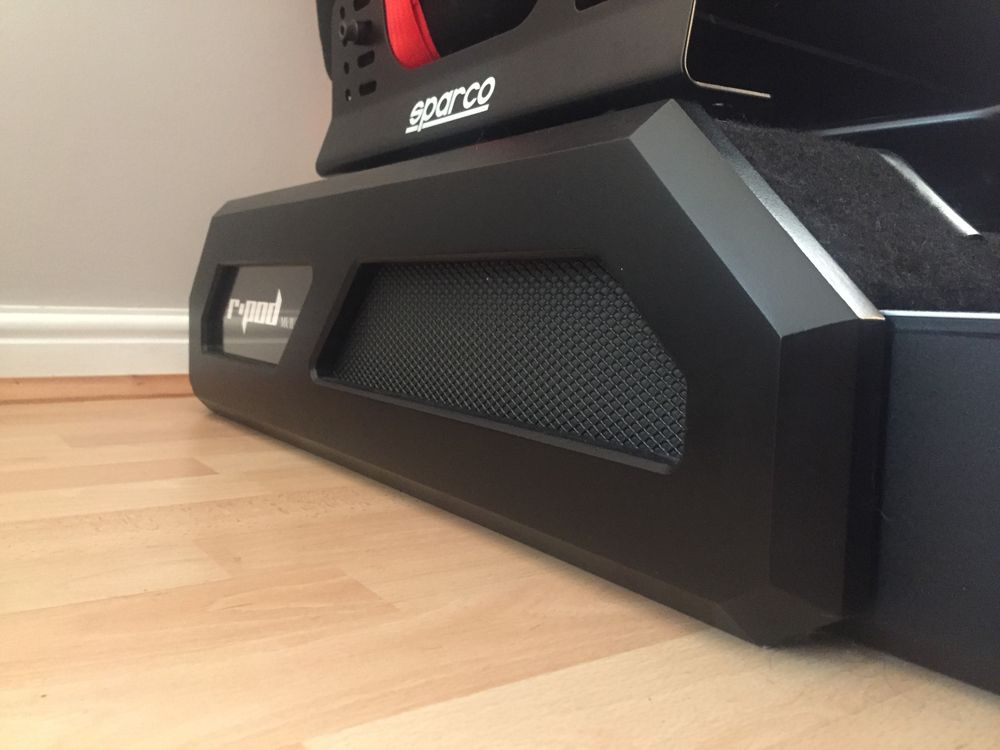
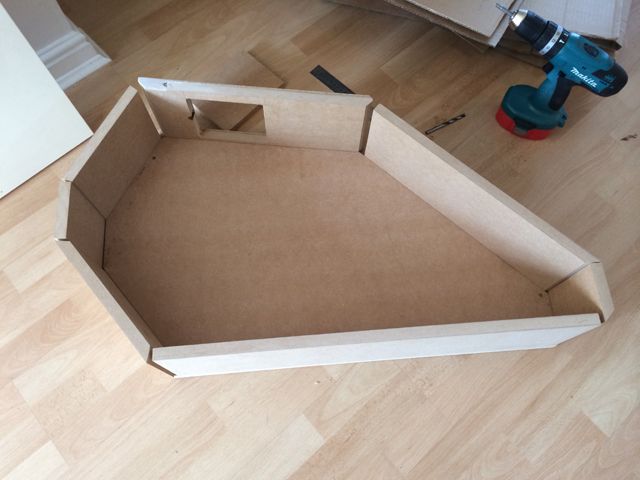
The base of the system was then started:


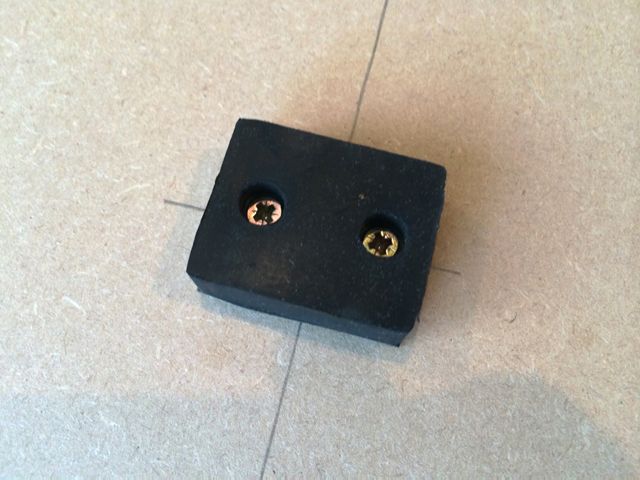
The seat base sits on isolators to keep the vibrations from the transducers localised:


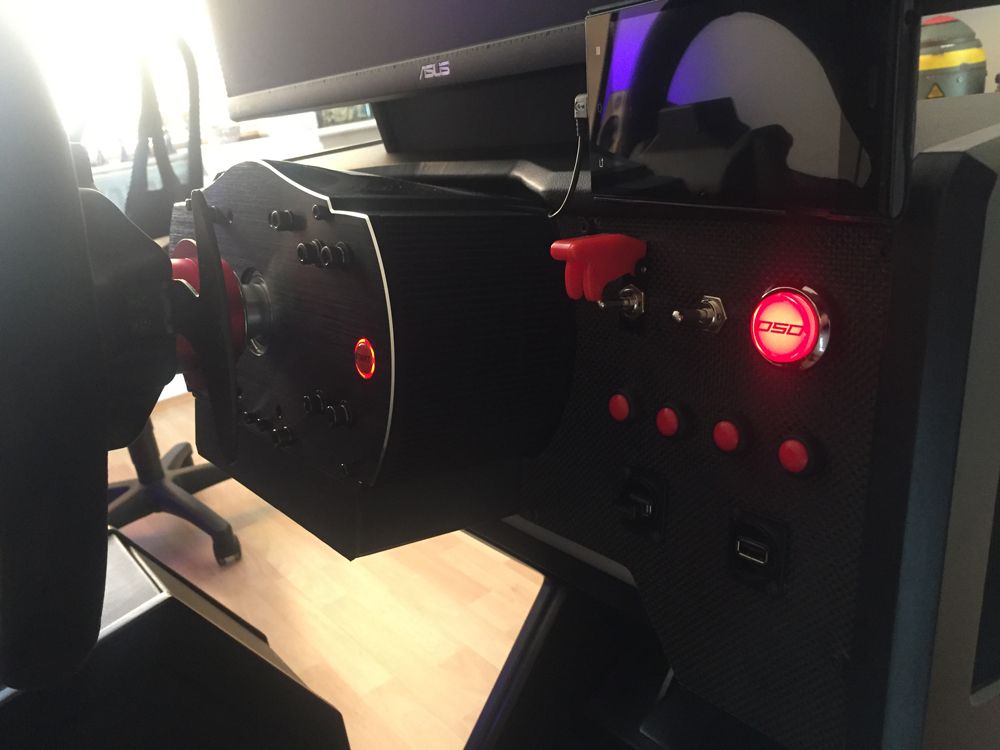
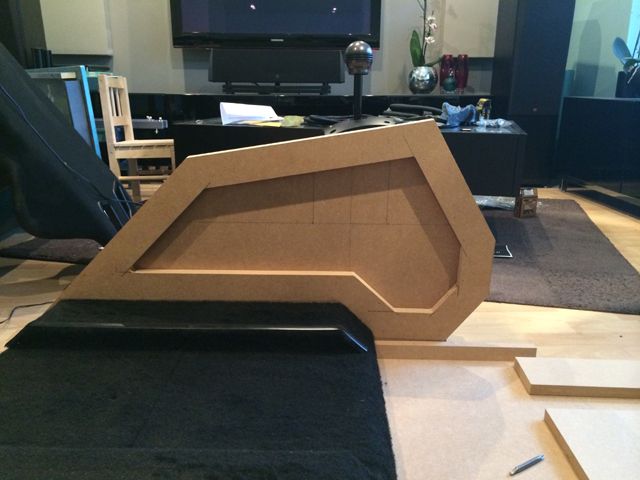
Once complete, I set about designing a console to accommodate the shifter and spent some time figuring out where to position it:


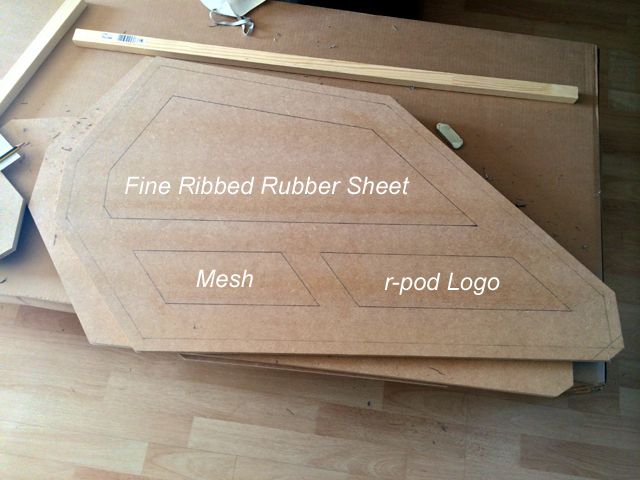
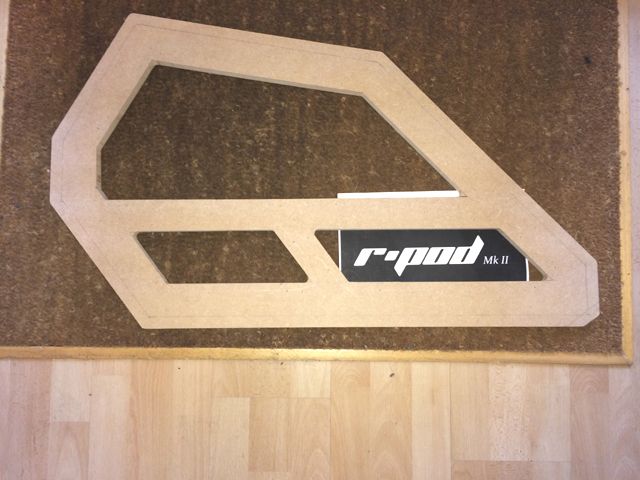
The outside of the console was designed to look like this with recesses for various inlays:


Logo (this will sit behind 3mm acrylic sheet):


Logo test:


Mesh test:


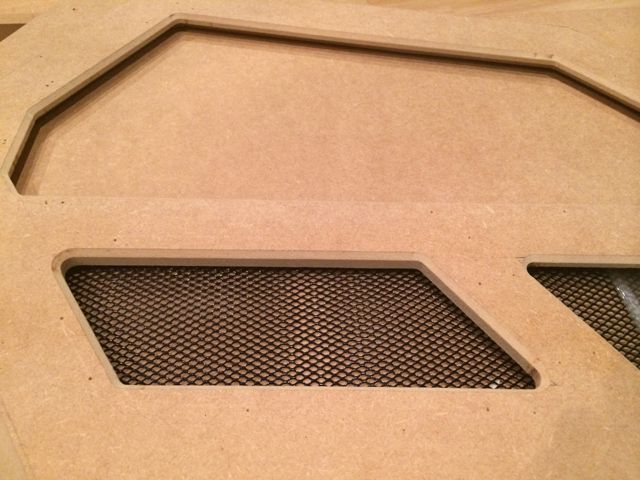
A template was cut for the ribbed rubber sheet and then glued on before test fitting:


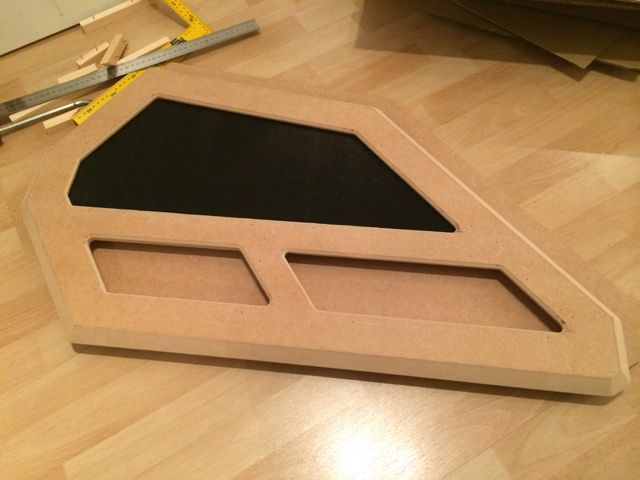
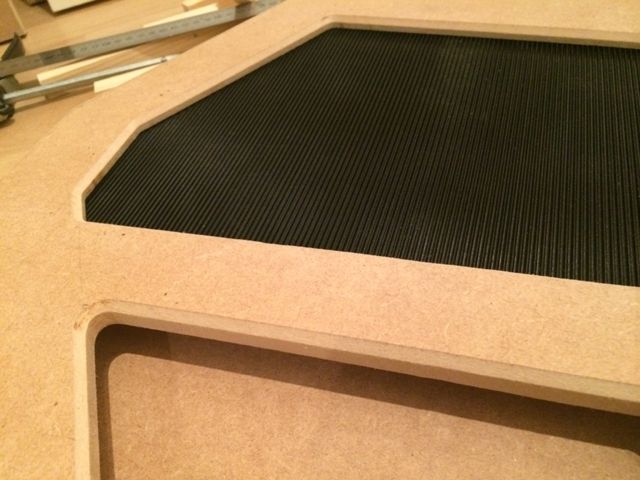
Ribbed rubber sheet close-up:


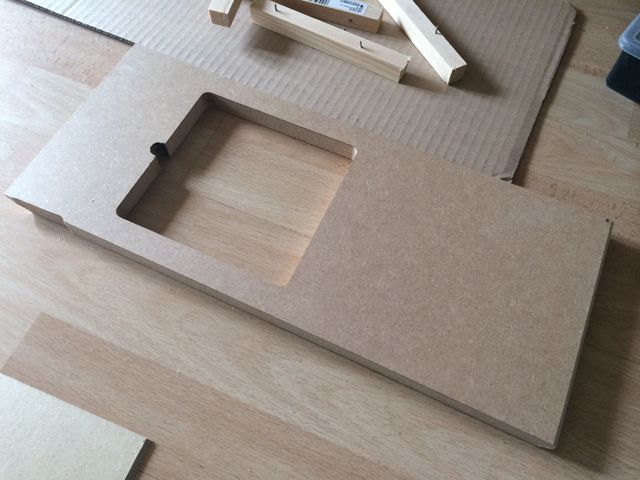
The inside of the shifter console has a cut-out for leather material inlay:


Cut-out:


Cut-out after routing:


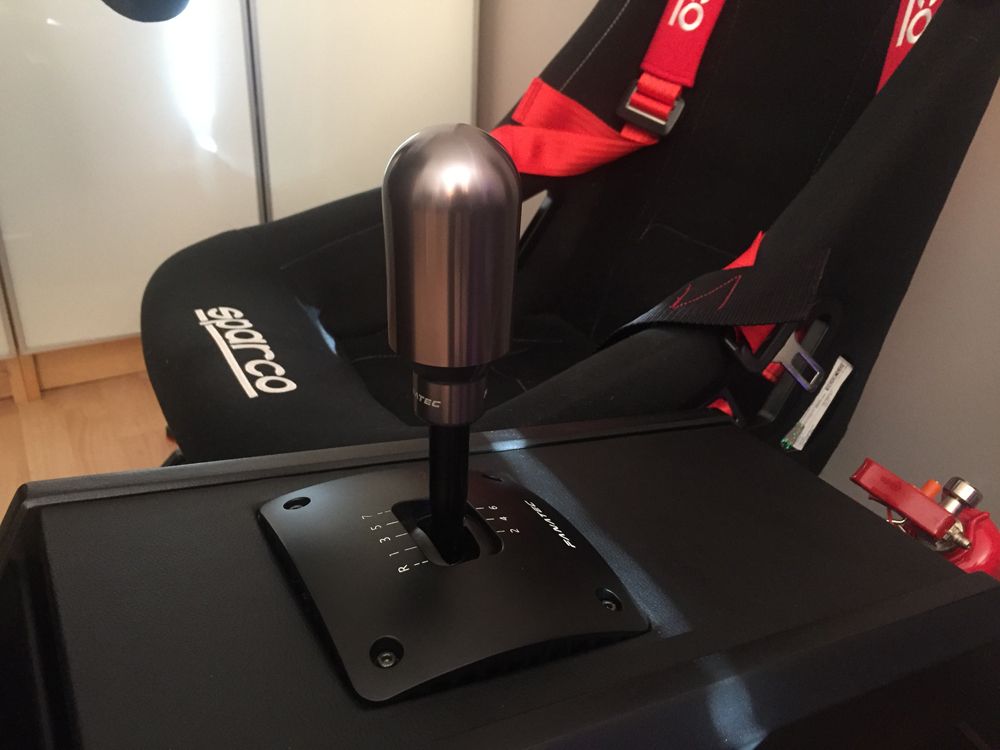
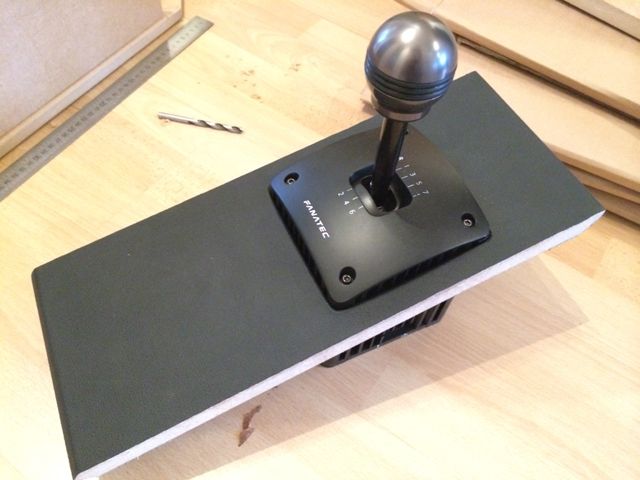
The top of the shifter console which will house the shifter itself was designed to ensure that everything was a tight fit. The shifter is at an angle so has made the job that much trickier to implement:


A top plate for this has been included as well to hide the cable recess.

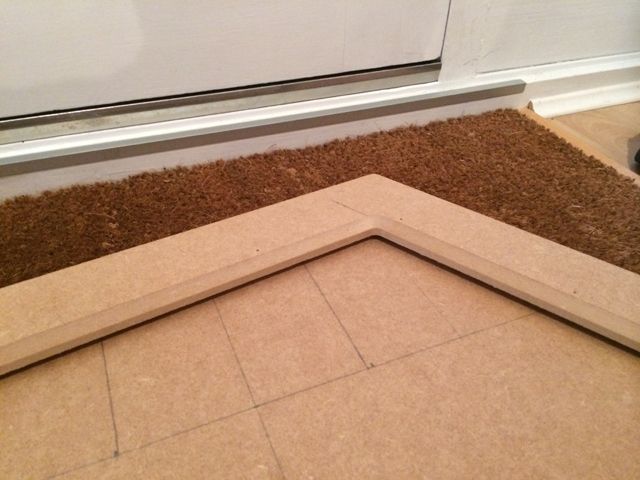
That takes me up to where I am today, working on building the side panels:


This will require some sanding and filling to get the finish correct.

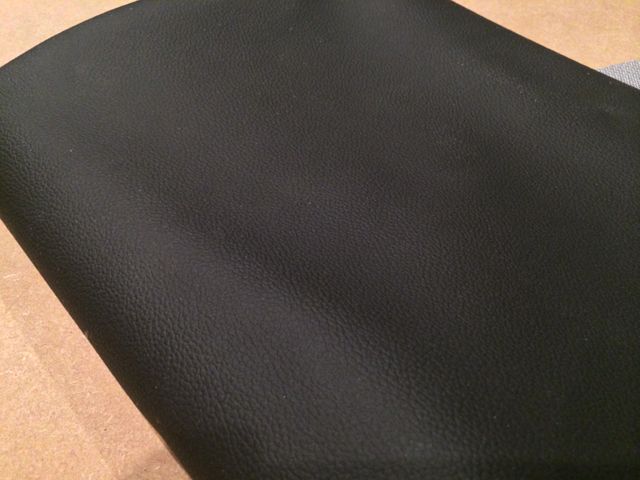
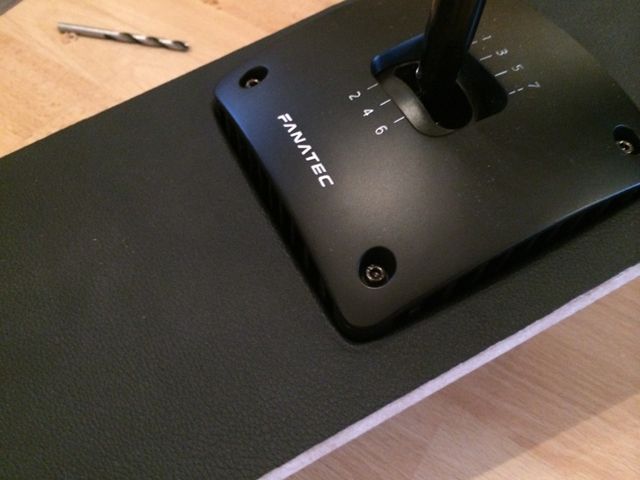
The top shifter panel has also been covered in leather vinyl material:


Close-up:


I’ll post more updates as things progress if anyone is interested in seeing this develop.

« Last Edit: January 24, 2017, 02:23:13 pm by SpaceHedgehog »
Click a pic for a video tour 

janey6152

  • Trade Count: (0)
  • Full Member
  • ***
  • Offline Offline
  • Posts: 64
  • Last login:July 31, 2016, 03:39:36 pm
Re: R-Pod MkII Driving Simulator, Vewlix style
« Reply #1 on: March 08, 2014, 06:04:43 pm »
WOW. Beautiful... I LOVE RACING GAMES....

BadMouth

  • Trade Count: (+6)
  • Full Member
  • ***
  • Offline Offline
  • Posts: 9226
  • Last login:Yesterday at 09:41:59 am
  • ...
Re: R-Pod MkII Driving Simulator, Vewlix style
« Reply #2 on: March 08, 2014, 08:24:59 pm »
Good looking setup!  :cheers:

How do you like that fanatic shifter?
When it first came out and I saw the diagram of the internals, I thought to myself "that's how I would do it if I had the means".
I wasn't a fan of fanatec's previous shifter.

SpaceHedgehog

  • Trade Count: (0)
  • Full Member
  • ***
  • Offline Offline
  • Posts: 937
  • Last login:February 06, 2023, 12:10:24 pm
  • Almost done ...
Re: R-Pod MkII Driving Simulator, Vewlix style
« Reply #3 on: March 08, 2014, 10:34:59 pm »
@janey6152    Thanks and me too :)

@BadMouth    I came from a G25 and the difference is huge. You probably know the finer technical details but the feel of the shifter is fantastic. It's very easy to switch between the H-pattern and sequential settings also. I would thoroughly recommend it.
Click a pic for a video tour 

emphatic

  • Trade Count: (0)
  • Full Member
  • ***
  • Offline Offline
  • Posts: 2013
  • Last login:Yesterday at 03:41:11 pm
  • -"Suck it, Donny!" -"No, YOU suck it.... more".
    • Emphatic's Video Game Collection
Re: R-Pod MkII Driving Simulator, Vewlix style
« Reply #4 on: March 09, 2014, 02:23:27 pm »
So, so, very, very sexy. :cheers:

SpaceHedgehog

  • Trade Count: (0)
  • Full Member
  • ***
  • Offline Offline
  • Posts: 937
  • Last login:February 06, 2023, 12:10:24 pm
  • Almost done ...
Re: R-Pod MkII Driving Simulator, Vewlix style
« Reply #5 on: March 09, 2014, 03:45:10 pm »
Hey emphatic, thanks and good to see you again  :cheers:

Just for a bit of fun, I've bought a small fire extinguisher to mount on the back face of the shifter pod:

Size compared to a 360 controller:


Mounting bracket:


All the main cutting for the shifter pod is now complete. The outside face of this comprises an 18mm (decorative) and 12mm (inward facing) section. In order to insert the inlays, a window has to be cut in the 12mm section:


This in now ready for gluing and screwing to the outer 18mm section. For the width of this piece, I had to make sure there was sufficient clearance from the window sections whilst still enabling me to screw it in place without the screws coming through the outer beveled edges whilst also providing sufficient room to screw the inner 'window' piece back in-place. Difficult to describe!


The finished piece will effectively look like this again:


I will then be able to screw a wooden shelf to the inner window' piece for mounting the shifter. Stability/solidity and a seamless external finish were key consideration in doing all of this.

The bracing glued in place yesterday has dried and is now screwed in place.


The cut from the circular saw on the top piece wasn't too straight and I needed to round it off so another piece of rounded soft wood has been glued to the top:


This is the gap where this section meets the top panel (the leather material looks like it needs trimming slightly). Finger access so the top panel can be removed easily:


You can see how wonky the cut was.

The side pieces for the shifter pod are complete now with everything ready to prep for painting (hurrah). I want this unit to be detachable from the main base so I'm using some m10 bolts. The base and the inside panel have been drilled with a test fit to make sure it all fits:


The middle hole will house an extension cable for the shifter. I will also be feeding some audio cable through for when I buy a Buttkicker. I'm not too fussed by the quality of this hole as it won't be seen anyway:


Filler has been applied to the front panel and sanded back:


Close-up:


It doesn't need to be too perfect, just sharp enough edges and angles with no lumps and bumps so the vinyl lays flat and cuts straight. The real panels are a little behind this one so it's time to do some household duties while I wait for those to do their thing.
Click a pic for a video tour 

emphatic

  • Trade Count: (0)
  • Full Member
  • ***
  • Offline Offline
  • Posts: 2013
  • Last login:Yesterday at 03:41:11 pm
  • -"Suck it, Donny!" -"No, YOU suck it.... more".
    • Emphatic's Video Game Collection
Re: R-Pod MkII Driving Simulator, Vewlix style
« Reply #6 on: March 09, 2014, 05:37:55 pm »
 :applaud:

talkgeek

  • Trade Count: (0)
  • Full Member
  • ***
  • Offline Offline
  • Posts: 199
  • Last login:February 03, 2024, 02:30:46 am
  • Every day you wake up breathing is a GOOD day!
Re: R-Pod MkII Driving Simulator, Vewlix style
« Reply #7 on: March 09, 2014, 06:49:16 pm »
+1  :applaud:
Currently building http://forum.arcadecontrols.com/index.php/topic,137777.0.html Mass-Replicate
Built "n0tsq3" cocktail cab http://forum.arcadecontrols.com/index.php/topic,133913.0/all.html
..and restoring a Sega MegaLo 410 Candy Cab & Moon Patrol Cab

SpaceHedgehog

  • Trade Count: (0)
  • Full Member
  • ***
  • Offline Offline
  • Posts: 937
  • Last login:February 06, 2023, 12:10:24 pm
  • Almost done ...
Re: R-Pod MkII Driving Simulator, Vewlix style
« Reply #8 on: March 09, 2014, 06:52:49 pm »
Thanks for the encouragement guys  :cheers: It definitely helps to keep me going!

Just a quick update before I close down for the weekend. The side panels are filled sanded and covered with vinyl. There are many ways to do this I'm sure but just a quick tutorial on my DIY laminate (not as durable as the real stuff obviously).

Roll of blackboard vinyl (1m wide):


Cut a sensibly size piece for the panel which requires covering and start to peel the backing back whist smoothing if from the inside outwards:


When an edge is reached, use your thumbs to push it firmly around it. Again, start in the middle and go fairly slowly. It's imprtant to give it a bit of a push to ensure there are no air bubbles:


Once the panel is covered, trim with a sharp blade, working in sections:


Completed rear panel:


Completed front panel:


That's it for this weekend. I even managed to assemble a chest of drawers as well.

Click a pic for a video tour 

SpaceHedgehog

  • Trade Count: (0)
  • Full Member
  • ***
  • Offline Offline
  • Posts: 937
  • Last login:February 06, 2023, 12:10:24 pm
  • Almost done ...
Re: R-Pod MkII Driving Simulator, Vewlix style
« Reply #9 on: March 12, 2014, 05:14:53 pm »
I'm trying to use some very limited evening time to progress with this build so I'll be in a position to start painting it soon. I've elected to seal the cut edges of the MDF with PVA with some water. Apparently this can work quite well but I will see how it comes out:


I will probably give this 3 coats to be sure. There are some small areas which will require filler anyway.

I've also sent of my logo off to the printers as it wouldn't fit onto an A4 sheet. I should have that back tomorrow. I will then need to cut the mesh and acrylic for the inlays.
Click a pic for a video tour 

Generic Eric

  • Trade Count: (+2)
  • Full Member
  • ***
  • Offline Offline
  • Posts: 4520
  • Last login:March 05, 2024, 09:02:23 am
  • Restore! Don't maim for MAME, build from scratch!
    • forum.arcadecontrols.com/index.php/topic,143226.0.html
Re: R-Pod MkII Driving Simulator, Vewlix style
« Reply #10 on: March 12, 2014, 05:58:11 pm »
Wow.

The bar is being set friends and neighbors.   This must be what it was like watching the Statue of Liberty being built. 


I like the detail.  Thanks for sharing your progress. 

Superfrog

  • Trade Count: (0)
  • Full Member
  • ***
  • Offline Offline
  • Posts: 393
  • Last login:June 28, 2022, 10:39:08 am
    • My YouTube Channel
Re: R-Pod MkII Driving Simulator, Vewlix style
« Reply #11 on: March 12, 2014, 06:04:17 pm »
VERY NICE  :censored:

Sadly I don't have the room for a driving seat cabinet in the house  :censored: :censored:

Let those nice update coming  :cheers:

SpaceHedgehog

  • Trade Count: (0)
  • Full Member
  • ***
  • Offline Offline
  • Posts: 937
  • Last login:February 06, 2023, 12:10:24 pm
  • Almost done ...
Re: R-Pod MkII Driving Simulator, Vewlix style
« Reply #12 on: March 13, 2014, 05:01:15 pm »
Thank you Generic Eric and Superfrog  :cheers:  I'm trying to build this to the best of my limited abilities - everything I know about cutting and shaping wood has come from Arcade cabinet / controller construction so it's not that substantial.

After letting the PVA dry, I looked at the results when I returned from work this evening. The edges look to be pretty much the same as before I applied the PVA/water mixture (50:50 for the first application and around 70:30 for the second / third applications). They edges obviously felt harder so I have started to sand them down. With a small amount of effort, it looks to be a success. I will certainly have to apply filler to some parts of the edging (not the bevels though) to get things true and smooth. This is more to do with the original cut than anything else. I've tried to take some pictures to show a before and after but Im not sure the difference can be seen clearly. It can certainly be felt though.

Before:


After sanding:


My desk cable grommet finally arrived. This will be the access hole for changing the shifter setting:

Shifter:


The grommet will fit into a hole cut into the side of the shifter pod, seat-side. I'll need to make sure this is lined up correctly as there's not a lot of room for error:


The cover pops of quite easily and snaps back into place. It also has a handy finger hole to help with removing it:


Click a pic for a video tour 

SpaceHedgehog

  • Trade Count: (0)
  • Full Member
  • ***
  • Offline Offline
  • Posts: 937
  • Last login:February 06, 2023, 12:10:24 pm
  • Almost done ...
Re: R-Pod MkII Driving Simulator, Vewlix style
« Reply #13 on: March 15, 2014, 11:53:39 am »
Sadly my artwork (logo) didn't arrive from the printers yesterday so I won't be able to get this fully assembled unfortunately. They did give me a £15 credit to compensate though which was more than I paid for the artwork in the first place. I have completed the inlays and mesh.

Mesh cut, logo backboard and acrylic (protective film still on) to place over the logo:


Test fit:


The frame section has been filled and sanded so I will start painting that next.

Click a pic for a video tour 

SpaceHedgehog

  • Trade Count: (0)
  • Full Member
  • ***
  • Offline Offline
  • Posts: 937
  • Last login:February 06, 2023, 12:10:24 pm
  • Almost done ...
Re: R-Pod MkII Driving Simulator, Vewlix style
« Reply #14 on: March 15, 2014, 04:15:33 pm »
A coat of primer has been applied and lightly sanded back:


First coat of flat black paint applied. I will give this the usual 2 coats. It's still drying, hence the slight inconsistency in the finish:


There are a few areas which are showing as needing the extra coat but the finish looks good:


Click a pic for a video tour 

SpaceHedgehog

  • Trade Count: (0)
  • Full Member
  • ***
  • Offline Offline
  • Posts: 937
  • Last login:February 06, 2023, 12:10:24 pm
  • Almost done ...
Re: R-Pod MkII Driving Simulator, Vewlix style
« Reply #15 on: March 16, 2014, 09:25:46 am »
Second coat of flat black has been applied to the outside frame. This is now ready to have polyurethane varnish applied. I use the same water based products on all my builds and get consistently acceptable results.

Second coat of flat black:


Template cut for the inside face of the pod. This will have a hole drilled for the grommet and be covered with leather vinyl:


Primed / sanded back and showing the likely position of the grommett. I will need to assemble the whole unit first before drilling the hole to ensure it all lines up:


Click a pic for a video tour 

rCadeGaming

  • Trade Count: (0)
  • Full Member
  • ***
  • Offline Offline
  • Posts: 1256
  • Last login:December 20, 2023, 09:16:09 pm
  • Just call me Rob!
Re: R-Pod MkII Driving Simulator, Vewlix style
« Reply #16 on: March 16, 2014, 01:30:19 pm »
Wow, this is looking really nice and professional so far, although I'm not surprised having seen your Vewlix.  Anyhow, maybe I'm late to the party here, but what games are you playing with this?

SpaceHedgehog

  • Trade Count: (0)
  • Full Member
  • ***
  • Offline Offline
  • Posts: 937
  • Last login:February 06, 2023, 12:10:24 pm
  • Almost done ...
Re: R-Pod MkII Driving Simulator, Vewlix style
« Reply #17 on: March 16, 2014, 04:53:40 pm »
Thanks Rob, I'm trying to get this as good as I can reasonably expect.

Games-wise, this is for pretty much anything which is compatible with a wheel but mainly for sims such as Assetto Corsa, Game Stock Car 2013, rFactor etc. I'll also be using is for GRID and a few other arcade / simcade titles.

I ended up filling in a few blemished on the side pieces which resulted in me having to sand and repaint. Nevermind, I've completed it now and both pieces are ready for varnishing.

Inside piece with flat black + filler (this has since been given another 2 coats):


I may just have enough time to put 1 coat of varnish on this evening but we'll see.

I did order some dark grey matte vinyl last week and this will sit behind the grill. I'll be using some of this on the nose of the pod as well:


I should be able to get this pod complete during the coming week.
Click a pic for a video tour 

emphatic

  • Trade Count: (0)
  • Full Member
  • ***
  • Offline Offline
  • Posts: 2013
  • Last login:Yesterday at 03:41:11 pm
  • -"Suck it, Donny!" -"No, YOU suck it.... more".
    • Emphatic's Video Game Collection
Re: R-Pod MkII Driving Simulator, Vewlix style
« Reply #18 on: March 17, 2014, 09:20:52 am »
Wow, you work so swiftly and elegantly! :cheers:

SpaceHedgehog

  • Trade Count: (0)
  • Full Member
  • ***
  • Offline Offline
  • Posts: 937
  • Last login:February 06, 2023, 12:10:24 pm
  • Almost done ...
Re: R-Pod MkII Driving Simulator, Vewlix style
« Reply #19 on: March 17, 2014, 09:39:53 am »
Thanks emphatic  ;D I'm trying to keep on this so I can get the house back to a sensible state of tidiness. My wife is very accommodating but hates mess.

I'm having to work from home today which is giving me an opportunity to complete a few things as I'm going.

The artwork arrived:


I've trimmed an set it behind the acrylic. It needs dusting off between the print and acrylic before finally mounting it:


The Logo looks less black due to the reflection from the acrylic:


I'm pleased with the result.

Edit. Polyurethane varnish has been applied to the above piece. I will do the other piece next.
« Last Edit: March 17, 2014, 09:41:39 am by SpaceHedgehog »
Click a pic for a video tour 

Namco

  • Trade Count: (0)
  • Full Member
  • ***
  • Offline Offline
  • Posts: 621
  • Last login:May 02, 2024, 08:30:10 pm
  • Now addicted to Williams pins... all of them.
    • Freddo Mame Project
Re: R-Pod MkII Driving Simulator, Vewlix style
« Reply #20 on: March 17, 2014, 10:28:03 am »
This is looking really nice, especially starting with Fanatec Clubsport gear! (you bought both wheel hubs? wow). This will be one for the hall of fame thread. This is right up my alley since I've been doing iRacing for the past 6 months and have been meaning to improve my driving setup.

What are you doing for speakers? Also, are you going to put an e-brake on this thing? Would be pretty helpful for the better rally games.

edit:typo
« Last Edit: March 17, 2014, 11:36:14 am by Namco »

SpaceHedgehog

  • Trade Count: (0)
  • Full Member
  • ***
  • Offline Offline
  • Posts: 937
  • Last login:February 06, 2023, 12:10:24 pm
  • Almost done ...
Re: R-Pod MkII Driving Simulator, Vewlix style
« Reply #21 on: March 17, 2014, 12:09:04 pm »
Thanks for the feedback Namco  :cheers:

Speaker-wise, I'll be using wireless headphones - I'm currently using Logitech G930's but may upgrade. On the handbrake front, yes, I have thought about it! I'm waiting for the Fanatec one to be released - there's no arrival date for that at the moment though. This teaser is from Fanatec's website:


I'm not going to glue everything together for this unit (as much as I'd would like to), only screw it together so I can modify things later.
 
Edit: Headphones also mean you don't hear any of the sound / vibration from the transducers and allow mounting of a TrackIR receiver :)
« Last Edit: March 17, 2014, 12:34:44 pm by SpaceHedgehog »
Click a pic for a video tour 

SpaceHedgehog

  • Trade Count: (0)
  • Full Member
  • ***
  • Offline Offline
  • Posts: 937
  • Last login:February 06, 2023, 12:10:24 pm
  • Almost done ...
Re: R-Pod MkII Driving Simulator, Vewlix style
« Reply #22 on: March 17, 2014, 02:45:39 pm »
Finally feel like this is all coming together now. It's turned out as well as I could have reasonably expected it to. I'm just waiting on the grey vinyl before putting it all together. I still need to spend a little bit of time getting the shelf that the shifter will sit on in the right place.

First coat of polyurethane on the inside piece:


The shifter pod will sit on 4 of these:


I spent some time hot-gluing the panels and mesh into the frame. I am really pleased with how this came out. It was just as I had imagined it.

A few shots of the outside face of the shifter pod:


Reviewing the outcome, it was worth the effort. It's easy to compromise when things start getting challenging or taking too much time but I didn't want to look back and wish I'd done it differently.
Click a pic for a video tour 

SpaceHedgehog

  • Trade Count: (0)
  • Full Member
  • ***
  • Offline Offline
  • Posts: 937
  • Last login:February 06, 2023, 12:10:24 pm
  • Almost done ...
Re: R-Pod MkII Driving Simulator, Vewlix style
« Reply #23 on: March 17, 2014, 06:08:51 pm »
I've just ordered some 'cool white' LED lighting to fit underneath the rig. I prefer a dispersed rather than concentrated dot look (if you know what I mean) so I need to figure out the correct distance from the edges I needed to fit it to avoid the 'dot effect'. I'll may need to embed the strip - figuring this out at the moment.

The inside piece now has 3 coats of polyurethane applied so, provided my vinyl turns up tomorrow, I should be in a position to start assembling it. Hope to complete it by Wed / Thurs.
Click a pic for a video tour 

rCadeGaming

  • Trade Count: (0)
  • Full Member
  • ***
  • Offline Offline
  • Posts: 1256
  • Last login:December 20, 2023, 09:16:09 pm
  • Just call me Rob!
Re: R-Pod MkII Driving Simulator, Vewlix style
« Reply #24 on: March 17, 2014, 10:25:17 pm »
Most people either work fast or carefully.  What's your secret?

SpaceHedgehog

  • Trade Count: (0)
  • Full Member
  • ***
  • Offline Offline
  • Posts: 937
  • Last login:February 06, 2023, 12:10:24 pm
  • Almost done ...
Re: R-Pod MkII Driving Simulator, Vewlix style
« Reply #25 on: March 18, 2014, 09:19:19 am »
Most people either work fast or carefully.  What's your secret?

I have this annoying voice in my head that says "it's not going to build itself you know".

Actually, I call this full-on approach the Terminator method - don't stop, ever, until the job is done.
Click a pic for a video tour 

Namco

  • Trade Count: (0)
  • Full Member
  • ***
  • Offline Offline
  • Posts: 621
  • Last login:May 02, 2024, 08:30:10 pm
  • Now addicted to Williams pins... all of them.
    • Freddo Mame Project
Re: R-Pod MkII Driving Simulator, Vewlix style
« Reply #26 on: March 18, 2014, 12:10:38 pm »
I have a short attention span. There's so many voices in my head, when I decide to listen to one of them they're always telling me something different to do. When I'm working on a project sometimes I'll get distr... oh wow someone brought donuts today!

I should build a vpin table.

rCadeGaming

  • Trade Count: (0)
  • Full Member
  • ***
  • Offline Offline
  • Posts: 1256
  • Last login:December 20, 2023, 09:16:09 pm
  • Just call me Rob!
Re: R-Pod MkII Driving Simulator, Vewlix style
« Reply #27 on: March 18, 2014, 04:48:08 pm »
You're a T1000.

SpaceHedgehog

  • Trade Count: (0)
  • Full Member
  • ***
  • Offline Offline
  • Posts: 937
  • Last login:February 06, 2023, 12:10:24 pm
  • Almost done ...
Re: R-Pod MkII Driving Simulator, Vewlix style
« Reply #28 on: March 18, 2014, 05:41:21 pm »
I should build a vpin table.

Please don't tempt me ... I've seriously considered this but don't have the room at the moment :(

You're a T1000.

The original and the best imho :)

Just got back from parents' evening to find that the vinyl hasn't arrived so I'm scuppered as far as progress tonight is concerned. Never mind, I'll be back ... tomorrow  :cheers:
Click a pic for a video tour 

Namco

  • Trade Count: (0)
  • Full Member
  • ***
  • Offline Offline
  • Posts: 621
  • Last login:May 02, 2024, 08:30:10 pm
  • Now addicted to Williams pins... all of them.
    • Freddo Mame Project
Re: R-Pod MkII Driving Simulator, Vewlix style
« Reply #29 on: March 18, 2014, 06:55:24 pm »

You're a T1000.

The original and the best imho :)


Sigh. The T-600s were the first infiltrators, but they had rubber skin and didn't fool the guard dogs. They were old fashioned and primative, like Pong or an electro-mechanical pinball machine. The Terminators that resemble Mr. Governator are T-800s, living flesh over a metal endoskeleton. Classic and timeless, like Robotron or The Getaway: High Speed 2.  T-1000s are a polymorphic alloy, liquid metal. Like LCDs replacing CRTs, although they're more efficient T-1000s are a puny, inadequate replacement for their big brother T-800s.

You don't want to be a T-1000 you'll slip down through a storm drain or something, you're a badass T-800 with a shotgun in one hand and a vinyl roller in the other.

Slippyblade

  • Trade Count: (+2)
  • Full Member
  • ***
  • Offline Offline
  • Posts: 3167
  • Last login:November 16, 2023, 11:39:51 am
  • And to the death god we say, "Not today!"
Re: R-Pod MkII Driving Simulator, Vewlix style
« Reply #30 on: March 18, 2014, 07:00:31 pm »
Sigh. The T-600s were the first infiltrators, but they had rubber skin and didn't fool the guard dogs. They were old fashioned and primative, like Pong or an electro-mechanical pinball machine. The Terminators that resemble Mr. Governator are T-800s, living flesh over a metal endoskeleton. Classic and timeless, like Robotron or The Getaway: High Speed 2.  T-1000s are a polymorphic alloy, liquid metal. Like LCDs replacing CRTs, although they're more efficient T-1000s are a puny, inadequate replacement for their big brother T-800s.

You don't want to be a T-1000 you'll slip down through a storm drain or something, you're a badass T-800 with a shotgun in one hand and a vinyl roller in the other.

Someone put WAY to much thought into this.  I like it!  :applaud:

SpaceHedgehog

  • Trade Count: (0)
  • Full Member
  • ***
  • Offline Offline
  • Posts: 937
  • Last login:February 06, 2023, 12:10:24 pm
  • Almost done ...
Re: R-Pod MkII Driving Simulator, Vewlix style
« Reply #31 on: March 18, 2014, 07:07:45 pm »

You're a T1000.

The original and the best imho :)


Sigh. The T-600s were the first infiltrators, but they had rubber skin and didn't fool the guard dogs. They were old fashioned and primative, like Pong or an electro-mechanical pinball machine. The Terminators that resemble Mr. Governator are T-800s, living flesh over a metal endoskeleton. Classic and timeless, like Robotron or The Getaway: High Speed 2.  T-1000s are a polymorphic alloy, liquid metal. Like LCDs replacing CRTs, although they're more efficient T-1000s are a puny, inadequate replacement for their big brother T-800s.

You don't want to be a T-1000 you'll slip down through a storm drain or something, you're a badass T-800 with a shotgun in one hand and a vinyl roller in the other.

Great, concise Terminator history lesson! I guess I don't know my T1000s from my T800s :) Yes, I like the image you've painted so I'll take the T800 model thank you.
Click a pic for a video tour 

SpaceHedgehog

  • Trade Count: (0)
  • Full Member
  • ***
  • Offline Offline
  • Posts: 937
  • Last login:February 06, 2023, 12:10:24 pm
  • Almost done ...
Re: R-Pod MkII Driving Simulator, Vewlix style
« Reply #32 on: March 19, 2014, 05:40:53 pm »
I managed to motivate myself to sort out the shifter access hole. This took about an hour of measuring, marking, drilling, and lining up panels to confirm where I needed to drill the hole.

Inside panel of shifter pod with grommett fitted:


Shifter in position (it will sit a couple of mm higher once the internal shelf has been attached:


Close-up of access hole:


I will need to tidy up the inside shelf to ensure it's all blacked out when I assemble it.
Click a pic for a video tour 

SpaceHedgehog

  • Trade Count: (0)
  • Full Member
  • ***
  • Offline Offline
  • Posts: 937
  • Last login:February 06, 2023, 12:10:24 pm
  • Almost done ...
Re: R-Pod MkII Driving Simulator, Vewlix style
« Reply #33 on: March 19, 2014, 06:41:18 pm »
Why waste an hour? I decided to finish of the leather vinyl insert.

Leather vinyl attached to template:


Fitted to the inside frame:


Close-up:


I found out my grey vinyl had been left at the depot. I'll be picking that up sometime tomorrow.
Click a pic for a video tour 

Superfrog

  • Trade Count: (0)
  • Full Member
  • ***
  • Offline Offline
  • Posts: 393
  • Last login:June 28, 2022, 10:39:08 am
    • My YouTube Channel
Re: R-Pod MkII Driving Simulator, Vewlix style
« Reply #34 on: March 19, 2014, 07:26:06 pm »
Excellent  :applaud:

Keep up the good work  :cheers:

SpaceHedgehog

  • Trade Count: (0)
  • Full Member
  • ***
  • Offline Offline
  • Posts: 937
  • Last login:February 06, 2023, 12:10:24 pm
  • Almost done ...
Re: R-Pod MkII Driving Simulator, Vewlix style
« Reply #35 on: March 20, 2014, 03:18:22 pm »
Thanks Superfrog  :)

LEDs and vinyl arrived:


I've put the vinyl on the backing of this panel and put some bracing on the back of the other panels to ensure that there's no give and everything is solid. The reason for the vinyl in the first place is to bring out the texture of the mesh. With a dark background, it's less noticable.

Vinyl applied:


A close-up which shows the contrast better:


Click a pic for a video tour 

BadMouth

  • Trade Count: (+6)
  • Full Member
  • ***
  • Offline Offline
  • Posts: 9226
  • Last login:Yesterday at 09:41:59 am
  • ...
Re: R-Pod MkII Driving Simulator, Vewlix style
« Reply #36 on: March 20, 2014, 04:39:38 pm »
 :applaud:
You're setting standards man!

Generic Eric

  • Trade Count: (+2)
  • Full Member
  • ***
  • Offline Offline
  • Posts: 4520
  • Last login:March 05, 2024, 09:02:23 am
  • Restore! Don't maim for MAME, build from scratch!
    • forum.arcadecontrols.com/index.php/topic,143226.0.html
Re: R-Pod MkII Driving Simulator, Vewlix style
« Reply #37 on: March 20, 2014, 04:47:04 pm »
Year of Star Wars!  Come to the Dark Side.  Build a Tie Fighter sphere thing to fly against Maximus Rebel Cockpit.


What is the dashboard going to look like?  I can't stand it.  The waiting is the hardest part.

shrunkenmaster

  • Trade Count: (0)
  • Full Member
  • ***
  • Offline Offline
  • Posts: 636
  • Last login:July 24, 2022, 10:17:33 am
Re: R-Pod MkII Driving Simulator, Vewlix style
« Reply #38 on: March 20, 2014, 04:47:47 pm »
Nice work fella, I take it you're in the UK too judging by the 3-pin plug I saw! Can I ask what black paint you're using, and also where you got the mesh from?

SpaceHedgehog

  • Trade Count: (0)
  • Full Member
  • ***
  • Offline Offline
  • Posts: 937
  • Last login:February 06, 2023, 12:10:24 pm
  • Almost done ...
Re: R-Pod MkII Driving Simulator, Vewlix style
« Reply #39 on: March 20, 2014, 05:30:53 pm »
:applaud:
You're setting standards man!

Thanks again Badmouth. I'm trying to make it an interesting, functional and adjustable design using the limited techniques and tools at my disposal.

Year of Star Wars!  Come to the Dark Side.  Build a Tie Fighter sphere thing to fly against Maximus Rebel Cockpit.

What is the dashboard going to look like?  I can't stand it.  The waiting is the hardest part.

I have to agree, with the various textures being used, it does look a little Star Wars :)

Nice work fella, I take it you're in the UK too judging by the 3-pin plug I saw! Can I ask what black paint you're using, and also where you got the mesh from?

The paint I've used on the majority of my projects has come from Wilko / Wilkinsons of all places. It holds up incredibly well. I used a standard wood primer for the base coat (2 coats), blackboard paint on top of that (2 coats) followed by matt polyurethane varnish (3 coats). Everything is water based and applied with a foam roller. I sand down very lightly between coats with 320 grit - it really doesn't add too much time to the process and is definitely worth doing. The polyurethane needs to be used fairly sparingly (but not too little to leave it patchy) which I then go over a few times to take any small bubbles out. It's best to use continuous strokes if possible. It's not completely perfect but considering the time required to complete the task, it's the best technique I've tried. IT does take a little practice and patience to get it looking reasonable.

The mesh is diamond car grill mesh sourced from eBay.
« Last Edit: March 20, 2014, 05:35:30 pm by SpaceHedgehog »
Click a pic for a video tour