Main Restorations Software Audio/Jukebox/MP3 Everything Else Buy/Sell/Trade
Project Announcements Monitor/Video GroovyMAME Merit/JVL Touchscreen Meet Up Retail Vendors
Driving & Racing Woodworking Software Support Forums Consoles Project Arcade Reviews
Automated Projects Artwork Frontend Support Forums Pinball Forum Discussion Old Boards
Raspberry Pi & Dev Board controls.dat Linux Miscellaneous Arcade Wiki Discussion Old Archives
Lightguns Arcade1Up Try the site in https mode Site News

Unread posts | New Replies | Recent posts | Rules | Chatroom | Wiki | File Repository | RSS | Submit news


Author Topic: Tzakiel's UAII 2P Fighter CRT Build  (Read 39605 times)

0 Members and 1 Guest are viewing this topic.

Tzakiel

  • Trade Count: (0)
  • Full Member
  • ***
  • Offline Offline
  • Posts: 272
  • Last login:March 02, 2019, 12:59:01 pm
  • I want to build my own arcade controls!
Tzakiel's UAII 2P Fighter CRT Build
« on: October 18, 2013, 11:30:07 am »
Quick links to thread updates:

Control panel plan:
http://forum.arcadecontrols.com/index.php/topic,135197.msg1396473.html#msg1396473

Marquee concept:
http://forum.arcadecontrols.com/index.php/topic,135197.msg1396852.html#msg1396852

Realizing I suck at cutting MDF:
http://forum.arcadecontrols.com/index.php/topic,135197.msg1396936.html#msg1396936

Realizing I suck at measuring MDF:
http://forum.arcadecontrols.com/index.php/topic,135197.msg1398368.html#msg1398368

Hand picked game list:
http://forum.arcadecontrols.com/index.php/topic,135197.msg1397150.html#msg1397150

Fixing the control panel box pieces:
http://forum.arcadecontrols.com/index.php/topic,135197.msg1398609.html#msg1398609

Final marquee and CP art:
http://forum.arcadecontrols.com/index.php/topic,135197.msg1398618.html#msg1398618

Got the control box put together, paint issues and artwork received in mail:
http://forum.arcadecontrols.com/index.php/topic,135197.msg1400604.html#msg1400604

Coming together - Routing, artwork and plexi:
http://forum.arcadecontrols.com/index.php/topic,135197.msg1403274.html#msg1403274

Photo of near-final cabinet:
http://forum.arcadecontrols.com/index.php/topic,135197.msg1403993.html#msg1403993


---------------------------

The Concept:
A North Coast/Mameroom UAII cabinet with custom control panel, 2 players, primarily for 2d fighting games. Look and feel of a fighting cabinet. Most importantly - a CRT screen running games in real native resolutions via RBG.

Inspiration:
Trips to Japan, playing in arcades there, experience with Hori, Sanwa parts and fighting games. I got really into Street Fighter 4, picked up and modded a Hori stick for that. Then I learned about how great KOF, SF3, the Last Blade, etc are, and now I want a full cabinet.

Construction:
I am using a North Coast UAII kit, which I purchased because I have zero woodworking experience outside of drilling and screwing. I also purchased their marquee holder and plexiglass front monitor cover, as well as a HAPP 27" curved bezel. I'll make my own control panel even though I am a woodworking newbie.

Display
For as accurate of an experience as possible, I am using a video card supported by CRT_emu drivers from Calamity, which goes VGA out to a TC1600 transcoder from Crescendo Systems. The transcoder sends unscaled RGB component signal to the TV. I'm using a Toshiba 27A50 as a display, because it is the right dimensions (I hope) and has component-in. So far that is working beautifully, though it took research and help to get set up. I use Groovymame for native resolution switching. The video card is also powerful enough to support modern console emulators.

Front End / Game Support
I will be running Groovymame for native resolution support. That emulator, along with NullDC, Zsnes, Daphne, a Gamecube, PSX, and PS2 emulator will all launch from Hyperspin. Hyperspin will probably be difficult to set up, but I love the look. I am hoping to get the other emulators to output native resolutions as well if possible. I am hand-picking a list of games I feel are going to be popular with guests and that I personally like. I am avoiding a lot of duplicative or iterative games in the list.

Control Panel Art and Design:
1/2" MDF and plexi. Artwork TBD but I know I want a vewlix or egret-inspired design, which I will draw myself in illustrator and sandwich under plexi.

Something like this design-wise:
http://media.eventhubs.com/images/2010/01/14_vewlix01.jpg

Button layout will be Astro city style like this for both players:
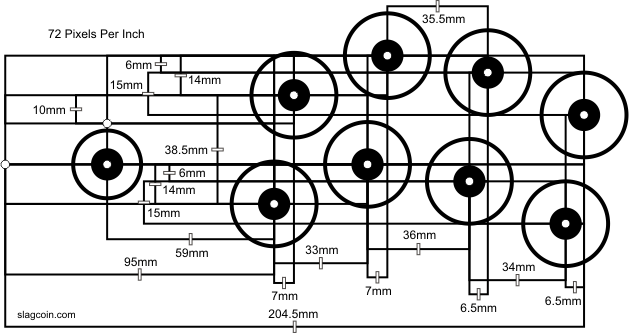


The CP will have two Sanwa JLF sticks, 8 sanwa screw in buttons per player, 1p start, 1p coin, 2p start, 2p coin, pause, exit buttons. Might also do volume up/down buttons on side of cabinet where they are reachable but out of the way.

Parts Acquired:

Sanwa JLF sticks x2 with wire harnesses and dust washers
Sanwa ball tops x2 and 30mm buttons x8, white
Happ 1p, 2p, 2x blue, 2x white, 1x red, 1x yellow buttons (for coin, exit, pause, volume)
i-pac PCB
Crappy usb PC speakers
Ground wire daisy chains and colored wires for controls


Tools I Plan to Use:

Fixed base router
Jigsaw with wood and plastic cutting blades
Circular saw
Power drill
30mm and 24mm hole saws and arbor
Top-bearing flush trim router bit
1/16" slotting router bit
Countersinks for JLF mounting flush
Velcro strips
Wire crimper/cutter
Screwdrivers and other basic hand tools


Next Steps:
Assemble UAII cabinet
Paint speaker cutouts in cabinet (they are unpainted and I think the raw MDF will be visible)
Start planning dimensions of control panel once I have cabinet together
Research CP construction, routing, jigsaw cutting, and JLF top-mounting
« Last Edit: November 22, 2013, 02:02:59 pm by Tzakiel »
My Fighter CRT Cabinet Thread: Tzakiel's 2P Cabinet

Yenome

  • Trade Count: (0)
  • Full Member
  • ***
  • Offline Offline
  • Posts: 547
  • Last login:April 12, 2024, 01:03:06 am
  • Punch a fish. Make a wish
Re: Tzakiel's UAII 2P Fighter CRT Build
« Reply #1 on: October 19, 2013, 03:25:31 am »
nice start i was thinking of building me one of japan style sticks since i wont be getting there anytime soon fig it was the next best thing. tho personally ill be dropping the 4th button on the top row. since ill only be using it for games that use only up to 6 4th button i like for neogeo
My Gf made me put a sig up. /whipped

Tzakiel

  • Trade Count: (0)
  • Full Member
  • ***
  • Offline Offline
  • Posts: 272
  • Last login:March 02, 2019, 12:59:01 pm
  • I want to build my own arcade controls!
Re: Tzakiel's UAII 2P Fighter CRT Build
« Reply #2 on: October 21, 2013, 02:43:39 pm »
Progress: I got the UAII cabinet almost completely built. I didn't do a good job of taking photos of the process, but overall I'd say it's a "pretty good" product. It does have some issues. Some of the pieces arrived chipped or cracked. In some cases, it didn't really matter and I filled in with a black marker. In other places, the corners were crushed:


However, North Coast was willing to ship me replacement parts free of charge. So, that's good... It's still a bit annoying, since the boxes were sort of loosely packed. There is a lot of styrofoam, but things still slide around and get damaged. And the shipping ain't cheap.

Also, some of the directions in the manual didn't match reality... such as the drawer rails being a different size than pictured, and one step calling for parts that don't exist (and luckily aren't needed). But it was definitely easier than cutting my own panels entirely. Next time I might try that but for this first effort, I was glad to have a cabinet kit. Just be aware that if you buy this, you will need to problem solve here and there.


Anyway, I ended up getting it done. I put these sliders on the bottom (along the side rails/edges which touch the ground) to help slide it around on the carpet. Later on, I was glad I did. Next time I might put even more of a "foot" on each corner to help it slide better. You can't just put wheels or feet on the floor piece, unfortunately, because it's just particleboard suspended on cams and floating, rather than sitting on the floor itself.


The Toshiba 27A50 TV fit perfectly into the cabinet and also works well with the 27" Happ curved bezel. I had to trim the bezel with a utility knife to fit the cabinet and the height of the screen. That was a bit scary and I learned that I stink at using a utility knife to cut straight lines. But, amazingly, it got done and looks decent. I did also have to remove the bottom wood strip from the UAII bezel frame in order to slide the TV up far enough into the bezel curve. Once I did that, the fit was pretty good.

I also installed USB speakers with velcro strips and a fluorescent under cabinet light for the marquee. I have the retainers and plexi for it, but haven't installed that yet.


Here it is all hooked up and working great!


I'm very happy with the Toshiba TV and TC1600 transcoder combo. The TV has a good picture and accepts the unscaled component from the transcoder beautifully. This means that games run in original resolution via Groovymame, with scanlines intact.


It also has power return which is nice, so you can just kill the TV power and restore it when ready to play. Since the TV worked out so well, I will probably look for a spare to keep in storage for the inevitable day it breaks.

Next steps:
  • Plan and start cutting MDF for control panel - it looks like I will need to build a box rather than just a board. Will make another post about that soon.
  • Plexiglass over the monitor bezel - I have this, not sure if it should go over top of bezel but I can't see why not.
« Last Edit: October 21, 2013, 03:36:06 pm by Tzakiel »
My Fighter CRT Cabinet Thread: Tzakiel's 2P Cabinet

CaptainMarvel

  • Trade Count: (0)
  • Full Member
  • ***
  • Offline Offline
  • Posts: 104
  • Last login:May 03, 2020, 04:49:55 pm
Re: Tzakiel's UAII 2P Fighter CRT Build
« Reply #3 on: October 21, 2013, 02:51:12 pm »
Looking Great thus far !!!


I'm planning to build a UAII as well - though from scratch using the UAII cut and assembly plans from North Coast. 
Nevertheless, I really enjoy watching other's UAII projects come together. 

How's progress thus far on your control panel?


TOM

Understanding that you may not see success instantly, but that all your good decisions add up to a cumulative success over time is what separates those who "get there" and those who don't. Every day you either get further away from your goals, or closer to them . . . Its up to YOU."

emphatic

  • Trade Count: (0)
  • Full Member
  • ***
  • Offline Offline
  • Posts: 2013
  • Last login:Today at 12:27:08 pm
  • -"Suck it, Donny!" -"No, YOU suck it.... more".
    • Emphatic's Video Game Collection
Re: Tzakiel's UAII 2P Fighter CRT Build
« Reply #4 on: October 22, 2013, 12:50:15 pm »
That TV picture is amazzzzzing.  :cheers:

Tzakiel

  • Trade Count: (0)
  • Full Member
  • ***
  • Offline Offline
  • Posts: 272
  • Last login:March 02, 2019, 12:59:01 pm
  • I want to build my own arcade controls!
Re: Tzakiel's UAII 2P Fighter CRT Build
« Reply #5 on: October 23, 2013, 12:57:42 am »
Welp, I am about to start cutting 1/2" mdf for control panel and box to mount on the cabinet. Here is the plan:


(Ignore cam and screw holes, used north coast diagram as a reference.)

The goal is to make sure the panel is flush with the uaii shelf rails at the base, and 28.5" across the top to match width of the cabinet. The "floor" of the box will be inset into the 4 sides.

Questions:

1. Does this seem sound? Any reason not to do pieces like this?

2. I'm realizing I will have to paint the base/box part. What sort of paint should I use to match the cabinet's black laminate fairly closely?

3. Should I paint the pieces before assembling box or after?

4. How should I assemble the box sides and floor panels? I am thinking L brackets and wood screws? Will that work for mdf?  Or should I do drywall screws and glue as I have seen on subwoofer forums? Looking for the easiest option that is still going to be somewhat sturdy. It doesn't need to be a tank, but I'd like things to go together fairly tight.


« Last Edit: October 23, 2013, 09:09:32 am by Tzakiel »
My Fighter CRT Cabinet Thread: Tzakiel's 2P Cabinet

Sjaak

  • Trade Count: (+1)
  • Full Member
  • ***
  • Offline Offline
  • Posts: 706
  • Last login:May 27, 2024, 11:32:28 am
Re: Tzakiel's UAII 2P Fighter CRT Build
« Reply #6 on: October 23, 2013, 09:16:01 am »
Will the Sanwa buttons fit in the 5/8" wood?

Tzakiel

  • Trade Count: (0)
  • Full Member
  • ***
  • Offline Offline
  • Posts: 272
  • Last login:March 02, 2019, 12:59:01 pm
  • I want to build my own arcade controls!
Re: Tzakiel's UAII 2P Fighter CRT Build
« Reply #7 on: October 23, 2013, 09:30:02 am »
Will the Sanwa buttons fit in the 5/8" wood?

It's 1/2" MDF with 1/8" plexi on top, for the CP.  No, they will not fit.  I will be routing out the bottom of the CP to about 1/4" where the buttons are. Will also be top-mounting the JLF with a slight recess for the plate.
My Fighter CRT Cabinet Thread: Tzakiel's 2P Cabinet

Tzakiel

  • Trade Count: (0)
  • Full Member
  • ***
  • Offline Offline
  • Posts: 272
  • Last login:March 02, 2019, 12:59:01 pm
  • I want to build my own arcade controls!
Re: Tzakiel's UAII 2P Fighter CRT Build
« Reply #8 on: October 23, 2013, 11:18:51 am »
Reading around more, it seems like butt joints with carpenter glue and drywall screws is probably the way to go?  Any idea what screws would be a good size/diameter for the 1/2" edges? I assume I would drill holes first and countersink.

Only problem is this will leave exposed screw heads on the outside of the cabinet. :[
My Fighter CRT Cabinet Thread: Tzakiel's 2P Cabinet

CaptainMarvel

  • Trade Count: (0)
  • Full Member
  • ***
  • Offline Offline
  • Posts: 104
  • Last login:May 03, 2020, 04:49:55 pm
Re: Tzakiel's UAII 2P Fighter CRT Build
« Reply #9 on: October 23, 2013, 11:26:49 am »
Why not try dowel joinery?

You can get a self centering dowel jog pretty inexpensively via Harbor Freight Tools


TOM

Understanding that you may not see success instantly, but that all your good decisions add up to a cumulative success over time is what separates those who "get there" and those who don't. Every day you either get further away from your goals, or closer to them . . . Its up to YOU."

Tzakiel

  • Trade Count: (0)
  • Full Member
  • ***
  • Offline Offline
  • Posts: 272
  • Last login:March 02, 2019, 12:59:01 pm
  • I want to build my own arcade controls!
Re: Tzakiel's UAII 2P Fighter CRT Build
« Reply #10 on: October 24, 2013, 09:29:33 am »
Thanks Captain, I will read up about it.

Marquee

While I try to figure out the CP box joining method and such, what do you all think of this for marquee?  Control panel art would have a similar theme.

Edit: updated with new marquee after I got some feedback.
« Last Edit: October 25, 2013, 10:18:02 pm by Tzakiel »
My Fighter CRT Cabinet Thread: Tzakiel's 2P Cabinet

rablack97

  • Trade Count: (+3)
  • Full Member
  • ***
  • Offline Offline
  • Posts: 2215
  • Last login:May 11, 2022, 06:50:10 pm
  • If you don't try, you have no chance at innovation
Re: Tzakiel's UAII 2P Fighter CRT Build
« Reply #11 on: October 24, 2013, 09:43:56 am »
Check out control panel section...its similar to yours, i've done this a few times and works well


http://robandgabe.com/rdowney/arcadeodyssey/

Another way is here...

http://forum.arcadecontrols.com/index.php/topic,118612.120.html

Also the reason why nobody is posting to your thread is because you've skipped details in your build, when you just show results, folks just glance and go..

If you show me detail in how your building, then you'll get more of a response..

Good Luck

Tzakiel

  • Trade Count: (0)
  • Full Member
  • ***
  • Offline Offline
  • Posts: 272
  • Last login:March 02, 2019, 12:59:01 pm
  • I want to build my own arcade controls!
Re: Tzakiel's UAII 2P Fighter CRT Build
« Reply #12 on: October 24, 2013, 10:03:46 am »

Also the reason why nobody is posting to your thread is because you've skipped details in your build, when you just show results, folks just glance and go..


I'm not sure what you mean?  I stated that I assembled the UAII kit from north coast, showed a pic of that, and then I laid out my plan for the CP with specific questions about building it. That is where I am at. Not sure what other "build" details I have to share at the moment?

Thanks for links, I will check them out. Your control panel box is beautiful... don't know if I have the skill for that... nice mitered edges and custom glue clamps, etc. Good work though.
« Last Edit: October 24, 2013, 12:25:15 pm by Tzakiel »
My Fighter CRT Cabinet Thread: Tzakiel's 2P Cabinet

rablack97

  • Trade Count: (+3)
  • Full Member
  • ***
  • Offline Offline
  • Posts: 2215
  • Last login:May 11, 2022, 06:50:10 pm
  • If you don't try, you have no chance at innovation
Re: Tzakiel's UAII 2P Fighter CRT Build
« Reply #13 on: October 24, 2013, 12:55:09 pm »
Understood, its was a kit though, you have already assembled it.

I get the same let down all the time, cause I don't post enough pics of putting the project together.  I just post results, people seem to be more interested in the different techniques used in construction.

So your on the right track with the CP to get more interaction on your build. 

That's not my build, that's rdowneys Arcade odyssey.

At this point, look at it like this, it's just a box, there is no wrong way to do it.  Once the glue sets, its not going anywhere.

Dowel joinery

Pocket Screws

Glue and mitered joints - thats the route i took in my build no custom clamps needed  (Black's Magic)

L-Brackets

Bottom line its a box, the art, is how you hide all of the hardware.

Fillers, Bondo, and placement of your hardware.  Look at the 2nd example i gave using the bracing blocks.  Fill in any gaps with filler or bondo, sand, and keep it moving.... :applaud:

Oh, paint the box after you put it together and are happy with the angles and aesthetics.  Prime, sand, and Spray paint and or foam rollers will do just fine.
« Last Edit: October 24, 2013, 12:57:49 pm by rablack97 »

Tzakiel

  • Trade Count: (0)
  • Full Member
  • ***
  • Offline Offline
  • Posts: 272
  • Last login:March 02, 2019, 12:59:01 pm
  • I want to build my own arcade controls!
Re: Tzakiel's UAII 2P Fighter CRT Build
« Reply #14 on: October 24, 2013, 01:04:00 pm »
Thanks for the encouragement. I just attempted to make my first cut on the MDF.  It's all wavy.  I really am a woodworking novice and have a lot to learn. :[  I tried to use a jigsaw with a long, clamped metal level as a guide. Did not go very well! Then I tried another cut freehand following my line and that was even worse. I might have to go for the circular saw.
My Fighter CRT Cabinet Thread: Tzakiel's 2P Cabinet

CaptainMarvel

  • Trade Count: (0)
  • Full Member
  • ***
  • Offline Offline
  • Posts: 104
  • Last login:May 03, 2020, 04:49:55 pm
Re: Tzakiel's UAII 2P Fighter CRT Build
« Reply #15 on: October 24, 2013, 01:06:29 pm »
Thanks for the encouragement. I just attempted to make my first cut on the MDF.  It's all wavy.  I really am a woodworking novice and have a lot to learn. :[


Exactly the reason I created a WOODWORKING RESOURCES for the BYOAC'er  thread/resource.

 :cheers:


Check out  ROBERT DOWNEY'S YOUTUBE CHANNEL --> http://www.youtube.com/user/rdowney111?feature=playlist
Not sure if Robert Downey is a member here on the BYOAC Forum, but I stumbled across his YouTube videos/channel a while back and found several of his video clips demonstrating various steps in the construction process to be very helpful visual "how to's" - including jigsawing side panels, router flush trimming and cutting out circles with the router.
« Last Edit: October 24, 2013, 01:09:34 pm by CaptainMarvel »
TOM

Understanding that you may not see success instantly, but that all your good decisions add up to a cumulative success over time is what separates those who "get there" and those who don't. Every day you either get further away from your goals, or closer to them . . . Its up to YOU."

Tzakiel

  • Trade Count: (0)
  • Full Member
  • ***
  • Offline Offline
  • Posts: 272
  • Last login:March 02, 2019, 12:59:01 pm
  • I want to build my own arcade controls!
Re: Tzakiel's UAII 2P Fighter CRT Build
« Reply #16 on: October 24, 2013, 01:42:19 pm »
Well, after 2 bad cuts I took a deep breath, re-drew my control panel shape in pencil on a different part of the MDF, measured the blade-to-boot distance on the jigsaw, clamped down my guide and measured everything, and tried again.


 :censored: :censored: :censored: :censored: :censored: :censored:

Not only is it wavy, but it's off angle from the line as well. So the guide must have moved somehow. I never would have thought the hardest part of this project would be cutting a simple straight line. At this rate I am going to have to buy more MDF. And I've got 5 pieces to go after this one.

Is this radically easier with a circular saw or am I just going to run into the same issues if I can't get the guide right?
My Fighter CRT Cabinet Thread: Tzakiel's 2P Cabinet

CaptainMarvel

  • Trade Count: (0)
  • Full Member
  • ***
  • Offline Offline
  • Posts: 104
  • Last login:May 03, 2020, 04:49:55 pm
Re: Tzakiel's UAII 2P Fighter CRT Build
« Reply #17 on: October 24, 2013, 02:07:42 pm »
I never would have thought the hardest part of this project would be cutting a simple straight line. At this rate I am going to have to buy more MDF. And I've got 5 pieces to go after this one.

Is this radically easier with a circular saw or am I just going to run into the same issues if I can't get the guide right?

For long straight cuts like that, I (personally) would use my circular saw over my jigsaw.

Of course, making sure the edge guide is clamped secure is monumentally important.


Here are some great resources for how to create an accurate circular saw cutting guide  . . .

http://www.startwoodworking.com/post/how-tame-tearout-circular-saw


http://www.instructables.com/id/Ultra-Precise-Circular-Saw-Router-Guide/


http://www.popularmechanics.com/home/reviews/4283497

TOM

Understanding that you may not see success instantly, but that all your good decisions add up to a cumulative success over time is what separates those who "get there" and those who don't. Every day you either get further away from your goals, or closer to them . . . Its up to YOU."

rablack97

  • Trade Count: (+3)
  • Full Member
  • ***
  • Offline Offline
  • Posts: 2215
  • Last login:May 11, 2022, 06:50:10 pm
  • If you don't try, you have no chance at innovation
Re: Tzakiel's UAII 2P Fighter CRT Build
« Reply #18 on: October 24, 2013, 02:58:00 pm »
No worries I have the same problem of cutting straight lines.

Marvel linked to a great jig, I suggest you build one of those since your new to woodworking.

Lining up the disance from the sawblade to your cut line is a bit taxing if your a newb.  I've ruined tons of sheets of mdf.

I'm with Marvel, circular saw for your longer rough cuts, jigsaw for your ninja precise cuts.  Now some folks are good at the jigsaw and can just straight lines no problem, this requires a steady hand.  The look of your cuts tell me your pushing hard against the fence instead of forward, your so worried about the guide that your putting too much pressure on the guide, hence the wavy line.  The force should be forward not sideways.

Always double check your clamps, try to move them with your hands with a good amount of force, make sure your piece is clamped to something as well, just clamping the straight edge is not enough....

For now, make jig 2, you kinda went pro too soon, jigsaw cuts are a more advanced technique.


Tzakiel

  • Trade Count: (0)
  • Full Member
  • ***
  • Offline Offline
  • Posts: 272
  • Last login:March 02, 2019, 12:59:01 pm
  • I want to build my own arcade controls!
Re: Tzakiel's UAII 2P Fighter CRT Build
« Reply #19 on: October 24, 2013, 05:15:47 pm »
Thanks all.  I am going to pick up a fine tooth circular blade tonight and possibly make that jig as well. I like the simplicity of it even though it's a few extra steps to make it.
My Fighter CRT Cabinet Thread: Tzakiel's 2P Cabinet

CaptainMarvel

  • Trade Count: (0)
  • Full Member
  • ***
  • Offline Offline
  • Posts: 104
  • Last login:May 03, 2020, 04:49:55 pm
Re: Tzakiel's UAII 2P Fighter CRT Build
« Reply #20 on: October 24, 2013, 06:53:06 pm »
Thanks all.  I am going to pick up a fine tooth circular blade tonight and possibly make that jig as well. I like the simplicity of it even though it's a few extra steps to make it.

A few steps to make it, but it will serve you well for a very long time - for all kinds of projects. 

You can make several - of different lengths - if you like as well ... and then just pull out the best length for the particular project at any given time.


 :cheers:
TOM

Understanding that you may not see success instantly, but that all your good decisions add up to a cumulative success over time is what separates those who "get there" and those who don't. Every day you either get further away from your goals, or closer to them . . . Its up to YOU."

Tzakiel

  • Trade Count: (0)
  • Full Member
  • ***
  • Offline Offline
  • Posts: 272
  • Last login:March 02, 2019, 12:59:01 pm
  • I want to build my own arcade controls!
Re: Tzakiel's UAII 2P Fighter CRT Build
« Reply #21 on: October 24, 2013, 07:26:25 pm »
I picked up a 60 tooth finish saw for my circular. Will give that a try when baby allows... (the joys of being a new father!)
My Fighter CRT Cabinet Thread: Tzakiel's 2P Cabinet

a1pharm

  • Trade Count: (0)
  • Full Member
  • ***
  • Offline Offline
  • Posts: 374
  • Last login:April 15, 2024, 08:25:50 pm
  • Planning and preparation prevents problems
Re: Tzakiel's UAII 2P Fighter CRT Build
« Reply #22 on: October 24, 2013, 08:00:07 pm »
I picked up a 60 tooth finish saw for my circular. Will give that a try when baby allows... (the joys of being a new father!)

Congrats on being a dad!  Make sure you put in a coin door and pay out allowance in quarters.  If you do it right, you can just recycle the allowance each week, and this thing will pay for itself!

Kidding aside, use the circular saw for straight cuts, and use a guide.  Do not push against the guide, just allow it to show you the way.  Go slow with your cuts, and get your face close to what you're doing so you can tell if you're doing it right (and, of course, wear your safety glasses and mask).  MDF in the eyes and lungs = a bad time.

As for joining the panels together: use a 2x2 pine board.  Drill pilot holes into it.  Apply Gorilla glue to the 2x2, place it at the joint end of one board, clamp in in place: hard, and screw it in place.  Do this on the other side of the board.  Then do this on the board that is opposite.  Then attach the side boards to the boards that now have the pine boards.  This results in no screws on the outside of the the box.  Take a look at how martijn or I attached pine boards to our side panels, and then attached the front/back panels to those side panels.  Same concept.

You could also just put screws on the outside of the box, and countersink them.  Make sure the screws are below the surface of the board, and apply joint compound or drywall mud over the screw head.  Then sand it, and apply paint.

As for painting: I would paint the box prior to assembly, especially if you are using spray paint (which might be the only way to get a similar finish to the laminate).  Take a look at "hammered" spray paint.  Buy few cans of different options and test it out on some scrap.  Also: be sure you use primer before applying paint to bare wood, or use a paint that already has primer in it.

Sorry for the lack of pictures and long-winded explanations, but I think I gave you all of the info you requested.

You may not think so now, but you will build another cab someday.  Try to think of things you would do differently to improve your process.  If you're brave, share them with this forum to help others out.

The build is looking good so far, and that screen is AMAZING!  This is what most people will be focusing on.  You'll always see the faults in your build, but almost no one else will (unless you point them out).

Keep up the good work!
Cheers!
 :cheers:

rablack97

  • Trade Count: (+3)
  • Full Member
  • ***
  • Offline Offline
  • Posts: 2215
  • Last login:May 11, 2022, 06:50:10 pm
  • If you don't try, you have no chance at innovation
Re: Tzakiel's UAII 2P Fighter CRT Build
« Reply #23 on: October 24, 2013, 09:41:04 pm »
Interesting, paint before your assemble?  Hope your assembly pieces together perfect and you have no gaps >:D

Zzap

  • Trade Count: (0)
  • Full Member
  • ***
  • Offline Offline
  • Posts: 74
  • Last login:September 06, 2021, 03:12:54 am
Re: Tzakiel's UAII 2P Fighter CRT Build
« Reply #24 on: October 25, 2013, 03:22:46 am »
I can fully reccommend the building of a sawboard to assist in the cuts. It took me a little while to get it right (see my project http://forum.arcadecontrols.com/index.php/topic,135290.0.html), but it's been invaluable in getting nice straight cuts since. I used a jigsaw for my previous build, got "ok" results, needed a lot of sanding to get straight, and never perfect.

a1pharm

  • Trade Count: (0)
  • Full Member
  • ***
  • Offline Offline
  • Posts: 374
  • Last login:April 15, 2024, 08:25:50 pm
  • Planning and preparation prevents problems
Re: Tzakiel's UAII 2P Fighter CRT Build
« Reply #25 on: October 25, 2013, 08:40:04 am »
Interesting, paint before your assemble?  Hope your assembly pieces together perfect and you have no gaps >:D

If you don't get it perfect, doing touch up painting will be easy.  Sanding a box that's put together in between coats is a pain in the ass, especially if the paint runs (happens often when the surface you are painting is not parallel to the ground).

rablack97

  • Trade Count: (+3)
  • Full Member
  • ***
  • Offline Offline
  • Posts: 2215
  • Last login:May 11, 2022, 06:50:10 pm
  • If you don't try, you have no chance at innovation
Re: Tzakiel's UAII 2P Fighter CRT Build
« Reply #26 on: October 25, 2013, 08:59:32 am »
Hmm, I didnt have any problems spray painting my CP, after it was put together, I just used light coats, never had a run problem.

The inside of the CP doesnt have to be perfect, and outside corners are easy to sand.

However, everyone has their own technique, no way is the wrong way if the results are nice in the end.... :cheers:

a1pharm

  • Trade Count: (0)
  • Full Member
  • ***
  • Offline Offline
  • Posts: 374
  • Last login:April 15, 2024, 08:25:50 pm
  • Planning and preparation prevents problems
Re: Tzakiel's UAII 2P Fighter CRT Build
« Reply #27 on: October 25, 2013, 09:19:26 am »
Hmm, I didnt have any problems spray painting my CP, after it was put together, I just used light coats, never had a run problem.

The inside of the CP doesnt have to be perfect, and outside corners are easy to sand.

However, everyone has their own technique, no way is the wrong way if the results are nice in the end.... :cheers:

You're right: there's more than one way to skin a cat.

Tzakiel

  • Trade Count: (0)
  • Full Member
  • ***
  • Offline Offline
  • Posts: 272
  • Last login:March 02, 2019, 12:59:01 pm
  • I want to build my own arcade controls!
Re: Tzakiel's UAII 2P Fighter CRT Build
« Reply #28 on: October 25, 2013, 09:36:09 am »
Game List

While we wait for me to get my act together and make a saw guide, I thought it might be entertaining to share my intended games list. As I said, I wanted a hand-picked list for Hyperspin so users don't have to cycle through a long list of bad or repetitive versions of games across different platforms.

Where games are red, I am acknowledging there are duplicates and I need to test and see if one or the other is "the" one to keep. I also have a "Works" column for my MAME games, because so many of them have rom or bios problems and I needed to start keeping a log of all the games I need to fix. I wish there was an easier way to get them all working. I started with a torrent and have been fixing from there. Where that column is blank just means I haven't gotten to testing that game yet.

https://docs.google.com/spreadsheet/ccc?key=0AqNEYT4M5QOVdDdjakl5b3dGcnhVRDNFT1pJbm0tblE&usp=sharing

Many of these I have played, many are recommendations from forums or other users for games that are must-plays. Obviously the consoles have a ton of fantastic games but I tried to limit it mostly to games that work well with digital d-pad style control. Let me know if there are any gems I have missed.
« Last Edit: October 25, 2013, 09:43:46 am by Tzakiel »
My Fighter CRT Cabinet Thread: Tzakiel's 2P Cabinet

Tzakiel

  • Trade Count: (0)
  • Full Member
  • ***
  • Offline Offline
  • Posts: 272
  • Last login:March 02, 2019, 12:59:01 pm
  • I want to build my own arcade controls!
Re: Tzakiel's UAII 2P Fighter CRT Build
« Reply #29 on: October 26, 2013, 11:06:24 pm »
Well, here we go.

I re-drew my CP plan on the mdf:


I made the saw guide. It wasn't too hard to do and I am pleased with the result. Here is a pic of me about to cut off my previous badly cut edge (to the right).


The saw guide did what it advertised. I simply lined up the edge with my drawn line and you can see here the cut does lines up exactly with the edge of the guide and my mark.


I did screw up in the picture above. I forgot to change depth of the saw, because I forgot I was adding another half inch of "thickness" due to the guide. But that was easily fixed. I got a straight cut!

Then the baby started bawling so I hung it up for the night... but I am encouraged that this works and now I can use the guide to finish all of my cuts. I am hoping to just cut everything else tomorrow if possible.

Question: Should I use the jigsaw or the router with flush trim bit to freehand cut the rounded corners from the font of the CP? (See first pic above.) I am nervous that I will go inside my lines or get something less than perfectly round corners.
« Last Edit: October 26, 2013, 11:08:52 pm by Tzakiel »
My Fighter CRT Cabinet Thread: Tzakiel's 2P Cabinet

AlienInferno

  • Trade Count: (0)
  • Full Member
  • ***
  • Offline Offline
  • Posts: 515
  • Last login:April 28, 2024, 04:10:07 pm
Re: Tzakiel's UAII 2P Fighter CRT Build
« Reply #30 on: October 27, 2013, 12:15:59 am »
To cut the rounded corners on my control panel I used a jigsaw to cut close to the line. Staying outside that line by a little bit. Then went at it with some sand paper to get it to completion.

Sent from my SAMSUNG-SGH-I747 using Tapatalk 2


a1pharm

  • Trade Count: (0)
  • Full Member
  • ***
  • Offline Offline
  • Posts: 374
  • Last login:April 15, 2024, 08:25:50 pm
  • Planning and preparation prevents problems
Re: Tzakiel's UAII 2P Fighter CRT Build
« Reply #31 on: October 27, 2013, 08:46:49 am »
Use the jigsaw for the rounded corner if you are doing it free hand (you will have a hard time seeing the router bit).  If you can "trace" something for the curve, use the flush trim.

Using a normal size router for free hand precision work usually results in frustration, lost time, swearing, and redoing your work.  Unless you're pro.

rablack97

  • Trade Count: (+3)
  • Full Member
  • ***
  • Offline Offline
  • Posts: 2215
  • Last login:May 11, 2022, 06:50:10 pm
  • If you don't try, you have no chance at innovation
Re: Tzakiel's UAII 2P Fighter CRT Build
« Reply #32 on: October 27, 2013, 10:21:03 am »
Use the jigsaw for the rounded corner if you are doing it free hand (you will have a hard time seeing the router bit).  If you can "trace" something for the curve, use the flush trim.

Using a normal size router for free hand precision work usually results in frustration, lost time, swearing, and redoing your work.  Unless you're pro.

+1

mercury187

  • Trade Count: (0)
  • Full Member
  • ***
  • Offline Offline
  • Posts: 11
  • Last login:October 28, 2013, 06:10:12 pm
Re: Tzakiel's UAII 2P Fighter CRT Build
« Reply #33 on: October 28, 2013, 05:19:06 pm »
I tried to make some mini CPs last week and I'm glad i'm not the only one that had trouble cutting a simple straight line, had my guide all clamped and everything also. It appears the only way i've gotten success is to use a table saw..

Yenome

  • Trade Count: (0)
  • Full Member
  • ***
  • Offline Offline
  • Posts: 547
  • Last login:April 12, 2024, 01:03:06 am
  • Punch a fish. Make a wish
Re: Tzakiel's UAII 2P Fighter CRT Build
« Reply #34 on: October 28, 2013, 10:52:50 pm »
*GASP* how do you not have KI working? not saying you think this but i have noticed from a few people i speak to they all believe KI doesnt work past like mame 1.2? something. i tell them i been playing Ki since i got into mame and it has always worked for me dont know what trouble they have but if you having same trouble i got the files working with 1.5 if you need them.
My Gf made me put a sig up. /whipped

Tzakiel

  • Trade Count: (0)
  • Full Member
  • ***
  • Offline Offline
  • Posts: 272
  • Last login:March 02, 2019, 12:59:01 pm
  • I want to build my own arcade controls!
Re: Tzakiel's UAII 2P Fighter CRT Build
« Reply #35 on: October 28, 2013, 11:18:48 pm »
*GASP* how do you not have KI working?

A lot of the not working roms I think I just have bad file sets. Crappy torrent. I will fix but the CP is my top priority for now.
My Fighter CRT Cabinet Thread: Tzakiel's 2P Cabinet

Tzakiel

  • Trade Count: (0)
  • Full Member
  • ***
  • Offline Offline
  • Posts: 272
  • Last login:March 02, 2019, 12:59:01 pm
  • I want to build my own arcade controls!
Re: Tzakiel's UAII 2P Fighter CRT Build
« Reply #36 on: October 30, 2013, 02:38:43 pm »
Progress update:

I have finished cutting out the 6 pieces of MDF that will comprise my control panel, as well as the rounded corners of the CP, which I can sand to get perfect.


Everything looked good at a glance, but then I took a closer look at the corners:


So, while I have succeeded in cutting straight lines with the circular saw, I have failed, miserably, to keep my dimensions correct. I measured very carefully and re-checked before cutting, so I am not sure how this happened. Pretty much everything is off. I think I did not keep my perpendicular lines square, or something.

I have been able to fix this somewhat with my router and flush trim bit, by drawing a square line and clamping down a guide piece, so I will continue to use that to see if I can at least get things back to square and hopefully lining up better. Woodworking is hard, at least when you don't use a square and measure very carefully.
« Last Edit: October 30, 2013, 02:40:34 pm by Tzakiel »
My Fighter CRT Cabinet Thread: Tzakiel's 2P Cabinet

Tzakiel

  • Trade Count: (0)
  • Full Member
  • ***
  • Offline Offline
  • Posts: 272
  • Last login:March 02, 2019, 12:59:01 pm
  • I want to build my own arcade controls!
Re: Tzakiel's UAII 2P Fighter CRT Build
« Reply #37 on: October 30, 2013, 02:44:56 pm »
Updated Marquee and made control panel art:


My Fighter CRT Cabinet Thread: Tzakiel's 2P Cabinet

yotsuya

  • Trade Count: (+21)
  • Full Member
  • ***
  • Offline Offline
  • Posts: 19958
  • Last login:Today at 01:59:06 am
  • 2014 UCA Winner, 2014, 2015, 2016 ZapCon Winner
    • forum.arcadecontrols.com/index.php/topic,137636.msg1420628.html
Re: Tzakiel's UAII 2P Fighter CRT Build
« Reply #38 on: October 30, 2013, 03:12:06 pm »
Man, now all I see is a Kirby balloon.  ;D
***Build what you dig, bro. Build what you dig.***

BadMouth

  • Trade Count: (+6)
  • Full Member
  • ***
  • Offline Offline
  • Posts: 9226
  • Last login:June 13, 2024, 01:06:22 pm
  • ...
Re: Tzakiel's UAII 2P Fighter CRT Build
« Reply #39 on: October 30, 2013, 03:19:42 pm »
I like the marquee. The strip of logos is cool.
I'm not a Kirby fan, but to each their own.
I'd replace the astro city logos with something specific to your cab.

Maybe a bit early, but a word of advice on having more than 6 buttons...
Current versions of MAME assume you have this layout:
123
456
When you map your 8 buttons globally in MAME, do them like this:
1237
4568

Do that and all the Capcom and Mortal Kombat games will be mapped correctly without you having to do them individually.
NEO GEO fighters will either need to be remapped or you can use your thumb to hit the first button in the second row for D.
I've found that this is actually more comfortable, but was making a NEO GEO themed cab so stuck to the four-in-a-row.

Tzakiel

  • Trade Count: (0)
  • Full Member
  • ***
  • Offline Offline
  • Posts: 272
  • Last login:March 02, 2019, 12:59:01 pm
  • I want to build my own arcade controls!
Re: Tzakiel's UAII 2P Fighter CRT Build
« Reply #40 on: October 30, 2013, 03:51:40 pm »
I like the marquee. The strip of logos is cool.
I'm not a Kirby fan, but to each their own.
I'd replace the astro city logos with something specific to your cab.

Maybe a bit early, but a word of advice on having more than 6 buttons...
Current versions of MAME assume you have this layout:
123
456
When you map your 8 buttons globally in MAME, do them like this:
1237
4568

Do that and all the Capcom and Mortal Kombat games will be mapped correctly without you having to do them individually.
NEO GEO fighters will either need to be remapped or you can use your thumb to hit the first button in the second row for D.
I've found that this is actually more comfortable, but was making a NEO GEO themed cab so stuck to the four-in-a-row.

Thanks for tips and feedback. The only real "theme" I have going is that the cabinet is Japanese arcade-inspired, so I went with a (CRT) japanese cabinet as a model for graphics. I do recognize that this isn't a "candy" style cab and so the analogy only goes so far, but I wanted some of the feel to be there.  Maybe I could still get it with something else for the graphics but for now I'm pretty happy with the art.
My Fighter CRT Cabinet Thread: Tzakiel's 2P Cabinet

emphatic

  • Trade Count: (0)
  • Full Member
  • ***
  • Offline Offline
  • Posts: 2013
  • Last login:Today at 12:27:08 pm
  • -"Suck it, Donny!" -"No, YOU suck it.... more".
    • Emphatic's Video Game Collection
Re: Tzakiel's UAII 2P Fighter CRT Build
« Reply #41 on: October 30, 2013, 05:53:44 pm »
I'd loose the Astro City specific stuff from the CPO and just change it to a similar text, especially as I think the colours clashes against the deep red that looks more Vewlix. And you should not mix SEGA and TAITO on one cabinet.  :cheers:

a1pharm

  • Trade Count: (0)
  • Full Member
  • ***
  • Offline Offline
  • Posts: 374
  • Last login:April 15, 2024, 08:25:50 pm
  • Planning and preparation prevents problems
Re: Tzakiel's UAII 2P Fighter CRT Build
« Reply #42 on: October 30, 2013, 06:32:28 pm »
Seriously: kill Kirby

Just do it now

 :soapbox:

PL1

  • Global Moderator
  • Trade Count: (+1)
  • Full Member
  • *****
  • Online Online
  • Posts: 9425
  • Last login:Today at 04:28:35 pm
  • Designated spam hunter
Re: Tzakiel's UAII 2P Fighter CRT Build
« Reply #43 on: October 30, 2013, 07:48:01 pm »
Seriously: kill Kirby

Just do it now

 :soapbox:


Scott
« Last Edit: October 30, 2013, 07:50:30 pm by PL1 »

Tzakiel

  • Trade Count: (0)
  • Full Member
  • ***
  • Offline Offline
  • Posts: 272
  • Last login:March 02, 2019, 12:59:01 pm
  • I want to build my own arcade controls!
Re: Tzakiel's UAII 2P Fighter CRT Build
« Reply #44 on: October 31, 2013, 09:24:35 am »
Well, the art went to the printer (gameongrafix) last night with a few changes. Will post the final when I get a chance. Next step: fix my box panels to be flush / the right size. Really hoping I don't end up re-cutting most pieces.
My Fighter CRT Cabinet Thread: Tzakiel's 2P Cabinet

Tzakiel

  • Trade Count: (0)
  • Full Member
  • ***
  • Offline Offline
  • Posts: 272
  • Last login:March 02, 2019, 12:59:01 pm
  • I want to build my own arcade controls!
Re: Tzakiel's UAII 2P Fighter CRT Build
« Reply #45 on: October 31, 2013, 03:00:24 pm »
Progress: Happy to say that I have got the box panels in excellent shape.


The saw guide acted very very nicely as a router guide as well, which saved my bad work measuring and drawing the lines. I trimmed off the edges which were too long on some panels. I had to use the router because in some cases it was just a few MM.


Everything lines up wonderfully now.


I think it's gonna look good!  A little nervous I will somehow screw it up with paint or screws/glue but hopeful it will go smoothly.

Next steps: sand box panels and rounded corners, cut slot for t-molding, glue/screw together without splitting the MDF.  Paint something that matches the UAII laminate - any suggestions on spraypaints? The UAII is what I would call satin "plus" or maybe semi-gloss. It has some texture but it's extremely fine, not like a bumpy finish.
« Last Edit: October 31, 2013, 03:20:31 pm by Tzakiel »
My Fighter CRT Cabinet Thread: Tzakiel's 2P Cabinet

CaptainMarvel

  • Trade Count: (0)
  • Full Member
  • ***
  • Offline Offline
  • Posts: 104
  • Last login:May 03, 2020, 04:49:55 pm
Re: Tzakiel's UAII 2P Fighter CRT Build
« Reply #46 on: October 31, 2013, 03:31:20 pm »
Looking Good thus far . . . And seeing as how my plan is to build one of these bad-boys from scratch,
I continue to be most interested and inspired by your efforts and progress.


KEEP UP THE GREAT WORK !!!


 :applaud:
TOM

Understanding that you may not see success instantly, but that all your good decisions add up to a cumulative success over time is what separates those who "get there" and those who don't. Every day you either get further away from your goals, or closer to them . . . Its up to YOU."

Tzakiel

  • Trade Count: (0)
  • Full Member
  • ***
  • Offline Offline
  • Posts: 272
  • Last login:March 02, 2019, 12:59:01 pm
  • I want to build my own arcade controls!
Re: Tzakiel's UAII 2P Fighter CRT Build
« Reply #47 on: October 31, 2013, 03:36:07 pm »
Final marquee and CP art:

These babies went off to the printer gameongrafix. I also requested a B+W full size template for drilling. Yes, Kirby STAYS! :) My WAF (wife approval factor) was already a 0, and she likes Kirby, so this might get me at least into the "1" range. Besides, there is meaning to the 3 characters in this marquee... I am white (and sort of blond), my wife is of Chinese heritage, and our new baby is.. well.. cute!

The CP I decided to nix the sega astro city and put in the same font/name as marquee for consistency. However, I had to keep the Engrish from the Japanese cab... just love it!


My Fighter CRT Cabinet Thread: Tzakiel's 2P Cabinet

CaptainMarvel

  • Trade Count: (0)
  • Full Member
  • ***
  • Offline Offline
  • Posts: 104
  • Last login:May 03, 2020, 04:49:55 pm
Re: Tzakiel's UAII 2P Fighter CRT Build
« Reply #48 on: October 31, 2013, 03:50:37 pm »
PLEASE take some pics of how the printouts are packed and received ... I've been wondering how they look out of the box
(before modifying them for installation)


TOM

Understanding that you may not see success instantly, but that all your good decisions add up to a cumulative success over time is what separates those who "get there" and those who don't. Every day you either get further away from your goals, or closer to them . . . Its up to YOU."

Tzakiel

  • Trade Count: (0)
  • Full Member
  • ***
  • Offline Offline
  • Posts: 272
  • Last login:March 02, 2019, 12:59:01 pm
  • I want to build my own arcade controls!
Re: Tzakiel's UAII 2P Fighter CRT Build
« Reply #49 on: October 31, 2013, 09:22:07 pm »
I'll need to pick up a hinge and screws to install hinge tomorrow. I am thinking a piano hinge would be easiest, under front lip outside control box, or side. I am looking for an easy sturdy install.

Question is a what kind of screws should I use? This is 1/2" mdf. Can I just uses bunch of short wood screws if I drill pilots?

EDIT: hinges came with screws. I'll just use those.
« Last Edit: November 02, 2013, 01:49:53 pm by Tzakiel »
My Fighter CRT Cabinet Thread: Tzakiel's 2P Cabinet

rCadeGaming

  • Trade Count: (0)
  • Full Member
  • ***
  • Offline Offline
  • Posts: 1256
  • Last login:December 20, 2023, 09:16:09 pm
  • Just call me Rob!
Re: Tzakiel's UAII 2P Fighter CRT Build
« Reply #50 on: November 01, 2013, 04:49:23 pm »
Tzakiel, this is coming along very nicely.  I really like the influences from Japanese cabinets, which you rarely see around here.  I'm planning an Astro-City style cab.

Your video looks great.  I was going to ask if you're matching native refresh rate along with resolution, but if you're using GroovyMAME's autogeneration you're good to go.

Is the TV not decased though?  It looks you can see the TV's case behind the bezel.  I think that would be worth fixing.  It looks like it's going to be a very classy cabinet overall, and that is kind of a slight  blemish all around the screen.

You might want to look into better audio if you describe the current speakers as "crappy," haha.  It can be argued that good audio is as important as video.  A lot of these games can sound really great with the right setup.  You could either build some custom speakers into the cab or at least get some quality PC speakers.  There's no replacement for cone size.  Little satellites and a subwoofer equals over-emphasized high and lows, with almost no midrange.

I love that you selected Sanwa sticks and buttons and the Astro City layout.  Once you get used to the best you can't go back.  I'm guessing you're using Happs for administrative buttons because you can't get labelled Sanwas?  You can get clear top Seimitsu buttons that you can put paper inserts into to label them whatever you want.  Those would match your main Sanwas a lot better in look and feel.  You can even put the inner plunger of a Seimitsu button into the outer frame of a Sanwa to get it really close.  Same microswitch, same feel.

Also, if you're going to be playing shmups, you might want to check out my JLF mod.  The stock JLF is not so hot for shmups due to its long engage and throw distances.

From your game list I really like your taste in games.  It looks like you're really into fighters, shmups, and 2D platformers, which are my favorite genres (not including other genres that don't work well on a cab).  I laughed when I saw Cho Aniki.

I don't have an organized list of what I'm planning to use from MAME, but I do have a list of console games I want to support on my cab if you're interested in looking at it.  I think you might like some of these:

Code: [Select]
-Nintendo-
Battle Kid: Fortress of Peril
Blaster Master
Bionic Commando
Crisis Force (NTSC-J)
Gargoyle's Quest II
Guardian Legend
Gun-Nac
Little Samson (Seirei Densetsu Lickle)
Mega Man
Mega Man 2
Mega Man 3
Metal Storm
Mike Tyson's Punch-Out!!
Mr. Gimmick (Gimmick!)
Recca - Summer Carnival '92 (NTSC-J)
Super Turrican
Zanac

-PC Engine-
Blazing Lazers (Gunhed): Caravan '89
Super Star Soldier: Caravan '90
Final Soldier: Caravan '91 (NTSC-J)
Soldier Blade: Caravan '92 (NTSC-J)
-PC Engine CD-
Gate of Thunder
Lords of Thunder
Ginga Fukei Densetsu: Sapphire (NTSC-J)
Spriggan Mark 2 (NTSC-J)
Seirei Senshi Spriggan: Summer Carnival '91 (NTSC-J)
Alzadick: Summer Carnival '92 (NTSC-J)
Nexzr Special: Summer Carnival '93 (NTSC-J)

-Sega Genesis-
Alien Soldier (NTSC-J/PAL)
Comix Zone
Contra: Hard Corps
Eliminate Down (NTSC-J)
Super Fantasy Zone (NTSC-J/PAL)
Gaiares
Gleylancer (NTSC-J)
Gunstar Heroes
Ms. Pac-Man (Tengen)
M.U.S.H.A.
Ranger X
Rocket Knight Adventures
Steel Empire
Target Earth
Thunder Force II
Thunder Force III
Lightening Force (Thunder Force IV)
Vectorman
-Sega CD-
Bari-Arm
Robo Aleste
Silpheed
Soul Star

-Super Nintendo-
Batman Returns
Biometal
Chrono Trigger
Contra III: The Alien Wars
Cybernator
Demon's Crest
Hagane (NTSC-J)
Firepower 2000
Super Ghouls 'n Ghosts
Joe & Mac
Mega Man 7
Rockman & Forte (Mega Man & Bass, NTSC-J)
Mega Man X
Mega Man X2
Mega Man X3
Metal Warriors
Ninja Warriors
R-Type III: The Third Lightning
Space Megaforce (Super Aleste)
Teenage Mutant Ninja Turtles IV: Turtles in Time
Super Turrican
Super Turrican 2
U.N. Squadron
Wild Guns

-Sega Saturn-
Assault Suits Leynos II (NTSC-J)
Guardian Heroes
Mega Man 8
Radiant Silvergun (NTSC-J)
Rayman
Thunder Force V (NTSC-J)
Virtua Fighter 2

-Playstation-
Gaia Seed (NTSC-J PSX) $
Gradius Gaiden (NTSC-J)
Guilty Gear
Harmful Park (NTSC-J) $
Mega Man X4
Mega Man X5
Mega Man X6
R-Type Delta
Silhouette Mirage
Zanac X Zanac

-Nintendo 64-
Sin & Punishment (NTSC-J)

-Sega Dreamcast-
Bangai-O
Border Down (NTSC-J)
Capcom vs. SNK
Chaos Field (NTSC-J)
ChuChu Rocket!
Fast Striker
Gunlord
Ikaruga (NTSC-J)
Last Hope - Pink Bullets
NEO XYX
Psyvariar 2 (NTSC-J)
Puyo Puyo Fever (NTSC-J)
Q*bert
Radirgy (NTSC-J)
Shikigami no Shiro II (NTSC-J)
Soul Calibur
Triggerheart Exelica (NTSC-J)
Trizeal (NTSC-J)
Under Defeat (NTSC-J)
Virtua Fighter 3TB
Zero Gunner 2 (NTSC-J)

-Playstation 2-
Contra: Shattered Soldier
Do Don Pachi Daioujou (NTSC-J)
Ibara (NTSC-J)
Gradius V
Guilty Gear X Plus
Guilty Gear XX #Reload
R-Type Final
Silpheed: The Lost Planet
Raiden III
Thunder Force VI (NTSC-J)
Soul Calibur III
Virtua Fighter 4: Evolution

-Nintendo GameCube-
Pac-Man VS. (comes with Pac-Man World 2)
Puyo Pop Fever

-XBox-
Soul Calibur II
Capcom vs. SNK 2

-XBox 360-
Deathsmiles
DoDonPachi Resurrection Deluxe Edition (PAL region-free)
Eschatos (incl. Judgement Silversword + Cardinal Sins) (NTSC-J region-free)
Espgaluda II (NTSC-J region-free)
Mushihime-Sama (NTSC-J region-free)
Mushihime-Sama Futari (NTSC-J region-free)
Raiden IV
-XBLA-
Alien Hominid HD
Deathsmiles II
Mark of the Ninja
Super Meat Boy
Mega Shooter 11

-Nintendo Wii-
Castle of Shikigami III
Sin & Punishment: Star Successor
-VC-
Contra Rebirth
Gradius Rebirth
Mega Man 9
Mega Man 10

-Playstation 3-
BlazBlue: Continuum Shift Extend
Blazblue Chrono Phantasma
Rayman Origins
Soul Calibur IV
Soul Calibur V
Super Street Fighter IV: Arcade Edition
Ultimate Marvel vs. Capcom 3
-PSN-
Guilty Gear XX Accent Core Plus
Hard Corps: Uprising
Marvel vs. Capcom Origins
Marvel vs. Capcom 2
Pac-Man Championship Edition DX
Super Street Fighter II Turbo HD Remix
Street Fighter III: Third Strike Online Edition
Virtua Fighter 5 Final Showdown

I didn't mention any Castlevania games because I prefer those with a controller, but since you're a fan I though I should mention Rondo of Blood for the PCE-CD.  I think that's my favorite in the series (tough call between that and Super IV).

Anyhow, since you're using that transcoder, I think I should also mention that you could be using real hardware for console games.  It will accept RGBS by connecting c sync to the h sync pin.  You can get RGBS or RGBHV (VGA) from the all the consoles on our list without modifying the console itself.  You just need a custom cable that can be made in a few minutes.  The only exceptions to this are NES, PC-E/TG-16, and N64 (need internal RGB mod), Gamecube (cable mod only, but the cable is expensive and its more difficult), and Wii (a couple different ways to handle this one).

You mentioned your love of fighting games.  I love them as well, but when other players aren't around in person, the AI doesn't really cut for me.  Online play is a must.  Consider that with a PS3 or 360 in the cab, you could play all of these online:

Code: [Select]
BlazBlue: Continuum Shift Extend
Guilty Gear XX Accent Core Plus
Marvel vs. Capcom Origins
Marvel vs. Capcom 2
Ultimate Marvel vs. Capcom 3
Soul Calibur V
Super Street Fighter IV: Arcade Edition
Super Street Fighter II Turbo HD Remix
Street Fighter III: Third Strike Online Edition
Virtua Fighter 5 Final Showdown

The last piece of constructive criticism is about the marquee and control panel art.  I mostly agree with Badmouth's comments.  It most reminds me of a mixture of Vewlix and Astro City styling.  Vewlix cabs are nice, but they're slick, thin, and based around a 32" widescreen LCD.  It doesn't make sense to me in relation to your project, which is a thick full bodied cab based around a CRT.  I think you should lean toward cues from the Astro City, or Egret, which you also mentioned.

Also, the sketchy font for "Multicade" doesn't go with the otherwise slick design.  Using the Astro City logo itself doesn't look right either.  While it's closer than a Vewlix, your cab is still too different to literally call it an Astro City.  Maybe you could replace the words "Astro City" with "Multicade," and use the Astro City style for "Multicade" wherever it appears, and change "Aero Dynamic Shape" to sometime representing your design.

I like the use of the developer logos in the marquee.  I would just make sure those developers represent the games you'll be playing.  Most of them look good, but I think maybe there are some others you could add that are more relevant to your game list than Atari.  I think NEO-GEO definitely needs to go though, as it's inconsistent with the rest.  All of the other logos represent developers of arcade games, whereas NEO-GEO is a type of hardware.  You already have SNK there, so I'd just stick with that.  Anyhow though, they look good.  Maybe you could also use that in the control panel to fill up some of the empty space.

As for the characters, I'm not really a fan of them.  Kirby looks totally out of place, as he's not at all arcade related.  Street Fighter characters are more relative, but it's not exclusively a Street Fighter cabinet.  You have a bunch of developers represent there, so to be consistent you either need lots of characters to represent all of them, or none at all.  Just the ones there don't make sense to me.  I would lean toward none at all, because I think what you have going could be really classy, and not having random characters would enhance that.


Tzakiel

  • Trade Count: (0)
  • Full Member
  • ***
  • Offline Offline
  • Posts: 272
  • Last login:March 02, 2019, 12:59:01 pm
  • I want to build my own arcade controls!
Re: Tzakiel's UAII 2P Fighter CRT Build
« Reply #51 on: November 01, 2013, 05:04:32 pm »
Tzakiel, this is coming along very nicely.  I really like the influences from Japanese cabinets, which you rarely see around here.  I'm planning an Astro-City style cab.


rCadeGaming - thanks for your feedback and thoughts. I will look over your games list. I do really want to play online - you are probably right that the best way would be actual consoles in the cab. However, I'm not sure how the control panel would interface with several different consoles (I'm sure it would work, but I don't want to be manually switching stuff.  I also don't want to be manually inserting game dvds/carts... I like the idea of everything in a front end.  If I could somehow just play online without needing the consoles, that would be the ultimate, but I don't see it happening.  I do have a hori stick I modded with sanwa parts that I can take upstairs, sit on the couch and play the modern fighters online via PS3.

Re: the TV bezel, it fits pretty well and looks good in person. I may de-case it but not in a hurry since it looks good to me. Always an option though.  I plan to also put plexi over the bezel but not sure yet how best to fit that or if I want to paint the back.

As for the art, first of all, it's with the printer already, so the ship has sailed. I did make some revisions, including some you mentioned. As for kirby, well the marquee does say "and console classics"  In retrospect I think you are probably right that egret or astro city is a better reference than vewlix, because they were CRT cabs, but oh well. At some point, it probably should just be a CRT candy cab repro if that is what I am trying to make. So, for what this is, a catch-all, I still enjoy it and that's what matters. Some day I may re-do artwork. I'd love to make a vewlix repro with a LCD some day too which would be all about modern PC versions of fighters.

My Fighter CRT Cabinet Thread: Tzakiel's 2P Cabinet

Tzakiel

  • Trade Count: (0)
  • Full Member
  • ***
  • Offline Offline
  • Posts: 272
  • Last login:March 02, 2019, 12:59:01 pm
  • I want to build my own arcade controls!
Re: Tzakiel's UAII 2P Fighter CRT Build
« Reply #52 on: November 01, 2013, 05:13:13 pm »
Also, I am starting to realize that, if I really want to play Radiant Silvergun, CAVE shooters, etc, I am going to need a core i5, and thus a new MOBO. I really hope that won't undo my windows/groovymame/drivers install.
My Fighter CRT Cabinet Thread: Tzakiel's 2P Cabinet

rCadeGaming

  • Trade Count: (0)
  • Full Member
  • ***
  • Offline Offline
  • Posts: 1256
  • Last login:December 20, 2023, 09:16:09 pm
  • Just call me Rob!
Re: Tzakiel's UAII 2P Fighter CRT Build
« Reply #53 on: November 01, 2013, 07:23:24 pm »
I'm not sure how the control panel would interface with several different consoles.

As far as just getting button signals to the consoles, one MC Cthulhu per player will work for most of the consoles on my list.  Genesis, N64, and 360 need hacked PCB's if you want to use them.  Either way, I'd stick with a keyboard encoder for the PC, as that works faster with MAME and Windows than a joystick encoder.

As for switching between everything, that depends how far you want to take it.  I'm working on automating everything with an Arduino.  You will be able to select from more than a dozen consoles from the PC's front-end, and it will tell the Arduino to switch the video, audio, and controls.  It will be controlling a large circuit of solid-state relays.  Then press a menu button to return to the front-end when you're done playing that console.

You could keep it very simple if just switching between the PC and one console.  Just run the button connections through a DB-15 or DB-25 switch box.  Switch it one way and the buttons are connected to your I-PAC.  The other way they're connected to MC Cthulhu's.  Then you just need to switch audio/video.  With some custom cabling you could do run both audio/video and controls through a single DB-25 or DB-37 switch.  It's just simple connect the dots wiring, no fancy electronics.

I also don't want to be manually inserting game dvds/carts...

It's kind of a necessary evil if you must have real hardware or PSN/XBL online play.  You can download entire games from PSN and run them from your hard drive if you want (including games that also came out on disc like UMVC3).  I prefer to have the physical copy for my collection though.

If I could somehow just play online without needing the consoles, that would be the ultimate, but I don't see it happening.

There are some online options on the PC.  GGPO is worth looking into for older games you can't play online anywhere else.  As for anything available on PS3 or 360, that's always the best option.  The larger the user base, the easier it is to find quality matches consistently.

I do have a hori stick I modded with sanwa parts that I can take upstairs, sit on the couch and play the modern fighters online via PS3.

I hear that.  I wouldn't want to play Blazblue on my cab, as it looks much better on the low-lag LCD I have for that kind of thing.  Anything meant for a CRT though (Third Strike online, Guilty Gear online, etc.), I have to be able to play it on my cab.

As for the art, first of all, it's with the printer already, so the ship has sailed.

Yeah... I didn't realize there was a second page here before posting, so I didn't see that.  Dumb*ss mistake, sorry.   :banghead:

One thing I forgot to mention is that I saw Last Blade 2 on your list.  I love that game (look at my user pic)!  I don't get to play it enough because I'm always putting my time into fighters I can play online on PSN.  I wish they would re-release Last Blade 2.  Not likely though, given how unknown it is and the state of SNK these days.  I think it might be on GGPO, but apparently their site is down and has been for a while.  I don't know what's up with that...

Anyhow, yeah, great game.  Is there a reason you listed the Dreamcast version?  NEO-GEO games run great in MAME, very low lag, and Last Blade 1 and 2 are both there.  Are there some special features on the Dreamcast version or something?

Also, I am starting to realize that, if I really want to play Radiant Silvergun, CAVE shooters, etc, I am going to need a core i5, and thus a new MOBO. I really hope that won't undo my windows/groovymame/drivers install.

Well, you need to stick to XP64, and that is getting harder with new motherboards.  I need to make a post about this in the GroovyMAME section and ask Calamity a few things.

[cookie monster video]

Man this cracked me up.  He doesn't spaz out and eat all the cookies at the end though...

rCadeGaming

  • Trade Count: (0)
  • Full Member
  • ***
  • Offline Offline
  • Posts: 1256
  • Last login:December 20, 2023, 09:16:09 pm
  • Just call me Rob!
Re: Tzakiel's UAII 2P Fighter CRT Build
« Reply #54 on: November 01, 2013, 07:31:40 pm »
Oh, one more thing.  You mentioned top mounting your JLF's.  Do you know about the s-plates?

Tzakiel

  • Trade Count: (0)
  • Full Member
  • ***
  • Offline Offline
  • Posts: 272
  • Last login:March 02, 2019, 12:59:01 pm
  • I want to build my own arcade controls!
Re: Tzakiel's UAII 2P Fighter CRT Build
« Reply #55 on: November 01, 2013, 08:19:28 pm »
Thanks rcade. I am actually on xp32. No good reason really, just what I had lying around. I'm not sure 64 is worth the trouble for driver issues but I might try it before I go thru the entire config. Just hard with the baby and all to find time for lengthy software marathons.

Yeah, the pc speakers are temporary.

No reason for last blade 2 DC, just want sure if it was better or worse than arcade. Id prefer native res if possible, so if MAME works well, great.

Speaking of native res, any chance that snes, Saturn, or nes emulators, etc can put out native resolutions (without changing windows res manually first)
My Fighter CRT Cabinet Thread: Tzakiel's 2P Cabinet

rCadeGaming

  • Trade Count: (0)
  • Full Member
  • ***
  • Offline Offline
  • Posts: 1256
  • Last login:December 20, 2023, 09:16:09 pm
  • Just call me Rob!
Re: Tzakiel's UAII 2P Fighter CRT Build
« Reply #56 on: November 01, 2013, 09:06:22 pm »
I don't think the driver issues with new motherboards are any worse with XP64 vs 32.  64 is needed to get the most out of a faster processor with GroovyMAME though.

As for console emulators, I'm not sure.  I think some can.  Setting up all those different emulators for different consoles can be a mess, and then the lag is questionable.  Unless the emulation is really hacked up, it's generally at least one frame more than real hardware, could be several depending on the emulator.  You might want to look in GroovyUME. 

For me it's another reason to use real hardware for console stuff.  I would use all real arcade PCB's too but they're more expensive and take up more space .  I'm planning on getting a few though.

rCadeGaming

  • Trade Count: (0)
  • Full Member
  • ***
  • Offline Offline
  • Posts: 1256
  • Last login:December 20, 2023, 09:16:09 pm
  • Just call me Rob!
Re: Tzakiel's UAII 2P Fighter CRT Build
« Reply #57 on: November 01, 2013, 09:20:28 pm »
Clear Sanwa button plungers are available now that you can put labels inside:

http://www.paradisearcadeshop.com/sanwa-obsc-30mm-clear-pushbutton/732-sanwa-obsc-30-crystal.html

Tzakiel

  • Trade Count: (0)
  • Full Member
  • ***
  • Offline Offline
  • Posts: 272
  • Last login:March 02, 2019, 12:59:01 pm
  • I want to build my own arcade controls!
Re: Tzakiel's UAII 2P Fighter CRT Build
« Reply #58 on: November 02, 2013, 12:49:51 am »
Oh, one more thing.  You mentioned top mounting your JLF's.  Do you know about the s-plates?

I saw them, but I wanted a nice high mount and I saw there is a top mount guide here on the forum so I felt more comfortable following that.
My Fighter CRT Cabinet Thread: Tzakiel's 2P Cabinet

Tzakiel

  • Trade Count: (0)
  • Full Member
  • ***
  • Offline Offline
  • Posts: 272
  • Last login:March 02, 2019, 12:59:01 pm
  • I want to build my own arcade controls!
Re: Tzakiel's UAII 2P Fighter CRT Build
« Reply #59 on: November 02, 2013, 01:48:34 pm »


I made good progress sanding the rounded corners of the CP to perfection. So the CP blank is done, but still need to drill (waiting for gameongrafix to ship my template), route, and do the t-moulding slot.

My goal this weekend was to glue the bottom and side panels of the box together, and paint those, but I've hit a snag testing butt joints on scrap.

Basically, the coarse thread drywall screws are going into the pilot hole nicely, but when they reach the head of the screw against the mdf, they just turn freely. Maybe my pilot hole is too big - unfortunately I don't have a smaller bit to try. I'm using 1 5/8" screws.


Then I tried countersinking in hopes of the screws going in better. The problem is that the countersink bit only seems to cut so much and then just stops biting, turning in the countersink hole but not doing anything. Thus, the screw isn't flush or inset like I wanted. And it still turns freely. I tried a couple different size countersink bits but all just stop cutting at a certain depth. Argh! Any ideas?

My Fighter CRT Cabinet Thread: Tzakiel's 2P Cabinet

a1pharm

  • Trade Count: (0)
  • Full Member
  • ***
  • Offline Offline
  • Posts: 374
  • Last login:April 15, 2024, 08:25:50 pm
  • Planning and preparation prevents problems
Re: Tzakiel's UAII 2P Fighter CRT Build
« Reply #60 on: November 02, 2013, 04:43:53 pm »


I made good progress sanding the rounded corners of the CP to perfection. So the CP blank is done, but still need to drill (waiting for gameongrafix to ship my template), route, and do the t-moulding slot.

My goal this weekend was to glue the bottom and side panels of the box together, and paint those, but I've hit a snag testing butt joints on scrap.

Basically, the coarse thread drywall screws are going into the pilot hole nicely, but when they reach the head of the screw against the mdf, they just turn freely. Maybe my pilot hole is too big - unfortunately I don't have a smaller bit to try. I'm using 1 5/8" screws.


Then I tried countersinking in hopes of the screws going in better. The problem is that the countersink bit only seems to cut so much and then just stops biting, turning in the countersink hole but not doing anything. Thus, the screw isn't flush or inset like I wanted. And it still turns freely. I tried a couple different size countersink bits but all just stop cutting at a certain depth. Argh! Any ideas?

To fix the "spinning" drill a smaller pilot hole.

To fix the countersink problem: apply more pressure, and oscillate the drill as you are pressing.  Don't be surprised if you are leaning on the drill with almost all of your weight as you oscillate the drill.

Tzakiel

  • Trade Count: (0)
  • Full Member
  • ***
  • Offline Offline
  • Posts: 272
  • Last login:March 02, 2019, 12:59:01 pm
  • I want to build my own arcade controls!
Re: Tzakiel's UAII 2P Fighter CRT Build
« Reply #61 on: November 05, 2013, 12:32:26 am »
Some updates:

I was able to get a smaller drill bit and now the drywall screws are grabbing nicely into the MDF. I also managed to get some deeper countersinks, thanks to a1pharm for ensuring I wasn't crazy and just needed to keep at it.


I drilled a couple of button holes in the left side panel using my dewalt hole saw. In the pic you can't really tell, but this burned the SH*T out of the MDF. Tons of black dust came up and smoke... lots of bad fumes. The insides of the holes are toast. Am I doing it wrong? These came out OK enough, but for my control panel drilling I don't want to fry it so badly.  I simply installed the hole saw into the arbor, and went at it with a medium speed power drill. Not sure what caused such horrible burning.


I cut the slot for my t-molding which was easier than I expected. It's offset a bit to account for plexi on top. Overall I really like the router... good tool.


And I tested out two types of black spray paint. Flat and satin. The flat is too flat and the satin is too glossy... in the pic it appears the flat is close, but in reality it has no shine at all and really doesn't match too well when the light hits it.

(test piece of MDF is the skinny one with flat on top and satin below, UAII laminate is on right)


Next steps:

  • Finish all pilot holes and sinks, screw and glue box together, bondo and sand over screws. Paint.
  • Receive artwork and template in mail (shouldn't be more than a day or two, already shipped to my surprise!
  • Drill CP holes for buttons, top mount JLFs
  • Buy a piece of 1/8" plexi (seems like a size my Lowes doesn't have) and figure out how to cut holes in it that match CP
  • Lay down artwork, plexi, wire everything up!
  • Install XP 64, get hyperspin working right (I dread this), and everything configured

« Last Edit: November 05, 2013, 12:36:13 am by Tzakiel »
My Fighter CRT Cabinet Thread: Tzakiel's 2P Cabinet

PL1

  • Global Moderator
  • Trade Count: (+1)
  • Full Member
  • *****
  • Online Online
  • Posts: 9425
  • Last login:Today at 04:28:35 pm
  • Designated spam hunter
Re: Tzakiel's UAII 2P Fighter CRT Build
« Reply #62 on: November 05, 2013, 01:15:42 am »
I drilled a couple of button holes in the left side panel using my dewalt hole saw. In the pic you can't really tell, but this burned the SH*T out of the MDF. Tons of black dust came up and smoke... lots of bad fumes. The insides of the holes are toast. Am I doing it wrong? These came out OK enough, but for my control panel drilling I don't want to fry it so badly.  I simply installed the hole saw into the arbor, and went at it with a medium speed power drill. Not sure what caused such horrible burning.
The burning was caused by the same things that make bow-and-drill firestarting work -- friction/heat + fine wood dust + compression.

To keep from burning it up, you need to back out periodically to clear out the dust from the cut and cool the blade.

Better yet, get a Freud FB-008 1-1/8-Inch by 3/8-Inch Shank Forstner Drill Bit or similar.

It's a truly worthwhile investment IMHO.


Scott

Tzakiel

  • Trade Count: (0)
  • Full Member
  • ***
  • Offline Offline
  • Posts: 272
  • Last login:March 02, 2019, 12:59:01 pm
  • I want to build my own arcade controls!
Re: Tzakiel's UAII 2P Fighter CRT Build
« Reply #63 on: November 07, 2013, 08:57:54 am »
Sorry, messed this post up... disregard
« Last Edit: November 07, 2013, 09:24:14 am by Tzakiel »
My Fighter CRT Cabinet Thread: Tzakiel's 2P Cabinet

Tzakiel

  • Trade Count: (0)
  • Full Member
  • ***
  • Offline Offline
  • Posts: 272
  • Last login:March 02, 2019, 12:59:01 pm
  • I want to build my own arcade controls!
Re: Tzakiel's UAII 2P Fighter CRT Build
« Reply #64 on: November 07, 2013, 09:23:30 am »


Quote
The burning was caused by the same things that make bow-and-drill firestarting work -- friction/heat + fine wood dust + compression.

Except that usually doesn't work except in the movies, where as this hole saw fire method worked quite well  :laugh:

More progress to post soon....
My Fighter CRT Cabinet Thread: Tzakiel's 2P Cabinet

rCadeGaming

  • Trade Count: (0)
  • Full Member
  • ***
  • Offline Offline
  • Posts: 1256
  • Last login:December 20, 2023, 09:16:09 pm
  • Just call me Rob!
Re: Tzakiel's UAII 2P Fighter CRT Build
« Reply #65 on: November 07, 2013, 05:21:08 pm »
Yup, with those hole saws, there's nowhere for the material you're removing to go so it starts to build up in the teeth.  They fill up pretty quickly to the point where it's mostly wood on wood at the point of contact, hence the burning through instead of cutting.  A forstner bit on the other hand provides a path for the material you're removing to be drawn out.

PL1, tell me this though.  A benefit of a hole saw for me is that I can cut through the plexiglass and the wood underneath at the same time, ensuring that my button holes are in the same place on both pieces.  How is a forstner bit on plexi?

a1pharm

  • Trade Count: (0)
  • Full Member
  • ***
  • Offline Offline
  • Posts: 374
  • Last login:April 15, 2024, 08:25:50 pm
  • Planning and preparation prevents problems
Re: Tzakiel's UAII 2P Fighter CRT Build
« Reply #66 on: November 07, 2013, 05:40:07 pm »
... it's mostly wood on wood at the point of contact, hence the burning ...

I think there is a joke somewhere in that line, but I can't come up with one right now...

Tzakiel

  • Trade Count: (0)
  • Full Member
  • ***
  • Offline Offline
  • Posts: 272
  • Last login:March 02, 2019, 12:59:01 pm
  • I want to build my own arcade controls!
Re: Tzakiel's UAII 2P Fighter CRT Build
« Reply #67 on: November 07, 2013, 05:45:39 pm »

PL1, tell me this though.  A benefit of a hole saw for me is that I can cut through the plexiglass and the wood underneath at the same time, ensuring that my button holes are in the same place on both pieces.  How is a forstner bit on plexi?

Sh*t. I started drilling my cp holes today and forgot this. I haven't bought plexi yet. I only did 4 holes... Should I wait to buy plexi before doing the rest? 
My Fighter CRT Cabinet Thread: Tzakiel's 2P Cabinet

rCadeGaming

  • Trade Count: (0)
  • Full Member
  • ***
  • Offline Offline
  • Posts: 1256
  • Last login:December 20, 2023, 09:16:09 pm
  • Just call me Rob!
Re: Tzakiel's UAII 2P Fighter CRT Build
« Reply #68 on: November 07, 2013, 05:46:47 pm »
... it's mostly wood on wood at the point of contact, hence the burning ...

I think there is a joke somewhere in that line, but I can't come up with one right now...

Well, Tzakiel is talking about MDF, I think you're thinking of hardwood...  Also, this is an immediate burn, it doesn't take until the next morning.

Sh*t. I started drilling my cp holes today and forgot this. I haven't bought plexi yet. I only did 4 holes... Should I wait to buy plexi before doing the rest?

Yeah, probably.

a1pharm

  • Trade Count: (0)
  • Full Member
  • ***
  • Offline Offline
  • Posts: 374
  • Last login:April 15, 2024, 08:25:50 pm
  • Planning and preparation prevents problems
Re: Tzakiel's UAII 2P Fighter CRT Build
« Reply #69 on: November 07, 2013, 06:10:11 pm »

PL1, tell me this though.  A benefit of a hole saw for me is that I can cut through the plexiglass and the wood underneath at the same time, ensuring that my button holes are in the same place on both pieces.  How is a forstner bit on plexi?

Sh*t. I started drilling my cp holes today and forgot this. I haven't bought plexi yet. I only did 4 holes... Should I wait to buy plexi before doing the rest?

Finish your CP hole drilling, and buy your plexi later.  Clamp the plexi over the drilled CP.  Drill a 1/2" hole using a hole saw in about the middle of each hole.  Use a flush trim router bit and have it enter through the plexi in that 1/2" hole you just drilled, and use it to cut flush holes in the plexi.  Make sure you don't go too slow and burn the plexi.

If you use a hole saw, you may melt the plexi, and it will look like ---steaming pile of meadow muffin---.  Trust me on the method I outlined above. If it doesn't make sense, let me know.
« Last Edit: November 07, 2013, 06:15:42 pm by a1pharm »

PL1

  • Global Moderator
  • Trade Count: (+1)
  • Full Member
  • *****
  • Online Online
  • Posts: 9425
  • Last login:Today at 04:28:35 pm
  • Designated spam hunter
Re: Tzakiel's UAII 2P Fighter CRT Build
« Reply #70 on: November 07, 2013, 06:12:49 pm »
Quote
The burning was caused by the same things that make bow-and-drill firestarting work -- friction/heat + fine wood dust + compression.
Except that usually doesn't work except in the movies, where as this hole saw fire method worked quite well  :laugh:
Getting smoke with bow and drill is easy, getting a fire is harder -- the movies don't show the fine points that make it work.    ;D


How is a forstner bit on plexi?
I don't do plexi over my CPs so I'll defer to Selfie on this one.
Forstner Bits and hole saws are suitable also


Scott
« Last Edit: November 07, 2013, 06:18:53 pm by PL1 »

rCadeGaming

  • Trade Count: (0)
  • Full Member
  • ***
  • Offline Offline
  • Posts: 1256
  • Last login:December 20, 2023, 09:16:09 pm
  • Just call me Rob!
Re: Tzakiel's UAII 2P Fighter CRT Build
« Reply #71 on: November 07, 2013, 06:15:12 pm »
If you use a hole saw, you may melt the plexi, and it will look like ---steaming pile of meadow muffin---.

This only happens if you go too fast.  If you take it slow and regularly clear the teeth, you'll get nice results.

rCadeGaming

  • Trade Count: (0)
  • Full Member
  • ***
  • Offline Offline
  • Posts: 1256
  • Last login:December 20, 2023, 09:16:09 pm
  • Just call me Rob!
Re: Tzakiel's UAII 2P Fighter CRT Build
« Reply #72 on: November 07, 2013, 06:17:23 pm »
Also, a drill press makes things a lot easier (provided you have one with enough space to fit your panel under).

Tzakiel

  • Trade Count: (0)
  • Full Member
  • ***
  • Offline Offline
  • Posts: 272
  • Last login:March 02, 2019, 12:59:01 pm
  • I want to build my own arcade controls!
Re: Tzakiel's UAII 2P Fighter CRT Build
« Reply #73 on: November 07, 2013, 06:25:38 pm »

Quote

Finish your CP hole drilling, and buy your plexi later.  Clamp the plexi over the drilled CP.  Drill a 1/2" hole using a hole saw in about the middle of each hole.  Use a flush trim router bit and have it enter through the plexi in that 1/2" hole you just drilled, and use it to cut flush holes in the plexi.  Make sure you don't go too slow and burn the plexi.


Hm.. sounds reasonable... since I have the tools and bit for this I can give it a try. Honestly it makes me a bit nervous drilling both at the same time anyway, given how badly the hole saw is burning the MDF.  I am backing it out and clearing it but it burns almost instantly.

In fact, the process of drilling the holes with the saw in general is frustrating... What happens is I clamp the CP down over my table (with a hole in it to clear the saw where I am drilling), then I drill the hole, backing out 3-4 times to let it cool... then it punches through and the MDF plugs the saw. So I have to unplug the drill, remove the hole saw, remove the arbor, pry out the chunk of MDF with a screwdriver, clear the teeth, re-assemble the arbor, reinstall the bit in the drill, and then move my CP so the next hole is over my table's hole, clamp, and drill again. And I have a lot of holes left! :)

Also starting to get worried about my screw in button locations a bit... lining up the orange screw rings over my printed templates, there are places where they seem like they will be too close to each other to fit. Which is odd since I used the slagcoin template and printed at 100% size. But I guess we will find out.
My Fighter CRT Cabinet Thread: Tzakiel's 2P Cabinet

a1pharm

  • Trade Count: (0)
  • Full Member
  • ***
  • Offline Offline
  • Posts: 374
  • Last login:April 15, 2024, 08:25:50 pm
  • Planning and preparation prevents problems
Re: Tzakiel's UAII 2P Fighter CRT Build
« Reply #74 on: November 07, 2013, 06:34:26 pm »
If you use the method I proposed, don't press too hard on the plexi when drilling the "pilot" holes, or you may crack the sheet.  You may want to just mark with a marker where on the plexi you want the pilot holes, then put the plexi over a piece of scrap wood, and then drill the pilots.  After the pilots are drilled, then clamp it to the CP, and use the flush trim bit.

Also: yeah using a hole saw for buttons sucks.  They sell 1 1/8" spade bits at ACE Hardware for less than $5.

rCadeGaming

  • Trade Count: (0)
  • Full Member
  • ***
  • Offline Offline
  • Posts: 1256
  • Last login:December 20, 2023, 09:16:09 pm
  • Just call me Rob!
Re: Tzakiel's UAII 2P Fighter CRT Build
« Reply #75 on: November 07, 2013, 06:59:56 pm »
Honestly it makes me a bit nervous drilling both at the same time anyway, given how badly the hole saw is burning the MDF.  I am backing it out and clearing it but it burns almost instantly...  I drill the hole, backing out 3-4 times to let it cool...

It shouldn't be that bad.  The teeth on your hole saw might be worn.

...then it punches through and the MDF plugs the saw. So I have to unplug the drill, remove the hole saw, remove the arbor, pry out the chunk of MDF with a screwdriver, clear the teeth, re-assemble the arbor, reinstall the bit in the drill...

Doesn't the hole saw have a slot in the side of it for getting the plugs of material out?  I can clear mine with a screwdriver in about two seconds.  I don't even have to take the bit out of the drill, much less the saw off the arbor.

Also starting to get worried about my screw in button locations a bit... lining up the orange screw rings over my printed templates, there are places where they seem like they will be too close to each other to fit. Which is odd since I used the slagcoin template and printed at 100% size. But I guess we will find out.

I've used the Astro City player one template from Slagcoin on several control panels using Sanwa screw-in buttons and didn't have any problems.  You'll find that the buttons have a little wiggle room in a 1-1/8 hole.

Also: yeah using a hole saw for buttons sucks.  They sell 1 1/8" spade bits at ACE Hardware for less than $5.

To each his own.  With a good sharp hole saw I'm able to do it all in one step without any trouble.  No need to move to router.

Spade bits aren't always the best option on plexiglass.

Tzakiel

  • Trade Count: (0)
  • Full Member
  • ***
  • Offline Offline
  • Posts: 272
  • Last login:March 02, 2019, 12:59:01 pm
  • I want to build my own arcade controls!
Re: Tzakiel's UAII 2P Fighter CRT Build
« Reply #76 on: November 07, 2013, 07:32:22 pm »
rCade: actually the hole saw is new. It does have slots but the mdf circle doesn't budge until I take arbor out and jam a screwdriver in the pilot hole and remove piece by piece. Maybe just a crappy saw. It's a dewalt 1 3/16" (marked 30mm)

Good to know about wiggle room, that's probably right.
My Fighter CRT Cabinet Thread: Tzakiel's 2P Cabinet

rCadeGaming

  • Trade Count: (0)
  • Full Member
  • ***
  • Offline Offline
  • Posts: 1256
  • Last login:December 20, 2023, 09:16:09 pm
  • Just call me Rob!
Re: Tzakiel's UAII 2P Fighter CRT Build
« Reply #77 on: November 07, 2013, 08:00:32 pm »
It could be the saw.  Are the teeth offset like this:


Or are they just flush with the saw?

I don't know, I'm just sharing my experience with the matter, but I'm not saying not to try the other methods recommended here.  We are two different people using different tools in different workshops.  Find what works best for you.

Tzakiel

  • Trade Count: (0)
  • Full Member
  • ***
  • Offline Offline
  • Posts: 272
  • Last login:March 02, 2019, 12:59:01 pm
  • I want to build my own arcade controls!
Re: Tzakiel's UAII 2P Fighter CRT Build
« Reply #78 on: November 07, 2013, 09:05:51 pm »
They are offset like the first pic.

And I just realized a huge update from this morning somehow didn't post. Will have to repost in a bit.
My Fighter CRT Cabinet Thread: Tzakiel's 2P Cabinet

Tzakiel

  • Trade Count: (0)
  • Full Member
  • ***
  • Offline Offline
  • Posts: 272
  • Last login:March 02, 2019, 12:59:01 pm
  • I want to build my own arcade controls!
Re: Tzakiel's UAII 2P Fighter CRT Build
« Reply #79 on: November 08, 2013, 12:39:26 am »
Well, as I said, a big update somehow got lost here and that's frustrating.

Long story short, I finished screwing and gluing the box together. Bondo over the screw heads, then sanded what i thought was very smooth.


Then I sprayed black, using several thin coats:


It looks good from the right angles, but when you take a closer look the bondo is VERY visible under the paint. I wish I had just not used it... looks terrible.  A shame because I have worked with spackle and repairing drywall in the past, and didn't think it would show since I tried to feather and sand it. Apparently not nearly enough.


Is this fixable? Should I block sand it after the spraypaint is fully dried?  Or is it too late for that?


Also, pics of the artwork was requested. Here they are:


Everything is very high quality and the paper is more like plastic, very nice. The marquee lights up extremely vibrant when held up to light.


For some reason he sent me an adhesive back for the CP art despite ordering the no adhesive option. I tried laying it flat, thinking I could just use it anyway and not remove the backing, but the backing has buckled and made a bubble as a result, so I hesitate to do that. I've contacted him for a fix/replacement but haven't heard back yet.


This is the template option I chose which is also printed on nice plastic-like paper.


Nice high quality print all around... my files were 260dpi rather than the 300dpi gold standard, and still looks amazing. Dunno if I could tell the difference at a higher dpi.

My take on Gameongrafix
  • Print quality: Very high
  • Paper quality: Thick and durable, good stuff. marquee lights up brightly.
  • Order process time: Faster than advertised, shipped within a few business days
  • Communication: A bit slow. Replies seem to take a couple of days. Also when I asked about hole trimming before the order he said he could do it and they do it by hand... so I replied and said okay, please cut the holes in my order. Then it arrived with the holes not cut. Not a big deal but I didn't get the sense that communication was a strong suit. The web site also says customers may not call. Fair enough... I just hope I can get the right print without adhesive as I ordered. I'll be sure to update here if (as expected) things go right.
« Last Edit: November 08, 2013, 12:41:10 am by Tzakiel »
My Fighter CRT Cabinet Thread: Tzakiel's 2P Cabinet

CaptainMarvel

  • Trade Count: (0)
  • Full Member
  • ***
  • Offline Offline
  • Posts: 104
  • Last login:May 03, 2020, 04:49:55 pm
Re: Tzakiel's UAII 2P Fighter CRT Build
« Reply #80 on: November 08, 2013, 01:00:17 pm »
AWESOME UPDATE !!!!


Keep up the great work !!!


 :applaud:
TOM

Understanding that you may not see success instantly, but that all your good decisions add up to a cumulative success over time is what separates those who "get there" and those who don't. Every day you either get further away from your goals, or closer to them . . . Its up to YOU."

rCadeGaming

  • Trade Count: (0)
  • Full Member
  • ***
  • Offline Offline
  • Posts: 1256
  • Last login:December 20, 2023, 09:16:09 pm
  • Just call me Rob!
Re: Tzakiel's UAII 2P Fighter CRT Build
« Reply #81 on: November 08, 2013, 03:04:34 pm »
Looking good.  Yeah, those bondo marks should sand out.  Maybe it expanded a little after the first time you sanded it flat, due to the paint moistening it.

Tzakiel

  • Trade Count: (0)
  • Full Member
  • ***
  • Offline Offline
  • Posts: 272
  • Last login:March 02, 2019, 12:59:01 pm
  • I want to build my own arcade controls!
Re: Tzakiel's UAII 2P Fighter CRT Build
« Reply #82 on: November 08, 2013, 03:23:04 pm »
Okay, so I can just go ahead and sand the spraypainted panels and re-paint again over it?
My Fighter CRT Cabinet Thread: Tzakiel's 2P Cabinet

rCadeGaming

  • Trade Count: (0)
  • Full Member
  • ***
  • Offline Offline
  • Posts: 1256
  • Last login:December 20, 2023, 09:16:09 pm
  • Just call me Rob!
Re: Tzakiel's UAII 2P Fighter CRT Build
« Reply #83 on: November 08, 2013, 03:28:45 pm »
Yes.  After sanding you might want to repaint that whole side there evenly, with the other sides masked.  That way there's no blending to worry about.  The transition between the different coats will be at the corners.  You may also want to rough up any spray point that'll be getting another coat, so that it looks even with the main area you're sanding.

BadMouth

  • Trade Count: (+6)
  • Full Member
  • ***
  • Offline Offline
  • Posts: 9226
  • Last login:June 13, 2024, 01:06:22 pm
  • ...
Re: Tzakiel's UAII 2P Fighter CRT Build
« Reply #84 on: November 08, 2013, 10:19:04 pm »
The key is getting enough primer or bondo on the MDF to seal it completely so the paint can't sink in anymore.
Then the bondo will blend in.  If you can still tell it's MDF and not metal, you need more primer.

a1pharm

  • Trade Count: (0)
  • Full Member
  • ***
  • Offline Offline
  • Posts: 374
  • Last login:April 15, 2024, 08:25:50 pm
  • Planning and preparation prevents problems
Re: Tzakiel's UAII 2P Fighter CRT Build
« Reply #85 on: November 09, 2013, 11:55:51 am »
This may be too late, but take a look at this thread:

http://forum.arcadecontrols.com/index.php/topic,134090.msg1386514.html#msg1386514

It goes over how to make a glue/water mixture that "seals" and hardens the bare MDF.  I used this idea on the most recent barcade I made, and WOW does this work great!  It makes the slot edge super durable.

Tzakiel

  • Trade Count: (0)
  • Full Member
  • ***
  • Offline Offline
  • Posts: 272
  • Last login:March 02, 2019, 12:59:01 pm
  • I want to build my own arcade controls!
Re: Tzakiel's UAII 2P Fighter CRT Build
« Reply #86 on: November 10, 2013, 05:11:01 pm »
I got all of the cp holes drilled. Was about to dive in to making the joystick hole and recesses when I realized I am still pretty clueless about top mounting jlfs even though the guide on this site is helpful. For one, I am not sure which way to orient the stick so up is up on the stick. In addition, I can't seem to get the e clip off the stick which the guide says to do so you can trace the bottom, etc. After that, I'm a bit nervous about all the tracing, cutting, template making, etc. I'm starting to think that for a newbie like me maybe I should just under mount the sticks after recessing the bottom. That would be a pretty thin area so maybe I should go ahead and order s-plates to make it a bit thicker. That seems easier then bothering with top mounting.

If my plexiglass is 1/8" thick, how shallow/thick do I need to make the mdf where buttons and stick plates go? I think the buttons would have to be 1/8" for a total of 1/4" mdf and plexi... Seems very thin! And the stick I honestly am not sure. Anyone have an idea what the thickness should be including plexi for a s plates or regular plates?
« Last Edit: November 10, 2013, 05:36:03 pm by Tzakiel »
My Fighter CRT Cabinet Thread: Tzakiel's 2P Cabinet

Tzakiel

  • Trade Count: (0)
  • Full Member
  • ***
  • Offline Offline
  • Posts: 272
  • Last login:March 02, 2019, 12:59:01 pm
  • I want to build my own arcade controls!
Re: Tzakiel's UAII 2P Fighter CRT Build
« Reply #87 on: November 10, 2013, 09:27:02 pm »
Okay, to put my progress and questions into a clearer format with pics...

I got the holes drilled:


I drilled 24mm holes for the joysticks for now, knowing that I would need to expand these for the top mount idea. Now I need to recess the bottom of the CP to fit my buttons, which are sanwa OBSN, and my joysticks, which are JLF with normal mounting plates.

For the buttons, I assume I need to get an overall thickness of 1/4", which should include the 1/8" plexiglass, and so I assume I need to route the 1/2" MDF all the way down to 1/8" from below. Will that be OK?

The joysticks... I planned to use the top mount guide on this site. It basically involves taking apart the stick, tracing the base, making a hole of that shape and size, then tracing the mounting plate and recessing that into the top of the CP just enough to make it flush. Now I'm considering a more simple under mount.. (see below)

A few questions...

Is this the correct orientation to mount the stick?  So the wire harness thing on the upper left... and in this pic, up would indeed be up? There are no indicators as far as I can tell, so I really don't even know which way it's supposed to face. This is a guess:


How do I safely remove the E-clip?  I can't get it off... I can almost get it off with a big screwdriver but it won't quite slip off.

EDIT: I think I figured this out for bottom mounting using the basic plate... after drawing it out and confusing myself a couple of times. The thickness of my MDF and plexi will be 15.7mm. It should be 11mm, given that the recommended shaft distance for JLF is 23mm. Since the shaft is 34mm base to ball, 34-11 = 23mm.  So I think I will have to route a recess of 4.7mm in the bottom, in order to have 8mm of MDF remaining + 3mm of plexi to equal 11mm of material.  Make sense?  Is 8mm of MDF strong enough to support the stick if I use machine screws and nuts/washers?  I'd countersink the top for screw heads to lay flush, I think.

The alternative is to mount with s-plates but then I am at 6.7mm of material without doing anything... I'd need to add washers or spacers to move the joystick plate down and get the required 11mm distance. It would be a stronger hold probably but would the regular mounting plate work OK?
« Last Edit: November 10, 2013, 10:43:41 pm by Tzakiel »
My Fighter CRT Cabinet Thread: Tzakiel's 2P Cabinet

rCadeGaming

  • Trade Count: (0)
  • Full Member
  • ***
  • Offline Offline
  • Posts: 1256
  • Last login:December 20, 2023, 09:16:09 pm
  • Just call me Rob!
Re: Tzakiel's UAII 2P Fighter CRT Build
« Reply #88 on: November 10, 2013, 11:32:56 pm »
First of all, it's good that you're sticking to the recommended height.  I wouldn't deviate from that.

Your math is sound, but 8mm of MDF is not much to support your stick.  That is less than a quarter inch.  On top of that, you'll be countersinking a considerable depth into the MDF to get the screws flush, and there will be even less material left between the plate and the screw heads.  (The screws will be hidden underneath the plexi right?)

It doesn't sound safe enough to me.  Think how much work has gone into this already, and how much work it will take to fix it if someone gets excited and breaks it during a heated game.  It's possible it would hold up for a while, but better safe than sorry.

For starters, are you married to 1/8" plexi?  1/16" is plenty thick for that application; it's what I used on top of all my control panels.  Switching would give an extra 1/16" of MDF right off the bat.  I also used 5/8" MDF, but I doubt you want to change that at this point.

Anyhow, if bottom mounting gives you more material that's what you need to do.

The buttons will be fine.  Unlike the stick, they get a lot of support from the plexi as well as the MDF.

As for the clip, it should come off without too much trouble.  Find a flathead screwdriver that will fit well into one of the spaces between the shaft and the clip and work it off.  Keep in mind that the clip should follow a path  away and perpendicular to the axis of the shaft as it comes off.

Tzakiel

  • Trade Count: (0)
  • Full Member
  • ***
  • Offline Offline
  • Posts: 272
  • Last login:March 02, 2019, 12:59:01 pm
  • I want to build my own arcade controls!
Re: Tzakiel's UAII 2P Fighter CRT Build
« Reply #89 on: November 10, 2013, 11:49:45 pm »
Thanks again rCade... 8mm is actually .31 inches so it's more than a quarter inch but not by much. So are you advocating for the s plates? I think they give you 9mm so I would actually have the opposite problem and need to use washers, I guess, to add thickness and move them down far enough to keep things at the right distance.

Re: 1/8" plexi, I bought the 5/8" t molding and cut the slot based on that so id like to keep to that. But I suppose I could do 1/16" and trim the t molding a bit, if there were a safe way to razor it off without damaging plexi.
« Last Edit: November 10, 2013, 11:53:34 pm by Tzakiel »
My Fighter CRT Cabinet Thread: Tzakiel's 2P Cabinet

Locke141

  • Trade Count: (0)
  • Full Member
  • ***
  • Offline Offline
  • Posts: 1690
  • Last login:June 09, 2024, 10:35:34 am
  • Never grow up.
Re: Tzakiel's UAII 2P Fighter CRT Build
« Reply #90 on: November 10, 2013, 11:58:34 pm »
If your going to do Saturn emulation you should add Guardian Heroes. There are many other Saturn gems you could add, the system has held up much better then the play station.

I feel Dragon Force is also worth a special mention. There is a english patch for the sequel.

http://www.romhacking.net/translations/1622/ 
   
Have a read over at racketboy.com He has many articles on Saturn, and he even still sells mod chips.

http://www.racketboy.com/retro/best-undiscovered-sega-saturn-games
« Last Edit: November 11, 2013, 12:05:16 am by Locke141 »

rCadeGaming

  • Trade Count: (0)
  • Full Member
  • ***
  • Offline Offline
  • Posts: 1256
  • Last login:December 20, 2023, 09:16:09 pm
  • Just call me Rob!
Re: Tzakiel's UAII 2P Fighter CRT Build
« Reply #91 on: November 11, 2013, 12:14:30 am »
Right, right.  8 / 25.4 = 0.315.  I shouldn't try to do mental math when I'm tired.  .315 still doesn't sound safe though.

Yes, I made a typo too, I should have said "Anyhow, if bottom mounting with the s-plates gives you more material that's what you need to do."

As for the 1/16" plexi, scratch that as well.  My last was truly a crap post all around!  To be honest I'm pretty sick atm.   :dizzy:

Sounds like with the s-plates you'll have the full 1/2" of MDF either way, so the 1/16" plexi will just increase the size of spacers you need.  Stick with the 1/8" plexi, it will just strengthen the button mounting.  No need to jeopardize your T-molding.

Locke, I never guessed you were into Guardian Heroes ;).  Seriously though, given how good it is, it deserves real hardware :D.

Tzakiel

  • Trade Count: (0)
  • Full Member
  • ***
  • Offline Offline
  • Posts: 272
  • Last login:March 02, 2019, 12:59:01 pm
  • I want to build my own arcade controls!
Re: Tzakiel's UAII 2P Fighter CRT Build
« Reply #92 on: November 11, 2013, 05:43:59 am »
Thanks. Looks like I am going to need s plates.

Does anyone know if I have the orientation right in my photo?
My Fighter CRT Cabinet Thread: Tzakiel's 2P Cabinet

Tzakiel

  • Trade Count: (0)
  • Full Member
  • ***
  • Offline Offline
  • Posts: 272
  • Last login:March 02, 2019, 12:59:01 pm
  • I want to build my own arcade controls!
Re: Tzakiel's UAII 2P Fighter CRT Build
« Reply #93 on: November 11, 2013, 05:52:05 am »
Hmm, focusattack sells the s plates with or without screws it says you need to install on a jlf. Do I need those or are they the same as come with the complete stick?
My Fighter CRT Cabinet Thread: Tzakiel's 2P Cabinet

rCadeGaming

  • Trade Count: (0)
  • Full Member
  • ***
  • Offline Offline
  • Posts: 1256
  • Last login:December 20, 2023, 09:16:09 pm
  • Just call me Rob!
Re: Tzakiel's UAII 2P Fighter CRT Build
« Reply #94 on: November 11, 2013, 09:21:45 am »
No, you don't need those screws.  Sorry, I forgot about the orientation question.  It doesn't matter how it's oriented, you can swap the wires around so that up is up, down is down, etc.  Orient it however it looks best, or however will make the wiring cleanest.

Tzakiel

  • Trade Count: (0)
  • Full Member
  • ***
  • Offline Offline
  • Posts: 272
  • Last login:March 02, 2019, 12:59:01 pm
  • I want to build my own arcade controls!
Re: Tzakiel's UAII 2P Fighter CRT Build
« Reply #95 on: November 11, 2013, 12:24:12 pm »
Here is the response I got back from the seller regarding s-plate screws... I didn't imagine the screws being hard to remove but maybe it's worth picking them up for the extra couple of dollars.

Quote
Thanks for your inquiry.  The S plate is sold without the screws.  I would recommend buying the screws because removing the original screws from the joystick are notoriously difficult.  There is a red glue installed in each screw and nut that attaches the plate to the joystick.  Trying to remove them will often resulting in stripping the screws.
My Fighter CRT Cabinet Thread: Tzakiel's 2P Cabinet

Locke141

  • Trade Count: (0)
  • Full Member
  • ***
  • Offline Offline
  • Posts: 1690
  • Last login:June 09, 2024, 10:35:34 am
  • Never grow up.
Re: Tzakiel's UAII 2P Fighter CRT Build
« Reply #96 on: November 11, 2013, 12:37:16 pm »
Locke, I never guessed you were into Guardian Heroes ;).  Seriously though, given how good it is, it deserves real hardware :D.

Oh, I have a original copy game. At one point of planing I was thinking of hacking some knock off Saturn controllers to use my build with my Saturn. That was a little much. Saturn emulations, still is not perfect but it has come a long way. I spent hours playing with my brothers.

Just saying, if some ones going to do Saturn emulations they should add some premium games.

rCadeGaming

  • Trade Count: (0)
  • Full Member
  • ***
  • Offline Offline
  • Posts: 1256
  • Last login:December 20, 2023, 09:16:09 pm
  • Just call me Rob!
Re: Tzakiel's UAII 2P Fighter CRT Build
« Reply #97 on: November 11, 2013, 01:21:40 pm »
I've gotten those out without stripping them.  At $1.25 per set, nothing wrong with getting some if you're worried about it though.  I know the red "glue" they're talking about.  It's more like some kind of loc-tite equivalent, and yes its a b*tch.  Be careful of stripping the heads.  Use a quality phillips head with the right shaped head for those screws, or else you'll be drilling them out.

Also, notice how the s-plate only has two holes for mounting screws going into the wood.  I'd recommend drilling four new ones at the corners.

rCadeGaming

  • Trade Count: (0)
  • Full Member
  • ***
  • Offline Offline
  • Posts: 1256
  • Last login:December 20, 2023, 09:16:09 pm
  • Just call me Rob!
Re: Tzakiel's UAII 2P Fighter CRT Build
« Reply #98 on: November 11, 2013, 01:22:42 pm »
Locke, the MC Cthulhu supports saturn.  No need for pad hacks.

Tzakiel

  • Trade Count: (0)
  • Full Member
  • ***
  • Offline Offline
  • Posts: 272
  • Last login:March 02, 2019, 12:59:01 pm
  • I want to build my own arcade controls!
Re: Tzakiel's UAII 2P Fighter CRT Build
« Reply #99 on: November 11, 2013, 04:30:49 pm »
Thanks again for all the help. Bottom mounting does seem to make more sense so that the stick height is correct. Top mounting means a full 31 mm or so of length. It looks like the s plates are out of stock at FA at the moment. I will just have to wait. In the meantime, am I correct that I can "space" the s-plate downwards away from the MDF using several machine screw washers or similar between the nut and MDF?
« Last Edit: November 11, 2013, 04:35:48 pm by Tzakiel »
My Fighter CRT Cabinet Thread: Tzakiel's 2P Cabinet

rCadeGaming

  • Trade Count: (0)
  • Full Member
  • ***
  • Offline Offline
  • Posts: 1256
  • Last login:December 20, 2023, 09:16:09 pm
  • Just call me Rob!
Re: Tzakiel's UAII 2P Fighter CRT Build
« Reply #100 on: November 11, 2013, 05:32:09 pm »
No prob, and yes.

There should be other places you can find s-plates.

Tzakiel

  • Trade Count: (0)
  • Full Member
  • ***
  • Offline Offline
  • Posts: 272
  • Last login:March 02, 2019, 12:59:01 pm
  • I want to build my own arcade controls!
Re: Tzakiel's UAII 2P Fighter CRT Build
« Reply #101 on: November 14, 2013, 05:56:31 am »

PL1, tell me this though.  A benefit of a hole saw for me is that I can cut through the plexiglass and the wood underneath at the same time, ensuring that my button holes are in the same place on both pieces.  How is a forstner bit on plexi?

Sh*t. I started drilling my cp holes today and forgot this. I haven't bought plexi yet. I only did 4 holes... Should I wait to buy plexi before doing the rest?

Finish your CP hole drilling, and buy your plexi later.  Clamp the plexi over the drilled CP.  Drill a 1/2" hole using a hole saw in about the middle of each hole.  Use a flush trim router bit and have it enter through the plexi in that 1/2" hole you just drilled, and use it to cut flush holes in the plexi.  Make sure you don't go too slow and burn the plexi.

If you use a hole saw, you may melt the plexi, and it will look like ---steaming pile of meadow muffin---.  Trust me on the method I outlined above. If it doesn't make sense, let me know.

If the plexi is sitting on top of holes and I use my top bearing flush trim bit, it will bite into my button holes as well. I'm thinking I would need a bottom bearing bit to do this safely. Otherwise I could put plexi on bottom and keep moving the cp and plexi to an open area on my table but that is a pain. Not sure if I could use my 30mm hole saw with cp as a guide... Problem there is centering the saw.
« Last Edit: November 14, 2013, 10:11:50 am by Tzakiel »
My Fighter CRT Cabinet Thread: Tzakiel's 2P Cabinet

BadMouth

  • Trade Count: (+6)
  • Full Member
  • ***
  • Offline Offline
  • Posts: 9226
  • Last login:June 13, 2024, 01:06:22 pm
  • ...
Re: Tzakiel's UAII 2P Fighter CRT Build
« Reply #102 on: November 14, 2013, 10:03:15 am »
..a bit late, but my $.02

There is no correct or incorrect orientation for the stick.  Up is whatever direction you decide Up should be.

I'm using the S-Plates in my build, but in reality they aren't offset that much, so you're still dealing with mounting them to a fairly thin layer of wood.
On the last CP I did for someone else, I made my own adapter plates using 1/2" nylon spacers from lowes and some scrap aluminum plate.
Basically I just ran flat head machine screws through the original JLF plate (which had been partially drilled with a very large bit to countersink the heads), through the spacers and then through a separate plate on each side.  I was surprised how solid this felt.  (It was attached from underneath using screws, not bolts)
If you do go with the s-plates, I'd drill mounting holes on the corners instead of using the 2 centered ones.


I like this better than the s-plates, although I still plan to use the s-plates on mine because I repurposed my original plates and no longer have them.
(actually I had modified my jlfs so much that I was able to build another set by ordering just a few parts)

Instead of routing out pockets for the joysticks and the screw-in buttons, I've started cutting the top layer out of 1/4" mdf and the pocketed area out of 1/2" mdf, and then gluing them together.  It's made for much less mess and doesn't require me to make a jig for the router.
Home Depot has small 2'x4' pieces of each for around $10.

That's where I'm at now with what I know now.  My methods are always changing as I learn more.
« Last Edit: November 14, 2013, 10:13:53 am by BadMouth »

a1pharm

  • Trade Count: (0)
  • Full Member
  • ***
  • Offline Offline
  • Posts: 374
  • Last login:April 15, 2024, 08:25:50 pm
  • Planning and preparation prevents problems
Re: Tzakiel's UAII 2P Fighter CRT Build
« Reply #103 on: November 15, 2013, 11:06:24 am »
..a bit late, but my $.02

There is no correct or incorrect orientation for the stick.  Up is whatever direction you decide Up should be.

I'm using the S-Plates in my build, but in reality they aren't offset that much, so you're still dealing with mounting them to a fairly thin layer of wood.
On the last CP I did for someone else, I made my own adapter plates using 1/2" nylon spacers from lowes and some scrap aluminum plate.
Basically I just ran flat head machine screws through the original JLF plate (which had been partially drilled with a very large bit to countersink the heads), through the spacers and then through a separate plate on each side.  I was surprised how solid this felt.  (It was attached from underneath using screws, not bolts)
If you do go with the s-plates, I'd drill mounting holes on the corners instead of using the 2 centered ones.


I like this better than the s-plates, although I still plan to use the s-plates on mine because I repurposed my original plates and no longer have them.
(actually I had modified my jlfs so much that I was able to build another set by ordering just a few parts)

Instead of routing out pockets for the joysticks and the screw-in buttons, I've started cutting the top layer out of 1/4" mdf and the pocketed area out of 1/2" mdf, and then gluing them together.  It's made for much less mess and doesn't require me to make a jig for the router.
Home Depot has small 2'x4' pieces of each for around $10.

That's where I'm at now with what I know now.  My methods are always changing as I learn more.

Wow, that's a great idea.
 :applaud:

ppv

  • Trade Count: (0)
  • Full Member
  • ***
  • Offline Offline
  • Posts: 236
  • Last login:October 16, 2020, 03:08:56 pm
  • The cheap@ss gamer
Re: Tzakiel's UAII 2P Fighter CRT Build
« Reply #104 on: November 15, 2013, 12:27:24 pm »
Man, now all I see is a Kirby balloon.  ;D
:laugh2: Can't unsee now!

Like the marquee, though, nice an clean. 8)
Doing arcades, the cheap@ss way!
First Project : ttp://forum.arcadecontrols.com/index.php/topic,151071.0.html
Next one : The Token Muncher [urlhttp://forum.arcadecontrols.com/index.php/topic,135417.0.html[/url]

Tzakiel

  • Trade Count: (0)
  • Full Member
  • ***
  • Offline Offline
  • Posts: 272
  • Last login:March 02, 2019, 12:59:01 pm
  • I want to build my own arcade controls!
Re: Tzakiel's UAII 2P Fighter CRT Build
« Reply #105 on: November 16, 2013, 12:21:28 am »
Update:

Bought plexiglass, tried to cut it. I put it down underneath the mdf control panel and used the cp as a guide for the hole saw. That helped align the saw perfectly. Everything was clamped together and I was drilling into scrap so it seemed like a really good method.


Result: cracked in 4 different places. I could feel the hole saw grabbing and cracking the plastic as it took hold. Even the pilot hole from the arbor could be heard shattering the plastic.

As a bonus the arbor is now stuck in the hole saw and I can't get it out even with a pipe wrench.  So I'm pretty much stuck at this point.
My Fighter CRT Cabinet Thread: Tzakiel's 2P Cabinet

rCadeGaming

  • Trade Count: (0)
  • Full Member
  • ***
  • Offline Offline
  • Posts: 1256
  • Last login:December 20, 2023, 09:16:09 pm
  • Just call me Rob!
Re: Tzakiel's UAII 2P Fighter CRT Build
« Reply #106 on: November 16, 2013, 01:42:27 am »
I've used that same method to drill plexi.  I found that sometimes the cracking of the plexi is caused by the pilot drill bit in the saw grabbing, not the saw itself.  Just take the out the drill bit and use the saw only, the holes in the MDF are enough of a guide.

As for the jammed up hole saw, I don't know.  Apply more elbow grease, or get a better saw?

lukensteinz

  • Trade Count: (0)
  • Full Member
  • ***
  • Offline Offline
  • Posts: 47
  • Last login:June 28, 2015, 04:30:25 am
Re: Tzakiel's UAII 2P Fighter CRT Build
« Reply #107 on: November 17, 2013, 04:20:56 am »
Update:

Bought plexiglass, tried to cut it. I put it down underneath the mdf control panel and used the cp as a guide for the hole saw. That helped align the saw perfectly. Everything was clamped together and I was drilling into scrap so it seemed like a really good method.

Result: cracked in 4 different places. I could feel the hole saw grabbing and cracking the plastic as it took hold. Even the pilot hole from the arbor could be heard shattering the plastic.

As a bonus the arbor is now stuck in the hole saw and I can't get it out even with a pipe wrench.  So I'm pretty much stuck at this point.


Use a SPADE BIT. This is the best and most effective way of cutting holes in plexi.
Not a holesaw, the teeth melt the plexi and gum up, or anything else, use a spade bit. And nice even slow pressure. Works a charm!  ;D
See my attached picture.

After a few holes you'll notice the spade bit gets pretty damn hot, which is why a hole saw is a no-no.
« Last Edit: November 17, 2013, 04:23:24 am by lukensteinz »

BadMouth

  • Trade Count: (+6)
  • Full Member
  • ***
  • Offline Offline
  • Posts: 9226
  • Last login:June 13, 2024, 01:06:22 pm
  • ...
Re: Tzakiel's UAII 2P Fighter CRT Build
« Reply #108 on: November 17, 2013, 10:11:37 am »
Any method of sawing/drilling will crack it if you apply pressure.
Think of it more as grinding away the hole rather than cutting it.
Just let the blade slowly scrape away until there's no more material left.

Some people use a small router or a dremel with the router base, using the CP as a template.
I haven't done this yet except for some testing, but plan to do it on my current build using a dremel with a drywall cutout bit.
Have to drill a hole for the bit to start in, and the above still applies to that.

rCadeGaming

  • Trade Count: (0)
  • Full Member
  • ***
  • Offline Offline
  • Posts: 1256
  • Last login:December 20, 2023, 09:16:09 pm
  • Just call me Rob!
Re: Tzakiel's UAII 2P Fighter CRT Build
« Reply #109 on: November 17, 2013, 10:32:51 am »
a hole saw is a no-no.


I did this with a hole saw.  No cracking; perfectly formed holes.  Stop acting like it can't be done properly.  You just need to take it slow.

lukensteinz

  • Trade Count: (0)
  • Full Member
  • ***
  • Offline Offline
  • Posts: 47
  • Last login:June 28, 2015, 04:30:25 am
Re: Re: Tzakiel's UAII 2P Fighter CRT Build
« Reply #110 on: November 17, 2013, 01:05:50 pm »
a hole saw is a no-no.

I did this with a hole saw.  No cracking; perfectly formed holes.  Stop acting like it can't be done properly.  You just need to take it slow.

Very nice!
Sorry mate, I was acting on advice from a plexiglass/plastics wholesaler, they were adamant that a hole saw is a bad choice and a spade bit works best.
The reason being that there's less surface area on the bit to clog up.

I did try both, the spade was easier to use, quicker, and more accurate (just my experience there, yours is obviously different) .

Sent from my Sony Phoney using Tapatalk.


rCadeGaming

  • Trade Count: (0)
  • Full Member
  • ***
  • Offline Offline
  • Posts: 1256
  • Last login:December 20, 2023, 09:16:09 pm
  • Just call me Rob!
Re: Tzakiel's UAII 2P Fighter CRT Build
« Reply #111 on: November 17, 2013, 01:10:06 pm »
The negative of less surface area is more concentrated pressure.  Too much force distributed over just those two little points makes it easy bite and jerk the plexi if you're not careful.

Tzakiel

  • Trade Count: (0)
  • Full Member
  • ***
  • Offline Offline
  • Posts: 272
  • Last login:March 02, 2019, 12:59:01 pm
  • I want to build my own arcade controls!
Re: Tzakiel's UAII 2P Fighter CRT Build
« Reply #112 on: November 17, 2013, 04:23:55 pm »
I have an update but haven't had time to write it up yet.

The plexiglass is done. RCadegamigs tip about not using the pilot / drill in center of hole saw was the key. I retracted it to be flush with the saw edges and my second sheet came out clean.  That arbor bit really was doing the cracking. Still had some melting/crud but that scraped off easily.

I also got the routed recesses done in bottom of control panel for mounting.

I also received a new control panel printout from gameongrfafix minus the adhesive, which again looks great. I installed s plates on the sticks and that was very easy... You'd really have to be a gorilla with the screwdriver to strip the jlf screws.

Will update with pics later on.
My Fighter CRT Cabinet Thread: Tzakiel's 2P Cabinet

lukensteinz

  • Trade Count: (0)
  • Full Member
  • ***
  • Offline Offline
  • Posts: 47
  • Last login:June 28, 2015, 04:30:25 am
Re: Re: Tzakiel's UAII 2P Fighter CRT Build
« Reply #113 on: November 17, 2013, 07:35:23 pm »
The negative of less surface area is more concentrated pressure.  Too much force distributed over just those two little points makes it easy bite and jerk the plexi if you're not careful.
Can't say I experienced that though. 99% of the cuttings is done by the flat spade shaped section, not the points which are only there to guide and never once bit. It was usually the flat the bit, and it never cracked either.
Anyway...

Sounds like you're making pretty quick progress there

rCadeGaming

  • Trade Count: (0)
  • Full Member
  • ***
  • Offline Offline
  • Posts: 1256
  • Last login:December 20, 2023, 09:16:09 pm
  • Just call me Rob!
Re: Tzakiel's UAII 2P Fighter CRT Build
« Reply #114 on: November 17, 2013, 09:09:43 pm »
I don't mean to argue.  Both will work as long as you do it carefully.   :cheers:

a1pharm

  • Trade Count: (0)
  • Full Member
  • ***
  • Offline Offline
  • Posts: 374
  • Last login:April 15, 2024, 08:25:50 pm
  • Planning and preparation prevents problems
Re: Tzakiel's UAII 2P Fighter CRT Build
« Reply #115 on: November 18, 2013, 06:12:05 pm »
I've used both a hole saws and spade bits for drilling holes in plexi.  For the novice, the hole saw will result in more problems than the spade bits.  The reasons for this are numerous.  No matter your skill level, you will always get plexi "gum" on the teeth of the hole saw, which will affect the performance of the saw.  In addition, the hole saw causes more friction based heat along the cut edges than a spade bit.

Hole saws work great if you are trying to make some custom plexi dustwashers.

If you have never cut through plexi before, go the safe route and use a spade bit.  You'll save money, time, and headache.  If you want to be different, or just "stick it to the man" use a hole saw.

rCadeGaming is right: both work.  However, one is easier and cheaper than the other.

I don't intend to hijack this thread, but for people reading this looking for advice, the best advice is to use the spade bit.

Tzakiel

  • Trade Count: (0)
  • Full Member
  • ***
  • Offline Offline
  • Posts: 272
  • Last login:March 02, 2019, 12:59:01 pm
  • I want to build my own arcade controls!
Re: Tzakiel's UAII 2P Fighter CRT Build
« Reply #116 on: November 19, 2013, 12:56:11 pm »
Update:

Things are starting to come together.


I routed the bottom of the CP to be the right thickness for the buttons (accounting for plexi) and to inset the joysticks a bit (which will have s-plate and washers for a 24mm height to ball top) I just freehanded it (after tracing some of the hardware outlines). Seems to be fine.

EDIT: I later found out that I had to route more for the joysticks, which had tabs and plastic clips getting in the way of the recess edge. So the pic above does not show that.


The plexi got cut and I installed it with the artwork.


Also hinged the CP to the box using 24" of piano hinge and the included screws (drilled pilots). Seems fairly sturdy in general but a little weak when it's resting on the hinge open. Could just be the metal flexing a bit.


Buttons installed... very happy to get to this point.... a lot of challenges in this build for a novice like me.

One problem... one of the orange plastic screw-in OBSN nuts doesn't fit... I must have missed the template a hair and it's too close to its neighbor button. Any way to remedy that or is there a a thinner nut I can use?

Next Steps:
  • Attach iPAC to the cp - what is the best way to do this?
  • Wire sticks and buttons to iPAC
  • Figure out a solution for powering on the TV. It has power return, which is great... but i just have it plugged into a power strip inside the cabinet. I have to go back there each time. How do I get the TV wired to a little power switch on side of cabinet or similar?
  • Marquee light - should come on at same time as TV. Guess the switch should toggle both.
  • The PC stays on all the time, not sure if that is a problem or not. I don't really care about the electricity use.
  • Need to install XP 64, get hyperspin working right, and everything configured. Which will probably be a pain with hyperspin's convoluted setup, my custom list of games, and groovymame's resolutions/HS bug involved. Also probably need to look at an i5 CPU and mobo for some of the games I like to play.
« Last Edit: November 22, 2013, 02:08:34 pm by Tzakiel »
My Fighter CRT Cabinet Thread: Tzakiel's 2P Cabinet

BadMouth

  • Trade Count: (+6)
  • Full Member
  • ***
  • Offline Offline
  • Posts: 9226
  • Last login:June 13, 2024, 01:06:22 pm
  • ...
Re: Tzakiel's UAII 2P Fighter CRT Build
« Reply #117 on: November 19, 2013, 01:15:10 pm »
With the buttons, try loosening all its neighbors and working from the center out tightening the nuts.
EDIT: Actually, leave them loose enough that the button can still shift around in it's hole, then after all of them are to that point, tighten them all the way.
I keep the buttons close enough together for the nuts to just touch.  They catch on each other when trying to tighten, but stay evenly spaced that way.
Mine have clear nuts that aren't as tall as those.  Not sure if the orange ones are thicker, but they look like it from the pics.

If loosening up the surrounding buttons doesn't work, I'd grind the one offending nut down on a grinding wheel if you have one.
It would be tedious and look like crap, but it would work.
« Last Edit: November 19, 2013, 01:42:43 pm by BadMouth »

yotsuya

  • Trade Count: (+21)
  • Full Member
  • ***
  • Offline Offline
  • Posts: 19958
  • Last login:Today at 01:59:06 am
  • 2014 UCA Winner, 2014, 2015, 2016 ZapCon Winner
    • forum.arcadecontrols.com/index.php/topic,137636.msg1420628.html
Re: Tzakiel's UAII 2P Fighter CRT Build
« Reply #118 on: November 19, 2013, 01:40:31 pm »
I just realized you're mixing button styles on your CP.
***Build what you dig, bro. Build what you dig.***

Tzakiel

  • Trade Count: (0)
  • Full Member
  • ***
  • Offline Offline
  • Posts: 272
  • Last login:March 02, 2019, 12:59:01 pm
  • I want to build my own arcade controls!
Re: Tzakiel's UAII 2P Fighter CRT Build
« Reply #119 on: November 19, 2013, 01:43:46 pm »
I just realized you're mixing button styles on your CP.

Yep... I sort of like the look of the Happ buttons for admin and coin/start stuff, and they are a lot easier to drop in to the 1/2" MDF.  My eyes still hurt from routing that control panel... dust *everywhere*  I used glasses but next time, goggles for sure.  I haven't really shown it but I have 2 happ buttons on the side for volume up and down, too.
My Fighter CRT Cabinet Thread: Tzakiel's 2P Cabinet

jongunz

  • Trade Count: (0)
  • Full Member
  • ***
  • Offline Offline
  • Posts: 76
  • Last login:July 22, 2015, 11:57:42 pm
  • I want to build my own arcade controls!
Re: Tzakiel's UAII 2P Fighter CRT Build
« Reply #120 on: November 19, 2013, 02:07:10 pm »
Agree with badmouth about tightening down those nuts.  You should have a little bit of room to move the buttons slightly.  It not you can always try to slightly router out the button hole so you can shift it around some.

rCadeGaming

  • Trade Count: (0)
  • Full Member
  • ***
  • Offline Offline
  • Posts: 1256
  • Last login:December 20, 2023, 09:16:09 pm
  • Just call me Rob!
Re: Tzakiel's UAII 2P Fighter CRT Build
« Reply #121 on: November 19, 2013, 05:08:39 pm »
+1 on Badmouth's advice on the buttons.  One other thing you can do is take a rat-tail file to the one of the holes to enlarge it just slightly for a little more wiggle room; just a little bit, so the top lip of the button will still cover it.  That is only a last resort though, try Badmouth's advice first.

As for the turning on the TV and marquee light, search about smart power strips.

Your control panel is looking very nice.  I like the white buttons on black, with the red nearby.  Also, you did a great job of minimizing the admin buttons to only what's needed.  Very clean.

As for the happ buttons, you can't get white Sanwa 24mm screw-ins anyway.  The closest you can get is a white Sanwa 24mm plunger from a snap-in in a white Seimitsu screw-in body.  That's what I did in the pic a few posts back.

Tzakiel

  • Trade Count: (0)
  • Full Member
  • ***
  • Offline Offline
  • Posts: 272
  • Last login:March 02, 2019, 12:59:01 pm
  • I want to build my own arcade controls!
Re: Tzakiel's UAII 2P Fighter CRT Build
« Reply #122 on: November 19, 2013, 08:01:42 pm »
I've made two dumb mistakes, and in fixing one I discovered the other, bigger one.

First, I installed artwork and buttons but forgot to put bolts in for joysticks first, which sit under the art in countersink holes. So I had to take apart all buttons, plexi, and art.

Then once I went to put the joysticks in, I realized I had traced and routed for the s plates but there are black tabs on the sticks that protrude and prevent them from sitting in my routed area. Sh*t. Now I have to go back to the router and hopefully not break the hinge in the process.

My Fighter CRT Cabinet Thread: Tzakiel's 2P Cabinet

Tzakiel

  • Trade Count: (0)
  • Full Member
  • ***
  • Offline Offline
  • Posts: 272
  • Last login:March 02, 2019, 12:59:01 pm
  • I want to build my own arcade controls!
Re: Tzakiel's UAII 2P Fighter CRT Build
« Reply #123 on: November 19, 2013, 08:05:32 pm »
+1 on Badmouth's advice on the buttons.  One other thing you can do is take a rat-tail file to the one of the holes to enlarge it just slightly for a little more wiggle room; just a little bit, so the top lip of the button will still cover it.  That is only a last resort though, try Badmouth's advice first.

As for the turning on the TV and marquee light, search about smart power strips.

My button holes are really tight. Would the file work on the plexi as well as mdf?

Smart strips look really cool. I get that they can control everything based on 1 device, but still not sure how to get an external button or switch going to activate the strip.
My Fighter CRT Cabinet Thread: Tzakiel's 2P Cabinet

rCadeGaming

  • Trade Count: (0)
  • Full Member
  • ***
  • Offline Offline
  • Posts: 1256
  • Last login:December 20, 2023, 09:16:09 pm
  • Just call me Rob!
Re: Tzakiel's UAII 2P Fighter CRT Build
« Reply #124 on: November 19, 2013, 08:14:09 pm »
Then once I went to put the joysticks in, I realized I had traced and routed for the s plates but there are black tabs on the sticks that protrude and prevent them from sitting in my routed area.

Those black tabs are completely useless when using a mounting plate.  I'd just take the stick apart and cut them off, rather than doing any more routing.  A hacksaw will probably work nicely.

As for the smart strip, you wire your power button to the PC motherboard.  Push the button, PC starts, that causes the strip to turn everything else on.

Asmotron

  • Trade Count: (0)
  • Full Member
  • ***
  • Offline Offline
  • Posts: 25
  • Last login:August 10, 2014, 03:58:46 pm
  • Punishing and Enslaving since '96.
Re: Tzakiel's UAII 2P Fighter CRT Build
« Reply #125 on: November 19, 2013, 09:44:16 pm »
Smart strips look really cool. I get that they can control everything based on 1 device, but still not sure how to get an external button or switch going to activate the strip.

Remote power switch to the PC so when it turns on the smart strip powers up the everything else on the slave outlets. :)

I really want a smart strip, but I like fiddly switches too much.

Tzakiel

  • Trade Count: (0)
  • Full Member
  • ***
  • Offline Offline
  • Posts: 272
  • Last login:March 02, 2019, 12:59:01 pm
  • I want to build my own arcade controls!
Re: Tzakiel's UAII 2P Fighter CRT Build
« Reply #126 on: November 19, 2013, 11:22:30 pm »
I've severely underestimated the various facets of joystick mounting.

RCadeGaming, I was very excited about your solution to just cut off the tabs but reviewing the way they are sitting even the black clips that protrude would prevent the stick from sinking in. So routing is really the only option.

Now I'm realizing that the joystick's wire harness will actually prevent me from using one of he bolts I've already drilled for:


Can I just use 3/4 holes and get away with it? Or I could drill a new hole in the cp for middle of plate where the factory hole is.
My Fighter CRT Cabinet Thread: Tzakiel's 2P Cabinet

BadMouth

  • Trade Count: (+6)
  • Full Member
  • ***
  • Offline Offline
  • Posts: 9226
  • Last login:June 13, 2024, 01:06:22 pm
  • ...
Re: Tzakiel's UAII 2P Fighter CRT Build
« Reply #127 on: November 20, 2013, 09:18:38 am »
ROTATE THE PCB 90 DEGREES!  :P

Tzakiel

  • Trade Count: (0)
  • Full Member
  • ***
  • Offline Offline
  • Posts: 272
  • Last login:March 02, 2019, 12:59:01 pm
  • I want to build my own arcade controls!
Re: Tzakiel's UAII 2P Fighter CRT Build
« Reply #128 on: November 20, 2013, 09:25:28 am »
ROTATE THE PCB 90 DEGREES!  :P

The tabs don't fit in the s-plate when rotated that way. I guess that is why Sanwa manufactures the s-plate with single holes instead of double on each side... to make room for the harness since it can only be rotated 2 ways and the harness would cover a corner no matter what.  Now I guess I could hacksaw the tabs and then rotate the pcb black "thing"... and that might solve both problems?
« Last Edit: November 20, 2013, 10:55:10 am by Tzakiel »
My Fighter CRT Cabinet Thread: Tzakiel's 2P Cabinet

BadMouth

  • Trade Count: (+6)
  • Full Member
  • ***
  • Offline Offline
  • Posts: 9226
  • Last login:June 13, 2024, 01:06:22 pm
  • ...
Re: Tzakiel's UAII 2P Fighter CRT Build
« Reply #129 on: November 20, 2013, 09:32:50 am »
ROTATE THE PCB 90 DEGREES!  :P

The tabs don't fit in the s-plate when rotated that way. I guess that is why Sanwa manufactures the s-plate with single holes instead of double on each side... to make room for the harness.  Now I guess I could hacksaw the tabs and then rotate the pcb... and that might solve both problems?

I'm not speculating here.  ;)
Remove the restrictor plate, rotate the pcb and switch assembly 90 degrees, replace the restrictor plate.
Mine are mounted that way:
 (this is a crappy temporary cp until I have the artwork as a template for the final one.  The extra wire is power for optical switches)
« Last Edit: November 20, 2013, 09:36:22 am by BadMouth »

Tzakiel

  • Trade Count: (0)
  • Full Member
  • ***
  • Offline Offline
  • Posts: 272
  • Last login:March 02, 2019, 12:59:01 pm
  • I want to build my own arcade controls!
Re: Tzakiel's UAII 2P Fighter CRT Build
« Reply #130 on: November 20, 2013, 10:52:56 am »


I'm not speculating here.  ;)
Remove the restrictor plate, rotate the pcb and switch assembly 90 degrees, replace the restrictor plate.
Mine are mounted that way:
 (this is a crappy temporary cp until I have the artwork as a template for the final one.  The extra wire is power for optical switches)


Oh I see, you are saying I can rotate the PCB/harness while keeping tabs as they are? I didn't realize that was possible.  I'll still have to route or cut off the tabs/rotate/figure something out. But that solves the harness covering the screw hole.
My Fighter CRT Cabinet Thread: Tzakiel's 2P Cabinet

rCadeGaming

  • Trade Count: (0)
  • Full Member
  • ***
  • Offline Offline
  • Posts: 1256
  • Last login:December 20, 2023, 09:16:09 pm
  • Just call me Rob!
Re: Tzakiel's UAII 2P Fighter CRT Build
« Reply #131 on: November 20, 2013, 09:26:01 pm »
My button holes are really tight. Would the file work on the plexi as well as mdf?

Yes.  You'd probably only want to apply force in direction, pushing/pulling the plexi toward the MDF.  Pushing/pulling it away could risk cracking it.  That really should be your last resort though.  Try and get what you can out of Badmouth's method first.

Asmotron

  • Trade Count: (0)
  • Full Member
  • ***
  • Offline Offline
  • Posts: 25
  • Last login:August 10, 2014, 03:58:46 pm
  • Punishing and Enslaving since '96.
Re: Tzakiel's UAII 2P Fighter CRT Build
« Reply #132 on: November 20, 2013, 09:58:22 pm »
Attach iPAC to the cp - what is the best way to do this?

If you haven't come up with a good way to do this yet you could use coarse threaded motherboard standoffs.  I am using them in my test CP and they work great.  I just laid the iPac on the back of the CP, marked my hole positions, drilled, and hand threaded them in.  Then I attached the iPac, worked like a charm.

10 pack on Ebay
15 pack on Amazon

Tzakiel

  • Trade Count: (0)
  • Full Member
  • ***
  • Offline Offline
  • Posts: 272
  • Last login:March 02, 2019, 12:59:01 pm
  • I want to build my own arcade controls!
Re: Tzakiel's UAII 2P Fighter CRT Build
« Reply #133 on: November 21, 2013, 02:33:53 am »
Update:

After more routing, which I did need to do, and some trial and error with mounting height, I got the sticks installed and artwork and buttons back in place.


I was able to rotate the pcb and that was drop dead easy.

Next up: wiring. I am wondering.. How do I tell which color wire in the JLF harness goes with which microswitch on the stick? Just wondering which wire to put in the ipac "up" "left" etc. 
My Fighter CRT Cabinet Thread: Tzakiel's 2P Cabinet

BadMouth

  • Trade Count: (+6)
  • Full Member
  • ***
  • Offline Offline
  • Posts: 9226
  • Last login:June 13, 2024, 01:06:22 pm
  • ...
RE: Tzakiel's UAII 2P Fighter CRT Build
« Reply #134 on: November 21, 2013, 07:18:51 am »
Be aware when wiring that a lot of sellers include a wiring harness meant for something something else and the colors mean nothing.  Ground is the closest wire to the outside edge of the PCB. (the one I'm looking at is red, ugh EDIT:The ones in my pic above are original Sanwa and colored correctly; black is GND)

Where the rest of the wires go depend on how you oriented the PCB.
Since I know you have it mounted sideways, I can tell you that the two wires next t ground are L or R and the last two are D or U

I usually hold the joystick in the up position, then test the wires through trial and error.  Search the software forum for " keyboard test utility" if using a keyboard encoder.  If using an interface that shows up as a gamepad, just us the controller settings thing in windows.

sent from my phone while driving
« Last Edit: November 21, 2013, 08:50:32 am by BadMouth »

rCadeGaming

  • Trade Count: (0)
  • Full Member
  • ***
  • Offline Offline
  • Posts: 1256
  • Last login:December 20, 2023, 09:16:09 pm
  • Just call me Rob!
Re: Tzakiel's UAII 2P Fighter CRT Build
« Reply #135 on: November 21, 2013, 09:31:20 am »
Lookin' good.

Just wondering which wire to put in the ipac "up" "left" etc.

Just check it with a multimeter.

jongunz

  • Trade Count: (0)
  • Full Member
  • ***
  • Offline Offline
  • Posts: 76
  • Last login:July 22, 2015, 11:57:42 pm
  • I want to build my own arcade controls!
Re: Tzakiel's UAII 2P Fighter CRT Build
« Reply #136 on: November 21, 2013, 12:11:02 pm »
Glad you got everything figured out.  Looks awesome.

Tzakiel

  • Trade Count: (0)
  • Full Member
  • ***
  • Offline Offline
  • Posts: 272
  • Last login:March 02, 2019, 12:59:01 pm
  • I want to build my own arcade controls!
Re: Tzakiel's UAII 2P Fighter CRT Build
« Reply #137 on: November 21, 2013, 06:13:48 pm »
I got everything wired to the ipac which is very exciting!

One button, 1p start, has a weird behavior. When it's pressed it does nothing, and then on release it fires briefly Then goes off. If you hold it down it again does nothing and then fires 1 time on release. It's wired the same way as all the others and just mapped to the 1 key.

EDIT: It was just the shift function.
« Last Edit: November 25, 2013, 09:18:04 am by Tzakiel »
My Fighter CRT Cabinet Thread: Tzakiel's 2P Cabinet

harveybirdman

  • Trade Count: (0)
  • Full Member
  • ***
  • Offline Offline
  • Posts: 2538
  • Last login:February 19, 2024, 12:40:25 pm
  • SHMUP'EM
Re: Tzakiel's UAII 2P Fighter CRT Build
« Reply #138 on: November 21, 2013, 07:37:01 pm »
You sure that it's not on NC instead of NO?

have you tried switching out the micro switch?

yotsuya

  • Trade Count: (+21)
  • Full Member
  • ***
  • Offline Offline
  • Posts: 19958
  • Last login:Today at 01:59:06 am
  • 2014 UCA Winner, 2014, 2015, 2016 ZapCon Winner
    • forum.arcadecontrols.com/index.php/topic,137636.msg1420628.html
Re: Tzakiel's UAII 2P Fighter CRT Build
« Reply #139 on: November 21, 2013, 07:42:27 pm »
If you're using an iPac, that's normal behavior.
***Build what you dig, bro. Build what you dig.***

Tzakiel

  • Trade Count: (0)
  • Full Member
  • ***
  • Offline Offline
  • Posts: 272
  • Last login:March 02, 2019, 12:59:01 pm
  • I want to build my own arcade controls!
Re: Tzakiel's UAII 2P Fighter CRT Build
« Reply #140 on: November 21, 2013, 08:35:51 pm »
If you're using an iPac, that's normal behavior.

It is an ipac. That's normal? None of the other buttons work like this one though. For instance 2p start fires as long as held down and then stops on release. But they are all wired the same as I said. I tried the other prong but that did the whole always on thing.

Harvey: yeah I can try a diff switch or wire another button to 1p start on the ipac and see if it still happens.

The good thing is that firing 1 time after release kind of works fine for a start button anyway.
« Last Edit: November 21, 2013, 08:38:49 pm by Tzakiel »
My Fighter CRT Cabinet Thread: Tzakiel's 2P Cabinet

Tzakiel

  • Trade Count: (0)
  • Full Member
  • ***
  • Offline Offline
  • Posts: 272
  • Last login:March 02, 2019, 12:59:01 pm
  • I want to build my own arcade controls!
Re: Tzakiel's UAII 2P Fighter CRT Build
« Reply #141 on: November 21, 2013, 08:44:40 pm »
I think I just realized this 1p start behavior is due to the shift function the ipac does. Yotsuya, I assume that's what you meant.

Now to turn off sticky keys... So annoying to have that enable when hitting the 1p 4 button or whatever is shift.
My Fighter CRT Cabinet Thread: Tzakiel's 2P Cabinet

yotsuya

  • Trade Count: (+21)
  • Full Member
  • ***
  • Offline Offline
  • Posts: 19958
  • Last login:Today at 01:59:06 am
  • 2014 UCA Winner, 2014, 2015, 2016 ZapCon Winner
    • forum.arcadecontrols.com/index.php/topic,137636.msg1420628.html
Re: Tzakiel's UAII 2P Fighter CRT Build
« Reply #142 on: November 22, 2013, 01:18:48 am »
I think I just realized this 1p start behavior is due to the shift function the ipac does. Yotsuya, I assume that's what you meant.

Now to turn off sticky keys... So annoying to have that enable when hitting the 1p 4 button or whatever is shift.

That is correct. As you hold it down, it's "shifting". I think we've all made that mistake at one time or another.  :cheers:
***Build what you dig, bro. Build what you dig.***

Tzakiel

  • Trade Count: (0)
  • Full Member
  • ***
  • Offline Offline
  • Posts: 272
  • Last login:March 02, 2019, 12:59:01 pm
  • I want to build my own arcade controls!
Re: Tzakiel's UAII 2P Fighter CRT Build
« Reply #143 on: November 22, 2013, 01:55:49 pm »
Wanted to post a pic of the near final cabinet! Still need to take care of a few details and set up the front end, work out power supply/switch, etc... but looks-wise this is about it!


Anyone have a good grasp of how to configure Hyperspin to show a custom list of 200 games broken into system, then categories? I know Don's Tools can help with that a bit, but it seems a bit daunting. Also tried downloading an art pack or two and couldn't get it to show up in HS... kind of a mish-mash, that software is. I might have to spring for the premium membership if that makes it any easier to configure.
My Fighter CRT Cabinet Thread: Tzakiel's 2P Cabinet

a1pharm

  • Trade Count: (0)
  • Full Member
  • ***
  • Offline Offline
  • Posts: 374
  • Last login:April 15, 2024, 08:25:50 pm
  • Planning and preparation prevents problems
Re: Tzakiel's UAII 2P Fighter CRT Build
« Reply #144 on: November 23, 2013, 08:40:46 am »
Wanted to post a pic of the near final cabinet! Still need to take care of a few details and set up the front end, work out power supply/switch, etc... but looks-wise this is about it!


Anyone have a good grasp of how to configure Hyperspin to show a custom list of 200 games broken into system, then categories? I know Don's Tools can help with that a bit, but it seems a bit daunting. Also tried downloading an art pack or two and couldn't get it to show up in HS... kind of a mish-mash, that software is. I might have to spring for the premium membership if that makes it any easier to configure.

Cab is looking great, nice work!

As for Hyperspin: you should consider getting a gold membership to hyperspin, and paying for Emumovies. Then get ready to rename your roms using the database conventions that Hyperspin needs.  You may have to do it manually, but with 200 games, thats not so bad.

Tzakiel

  • Trade Count: (0)
  • Full Member
  • ***
  • Offline Offline
  • Posts: 272
  • Last login:March 02, 2019, 12:59:01 pm
  • I want to build my own arcade controls!
Re: Tzakiel's UAII 2P Fighter CRT Build
« Reply #145 on: November 26, 2013, 12:55:34 am »
Having major problems trying to get hyperspin working even straight out of the install RAR on xp64. I'm using crt emu drivers and I have turned on magic resolutions so that hyperspin does load.

First I installed .net 3.5 and 4, windows media player 11, and made sure I had directx9.0c. Those are all installed.

Then I downloaded HS install pack, latest one, and unpacked it to c:/hyperspin

Result: it loads up, but with multiple problems...

1. There is no sound
2. When I try to select any system, it just does nothing (reloads system wheel)
3. Escape key pauses the HS interface, rather than exiting??

This is really weird. Pretty sure none of this happened before. To be sure I wiped out the HS directory, unpacked the Install pack again and ran hyperspin again without making any changes or using any of the other apps. Same results.

EDIT: looks like sound drivers may be the issue:

http://www.hyperspin-fe.com/forum/showthread.php?7353-Baffled-by-this-weird-anomaly-Escape-is-now-pausing-HyperSpin-instead-of-exiting
« Last Edit: November 26, 2013, 10:03:21 am by Tzakiel »
My Fighter CRT Cabinet Thread: Tzakiel's 2P Cabinet

Tzakiel

  • Trade Count: (0)
  • Full Member
  • ***
  • Offline Offline
  • Posts: 272
  • Last login:March 02, 2019, 12:59:01 pm
  • I want to build my own arcade controls!
Re: Tzakiel's UAII 2P Fighter CRT Build
« Reply #146 on: November 26, 2013, 05:29:35 pm »
Bad news... I rather dreaded XP64 due to drivers issues I always heard about, and sure enough it looks like the MB's onboard audio card doesn't support XP64... Gateway's site has no XP64 bit drivers, and realtek's universal XP drivers didn't take, either. It just keeps coming back as new hardware found, high definition device on audio bus... then can't install hardware. Sucks.

Worse, the driver problem is causing Hyperspin to be non-functional, as you can see in my post above (edit)

So I have two options, unless I can somehow get drivers working in 64:

1. I can do my PC upgrade now (core i5 and new MB) and choose a MB with good XP64 support. But I don't have enough WAF for this yet. I was planning to get this MB which seems to have all the xp 64 drivers: http://www.asrock.com/mb/Intel/Z75%20Pro3/?cat=Download&os=XP64

2. I can go back, back, BACK to XP32! (just kill me...)

Drivers suck.
My Fighter CRT Cabinet Thread: Tzakiel's 2P Cabinet

rCadeGaming

  • Trade Count: (0)
  • Full Member
  • ***
  • Offline Offline
  • Posts: 1256
  • Last login:December 20, 2023, 09:16:09 pm
  • Just call me Rob!
Re: Tzakiel's UAII 2P Fighter CRT Build
« Reply #147 on: November 26, 2013, 06:14:06 pm »
ASRock is a ASUS's budget brand.  I'd use an actual ASUS mobo.  Good info on running XP64 on current hardware here:

http://forum.arcadecontrols.com/index.php/topic,135517.0.html

Tzakiel

  • Trade Count: (0)
  • Full Member
  • ***
  • Offline Offline
  • Posts: 272
  • Last login:March 02, 2019, 12:59:01 pm
  • I want to build my own arcade controls!
Re: Tzakiel's UAII 2P Fighter CRT Build
« Reply #148 on: November 26, 2013, 07:53:40 pm »
Yep, I know... But it has good reviews, xp 64 drivers and I don't plan to overclock.
My Fighter CRT Cabinet Thread: Tzakiel's 2P Cabinet

Tzakiel

  • Trade Count: (0)
  • Full Member
  • ***
  • Offline Offline
  • Posts: 272
  • Last login:March 02, 2019, 12:59:01 pm
  • I want to build my own arcade controls!
Re: Tzakiel's UAII 2P Fighter CRT Build
« Reply #149 on: December 19, 2013, 12:13:53 pm »
I picked up an asrock z77 extreme4 motherboard, which seems to have a full set of xp64 drivers available, and a 3570K as well as a cooler. Reviews on the board are great - looking forward to firing it up, getting the clock speed up a bit and playing Radiant Silvergun at much better speeds :)  I can confirm that the newer haswell chips/boards don't support windows XP... nothing available even for 32 bit on those.
My Fighter CRT Cabinet Thread: Tzakiel's 2P Cabinet