So here's a quick rundown of the progress I've been making over the last months. I've felt that most of this hasn't warranted posting on it's own, so I've waited until I'm ready to make more interesting progress to post this stuff. Previously on Mission Control:Back in July, yes that July
almost a year ago..... the changing humidity had wreaked havoc with the moisture content of the cherry and hairline cracks appeared in the ends of the sides. I was nervous that cutting dados and gluing up with the dimensional changes in the wood during the warm weather would be dangerous... risking misalignment or even further cracking when forcing the wood under clamping pressure. These cracks have since sealed back up with the cooler weather and I'm comfortable moving forward with the glue up of the cabinet and sealing of the sides. So to catch up with everything since my last update here's what's been done:
Complete rebuild of the walnut "marquee box" panels to make them as thick as the sides and to cut an angled channel for the plastic marquee so it fits with less of a gap at the top.
Sanding the faces of the sides.
Rounding off the cabinets edges with a single radius (as seen above)
Sanding the edges of the sides This required a specially shaped sanding block to match the profile of the edges (as seen above)
Squaring up and angling of all the interior "shelves" of the cabinet that'll hold the thing together. These can be seen in the glue up pics that follow. A discussion of the process involved in squaring and cutting these sheets is
here.Creation of the various arcs that will give the top and back of the cabinet it's curved shape. These will get ribs connecting them between the sides and then get covered with curved sheets of poplar before laminating them with cherry to match the rest of the cabinet. Epyx has already done something very similar on his project.

Because the sides of the cabinet are angled downward (wider opening at the top than bottom). I had to make a jig to cut any horizontal dados at the proper angle. Here's a breakdown of the design and creation of the angled router jig (For simplicity's sake, but mostly because it's so much fun to say out loud, this jig will subsequently be referred to by the military style acronymn R-BAAD (router baseplate assembly for angled dados.) Unless somebody can come up with something better

To create the jig I drew out the router in Illustrator at full scale against the side panel. This gave me the measurement for how high the "cleat" holding the router at an angle would have to be.

I then cut a piece of wood to this height with the proper angle to glue onto the jig's base. Basically I had to cut a piece of 3/4" pine leaving the bottom 1/32" narrower than the top. Shocking that Mr. Crappy the "table" saw could manage that tolerance. I did have to buy a fancy billion tooth Freud blade to help.


I bolted this onto a rigid piece of 3/8" plexi and attached it to the bottom of the router.


Next I tested all the angled dado cuts in two pieces of 2" thick pine for each side at the full scale of the cabinet and assembled the shelves into it as though they were the finished sides. They fit nice and flush with the "cabinet" at its proper width top and bottom, which confirmed the jig angle was correct. It was also really easy to control the router with the jig on. That had really concerned me until testing.


All these crazy measurements were getting incredibly time consuming so I picked up a pair of digital calipers to make repeated measurements super easy. They also made staying to 1/64" simple. Measuring to those tolerances with the yardstick SUCKED.

VERSUS

Next I had to cut all the dados and mortises in the sides of the cabinet. First I traced the marquee box's profile onto a piece of MDF to make a template for cutting the marquee's shape and ensuring that the radiused wood fit snugly with no gapping and that the angled marquee plastic had a matching slot to fit snugly into. I cut the template shape into the cherry side and cleaned up the corners with a rasp.


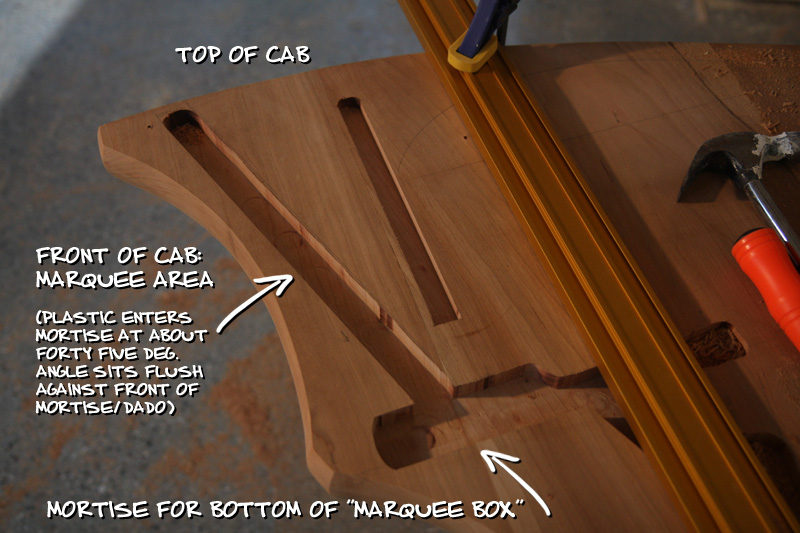
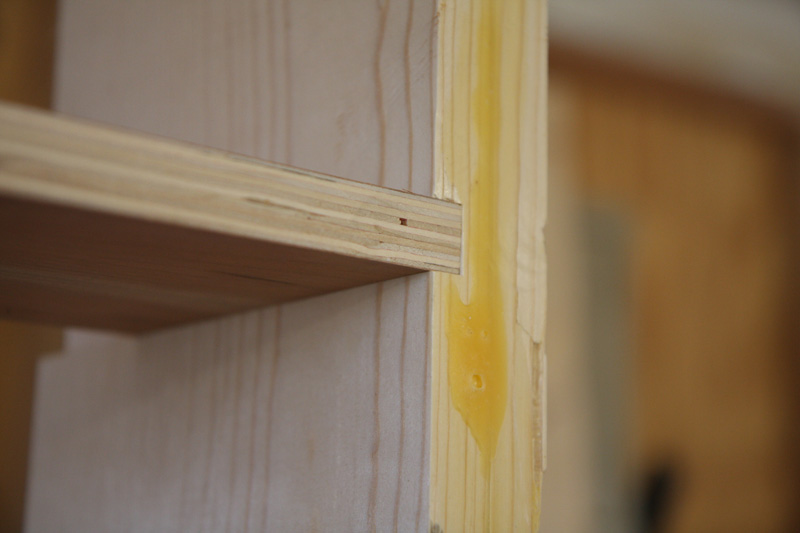
The marquee box is seen here dadoed/mortised into the sides at 1/2" deep. Pretty clean joint especially considering it intersects at a compound angle with the plastic. I didn't want any butt joints or anything surface mounted. I was pretty sure that with the angle of the sides, anything on the surface would leave obvious gaps.

I'll post a video of the dadoing process for the structural panels and a time lapse of the glue up since it's just so much fun to watch.
Lots more coming. Dados, speaker grille assembly, and glue up need to be posted. I'm so behind on posts it's tedious catching up.


 Home
Home Help
Help Search
 Login
Login Register

 Poll
Poll
 Send this topic
 Print
Print Topic: Mission Control Project: 5 years on, what to do with the leftovers? (Read 783034 times)


