Main Restorations Software Audio/Jukebox/MP3 Everything Else Buy/Sell/Trade
Project Announcements Monitor/Video GroovyMAME Merit/JVL Touchscreen Meet Up Retail Vendors
Driving & Racing Woodworking Software Support Forums Consoles Project Arcade Reviews
Automated Projects Artwork Frontend Support Forums Pinball Forum Discussion Old Boards
Raspberry Pi & Dev Board controls.dat Linux Miscellaneous Arcade Wiki Discussion Old Archives
Lightguns Arcade1Up Try the site in https mode Site News

Unread posts | New Replies | Recent posts | Rules | Chatroom | Wiki | File Repository | RSS | Submit news


Author Topic: Aliens Themed Cab  (Read 147201 times)

0 Members and 1 Guest are viewing this topic.

Epyx

  • Trade Count: (+1)
  • Full Member
  • ***
  • Offline Offline
  • Posts: 1961
  • Last login:December 25, 2023, 07:56:36 pm
  • "You're an oddity"
Aliens Themed Cab
« on: September 20, 2009, 10:00:49 pm »
I had started working on the Wasteland Cab but decided to put it on ice because of the lighting colours and difficulty of getting Yellow neon in the size required.  My plan is to have two cabs that highlight what I have learned (and push me further out of my comfort zone), one horizontal and one vertical. This is the horizontal cabinet, the Wasteland will eventually be the vertical cabinet. I have scrapped the portable from the build. These things will be staying put and are much smaller than my original behemoth of a cab if I do end up having to move them (at least these will fit through doorways!).

I have started the horizontal first because the colour scheme has readily available lighting and cause Aliens are cool.

I want this cab to be a mix of BYOAC cabs that I have drooled over the last few years. Two that immediately come to mind are Martijn's SF cab and Knievel's Neon mame (copied ad nauseum but I like it!).

This cab will feature elements I like from both cabs...the lighting and side-work of Neon with the sexy curves of Martijn's cab.  Colour scheme will be black with Galaxian green T-Molding.  Cost will be kept down because everything on my 1st upright will more or less be transplanted over (at least that was the story I told my wife *cough*)

I always liked the cover art on the Alien Quadrilogy box set and felt it would make a pretty nice neon side art.  Ond was kind enough to take the small crappy picture I sent him and re-do it (better than the original imo):


Ond's render and cab as of March 21, 2010


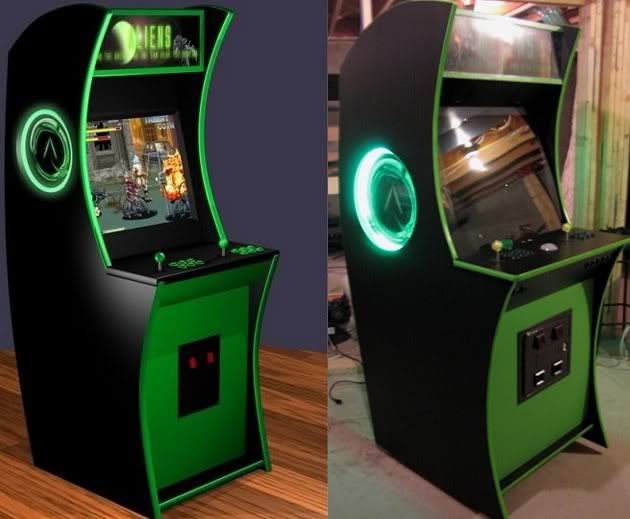
Current Version (March 29 2010):


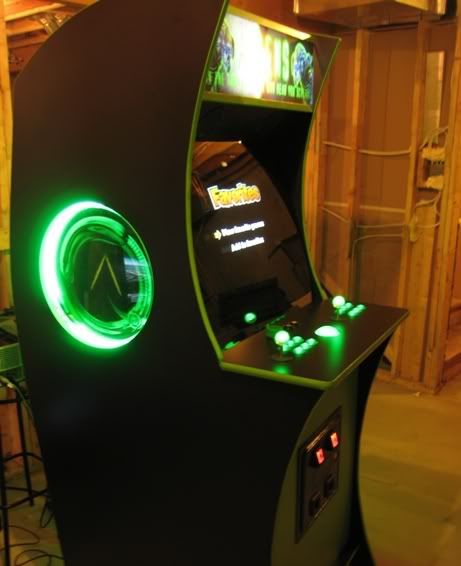
Short Movie Clip showing lighting...again marquee and lights in general are not washed out, they appear slightly overexposed on this clip and in the pics...I have one LED tube in there turned around facing the foil:


« Last Edit: February 05, 2012, 02:15:57 am by Epyx »
Last Project


Epyx Tutorials:
Tutorials

Epyx

  • Trade Count: (+1)
  • Full Member
  • ***
  • Offline Offline
  • Posts: 1961
  • Last login:December 25, 2023, 07:56:36 pm
  • "You're an oddity"
Re: Aliens Upright Horizontal Project
« Reply #1 on: September 20, 2009, 10:05:23 pm »
First thing I did today was draft the rough measurements. Here is the first version of the measurements, which was printed out in 3 angle views (front/side/back) and filled with about 40 additional measurements soon after.

This was then transferred to wood 3/4" MDF. I created a quick n'dirty cardboard dimensional representation of my 27" WG D9800 monitor to ensure the size works. I used some scrap laminate and my clamps (what can't these things do...) to draw the curves.


I will cut once I decide on the bottom front...still not sure if I should risk the challenge of going with an additional curve as per Ond's render and my original drawing or Martijn's relaxed lines.  I will think about this over the next day or two before I start cutting.


« Last Edit: September 25, 2009, 11:14:38 am by Epyx »
Last Project


Epyx Tutorials:
Tutorials

severdhed

  • Trade Count: (0)
  • Full Member
  • ***
  • Offline Offline
  • Posts: 2971
  • Last login:October 07, 2022, 04:45:32 pm
  • RIP Dinosaur Hippo
Re: Aliens Neon Curvy Upright Horizontal Project
« Reply #2 on: September 20, 2009, 11:26:15 pm »
awesome....i love the shape of this cabinet...and who doesnt like aliens?
Current Projects:      Zak-Man | TMNT Pedestal | SNES Pi | N64 Odroid
Former Projects:     4 Player Showcase | Donkey Kong | iCade

SpaceHedgehog

  • Trade Count: (0)
  • Full Member
  • ***
  • Offline Offline
  • Posts: 937
  • Last login:February 06, 2023, 12:10:24 pm
  • Almost done ...
Re: Aliens Upright Horizontal Project
« Reply #3 on: September 21, 2009, 05:05:03 am »

I will cut once I decide on the bottom front...still not sure if I should risk the challenge of going with an additional curve as per Ond's render and my original drawing or Martijn's relaxed lines.  I will think about this over the next day or two before I start cutting.


Go for the curves! The original design is great.
Click a pic for a video tour 

jmike

  • Trade Count: (+10)
  • Full Member
  • ***
  • Offline Offline
  • Posts: 1017
  • Last login:June 26, 2023, 05:14:03 am
Re: Aliens Neon Curvy Upright Horizontal Project
« Reply #4 on: September 21, 2009, 07:30:12 am »
That's going to look sick!  The curves might be a bit hard but It'll be worth it in the end.

Also the Alien side art looks amazing (Ond  :cheers:). Keep up posted with lots of pics.

 :applaud:

Kman-Sweden

  • Trade Count: (+1)
  • Full Member
  • ***
  • Offline Offline
  • Posts: 526
  • Last login:October 23, 2015, 07:29:00 am
  • Up the Irons!
Re: Aliens Neon Curvy Upright Horizontal Project
« Reply #5 on: September 21, 2009, 07:50:24 am »
Sweet rendering.  :applaud: Hope the cab ends up as good.
Keep up the good work.

drventure

  • Trade Count: (+2)
  • Full Member
  • ***
  • Offline Offline
  • Posts: 4152
  • Last login:June 25, 2023, 02:23:57 pm
  • Laser Death Ray Bargain Bin! Make me an offer!
Re: Aliens Neon Curvy Upright Horizontal Project
« Reply #6 on: September 21, 2009, 09:06:05 am »
Very nice. I love the shape and the color scheme on this one!

Ryglore

  • Trade Count: (+1)
  • Full Member
  • ***
  • Offline Offline
  • Posts: 779
  • Last login:November 16, 2021, 05:49:39 pm
  • Likes to make things difficult.
    • The Brush Wizard
Re: Aliens Neon Curvy Upright Horizontal Project
« Reply #7 on: September 21, 2009, 09:44:55 am »
Nice! Can't wait to see it progress. Sucks that you had to shelve the Wasteland cab,  Hopefully you can hop back on it eventually. I totally dig the curves on this one.  :)

Epyx

  • Trade Count: (+1)
  • Full Member
  • ***
  • Offline Offline
  • Posts: 1961
  • Last login:December 25, 2023, 07:56:36 pm
  • "You're an oddity"
Re: Aliens Neon Curvy Upright Horizontal Project
« Reply #8 on: September 21, 2009, 10:51:33 am »
The Wasteland will be resurrected once this one is complete but I might take a different approach to the lighting. This one has all the parts sitting and waiting.  Ya Ond, did a great job on the rendering and cleaning up/enlarging the box art.  I think I may just try the curve on the lower front as it will give it that alien feel and make it unique rather than a bit of a copy and do his render more justice!  It will be fun to try and curve plywood.

I will be laminating this cab now that I am more comfortable with laminating the last few CPs.
Last Project


Epyx Tutorials:
Tutorials

Dizzle

  • Trade Count: (0)
  • Full Member
  • ***
  • Offline Offline
  • Posts: 355
  • Last login:August 09, 2014, 05:28:04 pm
Re: Aliens Neon Curvy Upright Horizontal Project
« Reply #9 on: September 21, 2009, 01:52:27 pm »
Looks sweet!  I'll be following this and your Wasteland cab closely.  The design you've come up with has got to be my favorite cab design.

Epyx

  • Trade Count: (+1)
  • Full Member
  • ***
  • Offline Offline
  • Posts: 1961
  • Last login:December 25, 2023, 07:56:36 pm
  • "You're an oddity"
Re: Aliens Neon Curvy Upright Horizontal Project
« Reply #10 on: September 21, 2009, 02:21:45 pm »
Thanks Dizzle.  Your comment finalized it for me, I will definitely go with the original curves as I liked them too and seeing them come alive in Ond's render it would be a shame to "wimp out".  The whole point of this build was to challenge myself and take my time...Which I gotta admit is easier when you have a couple of cabinets to fall back on for a "playing fix" ;)
Last Project


Epyx Tutorials:
Tutorials

n88n

  • Trade Count: (0)
  • Full Member
  • ***
  • Offline Offline
  • Posts: 55
  • Last login:February 12, 2020, 11:46:46 am
Re: Aliens Neon Curvy Upright Horizontal Project
« Reply #11 on: September 21, 2009, 02:45:49 pm »
I had not seen a green cab yet that I really liked but this one looks great! 

Ryglore

  • Trade Count: (+1)
  • Full Member
  • ***
  • Offline Offline
  • Posts: 779
  • Last login:November 16, 2021, 05:49:39 pm
  • Likes to make things difficult.
    • The Brush Wizard
Re: Aliens Neon Curvy Upright Horizontal Project
« Reply #12 on: September 21, 2009, 03:30:33 pm »
You know you totally have to have lighted buttons on this right?

Jefferson

  • Trade Count: (+1)
  • Full Member
  • ***
  • Offline Offline
  • Posts: 169
  • Last login:January 14, 2024, 08:50:59 pm
Re: Aliens Neon Curvy Upright Horizontal Project
« Reply #13 on: September 21, 2009, 03:42:57 pm »
Wow, yeah. Imagine black opaque buttons with green lights inside like Ond's technique:

http://forum.arcadecontrols.com/index.php?topic=59359.msg971847#msg971847

Ryglore

  • Trade Count: (+1)
  • Full Member
  • ***
  • Offline Offline
  • Posts: 779
  • Last login:November 16, 2021, 05:49:39 pm
  • Likes to make things difficult.
    • The Brush Wizard
Re: Aliens Neon Curvy Upright Horizontal Project
« Reply #14 on: September 21, 2009, 04:01:25 pm »
Or maybe a way to get the green ball tops on the joysticks to glow also? Like use this Sanwa balltop and rework it to accept a led...   :blowup:

« Last Edit: September 21, 2009, 04:05:55 pm by Ryglore »

Epyx

  • Trade Count: (+1)
  • Full Member
  • ***
  • Offline Offline
  • Posts: 1961
  • Last login:December 25, 2023, 07:56:36 pm
  • "You're an oddity"
Re: Aliens Neon Curvy Upright Horizontal Project
« Reply #15 on: September 21, 2009, 04:53:49 pm »
Quote
You know you totally have to have lighted buttons on this right?

Already in the plans and on order.  Yes, likely utilizing that technique as well for a nice glow.

Quote
Or maybe a way to get the green ball tops on the joysticks to glow also? Like use this Sanwa balltop and rework it to accept a led...

Damn, nice find!  I am ordering U360s as well and apparently these are compatible.  Nice!

EDIT: Holy impulse buy...just ordered two :)
Last Project


Epyx Tutorials:
Tutorials

Ryglore

  • Trade Count: (+1)
  • Full Member
  • ***
  • Offline Offline
  • Posts: 779
  • Last login:November 16, 2021, 05:49:39 pm
  • Likes to make things difficult.
    • The Brush Wizard
Re: Aliens Neon Curvy Upright Horizontal Project
« Reply #16 on: September 21, 2009, 09:34:43 pm »
Haha! Awesome! I can't wait to see how that works.


Already in the plans and on order.  Yes, likely utilizing that technique as well for a nice glow.


If I wasn't going for the retro 80s/90s arcade look. I'd totally do glowing buttons. I'm still not sure if I want a Blue or White trackball...  :lol
« Last Edit: September 21, 2009, 09:40:07 pm by Ryglore »

Generic Eric

  • Trade Count: (+2)
  • Full Member
  • ***
  • Offline Offline
  • Posts: 4520
  • Last login:March 05, 2024, 09:02:23 am
  • Restore! Don't maim for MAME, build from scratch!
    • forum.arcadecontrols.com/index.php/topic,143226.0.html
Re: Aliens Neon Curvy Upright Horizontal Project
« Reply #17 on: September 22, 2009, 05:09:48 pm »
awesome....i love the shape of this cabinet...and who doesnt like aliens?
Predators


cool design!

Epyx

  • Trade Count: (+1)
  • Full Member
  • ***
  • Offline Offline
  • Posts: 1961
  • Last login:December 25, 2023, 07:56:36 pm
  • "You're an oddity"
Re: Aliens Neon Curvy Upright Horizontal Project
« Reply #18 on: September 23, 2009, 11:44:43 am »
Thanks.  Well I have a whole new appreciation for Martijn's "it just fits perfectly" approach... I'm not quite as ballsy...I spent 4 hours drawing, erasing and redrawing the lines to match the render as closely as possible but finally had to give the monitor that extra 1" "just in case" on the back.  The nice thing is that it now really does look like the render but slightly adjusted for the larger CRT monitor. 

I also have some cool ideas for approaching the construction that I will document this weekend.  I ordered the green translucent ball tops but am leaning towards the J-Sticks over the U360s at this point. I would still like to try them at some point but for now the J-sticks feel like the way to go.

My last other annoyance is Laminate...here in BC, Canada I could get flat black laminate at Home Depot for about $50 a sheet. Two days ago I was told that Home Depot has cleared that part number and will no longer restock it. This sucks because their price was heavily discounted owing to their volume purchasing. Mom and pop shops are charging about $80 per sheet and Rona (our version of HD) wanted $100 per sheet!

I think when it comes to laminating I will likely make a trip across the border and hit up the Home Depot in Bellingham they have it for $58.56 US.   Even with taxes I should still be saving a couple of 10 spots and I get to help the US economy lol.
 
I will take pictures tonight and finally cut the first side.

EDIT: Just grabbed 2 sheets from one of the last HD stores in the city here with stock.
« Last Edit: September 23, 2009, 05:52:20 pm by Epyx »
Last Project


Epyx Tutorials:
Tutorials

Epyx

  • Trade Count: (+1)
  • Full Member
  • ***
  • Offline Offline
  • Posts: 1961
  • Last login:December 25, 2023, 07:56:36 pm
  • "You're an oddity"
Re: Aliens Neon Curvy Upright Horizontal Project
« Reply #19 on: September 23, 2009, 10:54:20 pm »
I touched up my pencil lines on the MDF and just went for the curves as I have a good gameplan. My only concern is how tight the monitor fit will be.  However, I left about 3" that leaves a bit for the bezel and glass and the back panel will be 1/4" Plywood and the cross bracing I use will sit above and below that portion of the monitor

Here was the final pencil outline I went with:


My victims lined up:


Prepping the first piece on the sanding table for use tomorrow as the template guide for routing both pieces:


And a final pic before tomorrows routing of the sanded template side with monitor mock up back on:


The top and back will be two pieces of curved plywood. Each piece will sit atop a brace frame that will connect it to the sides. The idea is for a flush outter shell that rides just lower than the Galaxian green T-molding along the edge, maybe 1/8".


« Last Edit: September 23, 2009, 10:57:23 pm by Epyx »
Last Project


Epyx Tutorials:
Tutorials

javeryh

  • Trade Count: (+1)
  • Full Member
  • ***
  • Offline Offline
  • Posts: 7901
  • Last login:March 17, 2024, 05:35:40 pm
Re: Aliens Neon Curvy Upright Horizontal Project *First Cuts* Sep 23
« Reply #20 on: September 24, 2009, 07:55:53 am »
Looking really good Epyx.  Those curves are nice - this is going to be challenging but the end result will be worth it.   :cheers:

Ond

  • Trade Count: (0)
  • Full Member
  • ***
  • Offline Offline
  • Posts: 2267
  • Last login:Yesterday at 11:41:19 pm
Re: Aliens Neon Curvy Upright Horizontal Project *First Cuts* Sep 23
« Reply #21 on: September 24, 2009, 04:53:43 pm »
Good progress already man  :),  It sucks about how expensive laminate is, I want some too, but only a small amount and was quoted $84!  The answer might be find someone who has off-cuts.  They go for much cheaper.

Epyx

  • Trade Count: (+1)
  • Full Member
  • ***
  • Offline Offline
  • Posts: 1961
  • Last login:December 25, 2023, 07:56:36 pm
  • "You're an oddity"
Re: Aliens Neon Curvy Upright Horizontal Project *First Cuts* Sep 23
« Reply #22 on: September 24, 2009, 04:58:34 pm »
Agreed :(

At least I managed to scrounge up 3 sheets from around my city so I will have enough to finish this cab at least (if I don't muck up!).

Last Project


Epyx Tutorials:
Tutorials

SpaceHedgehog

  • Trade Count: (0)
  • Full Member
  • ***
  • Offline Offline
  • Posts: 937
  • Last login:February 06, 2023, 12:10:24 pm
  • Almost done ...
Re: Aliens Neon Curvy Upright Horizontal Project *First Cuts* Sep 23
« Reply #23 on: September 24, 2009, 05:48:30 pm »
I'm glad you went with the curves. This is going to look great and I love the colour scheme as well
Click a pic for a video tour 

clickhea

  • Trade Count: (0)
  • Full Member
  • ***
  • Offline Offline
  • Posts: 418
  • Last login:August 09, 2019, 07:33:40 am
Re: Aliens Neon Curvy Upright Horizontal Project *First Cuts* Sep 23
« Reply #24 on: September 24, 2009, 05:51:02 pm »
what did you use as a guide for the router to route those curves out perfectly?

Epyx

  • Trade Count: (+1)
  • Full Member
  • ***
  • Offline Offline
  • Posts: 1961
  • Last login:December 25, 2023, 07:56:36 pm
  • "You're an oddity"
Re: Aliens Neon Curvy Upright Horizontal Project *First Cuts* Sep 23
« Reply #25 on: September 24, 2009, 06:15:32 pm »
@SpaceHedgehog

Ya me too...the challenge is more fun than had I wimped out...besides knowing me I would always be wondering "what if I had just"...

I have an idea that will make assembling and disassembling this cab easy as pie...ill test and document the idea tonight but I am confident it will work.


@clickhea

I used a large chunk of leftover rectangular laminate...approx 8" wide by 60" long.  You can see this in one of the above pictures. Using clamps I held the back of the curve in place. I would then trace with a pencil along the inner side of the curve. I would start at one end but just a bit ahead of my pencil (maybe 12") I would place a counterweight like wood etc to push the laminate against the clamps from behind, maintaining the curve.

The picture above shows only a couple of clamps but this picture was before drawing...during drawing I had about 8 clamps forming the backside of the curve.

The actual cutting of the curves was done with my jigsaw (going very slow and steady and set to slight orbital curve).  I then sanded just the first piece smooth. The 2nd piece I will route tonight using the first piece as a template with my flush router bit.
« Last Edit: September 24, 2009, 06:24:46 pm by Epyx »
Last Project


Epyx Tutorials:
Tutorials

clickhea

  • Trade Count: (0)
  • Full Member
  • ***
  • Offline Offline
  • Posts: 418
  • Last login:August 09, 2019, 07:33:40 am
Re: Aliens Neon Curvy Upright Horizontal Project *First Cuts* Sep 23
« Reply #26 on: September 24, 2009, 06:22:45 pm »
well it looks awesome bro

Epyx

  • Trade Count: (+1)
  • Full Member
  • ***
  • Offline Offline
  • Posts: 1961
  • Last login:December 25, 2023, 07:56:36 pm
  • "You're an oddity"
Re: Aliens Neon Curvy Upright Horizontal Project *First Cuts* Sep 23
« Reply #27 on: September 24, 2009, 11:55:34 pm »
Tonight I flush routed side 2 from side 1 and did a final sanding.  I initially had some thought about portability, and decided what I really wanted was the ability to disassemble the cab if required.   The main reason is I want to do the finishing work (painting etc) in the garage where my tools are, but hate the thought of having to move the entire cab downstairs.  Reading in the forums a few threads discussed threaded inserts but most of them were horizontal which is less than ideal.

I did a quick mock up to test if I could do a horizontal flanged insert. The idea being three horizontal layers of support beams.  Most of the weight in the cab is weight pushing down, not to the side.  With this logic as long as the monitor weight is directly support by the ground via support beams I should be able to connect the sides with horizontal beams that use vertically mounted flanged inserts. Mounting the flanged inserts this way ensures they won't get ripped out.  The bolt screws through the horizontal beam and then into the cross latch which itself is mounted to the side via wood glue.

To disassemble the cab I would remove the top marquee retainer (also connected via inserts) and remove the marquee picture, marquee light (also on a horizontal board). Then I would remove the monitor and computer and take out the horizontal support beams.  Using the inserts I don't have to worry about wearing out screw holes etc.

 This picture illustrates the idea:


And here pictures of a mock up to test the idea.:


« Last Edit: September 25, 2009, 12:09:48 am by Epyx »
Last Project


Epyx Tutorials:
Tutorials

Epyx

  • Trade Count: (+1)
  • Full Member
  • ***
  • Offline Offline
  • Posts: 1961
  • Last login:December 25, 2023, 07:56:36 pm
  • "You're an oddity"
Re: Aliens Neon Curvy Upright Horizontal Project *Interior Assembly Plan* Sep 24
« Reply #28 on: September 25, 2009, 12:02:03 am »
cont...

The top and back will be plywood. 1/8" on the top and 1/4" on the back.  I will use one of the existing sides of the cabinet as a template for the curve of the exo-skeleton that the plywood will curve over. The back and top will each have 4 ribs. The outer side ribs of the top portion will connect to the sides of the cab via horizontal flanged inserts (the main horizontal support beams have vertical ones so this should be fine).

The plan for the back is a series of magnets, like a hatch door. I used magnets on my first cab and it worked well so hopefully it works here..if not plan b...oh don't have a plan b yet...

Both top and back will have the laminate over the plywood so this should form a smooth matching curved back and top just under the side edges.

Either way that is the plan for the next few weeks.  More Pics to follow as the build progresses.
« Last Edit: September 25, 2009, 12:05:08 am by Epyx »
Last Project


Epyx Tutorials:
Tutorials

Ryglore

  • Trade Count: (+1)
  • Full Member
  • ***
  • Offline Offline
  • Posts: 779
  • Last login:November 16, 2021, 05:49:39 pm
  • Likes to make things difficult.
    • The Brush Wizard
Re: Aliens Neon Curvy Upright Horizontal Project *Interior Assembly Plan* Sep 24
« Reply #29 on: September 25, 2009, 12:07:42 am »
Nice! The portability idea is neat, but I don't know if I would do it. I think maybe if you were taking the time to do it and make it the best possible (including any Bella-like technique of Sand and Paint hell) I would be worried about moving it and maring the surfaces. I know I'll be super over protective of Shmup when it's done, just cause of the side graphics.

But, hey I'm sure you can pull it off and I can't wait to see your progress!  :cheers:

Epyx

  • Trade Count: (+1)
  • Full Member
  • ***
  • Offline Offline
  • Posts: 1961
  • Last login:December 25, 2023, 07:56:36 pm
  • "You're an oddity"
Re: Aliens Neon Curvy Upright Horizontal Project *Interior Assembly Plan* Sep 24
« Reply #30 on: September 25, 2009, 12:11:50 am »
Agreed.  And that is why portability is out...really I just want to be able to disassemble it...once or twice or in the event of an emergency.  The outside is all laminate so should be fine and I would cover each piece with bubblewrap before I haul it downstairs etc.  Doing it this way in theory shouldn't be much more work than just screwing/gluing everything permanently.

My first cabinet is such a behemoth that a) it doesn't fit through anything smaller than a cargo elevator..and b) I would have to take a hammer to it to take it apart...ie 1 way ;)
Last Project


Epyx Tutorials:
Tutorials

Ryglore

  • Trade Count: (+1)
  • Full Member
  • ***
  • Offline Offline
  • Posts: 779
  • Last login:November 16, 2021, 05:49:39 pm
  • Likes to make things difficult.
    • The Brush Wizard
Re: Aliens Neon Curvy Upright Horizontal Project *Interior Assembly Plan* Sep 24
« Reply #31 on: September 25, 2009, 12:22:28 am »
Haha, Ya I made my cab with the intentions of being able to fit in through a doorway and it is roughly 28 inches wide total. I have to dolly it up a flight of stairs, and though my apartment door... And if all goes well I'll have to get it down the out the door and down the stairs and into a house... within months of completion.  :banghead:

Martijn

  • Trade Count: (0)
  • Full Member
  • ***
  • Offline Offline
  • Posts: 822
  • Last login:January 25, 2024, 10:34:36 am
  • Akira!
    • ModMyBox
Re: Aliens Neon Curvy Upright Horizontal Project *Interior Assembly Plan* Sep 24
« Reply #32 on: September 26, 2009, 04:35:21 am »
Hmm, making it portable makes it unstable in time i think. maybe make the tv removable and or other parts.
And some panels makes it more light to handle?

Epyx

  • Trade Count: (+1)
  • Full Member
  • ***
  • Offline Offline
  • Posts: 1961
  • Last login:December 25, 2023, 07:56:36 pm
  • "You're an oddity"
Re: Aliens Neon Curvy Upright Horizontal Project *Interior Assembly Plan* Sep 24
« Reply #33 on: September 26, 2009, 04:46:43 am »
Thanks Martijn. I will heed your advice and plan very carefully this weekend as I begin working on the base and top.  It won't be portable as much as allow me to disassemble it *if* required.  I still think the design should be as strong and stable as the conventional methods as the main support beams will be permanent on the inner sides of the cabinet but you are right...think...slow...careful ;)

« Last Edit: September 26, 2009, 04:48:47 am by Epyx »
Last Project


Epyx Tutorials:
Tutorials

Martijn

  • Trade Count: (0)
  • Full Member
  • ***
  • Offline Offline
  • Posts: 822
  • Last login:January 25, 2024, 10:34:36 am
  • Akira!
    • ModMyBox
Re: Aliens Neon Curvy Upright Horizontal Project *Interior Assembly Plan* Sep 24
« Reply #34 on: September 26, 2009, 06:40:26 am »
laminating the inside first would make it easier btw. if you plant the panels and other wood pieces to the side first its hard to cut out a laminate piece filling the visible edges. i did that first and it was almost impossible to cut out a fitting piece of laminate in the insde with all the pieces of wood gluid and screwed already

as to see here

it was a hell of a job cutting laminate in 1 piece to fit the edge

Shortbus

  • Trade Count: (0)
  • Full Member
  • ***
  • Offline Offline
  • Posts: 194
  • Last login:August 26, 2023, 03:20:00 pm
Re: Aliens Neon Curvy Upright Horizontal Project *Interior Assembly Plan* Sep 24
« Reply #35 on: September 26, 2009, 07:03:08 am »
Nice Work, Awesome Cabinet, colors and everything....will watch this unfold......

 :applaud:

Epyx

  • Trade Count: (+1)
  • Full Member
  • ***
  • Offline Offline
  • Posts: 1961
  • Last login:December 25, 2023, 07:56:36 pm
  • "You're an oddity"
Re: Aliens Neon Curvy Upright Horizontal Project *Interior Assembly Plan* Sep 24
« Reply #36 on: September 26, 2009, 01:41:44 pm »
@Martijn

Yes, I remember this part of your project well and the advice is burned in my memory.  I will be paying special attention to this.  I think it is worth it because one of my favourite things about your cabinet is the finish.  Laminating the interior (even the hard way as you put it) makes it look like a factory finish.

@Shortbus

Thanks!  The fun is just about to begin.

« Last Edit: September 27, 2009, 05:11:38 am by Epyx »
Last Project


Epyx Tutorials:
Tutorials

Epyx

  • Trade Count: (+1)
  • Full Member
  • ***
  • Offline Offline
  • Posts: 1961
  • Last login:December 25, 2023, 07:56:36 pm
  • "You're an oddity"
Re: Aliens Neon Curvy Upright Horizontal Project *Interior Assembly Plan* Sep 24
« Reply #37 on: September 27, 2009, 10:39:30 pm »
Spent today making a circle jig and the start of the top portion of the cab. The top portion will hold the marquee, lighting and curved plywood (to where it will meet the back panel).

The circle jig is nothing fancy compared to some of the ones on here but does the sizes I will require (8", 10", 12", 14.5" and 15")  Over the coming days I will determine if I go with 12", 14.5" or 15":


Here are the 6 MDF pieces (4 below but i had 2 more, that will serve as the ribs that hold the plywood on the top and the top marquee retainer/lighting:


Here is the plan:


The diagram shows the bottom of the ribs being flat and extended to the bottom of the curve in a straight line. In reality I will make only a 5" portion flat...the rest will curve along approximately 3" from the top.  I have tested the plywood and it curves perfectly (and as Ond mentioned...easily) along the top.  Over the next few days I will glue this on once I have everything lined up.  Overtop of the plywood will sit the laminate. 

I purchased a 3/4" aluminum angle which I will paint green and act as the marquee retainer.  The top portion as illustrated will be attached to the pine via threaded inserts.  1 rib will be glued to each side of the cab. The other 4 will form the skeleton for the plywood. The outter 2 ribs will be offset from the edge of the plywood by 3/4" so that the 3/4" plywood overhang will rest flush with the ribs glued to the side.  They will also attach via threaded inserts.


« Last Edit: September 28, 2009, 12:56:20 pm by Epyx »
Last Project


Epyx Tutorials:
Tutorials

Epyx

  • Trade Count: (+1)
  • Full Member
  • ***
  • Offline Offline
  • Posts: 1961
  • Last login:December 25, 2023, 07:56:36 pm
  • "You're an oddity"
Re: Aliens Neon Curvy Upright Horizontal Project *Circle Jig and started top* Se
« Reply #38 on: September 28, 2009, 11:13:58 pm »
Today I completed the "ribs"...sorry if you were expecting food! Just a bit of sanding and some final shaping on the retainer portion left to do. I get the feeling a few people were wondering what I was on about and scratching their heads with the illustrated plan above (my google sketchup isn't the best) so here are some pictures to better show what I will do.

Here you can see a stack of "ribs" with what will be the top of the cab. The plywood really has no issue making the bend, I'm not sure why I was so worried about this.  The following pictures will show how far apart these will actually be.


Each side of the cab will have one of the ribs (made of pine or harder wood) connected to it with threaded inserts. The main stress will be downward and the vertical inserts will take the load off  the few horizontal ones I use (like these).  You can also see on this picture the idea behind the curved skelton. It will continue in a 2nd piece that will curve along the back to the bottom so that what I end up with is a nice curve outlining the cab...no squares here ;)


Here is a picture of them lined up on a workbench so you can see the approximate spacing. Note they are doubled up on the sides. One piece on the cab side as mentioned and the outmost of the rib set will thread screw to the one on the cab side.  The retainer spacing will house a small piece of pine that I will glue on and I have cut it so it is square with the ground. 


Here is a front shot to give you an idea of how the retainer will sit. Of course it will be green and will be slightly higher (no pine in there yet):


Next, I'm going to finish the retainer portion and mount the pine retainer beam. There will also be a piece of pine that will run along the flat inner portion you see.


« Last Edit: September 28, 2009, 11:36:18 pm by Epyx »
Last Project


Epyx Tutorials:
Tutorials

emphatic

  • Trade Count: (0)
  • Full Member
  • ***
  • Offline Offline
  • Posts: 2008
  • Last login:Today at 01:08:03 am
  • -"Suck it, Donny!" -"No, YOU suck it.... more".
    • Emphatic's Video Game Collection
Re: Aliens Neon Curvy Upright Horizontal Project *Mmmm tasty ribs* Sep 29
« Reply #39 on: September 29, 2009, 04:25:25 am »
Spectacular!  :applaud: