Main Restorations Software Audio/Jukebox/MP3 Everything Else Buy/Sell/Trade
Project Announcements Monitor/Video GroovyMAME Merit/JVL Touchscreen Meet Up Retail Vendors
Driving & Racing Woodworking Software Support Forums Consoles Project Arcade Reviews
Automated Projects Artwork Frontend Support Forums Pinball Forum Discussion Old Boards
Raspberry Pi & Dev Board controls.dat Linux Miscellaneous Arcade Wiki Discussion Old Archives
Lightguns Arcade1Up Try the site in https mode Site News

Unread posts | New Replies | Recent posts | Rules | Chatroom | Wiki | File Repository | RSS | Submit news


Author Topic: Retrotron: 1984 (5/3/14) Death of Retrotron: 1984  (Read 29807 times)

0 Members and 1 Guest are viewing this topic.

Ryglore

  • Trade Count: (+1)
  • Full Member
  • ***
  • Offline Offline
  • Posts: 779
  • Last login:November 16, 2021, 05:49:39 pm
  • Likes to make things difficult.
    • The Brush Wizard
Retrotron: 1984 (5/3/14) Death of Retrotron: 1984
« on: October 15, 2012, 11:52:04 pm »
Table of Contents:
10/15/12 - Original Post Below
10/16/12 -  Prep Work
10/17/12 - Marquee Design
10/18/12 - Marquee Design Part 2
10/23/12 - PC Arrived
10/25/12 - Crafting the New CP and Testing Button Layout
10/29/12 - Control Panel Artwork Complete
11/1/12 - Bezel Artwork Completed
11/3/12 - Test Mounting Joystick
11/9/12 - Fairly Large Update
11/10/12 - Artwork Arrived!
11/14/12 - We've Hit a Snag in Paint Hell
11/16/12 - Paaaaaint....
11/18/12 - More Paaaaaaint, plus CP work & Marquee Light
11/21/12 - Wiring the CP & Cab, Bezel mounted
11/24/12 - Work Completed? Not Really...
12/12/12 - It's ALIIIIIIVE! ...again
12/26/12 - Solving the Power Button
12/27/12 - PC Installed & Project Officially Complete!
5/3/14 - Death of Retrotron: 1984

-----------------------------------------------------------------------------------------------------------------------------
Hey all, long time no see. I'm back! Now you may say, but Ryglore... you have your Centipede project to finish. Why on earth are you working on a new project?! That, my friends, is simple. I've been commissioned to refurbish a MAME cab for a friend of mine!

This cab was actually the last cab made by my buddy madk. This was also the cab that inspired me to build the SHMUP. Well, it's sat in madk's garage for the last 2 years and before that it sat disassembled in his side room. It was kind of a shame. Especially after I finished SHMUP and had this sweet cab and the one that inspired it went unloved for all this time.

Here it is, It's kind of in sad condition at the moment. This was taken in madk's garage before I moved it.
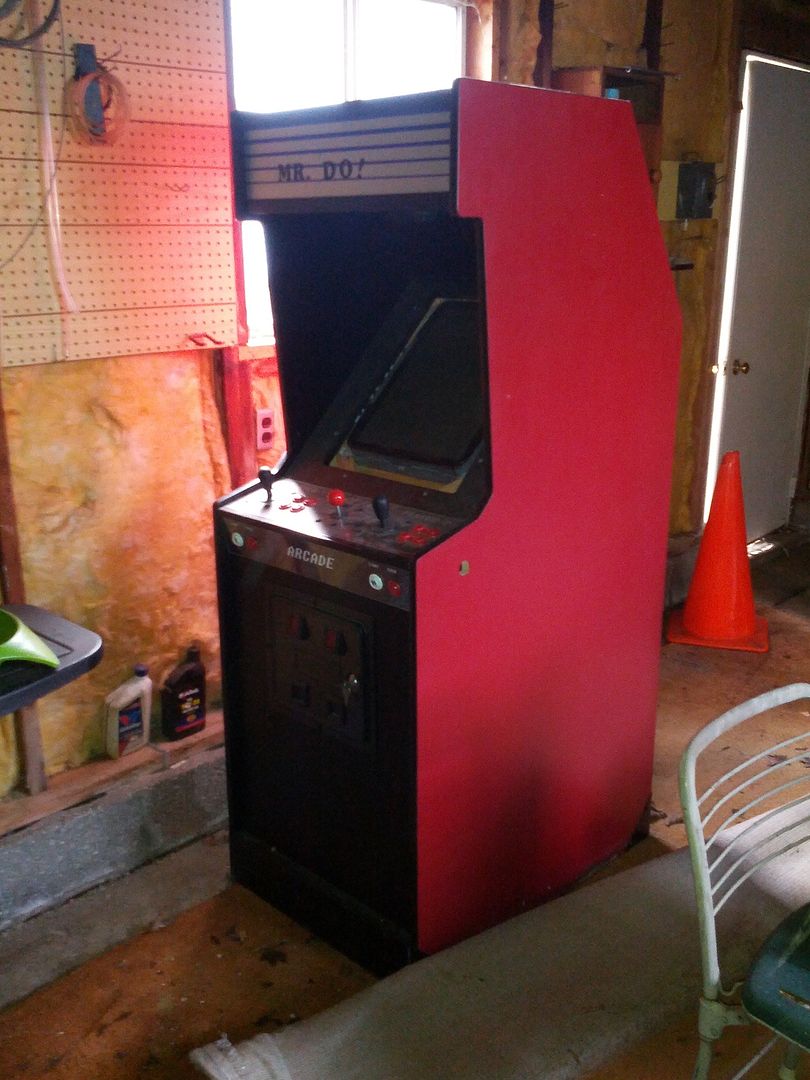

Recently, another friend of mine was talking about wanting an arcade cab for his son and was talking to me about it.  He asked how much time it took and how much it cost me to build the SHMUP. After talking about it for awhile, I mentioned that madk might be interested in selling his cab and if he can get it it would save him a bunch of money. He asked if I could find out for sure and I then asked madk and he agreed to sell it. And it is now sitting in my basement awaiting some much needed TLC.

So now I have a new cab project! This one should go pretty smoothly, since I'm not on the hook for all the money and I've given my buddy an estimate on how much it will cost. The cab is an old legit arcade cab, it has a 20" monitor already installed. He's already budgeted for it and he has the PC coming already. All I need to do is pick up the paint, some plexi, a few buttons, a marquee light and do up some sweet new graphics it'll be complete.

Now, the plan:

The plan for this cab is to be themed after Robotron: 2084. The graphics will be a take on Robotron's original graphics and the paint colors will follow suit. The Marquee and anywhere that reads Robotron: 2084 will instead read Retrotron: 1984 and the side of the cab will be 1984 rather than 2084. The screen is already mounted vertically, so I'm going to leave it that way and I'll rework the bezel to fit.

The cab will run MAME again and I'll be using another Windows XP based PC for the system. I'll be hiding windows, like I did on the SHMUP and building a custom and fitting GUI for game selection using MALA again. Luckily I had the presence of mind to keep all of my files saved on a portable HDD for easy access and they are also on the SHMUP if needed, thus I don't need to track anything down. Plus I kept a folder with a bunch of important notes in it on instant sheller and such for hiding windows completely. I'll also be using romlister again to build some good all around play lists and will have to make sure that the games list is kid friendly as possible, making sure to remove any and all "adult" games (I'm looking at you Mahjong)  I'm also going to go ahead with an idea for an intro video that I originally was going to do for SHMUP and that is the idea of making it do mock start up/ rom checks.

My buddy has asked if there was a way to squeeze in 2 extra buttons on each side. So I'll need to rework the CP somehow and I think I may be able to do it without too much issues. The 4 way stick will be staying to allow for DK, Frogger, Galaga etc. Currently the front of the cab has coin buttons and P1/P2 Buttons. I'm going to do away with the coin up buttons and instead wire the coin door up and make it use tokens, just like the SHMUP.

Currently there are holes for possible flipper buttons for virtual pinball, but we've decided to plug them and only focus on arcade games. I may have to keep the P1/P2 buttons on the front, as real estate on the CP is limited. I will be incorporating a pause button onto the cab somewhere, prolly someplace that will be within easy reach for his son. For these I may end up using 2 of my Atari Volcano buttons that I had picked up for the Centipede cab, since I have some spare all black ones and put them on top of the CP. I will also need to make the exit game button easy to reach. My buddy liked the idea of the ones on the SHMUP being hidden, but there isn't anywhere to hide them on this cab.

The Control Panel as it sits
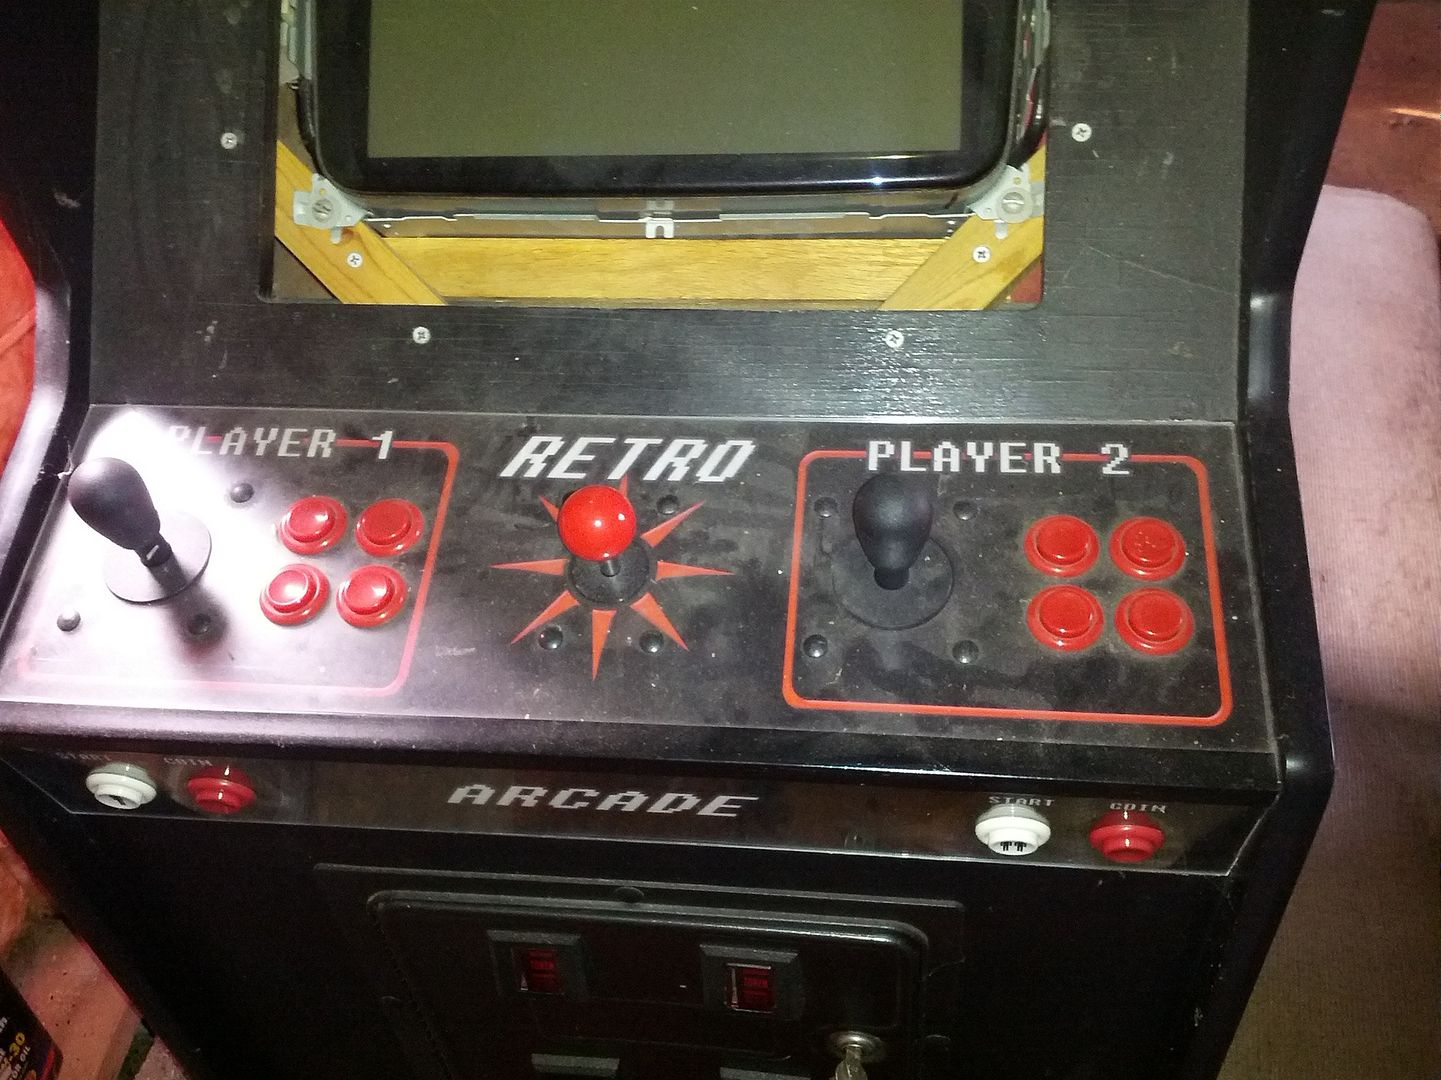

Now that I have the cab in front of me, I can start taking measurements and working on the artwork. This cab is pretty filthy at the moment and will need to good cleaning. I need to peel off the t-molding and will likely buy replacement for it, sand the paint down and patch old holes. Then I can prime the sides and repaint them with the new color. I think the black should be ok for the middle of the body, but I haven't taken a good look at it.

But there you have it, a new project! Hopefully all goes as smoothly as we think it will and I can get this knocked out. I really can't wait to see the look on my buddy's son's face when he sees it!
« Last Edit: May 03, 2014, 11:39:45 pm by Ryglore »

wp34

  • Trade Count: (+3)
  • Full Member
  • ***
  • Offline Offline
  • Posts: 4794
  • Last login:April 10, 2022, 09:48:19 pm
Re: Retrotron: 1984 (10/15/12 Cab Picked Up, New Project Begins)
« Reply #1 on: October 16, 2012, 10:57:26 am »
Welcome back.   I loved the SHMUP and am looking forward to following this build.

Sent from my Atari 800 mobile device using Tapatalk


Ryglore

  • Trade Count: (+1)
  • Full Member
  • ***
  • Offline Offline
  • Posts: 779
  • Last login:November 16, 2021, 05:49:39 pm
  • Likes to make things difficult.
    • The Brush Wizard
Re: Retrotron: 1984 (10/15/12 Cab Picked Up, New Project Begins)
« Reply #2 on: October 16, 2012, 01:08:45 pm »
Thanky. I hope to make this cab look as good, if not better than the SHMUP. Hopefully I don't disappoint.

TopJimmyCooks

  • Trade Count: (+1)
  • Full Member
  • ***
  • Offline Offline
  • Posts: 2097
  • Last login:March 26, 2024, 01:18:39 pm
Re: Retrotron: 1984 (10/15/12 Cab Picked Up, New Project Begins)
« Reply #3 on: October 16, 2012, 08:53:36 pm »
Lot of potential and some good stuff to work with there. 

Ryglore

  • Trade Count: (+1)
  • Full Member
  • ***
  • Offline Offline
  • Posts: 779
  • Last login:November 16, 2021, 05:49:39 pm
  • Likes to make things difficult.
    • The Brush Wizard
Re: Retrotron: 1984 (10/16/12 Prep Work)
« Reply #4 on: October 16, 2012, 10:12:29 pm »
Today I started gutting the wiring and cleaning the cab.

I started by peeling the T-molding off of the cab, turns out it's a lot more jacked up than I originally thought. So I'll need to replace it. But that's not a big deal at all. Once the t-molding was peeled off, I pulled the CP off and started cleaning up the wiring. The plan all along was to rewire the entire thing anyway and so I'm scrapping the wiring and starting fresh.

T-Molding off, and CP dismounted.


CP set aside


Previous Wiring setup


Wiring ripped out


IPac removed


As I was working on the wiring, I was playing around with the coin door and pulling the wiring from it. When i took the picture of the Previous Wiring setup, I glanced down and noticed the box for the coin bin to sit in. It was dark in there, but I noticed that there was something in there. Either someone thought the coin door loaded credits, or madk was testing the door. But it turns out that there was .75 cents in there, which means I just got made a profit! ha

What's this?


Oh, cool. Coins!


The coin door looks like it's in pretty good shape, I believe madk told me that he went through it and it should be in full working order. Which is excellent news, since the plan is to remove the coin up buttons on the front and wire it in like the SHMUP for tokens.

Rear of the coin door


Madk told me that the kicker on the bottom of the cab was an add on that he put on there and that it should be pretty simple to remove, if I chose to. Well I poked at it and the wood seemed kinda soft... I decided that I will instead paint up some diamond plate in place of it in the front. So I found the holes where madk had the screws and cleaned it out w/ my pocket knife and then unscrewed the wood.... turns out it was glued in place too. It was 2 3/4" layers of MDF glued together. I put the prybar between them and peeled one layer off and it came off in soft MDF sections. I then took the second section off and... found water damaged, rotten plywood. hrm...

View one.


View two.


So now I need to figure out how to repair this. The way it sits right now, I'm thinking I'll have to cut it out and replace it with fresh plywood and then fill gaps. Unless any of you have some pointers on fixing it without major surgery. It looks like the MDF soaked the sides a bit too, but I may need to leave that there...


Ryglore

  • Trade Count: (+1)
  • Full Member
  • ***
  • Offline Offline
  • Posts: 779
  • Last login:November 16, 2021, 05:49:39 pm
  • Likes to make things difficult.
    • The Brush Wizard
Re: Retrotron: 1984 (10/17/12 Marquee Design)
« Reply #5 on: October 18, 2012, 12:07:49 am »
Tonight I didn't work on the body of the cab. I'm still weighing my options and I haven't had a chance to talk to my Dad about what he thinks about fixing the rot. I did look at some steel panels we have laying around the shop though and am seriously considering putting one on the front for a kick panel along with repairing the wood, to help save what is there from future abuse. Especaially when you consider that this is going to a house with 2 boys under the age of 10.

But since it was raining all day and I didn't feel like being cramped in the basement I instead came up to the PC and worked on the marquee. Like I said before, I'm naming the cab "Retrotron: 1984" and I'm going to recreate the Robotron: 2084 artwork from scratch with tweaks. So after about 2 hours of work and some internet searches to find decent matches for both the Robotron font and the Williams font. Here's what I've come up with.

Marquee! If anyone knows where I can get a closer font match for the Robotron logo, lemme know. Thanks!


So far this is all the playing I can do in Illustrator. I need rework the CP to see if I can manage a 6 button layout w/ the 4 Way joy in the middle like it is. And if I can, then I'll need to adjust the art for the P1 and P2 sticks accordingly. But I may also rebuilt the CP from scratch to I don't have to mess around with moving/plugging holes. Since it looks like madk built a replacement CP for it out of MDF. Plus I want to adjust it a little anyway, since the way it sits, I'm not sure how the bezel plexi will stay in place.
« Last Edit: October 18, 2012, 12:10:22 am by Ryglore »

Jigenjuke

  • Trade Count: (0)
  • Full Member
  • ***
  • Offline Offline
  • Posts: 482
  • Last login:October 02, 2016, 12:00:50 am
Re: Retrotron: 1984 (10/17/12 Marquee Design)
« Reply #6 on: October 18, 2012, 07:33:00 am »
Hey there Ryglore,


Take a look at this thread. http://forum.arcadecontrols.com/index.php?topic=45368.0

Timoe took the Illustrator vector file from http://vectorlib.free.fr and rebuilt the letters he needed from what was already there.  It may be the easiest thing to do as I have not come across a faithful font for Robotron. 

Jigenjuke

Ryglore

  • Trade Count: (+1)
  • Full Member
  • ***
  • Offline Offline
  • Posts: 779
  • Last login:November 16, 2021, 05:49:39 pm
  • Likes to make things difficult.
    • The Brush Wizard
Re: Retrotron: 1984 (10/17/12 Marquee Design)
« Reply #7 on: October 18, 2012, 08:56:42 am »
Thank Jigenjuke,

I found a font called Data 70 that looks a lot closer than this one. But I don't want to buy it for 1 project. I did however use the "preview mode" on the site I found it on. Typed out RETROTRON: on it then did a screen capture. I figure if I don't like how this one looks, I'll trace this image in illustrator.

Also I just noticed that I screwed up and the Yellow stripe on the bottom should not be running straight across.

TPA5

  • Trade Count: (0)
  • Full Member
  • ***
  • Offline Offline
  • Posts: 59
  • Last login:May 30, 2017, 10:25:16 pm
  • Wanting A Cab
Retrotron: 1984 (10/17/12 Marquee Design)
« Reply #8 on: October 18, 2012, 11:33:51 am »
I like where this is going! Subscribed.

On a random note, did you ever finish your Centipede build?

Ryglore

  • Trade Count: (+1)
  • Full Member
  • ***
  • Offline Offline
  • Posts: 779
  • Last login:November 16, 2021, 05:49:39 pm
  • Likes to make things difficult.
    • The Brush Wizard
Re: Retrotron: 1984 (10/17/12 Marquee Design)
« Reply #9 on: October 18, 2012, 12:09:16 pm »
I like where this is going! Subscribed.

On a random note, did you ever finish your Centipede build?

Thanks, and no not yet. I did find a micro PC that could work for running centipede but haven't pulled the trigger on buying it so I can test it. The main hold up on it is the screen though. opt2not showed me a nice 8" 4:3 ration screen from deal extreme a few years ago. But I'm iffy on ordering things from overseas. Hopefully one day I can finish it.

Ryglore

  • Trade Count: (+1)
  • Full Member
  • ***
  • Offline Offline
  • Posts: 779
  • Last login:November 16, 2021, 05:49:39 pm
  • Likes to make things difficult.
    • The Brush Wizard
Re: Retrotron: 1984 (10/18/12 Marquee Design Part 2)
« Reply #10 on: October 19, 2012, 12:45:06 am »
Just a quicky update.

I did some internet searching today and was able to score a free download of that Data 70 font I was looking at. So with that I was able to redo the RETROTRON text and while I was at it I fixed that stupid yellow line. It looks 100% better now.


Ryglore

  • Trade Count: (+1)
  • Full Member
  • ***
  • Offline Offline
  • Posts: 779
  • Last login:November 16, 2021, 05:49:39 pm
  • Likes to make things difficult.
    • The Brush Wizard
Re: Retrotron: 1984 (10/23/12 PC Arrived)
« Reply #11 on: October 23, 2012, 09:52:37 pm »
Hey all, I haven't forgotten about the project! I hit a snag w/ the ugly wood on the front of the cab and was going over options. The way the panel is mount on the front it's notched into a couple of grooves, which will make it a bear to get out of there. So, on the suggestion of my Dad (since he's still better at these things) I'll likely be filling the pulled away sections and leaving the wood as is. Then I'm going to take a piece of sheet steel and make a kickplate for it. Both for bracing and for durability.

But, for the next 2 weeks I am away from my house... so that means I can't tinker on the cab at all. But, the guy I'm building this for has gotten me the PC for the cab and I have that with me now. So I'll be working on the PC end of things 1st and the cab end of things 2nd. Pretty much all I have to share at the moment are a couple pics of the PC tower.

It's a 2.8Ghz Dell GX620 w/ 2GB of RAM and a 80 GB HDD. I'm unsure if I am going to gut the tower and put it all in the cab loose, like I did on the SHMUP or if I'll leave it in the case and secure it to the body somehow. Personally I like the idea of gutting it and then he won't have to worry about extra heat build up from dust building up in the case.

PC Tower


Case off of case


Anyway, that's all for now. Soon I'll start playing with designing a MALA layout and work on hiding windows. Luckily I have a folder full of info I saved from the last build to give me a refresher, if I can't find enough in the SHMUP thread.
« Last Edit: October 23, 2012, 10:52:30 pm by Ryglore »

MTPPC

  • Trade Count: (0)
  • Full Member
  • ***
  • Offline Offline
  • Posts: 535
  • Last login:November 26, 2021, 02:25:46 pm
Re: Retrotron: 1984 (10/23/12 PC Arrived)
« Reply #12 on: October 23, 2012, 10:54:43 pm »
I'm using a slim GX620 in my current bartop touchmaster project. It has a 15" CRT touch screen and I haven't begun the cabinet design. I can't decide if I should go wide, tall or long with it. I'm probably going to leave mine cased and use vents and ducts to pull in outside air through the PC and into the cabinet.
Pinball and Video Arcade Repair in Billings, MT USA
http://pinballmd.com/

TopJimmyCooks

  • Trade Count: (+1)
  • Full Member
  • ***
  • Offline Offline
  • Posts: 2097
  • Last login:March 26, 2024, 01:18:39 pm
Re: Retrotron: 1984 (10/23/12 PC Arrived)
« Reply #13 on: October 24, 2012, 09:15:35 am »
use the case and strap it in the cab.  since it's going to a less arcade inclined user - that will give them flexibility.  if there is a problem, they can pull the pc and give it to you for service.  Also, if you use a video card, you won't have to glue it in. 

Ryglore

  • Trade Count: (+1)
  • Full Member
  • ***
  • Offline Offline
  • Posts: 779
  • Last login:November 16, 2021, 05:49:39 pm
  • Likes to make things difficult.
    • The Brush Wizard
Re: Retrotron: 1984 (10/23/12 PC Arrived)
« Reply #14 on: October 24, 2012, 09:17:10 am »
use the case and strap it in the cab.  since it's going to a less arcade inclined user - that will give them flexibility.  if there is a problem, they can pull the pc and give it to you for service.  Also, if you use a video card, you won't have to glue it in.

Good point. I didn't think of that.

TopJimmyCooks

  • Trade Count: (+1)
  • Full Member
  • ***
  • Offline Offline
  • Posts: 2097
  • Last login:March 26, 2024, 01:18:39 pm
Re: Retrotron: 1984 (10/23/12 PC Arrived)
« Reply #15 on: October 24, 2012, 09:53:53 am »
Cab pic showing wood brackets that hold the SFF case.  More brackets inside the door to trap it when the back door of the cab is closed.  Tool free, baby.  Of course, I got the cab done and haven't removed the PC since. 


Ryglore

  • Trade Count: (+1)
  • Full Member
  • ***
  • Offline Offline
  • Posts: 779
  • Last login:November 16, 2021, 05:49:39 pm
  • Likes to make things difficult.
    • The Brush Wizard
Re: Retrotron: 1984 (10/23/12 PC Arrived)
« Reply #16 on: October 24, 2012, 03:08:54 pm »
Oh that's a neat idea for sure. I'm deff gonna need to weigh the options of cased vs caseless.

Drnick

  • Trade Count: (+2)
  • Full Member
  • ***
  • Offline Offline
  • Posts: 1642
  • Last login:June 21, 2024, 03:32:31 pm
  • Plodding Through Life
Re: Retrotron: 1984 (10/23/12 PC Arrived)
« Reply #17 on: October 24, 2012, 03:18:53 pm »
I used the same PC in my bartop. kept it cased and with the pretty little monitor stand :)


KeithPuetz

  • Trade Count: (0)
  • Full Member
  • ***
  • Offline Offline
  • Posts: 207
  • Last login:May 27, 2017, 04:26:21 pm
  • I want to build my own arcade controls!
Re: Retrotron: 1984 (10/23/12 PC Arrived)
« Reply #18 on: October 24, 2012, 03:48:23 pm »
I suggest putting metal the plates often seen on kickplates over that weak wood. I believe it would look cool over ordinary wood and remove the blemish.

Ryglore

  • Trade Count: (+1)
  • Full Member
  • ***
  • Offline Offline
  • Posts: 779
  • Last login:November 16, 2021, 05:49:39 pm
  • Likes to make things difficult.
    • The Brush Wizard
Re: Retrotron: 1984 (10/23/12 PC Arrived)
« Reply #19 on: October 24, 2012, 04:07:55 pm »
I suggest putting metal the plates often seen on kickplates over that weak wood. I believe it would look cool over ordinary wood and remove the blemish.

Yup that's the plan. I have a bunch of scrap plate steel laying around the shop that I can use and it should look good.

mgb

  • Trade Count: (0)
  • Full Member
  • ***
  • Offline Offline
  • Posts: 3499
  • Last login:February 21, 2024, 06:18:13 pm
  • North East, US
Re: Retrotron: 1984 (10/23/12 PC Arrived)
« Reply #20 on: October 25, 2012, 11:22:52 pm »
I'm looking forward to seeing how this one goes. I thought Shmup was great
good luck

Ryglore

  • Trade Count: (+1)
  • Full Member
  • ***
  • Offline Offline
  • Posts: 779
  • Last login:November 16, 2021, 05:49:39 pm
  • Likes to make things difficult.
    • The Brush Wizard
Re: Retrotron: 1984 (10/23/12 PC Arrived)
« Reply #21 on: October 25, 2012, 11:45:48 pm »
I'm looking forward to seeing how this one goes. I thought Shmup was great
good luck

Thanky,  I hope not to disappoint.  :cheers:

Ryglore

  • Trade Count: (+1)
  • Full Member
  • ***
  • Offline Offline
  • Posts: 779
  • Last login:November 16, 2021, 05:49:39 pm
  • Likes to make things difficult.
    • The Brush Wizard
Re: Retrotron: 1984 (10/25/12 Crafting the New CP and Testing Button Layout)
« Reply #22 on: October 26, 2012, 12:21:18 am »
Alrighty, so I now have a hard deadline on when this cab needs to be ready. I need to have it ready and in my friends new house by November 24th for his son's house warming sleep over. That means I have to bust to serious hind end to get this baby done in time. So now with a set deadline I made sure not to slack off tonight and cut the new control panel out of 1/2" MDF. Since he wants 6 buttons on each side for fighting games, I need to move things a little bit and rather than plug holes and wait for glue to dry I decided I would be best off just starting fresh. So, the goal for tonight was to get the CP cut out and play with the button layout. That way I can get the art all made and on order. Since I need to design the art, place the order and plan shipping time accordingly. I plan on getting rid of the plexi on the CP and putting laminated artwork on. Much like the real Robotron.

Original CP stripped down for proper measuring.


2 x 4 sheet of 1/2" MDF


First thing I did was to set up the router with the roundover bit and do some test cuts on the end I wasn't planning on using. Once that was set I cut the edge to a round and finally cut it to size. Then I cut he new panel for the front and set it aside. I made sure to save the drop pieces for gussets when gluing it all together.

Rounded edge


New CP top cut and ready for layout.


New CP front


Once this was all set, I brought the pieces inside and started laying out the joys and buttons to make sure everything was going to eventually fit. Keep in mind that this is just a quick layout and I didn't measure anything. And I am swapping the Happ Supers to Zippyy Red Ball Tops to keep with the theme (plus I was going to buy a set of Supers eventually anyway, so I just traded him for them basically). I decided that having the 4 way in the middle and in line withe the rest of the sticks made it seem slightly cluttered. So, I moved it up a little bit and it doesn't feel like the 2P Joy is crowded as much any more.


Now that I have the CP cut and measurements for it taken I can get started on converting the Robotron CP artwork to fit. This may take some finesse to make it look good. Thanks to the asymmetrical set up of the joysticks and all the extra buttons. But I'm sure I won't have to many problems. If all goes well, I should have the artwork done by the end of the weekend and then it's just a matter of getting it on order.

Also, I put in my parts order for the new marquee light, 2 Zippyy joysticks, 2 more red push buttons and the fresh t-molding. Hopefully those will arrive soon. But thanks to some internet searching I was able to find the dimensions of the Zippyy mounting plate, so it shouldn't hold me back from continuing to move forward.

madk

  • Trade Count: (0)
  • Full Member
  • ***
  • Offline Offline
  • Posts: 227
  • Last login:March 28, 2017, 04:59:49 pm
  • I actually am a llama!!
    • Digital Something
Re: Retrotron: 1984 (10/25/12 Crafting the New CP and Testing Button Layout)
« Reply #23 on: October 26, 2012, 09:13:02 am »
hey...this cab looks familiar.  :)
Matt (mad-k)

Ryglore

  • Trade Count: (+1)
  • Full Member
  • ***
  • Offline Offline
  • Posts: 779
  • Last login:November 16, 2021, 05:49:39 pm
  • Likes to make things difficult.
    • The Brush Wizard
Re: Retrotron: 1984 (10/25/12 Crafting the New CP and Testing Button Layout)
« Reply #24 on: October 26, 2012, 11:19:20 am »
hey...this cab looks familiar.  :)

And soon it won't look familiar at all!  :D

Ryglore

  • Trade Count: (+1)
  • Full Member
  • ***
  • Offline Offline
  • Posts: 779
  • Last login:November 16, 2021, 05:49:39 pm
  • Likes to make things difficult.
    • The Brush Wizard
Re: Retrotron: 1984 (10/29/12 Control Panel Artwork Complete)
« Reply #25 on: October 29, 2012, 10:36:44 pm »
Took me a few days, but I finally have the Control Panel artwork done.  I had to do some modifications to it to make it work for the new controls layout and moved the crosshair up a bit and the 4 way will be going through the middle of it. The dots are the spots for the buttons and the joysticks. Now all I need to do is tweak the bezel art and the side art.

control panel layout


Also, my order from GGG came in today. Got the fresh T-molding, 2 Zippyy joysticks 2 more red pushbuttons and a nova matrix lynx LED marquee light.


Work continues. I have a week left until I am back home, so I can't work on the cab yet. But, hopefully I can start setting up the PC in the next day or so. Then when I do get back home I won't have to worry about anything other than working on the cab.


opt2not

  • Trade Count: (+15)
  • Full Member
  • ***
  • Offline Offline
  • Posts: 6173
  • Last login:April 02, 2024, 07:42:30 pm
Re: Retrotron: 1984 (10/29/12 Control Panel Artwork Complete)
« Reply #26 on: October 30, 2012, 03:44:50 pm »
Looking good bud!  :cheers:

Ryglore

  • Trade Count: (+1)
  • Full Member
  • ***
  • Offline Offline
  • Posts: 779
  • Last login:November 16, 2021, 05:49:39 pm
  • Likes to make things difficult.
    • The Brush Wizard
Re: Retrotron: 1984 (10/29/12 Control Panel Artwork Complete)
« Reply #27 on: October 30, 2012, 10:48:54 pm »
Looking good bud!  :cheers:

Thank man, hopefully it will look even better soonish.  :cheers:

Ryglore

  • Trade Count: (+1)
  • Full Member
  • ***
  • Offline Offline
  • Posts: 779
  • Last login:November 16, 2021, 05:49:39 pm
  • Likes to make things difficult.
    • The Brush Wizard
Re: Retrotron: 1984 (11/1/12 Bezel Artwork Completed)
« Reply #28 on: November 01, 2012, 10:56:20 pm »
Finally finished the printed artwork! As of 15 mins ago, I finished the modified Bezel artwork and can now go over and double check all my colors and do any last minute edits before I ship them all off to get printed! Next up, I'll start work on the Mala layout and the PC end of things.


Ryglore

  • Trade Count: (+1)
  • Full Member
  • ***
  • Offline Offline
  • Posts: 779
  • Last login:November 16, 2021, 05:49:39 pm
  • Likes to make things difficult.
    • The Brush Wizard
Re: Retrotron: 1984 (11/03/12 - Test Mounting Joystick)
« Reply #29 on: November 03, 2012, 09:13:40 pm »
Got this idea from Leedsfan's Robotron Bartop, so full credit goes to him for it. I thought it was a sweet idea, and decided to mimic it.

Tonight I stayed after at work and built a quick demo unit for mounting the 4 way stick. I couldn't find a insert nut though and decided on T-nuts instead. I'm using 1/4" x 1/2" machine screws on the bottom side of the panel for mounting. Using Forstner bits, I cut a 2" recess into the board and then used an 1 1/8" bit for the center hole. the recesses for the t-nuts used a 5/8" bit. Once all the forstner holes were made, I set up the router to cut the recess for the plexi.

This all turned out pretty well, though I am not very smooth with the router and my edge wiggles all over the place. I got the thing all ready to go, then realized that the ball top doesn't remove from the shaft and that the dust washer on it is captive on the shaft. Which means I can only do this method on the P1 and P2 sticks and that the 4 way will end up w/ the dust washer on top of the panel. But, I also noticed that the recess for the washer and the hole for the shaft is slightly off center. But all of these things are what the demo unit was all for, so I didn't mess up the real thing.

All in all, I'm happy with how this is going to turn out. Thanks LeedsFan for the inspiration!

Holes cut and Zippyy dust washer in place as a test.


Joy base test fit. Hole slightly off center.


Backside showing mounting.


4 way test fit on top of the plexi to test shaft length.


Now that that's out of the way, I'm spending the rest of the night working on MALA. Hope it done later on tonight!

matt4949

  • Trade Count: (0)
  • Full Member
  • ***
  • Offline Offline
  • Posts: 431
  • Last login:November 07, 2021, 09:24:54 pm
  • Poor Kids Only Got To Watch Video Games
Re: Retrotron: 1984 (11/03/12 - Test Mounting Joystick)
« Reply #30 on: November 03, 2012, 11:34:38 pm »
cool build.

Ryglore

  • Trade Count: (+1)
  • Full Member
  • ***
  • Offline Offline
  • Posts: 779
  • Last login:November 16, 2021, 05:49:39 pm
  • Likes to make things difficult.
    • The Brush Wizard
Re: Retrotron: 1984 (11/03/12 - Test Mounting Joystick)
« Reply #31 on: November 04, 2012, 01:35:17 am »
Thanks  :cheers:

Yvan256

  • Trade Count: (0)
  • Full Member
  • ***
  • Offline Offline
  • Posts: 1039
  • Last login:June 20, 2017, 08:35:41 am
    • Yvan256
Re: Retrotron: 1984 (11/03/12 - Test Mounting Joystick)
« Reply #32 on: November 04, 2012, 09:47:57 am »
Very nice build so far, can't wait to see the finished cab.  :cheers:

I do hope you didn't trash that Mr. Do! marquee, it looks like an original and could probably fetch at least a few dozen cents on eBay!  ;)

Ryglore

  • Trade Count: (+1)
  • Full Member
  • ***
  • Offline Offline
  • Posts: 779
  • Last login:November 16, 2021, 05:49:39 pm
  • Likes to make things difficult.
    • The Brush Wizard
Re: Retrotron: 1984 (11/03/12 - Test Mounting Joystick)
« Reply #33 on: November 04, 2012, 04:12:41 pm »
I do hope you didn't trash that Mr. Do! marquee, it looks like an original and could probably fetch at least a few dozen cents on eBay!  ;)

I highly doubt that it's a legit marquee. I think he made it from scratch just so he has something to put in the hole.

Ryglore

  • Trade Count: (+1)
  • Full Member
  • ***
  • Offline Offline
  • Posts: 779
  • Last login:November 16, 2021, 05:49:39 pm
  • Likes to make things difficult.
    • The Brush Wizard
Re: Retrotron: 1984 (11/09/12 - Fairly Large Update)
« Reply #34 on: November 09, 2012, 10:06:46 am »
Alrighty, I've been doing a lot of work on things since I got back home.

Finally was able to set up the PC and install all of the arcade files onto it. I got Mala and Mame running and have made a bunch of play lists with  ROM Lister. With lists for All Games, 4 way/ 2 way games, Fighting and Beat 'em up, Shooters, Sports, Jeremy's Favorites and a Most Played list. I set up a custom Mala layout using my marquee image, and Opt2Not's drawing of the player character from Robotron (THANKS OPT2NOT), which I don't have saved on this PC and will have to show off later.

I tried setting up Instant Sheller, but was having all kinds of problems getting it to work. I knew that I had previously gotten it to work on SHMUP, so it should have worked fine on Retrotron. But I was getting runtime errors and it wouldn't launch. After about 2 hours of searching I was finally able to figure out that Instant Sheller hates .net Framework 4.0, which is what I had installed. So I did some more searching for .net Framework 2.0, installed it and patched it to Service Pack 1. Loaded up IS and bam, worked. I then saved the install file for .net 2.0 to my portable HDD in case I ever need it in the future. I've since undone IS for the time being and have to work on the load up video for MALA in the meantime.

I took the plunge on drilling out the holes and routing the recesses in the control panel. Took me about 2 hours to do after work one night. And The 1st time I did it I didn't make the recess for the dust washer deep enough, but that was an easy fix. I cut the plexiglass for over top of the dust washers on the band saw and they are all ready to be glued into place.

All holes cut!


Close up of the P1 Joystick mount and buttons.


Plexi and dust washer test fit.


The other night I also picked up a 1 1/4" hole saw to make plugs to fill the holes in the sides and top of the cab. I went with an 1 1/4" because the inner diameter ends up being just shy of 1 1/8" wide. I then took a piece of left over 1/2" thick MDF and cut out enough plugs for the cab. These will get glued into place and then sanded smooth. Once sanded I'll do any last minute patching on them and then I'll be good to go on painting.

1/2" Thick MDF Plug


Testing it in the side of the cab.


14 days left until the deadline. I'm not working (maybe) this weekend though, so I hope to knock out a lot of the cab work Saturday and Sunday. The goal is to have the thing cleaned, patched and primed by Sunday so I can start painting next week. The graphics are on their way from Scott @ Game On Grafix and I should have them in hand soon, since we both are in Michigan. I stopped by the craft store the other night and picked up the material to make my own stencils and need to get those made into the 1984 lettering asap too... but I just remembered there are 3 sheets in a pack and I only bought 2 packs... heh.


Ryglore

  • Trade Count: (+1)
  • Full Member
  • ***
  • Offline Offline
  • Posts: 779
  • Last login:November 16, 2021, 05:49:39 pm
  • Likes to make things difficult.
    • The Brush Wizard
Re: Retrotron: 1984 (11/10/12 - Artwork Arrived!)
« Reply #35 on: November 10, 2012, 09:40:24 pm »
Last night I got home and the artwork was in side my patio waiting for me. So I prompt grabbed it and eagerly opened it up to get a look at how it turned out. And I must say, I am super pleased with it! Yet another awesome set of graphics from Scott @ Game on Grafix!

I did a quick test fit of the marquee and I must have mis-measured a little bit, because the marquee is slightly taller than the opening. But that's not a big deal, and I sanded the opening a little bit to accept the marquee. I didn't want to attempt cutting down the art itself, since I had them mount it to a piece of plexi for me. Everything else looks good and seems right on the money fit wise.

Marquee Art!


Control Panel Art!


Bezel Art!


Also, here is the Mala layout (Again, thanks goes to Opt2Not for his Robotron dude)


And here's the Rom Check load up video for it. Just finished it this afternoon.


Once I finished the load up video, I started working on the control panel. The plan is to allow it to be removed , in the case that something under there screws up. I was going to try to find a way to hinge it, and still may. But for now I spent the afternoon gluing the front to the top and gluing the plexi over the dust washers. Here's what I accomplished so far.

Front glued and screwed to the top. I needed to add the corner braces, because for some reason the front piece was really bowed and needed to be held in place. I thought about removing the braces once it's dry, but I figure any extra support doesn't hurt.


Plexi glued above the dust washer.


I decided it would make things much cleaner and I wouldn't have to worry about goop getting in with the dust washer, if I taped over the hole. It worked out nicely!


And wood filler in place and drying.


That's it for tonight. Tomorrow I'm going to sand down the plugs in the sides and top of the cab and work on covering up the red paint on the sides. I also put some filler on top of the rotten wood, after applying some Elmer's Rotten Wood treatment to it. I'll sand that down and get some paint on it in prep for the metal kick panel that I'll be putting there. If that goes well, I'll stand the cab back up and remove the coin door so I can repaint the middle of the cab with a fresh coat of black.

Jigenjuke

  • Trade Count: (0)
  • Full Member
  • ***
  • Offline Offline
  • Posts: 482
  • Last login:October 02, 2016, 12:00:50 am
Re: Retrotron: 1984 (11/10/12 - Artwork Arrived!)
« Reply #36 on: November 12, 2012, 03:54:53 am »
Ryglore,

Looking great man!!  Can't wait to see the finished product.  How much did all of that art bling from Game on Grafix run ya?

Jigenjuke

Ryglore

  • Trade Count: (+1)
  • Full Member
  • ***
  • Offline Offline
  • Posts: 779
  • Last login:November 16, 2021, 05:49:39 pm
  • Likes to make things difficult.
    • The Brush Wizard
Re: Retrotron: 1984 (11/10/12 - Artwork Arrived!)
« Reply #37 on: November 12, 2012, 09:08:13 am »
How much did all of that art bling from Game on Grafix run ya?

Thanks! I'm really hitting my stride now and I think I'm doing pretty good time wise. The way it stands now, I don't see any reason why I'd have to worry about the deadline at the moment.

As for the graphics, it came out to just under $140 w/ shipping. I had the marquee sent with it already attached to plexi and the control panel art is adhesive backed. It woulda been cheaper if I had went without the bezel, but decided to go with it and keep with the plan to modify all of the Robotron artwork. All in all, I'm pleased with it and feel that it was worth it. It's the second time I've used them for arcade art, and they've not let me down yet.

opt2not

  • Trade Count: (+15)
  • Full Member
  • ***
  • Offline Offline
  • Posts: 6173
  • Last login:April 02, 2024, 07:42:30 pm
Re: Retrotron: 1984 (11/10/12 - Artwork Arrived!)
« Reply #38 on: November 12, 2012, 03:09:36 pm »
Looks great man!  But I really should give you a cleaner version of the Robotron dude.  If I have some time this weekend I'll throw it into Photoshop and do some clean-up. (I feel the sketch-looking colouring could look more consistent with the rest of the solid-coloured artwork...)  :cheers:

Ryglore

  • Trade Count: (+1)
  • Full Member
  • ***
  • Offline Offline
  • Posts: 779
  • Last login:November 16, 2021, 05:49:39 pm
  • Likes to make things difficult.
    • The Brush Wizard
Re: Retrotron: 1984 (11/10/12 - Artwork Arrived!)
« Reply #39 on: November 12, 2012, 03:15:50 pm »
Ya man, that would be awesome. And if you do, send it to me as a png w/ transparency if you could be so kind.  :)