Main Restorations Software Audio/Jukebox/MP3 Everything Else Buy/Sell/Trade
Project Announcements Monitor/Video GroovyMAME Merit/JVL Touchscreen Meet Up Retail Vendors
Driving & Racing Woodworking Software Support Forums Consoles Project Arcade Reviews
Automated Projects Artwork Frontend Support Forums Pinball Forum Discussion Old Boards
Raspberry Pi & Dev Board controls.dat Linux Miscellaneous Arcade Wiki Discussion Old Archives
Lightguns Arcade1Up Try the site in https mode Site News

Unread posts | New Replies | Recent posts | Rules | Chatroom | Wiki | File Repository | RSS | Submit news


Author Topic: How To Build A Circle Cutting Jig For A Router [COMPLETE]  (Read 27706 times)

0 Members and 1 Guest are viewing this topic.

javeryh

  • Trade Count: (+1)
  • Full Member
  • ***
  • Offline Offline
  • Posts: 7959
  • Last login:June 19, 2025, 11:24:08 am
How To Build A Circle Cutting Jig For A Router [COMPLETE]
« on: July 23, 2008, 01:57:29 pm »
OK... this post was buried in a Project Announcement thread that isn't even mine.  Initially I didn't want to start a new thread since I don't have detailed drawings/measurements but after receiving several PMs I've moved it here.

I will take some measurements tonight when I get home so people can copy this but there's nothing fancy to it.  I basically looked at the one mountain used to make his jukebox and tried to copy it. 

PART 1

The first thing I did was lay out the pattern I thought would work.


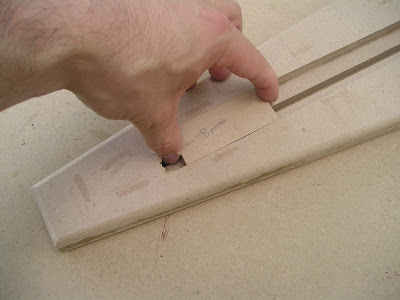
Then using a combination of my jigsaw and router with flush cutting bit and a straight edge I cut out the shape. Finally, I cut out a second piece about half the size using my pattern cutting bit.


This last pic shows how the two pieces will fit together.


I still have to cut out a block and drill a hole in it for the pin.  This block will slide up and down in the center groove.  I'll also cut a smaller groove in the smaller panel (just wide enough for the shaft of the knob to fit through which will be used to tighten the block/pin into place).

More updates to follow.   :cheers:

PART 2

The next step was to cut the 1/4" slot for the smaller panel. This was a bit tricky to set up with my router due to the small surface area of the panel but I managed to figure it out.


After that was done I glued it to the larger panel. The brown board in the middle is a spacer to make sure the groove stays at 1/4" wide during the glue-up.


Next, once the glue dried I used my router and a round-over bit to smooth over the edges of the jig (purely for decorative purposes).


The final steps will be fabricating the center block with the knob and pin which will slid in the groove. Then I'll drill the holes for mounting the router.

Almost finished!!!   :cheers:

Finally some progress.  I was on vacation 2 weeks ago and then last week I was working like crazy to catch up AND I had the stomach flu so I got nothing done.  I was able to sneak out of the house yesterday and mess around in the garage.

PART 3

The next step for this jig is to drill holes in the circular section so I can secure the router in place. The placement of these holes depends on the location of the screws on the router's base plate. It was actually pretty easy to do.

First, I removed the plate from the base of my router's plunge base. Then I clamped it into place with come spring clamps. I just eyeballed the location here. Next I drilled three holes all the way through the material for the three screws which will hold the router in place.


Next, I drilled out around the holes using a foerstner bit - this provides room for the screw heads so the base can lie flush with whatever you are routing. Also, the MDF is considerably thicker than the plastic base plate so I had to drill down about 3/8" in order for the screws to have enough length to poke out of the bottom and grab onto the router. Go slow on this part and remove a little material at a time and check the screw position. When you are satisfied that there is enough of the screw sticking out of the MDF to grab onto the router you can stop drilling down. Make sure not to go too deep. Repeat this for all three holes.


That's all there is to securing the router in place. It's pretty easy if you have the right tools (isn't everything?). Anyway, here are some shots of the router secured in place as well as a sneak preview (in the last pic) of the sliding mechanism for adjusting the diameter of the circles which I will explain next.


One more step and this thing is finally finished!
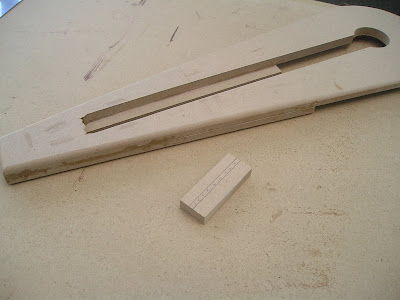
PART 4

One of the last things to for this jig was to manufacture the sliding mechanism for adjusting the radius of circles I'll be able to cut. I cut a small block out of MDF which fits in the large slot and lays flush on the bottom of the jig. I had to do a bit of sanding to get it to fit in there properly - I didn't want it to be too loose in there - a snug fit works best. As you can see from these two pictures, the block slides up and down the channel on the bottom of the jig.


With the block in place, I drew some lines on it through the smaller 1/4" opening from the top of the jig so I would know where to place the screw I will use for locking the block in place. It's not exactly centered but it doesn't have to be (although you should aim for that if you decide to build one of these yourself).


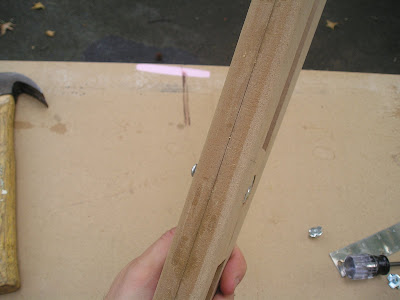
The next step was to drill a hole in the area I just laid out. This will be for the locking mechanism which is just a screw on the top and a tee nut on the bottom.


Next, I flipped the block over and used a foerstner bit to countersink the tee-nut so it is flush with the bottom (or even a little recessed). I had to tap it in pretty hard with the hammer.


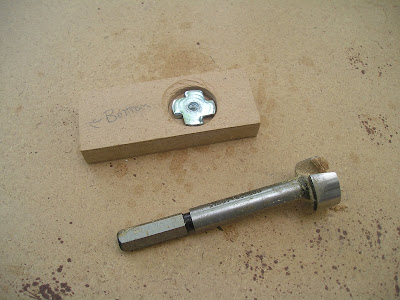
As you can now see, the screw goes in the tee nut through the top of the jig and locks the sliding block into place. SO when I'm using this thing all I have to do is measure the distance from whatever router bit I'm using to the center of the pin and that will be the radius of the circle. Easy!


This shot from my last post shows the (almost) completed jig. I cut out a handle of sorts to help me slide the block up and down the jig as well as enable me to lock it into place.


Here is a random shot of some of the supplies I used in case anyone is interested:


I'm almost done. The final step is just to drill a hole in the block for a #10 nail which will act as the pivot pin. Unfortunately, I don't have a drill press and it is imperative that this hole be exactly perpendicular. Any deviation will throw off the radius of any circles I try to cut! I think I figured out how to drill the hole but that will have to wait until tonight and then I can test it out!

PART 5 - COMPLETE!

After way too much time working on this thing I am finally ready to start cutting some circles! The circle jig is complete. The last step was to drill a hole in the sliding block for the nail which acts as the pivot pin. Drilling the hole was difficult without a drill press. I bought a drill guide but it was totally useless.

After finishing the jig I had to test it out. First, I drilled a 1/8" hole in a piece of scrap MDF for the pivot pin which acts as the center of the circle.


After placing the pivot pin in the center hole, I laid the jig on top and adjusted the radius of the circle until I had the size I wanted. Then I tightened the screw to keep the sliding block in place.


Next, I turned the router on and plunged the bit into the work piece. Finally, with one hand on the router and the other hand on the jig near the pivot pin to keep everything in place, I used the jig to cut out a circle!


Easy!
« Last Edit: August 19, 2008, 04:20:25 pm by javeryh »

GadgetGeek

  • Trade Count: (+1)
  • Full Member
  • ***
  • Offline Offline
  • Posts: 414
  • Last login:July 09, 2024, 09:32:57 am
  • whatever
Re: I'm Making a Circle Cutting Jig for My Router
« Reply #1 on: July 23, 2008, 06:28:30 pm »
The rounded end will vary depending on your router.  Just trace the base of your router for that part of the jig. 
Looking forward to details on what hardware you use to create the adjustment fitting.

Thanks for taking the extra effort for the rest of us.

javeryh

  • Trade Count: (+1)
  • Full Member
  • ***
  • Offline Offline
  • Posts: 7959
  • Last login:June 19, 2025, 11:24:08 am
Re: I'm Making a Circle Cutting Jig for My Router
« Reply #2 on: July 23, 2008, 06:34:47 pm »
Looking forward to details on what hardware you use to create the adjustment fitting.

Me too!  I was at Home Depot today asking for a threaded knob and the moron clerk told me there was no such thing in existence and I made it up in my head!  Then he showed me some brass doorknobs and told me they should do the trick.  For now I bought some machine screws - one will be the pin and the other (along with a nut, a washer and a tee nut) will be the knob (to be tightened with a screwdriver, I guess) until I think of a more elegant solution.

Thanks for taking the extra effort for the rest of us.

No problem.  I'm always happy to chip in around here since I'm constantly asking questions and "borrowing" other people's designs and stuff.   :cheers:

Franco B

  • Trade Count: (+10)
  • Full Member
  • ***
  • Offline Offline
  • Posts: 3766
  • Last login:February 15, 2024, 09:14:06 am
Re: I'm Making a Circle Cutting Jig for My Router
« Reply #3 on: July 24, 2008, 05:57:55 am »
Yeah thanks for doing this, this is something I have been wanting to make  :applaud:

javeryh

  • Trade Count: (+1)
  • Full Member
  • ***
  • Offline Offline
  • Posts: 7959
  • Last login:June 19, 2025, 11:24:08 am
Re: I'm Making a Circle Cutting Jig for My Router
« Reply #4 on: July 24, 2008, 11:17:44 am »
THE PLAN

OK... I wrote down the measurements of this thing but I did not get a chance to finish it last night due to the crazy rain.  I'm hoping for some better weather tonight.

This is by no means a definitive way of making this jig - I don't even know if it will work yet!   The main thing is to make sure the larger circle is bigger than the base of your router and go from there.  :cheers:

« Last Edit: July 24, 2008, 10:26:40 pm by javeryh »

mountain

  • Trade Count: (+9)
  • Full Member
  • ***
  • Offline Offline
  • Posts: 1205
  • Last login:January 29, 2025, 08:31:47 am
    • Mountain Jukeboxes
Re: I'm Making a Circle Cutting Jig for My Router
« Reply #5 on: July 24, 2008, 11:46:23 am »
I will try to contribute to this as well javeryh. Once I get back in town (this weekend) I will try and get some good close up shots of the circle jig. Great job ! :cheers:

javeryh

  • Trade Count: (+1)
  • Full Member
  • ***
  • Offline Offline
  • Posts: 7959
  • Last login:June 19, 2025, 11:24:08 am
Re: I'm Making a Circle Cutting Jig for My Router
« Reply #6 on: July 24, 2008, 10:22:53 pm »
Moved to first post   :cheers:
« Last Edit: August 19, 2008, 02:49:58 pm by javeryh »

DaOld Man

  • Trade Count: (+4)
  • Full Member
  • ***
  • Offline Offline
  • Posts: 5158
  • Last login:May 24, 2025, 09:57:44 pm
  • Wheres my coffee?
    • Skenny's Outpost
Re: I'm Making a Circle Cutting Jig for My Router
« Reply #7 on: August 03, 2008, 08:43:09 pm »
Hows this project coming along?

javeryh

  • Trade Count: (+1)
  • Full Member
  • ***
  • Offline Offline
  • Posts: 7959
  • Last login:June 19, 2025, 11:24:08 am
Re: I'm Making a Circle Cutting Jig for My Router
« Reply #8 on: August 03, 2008, 10:48:28 pm »
Hows this project coming along?

 It resumes tomorrow - I have been on vacation for the last 9 days but I'm home now... and back to work in the morning...  :angry:

javeryh

  • Trade Count: (+1)
  • Full Member
  • ***
  • Offline Offline
  • Posts: 7959
  • Last login:June 19, 2025, 11:24:08 am
Re: I'm Making a Circle Cutting Jig for My Router [UPDATE]
« Reply #9 on: August 11, 2008, 10:24:55 am »
Moved to first post   :cheers:
« Last Edit: August 19, 2008, 02:50:09 pm by javeryh »

facesmiths

  • Trade Count: (0)
  • Full Member
  • ***
  • Offline Offline
  • Posts: 142
  • Last login:April 10, 2011, 07:53:05 pm
  • nemo goggles
    • Borg Steam Factory
Re: I'm Making a Circle Cutting Jig for My Router
« Reply #10 on: August 11, 2008, 11:36:21 am »
PART 2

The next step was to cut the 1/4" slot for the smaller panel. This was a bit tricky to set up with my router due to the small surface area of the panel but I managed to figure it out.


After that was done I glued it to the larger panel. The brown board in the middle is a spacer to make sure the groove stays at 1/4" wide during the glue-up.


Next, once the glue dried I used my router and a round-over bit to smooth over the edges of the jig (purely for decorative purposes).


The final steps will be fabricating the center block with the knob and pin which will slid in the groove. Then I'll drill the holes for mounting the router.

Almost finished!!!   :cheers:

just a tidbit of info that might help and might not. dont cut the part out entirely untill all the stuff that required a larger piece to mount on is done

you can cut most of it out leaving small gaps in the cutting so it is more like a tree in a model kit. I attached a picture of what I am talking about and I found the picture on this site http://www.crankorgan.com/ so you can see more of what I was talking about. The site has been a major source of info on building my automated machinery that I now have back when I knew nothing. I have a lot more links if anyone is interested in that sort of thing for all aspects of it. Trick is once done it is pretty easy to knock off the tabs and pull the part out. oh and you might try wholesale tool for those knobs I know they carry a ton of that sort of thing.
two links for those things to be bought on line and for less that 5 bucks

$1.62 (plastic with a brass insert)
http://www.wttool.com/product-exec/product_id/10665/nm/Bar_Knobs

$2.78 (also solid aluminum)
http://www.wttool.com/product-exec/product_id/10696/nm/Cast_Aluminum_Hand_Knobs

they have cast iron ones too but I dont know what they charge and I think I have given enough here to guide you to them if you want them as well as a ton of other stuff

javeryh

  • Trade Count: (+1)
  • Full Member
  • ***
  • Offline Offline
  • Posts: 7959
  • Last login:June 19, 2025, 11:24:08 am
Re: Circle Cutting Jig for my Router [UPDATE 08.12.08]
« Reply #11 on: August 12, 2008, 11:02:48 am »
Moved to first post   :cheers:
« Last Edit: August 19, 2008, 02:50:23 pm by javeryh »

Franco B

  • Trade Count: (+10)
  • Full Member
  • ***
  • Offline Offline
  • Posts: 3766
  • Last login:February 15, 2024, 09:14:06 am
Re: Circle Cutting Jig for my Router [ALMOST FINISHED 08.12.08]
« Reply #12 on: August 12, 2008, 11:18:14 am »
Nice writeup buddy!  :applaud:

I will definitely be making one.  :cheers:

Just out of interest, what do you think is the approximate smallest circle/arc you could route with it? (radius)

javeryh

  • Trade Count: (+1)
  • Full Member
  • ***
  • Offline Offline
  • Posts: 7959
  • Last login:June 19, 2025, 11:24:08 am
Re: Circle Cutting Jig for my Router [ALMOST FINISHED 08.12.08]
« Reply #13 on: August 12, 2008, 11:38:24 am »
Nice writeup buddy!  :applaud:

I will definitely be making one.  :cheers:

Just out of interest, what do you think is the approximate smallest circle/arc you could route with it? (radius)

Heh, probably somewhere between a 6"-7" radius... which is WAY too big for the circle I want to cut which was the reason I built this thing to begin with!!   :laugh2:

I'm probably going to extend the top piece by about 4" by adding a block to each side which will make the 1/4" groove a bit longer and enable me to slide the block closer to the router.  I'm thinking I could get it down to about a 3" radius (6" circle) or so.  It's an easy fix.  I'm such a moron!

Paul Olson

  • Trade Count: (+4)
  • Full Member
  • ***
  • Offline Offline
  • Posts: 1235
  • Last login:June 20, 2024, 08:23:41 am
    • Paul's Arcade
Re: Circle Cutting Jig for my Router [ALMOST FINISHED 08.12.08]
« Reply #14 on: August 12, 2008, 01:51:57 pm »
Have you tested it out yet? I am wondering if the jig is too thick with the MDF. Are you able to cut all the way through a 3/4" board? I usually end up using 1/4" or 3'8" plywood for router jigs, because my bits aren't long enough with anything thicker.

mountain

  • Trade Count: (+9)
  • Full Member
  • ***
  • Offline Offline
  • Posts: 1205
  • Last login:January 29, 2025, 08:31:47 am
    • Mountain Jukeboxes
Re: Circle Cutting Jig for my Router [ALMOST FINISHED 08.12.08]
« Reply #15 on: August 12, 2008, 02:48:14 pm »
javeryh,

Looking great man. You are going to love having this tool.  :cheers:


Nice writeup buddy!  :applaud:

I will definitely be making one.  :cheers:

Just out of interest, what do you think is the approximate smallest circle/arc you could route with it? (radius)

Franco,
I have cut 3" diameter holes with the one I made. The beauty of the design is that it allows the block to be removed and flipped around. The pin can actually slide all the way up to the cutter.

Have you tested it out yet? I am wondering if the jig is too thick with the MDF. Are you able to cut all the way through a 3/4" board? I usually end up using 1/4" or 3'8" plywood for router jigs, because my bits aren't long enough with anything thicker.

I used to cut subwoofer holes in 3/4" MDF with mine back in the day.


javeryh

  • Trade Count: (+1)
  • Full Member
  • ***
  • Offline Offline
  • Posts: 7959
  • Last login:June 19, 2025, 11:24:08 am
Re: Circle Cutting Jig for my Router [ALMOST FINISHED 08.12.08]
« Reply #16 on: August 12, 2008, 03:44:23 pm »
Have you tested it out yet? I am wondering if the jig is too thick with the MDF. Are you able to cut all the way through a 3/4" board? I usually end up using 1/4" or 3'8" plywood for router jigs, because my bits aren't long enough with anything thicker.

I did a quick and dirty test and I don't think it will be a problem.  Actually, after thinking about it, I definitely don't think it will be a problem since I use a piece of 3/4" MDF as a straight edge with my pattern bit all the time and it is never an issue.

javeryh,

Looking great man. You are going to love having this tool.  :cheers:

Thanks - you've inspired me!   ;D

Franco,
I have cut 3" diameter holes with the one I made. The beauty of the design is that it allows the block to be removed and flipped around. The pin can actually slide all the way up to the cutter.

Damn, I didn't even think of that... yeah, now I think I'll be able to cut some pretty small circles if necessary.   :cheers:

scotthh

  • Trade Count: (0)
  • Full Member
  • ***
  • Offline Offline
  • Posts: 254
  • Last login:June 06, 2012, 10:03:42 pm
Re: Circle Cutting Jig for my Router [ALMOST FINISHED 08.12.08]
« Reply #17 on: August 12, 2008, 04:29:02 pm »
The final step is just to drill a hole in the block for a #10 nail which will act as the pivot pin. Unfortunately, I don't have a drill press and it is imperative that this hole be exactly perpendicular. Any deviation will throw off the radius of any circles I try to cut! I think I figured out how to drill the hole but that will have to wait until tonight and then I can test it out!

That's a 10 penny nail? 10d nails although all 3" long, seem to come in a variety of widths (.12, .131 or .145").

Assuming you don't have the skinny 10d nails, why not get a 1/8" (.125) straight or core box bit for your router and plunge the hole?

javeryh

  • Trade Count: (+1)
  • Full Member
  • ***
  • Offline Offline
  • Posts: 7959
  • Last login:June 19, 2025, 11:24:08 am
Re: Circle Cutting Jig for my Router [COMPLETE]
« Reply #18 on: August 18, 2008, 10:40:55 pm »
FINISHED!  All steps have been moved to the first post   :cheers:
« Last Edit: August 19, 2008, 02:51:19 pm by javeryh »

mountain

  • Trade Count: (+9)
  • Full Member
  • ***
  • Offline Offline
  • Posts: 1205
  • Last login:January 29, 2025, 08:31:47 am
    • Mountain Jukeboxes
Re: How To Build A Circle Cutting Jig For A Router [COMPLETE]
« Reply #19 on: August 27, 2008, 12:56:29 pm »
I missed your final post on this project somehow. It turned out great!  :applaud:

Now all you need to do is find the knob. Try finding a local Mom and Pop hardware store, they usually carry them. I have also found them at Sears hardware. Lowes has a pretty good selection of misc. hardware too.

javeryh

  • Trade Count: (+1)
  • Full Member
  • ***
  • Offline Offline
  • Posts: 7959
  • Last login:June 19, 2025, 11:24:08 am
Re: How To Build A Circle Cutting Jig For A Router [COMPLETE]
« Reply #20 on: August 27, 2008, 03:07:15 pm »
I missed your final post on this project somehow. It turned out great!  :applaud:

Now all you need to do is find the knob. Try finding a local Mom and Pop hardware store, they usually carry them. I have also found them at Sears hardware. Lowes has a pretty good selection of misc. hardware too.

Thanks!  I did manage to find a knob online but the screw is working for now.  Some issues I've run into since using it that I want to fix:

1.  The center groove on the top panel isn't actually centered.  I'm not sure what happened but I'm off by about 1/8".  this means I cannot flip the pin around to bring it closer to the bit in order to make smaller circles.  I had to get very creative in order for it to work the way I wanted.  I think I can just widen that gap by 1/8" so it will be centered.  as long as the adjustable block can stay in place when screwed down I don't think it will matter.

2.  My router isn't mounted straight.  I had the mounting plate upsidedown when I laid out the holes so the router is crooked as you can see in the pictures.  Not a big deal but worth noting.

3.  The nail as a pivot pin sucks.  I'd like to get a proper pin made out of steel and have it cut to about 1" in length so it isn't stick up when I'm using the jig.

That's about it.  I'll get to this stuff eventually...