Main Restorations Software Audio/Jukebox/MP3 Everything Else Buy/Sell/Trade
Project Announcements Monitor/Video GroovyMAME Merit/JVL Touchscreen Meet Up Retail Vendors
Driving & Racing Woodworking Software Support Forums Consoles Project Arcade Reviews
Automated Projects Artwork Frontend Support Forums Pinball Forum Discussion Old Boards
Raspberry Pi & Dev Board controls.dat Linux Miscellaneous Arcade Wiki Discussion Old Archives
Lightguns Arcade1Up Try the site in https mode Site News

Unread posts | New Replies | Recent posts | Rules | Chatroom | Wiki | File Repository | RSS | Submit news


Author Topic: STAR WARS: Pinball Unleashed - 46"/32"/DMD Widebody Virtual Pinball Build  (Read 78871 times)

0 Members and 1 Guest are viewing this topic.

griffindodd

  • Trade Count: (+1)
  • Full Member
  • ***
  • Offline Offline
  • Posts: 1536
  • Last login:July 07, 2025, 09:44:51 am
  • Builds Stuff
Re: STAR WARS: Pinball Unleashed - 46"/32"/DMD Widebody Build
« Reply #80 on: April 01, 2013, 02:01:07 pm »
Looking good Gamester, you're making me feel guilty for not working on mine more lol.
I drink and I know things.

Gamester

  • Trade Count: (0)
  • Full Member
  • ***
  • Offline Offline
  • Posts: 483
  • Last login:March 01, 2019, 03:00:10 pm
Re: STAR WARS: Pinball Unleashed - 46"/32"/DMD Widebody Build
« Reply #81 on: April 02, 2013, 10:49:44 am »
@griffindodd - Thanks!  You have nothing to feel guilty about...you've accomplished a lot on your build already!

So I managed to get in a few more hours of woodworking yesterday...

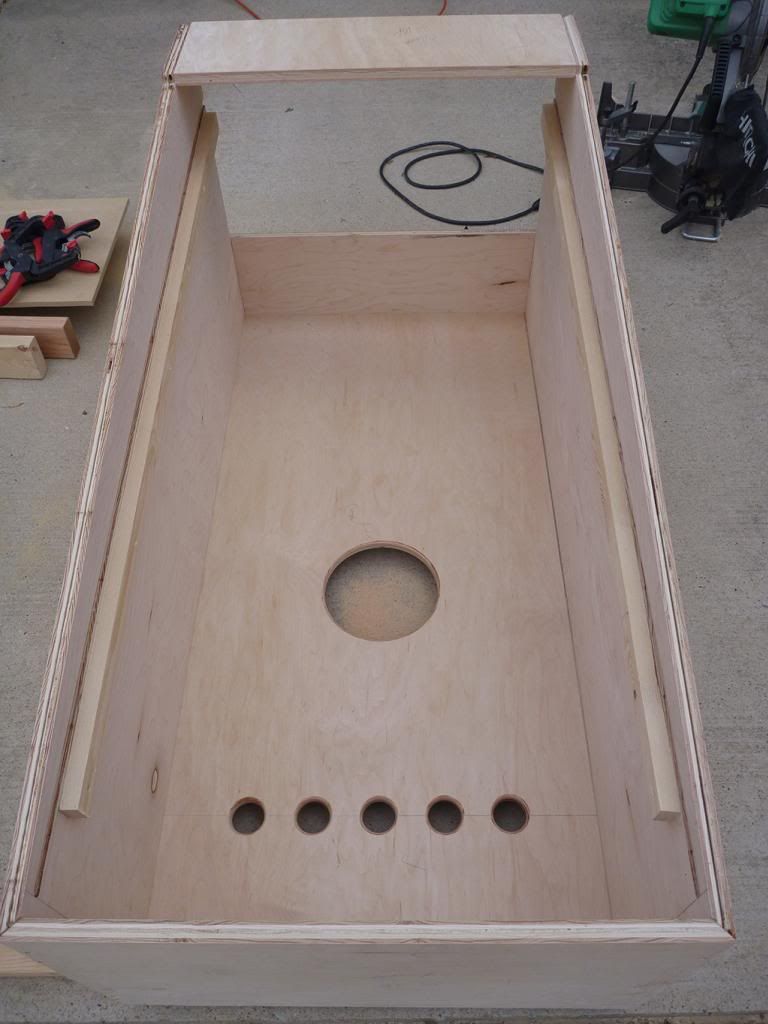
Cut and routed the 120mm fan hole for the backbox cover, cut and installed the hinge and used the router to round the edges of all of the fan and vent holes.  Also built the framework for the backglass TV and installed it (the TV) temporarily.  And finally, I cut and routed the fan holes for the back cover of the cabinet itself.

I had originally purchased those huge 200mm fans for the build, but I've since decided to just stick with 120mm fans. The 200mm units look impressive, but I found that I kept having to re-think every choice I was making with the dimensions of the various back pieces just to accommodate those big fans.  Ultimately, it's not worth the hassle to me.  Those big fans are really major overkill anyway.  I think three 120mm fans for the cabinet and one for the backbox, with strategically placed intake holes, will be plenty of ventilation, and these 120s I purchased are extremely quiet (only 11dBA) too.

So for the woodworking the only major things left are the DMD/Speaker panel, leg holes, coin door opening and button holes. Then it's on to patching and painting!  Luckily that part should not be as brutal and exacting as my last build was since I get to put artwork over it.  :)

Pics of the latest progress...


Current Project:                                                       First Project:
  

mcseforsale

  • Trade Count: (0)
  • Full Member
  • ***
  • Offline Offline
  • Posts: 1471
  • Last login:April 09, 2024, 03:07:41 pm
  • Creepy Mario Dude
Re: STAR WARS: Pinball Unleashed - 46"/32"/DMD Widebody Build
« Reply #82 on: April 02, 2013, 11:25:03 am »
Wow.  That looks amazing.  I'm using your thread to coax the executive branch along...  anywho, I found a bag of six 2" soffit vents and a bag of six 3" soffit vents at home depot on clearance for $.99 when I was building my cab.  Worked a treat for vent holes.  I actually don't have any fans in my cab since I'm venting from bottom (2" vents) to top (3" vents) and the airflow is amazing.  The cab's been in the garage for almost a year and I've never had heat issues, even in the Ga heat.

You'll still need the fans, but you could vent the front bottom of the case, near the nose of it (underneath) and pull the air across the entire kit and exit with the fans in the back.  Same with the backbox.  Vent it at the bottom and fans at the top.

They look like these, but mine are crappier.  They also have ones with "filter" screens that can be cleaned:

http://www.homedepot.com/p/Speedi-Products-2-in-White-Round-Soffit-Vent-SM-RSV-2/202907297#.UVr2j1fAmb4

Here they are on my cab:


AJ


I had originally purchased those huge 200mm fans for the build, but I've since decided to just stick with 120mm fans. The 200mm units look impressive, but I found that I kept having to re-think every choice I was making with the dimensions of the various back pieces just to accommodate those big fans.  Ultimately, it's not worth the hassle to me.  Those big fans are really major overkill anyway.  I think three 120mm fans for the cabinet and one for the backbox, with strategically placed intake holes, will be plenty of ventilation, and these 120s I purchased are extremely quiet (only 11dBA) too.


Gamester

  • Trade Count: (0)
  • Full Member
  • ***
  • Offline Offline
  • Posts: 483
  • Last login:March 01, 2019, 03:00:10 pm
Re: STAR WARS: Pinball Unleashed - 46"/32"/DMD Widebody Build
« Reply #83 on: April 02, 2013, 11:48:11 am »
Wow.  That looks amazing.  I'm using your thread to coax the executive branch along...  anywho, I found a bag of six 2" soffit vents and a bag of six 3" soffit vents at home depot on clearance for $.99 when I was building my cab.  Worked a treat for vent holes.  I actually don't have any fans in my cab since I'm venting from bottom (2" vents) to top (3" vents) and the airflow is amazing.  The cab's been in the garage for almost a year and I've never had heat issues, even in the Ga heat.

You'll still need the fans, but you could vent the front bottom of the case, near the nose of it (underneath) and pull the air across the entire kit and exit with the fans in the back.  Same with the backbox.  Vent it at the bottom and fans at the top.

AJ, thanks for the compliment, and for the tip on the soffit vents!  Those definitely make for a nice clean looking solution. 

And your suggestion for the cabinet cooling is exactly what I had in mind, with intake holes in the bottom front of the cab, and fans pulling out of the top of the back panel.  And that's the same approach I've already implemented for the backbox: holes in the bottom and a fan at the top.  One fan is plenty for the backbox as the TV is an LED and I do not expect it get get very hot in there.  I could probably get away with just vent holes in there with no problem, but I tend to err on the side of over-engineering my projects.  ;)
« Last Edit: April 02, 2013, 11:50:26 am by Gamester »
Current Project:                                                       First Project:
  

yotsuya

  • Trade Count: (+21)
  • Full Member
  • ***
  • Offline Offline
  • Posts: 19960
  • Last login:July 17, 2025, 10:00:30 pm
  • 2014 UCA Winner, 2014, 2015, 2016 ZapCon Winner
    • forum.arcadecontrols.com/index.php/topic,137636.msg1420628.html
Re: STAR WARS: Pinball Unleashed - 46"/32"/DMD Widebody Build
« Reply #84 on: April 02, 2013, 02:05:17 pm »
Love your clean, traditional lines, Gamester. Great job so far.  :cheers:
***Build what you dig, bro. Build what you dig.***

emphatic

  • Trade Count: (0)
  • Full Member
  • ***
  • Offline Offline
  • Posts: 2017
  • Last login:Today at 03:00:25 am
  • -"Suck it, Donny!" -"No, YOU suck it.... more".
    • Emphatic's Video Game Collection
Re: STAR WARS: Pinball Unleashed - 46"/32"/DMD Widebody Build
« Reply #85 on: April 02, 2013, 04:47:43 pm »
Great work on the build, and you photos all look amazing! :cheers:

wp34

  • Trade Count: (+3)
  • Full Member
  • ***
  • Offline Offline
  • Posts: 4794
  • Last login:April 10, 2022, 09:48:19 pm
Re: STAR WARS: Pinball Unleashed - 46"/32"/DMD Widebody Build
« Reply #86 on: April 02, 2013, 10:15:23 pm »
Great work on the build, and you photos all look amazing! :cheers:

+1 

The documentation on both your projects is top notch.


Gamester

  • Trade Count: (0)
  • Full Member
  • ***
  • Offline Offline
  • Posts: 483
  • Last login:March 01, 2019, 03:00:10 pm
Re: STAR WARS: Pinball Unleashed - 46"/32"/DMD Widebody Build
« Reply #87 on: April 03, 2013, 03:04:27 pm »
Thanks guys!  It's always exciting when the vision starts to take a tangible form...more than just piles of parts and sheets of wood lying about.   ;)
Current Project:                                                       First Project:
  

Gamester

  • Trade Count: (0)
  • Full Member
  • ***
  • Offline Offline
  • Posts: 483
  • Last login:March 01, 2019, 03:00:10 pm
Re: STAR WARS: Pinball Unleashed - 46"/32"/DMD Widebody Build
« Reply #88 on: April 08, 2013, 12:25:47 am »
Another progress update...

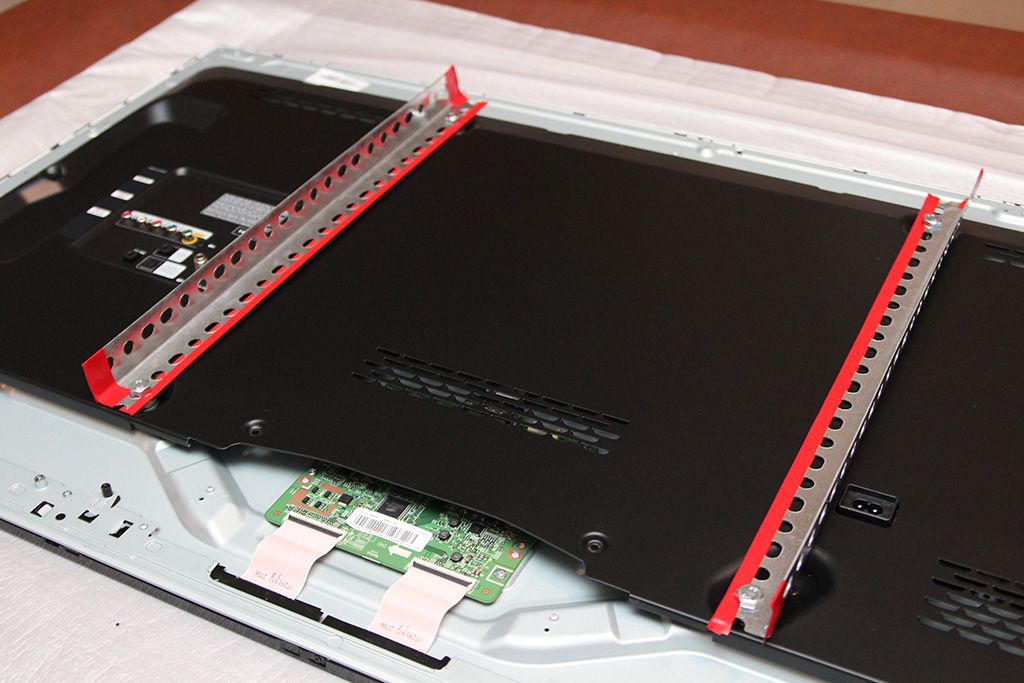
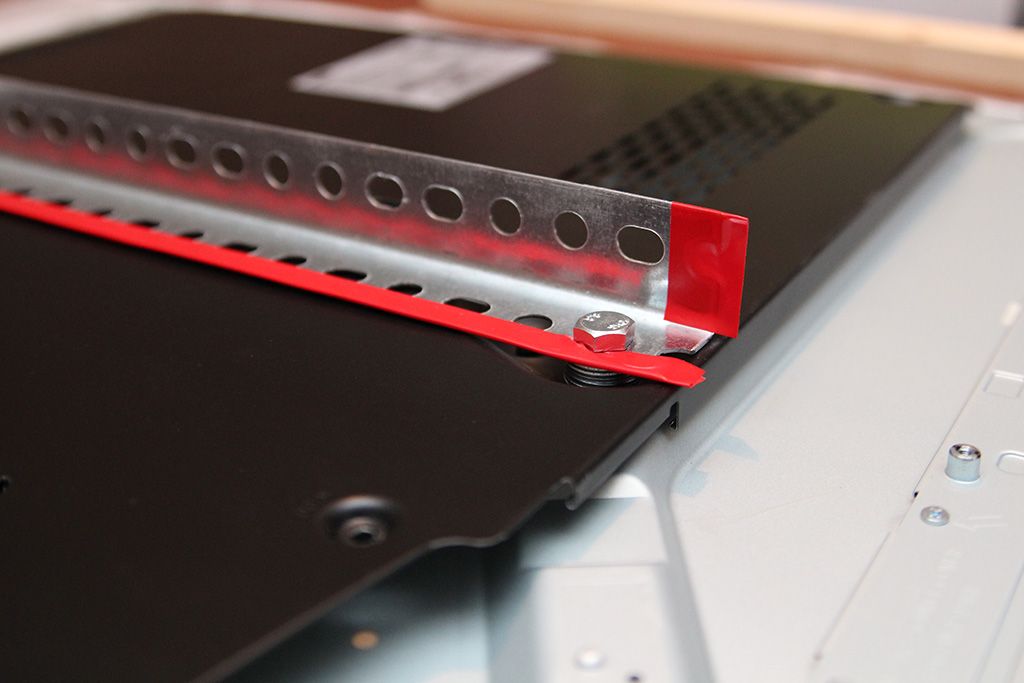
Since the TV is so thin, I was concerned about the long-term rigidity of it mounted horizontally, plus it's my nature to over-engineer stuff.  ;) So I decided to re-install the inner metal back cover, and reinforce it even further by installing brackets using the TV's wall mount holes (M8 size bolts btw).  I used some washers on each bolt to elevate the brackets a bit so they're not squishing the cover.  I think it's plenty rigid now.  :)


And on to more woodworking...

So this circle jig is the bomb!  Was a little intimidating at first trying to figure out how to use it, but it's actually quite simple, and it cuts PERFECT holes.
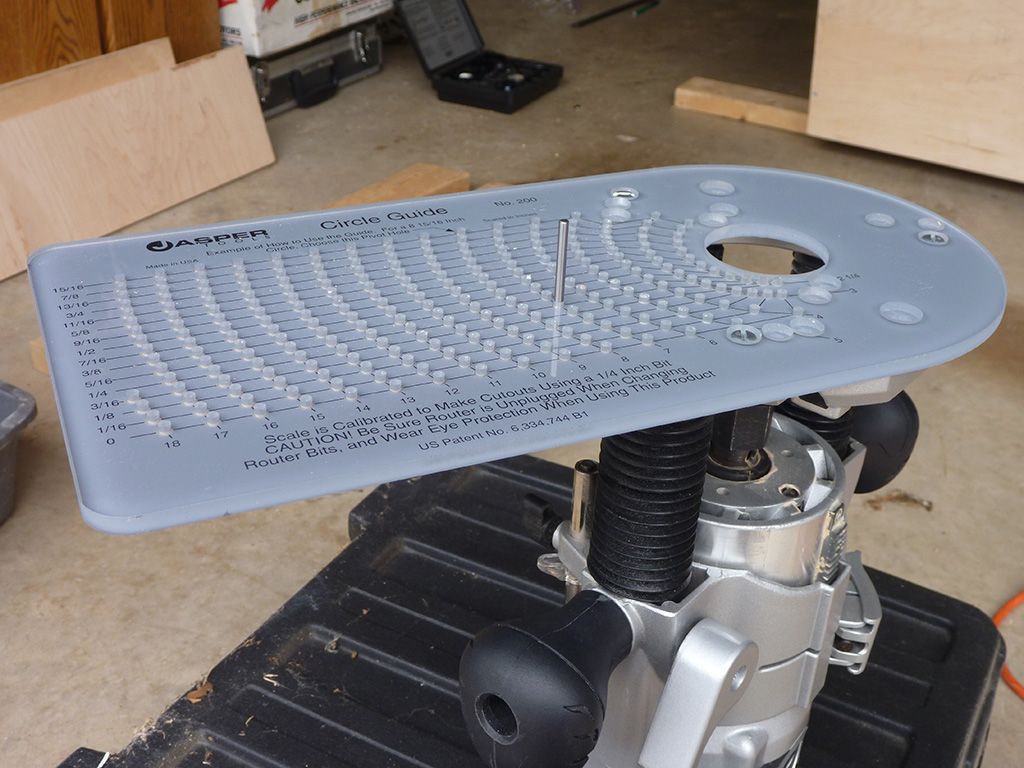


For those of you who may have never used one, here's how it works:

1. Attach the jig to your plunge router, install a 1/4" straight cut bit and insert the metal dowel pin in the jig bore that corresponds to the size of hole you want.  There is a grid printed on the jig that makes it really simple to choose the size.

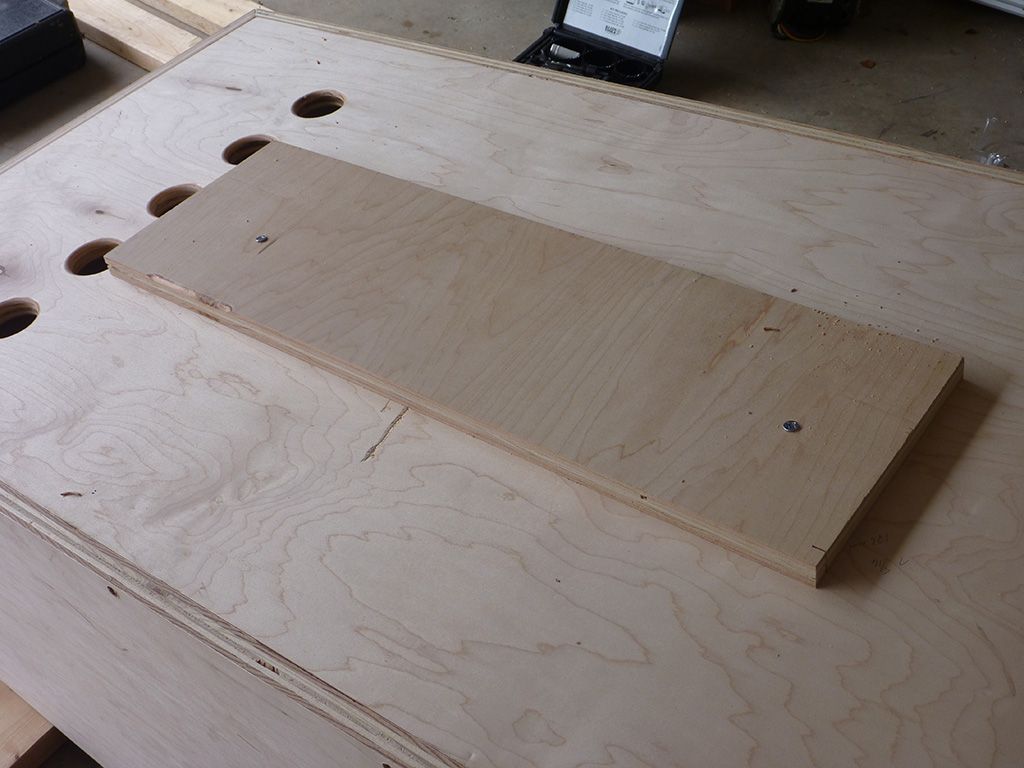
2. Attach a backing piece of wood to the work. Since the backing piece will not be cut, it allows the router to maintain a solid pivot point throughout the cut.

3. Identify the centerpoint for the hole you want to route and drill a 1/8" hole in the center. This hole is what the dowel pin will be inserted into when cutting.

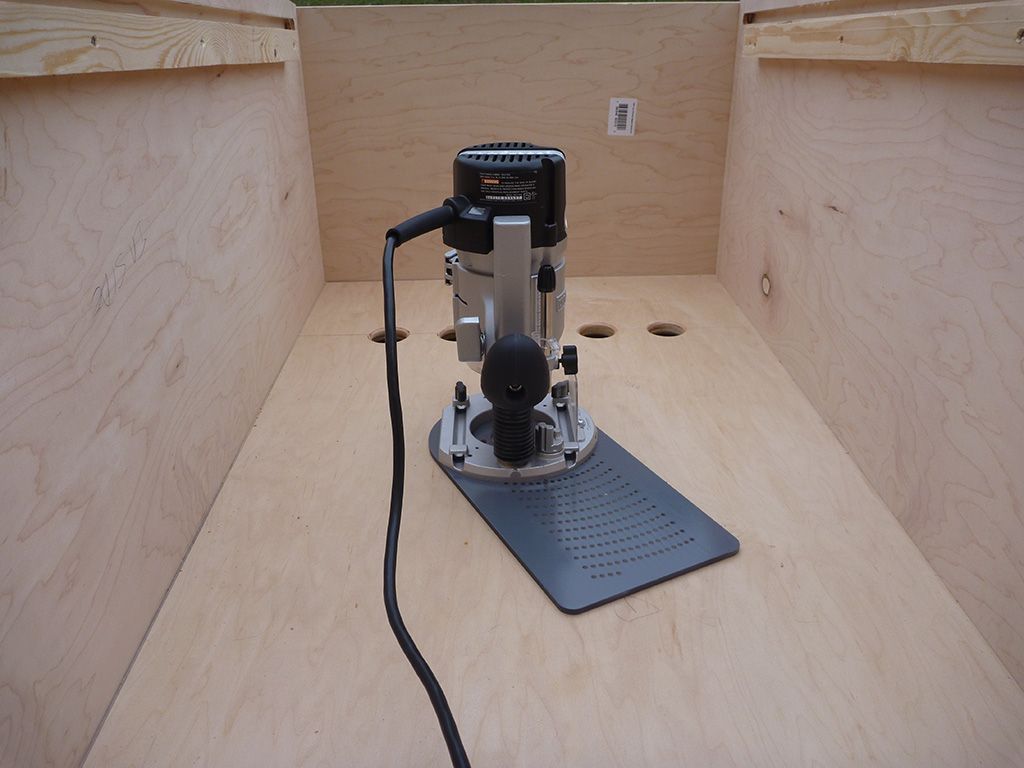
4. Insert the dowel pin into the centerpoint hole and gently set the router down so that the jig is flat.  Be sure the dowel pin is inserted far enough into the wood so that it goes all the way into the second piece.

5. Turn on the router, plunge the bit part way in, lock it down and rotate to make the cut. You'll want to make 2-3 progressively deeper cuts, depending on how thick your work piece is.  If you take your time, you'll end up with a perfect cut, exactly the size you wanted. 

So time to put it to work on the subwoofer hole. Attaching the backing piece...

Marked off the center point, drilled the 1/8" hole and inserted the router/dowel...

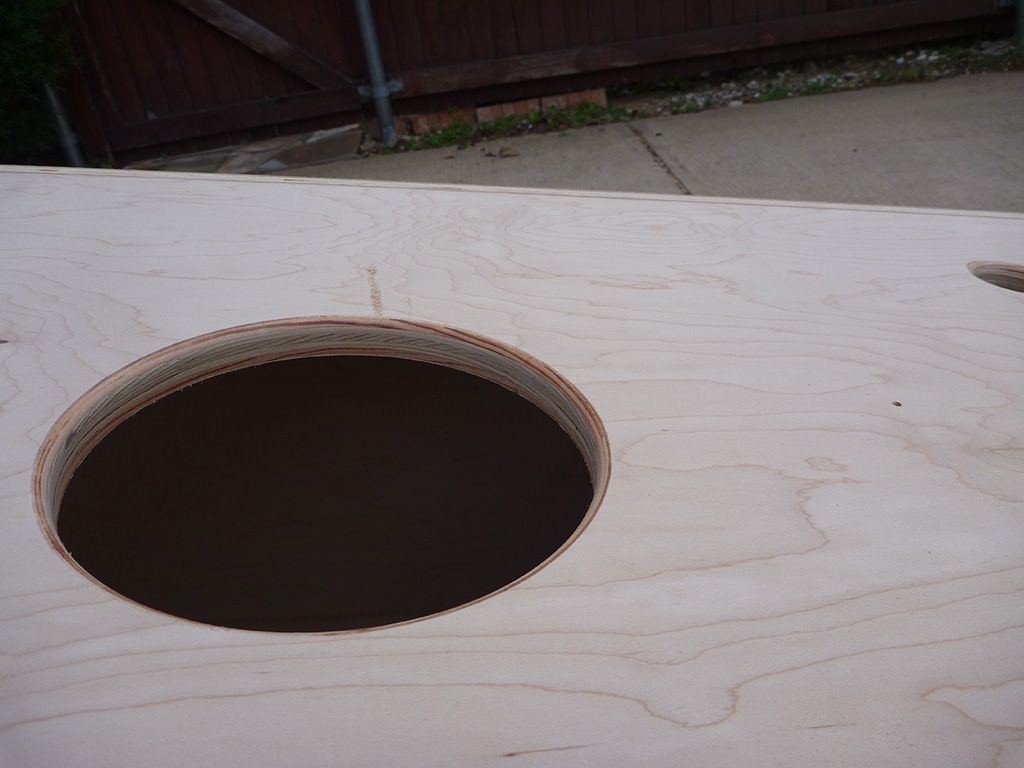
Three progressively deeper passes, and voila, a perfect hole.  It's best to let the bit cut into the backing piece just a bit; makes for a cleaner hole...
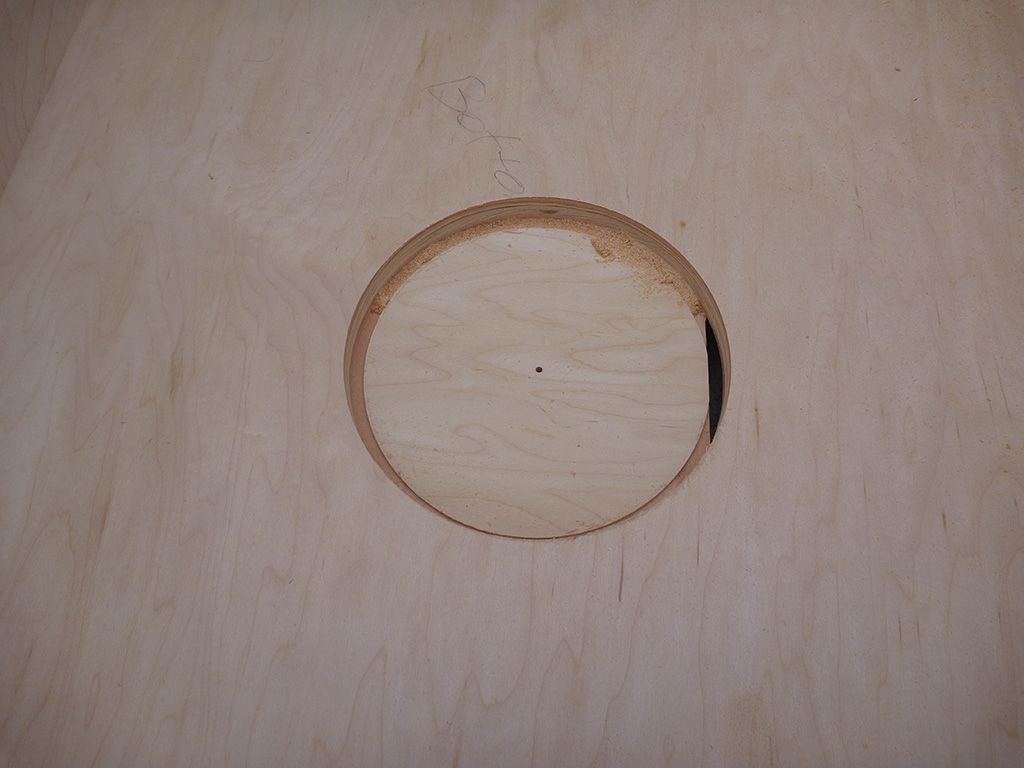

Ran the round over bit on the edge to give a nice clean rounded off look (only one side done here)...

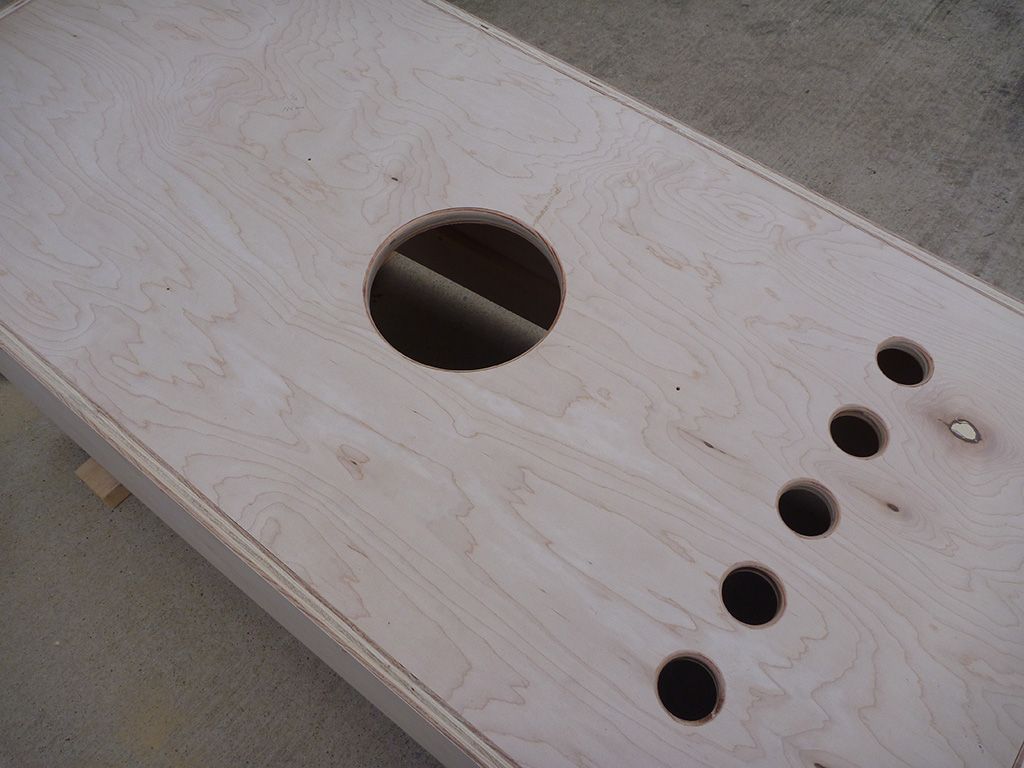
Also cut the intake ventilation holes using a drill hole saw and rounded those off too...


DMD panel anyone?  Yes, I think so...
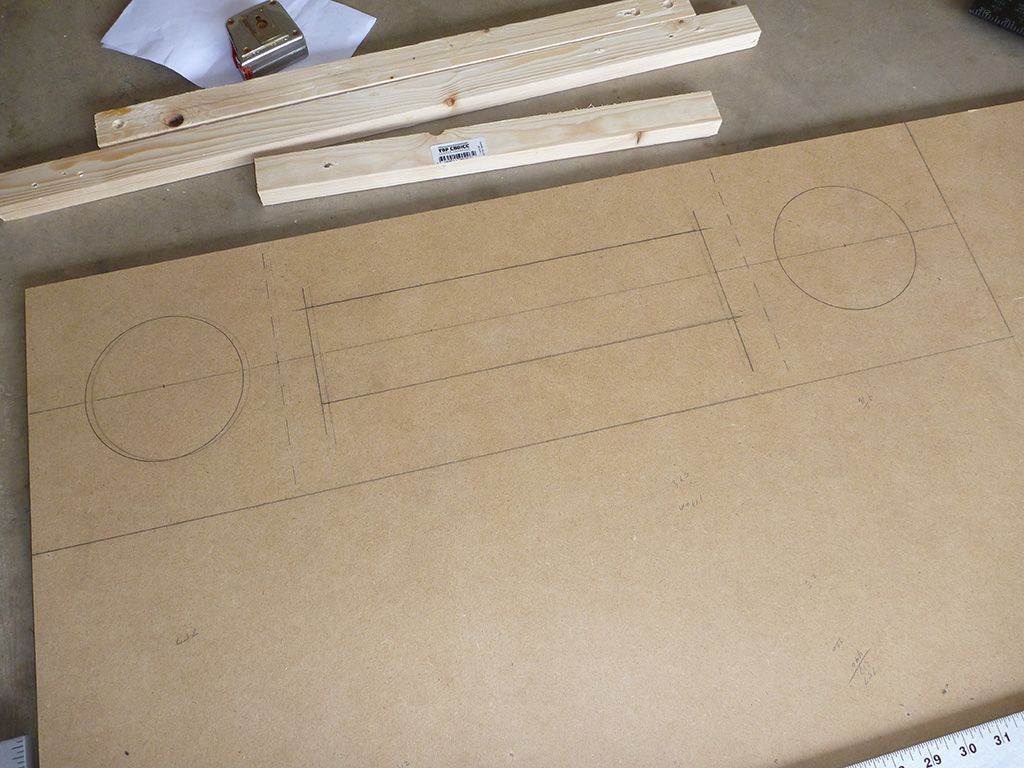


Used the circle jig again to cut out the speaker holes...
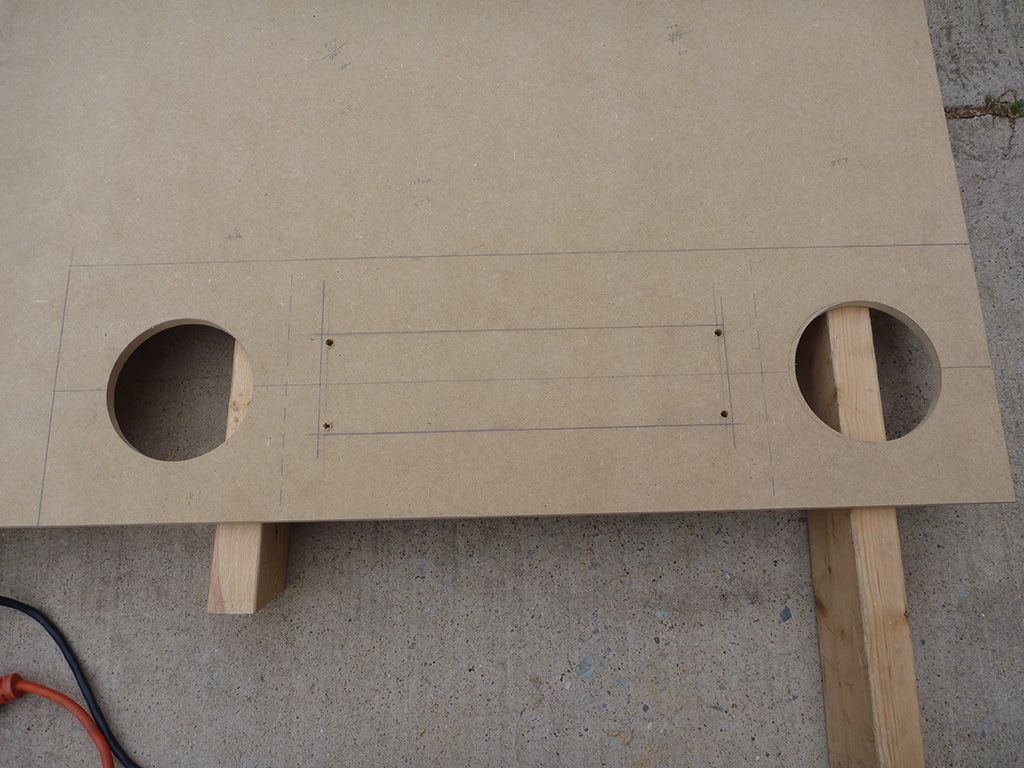

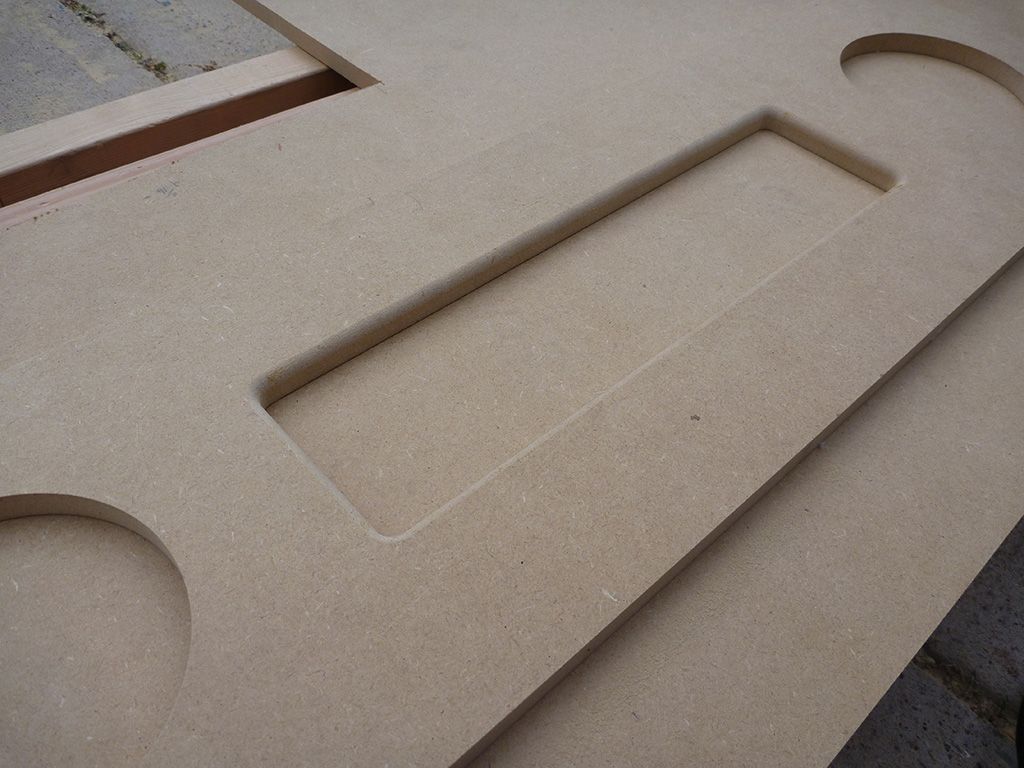
Did a rough cutout of the DMD window with the jig saw, staying 1/8" or so inside the line...
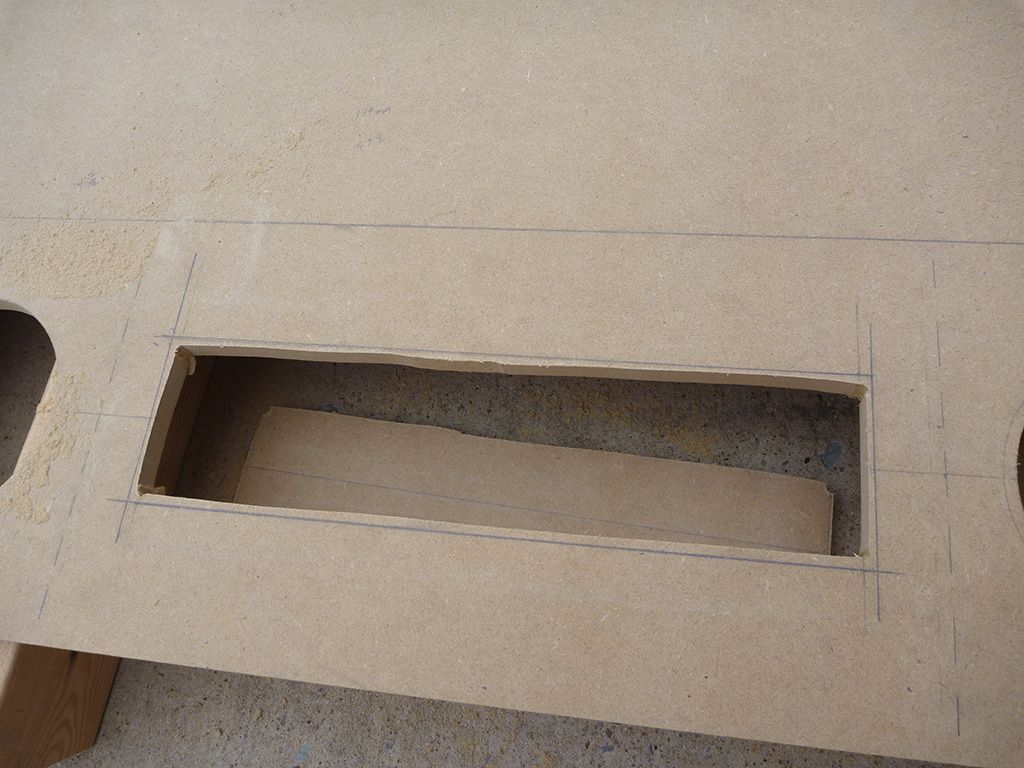

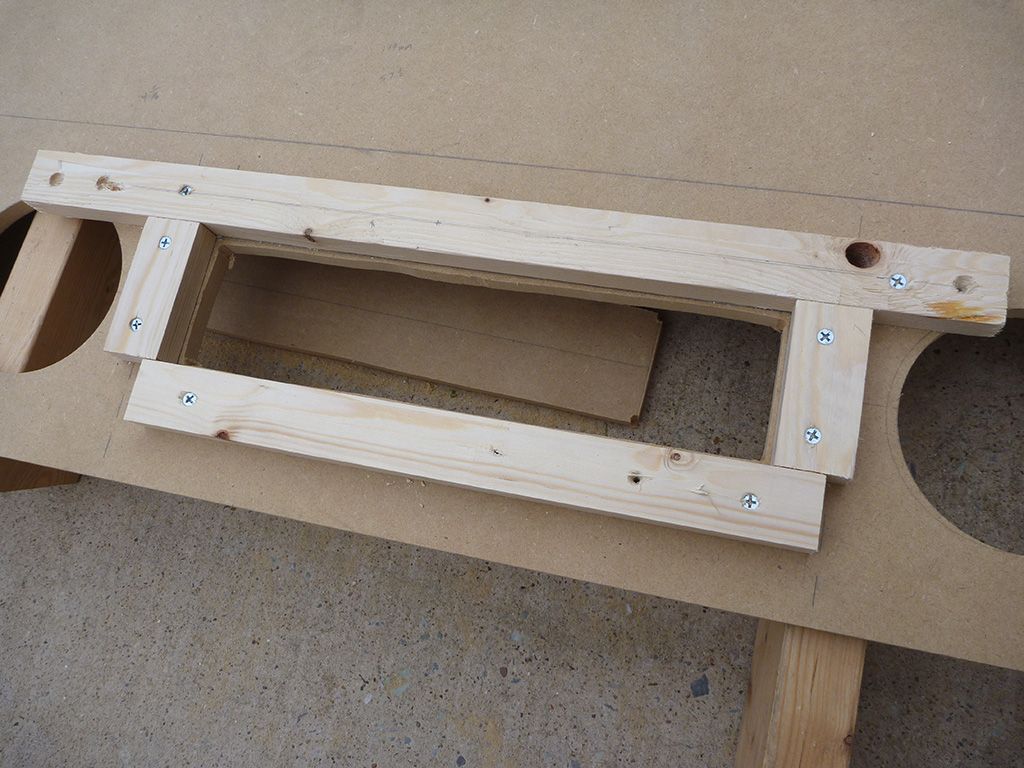
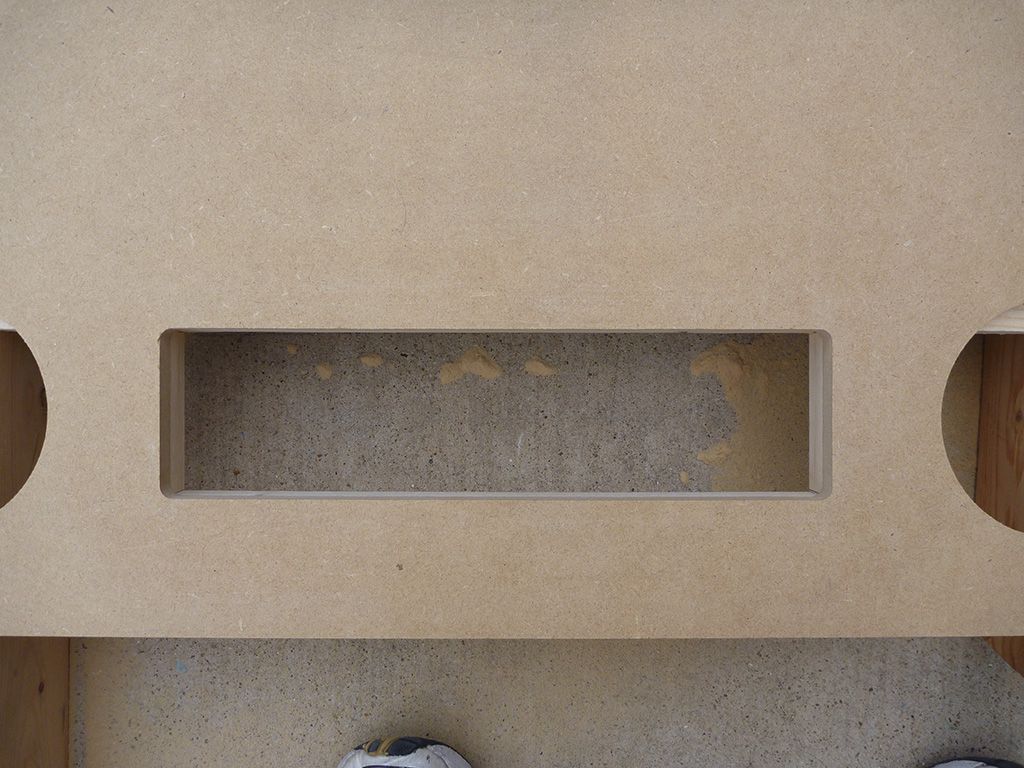
Built a guide on the back side with inside dimensions to match the exact size that I wanted the DMD window.  Basically just lined the wood up with the pencil lines and screwed them down (being careful not to go all the way through the wood). I then used a 1/2" flush cut router bit to make the finish cut. The roller on the bottom of the bit follows the guide and makes makes a perfect and smooth cut...


Rough cut the edge of the panel with a jig saw...
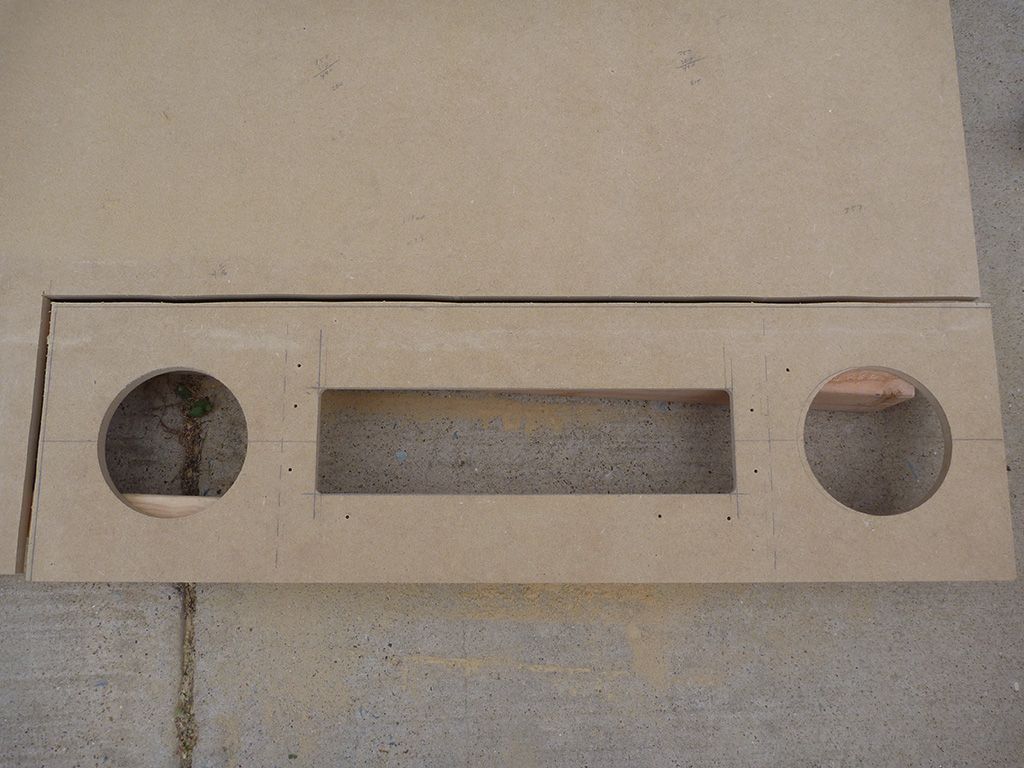

Then used the edge of the remaining MDF as a guide, once again making the finishing cut with the router and flush cut bit..
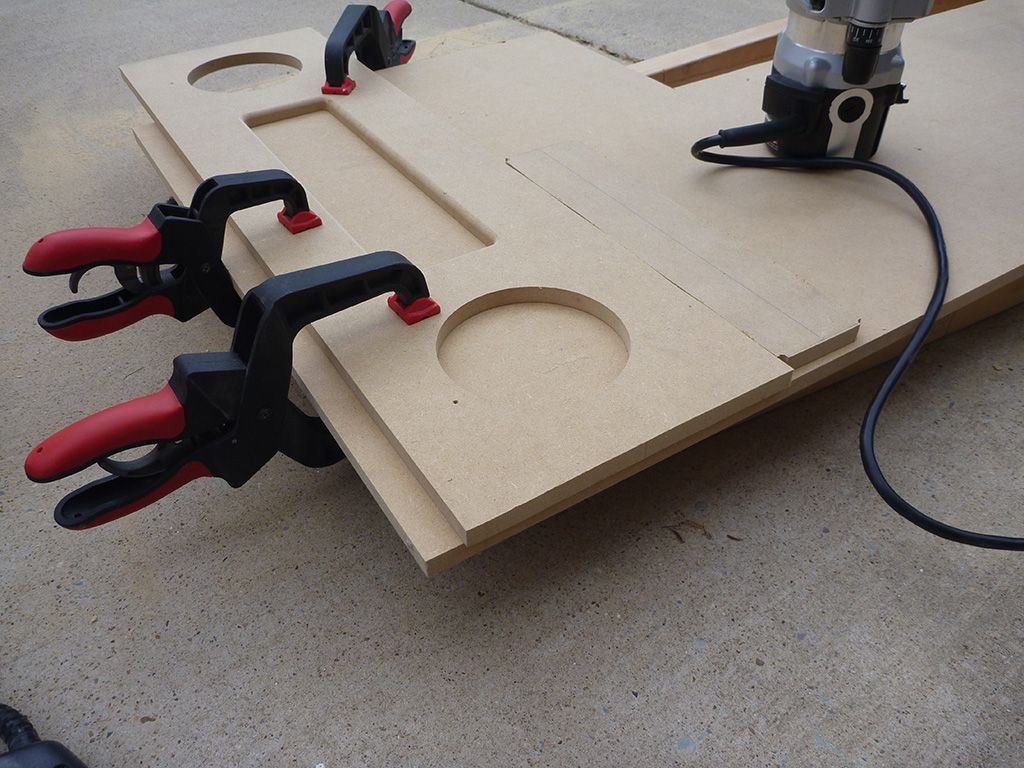

Went over the DMD window with a round over bit and we have a perfect DMD panel.  I didn't round the speaker holes because I'm going to be installing the grill on top...
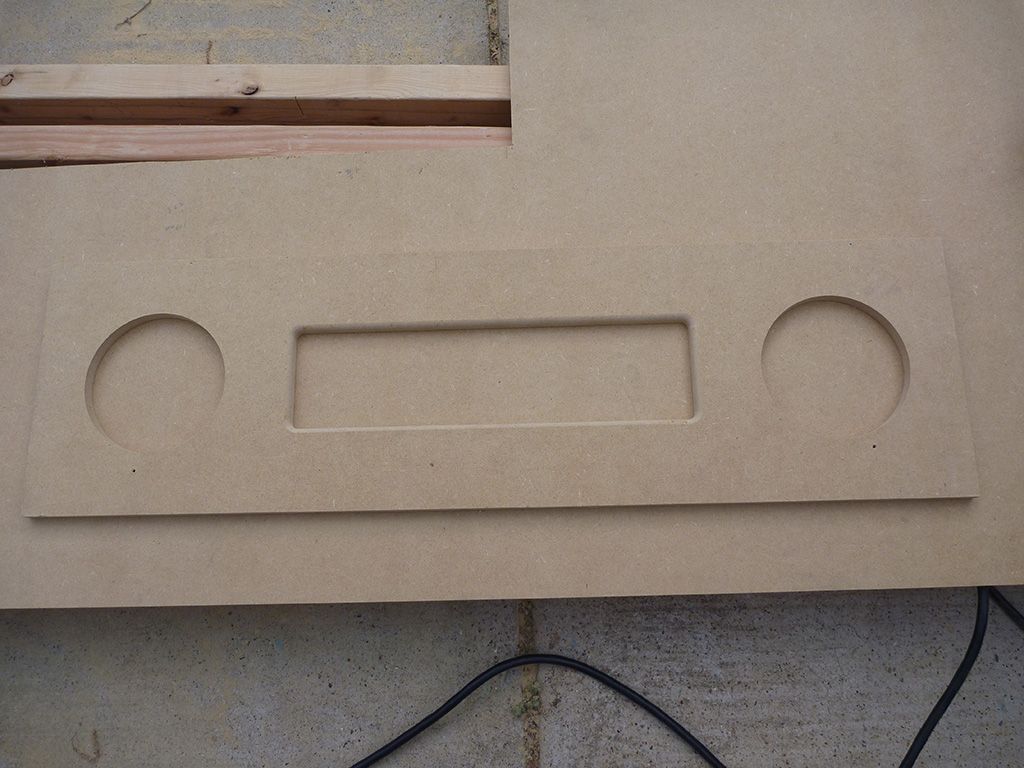


In the home stretch as far as the woodworking goes. Only things left are building the mounting framework for the DMD panel in the backbox, building a light bar for the space above the playfield, cutting the coin door hole and drilling the button holes.
« Last Edit: April 08, 2013, 12:30:34 am by Gamester »
Current Project:                                                       First Project:
  

yotsuya

  • Trade Count: (+21)
  • Full Member
  • ***
  • Offline Offline
  • Posts: 19960
  • Last login:July 17, 2025, 10:00:30 pm
  • 2014 UCA Winner, 2014, 2015, 2016 ZapCon Winner
    • forum.arcadecontrols.com/index.php/topic,137636.msg1420628.html
Re: STAR WARS: Pinball Unleashed - 46"/32"/DMD Widebody Build
« Reply #89 on: April 08, 2013, 12:41:51 am »
 :notworthy:
***Build what you dig, bro. Build what you dig.***

dandro

  • Trade Count: (0)
  • Full Member
  • ***
  • Offline Offline
  • Posts: 208
  • Last login:July 20, 2014, 12:32:46 am
  • I want to build my own arcade controls!
    • Link To project
Re: STAR WARS: Pinball Unleashed - 46"/32"/DMD Widebody Build
« Reply #90 on: April 08, 2013, 09:54:30 am »
yeah wow, I love the detailed descriptions and pictures that you are sharing, the details are tremendous and very helpful! I'm with Yots on this one!  :notworthy:

yotsuya

  • Trade Count: (+21)
  • Full Member
  • ***
  • Offline Offline
  • Posts: 19960
  • Last login:July 17, 2025, 10:00:30 pm
  • 2014 UCA Winner, 2014, 2015, 2016 ZapCon Winner
    • forum.arcadecontrols.com/index.php/topic,137636.msg1420628.html
Re: STAR WARS: Pinball Unleashed - 46"/32"/DMD Widebody Build
« Reply #91 on: April 08, 2013, 11:13:29 am »
Yeah, I just love the clean lines and traditional look to this machine. Can't wait to see the final results. Actually, with the level of detail and shared documentation going in to sharing the build, maybe I can!  :lol
***Build what you dig, bro. Build what you dig.***

Dance Commander

  • Trade Count: (0)
  • Full Member
  • ***
  • Offline Offline
  • Posts: 35
  • Last login:March 17, 2017, 09:39:30 am
  • Deify Dada
Re: STAR WARS: Pinball Unleashed - 46"/32"/DMD Widebody Build
« Reply #92 on: April 08, 2013, 11:38:33 am »
This is incredible. There is so much involved but it almost looks manageable. You are making it look too easy.

Gamester

  • Trade Count: (0)
  • Full Member
  • ***
  • Offline Offline
  • Posts: 483
  • Last login:March 01, 2019, 03:00:10 pm
Re: STAR WARS: Pinball Unleashed - 46"/32"/DMD Widebody Build
« Reply #93 on: April 08, 2013, 04:43:12 pm »
Thanks guys!

yotsuya - you can definitely do it!  It's the same approach as eating an elephant: one bite a time.  :)

Dance Commander - that is my goal...to try to explain the process enough to make it easier for others to follow suit.  This is my attempt to give back a little, as I've learned a TON on this forum and others.  I've always appreciated the more detailed build threads that explain HOW they did things, not just pics of the end result.
« Last Edit: April 08, 2013, 04:53:15 pm by Gamester »
Current Project:                                                       First Project:
  

yotsuya

  • Trade Count: (+21)
  • Full Member
  • ***
  • Offline Offline
  • Posts: 19960
  • Last login:July 17, 2025, 10:00:30 pm
  • 2014 UCA Winner, 2014, 2015, 2016 ZapCon Winner
    • forum.arcadecontrols.com/index.php/topic,137636.msg1420628.html
Re: STAR WARS: Pinball Unleashed - 46"/32"/DMD Widebody Build
« Reply #94 on: April 08, 2013, 04:55:01 pm »
Is that circle guide the pro version?
***Build what you dig, bro. Build what you dig.***

Gamester

  • Trade Count: (0)
  • Full Member
  • ***
  • Offline Offline
  • Posts: 483
  • Last login:March 01, 2019, 03:00:10 pm
Current Project:                                                       First Project:
  

TGov

  • Trade Count: (0)
  • Full Member
  • ***
  • Offline Offline
  • Posts: 223
  • Last login:March 21, 2017, 02:07:54 pm
  • I want to build my own arcade controls!
Re: STAR WARS: Pinball Unleashed - 46"/32"/DMD Widebody Build
« Reply #96 on: April 08, 2013, 11:34:07 pm »
Pretty awesome!

kahlid74

  • Trade Count: (+1)
  • Full Member
  • ***
  • Offline Offline
  • Posts: 1366
  • Last login:January 01, 2021, 12:42:56 pm
  • Gaming for a better future!
    • GamersAnon
Re: STAR WARS: Pinball Unleashed - 46"/32"/DMD Widebody Build
« Reply #97 on: April 10, 2013, 09:31:13 am »
Gamester, did you have a BOM for this?  Did you have all of the information to put one together quickly?  I don't want to waste your time but boy would it be nice to have when I embark on this glorious path in a year.

Gamester

  • Trade Count: (0)
  • Full Member
  • ***
  • Offline Offline
  • Posts: 483
  • Last login:March 01, 2019, 03:00:10 pm
Re: STAR WARS: Pinball Unleashed - 46"/32"/DMD Widebody Build
« Reply #98 on: April 10, 2013, 02:04:04 pm »
Gamester, did you have a BOM for this?  Did you have all of the information to put one together quickly?  I don't want to waste your time but boy would it be nice to have when I embark on this glorious path in a year.

I'll try to go back to my OP when I can and add some additional detail on the parts and materials.  Obviously some of it varies by build, but it should be a good starting point.
Current Project:                                                       First Project:
  

Le Chuck

  • Saint, make a poll!
  • Wiki Contributor
  • Trade Count: (+6)
  • Full Member
  • ***
  • Offline Offline
  • Posts: 5509
  • Last login:June 14, 2025, 06:26:06 pm
  • <insert personal text here>
Re: STAR WARS: Pinball Unleashed - 46"/32"/DMD Widebody Build
« Reply #99 on: April 10, 2013, 08:45:03 pm »
Looking sharp as usual man  :applaud:

I love that type of circle jig, I have a weird palm router and can't find one that fits it so I built my own and just drill the holes as I need them.  I really should look harder for a nice pro one like yours

wp34

  • Trade Count: (+3)
  • Full Member
  • ***
  • Offline Offline
  • Posts: 4794
  • Last login:April 10, 2022, 09:48:19 pm
Re: STAR WARS: Pinball Unleashed - 46"/32"/DMD Widebody Build
« Reply #100 on: April 10, 2013, 09:09:48 pm »
Looking good Gamester. 

I bought that same circle jig for my Tron build. I let the salesman at the Woodsmith store talk me out of it originally in favor of building your own.  That was fine at first but I got to a point where I needed more precision and picked one of those jigs up. Worth every penny.

Sent from my Atari 800 mobile device using Tapatalk


Gamester

  • Trade Count: (0)
  • Full Member
  • ***
  • Offline Offline
  • Posts: 483
  • Last login:March 01, 2019, 03:00:10 pm
Re: STAR WARS: Pinball Unleashed - 46"/32"/DMD Widebody Build
« Reply #101 on: April 23, 2013, 03:19:33 pm »
Thanks guys!

So another small update...

Coin door cut.  Just did the coin door freehand with the jigsaw...


Holes patched.  Started out using 'Plastic Wood'.  Hate it.  Never fills screw holes well and doesn't sand smooth enough (also tends to chip during sanding).  After getting frustrated with this stuff for the last time, I switched over to Bondo.  It stinks bad, but works much better.  Luckily I had a respirator to keep the fumes at bay.  :)  The only challenge with it, as many of you know,  is that it dries FAST.  Once you mix in the hardener, you only have about 2 minutes  to get it applied before it becomes unusable.  So the key is to mix it in small enough batches that you don't waste too much.  But the obvious advantage to the fast drying is that you can sand and paint it really quickly after application.


Button holes drilled and then priming.  Not too exciting, but the thing I do like about this step is how it makes everything looks so pristine.  All the wood grain, bondo, pencil marks and other blemishes vanish.  :)  Starts taking on a more finished look which is really refreshing.


Installed a slide out tray for the computer gear.  Used 18" ball bearing sliders so it pulls out for easy access to the components.


And painting!  Used a combo of 4" and 6" foam rollers, along with a foam brush for getting into tight spots.  I think for my next project I'm going to invest in a spray gun.  But in comparison to my arcade project, this paint job is a breeze.  I'm going to keep the inside of the cab white.  I like the contrast, plus will make it easier to see in there later on...


A little mockup of the artwork so I could see it at full size. Really glad I did this because it led to some changes.  To do this I took the art and saved it as a PDF within Photoshop then opened it in Acrobat, which has a feature during printing to allow you to 'tile' a large image into multiple sheets.


And Santa (Brad...aka Lucian045 over on the HS Forums) sent me this pic from his workshop.  He was really impressed with how it looks, so that's encouraging..  Can't wait to see it in person!


That's all for now.  Should be lots more updates coming over the next couple weeks.  Stay tuned...
Current Project:                                                       First Project:
  

mcseforsale

  • Trade Count: (0)
  • Full Member
  • ***
  • Offline Offline
  • Posts: 1471
  • Last login:April 09, 2024, 03:07:41 pm
  • Creepy Mario Dude
Re: STAR WARS: Pinball Unleashed - 46"/32"/DMD Widebody Build
« Reply #102 on: April 23, 2013, 03:22:28 pm »
that's cool.  Looks like an operating room inside!

AJ

sabreerbasAlpha

  • Trade Count: (0)
  • Full Member
  • ***
  • Offline Offline
  • Posts: 253
  • Last login:February 13, 2017, 07:28:29 pm
  • Remember those big 10ps?
Re: STAR WARS: Pinball Unleashed - 46"/32"/DMD Widebody Build
« Reply #103 on: April 23, 2013, 06:23:09 pm »
Simply stunning, a pleasure to read and look at your work Gamester. The cuts the lines are virtually flawless. Love this build. Cant wait to see it finished mate.  :notworthy:

yotsuya

  • Trade Count: (+21)
  • Full Member
  • ***
  • Offline Offline
  • Posts: 19960
  • Last login:July 17, 2025, 10:00:30 pm
  • 2014 UCA Winner, 2014, 2015, 2016 ZapCon Winner
    • forum.arcadecontrols.com/index.php/topic,137636.msg1420628.html
Re: STAR WARS: Pinball Unleashed - 46"/32"/DMD Widebody Build
« Reply #104 on: April 23, 2013, 06:30:15 pm »
My favorite pinball build since Chris'!  Keep up the great work! :applaud:
***Build what you dig, bro. Build what you dig.***

TheShaner

  • Trade Count: (0)
  • Full Member
  • ***
  • Offline Offline
  • Posts: 451
  • Last login:December 23, 2017, 10:42:25 pm
  • Shut your noise tube filthy Taco Human!
Re: STAR WARS: Pinball Unleashed - 46"/32"/DMD Widebody Build
« Reply #105 on: April 25, 2013, 03:20:50 pm »
This is good stuff here.  I'm gonna enjoy watching this come together!  Any idea what the overall cost gonna be?  I have a pincab in the design phase right now ... not sure how long it will be in that phase, but I am hoping to start building by the end of the year.  It looks like you are doing yours right, among other things, in that you are building your own cabinet to house the hardware, which is what I plan on doing as well.

Really really kick --I'm attempting to get by the auto-censor and should be beaten after I re-read the rules--!   :cheers:
« Last Edit: April 25, 2013, 03:22:27 pm by TheShaner »

TheShaner

  • Trade Count: (0)
  • Full Member
  • ***
  • Offline Offline
  • Posts: 451
  • Last login:December 23, 2017, 10:42:25 pm
  • Shut your noise tube filthy Taco Human!
Re: STAR WARS: Pinball Unleashed - 46"/32"/DMD Widebody Build
« Reply #106 on: April 25, 2013, 03:40:24 pm »
So, I have been hiding out for a while and havent been on the forums much lately.  While catching up, I came across this really cool thread about this bad ass pinball machine called Star Wars Pinball unleashed.  The guy building it has bought all of these cool parts, and has a really good plan laid out.  He's even gone as far as to do a test run of the 3 screens running off the computer.

I think it's cool, so I make a comment stating such ...

After my post shows up, I realize there is more than one page to this thread ... read read read ...

Holy Crap.  This is an awesome build!  Props Gamester, you really are going about this right.  Your carpentry work is top notch.  As I mentioned before, I have wanted to build my own box for my upcoming "PinHead" build.  I can guarantee you, when I get to the point to where I am actually building things, I am going to consult this thread heavily.  This is a well thought out, so far perfectly executed pincab build!  Good job on the artwork too!!

On the artwork, one of the things MaxiGriff was referring to when working with substandard artwork was using filters like the oilpainting filter I have referred to in my signature to clean up those pieces after they have been resized.  It works well. 

Cant wait to see more ... now time to go put on a fresh pair of underwear.

Maximus

  • Trade Count: (+2)
  • Full Member
  • ***
  • Offline Offline
  • Posts: 1391
  • Last login:May 26, 2017, 05:32:05 pm
  • Plans are for fools!!!!
    • Arcade Icons
Re: STAR WARS: Pinball Unleashed - 46"/32"/DMD Widebody Build
« Reply #107 on: April 26, 2013, 03:47:43 pm »
Looking great Gamester, the woodwork is really coming together and looking nice. It's always a thrill to see your artwork 'fullsize' for the first time, I bet you are really happy with that.

dandro

  • Trade Count: (0)
  • Full Member
  • ***
  • Offline Offline
  • Posts: 208
  • Last login:July 20, 2014, 12:32:46 am
  • I want to build my own arcade controls!
    • Link To project

Gamester

  • Trade Count: (0)
  • Full Member
  • ***
  • Offline Offline
  • Posts: 483
  • Last login:March 01, 2019, 03:00:10 pm
Re: STAR WARS: Pinball Unleashed - 46"/32"/DMD Widebody Build
« Reply #109 on: April 28, 2013, 02:11:54 am »
that's cool.  Looks like an operating room inside!

Thanks AJ!  Yeah, that's why I decided to keep it white inside.  Just has a nice clean look. 

Simply stunning, a pleasure to read and look at your work Gamester. The cuts the lines are virtually flawless. Love this build. Cant wait to see it finished mate.  :notworthy:

Thanks so much. I'm truly flattered.


My favorite pinball build since Chris'!  Keep up the great work! :applaud:

Thanks yotsuya.  Chris' build was a big inspiration for me in the beginning, so I'm honored that you would say that.  :)


Holy Crap.  This is an awesome build!  Props Gamester, you really are going about this right.  Your carpentry work is top notch.  As I mentioned before, I have wanted to build my own box for my upcoming "PinHead" build.  I can guarantee you, when I get to the point to where I am actually building things, I am going to consult this thread heavily.  This is a well thought out, so far perfectly executed pincab build!  Good job on the artwork too!!

TheShaner, your post cracked me up.  :) And I also appreciate the kind words.  I look forward to seeing your project when you get it under way. 


Looking great Gamester, the woodwork is really coming together and looking nice. It's always a thrill to see your artwork 'fullsize' for the first time, I bet you are really happy with that.

Yeah, and now I have the artwork in hand, and it's everything I envisioned.  I couldn't be more pleased.
Current Project:                                                       First Project:
  

Gamester

  • Trade Count: (0)
  • Full Member
  • ***
  • Offline Offline
  • Posts: 483
  • Last login:March 01, 2019, 03:00:10 pm
Re: STAR WARS: Pinball Unleashed - 46"/32"/DMD Widebody Build
« Reply #110 on: April 28, 2013, 03:45:14 am »
Okay, so let's just say I've been a busy little bee over the past week.  Got a LOT of stuff done on the build.  Oh, and I apologize to anyone trying to read this post on a slow connection...  :D

Added a couple extra parts to the stash.  Picked up the PSU that will run the toys (flashers, contactors, wiper motor and shaker):


Also got one of these, circa 1998 off of eBay new in box for about $15.  It has a built-in motion controller, similar to the modern Playstation SIXAXIS controller.  This will be used for the nudge functionality.  I'll get into more detail on how it's setup later in the build once I have it installed and working correctly.


Computer is mounted on the slide-out shelf.  Since I de-cased the components, I was a bit concerned about making sure the video card stayed mounted firmly in its socket, so I got this nice back plate to secure it.  I mounted the motherboard using PCB mounting feet, and I needed the back plate to match it in height.  Was too late for a hardware store run, so I tried a couple different things as spacers (cutting tubing, etc.) but couldn't quite get the base I wanted.  So my Macgyver mode kicked in as I shuffled through drawers and boxes.  Ended up using a plastic spacer, a washer and some plastic beads from my wife to get it just right.  :P  Video card is nice and secure.  Used some good 3M double-sided tape to mount the PSU.  It's not budging either.


Coin door and lockdown bar/guide installed...


Doors, fans, grills and door hardware installed.  I'm short one fan.  Will need to order that soon.  I considered using locks, but decided against it.  I just couldn't think of any compelling reason for locks, so I used a double-roller catch on one door and a magnetic latch in the other.  No particular reason I used a different latch for each.  Just what I happened to have on hand.


Speakers and DMD are mounted in the panel.  I cut and mounted a sheet of acrylic in front of the DMD to protect it.  Just used my jigsaw with a fine cut blade, carefully drilled holes and screwed it in.  There was some strategy involved with the dimensions of the acrylic because there are screw heads protruding from the front of the DMD that I had to work around or else it caused a bit more space between the DMD and acrylic than I wanted.

Also got the TV mounted and T-molding installed.  Just need to pick up a piece of glass and make a bezel to hide the TV's bezel and speaker panel interior framing.  I'm pretty pleased with how the backbox turned out. 


Hmmm... what's that peaking around the side there?


Also installed the legs.  The method I used was to screw them just snug into the brackets, and then install the screws for the plates on the back side.  This ensured that the plates would remain in the exact orientation needed for the bolts to thread properly. 

But of course, before I installed the coin door and legs, I installed the ARTWORK.  :)


Start, Exit and Coin buttons...


I can't say enough good things about this artwork from Brad.  The material he uses is INCREDIBLY forgiving.  I probably stuck/unstuck parts of it a dozen or more times, and it never lost its adhesion.  It's also really easy to get air bubbles out of it.  It's called air release technology, and they aren't kidding.  He includes a felt squeegee to apply it.  One key to installing this stuff is to make sure you have several brand new, sharp X-acto blades on hand.  It's critical to getting a clean edge.  This stuff is pretty tough, so even with a brand new blade, I had challenges occasionally with cutting it.  The important thing is to make sure you keep the knife straight and use the cabinet's edge as a guide.  Just go slow until you get a feel for it.

So back to the legs for a second...when I first installed the legs and leg protectors and tightened them down, I noticed that the tension of the legs up against the artwork caused it to pucker a bit.  I can only imagine the long term implications of this, so a solution was in order.  Here's what I came up with: adhesive felt pads.  Once I installed these, no more issues.  Artwork stayed nice and flat, even with the legs fully tightened.


So, next up is building the light panel for above the playfield and wiring...LOTS of wiring.

We're having a graduation party for my son in a couple weeks, and my goal was to have the pin fully playable by then.  I think I'm on track get meet that goal! 

More updates coming soon.  I'll get into a bit more detail on how I mounted the backbox and how the speaker panel is mounted, and of course all of the wiring.  Stay tuned...
Current Project:                                                       First Project:
  

emphatic

  • Trade Count: (0)
  • Full Member
  • ***
  • Offline Offline
  • Posts: 2017
  • Last login:Today at 03:00:25 am
  • -"Suck it, Donny!" -"No, YOU suck it.... more".
    • Emphatic's Video Game Collection
Re: STAR WARS: Pinball Unleashed - 46"/32"/DMD Widebody Build
« Reply #111 on: April 28, 2013, 06:10:36 am »
Thanks to these pictures, I've just cream'd my jeans.  :notworthy:

Nephasth

  • Guest
  • Trade Count: (0)
Re: STAR WARS: Pinball Unleashed - 46"/32"/DMD Widebody Build
« Reply #112 on: April 28, 2013, 10:18:37 am »
Looks amazing with the art installed! Can't wait to see that DMD in action! :applaud:

Gamester

  • Trade Count: (0)
  • Full Member
  • ***
  • Offline Offline
  • Posts: 483
  • Last login:March 01, 2019, 03:00:10 pm
Re: STAR WARS: Pinball Unleashed - 46"/32"/DMD Widebody Build
« Reply #113 on: April 28, 2013, 02:39:18 pm »
Thanks to these pictures, I've just cream'd my jeans.  :notworthy:

LOL.  Sorry about that.  ;)

Looks amazing with the art installed! Can't wait to see that DMD in action! :applaud:

Thanks Nephasth!  Trust me, I'm ready to see it in action too.  Should be pretty soon...  ;)
Current Project:                                                       First Project:
  

yotsuya

  • Trade Count: (+21)
  • Full Member
  • ***
  • Offline Offline
  • Posts: 19960
  • Last login:July 17, 2025, 10:00:30 pm
  • 2014 UCA Winner, 2014, 2015, 2016 ZapCon Winner
    • forum.arcadecontrols.com/index.php/topic,137636.msg1420628.html
Re: STAR WARS: Pinball Unleashed - 46"/32"/DMD Widebody Build
« Reply #114 on: April 28, 2013, 02:41:48 pm »
Slowly getting to "Best VP Build EVER" status...  :cheers:
***Build what you dig, bro. Build what you dig.***

Gamester

  • Trade Count: (0)
  • Full Member
  • ***
  • Offline Offline
  • Posts: 483
  • Last login:March 01, 2019, 03:00:10 pm
Re: STAR WARS: Pinball Unleashed - 46"/32"/DMD Widebody Build
« Reply #115 on: April 28, 2013, 03:49:22 pm »
@yotsuya - Thanks for the kind words!  I'm flattered man...   :cheers:

So just wanted to mention that these buttons are just placeholders.  Planning to do lit buttons (or solid buttons with lit outer rings)...  :)


Mom does stained glass, so I'm going to have her cut the backglass for me today.  I don't trust myself...  :P

Wiring will probably start tonight or tomorrow.  Taking a bit of a breather after the marathon last week to get it to this point.  ;)
Current Project:                                                       First Project:
  

emphatic

  • Trade Count: (0)
  • Full Member
  • ***
  • Offline Offline
  • Posts: 2017
  • Last login:Today at 03:00:25 am
  • -"Suck it, Donny!" -"No, YOU suck it.... more".
    • Emphatic's Video Game Collection
Re: STAR WARS: Pinball Unleashed - 46"/32"/DMD Widebody Build
« Reply #116 on: April 28, 2013, 04:07:31 pm »
It would look amazing (I think) if you could make speaker covers shaped like the Tie Fighters' wings.

sabreerbasAlpha

  • Trade Count: (0)
  • Full Member
  • ***
  • Offline Offline
  • Posts: 253
  • Last login:February 13, 2017, 07:28:29 pm
  • Remember those big 10ps?
Re: STAR WARS: Pinball Unleashed - 46"/32"/DMD Widebody Build
« Reply #117 on: April 28, 2013, 06:36:59 pm »
Gamester Honestly, Its simply stunning. Beautiful design and execution of it. You must be proud of her.. :notworthy:

ark_ader

  • Trade Count: (0)
  • Full Member
  • ***
  • Offline Offline
  • Posts: 5645
  • Last login:March 02, 2019, 07:35:34 pm
  • I glow in the dark.
Re: STAR WARS: Pinball Unleashed - 46"/32"/DMD Widebody Build
« Reply #118 on: April 28, 2013, 08:19:41 pm »
Wow simply wow.  :o

I definitely have to get a plunge router now.  ;D

Awesome.  :applaud:
If I had only one wish, it would be for three more wishes.

wp34

  • Trade Count: (+3)
  • Full Member
  • ***
  • Offline Offline
  • Posts: 4794
  • Last login:April 10, 2022, 09:48:19 pm
Re: STAR WARS: Pinball Unleashed - 46"/32"/DMD Widebody Build
« Reply #119 on: April 28, 2013, 09:26:05 pm »
That artwork is simply fantastic.  The cleanness with which you mounted your motherboard is as impressive as the rest of the build.  Nice work.   :applaud: