Main Restorations Software Audio/Jukebox/MP3 Everything Else Buy/Sell/Trade
Project Announcements Monitor/Video GroovyMAME Merit/JVL Touchscreen Meet Up Retail Vendors
Driving & Racing Woodworking Software Support Forums Consoles Project Arcade Reviews
Automated Projects Artwork Frontend Support Forums Pinball Forum Discussion Old Boards
Raspberry Pi & Dev Board controls.dat Linux Miscellaneous Arcade Wiki Discussion Old Archives
Lightguns Arcade1Up Try the site in https mode Site News

Unread posts | New Replies | Recent posts | Rules | Chatroom | Wiki | File Repository | RSS | Submit news


Author Topic: The Blue Lightning Project (Complete save artwork July 21, 2009)  (Read 25788 times)

0 Members and 1 Guest are viewing this topic.

Gatsu

  • Trade Count: (+3)
  • Full Member
  • ***
  • Offline Offline
  • Posts: 943
  • Last login:November 04, 2017, 08:23:43 am
  • I'm not prejudice. I hate everyone equally.
Re: The Blue Lightning Project (Update Nov 10, 2008)
« Reply #40 on: June 16, 2009, 02:25:59 pm »
I just look at it like this....you've already spent the money, time and effort on building the main cab. So whats it gonna hurt to finish it up for real and put a real CP on it.

They aren't hard to build. If you're using an iPac its even easier. You can even take the controls out of the X-arcade and put those in your CP.

It just makes the cab more official looking overall.

Epyx

  • Trade Count: (+1)
  • Full Member
  • ***
  • Offline Offline
  • Posts: 1961
  • Last login:December 25, 2023, 07:56:36 pm
  • "You're an oddity"
Re: The Blue Lightning Project (Update Nov 10, 2008)
« Reply #41 on: June 16, 2009, 02:29:23 pm »
Agreed.  Then it's final...considering I have all the parts ordered and sitting in a box (joysticks/buttons/Ipac)...although cannabilizing the trackball from the X arcade will probably save me some time and grief.
Last Project


Epyx Tutorials:
Tutorials

Epyx

  • Trade Count: (+1)
  • Full Member
  • ***
  • Offline Offline
  • Posts: 1961
  • Last login:December 25, 2023, 07:56:36 pm
  • "You're an oddity"
Re: The Blue Lightning Project (Update Nov 10, 2008)
« Reply #42 on: July 04, 2009, 11:05:52 pm »
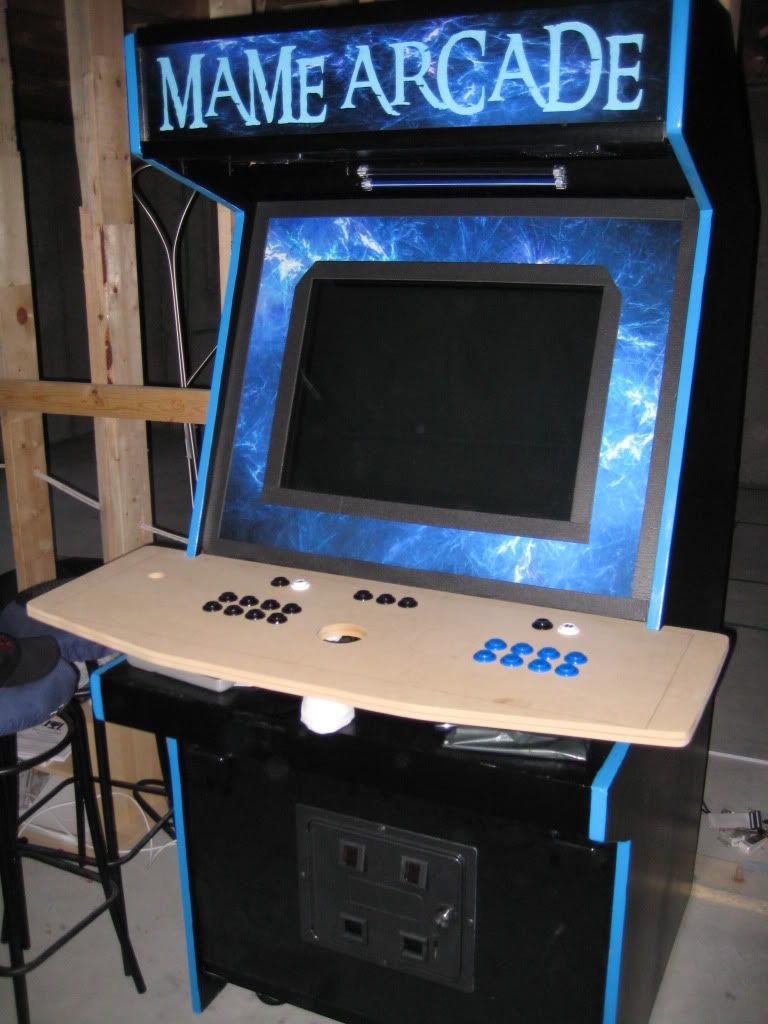
Well, given that this hobby has a habit of evoking "scope creep" i had decided to finish the CP and then just build a 2nd cab alongside this one since my "man cave" will have the room.  While I am disappointed with this first project in terms of what I have learned and will do differently with the next one, it is still my first and deserves to be finished.

I have completed the cutting of the top of the CP and drilled the holes. I just need to finish the joystick mounts and wait for the X-Arcade trackball to arrive.  I was going to try either Randy or Andy's trackball but I honestly haven't had any issues with the X-arcade trackball and rather like it on my X-arcade tankstick so just ordered their mounting kit.  In the interest of spreading my investments to others who support this hobby I did place an order with Andy for an ArcadeVga, Spinner with Randy and D9800 with X-Arcade. I also spent some coin on some new pc components as I wanted starblade running 100%...

I ended up getting an E5200 and Asus p5q pro. I have it running overclocked (basically stopped OC'ing when starblade hit 100%...roughly 3.6ghz!)

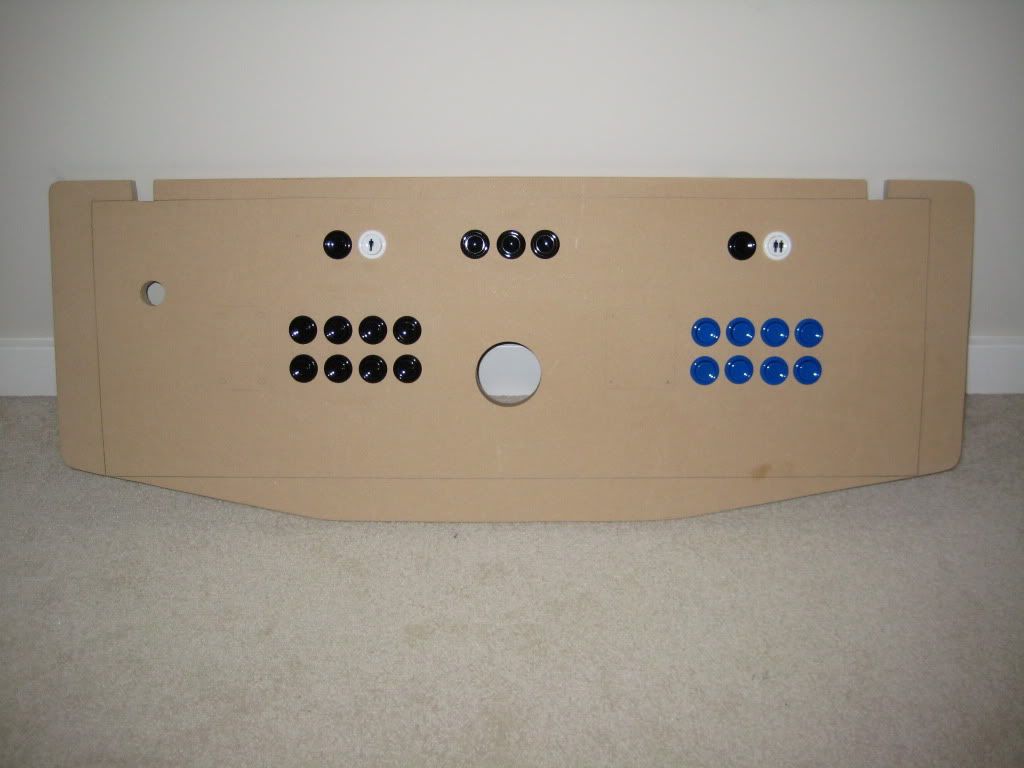
Here are some preliminary pics of the CP layout.  The empty button hole on the far left is where the Spinner will reside. I like this spot as I prefer a spinner in my left hand.  The joystick mounts will be completed tomorrow and then routing will begin once the trackball arrives. The left joystick is basically a blue Mag Stick Plus...the right 2nd player stick is an Ultimate 8 way.

I also purchased a 4x8 sheet of black Formica from HD which will sit on top of the CP. I will be using a blue trim T Mould for the edge. Ignore the roll of toilet paper propping up the CP in the 2nd pic ;)


« Last Edit: July 04, 2009, 11:17:36 pm by Epyx »
Last Project


Epyx Tutorials:
Tutorials

drventure

  • Trade Count: (+2)
  • Full Member
  • ***
  • Offline Offline
  • Posts: 4152
  • Last login:April 23, 2024, 06:53:06 pm
  • Laser Death Ray Bargain Bin! Make me an offer!
Re: The Blue Lightning Project (Update Nov 10, 2008)
« Reply #43 on: July 04, 2009, 11:49:38 pm »
Looks good!

I used black formica on my cab. Very pleased with the finish. Just be careful with your drill and router. me being the idiot, I didn't tighten a depth stop on my drill enough, it loosened and punched through in one spot, and formica +does not+ like to be punched through like that! a little black furniture crayon fixed it, +kind of+, but I'm still kicking myself.

Epyx

  • Trade Count: (+1)
  • Full Member
  • ***
  • Offline Offline
  • Posts: 1961
  • Last login:December 25, 2023, 07:56:36 pm
  • "You're an oddity"
Re: The Blue Lightning Project (Update Nov 10, 2008)
« Reply #44 on: July 04, 2009, 11:56:28 pm »
Drventure:

Would you recommend first a pilot hole via drill and then flush trim router bit?
Last Project


Epyx Tutorials:
Tutorials

Epyx

  • Trade Count: (+1)
  • Full Member
  • ***
  • Offline Offline
  • Posts: 1961
  • Last login:December 25, 2023, 07:56:36 pm
  • "You're an oddity"
Re: The Blue Lightning Project (Update Nov 10, 2008)
« Reply #45 on: July 06, 2009, 01:05:07 am »
Managed to get a bit more done today. Man Formica can be a PITA to work with (As Drventure just mentioned, my experience was similar to his)...I thought the router was going to be the trickiest part but as many have mentioned the router makes short work of the trimming and does indeed cut it like "butter"...it was the drilling that was a PITA...I had a few cracks where the Formica top coating splintered off...thankfully most of it is hidden by buttons and the small edges that aren't will just get the black paint touchup...not noticeable but I know its there so eventually ill cut into the rest of the 4x8 sheet I have left and try again for "perfection". At least I learned.

The Forstner bit was giving me the trouble, whereas the 1 1/8" spade/paddle bit cut it no problem. I had the Formica wedged between the CP and another piece of MDF.

Also put the T-Molding on (light blue).  This week I will build the box while I wait for the spinner and trackball to arrive.  Then the wiring fun begins...


« Last Edit: July 06, 2009, 01:08:29 am by Epyx »
Last Project


Epyx Tutorials:
Tutorials

LeedsFan

  • Trade Count: (0)
  • Full Member
  • ***
  • Offline Offline
  • Posts: 1042
  • Last login:January 17, 2021, 06:14:23 am
Re: The Blue Lightning Project (Update July 5, 2009)
« Reply #46 on: July 06, 2009, 02:00:12 am »
That CP really helps to finish it off now. Looks 100% better without the X-Arcade. A lot of people knock the X-Arcade but it helps people get into the hobby at least. Then they move on from that just like you have. I started with one myself... eventually sold it and converted a generic arcade cabinet to Mame with J-Pac and Arcade VGA etc..... then sold that and built my own CP from scratch with a laptop inside. A portable Mame arcade. :p

Gratz on the cabinet. Your woodworking skills are much better than mine. If I had a penchant for woodworking added with my love for all things retro arcade.... hello no... it doesn't bear thinking about!  :lol

Epyx

  • Trade Count: (+1)
  • Full Member
  • ***
  • Offline Offline
  • Posts: 1961
  • Last login:December 25, 2023, 07:56:36 pm
  • "You're an oddity"
Re: The Blue Lightning Project (Update July 5, 2009)
« Reply #47 on: July 06, 2009, 10:40:34 am »
LeedsFan

Guess we will just have to agree to disagree about my woodworking skills lol!

I will admit I have gotten better since starting this hobby and I expect much better things from the next cab.

Completely agree about the X-Arcade...besides it still make a nice portable controller for my bartop plus with the Dreamcast/Ps3 adapters its still a decent party CP to transport around.
Last Project


Epyx Tutorials:
Tutorials

Epyx

  • Trade Count: (+1)
  • Full Member
  • ***
  • Offline Offline
  • Posts: 1961
  • Last login:December 25, 2023, 07:56:36 pm
  • "You're an oddity"
Re: The Blue Lightning Project (Update July 5, 2009)
« Reply #48 on: July 10, 2009, 12:09:20 pm »
I have a question regarding my WG D9800 which arrived yesterday (I couldn't believe the difference when I plugged it in...don't get me wrong the LCD is fine but the authentic...wowsers). 

In my scouring of the forums I see that most are mounting these with proper mounting kits (universal etc). Is there any harm in just placing the D9800 on the same shelf I had the tv on? I would of course add a stop to prevent the tube from sliding (and raise the tail end a bit to get the right angle) but just wondering if there is any harm in simply having it sit on a shelf as opposed to suspended in official brackets?

Thanks!
Last Project


Epyx Tutorials:
Tutorials

Epyx

  • Trade Count: (+1)
  • Full Member
  • ***
  • Offline Offline
  • Posts: 1961
  • Last login:December 25, 2023, 07:56:36 pm
  • "You're an oddity"
Re: The Blue Lightning Project (Update July 5, 2009)
« Reply #49 on: July 19, 2009, 11:25:37 pm »
Decided to recut a new Formica overlay as the first had a few chips that were noticeable...finally got a nice clean.  I sandwiched the Formica between the CP and another piece of MDF. Used 1/2 spade bit to drill pilot holes for 1 1/8" button holes and then used Router to trim with flush bit. Drilled carriage bolt holes. I should have done it like this the first time...so easy.

Also began the process of wiring my CP. I want a modular design and after scouring the boards have gone with a Cat5 modular design. Still deciding on a way to mount the IPAC and its wire harness (5 cat 5 plugs 2 for each player and 1 for ground) to the bottom of the CP. Eventually I want a little box for the IP with flush Cat 5 female plugs so whatever I decide for the bottom of the CP will just be temporary.

Completed some of the wiring for player 1 as well. Pictures show the cat 5 plugs.  Eventually the Cat 5 female plugs will sit in a row underneath each player side on the CP for easy plug in...right now ill just plug them in and let the flop ;)  This week TT2 spinner should arrive and I will continue to wire the CP and finish Player 2 and the ground plug.


« Last Edit: July 19, 2009, 11:34:13 pm by Epyx »
Last Project


Epyx Tutorials:
Tutorials

drventure

  • Trade Count: (+2)
  • Full Member
  • ***
  • Offline Offline
  • Posts: 4152
  • Last login:April 23, 2024, 06:53:06 pm
  • Laser Death Ray Bargain Bin! Make me an offer!
Re: The Blue Lightning Project (Update July 19, 2009)
« Reply #50 on: July 19, 2009, 11:40:28 pm »
Hey Epyx
Sorry I missed your question. Sounds like you ended up doing exactly what I did. A spade bit cuts formica really well, I only used a router trim bit for the edge trim. All the holes I did with a spade bit or a hole saw (for the trackball and flight stick.).

Looks like it's coming along nicely!

Epyx

  • Trade Count: (+1)
  • Full Member
  • ***
  • Offline Offline
  • Posts: 1961
  • Last login:December 25, 2023, 07:56:36 pm
  • "You're an oddity"
Re: The Blue Lightning Project (Update July 19, 2009)
« Reply #51 on: July 19, 2009, 11:43:41 pm »
Hehe no worries. I just got paranoid using a 1 1/8" spade cause I kept getting small cracks. With the 1/2" bit I could afford a crack or two and still cover it up ;)
Last Project


Epyx Tutorials:
Tutorials

Epyx

  • Trade Count: (+1)
  • Full Member
  • ***
  • Offline Offline
  • Posts: 1961
  • Last login:December 25, 2023, 07:56:36 pm
  • "You're an oddity"
Re: The Blue Lightning Project (Update July 19, 2009)
« Reply #52 on: July 22, 2009, 12:34:12 am »
Everyone's probably sick of seeing this mediocre cab getting bumped up with updates. However, its my first cab and I've finally finished the control panel.  Now I will just replace the marquee with something more exciting, and get some matching artwork for the bezel and sides. I will keep the CP plain black with laminate as I kind of like it...can (and will) get fancier with the next upright.

Thanks to everyone for their assistance and my many PM questions...it has been appreciated.


« Last Edit: July 22, 2009, 12:35:51 am by Epyx »
Last Project


Epyx Tutorials:
Tutorials

drventure

  • Trade Count: (+2)
  • Full Member
  • ***
  • Offline Offline
  • Posts: 4152
  • Last login:April 23, 2024, 06:53:06 pm
  • Laser Death Ray Bargain Bin! Make me an offer!
Re: The Blue Lightning Project (Complete save artwork July 21, 2009)
« Reply #53 on: July 22, 2009, 12:45:51 am »
I dunno. Looks pretty good to me  :applaud:

I guess now it's time to get back to building that house in the background (ya gotta have priorities, right  :)


Epyx

  • Trade Count: (+1)
  • Full Member
  • ***
  • Offline Offline
  • Posts: 1961
  • Last login:December 25, 2023, 07:56:36 pm
  • "You're an oddity"
Re: The Blue Lightning Project (Complete save artwork July 21, 2009)
« Reply #54 on: July 22, 2009, 12:51:40 am »
Lol...when we purchased the house the agreement with my wife was that the basement would be my "man cave"...mini arcade, home theater, gym and full bathroom.

As you can see the only thing completed to date is the arcade cabinet lol.../sigh
Last Project


Epyx Tutorials:
Tutorials