Main Restorations Software Audio/Jukebox/MP3 Everything Else Buy/Sell/Trade
Project Announcements Monitor/Video GroovyMAME Merit/JVL Touchscreen Meet Up Retail Vendors
Driving & Racing Woodworking Software Support Forums Consoles Project Arcade Reviews
Automated Projects Artwork Frontend Support Forums Pinball Forum Discussion Old Boards
Raspberry Pi & Dev Board controls.dat Linux Miscellaneous Arcade Wiki Discussion Old Archives
Lightguns Arcade1Up Try the site in https mode Site News

Unread posts | New Replies | Recent posts | Rules | Chatroom | Wiki | File Repository | RSS | Submit news


Author Topic: The Blue Lightning Project (Complete save artwork July 21, 2009)  (Read 25782 times)

0 Members and 1 Guest are viewing this topic.

Epyx

  • Trade Count: (+1)
  • Full Member
  • ***
  • Offline Offline
  • Posts: 1961
  • Last login:December 25, 2023, 07:56:36 pm
  • "You're an oddity"


I have finally begun my long dreamed of Mame arcade cabinet. A cabinet that will figure prominently in the "Man Cave's" Home Theater.  First of all a thank you to www.arcadecab.com (Mike Trello) for his excellent cabinet plans on which the "Behemoth" is based.

I should also mention as an IT guy who is very competent with electronics and computers I am a complete neophyte when it comes to handyman projects. This project to me, will be about proving myself in that arena (Ikea furniture assembly doesn't count!).

Here are some basic specs:

Cabinet Height 6'
Cabinet Width 34"
3/4" MDF for sides
5/8" MDF for back/top etc
X-Arcade Tankstick (for now)
27" Sony Wega (Now Wells Gardner D9800)

I should also mention that I now have the utmost respect for the process of building ones of these things...I thought I could bang one off this Canadian long weekend...hehe I was delusional...Here are a few pics of the progress so far:
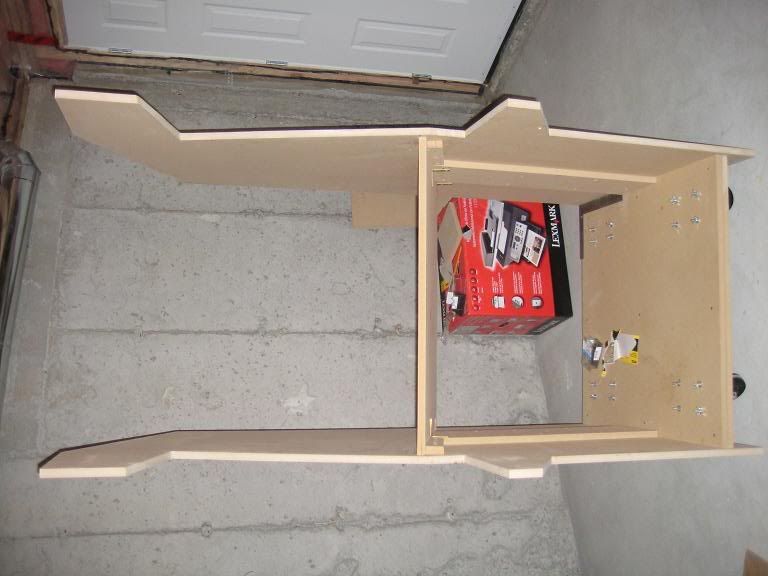

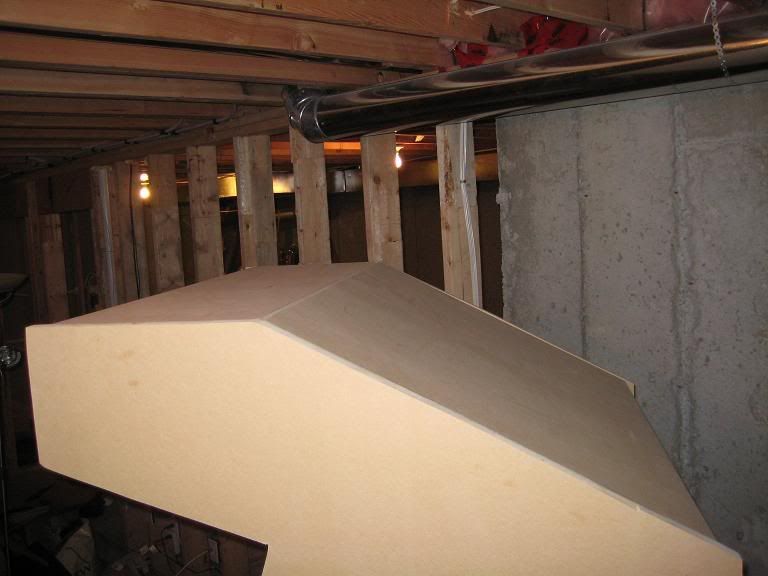
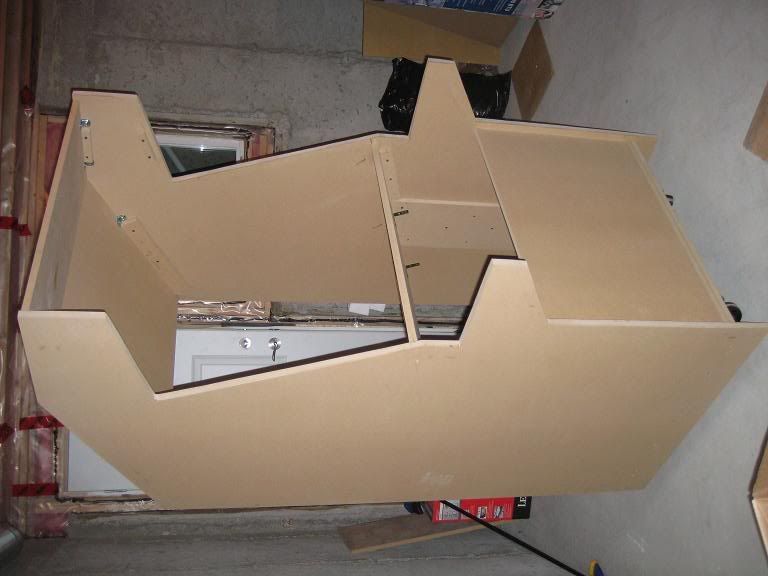
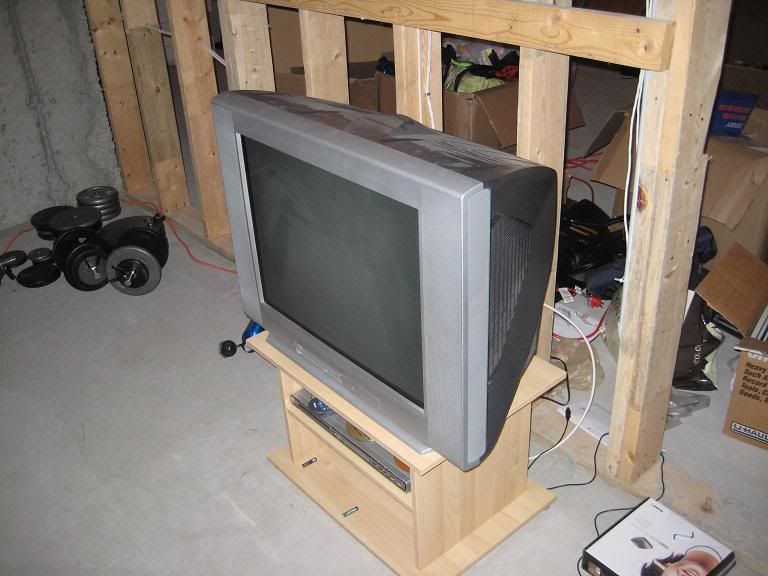


I will be adding 2x4 back support beams later today.  I will also look at purchasing a router (yes I know I didn't router pre-assembly as I was going to just glue it on by shaving off the T section of the molding...anyone know the part number for the Home Depot 1/16" slot cutter?

« Last Edit: September 10, 2009, 08:40:28 pm by Epyx »
Last Project


Epyx Tutorials:
Tutorials

javeryh

  • Trade Count: (+1)
  • Full Member
  • ***
  • Offline Offline
  • Posts: 7959
  • Last login:June 19, 2025, 11:24:08 am
Re: The Behemoth Project Begins
« Reply #1 on: October 15, 2008, 12:21:12 pm »
Looks good so far.  I'm not sure Home Depot sells the slot cutting bit - try MLCS.  They have everything.  I highly recommend you get a router if you think you will be doing any more building in the future (of any kind - not just arcade related).  It is such a versatile tool - I couldn't imagine being without one.

Also, finishing a cab over a long weekend?  No way! 

 :afro:

Epyx

  • Trade Count: (+1)
  • Full Member
  • ***
  • Offline Offline
  • Posts: 1961
  • Last login:December 25, 2023, 07:56:36 pm
  • "You're an oddity"
Re: The Behemoth Project Begins
« Reply #2 on: October 15, 2008, 12:31:55 pm »
Thanks Javeryh I will check out MLCS...can't help but imagine that there has to be a place here in Canada though where I can buy a 1/16" off the shelf.

And ya my hopes of finishing it off this last weekend were definitely misguided....I ended up wondering where the hell the time went at around 9pm on Monday...Thankfully my wife is pretty understanding as I think i saw her for Thanksgiving dinner and thats about it...
Last Project


Epyx Tutorials:
Tutorials

javeryh

  • Trade Count: (+1)
  • Full Member
  • ***
  • Offline Offline
  • Posts: 7959
  • Last login:June 19, 2025, 11:24:08 am
Re: The Behemoth Project Begins
« Reply #3 on: October 15, 2008, 12:39:12 pm »
Thanksgiving in October?  Crazy Canadians!   ;D

MLCS is great - I've ordered form them a bunch of times and they have good quality products at pretty low prices.  I sound like a commercial.  Anyway, if I were you, prior to cutting the slot I'd round some of the corners on the cabinet.  It will be easier to wrap the t-molding.

 :cheers:

Epyx

  • Trade Count: (+1)
  • Full Member
  • ***
  • Offline Offline
  • Posts: 1961
  • Last login:December 25, 2023, 07:56:36 pm
  • "You're an oddity"
Re: The Behemoth Project Begins
« Reply #4 on: October 15, 2008, 12:49:05 pm »
Ya we celebrate thanksgiving as your Columbus Day rather than the pilgrim thing in November :)

Thanks for the tips on the T Molding, appreciated. If I don't find anything local by lunch I will place the order with MLCS.
Last Project


Epyx Tutorials:
Tutorials

Martijn

  • Trade Count: (0)
  • Full Member
  • ***
  • Offline Offline
  • Posts: 822
  • Last login:January 25, 2024, 10:34:36 am
  • Akira!
    • ModMyBox
Re: The Behemoth Project Begins
« Reply #5 on: October 16, 2008, 02:28:23 am »
i have almost the same tv set , but then in 25 inch  :)

i also thought i could build it in a few weeks but its the little details and extra's that take time and make it more special.

and dont forget the artwork creation and printing.

good luck !


Todd H

  • Trade Count: (+2)
  • Full Member
  • ***
  • Offline Offline
  • Posts: 658
  • Last login:August 26, 2024, 02:23:32 pm
  • It's Gameday!
Re: The Behemoth Project Begins
« Reply #6 on: October 16, 2008, 08:16:36 am »


I will be adding 2x4 back support beams later today.  I will also look at purchasing a router (yes I know I didn't router pre-assembly as I was going to just glue it on by shaving off the T section of the molding...anyone know the part number for the Home Depot 1/16" slot cutter?


I believe it is Part # 2750017.

Epyx

  • Trade Count: (+1)
  • Full Member
  • ***
  • Offline Offline
  • Posts: 1961
  • Last login:December 25, 2023, 07:56:36 pm
  • "You're an oddity"
Re: The Behemoth Project Begins
« Reply #7 on: October 16, 2008, 10:54:49 am »
Thanks Todd!

Aye Martijn (sounds like a fellow dutchman!).

Quick question guys...i notice the back panel is really going to add stability...with a cabinet my size where should I leave access to the inside and what would be recommended? Open/close cabinet style door in front bottom and removable Bezel?

Any help would be appreciated!
Last Project


Epyx Tutorials:
Tutorials

Martijn

  • Trade Count: (0)
  • Full Member
  • ***
  • Offline Offline
  • Posts: 822
  • Last login:January 25, 2024, 10:34:36 am
  • Akira!
    • ModMyBox
Re: The Behemoth Project Begins
« Reply #8 on: October 16, 2008, 11:28:02 am »
if you need any help just pm me for shops or items you may need , i browsed a lot to find things that i needed in our country  :cheers:

I have removable back bottom and top panels

in the middle you will have something to hold your tv for stability

Epyx

  • Trade Count: (+1)
  • Full Member
  • ***
  • Offline Offline
  • Posts: 1961
  • Last login:December 25, 2023, 07:56:36 pm
  • "You're an oddity"
Re: The Behemoth Project Begins
« Reply #9 on: October 16, 2008, 11:45:42 am »
Well we immigrated to Canada when I was young so living here now but thanks for the tips...

I probably should have thought about access/stability *before* my first screw lol.

However, I will get it done....going to make the back panel removable as you suggested and likewise the front door.
Last Project


Epyx Tutorials:
Tutorials

Epyx

  • Trade Count: (+1)
  • Full Member
  • ***
  • Offline Offline
  • Posts: 1961
  • Last login:December 25, 2023, 07:56:36 pm
  • "You're an oddity"
Re: The Behemoth Project Begins
« Reply #10 on: October 17, 2008, 11:07:17 am »
Few updates. Have completed the following:

- Back Panel is ready with hole for variable speed 120mm fan
- Created temporary Marquee being printed at Staples and ready for pickup today (pic below)
- Have several other panels ready to go (Control panel, front coin door
- Added additional interior support structure (2x4s)
- Picked up Plexi for Marquee
- Still contemplating getting laminated glass vs Plexi. My thoughts are to go with plexi initially and then I can always use it as an exact templated for the glass to shop to cut off of. Id hate to have my measurements off on glass whereas on plexi I get 2 chances based on the sheet size im getting.

With luck I will be filling/sanding and priming tonight. So far no deep holes to fill just countersink holes.

Here are a few pics (Yes back panel will have hole for power cords! :)


Last Project


Epyx Tutorials:
Tutorials

Martijn

  • Trade Count: (0)
  • Full Member
  • ***
  • Offline Offline
  • Posts: 822
  • Last login:January 25, 2024, 10:34:36 am
  • Akira!
    • ModMyBox
Re: The Behemoth Project Begins (Update Oct 17, 2008)
« Reply #11 on: October 17, 2008, 11:16:45 am »
its a bit wide, that's because you will not strip the tv i think.

i tripped it because size did mater to me

how high is it from the floor down to the control panel? its seems a bit low.
did you try it out without hurting or bending your back?


Epyx

  • Trade Count: (+1)
  • Full Member
  • ***
  • Offline Offline
  • Posts: 1961
  • Last login:December 25, 2023, 07:56:36 pm
  • "You're an oddity"
Re: The Behemoth Project Begins (Update Oct 17, 2008)
« Reply #12 on: October 17, 2008, 11:22:52 am »
Correct. The tv will go in unstripped and that way I can always switch to a widescreen if desired...mostly its because my friends and I are large lads and its nice to stand without being elbow to elbow.

The control panel will sit on the ledge you see in the picture so actual height of the controls will be 42" (107cm).

I will put up a picture with me actually standing with controller but im 6' (1.82m) and it feels comfortable based on my height etc.
Last Project


Epyx Tutorials:
Tutorials

Martijn

  • Trade Count: (0)
  • Full Member
  • ***
  • Offline Offline
  • Posts: 822
  • Last login:January 25, 2024, 10:34:36 am
  • Akira!
    • ModMyBox
Re: The Behemoth Project Begins (Update Oct 17, 2008)
« Reply #13 on: October 17, 2008, 11:28:52 am »
then its really wide :P

no space in our country for such big cabs  :laugh2:

Epyx

  • Trade Count: (+1)
  • Full Member
  • ***
  • Offline Offline
  • Posts: 1961
  • Last login:December 25, 2023, 07:56:36 pm
  • "You're an oddity"
Re: The Behemoth Project Begins (Update Oct 17, 2008)
« Reply #14 on: October 17, 2008, 11:32:33 am »
Lol ya that is why im dubbing it the Behemoth for construction. Thankfully I have a very large basement (phew). However, I can sympathize as I lived in Holland (Beverwijk) for many years as a teenager and small child. Our place was very small!

But you get the best frietjes in the world so we are even! ;)
« Last Edit: October 17, 2008, 11:44:31 am by Epyx »
Last Project


Epyx Tutorials:
Tutorials

Martijn

  • Trade Count: (0)
  • Full Member
  • ***
  • Offline Offline
  • Posts: 822
  • Last login:January 25, 2024, 10:34:36 am
  • Akira!
    • ModMyBox
Re: The Behemoth Project Begins (Update Oct 17, 2008)
« Reply #15 on: October 17, 2008, 11:37:19 am »
it's "frietjes"  ;D

i will be watching your cab as its grows.

Will you put a dragon on the sideart? Waveryder can create something outstanding for you. hes on top of the artwork page.

will you be painting or laminating ?

budget cab or more bells and whistles

cheers,  :cheers:!

Epyx

  • Trade Count: (+1)
  • Full Member
  • ***
  • Offline Offline
  • Posts: 1961
  • Last login:December 25, 2023, 07:56:36 pm
  • "You're an oddity"
Re: The Behemoth Project Begins (Update Oct 17, 2008)
« Reply #16 on: October 17, 2008, 11:43:44 am »
Ya that was just a missed letter typo...my name is Pieter so I know the ie all too well :)

As for sideart I am not sure yet. I am a fussy person so I will likely be planning it for a while...although a dragon is a great idea. I will look up Waveryder to see his work.

I will be painting (I have thought about laminating but will likely just paint with my first cab).  So definitely will have bells and whistles..eventually ;)

I think you guys say...the work never really ends hehe.
Last Project


Epyx Tutorials:
Tutorials

Epyx

  • Trade Count: (+1)
  • Full Member
  • ***
  • Offline Offline
  • Posts: 1961
  • Last login:December 25, 2023, 07:56:36 pm
  • "You're an oddity"
Re: The Behemoth Project Begins (Update Oct 19, 2008)
« Reply #17 on: October 20, 2008, 12:35:17 am »
Weekend work summary:

- Cut Plexi for Custom Marquee
- Purchased and test installed 18" marquee light
- Completed screen fittings
- Purchased 32" x 27" laminated glass
- Purchased Matte board from Michaels craft store
- Designed and printed custom Bezel (Staples Photo Poster)
- Purchased paint
- Primed Saturday and painted sunday (Kilz Primer and Tremclad Rust Semi Gloss Black Oil based, Blue Breeze for trim)

Here are some pics:


Tomorrow I will sand and apply a 2nd coat.  I will then if I have enough time apply the trim which should look pretty good.  This paint is pretty sleek stuff.


« Last Edit: October 20, 2008, 10:52:53 am by Epyx »
Last Project


Epyx Tutorials:
Tutorials

tomdotcom

  • Trade Count: (+2)
  • Full Member
  • ***
  • Offline Offline
  • Posts: 179
  • Last login:March 05, 2014, 11:55:56 pm
Re: The Behemoth Project Begins (Update Oct 19, 2008)
« Reply #18 on: October 20, 2008, 10:19:31 am »
Looking good, lovin the paintjob so far..looks slick
=-= Pins: Fishtales, Bram Stoker's Dracula, Revenge from Mars, Skateball =-=

=-= Custom Mame cab =-=

Epyx

  • Trade Count: (+1)
  • Full Member
  • ***
  • Offline Offline
  • Posts: 1961
  • Last login:December 25, 2023, 07:56:36 pm
  • "You're an oddity"
Re: The Behemoth Project Begins (Update Oct 19, 2008)
« Reply #19 on: October 20, 2008, 10:45:47 am »
Thanks Tom. It's amazing what a difference simple foam rollers make. 

« Last Edit: October 20, 2008, 01:09:31 pm by Epyx »
Last Project


Epyx Tutorials:
Tutorials

Epyx

  • Trade Count: (+1)
  • Full Member
  • ***
  • Offline Offline
  • Posts: 1961
  • Last login:December 25, 2023, 07:56:36 pm
  • "You're an oddity"
Re: The Behemoth Project Begins (Update Oct 20, 2008)
« Reply #20 on: October 20, 2008, 01:10:55 pm »
Some quick questions for the experts...

1) As a general question to those with experience...Just wondering if I should sand at all between coats or go right to the 2nd coat? If I do sand it should be a high grit count over 300 or so?

2) I have a 27" Sony Wega going into the beast...would a single 120mm variable speed fan be sufficient to vent out the hot air?
Last Project


Epyx Tutorials:
Tutorials

Epyx

  • Trade Count: (+1)
  • Full Member
  • ***
  • Offline Offline
  • Posts: 1961
  • Last login:December 25, 2023, 07:56:36 pm
  • "You're an oddity"
Re: The Behemoth Project Begins (Update Oct 20, 2008)
« Reply #21 on: October 21, 2008, 11:11:03 am »
Sanded with 320 grit after 1st coat and applied 2nd coat. Woke up this morning and I must say the finish is smooth and very nice.  Tried out the color I had selected for the trim.  I must say I am pleased. It is going to match the marquee nicely.  Here are some pics:


Tonight I insert the monitor and get the bezel ready before applying final trim paint detailing.


« Last Edit: October 21, 2008, 11:12:46 am by Epyx »
Last Project


Epyx Tutorials:
Tutorials

Epyx

  • Trade Count: (+1)
  • Full Member
  • ***
  • Offline Offline
  • Posts: 1961
  • Last login:December 25, 2023, 07:56:36 pm
  • "You're an oddity"
Re: The Behemoth Project Begins (Update Oct 21, 2008)
« Reply #22 on: October 21, 2008, 11:45:12 pm »
Last night I tested the Marquee and speakers. I also inserted the TV and created a "poor man's" Bezel until I come up with some more permanent. The X Arcade Tankstick is also temporary until I design and build a custom controller. I will then have it printed at Staples/Kinko and insert it.  Tomorrow I put the computer inside and give it a good test run :)

Here are some pics. Please note that the circles are flashes on the paint and not splotches :)


« Last Edit: October 22, 2008, 12:02:42 am by Epyx »
Last Project


Epyx Tutorials:
Tutorials

Epyx

  • Trade Count: (+1)
  • Full Member
  • ***
  • Offline Offline
  • Posts: 1961
  • Last login:December 25, 2023, 07:56:36 pm
  • "You're an oddity"
Re: The Behemoth Project 80% (Update Oct 22, 2008)
« Reply #23 on: October 24, 2008, 07:03:02 pm »
First game pics...what better game to break in the cab than one of my fav...Black Tiger.

Of course I still have some tweaking on the S-Video...if I could get the darn Component working id be happy but no luck so far.


Last Project


Epyx Tutorials:
Tutorials

Epyx

  • Trade Count: (+1)
  • Full Member
  • ***
  • Offline Offline
  • Posts: 1961
  • Last login:December 25, 2023, 07:56:36 pm
  • "You're an oddity"
Re: The Behemoth Project 80% (Update Oct 25, 2008)
« Reply #24 on: October 26, 2008, 01:17:31 am »
Well got my basic Photoshop bezel installed. Really starting to look like an arcade. The problem is I can't stop playing...I keep sneaking downstairs to work and end up playing game after game.../sigh

Also got my 120mm fan installed on the back. Got both the front and back panel mounted with magnets and installed handles for easy removal. I will be changing out the front door once my coin door arrives so for now the handles can stay :)

I also managed to get component working and WOW...what a difference.  Much better clarity on text and more vibrancy in the colours.  The problem is its my main game computer running it and I have put the old unit in my computer room as an Internet surfing computer....guess I won't be playing any PC games for a while. Oh well with my PS3 and the Mame Arcade I should be okay...

Still to do:

- Add more lighting. Don't wanna go overboard but a few more lights to go with the Blue lightning theme will be nice
- Finalize design for control panel...some good ones out there so I will go slow on this. Controller will have the same blue lightning graphic.

Here is a picture with the bezel installed:


« Last Edit: October 26, 2008, 01:37:19 am by Epyx »
Last Project


Epyx Tutorials:
Tutorials

Blanka

  • Trade Count: (+1)
  • Full Member
  • ***
  • Offline Offline
  • Posts: 2248
  • Last login:January 25, 2018, 03:19:28 pm
Re: The Blue Lightning Project 85% (Update Oct 25, 2008)
« Reply #25 on: October 26, 2008, 02:24:07 am »
You say the tankstik is for now. Why not decase it and put everything directly in your shelve?

Epyx

  • Trade Count: (+1)
  • Full Member
  • ***
  • Offline Offline
  • Posts: 1961
  • Last login:December 25, 2023, 07:56:36 pm
  • "You're an oddity"
Re: The Blue Lightning Project 85% (Update Oct 25, 2008)
« Reply #26 on: October 26, 2008, 02:33:32 am »
I had thought of that but would prefer something that comes up and contours a bit more, plus I want a spinner and holsters for lightguns. That way I can keep the tankstick for casual sit down gaming on the bigscreen.

Besides with no controller to build I would be close to done and we can't have that :)
Last Project


Epyx Tutorials:
Tutorials

Franco B

  • Trade Count: (+10)
  • Full Member
  • ***
  • Offline Offline
  • Posts: 3766
  • Last login:February 15, 2024, 09:14:06 am
Re: The Blue Lightning Project 85% (Update Oct 25, 2008)
« Reply #27 on: October 26, 2008, 05:45:37 am »
Looks good :)

I would say the CP is more than 15% of the build though. ;) I would say its generally over 50%.

Epyx

  • Trade Count: (+1)
  • Full Member
  • ***
  • Offline Offline
  • Posts: 1961
  • Last login:December 25, 2023, 07:56:36 pm
  • "You're an oddity"
Re: The Blue Lightning Project 85% (Update Oct 25, 2008)
« Reply #28 on: October 26, 2008, 12:36:43 pm »
Hehe you are absolutely correct. The control panel would easily be 30 to 50%...my original percentages were based on the cab itself with Tankstick controller but like many others here as soon as the shell of the cabinet begins to take place the 3rd party controllers just don't "feel right".


Last Project


Epyx Tutorials:
Tutorials

Epyx

  • Trade Count: (+1)
  • Full Member
  • ***
  • Offline Offline
  • Posts: 1961
  • Last login:December 25, 2023, 07:56:36 pm
  • "You're an oddity"
Re: The Blue Lightning Project (Update Oct 25, 2008)
« Reply #29 on: November 07, 2008, 01:49:45 pm »
Well my Ebay coin doors arrived:


I have some ideas thanks to the members of this forum on how to restore this. Mark my words this will look killer when it's done. Now mind you after shipping and duty on my $10 Ebay doors (2 doors this is the better of the two) I could have gone with a Starburst in Canada and broken even... oh well I just tell myself this door has seen decades of use/abuse so it will give it that authentic touch.

On the FE side of things...I registered Maximus Arcade and aside form a few minor bugs love its configuration simplicity. It also looks very sleek in action.  Playing Amiga/C64 games on my cabinet was definitely a highlight this week.  The component was tweaked heavily using the Sony KV27FS100 service menu and is looking fantastic.

I currently have 5mm Laminated glass and just tinted plexi (using Canadian Tire tint roll 35%). Today I pick up an additional 3mm tinted tempered which will replace the plexi.

Poker night tomorrow again and this time the cab will get some good use I'm sure.

Next I will continue my design for a custom CP which I hope to have in the next few weeks.

Last Project


Epyx Tutorials:
Tutorials

Epyx

  • Trade Count: (+1)
  • Full Member
  • ***
  • Offline Offline
  • Posts: 1961
  • Last login:December 25, 2023, 07:56:36 pm
  • "You're an oddity"
Re: The Blue Lightning Project (Update Nov 7, 2008)
« Reply #30 on: November 08, 2008, 12:09:38 am »
Here is the same coin door after stripping. Rather than using a stripping liquid I chose to grind the paint off. I used a brass grinder and then a polish piece. The brass grinder made short work of the rust. Very smooth after the polish. Next step painting.   


On closer inspection (and cleaning!) the holes in the coin reject button are actually holes for a clip on.


« Last Edit: November 08, 2008, 12:16:40 am by Epyx »
Last Project


Epyx Tutorials:
Tutorials

Epyx

  • Trade Count: (+1)
  • Full Member
  • ***
  • Offline Offline
  • Posts: 1961
  • Last login:December 25, 2023, 07:56:36 pm
  • "You're an oddity"
Re: The Blue Lightning Project (Update Nov 8, 2008)
« Reply #31 on: November 08, 2008, 01:29:10 pm »
Here is the door after some TLC...just need to buy a camlock and figure out what to do with the coin reject buttons, but I have some ideas.


Last Project


Epyx Tutorials:
Tutorials

Epyx

  • Trade Count: (+1)
  • Full Member
  • ***
  • Offline Offline
  • Posts: 1961
  • Last login:December 25, 2023, 07:56:36 pm
  • "You're an oddity"
Re: The Blue Lightning Project (Update Nov 8, 2008)
« Reply #32 on: November 09, 2008, 11:00:08 pm »
Well the cab got some monumental playtime last night...amazing how this hobby of ours can impact others.  One of my buddies now wants a cab of his own...badly...couldn't get him off the cabinet last night.  Raiden III on this thing is a sight to behold and the classics were just as engrossing as decades ago.

A thanks to Peale btw for his excellent write-up on coin door restoration. Many of the tips were invaluable, particularly the hammered spray!

Here is a picture of the cabinet with restored coin door mounted and a closeup.  Next phase...continue on CP (almost have final design) and finalize reject coin button (overlay text and lighting) and finally wire it to insert coin button!


« Last Edit: November 09, 2008, 11:08:03 pm by Epyx »
Last Project


Epyx Tutorials:
Tutorials

Epyx

  • Trade Count: (+1)
  • Full Member
  • ***
  • Offline Offline
  • Posts: 1961
  • Last login:December 25, 2023, 07:56:36 pm
  • "You're an oddity"
Re: The Blue Lightning Project (Update Nov 9, 2008)
« Reply #33 on: November 10, 2008, 02:18:20 am »
Tweaked the settings some more on my Component connection.  Between the Sony service menu and Nvidia drivers I have what I feel is a darn good Component picture.  The pictures don't completely do the screens justice but I can honestly say this is easily 80 to 90% arcade quality. While it isn't true RGB the component is a huge step up from the S-Video I was using previous.


Last Project


Epyx Tutorials:
Tutorials

Epyx

  • Trade Count: (+1)
  • Full Member
  • ***
  • Offline Offline
  • Posts: 1961
  • Last login:December 25, 2023, 07:56:36 pm
  • "You're an oddity"
Re: The Blue Lightning Project (Update Nov 9, 2008)
« Reply #34 on: November 11, 2008, 01:44:40 am »
I was thinking of a way to get the coin door look as authentic as possible but with parts no longer available (in particular the coin reject bezel and text) i had to  come up with something different.

I downloaded the "Reject Coin" graphic from Mameroom and printed it out on transparency:


I then applied the tranparency with invisible 2 sided tape to the reject coin button:


I think the end result looks pretty good as it allows the red of the button to show through.  I then mounted the Coin Reject buttons back on the coin door:


And finally lit them using red 12v LED on the coin mechanism:


From rusty and beaten to almost new! :)


Last Project


Epyx Tutorials:
Tutorials

Thebeast

  • Trade Count: (0)
  • Full Member
  • ***
  • Offline Offline
  • Posts: 23
  • Last login:July 09, 2021, 10:18:47 pm
Re: The Blue Lightning Project (Update Nov 10, 2008)
« Reply #35 on: December 18, 2008, 04:48:03 pm »
This is a beautiful cabinet. It seems that with that current control panel on there its going to be nearly impossible to find the time to build your own CP (who wants to wire switches when you can play all of your favorite games lol)

I am eagerly awaiting pics of the finished machine.
What if this weren't a hypothetical question?

See my project at : http://forum.arcadecontrols.com/index.php?topic=87647.0

Epyx

  • Trade Count: (+1)
  • Full Member
  • ***
  • Offline Offline
  • Posts: 1961
  • Last login:December 25, 2023, 07:56:36 pm
  • "You're an oddity"
Re: The Blue Lightning Project (Update Nov 10, 2008)
« Reply #36 on: December 18, 2008, 10:33:09 pm »
Thanks TheBeast. You are correct...having the X arcade on it has made it about a 90% play versus 10% development machine. however, with my bartop project I am working on CPs for both the bartop and this unit...so they will be completed. I will likely finish both just before the New Year...well thats my goal ;)
Last Project


Epyx Tutorials:
Tutorials

bgspot

  • Trade Count: (+1)
  • Full Member
  • ***
  • Offline Offline
  • Posts: 63
  • Last login:January 10, 2020, 12:37:52 pm
Re: The Blue Lightning Project (Update Nov 10, 2008)
« Reply #37 on: December 22, 2008, 11:28:13 pm »
I like the wide stance of your cab. On my first cab i never got around to making my own cp because i hooked up my x-arcade stick and couldn't stop playin street fighter.

Epyx

  • Trade Count: (+1)
  • Full Member
  • ***
  • Offline Offline
  • Posts: 1961
  • Last login:December 25, 2023, 07:56:36 pm
  • "You're an oddity"
Re: The Blue Lightning Project (Update Nov 10, 2008)
« Reply #38 on: December 23, 2008, 10:45:58 am »
Hehe that was the situation with this cab for the first few weeks. However, I have just wrapped up my bartop and am now concentrating on CPs for both this and the bartop.  The main problem atm is a major cold snap here where I live...its just too damned cold to do any woodworking so I will likely wait until the Spring.

I like the wide stance too but given it was my first cab there are so many things I would have done differently...especially after having built the bartop...oh well now I can see why this hobby is so darn addicting...you always want to build that next cab a "bit better"... ;)
Last Project


Epyx Tutorials:
Tutorials

Epyx

  • Trade Count: (+1)
  • Full Member
  • ***
  • Offline Offline
  • Posts: 1961
  • Last login:December 25, 2023, 07:56:36 pm
  • "You're an oddity"
Re: The Blue Lightning Project (Update Nov 10, 2008)
« Reply #39 on: June 16, 2009, 02:16:07 pm »
Damn you guys and being right...curse the X Arcade controller and me not building a proper custom controller. Well, with the summer here I really can't procrastinate much longer. 

My only issue now with 2 builds under my belt (this and the bartop) is seeing all my rookie mistakes and wanting to build a 3rd properly...Lol I can't be the only one struggling with this.

Must...be...disciplined....finish CP....
Last Project


Epyx Tutorials:
Tutorials

Gatsu

  • Trade Count: (+3)
  • Full Member
  • ***
  • Offline Offline
  • Posts: 943
  • Last login:November 04, 2017, 08:23:43 am
  • I'm not prejudice. I hate everyone equally.
Re: The Blue Lightning Project (Update Nov 10, 2008)
« Reply #40 on: June 16, 2009, 02:25:59 pm »
I just look at it like this....you've already spent the money, time and effort on building the main cab. So whats it gonna hurt to finish it up for real and put a real CP on it.

They aren't hard to build. If you're using an iPac its even easier. You can even take the controls out of the X-arcade and put those in your CP.

It just makes the cab more official looking overall.

Epyx

  • Trade Count: (+1)
  • Full Member
  • ***
  • Offline Offline
  • Posts: 1961
  • Last login:December 25, 2023, 07:56:36 pm
  • "You're an oddity"
Re: The Blue Lightning Project (Update Nov 10, 2008)
« Reply #41 on: June 16, 2009, 02:29:23 pm »
Agreed.  Then it's final...considering I have all the parts ordered and sitting in a box (joysticks/buttons/Ipac)...although cannabilizing the trackball from the X arcade will probably save me some time and grief.
Last Project


Epyx Tutorials:
Tutorials

Epyx

  • Trade Count: (+1)
  • Full Member
  • ***
  • Offline Offline
  • Posts: 1961
  • Last login:December 25, 2023, 07:56:36 pm
  • "You're an oddity"
Re: The Blue Lightning Project (Update Nov 10, 2008)
« Reply #42 on: July 04, 2009, 11:05:52 pm »
Well, given that this hobby has a habit of evoking "scope creep" i had decided to finish the CP and then just build a 2nd cab alongside this one since my "man cave" will have the room.  While I am disappointed with this first project in terms of what I have learned and will do differently with the next one, it is still my first and deserves to be finished.

I have completed the cutting of the top of the CP and drilled the holes. I just need to finish the joystick mounts and wait for the X-Arcade trackball to arrive.  I was going to try either Randy or Andy's trackball but I honestly haven't had any issues with the X-arcade trackball and rather like it on my X-arcade tankstick so just ordered their mounting kit.  In the interest of spreading my investments to others who support this hobby I did place an order with Andy for an ArcadeVga, Spinner with Randy and D9800 with X-Arcade. I also spent some coin on some new pc components as I wanted starblade running 100%...

I ended up getting an E5200 and Asus p5q pro. I have it running overclocked (basically stopped OC'ing when starblade hit 100%...roughly 3.6ghz!)

Here are some preliminary pics of the CP layout.  The empty button hole on the far left is where the Spinner will reside. I like this spot as I prefer a spinner in my left hand.  The joystick mounts will be completed tomorrow and then routing will begin once the trackball arrives. The left joystick is basically a blue Mag Stick Plus...the right 2nd player stick is an Ultimate 8 way.

I also purchased a 4x8 sheet of black Formica from HD which will sit on top of the CP. I will be using a blue trim T Mould for the edge. Ignore the roll of toilet paper propping up the CP in the 2nd pic ;)


« Last Edit: July 04, 2009, 11:17:36 pm by Epyx »
Last Project


Epyx Tutorials:
Tutorials

drventure

  • Trade Count: (+2)
  • Full Member
  • ***
  • Offline Offline
  • Posts: 4152
  • Last login:April 23, 2024, 06:53:06 pm
  • Laser Death Ray Bargain Bin! Make me an offer!
Re: The Blue Lightning Project (Update Nov 10, 2008)
« Reply #43 on: July 04, 2009, 11:49:38 pm »
Looks good!

I used black formica on my cab. Very pleased with the finish. Just be careful with your drill and router. me being the idiot, I didn't tighten a depth stop on my drill enough, it loosened and punched through in one spot, and formica +does not+ like to be punched through like that! a little black furniture crayon fixed it, +kind of+, but I'm still kicking myself.

Epyx

  • Trade Count: (+1)
  • Full Member
  • ***
  • Offline Offline
  • Posts: 1961
  • Last login:December 25, 2023, 07:56:36 pm
  • "You're an oddity"
Re: The Blue Lightning Project (Update Nov 10, 2008)
« Reply #44 on: July 04, 2009, 11:56:28 pm »
Drventure:

Would you recommend first a pilot hole via drill and then flush trim router bit?
Last Project


Epyx Tutorials:
Tutorials

Epyx

  • Trade Count: (+1)
  • Full Member
  • ***
  • Offline Offline
  • Posts: 1961
  • Last login:December 25, 2023, 07:56:36 pm
  • "You're an oddity"
Re: The Blue Lightning Project (Update Nov 10, 2008)
« Reply #45 on: July 06, 2009, 01:05:07 am »
Managed to get a bit more done today. Man Formica can be a PITA to work with (As Drventure just mentioned, my experience was similar to his)...I thought the router was going to be the trickiest part but as many have mentioned the router makes short work of the trimming and does indeed cut it like "butter"...it was the drilling that was a PITA...I had a few cracks where the Formica top coating splintered off...thankfully most of it is hidden by buttons and the small edges that aren't will just get the black paint touchup...not noticeable but I know its there so eventually ill cut into the rest of the 4x8 sheet I have left and try again for "perfection". At least I learned.

The Forstner bit was giving me the trouble, whereas the 1 1/8" spade/paddle bit cut it no problem. I had the Formica wedged between the CP and another piece of MDF.

Also put the T-Molding on (light blue).  This week I will build the box while I wait for the spinner and trackball to arrive.  Then the wiring fun begins...


« Last Edit: July 06, 2009, 01:08:29 am by Epyx »
Last Project


Epyx Tutorials:
Tutorials

LeedsFan

  • Trade Count: (0)
  • Full Member
  • ***
  • Offline Offline
  • Posts: 1042
  • Last login:January 17, 2021, 06:14:23 am
Re: The Blue Lightning Project (Update July 5, 2009)
« Reply #46 on: July 06, 2009, 02:00:12 am »
That CP really helps to finish it off now. Looks 100% better without the X-Arcade. A lot of people knock the X-Arcade but it helps people get into the hobby at least. Then they move on from that just like you have. I started with one myself... eventually sold it and converted a generic arcade cabinet to Mame with J-Pac and Arcade VGA etc..... then sold that and built my own CP from scratch with a laptop inside. A portable Mame arcade. :p

Gratz on the cabinet. Your woodworking skills are much better than mine. If I had a penchant for woodworking added with my love for all things retro arcade.... hello no... it doesn't bear thinking about!  :lol

Epyx

  • Trade Count: (+1)
  • Full Member
  • ***
  • Offline Offline
  • Posts: 1961
  • Last login:December 25, 2023, 07:56:36 pm
  • "You're an oddity"
Re: The Blue Lightning Project (Update July 5, 2009)
« Reply #47 on: July 06, 2009, 10:40:34 am »
LeedsFan

Guess we will just have to agree to disagree about my woodworking skills lol!

I will admit I have gotten better since starting this hobby and I expect much better things from the next cab.

Completely agree about the X-Arcade...besides it still make a nice portable controller for my bartop plus with the Dreamcast/Ps3 adapters its still a decent party CP to transport around.
Last Project


Epyx Tutorials:
Tutorials

Epyx

  • Trade Count: (+1)
  • Full Member
  • ***
  • Offline Offline
  • Posts: 1961
  • Last login:December 25, 2023, 07:56:36 pm
  • "You're an oddity"
Re: The Blue Lightning Project (Update July 5, 2009)
« Reply #48 on: July 10, 2009, 12:09:20 pm »
I have a question regarding my WG D9800 which arrived yesterday (I couldn't believe the difference when I plugged it in...don't get me wrong the LCD is fine but the authentic...wowsers). 

In my scouring of the forums I see that most are mounting these with proper mounting kits (universal etc). Is there any harm in just placing the D9800 on the same shelf I had the tv on? I would of course add a stop to prevent the tube from sliding (and raise the tail end a bit to get the right angle) but just wondering if there is any harm in simply having it sit on a shelf as opposed to suspended in official brackets?

Thanks!
Last Project


Epyx Tutorials:
Tutorials

Epyx

  • Trade Count: (+1)
  • Full Member
  • ***
  • Offline Offline
  • Posts: 1961
  • Last login:December 25, 2023, 07:56:36 pm
  • "You're an oddity"
Re: The Blue Lightning Project (Update July 5, 2009)
« Reply #49 on: July 19, 2009, 11:25:37 pm »
Decided to recut a new Formica overlay as the first had a few chips that were noticeable...finally got a nice clean.  I sandwiched the Formica between the CP and another piece of MDF. Used 1/2 spade bit to drill pilot holes for 1 1/8" button holes and then used Router to trim with flush bit. Drilled carriage bolt holes. I should have done it like this the first time...so easy.

Also began the process of wiring my CP. I want a modular design and after scouring the boards have gone with a Cat5 modular design. Still deciding on a way to mount the IPAC and its wire harness (5 cat 5 plugs 2 for each player and 1 for ground) to the bottom of the CP. Eventually I want a little box for the IP with flush Cat 5 female plugs so whatever I decide for the bottom of the CP will just be temporary.

Completed some of the wiring for player 1 as well. Pictures show the cat 5 plugs.  Eventually the Cat 5 female plugs will sit in a row underneath each player side on the CP for easy plug in...right now ill just plug them in and let the flop ;)  This week TT2 spinner should arrive and I will continue to wire the CP and finish Player 2 and the ground plug.


« Last Edit: July 19, 2009, 11:34:13 pm by Epyx »
Last Project


Epyx Tutorials:
Tutorials

drventure

  • Trade Count: (+2)
  • Full Member
  • ***
  • Offline Offline
  • Posts: 4152
  • Last login:April 23, 2024, 06:53:06 pm
  • Laser Death Ray Bargain Bin! Make me an offer!
Re: The Blue Lightning Project (Update July 19, 2009)
« Reply #50 on: July 19, 2009, 11:40:28 pm »
Hey Epyx
Sorry I missed your question. Sounds like you ended up doing exactly what I did. A spade bit cuts formica really well, I only used a router trim bit for the edge trim. All the holes I did with a spade bit or a hole saw (for the trackball and flight stick.).

Looks like it's coming along nicely!

Epyx

  • Trade Count: (+1)
  • Full Member
  • ***
  • Offline Offline
  • Posts: 1961
  • Last login:December 25, 2023, 07:56:36 pm
  • "You're an oddity"
Re: The Blue Lightning Project (Update July 19, 2009)
« Reply #51 on: July 19, 2009, 11:43:41 pm »
Hehe no worries. I just got paranoid using a 1 1/8" spade cause I kept getting small cracks. With the 1/2" bit I could afford a crack or two and still cover it up ;)
Last Project


Epyx Tutorials:
Tutorials

Epyx

  • Trade Count: (+1)
  • Full Member
  • ***
  • Offline Offline
  • Posts: 1961
  • Last login:December 25, 2023, 07:56:36 pm
  • "You're an oddity"
Re: The Blue Lightning Project (Update July 19, 2009)
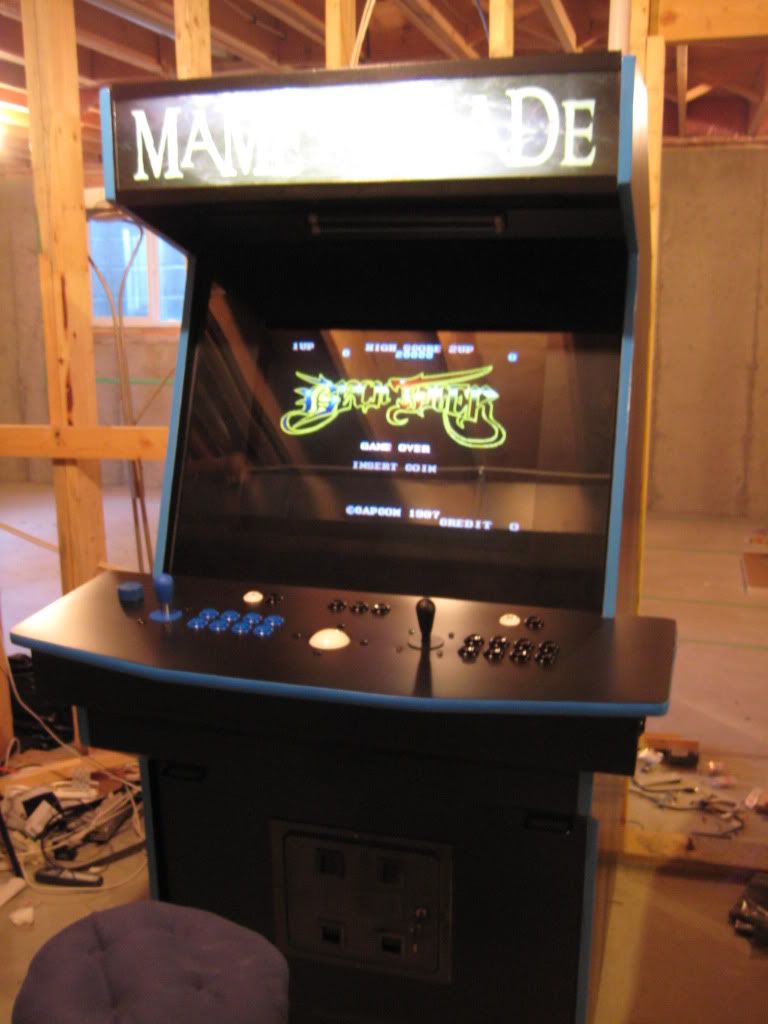
« Reply #52 on: July 22, 2009, 12:34:12 am »
Everyone's probably sick of seeing this mediocre cab getting bumped up with updates. However, its my first cab and I've finally finished the control panel.  Now I will just replace the marquee with something more exciting, and get some matching artwork for the bezel and sides. I will keep the CP plain black with laminate as I kind of like it...can (and will) get fancier with the next upright.

Thanks to everyone for their assistance and my many PM questions...it has been appreciated.


« Last Edit: July 22, 2009, 12:35:51 am by Epyx »
Last Project


Epyx Tutorials:
Tutorials

drventure

  • Trade Count: (+2)
  • Full Member
  • ***
  • Offline Offline
  • Posts: 4152
  • Last login:April 23, 2024, 06:53:06 pm
  • Laser Death Ray Bargain Bin! Make me an offer!
Re: The Blue Lightning Project (Complete save artwork July 21, 2009)
« Reply #53 on: July 22, 2009, 12:45:51 am »
I dunno. Looks pretty good to me  :applaud:

I guess now it's time to get back to building that house in the background (ya gotta have priorities, right  :)


Epyx

  • Trade Count: (+1)
  • Full Member
  • ***
  • Offline Offline
  • Posts: 1961
  • Last login:December 25, 2023, 07:56:36 pm
  • "You're an oddity"
Re: The Blue Lightning Project (Complete save artwork July 21, 2009)
« Reply #54 on: July 22, 2009, 12:51:40 am »
Lol...when we purchased the house the agreement with my wife was that the basement would be my "man cave"...mini arcade, home theater, gym and full bathroom.

As you can see the only thing completed to date is the arcade cabinet lol.../sigh
Last Project


Epyx Tutorials:
Tutorials