Main Restorations Software Audio/Jukebox/MP3 Everything Else Buy/Sell/Trade
Project Announcements Monitor/Video GroovyMAME Merit/JVL Touchscreen Meet Up Retail Vendors
Driving & Racing Woodworking Software Support Forums Consoles Project Arcade Reviews
Automated Projects Artwork Frontend Support Forums Pinball Forum Discussion Old Boards
Raspberry Pi & Dev Board controls.dat Linux Miscellaneous Arcade Wiki Discussion Old Archives
Lightguns Arcade1Up Try the site in https mode Site News

Unread posts | New Replies | Recent posts | Rules | Chatroom | Wiki | File Repository | RSS | Submit news


Author Topic: Pinky McJuke - Believe it or not, work continues =)  (Read 41682 times)

0 Members and 1 Guest are viewing this topic.

fivslt

  • Trade Count: (0)
  • Full Member
  • ***
  • Offline Offline
  • Posts: 14
  • Last login:July 31, 2009, 02:08:26 pm
Re: Pinky McJuke (Outer Sides + Test Fitting Monitor)
« Reply #40 on: September 23, 2008, 05:23:56 pm »
It is kind of a pity that those cool metal parts are only used as templates.  :banghead: Are you planning to make a ton of these cabs in the future?

Franco B

  • Trade Count: (+10)
  • Full Member
  • ***
  • Offline Offline
  • Posts: 3766
  • Last login:February 15, 2024, 09:14:06 am
Re: Pinky McJuke (Outer Sides + Test Fitting Monitor)
« Reply #41 on: September 24, 2008, 01:52:19 am »
Thanks. The templates do make things much easier, its a little more work to do before hand but its makes things much faster when you get to the routing.

Jav, I'm sure you could make some radius templates with your circle cutting jig could you not? IIRC you can get down to about 3" with it?

I'm sure there are plenty of things about that you could use for smaller (or even larger) radius templates. Tin cans come in loads of different sizes. You could carefully cut away most of the can so you are just left with the bottom and 10mm or so of the side of the can. Drill a couple of holes and you are done. Obviously you are limited to what can sizes you can find but you could base your design around the cans radius I suppose.

zupapa, I'm just planning on making this one for the moment. I do have another touchscreen the same as the one I am using but I was going to use that for a touchscreen bartop/juke. I think I'm now going to make a separate bartop and separate juke so I can use a really good LCD for the bartop. The responce time of these monitors is pretty good but if I'm building a bartop I want to have an awesome monitor in it, (plus it means I get to build a juke AND a bartop :)) Seeing as that is the case I'm may use the templates to build an identical juke for me but I would rather make another design just for fun. Ill hang on to the radius templates tho, I'm sure they will come in handy again sometime.

For the artwork I think I'm going to go for a Pink Panther theme. Thatitalian has been working on the sideart for me and this is what we have come up with so far, what do you think?


Kaytrim

  • I'm too nice a guy
  • Trade Count: (+4)
  • Full Member
  • ***
  • Offline Offline
  • Posts: 2095
  • Last login:September 22, 2015, 04:11:30 pm
Re: Pinky McJuke (Outer Sides + Test Fitting Monitor)
« Reply #42 on: September 24, 2008, 09:45:09 am »
For the artwork I think I'm going to go for a Pink Panther theme. Thatitalian has been working on the sideart for me and this is what we have come up with so far, what do you think?

Cool art theme, go with it. :applaud:

Kaytrim

polaris

  • You're a genius! Sheer genius!
  • Wiki Contributor
  • Trade Count: (+1)
  • Full Member
  • ***
  • Offline Offline
  • Posts: 1405
  • Last login:May 21, 2012, 05:18:59 pm
  • veni vidi congai
Re: Pinky McJuke (Outer Sides + Test Fitting Monitor + Concept Art)
« Reply #43 on: September 24, 2008, 11:00:34 am »
yeah it looks ok i suppose, the juke is a bit sloppily built but still :P

franco i think its about time your account was deleted again , you're too good mate.

the artworks great as is the juke, looking forward to the finish which i suppose will be sometime later giving you time to fabricate some templates and crack a bartop out before bedtime. :laugh:
i'm gonna be asking you for soooo much help when i start building :cheers:
got COLOR codes from projects, post them here

add stuff to the uk wiki section

thatitalian

  • Don't worry about the chicken, I feed my friends human all the time...
  • Trade Count: (0)
  • Full Member
  • ***
  • Offline Offline
  • Posts: 887
  • Last login:March 27, 2018, 10:52:37 am
  • The Revolution Is Coming...
Re: Pinky McJuke (Outer Sides + Test Fitting Monitor + Concept Art)
« Reply #44 on: September 24, 2008, 11:07:00 am »
i'm gonna be asking you for soooo much help when i start building :cheers:

Join the queue buddy!  ;D :laugh2: ;D

Kaytrim

  • I'm too nice a guy
  • Trade Count: (+4)
  • Full Member
  • ***
  • Offline Offline
  • Posts: 2095
  • Last login:September 22, 2015, 04:11:30 pm
Re: Pinky McJuke (Outer Sides + Test Fitting Monitor + Concept Art)
« Reply #45 on: September 24, 2008, 11:10:54 am »
i'm gonna be asking you for soooo much help when i start building :cheers:

Join the queue buddy!  ;D :laugh2: ;D

Ditto Dude  :laugh2:

Martijn

  • Trade Count: (0)
  • Full Member
  • ***
  • Offline Offline
  • Posts: 822
  • Last login:January 25, 2024, 10:34:36 am
  • Akira!
    • ModMyBox
Re: Pinky McJuke (Outer Sides + Test Fitting Monitor + Concept Art)
« Reply #46 on: September 24, 2008, 11:31:17 am »
Very nice color theme... for a girl  ;D

Great work !!  :cheers:

Franco B

  • Trade Count: (+10)
  • Full Member
  • ***
  • Offline Offline
  • Posts: 3766
  • Last login:February 15, 2024, 09:14:06 am
Re: Pinky McJuke (Outer Sides + Test Fitting Monitor + Concept Art)
« Reply #47 on: September 24, 2008, 12:07:29 pm »
Very nice color theme... for a girl  ;D

Great work !!  :cheers:

Don't let Jav here you say that, his dads bigger than yours! :D

Lol, thanks guys. If I can be of any help in anyway you only have to ask. I'm no expert but I'll help where I can.

Had a quick couple of hours this afternoon attaching the inner sides to the end pieces. I used some M6 t-nuts, M6 cap screws and large washers to join them together.  In essentially  it took two hours to drill six holes but I had to make sure everything lined up so that it bolted together correctly and so that (hopefully!) there will be no wobble when its assembled.


I bought 50 Pink LEDs and resistors off ebay today. Im going to order the LED WIZ tomorow along with GP Wiz40. Theres a virtual beer for anyone who guesses what the GP Wiz40 is for  :cheers:


Kaytrim

  • I'm too nice a guy
  • Trade Count: (+4)
  • Full Member
  • ***
  • Offline Offline
  • Posts: 2095
  • Last login:September 22, 2015, 04:11:30 pm
Re: Pinky McJuke (Outer Sides + Test Fitting Monitor + Concept Art)
« Reply #48 on: September 24, 2008, 12:20:35 pm »

I bought 50 Pink LEDs and resistors off ebay today. Im going to order the LED WIZ tomorow along with GP Wiz40. Theres a virtual beer for anyone who guesses what the GP Wiz40 is for  :cheers:


You are going to build a controller to connect via USB  Talk about portability.  :applaud:

javeryh

  • Trade Count: (+1)
  • Full Member
  • ***
  • Offline Offline
  • Posts: 7917
  • Last login:Yesterday at 12:18:00 pm
Re: Pinky McJuke (Outer Sides + Test Fitting Monitor + Concept Art)
« Reply #49 on: September 24, 2008, 12:34:31 pm »
Very nice color theme... for a girl  ;D

Great work !!  :cheers:

Hey!  I resemble that remark!   ;D

Great work Franco - you are flying through this build.   Lately I can't seem to get a night off from work to continue building.  I won't be making any progress tonight either - today is Bella's 4th birthday and we will be celebrating with some cake and some Frogger (her favorite right now) when I get home from work.  :cheers:

thatitalian

  • Don't worry about the chicken, I feed my friends human all the time...
  • Trade Count: (0)
  • Full Member
  • ***
  • Offline Offline
  • Posts: 887
  • Last login:March 27, 2018, 10:52:37 am
  • The Revolution Is Coming...
Re: Pinky McJuke (Outer Sides + Test Fitting Monitor + Concept Art)
« Reply #50 on: September 24, 2008, 12:39:11 pm »
Happy Birthday dude! To Bella I mean...

Franco B

  • Trade Count: (+10)
  • Full Member
  • ***
  • Offline Offline
  • Posts: 3766
  • Last login:February 15, 2024, 09:14:06 am
Re: Pinky McJuke (Outer Sides + Test Fitting Monitor + Concept Art)
« Reply #51 on: September 24, 2008, 02:30:54 pm »
Happy birthday to Bella!


I bought 50 Pink LEDs and resistors off ebay today. I'm going to order the LED WIZ tomorrow along with GP Wiz40. Theres a virtual beer for anyone who guesses what the GP Wiz40 is for  :cheers:


You are going to build a controller to connect via USB  Talk about portability.  :applaud:

Very close buddy, close enough anyway!

I'm going to make her a detachable CP but it will be connected by a d-sub. I would just put the GP Wiz in the CP but I need it in the juke for a couple of reasons.

1) I'm going to have another d-sub connection on the back of the juke so I can attach a CP for me to play on too.

Ive been trying to find some suitable pink multicored cable to wire to the CP/d-sub but suprise suprise there isn't much available. I think I'm going to double up a length of pink cat 5 cable which should give me 16 wires IIRC. I have thought of a nice way to attach the cables to each other which should fit with the colour scheme.


2) I'm planning on using some touch sensitive PCBs for 'admin' buttons:


Basically there is a 3 lead harness that connects to them. +5v power, switch output (to the GP Wiz, hence needing the GP Wiz inside the juke) and ground. I have tested the PCBs so far and they work though ~2mm plastic/glass. I'm hoping to route out the acrylic either side of the speakers and mount two of the switches on either side. Ill get some graphics printed to show/label the buttons.

Two of the buttons will control volume up/down. At least one of the buttons will cycle between the LED Blinky sequences (.lwax's). I should have one other button available, which I will probably use for mute. Are there any other buttons that I will need on the juke? (I'm going to have a power button on the back btw)


drawfull

  • Trade Count: (0)
  • Full Member
  • ***
  • Offline Offline
  • Posts: 463
  • Last login:May 18, 2012, 09:30:14 am
Re: Pinky McJuke (Outer Sides + Test Fitting Monitor + Concept Art)
« Reply #52 on: September 24, 2008, 02:44:07 pm »
This looks cool. I have a project to complete by xmas as we know. Where did you get the touch sensitive pcbs from? Just what I need!

Cheers

Kaytrim

  • I'm too nice a guy
  • Trade Count: (+4)
  • Full Member
  • ***
  • Offline Offline
  • Posts: 2095
  • Last login:September 22, 2015, 04:11:30 pm
Re: Pinky McJuke (Outer Sides + Test Fitting Monitor + Concept Art)
« Reply #53 on: September 24, 2008, 02:57:39 pm »
2) I'm planning on using some touch sensitive PCBs for 'admin' buttons:


Basically there is a 3 lead harness that connects to them. +5v power, switch output (to the GP Wiz, hence needing the GP Wiz inside the juke) and ground. I have tested the PCBs so far and they work though ~2mm plastic/glass. I'm hoping to route out the acrylic either side of the speakers and mount two of the switches on either side. Ill get some graphics printed to show/label the buttons.

Two of the buttons will control volume up/down. At least one of the buttons will cycle between the LED Blinky sequences (.lwax's). I should have one other button available, which I will probably use for mute. Are there any other buttons that I will need on the juke? (I'm going to have a power button on the back btw)


Where did you get these little gems?  I might have a use for them in my juke.

TTFN :cheers:

thatitalian

  • Don't worry about the chicken, I feed my friends human all the time...
  • Trade Count: (0)
  • Full Member
  • ***
  • Offline Offline
  • Posts: 887
  • Last login:March 27, 2018, 10:52:37 am
  • The Revolution Is Coming...
Re: Pinky McJuke (Outer Sides + Test Fitting Monitor + Concept Art)
« Reply #54 on: September 24, 2008, 06:22:55 pm »
Another possible concept.
« Last Edit: September 24, 2008, 06:25:45 pm by thatitalian »

polaris

  • You're a genius! Sheer genius!
  • Wiki Contributor
  • Trade Count: (+1)
  • Full Member
  • ***
  • Offline Offline
  • Posts: 1405
  • Last login:May 21, 2012, 05:18:59 pm
  • veni vidi congai
Re: Pinky McJuke (Outer Sides + Test Fitting Monitor + Concept Art)
« Reply #55 on: September 24, 2008, 06:44:11 pm »
Im just putting it out there im not 100% convinced about the name and whether id have any text on the side as opposed to just the artwork
got COLOR codes from projects, post them here

add stuff to the uk wiki section

somunny

  • Trade Count: (+8)
  • Full Member
  • ***
  • Offline Offline
  • Posts: 1618
  • Last login:September 05, 2018, 02:22:25 pm
  • Is it hot in here?
Re: Pinky McJuke (Outer Sides + Test Fitting Monitor + Concept Art)
« Reply #56 on: September 24, 2008, 07:39:04 pm »
I totally missed this one!  Stellar work, as usual.  :applaud:

javeryh

  • Trade Count: (+1)
  • Full Member
  • ***
  • Offline Offline
  • Posts: 7917
  • Last login:Yesterday at 12:18:00 pm
Re: Pinky McJuke (Outer Sides + Test Fitting Monitor + Concept Art)
« Reply #57 on: September 24, 2008, 11:19:41 pm »
Im just putting it out there im not 100% convinced about the name and whether id have any text on the side as opposed to just the artwork

I'll second this.  Just a suggestion - try seeing what it would look like without the name, without the Pink Panther and replacing the paw prints with random music notes (in the medium pink to match the circles) - also get rid of the white border so the whole thing is pink.  I think in the long run you will like it better with something subtle.   :cheers:

thatitalian

  • Don't worry about the chicken, I feed my friends human all the time...
  • Trade Count: (0)
  • Full Member
  • ***
  • Offline Offline
  • Posts: 887
  • Last login:March 27, 2018, 10:52:37 am
  • The Revolution Is Coming...
Re: Pinky McJuke (Outer Sides + Test Fitting Monitor + Concept Art)
« Reply #58 on: September 25, 2008, 05:18:23 am »
Okey dokey, will do an update tonight and post it (that is tonight UK time).

Martijn

  • Trade Count: (0)
  • Full Member
  • ***
  • Offline Offline
  • Posts: 822
  • Last login:January 25, 2024, 10:34:36 am
  • Akira!
    • ModMyBox
Re: Pinky McJuke (Outer Sides + Test Fitting Monitor + Concept Art)
« Reply #59 on: September 25, 2008, 08:01:40 am »
Another possible concept.

I like the first one better then this one.

thatitalian

  • Don't worry about the chicken, I feed my friends human all the time...
  • Trade Count: (0)
  • Full Member
  • ***
  • Offline Offline
  • Posts: 887
  • Last login:March 27, 2018, 10:52:37 am
  • The Revolution Is Coming...
Re: Pinky McJuke (Outer Sides + Test Fitting Monitor + Concept Art)
« Reply #60 on: September 25, 2008, 03:17:21 pm »
Another 2 concepts as requested.
« Last Edit: September 25, 2008, 03:20:11 pm by thatitalian »

javeryh

  • Trade Count: (+1)
  • Full Member
  • ***
  • Offline Offline
  • Posts: 7917
  • Last login:Yesterday at 12:18:00 pm
Re: Pinky McJuke (Outer Sides + Test Fitting Monitor + Concept Art)
« Reply #61 on: September 25, 2008, 05:04:20 pm »
Of course I like the top one  ;D

Nice work!  I'll see if I can think of any refinements but you pretty much nailed what I pictured in my head.

JackTucky

  • Trade Count: (+1)
  • Full Member
  • ***
  • Offline Offline
  • Posts: 1613
  • Last login:January 04, 2021, 12:00:58 pm
  • Soon I will post that I am a triathalete
Re: Pinky McJuke (Outer Sides + Test Fitting Monitor + Concept Art)
« Reply #62 on: September 25, 2008, 05:28:04 pm »
This does look great.  I hate to be Chaddy, but will that thing fall over when you touch the screen?  Is there enough weight in the bottom?
Well, that's where we go a-ridin' into town, a whampin' and whompin' every livin' thing that moves within an inch of its life. Except the women folks, of course.

Donkey_Kong

  • heh. I dont know what it stands for but I'm immature and thats hilarious.
  • Trade Count: (+14)
  • Full Member
  • ***
  • Offline Offline
  • Posts: 1693
  • Last login:October 20, 2019, 12:39:54 am
    • CNC Machines
Carved Signs, Custom Gameroom Signs, and Arcade Game Decor and now CNC MACHINES by Melissa Jones

Franco B

  • Trade Count: (+10)
  • Full Member
  • ***
  • Offline Offline
  • Posts: 3766
  • Last login:February 15, 2024, 09:14:06 am
Re: Pinky McJuke (Outer Sides + Test Fitting Monitor + Concept Art)
« Reply #64 on: September 26, 2008, 02:15:41 am »
Thanks for the input guys. Yeah I think you are right, in the long run a more subtle graphic will be better. I like the new designs, I'm leading towards the one with out the stave.

drawfull and Kaytrim. I got the PCBs off the masterful mountain. He managed to get hold of some discontinued prototypes and he kindly offered to trade me the last couple that he had.

JackChaddy (:D), I was concerned about the stability myself but when I test fitted the monitor in the assembly (with no other support etc) it was suprising stable. I gave it a good few pokes and it isn't going anywhere. There is still the speakers, PSU etc to go in the bottom so I'm not worried about the stability, thanks for your concern though.

I'm at work at the moment but it looks like its going to be a nice day so I think I'm going to leave at 10am and have a good days work on it. :)
« Last Edit: September 26, 2008, 03:34:10 am by Franco B »

drawfull

  • Trade Count: (0)
  • Full Member
  • ***
  • Offline Offline
  • Posts: 463
  • Last login:May 18, 2012, 09:30:14 am
Re: Pinky McJuke (Outer Sides + Test Fitting Monitor + Concept Art)
« Reply #65 on: September 26, 2008, 01:09:56 pm »
Shame about those PCBs; I think I'm going to use a mini PIR detector instead to turn it on / off - the one I have in mind is volt-free so should be perfect. Wave hand under front et voila - similar to the Bang and Olufsen stereo with sliding acrylic dust cover.

Also gonna use one on my SW bartop too to play samples as you pass the unit.

Cheers

Franco B

  • Trade Count: (+10)
  • Full Member
  • ***
  • Offline Offline
  • Posts: 3766
  • Last login:February 15, 2024, 09:14:06 am
Re: Pinky McJuke (Outer Sides + Test Fitting Monitor + Concept Art)
« Reply #66 on: September 26, 2008, 01:26:13 pm »
Do you have any more information about the mini PIR detector? Im looking for a place to mount the on off/button but it would be pretty sweet if you could wave your hand under the juke to turn it on :)

Ive been working on pinky from about 11am-5pm today and all I managed to do was to make a few brackets, cut the back and bottom panel out and mount the back panel with some of the brackets. So much for fast work, heh.  :D

drawfull

  • Trade Count: (0)
  • Full Member
  • ***
  • Offline Offline
  • Posts: 463
  • Last login:May 18, 2012, 09:30:14 am
Re: Pinky McJuke (Outer Sides + Test Fitting Monitor + Concept Art)
« Reply #67 on: September 26, 2008, 01:38:51 pm »
I used to work for the manufacturer of the PIR

I have a box (or 4, or 8 heh) of them. It's a two-part unit (detector and brain). The data sheet isn't great (and I wrote it  ::)) and the installation instructions aren't either. Yep I wrote those too.  :dunno

You can grab them from www.ex-or.com - here. You want the MSM2000A as it's the one with the volt-free output and DHx - x=White or Silver, but they'r easy to decase if you wanted the smallest hole possible. Also, this one has an analogue 1-10V output and inbuit (simple) scene setting meaning you can have funky lighting effects if you went with RGB lamps and enough 'brains'. Send me a PM if you need more info on what else they do. 

Cheers

edit: I was only the product manager...  :dunno, doesn't have a volt free out but the relay terminals are easy to hack >:D oops
« Last Edit: September 26, 2008, 01:45:27 pm by drawfull »

Franco B

  • Trade Count: (+10)
  • Full Member
  • ***
  • Offline Offline
  • Posts: 3766
  • Last login:February 15, 2024, 09:14:06 am
Re: Pinky McJuke (Outer Sides + Test Fitting Monitor + Concept Art)
« Reply #68 on: September 28, 2008, 01:19:49 pm »
Thanks for the info. I was thinking about putting one under the juke but there isn't quite enough room to get your hand/finger under. Ill definitely keep them in mind for another project tho.

Made a bit more progress with the juke.

Ive cut the back and bottom panel out of 12mm MDF and fastened them with some brackets I made from some aluminium section:


Ive also started to get the speakers mounted. I need to remake the bracket as the router grabbed when I was routing it. I was trying to cut corners by routing the piece with too much material on rather than removing the excess. That will teach me.


Here's a couple of shots with the monitor in too:


The whole of the monitor and speakers will be covered in pink acrylic and I'm going to put some mesh in to let the sound out.

As you know there is going to be pink 32 LEDs around the screen, I was going to mount them in a kind of 10mm wide bezel but I'm already using some chrome strip so I decided against it. I still wanted to have something to contrast with the LEDs so Ive made 32 stainless steel 'LEDs' to go in between each pink LED:


I started setting up the hardware last night. I'm going to use a 150GB drive for the moment, I should be able to get plenty of MP3s and games on that. I did a fresh XP install (Ill probably use tiny XP or something down the road) and then installed the motherboard drivers but I seem to have a graphics problem. When I originally tested the monitor on my other PC the image displayed at full screen and fit the monitor. I cant seem to get the image to fit the screen properly with the new setup. The image needs stretching and squashing slightly but there is no stretch feature o the monitors OSD. Any ideas how I can sort it?


waveryder

  • Trade Count: (+1)
  • Full Member
  • ***
  • Offline Offline
  • Posts: 585
  • Last login:July 14, 2011, 04:26:17 am
  • I Troop, therefore I am
    • BubbleGum Custom Art
Re: Pinky McJuke (VGA graphics help needed + update)
« Reply #69 on: September 28, 2008, 01:24:07 pm »
The image needs stretching and squashing slightly but there is no stretch feature o the monitors OSD. Any ideas how I can sort it?


If your GCard supports screen adjustments (ATI's are good for this) you can set it through the management software. Otherwise get powerstrip on there and adjust the screen layout through that. Dont forge to recalibrate the touch afterwards!
http://entechtaiwan.net/util/ps.shtm
When pixelated clipart just wont do, just call for Betty

Franco B

  • Trade Count: (+10)
  • Full Member
  • ***
  • Offline Offline
  • Posts: 3766
  • Last login:February 15, 2024, 09:14:06 am
Re: Pinky McJuke (Ally I/O panel complete)
« Reply #70 on: October 09, 2008, 11:34:21 am »
Cheers waveryder, that app was just what I needed  :cheers:

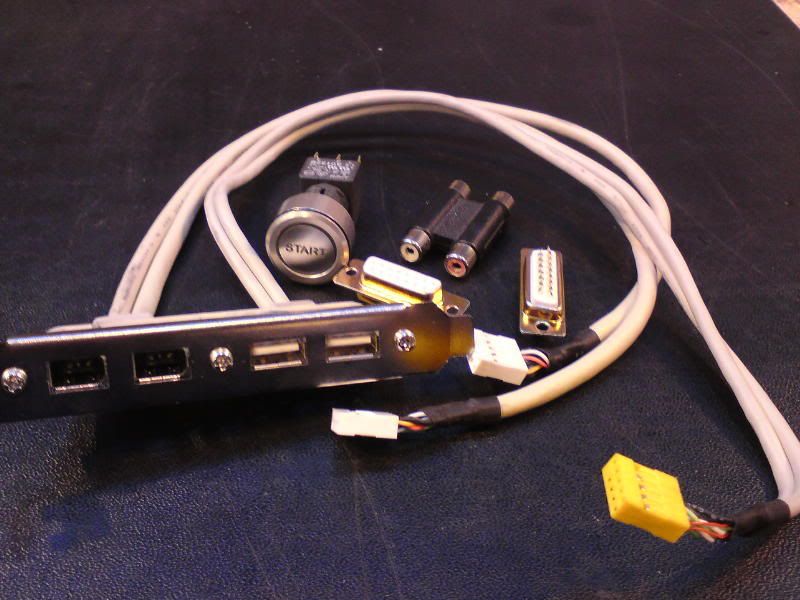
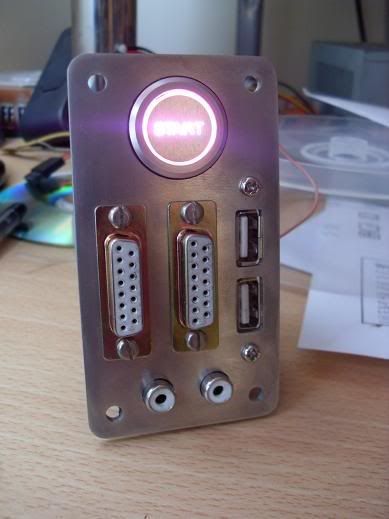
I decided I wanted an I/O panel on the back of Pinky to house a few components. I decided I would go for:

USBs: For maintenance, mass media transfer and also so she can connect her Ipod.

15 Pin D-subs: To connect the two CPs I'm going to make

Twin RCAs: for audio out

Start button: No prizes for guessing that one!

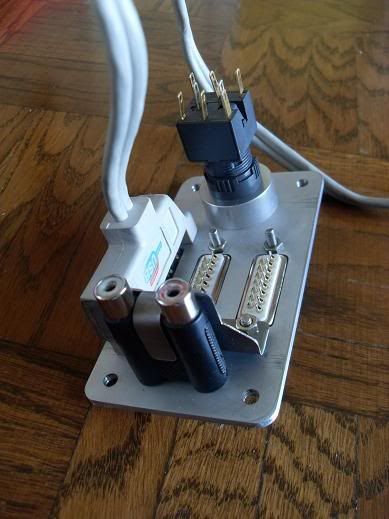
The motherboard came with a twin USB/firewire panel so I thought I would use the USBs from that. The ports connect directly to the motherboard so that will free up the motherboard USBs for the encoder/LED Wiz etc. I also had some 15 pin d-subs lying around and also a RCA coupler so I decided to use them. I'm using a Savage start button designed for a car. It has a blue 12v led in it but I have swapped it out for a pink LED.


I drew the componets to scale in AutoCAD and designed a panel to house them.


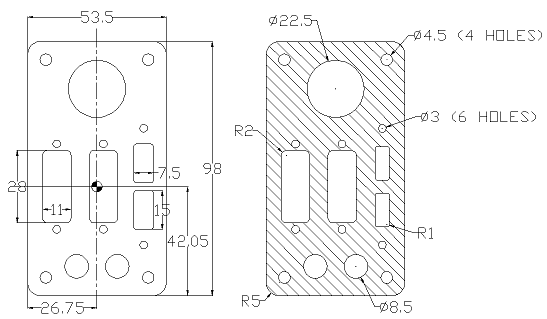
CAD is great for this type of thing as you get a real sense of how the finished product will look and its really handy as you can extract the coordinates from the datum to feed into the CNC mill.

Anywho's here is the finished panel:


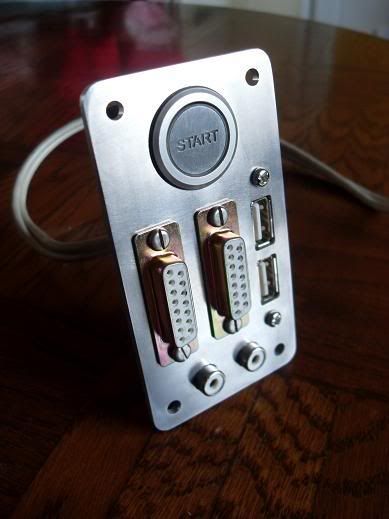
I was going to glue the RCA coupler into position but I decided to make a holding bracket to hold the coupler more securely.


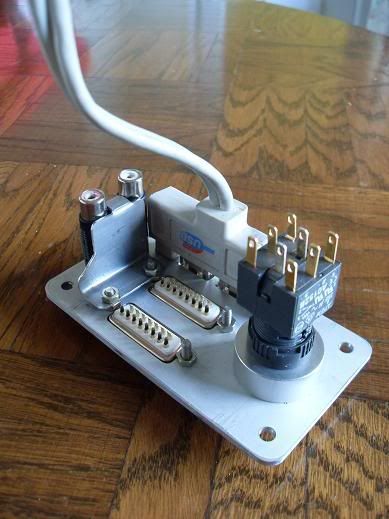
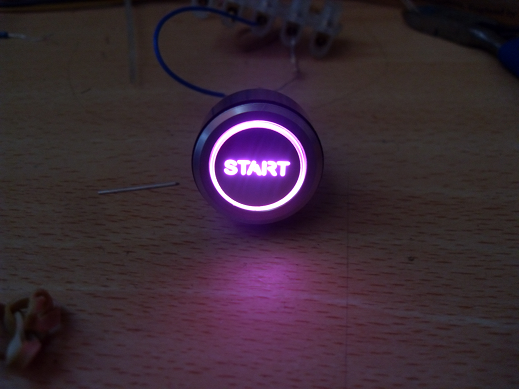
Pic of the panel with the LED on:


Ignore the finger prints and dirt  :D The LED is much more pink than that photo shows. Its closer to this picture but its still not quite accurate.


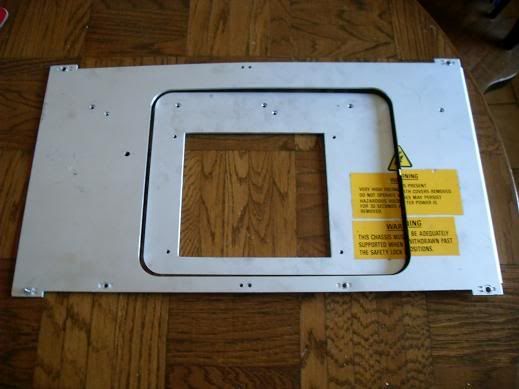
I'm going to have a access door on the back of the juke with a cam lock to close it. The mother board will also be mounted directly to it. I made a twin template by milling a profile with a 3mm endmill. I can use one piece of the template to cut the hole for the door and then use the other part to template route the door itself.


Ive been waiting until I had these parts made before continuing with the build. I'm planning on getting plenty more actual building done next week.


javeryh

  • Trade Count: (+1)
  • Full Member
  • ***
  • Offline Offline
  • Posts: 7917
  • Last login:Yesterday at 12:18:00 pm
Re: Pinky McJuke (CNC'd Ally I/O panel complete)
« Reply #71 on: October 09, 2008, 11:42:00 am »
SICK!!!  I absolutely love that I/O panel as well as the pink LED on the start button.  Amazing amazing work!   :cheers:

Franco B

  • Trade Count: (+10)
  • Full Member
  • ***
  • Offline Offline
  • Posts: 3766
  • Last login:February 15, 2024, 09:14:06 am
Re: Pinky McJuke (CNC'd Ally I/O panel complete)
« Reply #72 on: October 09, 2008, 11:46:01 am »
Thanks bud. I actually ran two off the machine whilst I was at it. I dont suppose the other one is of any use to you is it?

Kaytrim

  • I'm too nice a guy
  • Trade Count: (+4)
  • Full Member
  • ***
  • Offline Offline
  • Posts: 2095
  • Last login:September 22, 2015, 04:11:30 pm
Re: Pinky McJuke (CNC'd Ally I/O panel complete)
« Reply #73 on: October 09, 2008, 11:47:35 am »
Slick work Franco.  You have too much fun working metal. :notworthy:

mountain

  • Trade Count: (+9)
  • Full Member
  • ***
  • Offline Offline
  • Posts: 1205
  • Last login:March 26, 2024, 11:42:28 am
    • Mountain Jukeboxes
Re: Pinky McJuke (CNC'd Ally I/O panel complete)
« Reply #74 on: October 09, 2008, 11:52:02 am »
Very nice! The Pink light on the start switch is a great touch.  :applaud:

Franco B

  • Trade Count: (+10)
  • Full Member
  • ***
  • Offline Offline
  • Posts: 3766
  • Last login:February 15, 2024, 09:14:06 am
Re: Pinky McJuke (CNC'd Ally I/O panel complete)
« Reply #75 on: October 09, 2008, 11:52:50 am »
Thanks Kaytrim. You are right tho, it is far too much fun :)

EDIT: Thanks too mountain, sorry, we posted at the same time.

javeryh

  • Trade Count: (+1)
  • Full Member
  • ***
  • Offline Offline
  • Posts: 7917
  • Last login:Yesterday at 12:18:00 pm
Re: Pinky McJuke (CNC'd Ally I/O panel complete)
« Reply #76 on: October 09, 2008, 12:28:03 pm »
Thanks bud. I actually ran two off the machine whilst I was at it. I dont suppose the other one is of any use to you is it?

PM sent!

Nvts

  • Trade Count: (0)
  • Full Member
  • ***
  • Offline Offline
  • Posts: 76
  • Last login:September 15, 2010, 02:30:14 pm
Re: Pinky McJuke (CNC'd Ally I/O panel complete)
« Reply #77 on: October 09, 2008, 12:54:58 pm »
nice work.  8)   

I'm still working on the front of my juke, so I am not to the back yet.  I was wondering if you would you be interested in creating other IO panels if we had a similar plan?  I was thinking a door in the back as well, but nothing as grand as what you will likely end up with ;)
« Last Edit: October 09, 2008, 01:15:45 pm by Nvts »
"A common mistake that people make when trying to design something completely foolproof was to underestimate the ingenuity of complete fools."

kizer

  • Trade Count: (0)
  • Full Member
  • ***
  • Offline Offline
  • Posts: 200
  • Last login:January 30, 2012, 07:25:30 pm
    • Links4jeeps.com
Re: Pinky McJuke (CNC'd Ally I/O panel complete)
« Reply #78 on: October 09, 2008, 02:55:13 pm »
Nice panel. The only thing I would of done differently was to mount the serial cables mouting tabs on the inside opposed to the outside so it gave a more cleaner look.

Otherwise I think its really clean work.

Franco B

  • Trade Count: (+10)
  • Full Member
  • ***
  • Offline Offline
  • Posts: 3766
  • Last login:February 15, 2024, 09:14:06 am
Re: Pinky McJuke (CNC'd Ally I/O panel complete)
« Reply #79 on: October 10, 2008, 01:48:04 am »
nice work.  8)   

I'm still working on the front of my juke, so I am not to the back yet.  I was wondering if you would you be interested in creating other IO panels if we had a similar plan?  I was thinking a door in the back as well, but nothing as grand as what you will likely end up with ;)

Thanks Nvts. I would love to make a panel for you but they just take too long to mill on my CNC mill, it took me nearly a whole shift to mill those two panels out. What you really want is to have them laser/water jet cut. prOk offers such a service, check out  [this] thread. He will need a .dfx (AutoCAD file) to get a quote for you but I would be happy to create one for you. It would only take a couple of minutes to laser cut the panel out compared to 'x' hours on my CNC mill. Let me know if you need any help with the .dfx etc.

Nice panel. The only thing I would of done differently was to mount the serial cables mounting tabs on the inside opposed to the outside so it gave a more cleaner look.

Otherwise I think its really clean work.

Thanks kizer. In an ideal world I would have had the d-subs on the inside of the panel. The problem is that you would need a very thin panel so that the d-subs stick through far enough to allow the male d-subs to mate with them. Ideally I would have made the panel from ~1mm stainless but it would have been hard to mill some for the pockets as I had to use a 2mm slot drill to achieve the 1mm radii required for the corners for the USBs. It is possible to mill such pockets in 1mm stainless but the machine I used cannot reach the ~10,000rpm needed for the 2mm slot drill to cut stainless. I managed to cut the ally taking very small cuts at a lower speed to interpolate the pockets. I could have had the panel lasered but I like to make things myself and I just had to make do with the tooling and materials that I have available to me.