Main Restorations Software Audio/Jukebox/MP3 Everything Else Buy/Sell/Trade
Project Announcements Monitor/Video GroovyMAME Merit/JVL Touchscreen Meet Up Retail Vendors
Driving & Racing Woodworking Software Support Forums Consoles Project Arcade Reviews
Automated Projects Artwork Frontend Support Forums Pinball Forum Discussion Old Boards
Raspberry Pi & Dev Board controls.dat Linux Miscellaneous Arcade Wiki Discussion Old Archives
Lightguns Arcade1Up Try the site in https mode Site News

Unread posts | New Replies | Recent posts | Rules | Chatroom | Wiki | File Repository | RSS | Submit news


Author Topic: New Jukebox - Wurlitzer style - Spring construction has begun!  (Read 52827 times)

0 Members and 1 Guest are viewing this topic.

Franco B

  • Trade Count: (+10)
  • Full Member
  • ***
  • Offline Offline
  • Posts: 3766
  • Last login:February 15, 2024, 09:14:06 am
Re: New Jukebox - Wurlitzer style - Construction has begun!
« Reply #40 on: July 10, 2008, 09:58:20 am »
Dammit!!  :hissy: I can't see youtube videos at work (cough cough, I mean on this certain PC at home).

Im going to have to wait until I get home tomorrow to see. (Unless you have a photobucket account you can upload to, I can see videos hosted there  :)

I wanna see :-[

mccoy178

  • It's hard to work with a straight jacket on
  • Trade Count: (+9)
  • Full Member
  • ***
  • Offline Offline
  • Posts: 3127
  • Last login:September 03, 2021, 10:23:42 am
  • Go Bucks!
Re: New Jukebox - Wurlitzer style - Construction has begun!
« Reply #41 on: July 10, 2008, 10:44:58 am »
I can't believe you did all that in one night.  It looks like everything was cut PERFECTLY too.  I am jealous of your skills and your awesome woodshop.  This thing is going to be great!   :cheers:
Well, I would like to take credit for the leet cutting skillz, but I must give credit where credit is due.  The shopbot cnc did the cutting.  I just drew what I wanted on the laptop.

Dammit!!  :hissy: I can't see youtube videos at work (cough cough, I mean on this certain PC at home).

Im going to have to wait until I get home tomorrow to see. (Unless you have a photobucket account you can upload to, I can see videos hosted there  :)

I wanna see :-[
Sorry brother, it's 135mb.  That's why it didn't get posted last night because it wasn't done by the time I passed out. :cheers:

Franco B

  • Trade Count: (+10)
  • Full Member
  • ***
  • Offline Offline
  • Posts: 3766
  • Last login:February 15, 2024, 09:14:06 am
Re: New Jukebox - Wurlitzer style - Construction has begun!
« Reply #42 on: July 10, 2008, 10:50:20 am »
Ah well, all good things come to those who wait. Im sure its worth it   :cheers:

mccoy178

  • It's hard to work with a straight jacket on
  • Trade Count: (+9)
  • Full Member
  • ***
  • Offline Offline
  • Posts: 3127
  • Last login:September 03, 2021, 10:23:42 am
  • Go Bucks!
Re: New Jukebox - Wurlitzer style - Construction has begun!
« Reply #43 on: July 11, 2008, 12:25:21 am »
Well, after further review, I decided that the current cabinet is too big.  It's measurements are 36" wide x 60" tall x 25" deep.  I have just spent the last 3.5 hours redrawing everything and changing some of the design.  The new measurements are 32" wide x 58" tall x 20" deep.  I think it will look a little skinnier, but it won't stick out into the room so far.  As I post this, it is about 12:30 am.  I will report back later after things are cut and that should tell how long the process of cutting takes. :dizzy:

mccoy178

  • It's hard to work with a straight jacket on
  • Trade Count: (+9)
  • Full Member
  • ***
  • Offline Offline
  • Posts: 3127
  • Last login:September 03, 2021, 10:23:42 am
  • Go Bucks!
Re: New Jukebox - Wurlitzer style - Construction has rebegun!
« Reply #44 on: July 11, 2008, 03:32:53 am »
Each sheet took about an hour each and after sanding and assembly it took around 3 hours total.  I made a couple simple mistakes, but I like the tab system of holding it together.  I plan on expanding on that idea tomorrow, (or later today I guess).  Here are some pictures for your enjoyment.  I hope by the end of tomorrow I have it about 70-80% done.  That is the tremendously huge advantage of the cnc.  The great news is that once it is built, I can reproduce it by just selecting that file on the laptop. :cheers:
Here is the shopbot in action:


Here is the new and the old sitting together in harmony:


Here are some various pics of the cabinet:


Barry Barcrest

  • I'm only in it for the lack of money
  • Trade Count: (+2)
  • Full Member
  • ***
  • Offline Offline
  • Posts: 1620
  • Last login:November 09, 2021, 09:54:17 am
  • Simple Plan
    • E-Touch Jukebox
Re: New Jukebox - Wurlitzer style - Construction has rebegun!
« Reply #45 on: July 11, 2008, 10:47:43 am »
So you may be offering these as kits then dude  >:D

javeryh

  • Trade Count: (+1)
  • Full Member
  • ***
  • Offline Offline
  • Posts: 7959
  • Last login:July 24, 2025, 06:01:51 pm
Re: New Jukebox - Wurlitzer style - Construction has rebegun!
« Reply #46 on: July 11, 2008, 11:44:39 am »
Wow CNC machines look like a lot of fun.  Too bad I'll never get to play around with one.   :-[

shardian

  • Saint is the evil mastermind
  • Trade Count: (+23)
  • Full Member
  • ***
  • Offline Offline
  • Posts: 9218
  • Last login:August 21, 2015, 03:11:31 pm
  • Friends don't let friends build frankenpanels...
Re: New Jukebox - Wurlitzer style - Construction has rebegun!
« Reply #47 on: July 11, 2008, 03:56:42 pm »
That is just plain badass how the name of the piece is scribed into the wood. A kit would be very interesting indeed!

mccoy178

  • It's hard to work with a straight jacket on
  • Trade Count: (+9)
  • Full Member
  • ***
  • Offline Offline
  • Posts: 3127
  • Last login:September 03, 2021, 10:23:42 am
  • Go Bucks!
Re: New Jukebox - Wurlitzer style - Construction has rebegun!
« Reply #48 on: July 12, 2008, 03:20:15 am »
I decided to focus on the inside tonight.  Upon consideration of where everything would fit, I decided to keep six inches open behind the speakers for the receiver.  I also determined that the wide screen and the small touchscreen will barely, and I mean barely fit inside the area available.  I'll try to get the touchscreen area done over the weekend and the bubbler areas.  I have 20 rgb's to install, so I was trying to determine how and where to incorporate them all.  Now to the pics:

I decided to make a slide in sleeve type of contraption so that I could build the outsides, slide in the inside, and finish installation.  It took about three hours to draw up all the details, but it was fun.  By having the speakers sitting back appx. 3 inches, I should be able to fit the speaker grills and any lighting in there without issue.  Here is a three pic tutorial on how it went together.


Here is the jukebox with everything sitting in there loose:


Here is a shot of the back.  I did not make a back of the speaker box yet, as I still need to determine where the pressure holes will go and exactly what is going behind it.


And in closing, just a few more shots of the total progress:


I love the idea that this has only cost $70 in material to make so far.  I think that I will be under $125 in wood by the time it's all said and done. :cheers:
« Last Edit: July 12, 2008, 03:21:46 am by mccoy178 »

mountain

  • Trade Count: (+9)
  • Full Member
  • ***
  • Offline Offline
  • Posts: 1205
  • Last login:January 29, 2025, 08:31:47 am
    • Mountain Jukeboxes
Re: New Jukebox - Wurlitzer style - Construction has rebegun!
« Reply #49 on: July 12, 2008, 01:49:14 pm »
Man, that thing is going to be nice! I like those round at the top Jukes ;). Are you re-using the Cerwin Vega's?

mccoy178

  • It's hard to work with a straight jacket on
  • Trade Count: (+9)
  • Full Member
  • ***
  • Offline Offline
  • Posts: 3127
  • Last login:September 03, 2021, 10:23:42 am
  • Go Bucks!
Re: New Jukebox - Wurlitzer style - Construction has rebegun!
« Reply #50 on: July 12, 2008, 06:29:03 pm »
I am indeed reusing the cerwin vega's.  Today I made the shelf for the touch screen and drew up how I wanted the bubbler area to look.  The only issue I continue to mess up is the ribs that hold the top together.  They are a small footprint, so at least making them three or four times isn't using a lot of material.  I kept the touchscreen 1/4" from the front in order to have room for the plexiglass.  Here are some progress pics:


mccoy178

  • It's hard to work with a straight jacket on
  • Trade Count: (+9)
  • Full Member
  • ***
  • Offline Offline
  • Posts: 3127
  • Last login:September 03, 2021, 10:23:42 am
  • Go Bucks!
Re: New Jukebox - Wurlitzer style - Construction has rebegun!
« Reply #51 on: July 14, 2008, 12:32:11 am »
Well, I was hoping to have one whale of an update tonight, but the machine is still cutting.  All day yesterday I thought and thought about the bubbler area and how I wanted it to look.  During the early evening into the night my mind churned.  Even as I went to the movies with the wife and then on to bed I thought.  I almost had it.  Then, around 4am, I woke up with the idea in my head.  It took my about four hours tonight to draw the idea and get the tool pathing done properly, but I will say this, I am very excited to see the results.  I doubt the machine will be done for another couple hours, so I'm going home.  I will throw a pic of it cutting, but no major updates until tomorrow night.

mccoy178

  • It's hard to work with a straight jacket on
  • Trade Count: (+9)
  • Full Member
  • ***
  • Offline Offline
  • Posts: 3127
  • Last login:September 03, 2021, 10:23:42 am
  • Go Bucks!
Re: New Jukebox - Wurlitzer style - Construction has rebegun!
« Reply #52 on: July 14, 2008, 01:47:45 am »
Here are a couple cutting pics.  I don't know if they can be seen or not, but the first two pics are of all the guide holes that will hold everything together.  You can see where I started off with the wrong bit and thought I was going to burn the whole gig down.  The last pic is of where progress was when I left.


javeryh

  • Trade Count: (+1)
  • Full Member
  • ***
  • Offline Offline
  • Posts: 7959
  • Last login:July 24, 2025, 06:01:51 pm
Re: New Jukebox - Wurlitzer style - Construction has rebegun!
« Reply #53 on: July 14, 2008, 10:45:21 am »
Awesome.  So you can design the thing on the computer and the CNC machine will cut everything out exactly?  I assume you can check on the computer to make sure everything will line up once cut?  That is so cool.  I've never seen one of those things in action before... It would take me months to do what you have done in a few days...   :cheers:

mccoy178

  • It's hard to work with a straight jacket on
  • Trade Count: (+9)
  • Full Member
  • ***
  • Offline Offline
  • Posts: 3127
  • Last login:September 03, 2021, 10:23:42 am
  • Go Bucks!
Re: New Jukebox - Wurlitzer style - Construction has rebegun!
« Reply #54 on: July 14, 2008, 11:16:36 am »
Awesome.  So you can design the thing on the computer and the CNC machine will cut everything out exactly?  I assume you can check on the computer to make sure everything will line up once cut?  That is so cool.  I've never seen one of those things in action before... It would take me months to do what you have done in a few days...   :cheers:
There are a couple of ways of accomplishing this.  First, which I am hoping to do in the future, is to design everything in a CAD program like Sketchup, Autocad, ProE, etc., flatten the parts out, then cut them out.  Second, the way I am doing it now, is to design it flat piece by piece and hope that the measurements come out.  So far so good.

mccoy178

  • It's hard to work with a straight jacket on
  • Trade Count: (+9)
  • Full Member
  • ***
  • Offline Offline
  • Posts: 3127
  • Last login:September 03, 2021, 10:23:42 am
  • Go Bucks!
Re: New Jukebox - Wurlitzer style - Construction has rebegun!
« Reply #55 on: July 14, 2008, 12:14:26 pm »
Well, I'm on break for a little while.  A green bean monster is taking all my time! :notworthy:

kizer

  • Trade Count: (0)
  • Full Member
  • ***
  • Offline Offline
  • Posts: 200
  • Last login:January 30, 2012, 07:25:30 pm
    • Links4jeeps.com
Re: New Jukebox - Wurlitzer style - Construction has rebegun!
« Reply #56 on: July 14, 2008, 06:07:54 pm »
That is simply impressive as heck. Wow

mccoy178

  • It's hard to work with a straight jacket on
  • Trade Count: (+9)
  • Full Member
  • ***
  • Offline Offline
  • Posts: 3127
  • Last login:September 03, 2021, 10:23:42 am
  • Go Bucks!
Re: New Jukebox - Wurlitzer style - Construction has rebegun!
« Reply #57 on: July 14, 2008, 06:54:37 pm »
Here is a sneak preview of the pillar/bubbler area.  Everything is held together by the three aluminum rods.  I didn't buy a 4th yet, as I'm still deciding whether or not to just use dow rods and cut the middle/visible parts out.


Jigenjuke

  • Trade Count: (0)
  • Full Member
  • ***
  • Offline Offline
  • Posts: 482
  • Last login:October 02, 2016, 12:00:50 am
Re: New Jukebox - Wurlitzer style - Construction has rebegun!
« Reply #58 on: July 14, 2008, 11:10:54 pm »
Wow!  Great work.  All I wanna ask is when are the kits available and how much is shipping to Japan  ;D

mccoy178

  • It's hard to work with a straight jacket on
  • Trade Count: (+9)
  • Full Member
  • ***
  • Offline Offline
  • Posts: 3127
  • Last login:September 03, 2021, 10:23:42 am
  • Go Bucks!
Re: New Jukebox - Wurlitzer style - Construction has rebegun!
« Reply #59 on: July 15, 2008, 01:44:54 am »
I have decided to take a break on the designing and talk a little bit about how and why I decided to design the bubbler tubes.  I kept looking at the shell and wondering how in the world I would be able to design the tubes and make them something I would like.  If you google Wurlitzer 1015, you will see the traditional design that I wanted to copy.  The link that Shardian posted also had some features that I wanted to incorporate.  The problem that I had was that I had no idea how to create the 3d look.  With the combination of my experience with the cnc, past projects, and just research and poking and proding things I see in the real world, I came up with the current design. 

What was so difficult about what I made was that I made it out of thin air and designed it in 2d on the computer.  It took forever to make sure I had the proper measurements and the holes in the proper places.  Once I had a base to go with, I was able to customize the rest to what I wanted.  Take for example the base.  I decided that I wanted to create a base for the shell to sit on.  In order to do this, I had to layer the pieces together.  In thinking about each layer, I came up with the following adjustments:

The very first piece I designed was the piece that would be the top of the base and connect to the shell.  The bottom of the shell is made of 1/2" pressboard, so I decided to countersink 1/2" into the base piece.  Once I had that, I decided that I wanted the base to have some width to it.  I made it 1" wider all around except in the middle of the front and the rear, where it is 1/2".  Once I had that, I considered the other layers and decided to create 1/4" guide holes that dow rods could be used in to align everything.  Then, after I had everything done, I remembered that I had forgotten the hole for the bubbler tube.  I had to go back and add that hole to 27 pieces!  So, here is the very first piece that was designed on the computer:


Next, I decided to design the rest of the base.  In contemplating how tall I wanted it to be, I decided that two to three inches would be fine.  By adding four 4" circles to the bottom and three layers, that would give me a 2 1/2" addition to the total height of the machine.  Here is the middle section of the base:


When making the very bottom of the base, I decided to add (or leave, depending upon how you look at it) squares in the back to support the bottom 4" discs.  Here is the bottom of the base:


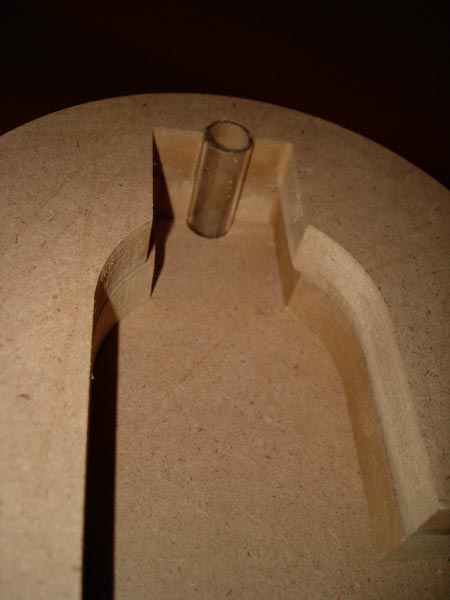
After I went back and added the .630" hole for the bubbler tube, I remembered the plumbing.  To accommodate
 that, I added a square to be cut out so that the area around the bubbler tube would be left open.  Now I can fit a 90 degree elbow at the base.  You can see that I did not go all the way through on the top section of the base, as I forgot about it and I didn't want to go back again.  As it stands, I have 1 1/2"'s to work with and if I need that additional 1/4", I can just use a flush trim bit to open that area up.  Here is the front of all three base sections:
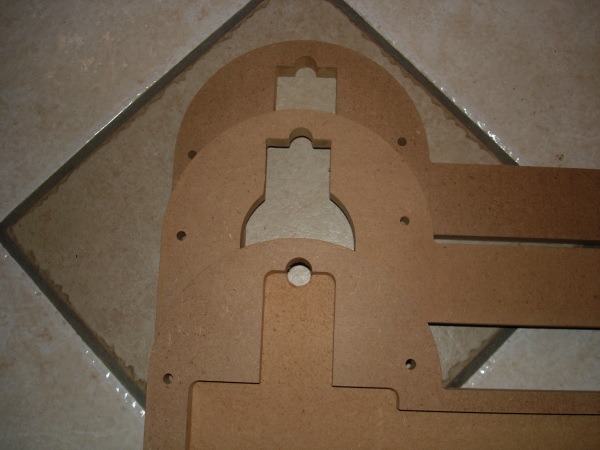

Here is the back of all three base pieces.  As I just copied and pasted that top layer, you can see how I changed each piece on the laptop to suit the needs of each piece:
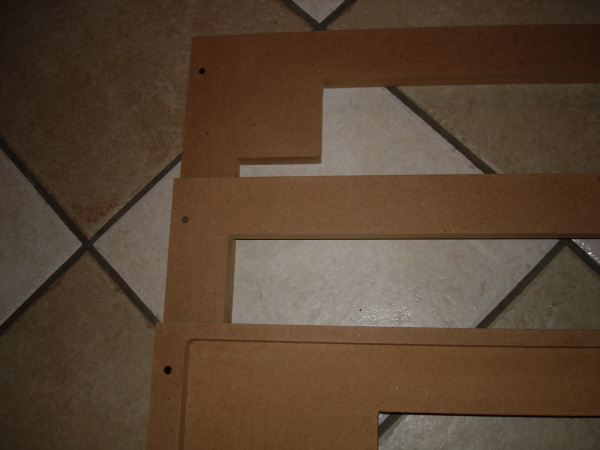

Here is all three pieces sitting together:


Now, I needed to design the pieces that would go up the sides.  A couple of things had to be considered.  1.  It had to not only be aesthetically pleasing, but also functional.  2.  It had to have a 3d look to it, to create "curb appeal" if you will.  3.  It had to be able to hold the light lense and the bubbler tube.  and 4.  It had to be able to easily attach to the shell.

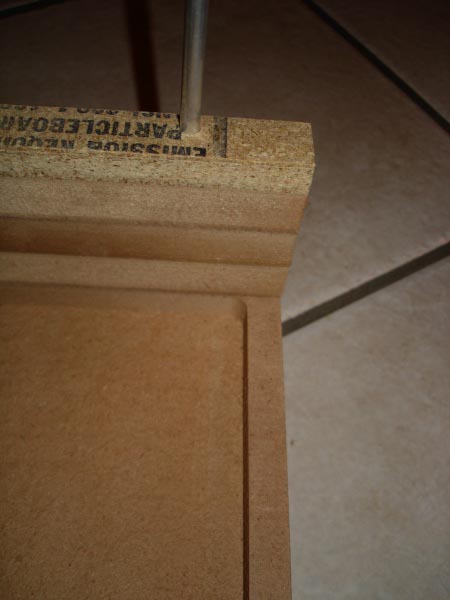
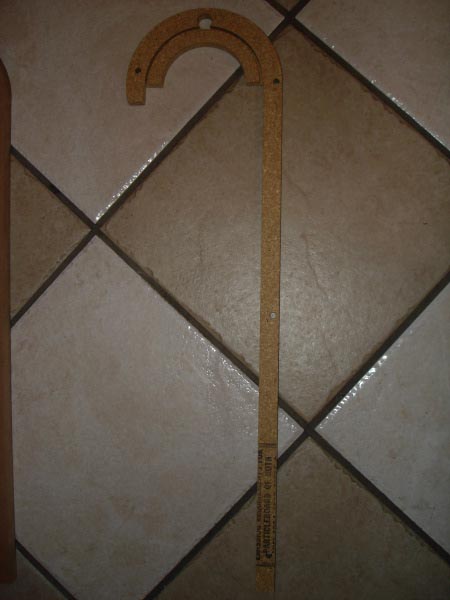
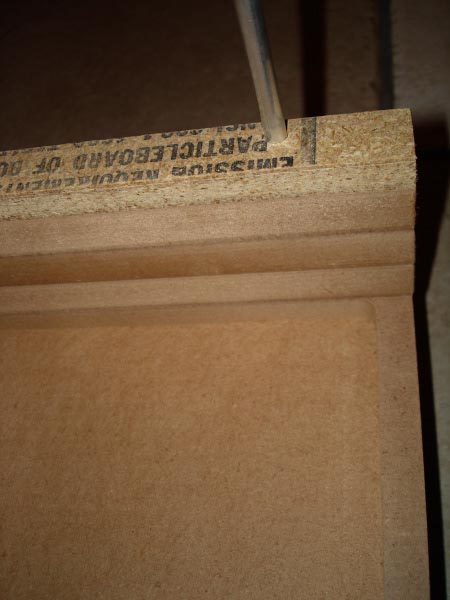
With these things to consider, I started off with some basics.  The fatter pieces would be center pieces in the base, the middle, and the top.  Skinnier, 1/2" press board would be skinnier and have the responsibility of holding the light lense in place.  After those were designed, I started to really look at the shell and see where I could add features to really set the pieces off.  If you look, I added a 3/4" wrap around that hooks into the middle of the machine.  With the 1/4" black plexi, the bubbler pieces will fit right up to the face of the middle.  In the back, I decided to go 1/2" past the edge of the shell.  This will allow for some accented trim pieces and give the juke just that much more "curb appeal".  In the end, there are 14- 3/4" pieces and 8- 1/2" pieces.  Here is an example of the 3/4" mdf middle pieces and a 1/2" pressed board piece with the channel routed for the light lense:


There is to be a 1/4" round over put on each of these to go along with the rounded theme:
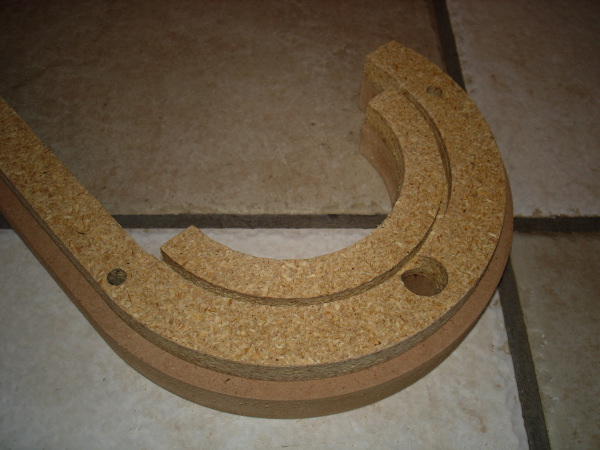

Using the 1/4" guide holes, I am using a piece of aluminum rod for demonstration.  Here is all of the pieces of the base attached:


Here is a view of the back of the base:


Here is the front with everything in place.  Although the light is deceiving, the pieces are alligned perfectly:


Here is the front with the bubbler tube in place:


Here is a shot of the underside with the open area for attaching the plumbing to the bubbler:


Sorry for the long post, but I realized that I hadn't been really explaining any of the ideas or concepts.  It was a nice break to do this and I hope this will help others in their planning of projects. :cheers:


Franco B

  • Trade Count: (+10)
  • Full Member
  • ***
  • Offline Offline
  • Posts: 3766
  • Last login:February 15, 2024, 09:14:06 am
Re: New Jukebox - Wurlitzer style - Bubble tube construction explained.
« Reply #60 on: July 15, 2008, 02:56:24 am »
I really can appreciate the work thats going into this. Respect brother  :cheers:

shardian

  • Saint is the evil mastermind
  • Trade Count: (+23)
  • Full Member
  • ***
  • Offline Offline
  • Posts: 9218
  • Last login:August 21, 2015, 03:11:31 pm
  • Friends don't let friends build frankenpanels...
Re: New Jukebox - Wurlitzer style - Bubble tube construction explained.
« Reply #61 on: July 15, 2008, 01:19:19 pm »
What is the plastic diffuser material you are putting in behind the bubbler tubes? I just re-read the last post and didn't see it mentioned anywhere.

Also, have you looked into diy vacuum forming to make plastics similar to the original bubbler machines? I've seen people make small to medium scale diy vacuum formers. I figure with your skills and access to shop grade equipment, you might be capable of making a 2'x3' vacuum former.

mccoy178

  • It's hard to work with a straight jacket on
  • Trade Count: (+9)
  • Full Member
  • ***
  • Offline Offline
  • Posts: 3127
  • Last login:September 03, 2021, 10:23:42 am
  • Go Bucks!
Re: New Jukebox - Wurlitzer style - Bubble tube construction explained.
« Reply #62 on: July 16, 2008, 02:05:42 am »
What is the plastic diffuser material you are putting in behind the bubbler tubes? I just re-read the last post and didn't see it mentioned anywhere.

Also, have you looked into diy vacuum forming to make plastics similar to the original bubbler machines? I've seen people make small to medium scale diy vacuum formers. I figure with your skills and access to shop grade equipment, you might be capable of making a 2'x3' vacuum former.
I used a 2' x 4' light diffuser from Lowe's.  It cost $7.  I did look into vacuum forming, but I just don't have enough time to truly make it happen the way I would like.

Here is some more pictures I took tonight.  I remade a few parts to adjust how things fit together.  I also remade the insert piece so that the middle monitor was angled back two inches instead of two and a half.  The speaker holes were a little small, so I remade that, as well as a couple of the smaller pieces.  I slapped it all together with the base in just for poops and giggles.


Blanka

  • Trade Count: (+1)
  • Full Member
  • ***
  • Offline Offline
  • Posts: 2248
  • Last login:January 25, 2018, 03:19:28 pm
Re: New Jukebox - Wurlitzer style - Bubble tube construction explained.
« Reply #63 on: July 16, 2008, 02:30:45 am »
If you use a serious speaker system like you did, I would try to make the casing of the speakers more sturdy. Maybe you need to segment it, give each speaker its own box, and for the woofers the box maybe 1.5 inch thick on all sides. Try to keep the boxes from being too rectangular to reduce standing waves. This is especially true for the midrange. The woofers produce too long waves to be affected by a box around 1 feet dimensions. Also fill the boxes with cloth or rockwool. Keep the opening for the wires minimal. Otherwise it is almost a pitty that you bought woofers like that. You limit 80% of their potention if they are mounted in one big hollow space with only 3/4 inch panels. Guess for the weight of your speakers, around 100lb of MDF may be necessary for casing the speakers themselves already.
« Last Edit: July 16, 2008, 02:32:35 am by Blanka »

Donkey_Kong

  • heh. I dont know what it stands for but I'm immature and thats hilarious.
  • Trade Count: (+14)
  • Full Member
  • ***
  • Offline Offline
  • Posts: 1693
  • Last login:October 20, 2019, 12:39:54 am
    • CNC Machines
Re: New Jukebox - Wurlitzer style - Bubble tube construction explained.
« Reply #64 on: July 16, 2008, 02:30:28 pm »
I really been wanting to make a juke now and one of my concerns was high powered vibrations. Is this ever a concern? I mean here you have a pair of (i think 12"?) high powered subs that are all going to be contained with the rest of your components, pc stuff, touchscreens, etc. Will the stuff be vulnerable to damage from vibrations? If so what do you do to address an issue like that on this project? (might not be an issue at all, just wanted to check) Also, what brand/model are you using again for an amp to power the big boomers?

So far it's looking great and you are moving super fast on it, thanks again for sharing your projects with us.

Edit: That's funny, I didn't read blankas post till now. I think his idea is addressing that type of concern??

Otherwise it is almost a pitty that you bought woofers like that.

So what do you suggest...smaller? I think those are spot on for this size of juke myself.
« Last Edit: July 16, 2008, 10:45:46 pm by Donkey_Kong »
Carved Signs, Custom Gameroom Signs, and Arcade Game Decor and now CNC MACHINES by Melissa Jones

mccoy178

  • It's hard to work with a straight jacket on
  • Trade Count: (+9)
  • Full Member
  • ***
  • Offline Offline
  • Posts: 3127
  • Last login:September 03, 2021, 10:23:42 am
  • Go Bucks!
Re: New Jukebox - Wurlitzer style - Bubble tube construction explained.
« Reply #65 on: July 17, 2008, 01:24:13 am »
If you use a serious speaker system like you did, I would try to make the casing of the speakers more sturdy. Maybe you need to segment it, give each speaker its own box, and for the woofers the box maybe 1.5 inch thick on all sides. Try to keep the boxes from being too rectangular to reduce standing waves. This is especially true for the midrange. The woofers produce too long waves to be affected by a box around 1 feet dimensions. Also fill the boxes with cloth or rockwool. Keep the opening for the wires minimal. Otherwise it is almost a pitty that you bought woofers like that. You limit 80% of their potention if they are mounted in one big hollow space with only 3/4 inch panels. Guess for the weight of your speakers, around 100lb of MDF may be necessary for casing the speakers themselves already.
Thanks for the post.   :cheers: I have been wondering about the speaker box considering all six speakers were in the same space.  I have a solution for that I believe.

I really been wanting to make a juke now and one of my concerns was high powered vibrations. Is this ever a concern? I mean here you have a pair of (i think 12"?) high powered subs that are all going to be contained with the rest of your components, pc stuff, touchscreens, etc. Will the stuff be vulnerable to damage from vibrations? If so what do you do to address an issue like that on this project? (might not be an issue at all, just wanted to check) Also, what brand/model are you using again for an amp to power the big boomers?

So far it's looking great and you are moving super fast on it, thanks again for sharing your projects with us.

Edit: That's funny, I didn't read blankas post till now. I think his idea is addressing that type of concern??

Otherwise it is almost a pitty that you bought woofers like that.

So what do you suggest...smaller? I think those are spot on for this size of juke myself.
I didn't have any issues with the other juke as far as vibrations are concerned.  When this is finished, I would be amazed if it vibrates terribly due to the insane weight of the whole machine.  I am using a kenwood receiver to power everything.  The speakers themselves have a small power unit that I attach the speaker wire to that control their output.

Neilyboy

  • Trade Count: (+3)
  • Full Member
  • ***
  • Offline Offline
  • Posts: 501
  • Last login:November 09, 2024, 08:46:40 am
  • what day is it...
Re: New Jukebox - Wurlitzer style - Bubble tube construction explained.
« Reply #66 on: July 17, 2008, 09:33:06 am »
mccoy, holy hell man this is just sick!! you my friend have a true talent!

keep up the great work man I can not wait to see this thing progress.

neil

Donkey_Kong

  • heh. I dont know what it stands for but I'm immature and thats hilarious.
  • Trade Count: (+14)
  • Full Member
  • ***
  • Offline Offline
  • Posts: 1693
  • Last login:October 20, 2019, 12:39:54 am
    • CNC Machines
Re: New Jukebox - Wurlitzer style - Bubble tube construction explained.
« Reply #67 on: July 18, 2008, 01:11:43 am »
I didn't have any issues with the other juke as far as vibrations are concerned.  When this is finished, I would be amazed if it vibrates terribly due to the insane weight of the whole machine.  I am using a kenwood receiver to power everything.  The speakers themselves have a small power unit that I attach the speaker wire to that control their output.

Oh yea i never thought of the overall weight of the juke to hold er down. I'm happy to hear this isn't a concern. I might have to consider some of blanka's suggestions for when I make one. I want to go with some big boomers myself and limiting the performance wouldn't be cool.
Carved Signs, Custom Gameroom Signs, and Arcade Game Decor and now CNC MACHINES by Melissa Jones

mccoy178

  • It's hard to work with a straight jacket on
  • Trade Count: (+9)
  • Full Member
  • ***
  • Offline Offline
  • Posts: 3127
  • Last login:September 03, 2021, 10:23:42 am
  • Go Bucks!
Re: New Jukebox - Wurlitzer style - Bubble tube construction explained.
« Reply #68 on: July 22, 2008, 12:04:09 am »
I decided to take the advice on the speaker box enclosure for the subs.  Thought I would share a website that is very helpful in calculating what size the sub will need. :cheers:

EDIT:  It would probably help if I included the website! :dizzy:
http://www.bcae1.com/spboxnew2.htm
« Last Edit: July 22, 2008, 10:52:59 pm by mccoy178 »

DaOld Man

  • Trade Count: (+4)
  • Full Member
  • ***
  • Offline Offline
  • Posts: 5158
  • Last login:May 24, 2025, 09:57:44 pm
  • Wheres my coffee?
    • Skenny's Outpost
Re: New Jukebox - Wurlitzer style - Bubble tube construction explained.
« Reply #69 on: July 22, 2008, 12:07:25 pm »
I hate you guys with CNC's... (man I wished I could have one too!)
Seriously, you are doing a great job!
Cant wait to see the final results.

newtrix

  • Trade Count: (0)
  • Full Member
  • ***
  • Offline Offline
  • Posts: 165
  • Last login:March 26, 2025, 04:16:36 pm
    • Loving Family Seeking to Adopt
Re: New Jukebox - Wurlitzer style - Bubble tube construction explained.
« Reply #70 on: July 29, 2008, 04:30:14 pm »
No Progress?  No Pictures? Your killing us here... :dunno :hissy:

mccoy178

  • It's hard to work with a straight jacket on
  • Trade Count: (+9)
  • Full Member
  • ***
  • Offline Offline
  • Posts: 3127
  • Last login:September 03, 2021, 10:23:42 am
  • Go Bucks!
Re: New Jukebox - Wurlitzer style - Bubble tube construction explained.
« Reply #71 on: July 30, 2008, 04:32:16 pm »
Sorry for the delay.  I went on a road trip last week and I have been hired to make a sign for my local community.  It's top secret for our town, but I don't mind sharing it with youse guys.  I will post pics of the pink foam board mockup I'm cutting right now.  It's a 4' x 8' sign.

mccoy178

  • It's hard to work with a straight jacket on
  • Trade Count: (+9)
  • Full Member
  • ***
  • Offline Offline
  • Posts: 3127
  • Last login:September 03, 2021, 10:23:42 am
  • Go Bucks!
Re: New Jukebox - Wurlitzer style - Bubble tube construction explained.
« Reply #72 on: July 31, 2008, 04:23:20 am »
Here's those pics of the sign mockup.  I need to clean up all of the insert letters, but all is going well.


mccoy178

  • It's hard to work with a straight jacket on
  • Trade Count: (+9)
  • Full Member
  • ***
  • Offline Offline
  • Posts: 3127
  • Last login:September 03, 2021, 10:23:42 am
  • Go Bucks!
Re: New Jukebox - Wurlitzer style - Bubble tube construction explained.
« Reply #73 on: July 31, 2008, 05:57:08 pm »
Here are some more pics with most of the letters installed.  The lake logo is also installed in the top.


mountain

  • Trade Count: (+9)
  • Full Member
  • ***
  • Offline Offline
  • Posts: 1205
  • Last login:January 29, 2025, 08:31:47 am
    • Mountain Jukeboxes
Re: New Jukebox - Wurlitzer style - Bubble tube construction explained.
« Reply #74 on: July 31, 2008, 06:05:02 pm »
Holy crap dude! That looks amazing! Did they supply you with the files?

Choctaw Lake is nice, been there a few times.

mccoy178

  • It's hard to work with a straight jacket on
  • Trade Count: (+9)
  • Full Member
  • ***
  • Offline Offline
  • Posts: 3127
  • Last login:September 03, 2021, 10:23:42 am
  • Go Bucks!
Re: New Jukebox - Wurlitzer style - Bubble tube construction explained.
« Reply #75 on: July 31, 2008, 06:07:34 pm »
Thanks!  They did supply the Indian logo in pdf format.  Other then that, the whole thing was created from scratch in about 2 hours. :cheers:

YoGaBaR

  • Trade Count: (0)
  • Full Member
  • ***
  • Offline Offline
  • Posts: 197
  • Last login:June 11, 2021, 12:10:54 pm
  • Yeah im in the club
Re: New Jukebox - Wurlitzer style - Bubble tube construction explained.
« Reply #76 on: July 31, 2008, 11:18:23 pm »
WOW! That is gonna be one awesome juke. Any plans on sharing the cad files for the build??? ;D
Check out my WOODY  Bubble Bobble

melarky

  • Trade Count: (0)
  • Full Member
  • ***
  • Offline Offline
  • Posts: 468
  • Last login:July 12, 2020, 12:49:22 pm
  • If I could be any animal, I would be a llama
Re: New Jukebox - Wurlitzer style - Bubble tube construction explained.
« Reply #77 on: August 01, 2008, 12:00:08 pm »
Thanks!  They did supply the Indian logo in pdf format.  Other then that, the whole thing was created from scratch in about 2 hours. :cheers:

Looks like you may be a vectric customer?  Do you use Vcarve for your signs?  I love their software, it's rare that I use anything else with my CNC now (makes it so quick).  I only end up using other cad/cam program now if I need some super precise stuff, but for most things vcarve does the trick.  Been wanting to try their cut3D program, but haven't had any real practical reason to buy it yet.

mccoy178

  • It's hard to work with a straight jacket on
  • Trade Count: (+9)
  • Full Member
  • ***
  • Offline Offline
  • Posts: 3127
  • Last login:September 03, 2021, 10:23:42 am
  • Go Bucks!
Re: New Jukebox - Wurlitzer style - Bubble tube construction explained.
« Reply #78 on: August 01, 2008, 03:19:16 pm »
Thanks!  They did supply the Indian logo in pdf format.  Other then that, the whole thing was created from scratch in about 2 hours. :cheers:

Looks like you may be a vectric customer?  Do you use Vcarve for your signs?  I love their software, it's rare that I use anything else with my CNC now (makes it so quick).  I only end up using other cad/cam program now if I need some super precise stuff, but for most things vcarve does the trick.  Been wanting to try their cut3D program, but haven't had any real practical reason to buy it yet.
Yeah, I have the vectric package.  I've yet to use the cut3d myself, but I think the photocarve is awesome.  Are you anywhere near Ohio?  There is a big shopbot camp in September and one of the two creators of Vectric will be there along with almost anyone related to cnc.  Of course it is a Shopbot event, but there will be plenty of reps there from supply companies and just good advice in general. :cheers:

melarky

  • Trade Count: (0)
  • Full Member
  • ***
  • Offline Offline
  • Posts: 468
  • Last login:July 12, 2020, 12:49:22 pm
  • If I could be any animal, I would be a llama
Re: New Jukebox - Wurlitzer style - Bubble tube construction explained.
« Reply #79 on: August 01, 2008, 03:54:55 pm »
Thanks!  They did supply the Indian logo in pdf format.  Other then that, the whole thing was created from scratch in about 2 hours. :cheers:

Looks like you may be a vectric customer?  Do you use Vcarve for your signs?  I love their software, it's rare that I use anything else with my CNC now (makes it so quick).  I only end up using other cad/cam program now if I need some super precise stuff, but for most things vcarve does the trick.  Been wanting to try their cut3D program, but haven't had any real practical reason to buy it yet.
Yeah, I have the vectric package.  I've yet to use the cut3d myself, but I think the photocarve is awesome.  Are you anywhere near Ohio?  There is a big shopbot camp in September and one of the two creators of Vectric will be there along with almost anyone related to cnc.  Of course it is a Shopbot event, but there will be plenty of reps there from supply companies and just good advice in general. :cheers:

Sounds like a lot of fun, but I'm in Utah, a little too far away to justify the expense and time off to go to it.  I'm really impressed with the vcarve software, I have used it to make many 2D cuts (not using their Cut2d or whatever their specific 2d software is, but just plain old vcarve).  I have cut a few arcades out using their software, the latest being those little namco arcade cabinets I was going to make kits for (I still will, just need to find the time to finish up the tool paths).

Photo vcarve is a blast, I've really enjoyed making lithopanes with that.  I'm fairly active over at the vectric forums and have posted some of my lithopanes there, but maybe I'll post one here too.  I cut mine out of little dollar store cutting boards (they come in about the perfect thickness, around 1/8", so I don't have to machine them down any to start, and I can cut them out after if I want to mount them in a light box or something).

This is one of the first lithopanes I carved, this is with no light source behind it.


Here is the same lithopane with a light source behind it, the picture doesn't do it justince, it's so much better in person, really neat.


Here is the source image, it's me and my wife when we visited Quebec one year, it was -40 degrees, hence the hats, lots of fun.


I cut that out with a v-bit too, it was before I had a nice micro ball nose end mill.  They seem to machine much nicer now with that.  I would love to try it out on some nice corian, I hear that stuff machines like a dream.

Anyways, sorry to derail your thread, your sign look great, and your juke box looks amazing.  I want to do a similar project some day, I have a little touch screen computer sitting by waiting for a project like this, but chances are I'll just get lazy and buy one of those cheap small wurlitzer knock offs and stuff the machine in there :)  Keep us updated on this jukebox, by far the most impressive one I've seen.