Main Restorations Software Audio/Jukebox/MP3 Everything Else Buy/Sell/Trade
Project Announcements Monitor/Video GroovyMAME Merit/JVL Touchscreen Meet Up Retail Vendors
Driving & Racing Woodworking Software Support Forums Consoles Project Arcade Reviews
Automated Projects Artwork Frontend Support Forums Pinball Forum Discussion Old Boards
Raspberry Pi & Dev Board controls.dat Linux Miscellaneous Arcade Wiki Discussion Old Archives
Lightguns Arcade1Up Try the site in https mode Site News

Unread posts | New Replies | Recent posts | Rules | Chatroom | Wiki | File Repository | RSS | Submit news


Author Topic: I know what you're thinking... Missile Command- multi-sync, multi-panel  (Read 5504 times)

0 Members and 1 Guest are viewing this topic.

bobbyb13

  • Trade Count: (+2)
  • Full Member
  • ***
  • Offline Offline
  • Posts: 1955
  • Last login:Yesterday at 11:29:57 am
  • I believe I may need an intervention
-And you're probably right.

So I've been wanting another MAME box since I gave my first attempt at this flavor of cabinet build to my buddy for his surf shop.

I had the whole swappable panel thing working but the panel shape did not lend itself to use on other cabinets also.- which I wanted to be possible.

Having things fit well in the loft based on the roof/knee wall bit kinda sucks, so the height and shape of cabinets is pretty important.
Missile Command was a favorite way back when (although I know I played it more on my 2600 than in an arcade) and the cabinet is not just unique but really suited to my space.

This is a fairly faithful homage (apart from width and tube size) so hopefully nobody gets too nauseated.

I've been planning this one for awhile and had it layed out on graph paper 3 times already but it is far and away my fastest build as I sketched the outline last night and I can paint it tomorrow I think.


A square and protractor make this so fast now it is silly.  The Appleton's doesn't hurt either.


It is irritating to see just how bad material has gotten recently.
One of the sheets was so out of square that tt took me longer to clean it up than it did to cut the whole thing out.

I have taken to using 2x2 for framing stability and it is plenty with some glue and 2" screws.
One can not own too mant clamps.


A bevel square and the adjustable protractor make getting cuts angled properly stupid easy.

1" rips of ply with glue and brad nails for panel support/bracing and things just fly together now.


I had great luck with a VGA multi-sync the last time I tried this so I am going to use this Kortek for this one too.


I got so far that I stayed up later than I should have- but I got the tube dry fit!


Bed time-
Relax, all right? My old man is a television repairman, he's got this ultimate set of tools! I can fix it.

Mike A

  • Trade Count: (0)
  • Full Member
  • ***
  • Offline Offline
  • Posts: 5901
  • Last login:November 06, 2024, 06:48:48 am
  • This plan is foolproof
You are an animal.

Keep it coming.


Zebidee

  • Trade Count: (+9)
  • Full Member
  • ***
  • Offline Offline
  • Posts: 3322
  • Last login:Today at 07:37:27 am
Wow. I go to sleep, you build a cab. Amazing  :o
Check out my completed projects!


javeryh

  • Trade Count: (+1)
  • Full Member
  • ***
  • Offline Offline
  • Posts: 7937
  • Last login:Today at 09:41:32 am
I’m speechless.  I check the forums and every day you have built a new cab.  Love it.

yotsuya

  • Trade Count: (+21)
  • Full Member
  • ***
  • Offline Offline
  • Posts: 19958
  • Last login:September 14, 2024, 08:17:47 pm
  • 2014 UCA Winner, 2014, 2015, 2016 ZapCon Winner
    • forum.arcadecontrols.com/index.php/topic,137636.msg1420628.html
Looking good, I love my Missile Command.

What will you be using using for controls?


Sent from my iPhone using Tapatalk
***Build what you dig, bro. Build what you dig.***

bobbyb13

  • Trade Count: (+2)
  • Full Member
  • ***
  • Offline Offline
  • Posts: 1955
  • Last login:Yesterday at 11:29:57 am
  • I believe I may need an intervention
Thanks all!
Building continues to be fun.
I can do a lot of damage on a partially free Sunday it appears.

Looking good, I love my Missile Command.

What will you be using using for controls?


Sent from my iPhone using Tapatalk

You have an original I imagine?
I'm trying to come up with the most reasonable way to play as many of my favorite games using proper controls with as few panels as possible- and have it be tasteful looking still.

I would like to think my game list sensibilities have matured (in the manner all here have said ad nauseum to all noobs) since I arrived.

Already for this I have a twin trackball panel with a few meaningful buttons (and the Alpha Delta Omega trio of course) that I built for my first go at a multi-panel cabinet- and it may work here with a little trimming and fiberglass tune up.

Not a 4" ball, but concessions need to be made in places for various reasons I guess (like- parts unobtanium) and being able to play Centipede, two player Marble Madness, Kick and the like on one machine is fun.

I also have a proper Star Wars yoke panel that needs to be altered to work, a twin joystick/button panel, and a triggerstick/spinner panel idea in process.

Idea is be able to swap these panels to a vector machine I hopefully get to build since there is so much control overlap that makes sense.

If I had the room and the $$ I would be a real menace.

It's things like Wacko and Toobin that really make for messy plans but I really liked those and some other weirdo control games so I will gradually sort it out.

Keeping harness pinouts well mapped and compatible is the biggest challenge really.

I have a U-HID that worked really well for this mayhem before so I will use it here also.

Biggest question mark still is wiring/connector type.
Molex?
Cat 5?
DB-25

I don't plan on swapping panels more frequently than once a month even maybe but still not sure what is the best choice.

Advice is welcome!
« Last Edit: July 12, 2022, 02:20:55 am by bobbyb13 »
Relax, all right? My old man is a television repairman, he's got this ultimate set of tools! I can fix it.

Xiaou2

  • Trade Count: (+1)
  • Full Member
  • ***
  • Offline Offline
  • Posts: 4105
  • Last login:November 05, 2024, 10:57:32 pm
  • NOM NOM NOM
Looks wide enough for two of those 4.5" trackballs.

 Could be good for games like  Marble Madness,  and  Atari XO Football  (that games gives you a real workout).

 Edit:  Noticed your reply, inside of the Quote box.

 I will say, that  KICK  is actually a spinner game.   It was a specially modified trackball, that only moves in a single
axis.   The problem with trying to play it with an actual trackball... is that when you roll the ball side to side.. you often
end up moving the ball up and down a bit.  This throws off your timing and distances, because its not moving the
character at the expected rate, due to the vertical variances.
« Last Edit: July 11, 2022, 11:07:56 pm by Xiaou2 »

Zebidee

  • Trade Count: (+9)
  • Full Member
  • ***
  • Offline Offline
  • Posts: 3322
  • Last login:Today at 07:37:27 am
My thoughts are... I think the reality of swappable control panels is that you won't end up swapping them much.

However, if we ignore that and you still want some modularity in your designs, have you considered using metal control panels?

You could go for metal+hinged, like on my Aussie lowboy build thread. Swappable if needed. That one has six carriage bolts, easy to remove or install, though it can be a bit finicky to get it lined up right. Might take me 3 minutes to remove, 10-12 minutes to install. Once installed, just two adjustable lockdown clamps to secure tightly. Flips out so servicing controls, replacing/cleaning glass, is really easy. I like the slightly angled top & curved front edge (ergonomics, etc.), good for trackballs, yokes, joysticks, whatever. Adapt how you want. Would suit style of most of your cabs (not SS Marshmallow :D ).

Obviously I like the metal+hinged CP, is why I bothered fussing with it (and raving on here). And in my case I already have blanks cut, so making a new one will be easy.

Yeah, I know what you are thinking. Next cab, maybe ;)

Which, knowing Bobby, means I only have to wait a couple of days.
Check out my completed projects!


bobbyb13

  • Trade Count: (+2)
  • Full Member
  • ***
  • Offline Offline
  • Posts: 1955
  • Last login:Yesterday at 11:29:57 am
  • I believe I may need an intervention
Yeah the swappy thing is more such that I can have panels that work on a few different cabinets and not have to buy multiples of some of the more expensive controls.

That and I'm staunchly against the Aircraft carrier/Fraken-panel too, AND it gives me an excuse to play around with resin to build some one-off funky panels.

If I can say "well, I think this month that the raster cabinet will have the dual trackball panel and the vector can have the Star Wars yoke..." and just undo a few panel clamps and connectors and make it happen I will be totally satisfied.
I was getting away with it for 3 different panels with my first attempt so I think this will be even easier, even though I am shooting for maybe seven panels total to swap across three machines.

Q*bert is the same interior dimensions, so it too can share in the mayhem.

I suppose maybe when I am finished with panel building and the game list reveals itself that it will make more sense and sound more like worth the effort involved.

Here is the panel that I made to play Missile Command, Centipede, Marble Madness (2 player even) Crystal Castles, golf games, etc.


This was for the Star Wars cabinet mind you so it has a rather spacey feel of course.
I was experimenting with polyester resin and pigments to see what kind of effects I could get without a lot of drama.

There is bunch of depth added to it by laying down the colors in different layers and putting clear coats in between.
I didn't sand it super flat so the finish has a little wobble to it on purpose just to keep the light moving around on the gloss coat too.

It is also 28" wide and I can trim the angled part off with the table saw and then round over the front edge and blend in new resin to coat the wood I exposed.
Plus it means I can be up and playing a few games pretty quickly!

The other panels I made will probably get a full reworking (or be abandoned) but we'll see as I go along.
The panel planning and building is one of the most fun parts of this for me (and not difficult at this pint) so this concept means I can just keep building panels until I am happy with the result.

Biggest thing to sort out soon is just how I will go about the wiring connectors.
Still haven't chosen between the D sub 25s and molex bits I was using before or trying the Cat5 thing that many have liked here.

Input there from anyone with experience would be greatly appreciated!

Stole some day-time to get spraying to allow for some dry time.
Looks better already even with just white.


I need to go for a materials run halfway across the island so maybe it will be dry enough to mask and spray the black interior stuff this evening.
 >:D
Relax, all right? My old man is a television repairman, he's got this ultimate set of tools! I can fix it.

Zebidee

  • Trade Count: (+9)
  • Full Member
  • ***
  • Offline Offline
  • Posts: 3322
  • Last login:Today at 07:37:27 am
Yeah, your work with the resins is awesome, stick to that :D

Are those volcano buttons? The Earth trackball on that backdrop is stunning.

In terms of connectors, whatever works for you. I've used molex before for control panels. In some ways molex plugs are easier to work with, so long as you like crimping, but the pins are large and if we are talking about a huge 3x4 block or bigger it can be hard to plug in/unplug.

Thinking aloud... each basic player control set may need up to twelve or more different connections (4 cardinal directions, 6 buttons, start, GND). You want these things to be consistent across various different panels.

Therefore, I suggest that DB25 would probably be easier in the long run, room to work with, and you may be able to use one DB25 for both P1 and P2 controls. You can use the flexible CAT5 LAN cabling for wiring. CAT6 cable is harder to work with, likely solid core wire too which is less flexible.

After wiring CAT6 my basic home internet/LAN/NAS network, saving $$ by making all new cables & wall sockets for routers, switches etc., my finger tips were so worn that my iPhone wouldn't recognise my fingerprint anymore! I swear they ached for a month.
Check out my completed projects!


bobbyb13

  • Trade Count: (+2)
  • Full Member
  • ***
  • Offline Offline
  • Posts: 1955
  • Last login:Yesterday at 11:29:57 am
  • I believe I may need an intervention
Thanks Andrew.
Resin work is tricky but fun for me finally after 25 years of learning.
Still have a way to go for color work actually so control panels are going to be an excellent exercise.

And those are legit volcano buttons!
I agonized about finding some explicitly for Missile Command.

Crappy used ones were really expensive and before I was done the arcadeshop guys had a repro made that while still not cheap, they are new- and still less $$ than the crappy used ones everywhere!

When I saw the earth-style ball I couldn't resist, especially to have an earth and moon setup for the two trackballs on one panel.

I built an excel spreadsheet to keep track of my wiring on my first attempt.
That approach worked, so I need to revisit that sheet.

My first time I was just making sure I had things in agreement for pinouts but this time I am going to do a by-the-circuit layout for each panel before I even wire one of them.
More like how I approach wiring a new home.

Should save some time and headache when I am actually running the wire.

I think I'll stick with the DB 25 route for now with a slight change to how I implement it.
Relax, all right? My old man is a television repairman, he's got this ultimate set of tools! I can fix it.

EvilNuff

  • Trade Count: (0)
  • Full Member
  • ***
  • Offline Offline
  • Posts: 430
  • Last login:February 24, 2024, 04:41:13 pm
...
Biggest thing to sort out soon is just how I will go about the wiring connectors.
Still haven't chosen between the D sub 25s and molex bits I was using before or trying the Cat5 thing that many have liked here.

Input there from anyone with experience would be greatly appreciated!
...

Do you have a list of panels (and controls) that you plan on building?  At a minimum you should figure out your maximum number of controls so your connectors have a suitable number of connections.  I assume you plan on keeping the encoder in the cab as opposed to making each cp "stand alone" with its own encoder?  If so then a typical 2 player fight panel 2 joysticks, 6 buttons each would be 20 connections (not counting any lighting) that would be 3 cat5 connections.  I would say the 25 pin dsubs are the way to go. 

I would want to secure one side of the connection so you can make those connections one handed.  If you were very precise with your placement having the connections connect when you set the cp into place would be pretty fantastic.  What I mean by that is have the mounting of the cp be precise such that it can only fit into the cabinet in one location and the act of inserting/placing/etc the cp into the cabinet connects the dsubs for you. 

bobbyb13

  • Trade Count: (+2)
  • Full Member
  • ***
  • Offline Offline
  • Posts: 1955
  • Last login:Yesterday at 11:29:57 am
  • I believe I may need an intervention
...
Biggest thing to sort out soon is just how I will go about the wiring connectors.
Still haven't chosen between the D sub 25s and molex bits I was using before or trying the Cat5 thing that many have liked here.

Input there from anyone with experience would be greatly appreciated!
...

Do you have a list of panels (and controls) that you plan on building?  At a minimum you should figure out your maximum number of controls so your connectors have a suitable number of connections.  I assume you plan on keeping the encoder in the cab as opposed to making each cp "stand alone" with its own encoder?  If so then a typical 2 player fight panel 2 joysticks, 6 buttons each would be 20 connections (not counting any lighting) that would be 3 cat5 connections.  I would say the 25 pin dsubs are the way to go. 

I would want to secure one side of the connection so you can make those connections one handed.  If you were very precise with your placement having the connections connect when you set the cp into place would be pretty fantastic.  What I mean by that is have the mounting of the cp be precise such that it can only fit into the cabinet in one location and the act of inserting/placing/etc the cp into the cabinet connects the dsubs for you.

Thanks for chiming in.
I have the general layout for 6 panels but still need to count circuits and that is a great reminder- thank you!

Yes, just to keep Windoze from making a mess of controller ordering (and to save on expense) the U-HID stays with the cabinet.

I really like the idea of panel installation also mating the connectors.
Af first blush I think the panels maybe too limited in space underneath to pull this off, but it is such a cool idea that it needs to be explored.
A great engineering exercise at least!
 :cheers:
Relax, all right? My old man is a television repairman, he's got this ultimate set of tools! I can fix it.

EvilNuff

  • Trade Count: (0)
  • Full Member
  • ***
  • Offline Offline
  • Posts: 430
  • Last login:February 24, 2024, 04:41:13 pm
The more I think about it the more I like the blind mate connector idea.  Btw I googled a bit during this work call and discovered that is the correct term, blind mate connector.  From one website: 
"Blind mate connectors are those in which the mating between connectors is done via a sliding or snapping action which does not require aligning the two connector interfaces in a particular way. They are constructed with a self-aligning feature that ensures a correct mating position on their own. These connectors are easy to connect and do not require wrenches or other tools."

I have not yet looked at feasibility/cost/connection size etc but here are a couple found:

https://www.fclane.com/news/industrial-rack-and-panel-connectors-perfect-blind-mating-applications
These look like they would be a pretty good fit, similar to a dsub but more suited for the blind connection.  (Such an obvious term why did I have to google to figure that out...)

https://experience.molex.com/solutions/blind-mate-interface-solutions/
The staggered mating one is interesting.

https://connectorsupplier.com/blind-mating-connector-products/

If you do figure out a solution that does something like this I think that would be very elegant indeed.

bobbyb13

  • Trade Count: (+2)
  • Full Member
  • ***
  • Offline Offline
  • Posts: 1955
  • Last login:Yesterday at 11:29:57 am
  • I believe I may need an intervention
Appreciate the leg work on finding all that.
I'm going to take a good shot at implementing this idea.

The ability to anchor one side solidly and allow the other to float a bit for alignment and mating is awesome and should make this possible
Relax, all right? My old man is a television repairman, he's got this ultimate set of tools! I can fix it.

EvilNuff

  • Trade Count: (0)
  • Full Member
  • ***
  • Offline Offline
  • Posts: 430
  • Last login:February 24, 2024, 04:41:13 pm
Oh I require copious pictures if you implement it!  :)

I was thinking some sort of rail system like a sliding dovetail or the like to line up the pieces?  I do woodworking as a hobby so I think about sliding dovetail first, maybe make the cabinet have an outside shell for the cp that has dovetail holes in it something like the attached picture.  Then each control panel would be sized to fit inside the shell with a male dovetail joint on each side.  This would align the cp's to the shell perfectly.  (Friction being what it is you would probably only do say 1-2" of the dovetail not all the way through as I show.)


PL1

  • Global Moderator
  • Trade Count: (+1)
  • Full Member
  • *****
  • Offline Offline
  • Posts: 9523
  • Last login:Today at 06:08:43 am
  • Designated spam hunter
Those blind mating connectors sound interesting, but it seems like there are some fairly major challenges and concerns with this approach:

1. Uncommon connectors are usually uncommonly expensive.

2. You'd need to precisely align multiple panels and multiple cabinets so any combination of panel and cabinet would fit together.

3. If the cabinet/panel tolerances are tight enough for the connectors to mate properly, how difficult will it be to insert a big, heavy, awkward panel into the cab?

4. What if the panel slips out of your grasp while you are lowering it into place?

5. How will you protect the connector when the panel is not installed in the cabinet?

just to keep Windoze from making a mess of controller ordering (and to save on expense) the U-HID stays with the cabinet.
If you want a less expensive option, use an Arduino encoder on each panel in place of a U-HID in each cab.
- The more cabs that use these swappable panels, the more you save by using Arduinos instead of U-HIDs.   ;)
- This also simplifies the panel-to-cab connection method by allowing you to use USB instead of a D-sub25 or blind mating connectors.
- To protect the panel's control wiring, make an enclosure on the underside of each panel -- maybe a 2"x2" pillar near each corner, hardboard sides, and a hardboard or 1/4" ply bottom held on using L-brackets, clip-on nutplates, rubber feet and machine screws. (see the end of this post for details and pics)

Since you mention Windows controller re-ordering as a concern:

1. Use a keyboard firmware for microswitch controls.

2. Use a gamepad firmware for potentiometer controls like analog joysticks.
- Putting all analog potentiometer axes on a single gamepad device should keep Windows from renumbering, right?

3. Use a mouse firmware for optical controls like trackballs/spinners.
- For the two trackball panel, you might be able to find or write a firmware that has two mouse devices on a single Arduino to avoid mouse renumbering problems.
- Worst case scenario, you put two Arduinos in the cab and use a D-sub connector to connect the two trackball panel.
- Use "-multimouse" in the game .ini of any games with more than one trackball.

4. You should be able to combine Baritonomarchetto's ArcadeHID sketches and/or other Arduino sketches to make each Arduino into a composite device that the computer sees as a keyboard, mouse, and/or gamepad.


Scott

EvilNuff

  • Trade Count: (0)
  • Full Member
  • ***
  • Offline Offline
  • Posts: 430
  • Last login:February 24, 2024, 04:41:13 pm
Those blind mating connectors sound interesting, but it seems like there are some fairly major challenges and concerns with this approach:

1. Uncommon connectors are usually uncommonly expensive.

2. You'd need to precisely align multiple panels and multiple cabinets so any combination of panel and cabinet would fit together.

3. If the cabinet/panel tolerances are tight enough for the connectors to mate properly, how difficult will it be to insert a big, heavy, awkward panel into the cab?

4. What if the panel slips out of your grasp while you are lowering it into place?

5. How will you protect the connector when the panel is not installed in the cabinet?
...

1. Definitely a concern, I think the coolness factor makes it worth some extra expense if feasible. :)

2. That's pretty easy.  Coming from a woodworker's experience getting precision enough to align mulitple cp's would be pretty easy.  You could use a drop in factor from the top like I suggested with the sliding dovetail.  Alternately and probably a better quality connection would be just using drawer slides.  Make the control panel essentially slide in like a drawer and have the blind mate connectors on the back.  Slides should be within 1/16" tolerance easily.  So the cabinet would have 2 sides a bottom and a back, the cp inserts would essentially be a box with drawer slides.  Easy to make or even buy a jig for aligning drawer slides.  The tolerance should be well within any blind mate connectors.  You would need some way to latch the panel in when it is fully inserted so you don't pull it out by accident of course.
To remove you unlatch, pull out the cp, and unlatch both drawer slides.  Grab the new cp, line it up with the slides, push it fully in so you feel the blind mate connect and latch it in place.
Really precisely aligning the cp's is easy with good woodworking skills.

3. Just like sliding a drawer into place, easy.

4. Typically with a drawer you can just rest it in the opening while lining up the glides.  With the top dovetail idea (which I now like less than the drawer slides lol) just rest it on top at a slight angle, straighten out and it can rest on the male dovetail pieces until it hits the dovetail slots.

5. You wouldn't ever leave the cab without a control panel (open cavity would look ugly) so the cab side isn't an issue.  Storing extra cp's you would need to protect them but really it shouldn't be much different than protecting say a large flightstick sticking out of the cp.

Good questions though!

bobbyb13

  • Trade Count: (+2)
  • Full Member
  • ***
  • Offline Offline
  • Posts: 1955
  • Last login:Yesterday at 11:29:57 am
  • I believe I may need an intervention
I'm long overdue for figuring out Arduino programming Scott!
I already have a bunch of Ultimarc interface boards so if I will run out on this project then Arduinos here I come!

Cost will be a concern for plugs if it is really crazy but we'll see.
The ones I like from that assortment noted by EvilNuff (rather jamma connector looking) are rated at 500 connect cycles so that should be ok I think- especially if the mating isn't really off-angle to induce more wear.

Once I have time to get a total circuit count I can actually figure out which ones may work.

At least I finally got the rest of the paint done!


Funny how much nicer a cabinet looks when it gets to this stage- especially when you get to put T-molding on it (which I used to wait on, but I like the immediate satisfaction awarded by doing it earlier now.)

So the busiest control panel (certainly in terms of component size- and probably also circuit count) is the one for two trackballs.

It has been so long since I did this though that now I can't recall why I had addded two buttons per player in addition to the traditional Alpha Delta Omega for Missile Command.
One? Sure- but two?  What game was I thinking of that uses a trackball and two buttons...?
Either way this is the earth and moon panel from before.


That is what the panel looks like after trimming down to fit these dimensions across the planned assortment of cabinets.

Even as tight as this control panel winds up (comically still- at 9"x28") there is still room to hold one end of the mating plug on the cabinet and still have space on the panel to mount the complementary piece.
Lower left under the buttons of course- and all other panels afterward also.
I would just need to make sure the rest use the same location- which is pretty minor really.

Best practice I think will be for the receiving piece on the cabinet to be anchored to the front vertical panel adjacent to the control panel itself with the mating part facing up.
Drop panel in from above, secure clamps by reaching through coin door opening- done.
This approach also accomodates the bulk associated with the controls hanging off the bottom side of the control panel, rendering a slide mechanism difficult to impossible.

I like my control panels at the angle this sits on so easy to reproduce within a few degrees tolerance and having one of the connectors 'float' a bit will accomodate the rest I believe and still connect fully.

I will have to mock something up to see but depending on the dimensions of the plugs I think this is do-able.

It will wind up far more rudimentary than something with drawer slides but there are supporting rips that the panel clamps mount to underneath on the sides that make having the panel on the correct plane to mate properly pretty easy if you aren't rough with the swapping.

Down the rabbit hole!
Relax, all right? My old man is a television repairman, he's got this ultimate set of tools! I can fix it.

Zebidee

  • Trade Count: (+9)
  • Full Member
  • ***
  • Offline Offline
  • Posts: 3322
  • Last login:Today at 07:37:27 am
Am I the only one that thinks this is getting waaaaaay too complicated?  :o
Check out my completed projects!


bobbyb13

  • Trade Count: (+2)
  • Full Member
  • ***
  • Offline Offline
  • Posts: 1955
  • Last login:Yesterday at 11:29:57 am
  • I believe I may need an intervention
Oh, but it is getting easier actually!

Self-mating panels will be awesome.
Doesn't really look hard to pull off.

I'll have a hell of a lot harder time getting the damn PC to behave itself.
 :)
Relax, all right? My old man is a television repairman, he's got this ultimate set of tools! I can fix it.

Zebidee

  • Trade Count: (+9)
  • Full Member
  • ***
  • Offline Offline
  • Posts: 3322
  • Last login:Today at 07:37:27 am
Have you thought about troubleshooting controller issues?

You won't be able to detach the panel, to service and check controls, while simultaneously having them connected so you can check their actual operation.

Unless you make extension cables. Which is more work, more stuff to store.

Check out my completed projects!


Zebidee

  • Trade Count: (+9)
  • Full Member
  • ***
  • Offline Offline
  • Posts: 3322
  • Last login:Today at 07:37:27 am
Alternatively, you could go for a hybrid approach: you have a port, a fixed point to plug into on the cab, but you connect with a cable from the control panel, then lock it down (clamps, whatever).

This way you have the flexibility to unclamp the CP and flip it upside down to service controls beneath, while still being able to operate the controls.

You could make a fixed port with female DB25 or whatever, this might save you some money.
Check out my completed projects!


bobbyb13

  • Trade Count: (+2)
  • Full Member
  • ***
  • Offline Offline
  • Posts: 1955
  • Last login:Yesterday at 11:29:57 am
  • I believe I may need an intervention
We'll see what I can do.
Thus far no supplier of what I want has replied to me so it may be the DB25 custom cabled that I did before.

At this point though it is time for the dreaded bezel chore.
Always agonize over this part.
I want to see if I can get away with no screen plexi panel on this one so I'm going to try using 1/8" melamine faced MDF this time for something strong but not ridiculous like solid fiberglass like previous mayhem.
No idea if it will need to be fiberglassed in the end or if I will get away with sealing and painting it- so I'm just winging it.

Thankfully I have a stock piece to use for dimension tracing somewhat so I have a headstart.
A quick trace and jigsaw action for the face plate and we're off.


I wish there was a way to template this crap and make it something that would apply to all 27" tubes but it seems that the curves used for the screen faces are different enough from one manufacturer to the next to render this idea difficult/impossible to implement.

Each one feels like a one-off.


So I got pretty decent mirrored cuts together for the 4 sides and literally taped it together on the backside to see how it would mock up.


As it seemed to hold together I figured it was worth having a go at putting it in place to see how I did.
I got pretty close first shot but the sides need a bit of tuning up to not block visible area of the screen.


Once I had it dialed in enough that I figured it was time to lock the angles in I mixed up a batch of epoxy and microballoons and gooped it up.


I did this yesterday afternoon so in theory it should be kicked now so that if I have time later today I can sand it out and then finish tuning up the edges where it meets the screen.
It will be a great hurdle since I can locate the bezel support pieces and that will enable me to work on the marquee seet up.

Which in this particular case means I can also finally set up the sound system.

After that I can really start in on control panels and interface wiring.
Relax, all right? My old man is a television repairman, he's got this ultimate set of tools! I can fix it.

Zebidee

  • Trade Count: (+9)
  • Full Member
  • ***
  • Offline Offline
  • Posts: 3322
  • Last login:Today at 07:37:27 am
Looks good to me Bobby!

Been looking forward to this, after your earlier fibreglass bezel.

How did you work out the inside corners and the curves? Or did you just wing it?

3mm MDF is a decent choice, just be careful not to crack it  :scared.
Check out my completed projects!


pbj

  • Trade Count: (+4)
  • Full Member
  • ***
  • Offline Offline
  • Posts: 10981
  • Last login:Today at 04:05:36 am
  • Obey.
    • The Chris Burke Band
10 year old cars balanced precariously on the edge of a hill…. All over your yard… i occasionally miss island life.


Cabinet looking great.


 :cheers:

bobbyb13

  • Trade Count: (+2)
  • Full Member
  • ***
  • Offline Offline
  • Posts: 1955
  • Last login:Yesterday at 11:29:57 am
  • I believe I may need an intervention
Thank you gents!

Did you live out here at some point pbj?
Sounds like the voice of local experience.
We have 5 vehicles here at the moment- and 4 of them are my fault.
At least three of mine are drivable.
 :)

I successfully sanded out the stabilizing/fill work I did on the bezel.
Still need to reinforce the backside in some way, but since it is melamine finished I need to sort out how to get something to stick.
Probably a bit of sanding and then a layer of epoxied fiberglass.
Next time I won't use laminated stuff (but it was what I had on hand when I decided I had to finally start this chapter.)

After I shaped the screen mating parts a bit I discovered that I still needed to shove the tube back in the cabinet a bit.
It happened to be off 3/4" - where did my math go off by a board thickness I wonder?  :banghead:

Anyway, with the tube rehung in its final resting place I put the bezel in and test fit control panel #1- with such success that I ran over to the mitre saw and cut a mock marquee panel too.


Holy ---steaming pile of meadow muffin--- it is going to work.
I'll need to cut a bevel on the underside of all the control panels (as expected) but they can remain 9" deep.

It all sits well and I even got to mark the backside bezel line for where support battens need to go on the cabinet walls.
I wound up with an even reveal above and below screen like I was hoping for after it all too.

I'll need to choose a finish for this thing but it is built.
I'm stoked.

Moral is, never underestimate the usefulness of good masking tape in mock up phase.
Relax, all right? My old man is a television repairman, he's got this ultimate set of tools! I can fix it.

bobbyb13

  • Trade Count: (+2)
  • Full Member
  • ***
  • Offline Offline
  • Posts: 1955
  • Last login:Yesterday at 11:29:57 am
  • I believe I may need an intervention
Re: I know what you're thinking... Missile Command- multi-sync, multi-panel
« Reply #27 on: August 01, 2022, 03:26:27 am »
I finally got through the mile wide spreadhsheet that I told my buddy i would build for his surfboard factory management so I bought myself some guilt-free time to work on this beast.

The screen surround/bezel saga continues.

I'm still trying to figure out if there is some means to make what I have been learning with these bezel builds something others can use (because I can't just build these freaking things for anybody and ship them anywhere- unless somebody is cool with paying the probably $100+ it is at this point for the stupid transport) but I have zero skills or knowledge with digital stuff so I am at a loss.
Sorry-

So this thing still fit the cabinet properly but since it was only some thin MDF I knew it needed some support to live through what abuse it may endure- and it is going to effectively wind up finish as there will not be any screen covering plexi this in the cabinet- so it should look prettier than me at least.

And therefore like all meaningful crap in my life, it must be fiberglassed.

Conveniently, I have another 75 ft or so of 4oz cloth on my glass rack- so trimming a 30" piece is easy.
Cutting that to be a useful shape to accomodate the compound curves of this bezel monstrosity is not so bad for me at this point.


The last time I made one of these I actually used a factory built one as a mold to do this (and it was a huge pain in the ass) so this time I figured I would form my own foundation and go from there.
It is proving to be a hell of a lot easier than the previous path.

This is the paradigm going forward for sure.

Standard lamination activity at this point.

Polyester resin
Black pigment in this case
MEK as our lovely toxic polymerization oxidizing agent
Acetone for the mess I will inevitably make
Squeegee
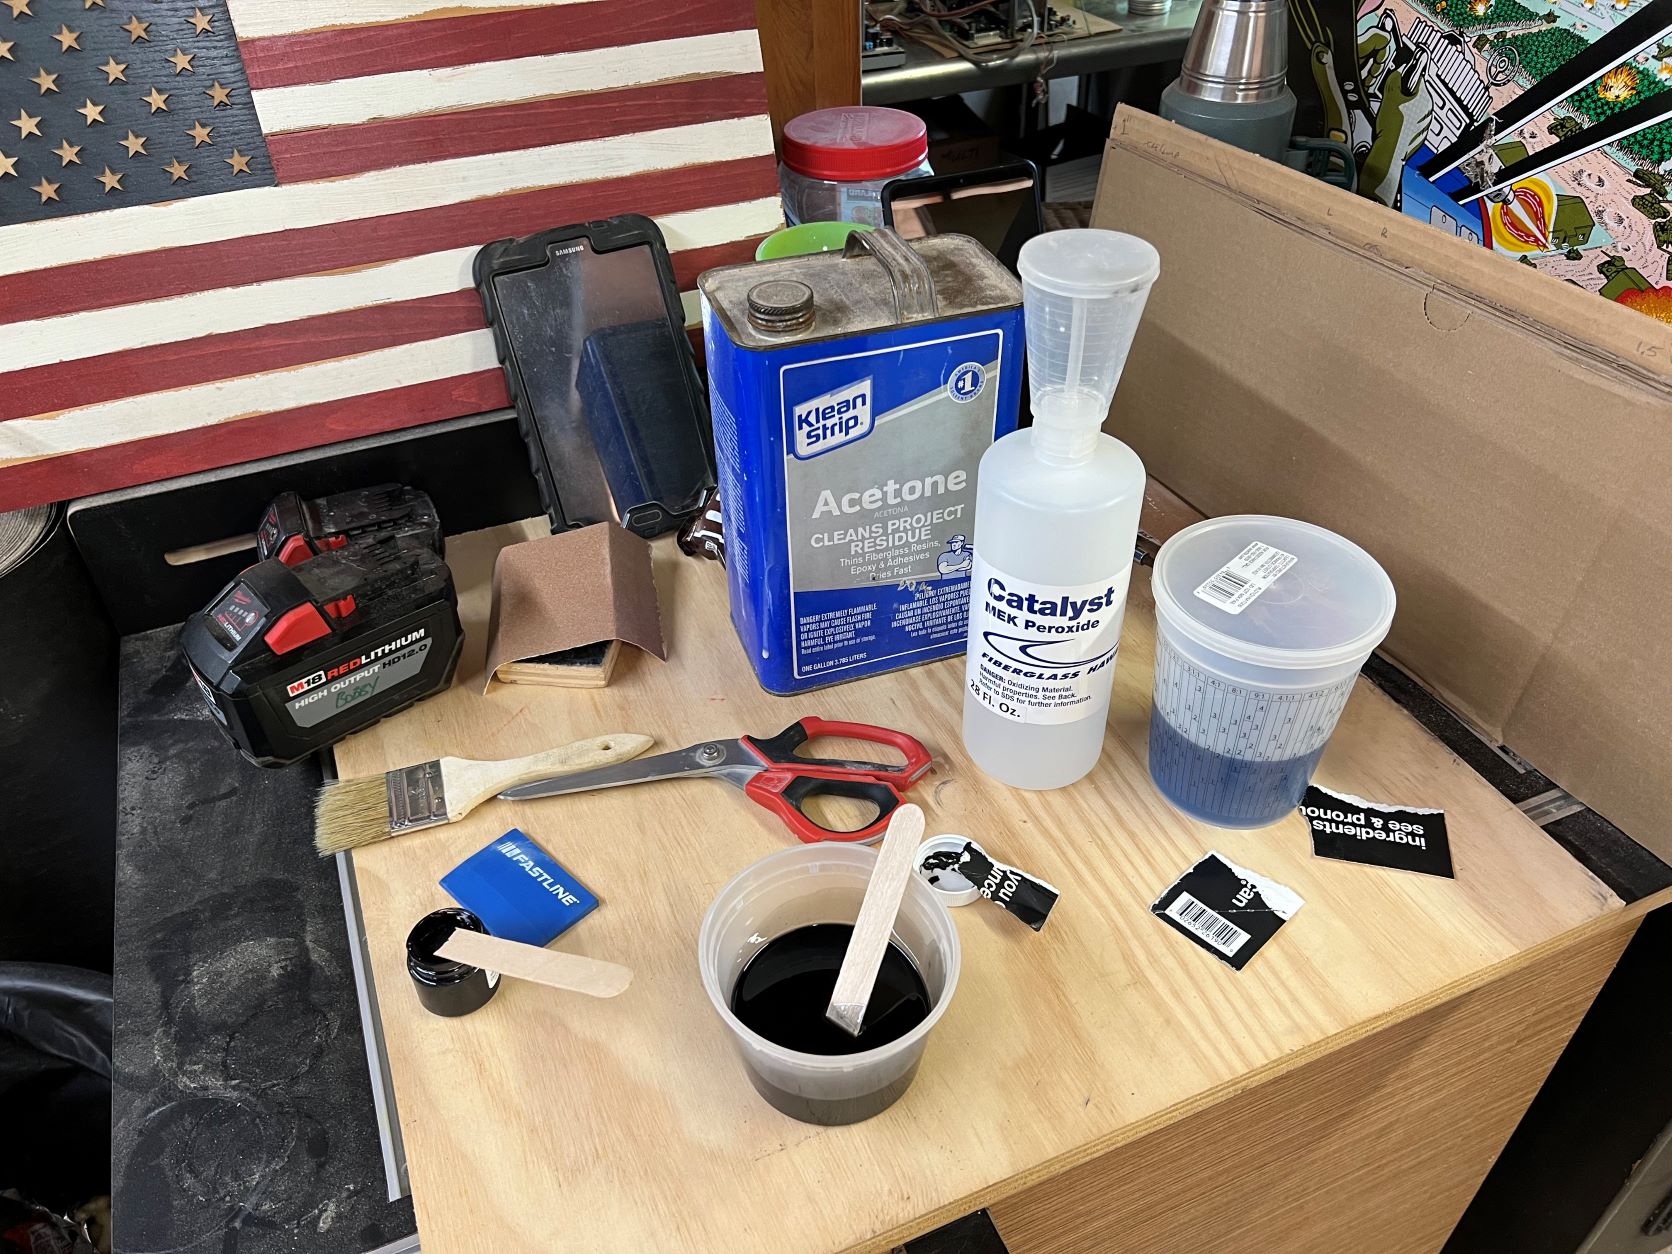


Mix it hot (like a 2% ratio) and let it rip.
It has been hot, humid and disgusting here for a few days (by our standards) so nothing makes the joyous exothermic reaction of resin going off happen quicker.


I figured that the hard angle sweep of part of the bezel would make for not perfect flatness with my cloth- so that I would need to add a step and put on an un-hardened hot coat of resin before I layed down the final layer.

For anyone who may for some reason give a ---steaming pile of meadow muffin---, when you are playing with polyester resins, if you want the stuff to be easy to continue to add layers to without having to sand it first (and thereby physically opening up the ends of those styrene monomer chains for further resin bonding) you use pure resin- that is, something that doesn't have surfacing agent- i.e. wax- added to it.
I did that here because I wanted to get a nice flat layer on my last (3rd) pour of resin so that I only needed to polish it.


That layed pretty flat but still needed some sanding work (as expected) so I gave it a rub with 120 grit to get it to shape and blew the dust off to add another layer of resin.
I used to think that you needed to give any substrate a wipe/wash with acetone to make sure it was contaminant free for subsequent layers- but this actually creates problems.
Blow off any sanding dust or other crap and press on.

For your final coat of resin you WANT to add wax (which isolates the reaction from atmosphere- and closes the ends of those polyester chains) so that your work can be sanded without gumming the crap out of your sandpaper.
As I wanted this to be black through and through I kept adding pigment to every layer.
The final coat actually came out pretty decent.


I'll let this last layer harden overnight at least so that it will sand nicely with 400 and 800.
I want it to have a flat finish or I would continue sanding at least to 1200 before I hit it with compound and a buffer.

We'll see how it looks by the end of tomorrow.
Relax, all right? My old man is a television repairman, he's got this ultimate set of tools! I can fix it.

Zebidee

  • Trade Count: (+9)
  • Full Member
  • ***
  • Offline Offline
  • Posts: 3322
  • Last login:Today at 07:37:27 am
Re: I know what you're thinking... Missile Command- multi-sync, multi-panel
« Reply #28 on: August 01, 2022, 04:11:08 am »
Wow :o

Looks amazing.

Was wondering if you'd go back to fiberglass. Seems to be what you know and do well.

Eeek toxic chemicals...  :scared   Hope you stay safe.

I appreciate your skills and enjoy the commentary details, really do. But will probably just stick with cardboard, glue, tape and poster paint :D

You going to use this as a template for more?
Check out my completed projects!


Mike A

  • Trade Count: (0)
  • Full Member
  • ***
  • Offline Offline
  • Posts: 5901
  • Last login:November 06, 2024, 06:48:48 am
  • This plan is foolproof
Re: I know what you're thinking... Missile Command- multi-sync, multi-panel
« Reply #29 on: August 01, 2022, 05:42:14 am »
You know.....

When you have a hammer sometimes the whole world looks like a nail.

Does the fiberglass add a lot to the end result?

However, doing all of that extra work doesn't seem to slow you down at all.

Very nice work.


bobbyb13

  • Trade Count: (+2)
  • Full Member
  • ***
  • Offline Offline
  • Posts: 1955
  • Last login:Yesterday at 11:29:57 am
  • I believe I may need an intervention
Re: I know what you're thinking... Missile Command- multi-sync, multi-panel
« Reply #30 on: August 01, 2022, 02:11:36 pm »
Thank you both.
Yeah, glass I can at least get to B+ grade work.
A bunch of the other stuff I still need practice with.
And certain software and other electronic stuff still completely evades me of course.

For this, fiberglass is not only what I know but a means to make this otherwise fragile bezel treatment strong- and at least a little bit prettier than what I might manage with a rattle can- which I would use for something this size.

I wish that there was some easy way to use any of these bezels as templates for future work.
With skipping between 27"- 19" screens on builds of different widths and then even the same visible area size tubes having different curves it makes the whole endeavour such that starting from scratch takes less time and nets a better result.

It kinda sucks.
Seems like this would be a good way to contribute to community knowledge but it still escapes me how to do it.

I have parts for a second BitKit, a Spy Hunter (both vertical 19"), a Bank Panic/Tetris/whatever else (horizontal 19"), and a MAME vector machine (25" horizontal) still yet to build so hopefully some easy to replicate theme presents itself at some point.

Presently that makes four more just for my own selfish pursuits.
God help me if I need to make more than that.
Relax, all right? My old man is a television repairman, he's got this ultimate set of tools! I can fix it.

Zebidee

  • Trade Count: (+9)
  • Full Member
  • ***
  • Offline Offline
  • Posts: 3322
  • Last login:Today at 07:37:27 am
Re: I know what you're thinking... Missile Command- multi-sync, multi-panel
« Reply #31 on: August 01, 2022, 10:35:06 pm »
Your fiberglass work is excellent. B+ is more than enough for bezels.

On bezels...

They are pretty much always black, surrounded by black, so even a D+ bezel job will hide most of your "sins".

On Bank Panic - do this in a cocktail, if possible. With a standup cab, the player turn-swap will always catch you by surprise, you'll be busy getting out of each others' way. Also, cocktail makes it easier to rest your beer on top. In my experience at least, Bank Panic is best as a "drinking" game between friends.

Check out my completed projects!


bobbyb13

  • Trade Count: (+2)
  • Full Member
  • ***
  • Offline Offline
  • Posts: 1955
  • Last login:Yesterday at 11:29:57 am
  • I believe I may need an intervention
Re: I know what you're thinking... Missile Command- multi-sync, multi-panel
« Reply #32 on: August 02, 2022, 02:29:57 am »
Oh, I had planned otherwise for Bank Panic- but a cocktail cabinet COULD be its future then I would say!

I had planned on it going in the same cabinet as the Tetris I wound up with (which is in a generic cabinet that is not in great shape to begin with and maybe is not worth fighting with the mouse pee scent and disintegrating particle board for) but builds are always on a dynamic design continuum until done around here.

However...!
I got through buffing out the bezel for the Missile Command-ish cabinet.


Flat black is good because it doesn't reflect a bunch of light everywhere and secondarily it does not telegraph transgressions as readily as glossy black does- which seems to amplify any aberrations.

The best part of this is that it has made it so that I can get going on the marquee/speaker panel so I can get the thing completely functional (even if I still don't have any artwork yet) and therfore move it upstairs with it's siblings.

Thus making space to build the next one.
 >:D

No matter what, I still need to pull the kick panel and decide what size hole to cut for the coin door- even if it just winds up a plain door for a little while.

Buying a coin door and getting it shipped to me now appears to be about $200- so it may be a looooong while.

I'll just keep making this ---steaming pile of meadow muffin--- up as I go along and have fun playing it when it is done.
Relax, all right? My old man is a television repairman, he's got this ultimate set of tools! I can fix it.

Zebidee

  • Trade Count: (+9)
  • Full Member
  • ***
  • Offline Offline
  • Posts: 3322
  • Last login:Today at 07:37:27 am
Re: I know what you're thinking... Missile Command- multi-sync, multi-panel
« Reply #33 on: August 02, 2022, 03:57:04 am »
Oh, I had planned otherwise for Bank Panic- but a cocktail cabinet COULD be its future then I would say!

Part of my Bank Panic/cocktail reasoning is how the game flips the screen for player change in cocktail mode. This clearly flags the player change. On upright cabs you will often miss it, end up playing your mate's game by accident, and lose the magic.

That, and the improved potential for drinking beer. You can put Tetris on it too if you like ;)

Quote
I had planned on it going in the same cabinet as the Tetris I wound up with (which is in a generic cabinet that is not in great shape to begin with and maybe is not worth fighting with the mouse pee scent and disintegrating particle board for) but builds are always on a dynamic design continuum until done around here.

If the mouse-piss-MDF isn't too terrible, you can restore a lot of strength (and hide the smell) by painting on some diluted PVA glue or the related wood glue, including that Titebond II I've seen in some of your earlier pics. The glue is designed to soak into the wood, and the water helps it penetrate. Do it a few times until you are satisfied, can finish off with a undiluted glue to be sure. Then paint over if possible.


Quote
I got through buffing out the bezel for the Missile Command-ish cabinet.


That bezel is a work of art.

Quote
Flat black is good because it doesn't reflect a bunch of light everywhere and secondarily it does not telegraph transgressions as readily as glossy black does- which seems to amplify any aberrations.

Yes, you want it to either soak up any stray photons, or misdirect them.

Quote
I'll just keep making this ---steaming pile of meadow muffin--- up as I go along and have fun playing it when it is done.

The best way :D
Check out my completed projects!


Xiaou2

  • Trade Count: (+1)
  • Full Member
  • ***
  • Offline Offline
  • Posts: 4105
  • Last login:November 05, 2024, 10:57:32 pm
  • NOM NOM NOM
Re: I know what you're thinking... Missile Command- multi-sync, multi-panel
« Reply #34 on: August 03, 2022, 11:28:48 am »
Quote
I had planned on it going in the same cabinet as the Tetris I wound up with (which is in a generic cabinet that is not in great shape to begin with and maybe is not worth fighting with the mouse pee scent and disintegrating particle board for) but builds are always on a dynamic design continuum until done around here.

 Check ebay or Amazon for an   "Ozone Generator"

 They use them to clean fire and smoke damaged houses.   They basically Bleach the air.


 Ive owned an air cleaner that has ozone capability.  There is no bad smell, that it cant completely Remove.

 If you leave it on for too long, the air you breath in, will actually burn your lungs.   As such, many of them have an
automatic timer..   and they suggest that,  for example..  you leave the house / room you are intending to clean,
while its operating... then when you return,  open all windows to get fresh air circulating in the house.

 The ozone fades away fairly quickly,  once the machine has stopped.

Zebidee

  • Trade Count: (+9)
  • Full Member
  • ***
  • Offline Offline
  • Posts: 3322
  • Last login:Today at 07:37:27 am
Re: I know what you're thinking... Missile Command- multi-sync, multi-panel
« Reply #35 on: August 03, 2022, 08:56:28 pm »
I had planned on it going in the same cabinet as the Tetris I wound up with (which is in a generic cabinet that is not in great shape to begin with and maybe is not worth fighting with the mouse pee scent and disintegrating particle board for) but builds are always on a dynamic design continuum until done around here.

If the mouse-piss-MDF isn't too terrible, you can restore a lot of strength (and hide the smell) by painting on some diluted PVA glue or the related wood glue, including that Titebond II I've seen in some of your earlier pics. The glue is designed to soak into the wood, and the water helps it penetrate. Do it a few times until you are satisfied, can finish off with a undiluted glue to be sure. Then paint over if possible.

I forgot to mention, before you start with the diluted PVA: you can carefully wash the MDF/particle board with flowing water (don't soak) to get the worst surface piss off, but you must be ready with a towel to immediately clean it up. Otherwise the exposed/raw MDF/particle board will soak up the water and swell etc.

Having that residual dampness on the surface layer will help the PVA soak in, so all good.

Once you've done all that PVA treatment, you can apply paint or varnish/clearcoat etc., the wood will be stronger and the rat-piss smell will be gone forever.
Check out my completed projects!


bobbyb13

  • Trade Count: (+2)
  • Full Member
  • ***
  • Offline Offline
  • Posts: 1955
  • Last login:Yesterday at 11:29:57 am
  • I believe I may need an intervention
Re: I know what you're thinking... Missile Command- multi-sync, multi-panel
« Reply #36 on: August 08, 2022, 05:45:25 am »
I'll need to look into saving that cabinet as it doesn't APPEAR to have termites at this point.

As far as this one goes, there was always the intent that because this was a MAME box that it would play multiple things and need multiple panels, because legitimate uncrowded controls.

Dual trackball panel in motion and nearly done.
Star Wars yoke panel in reconstruction.
And so on to the next.

I loved how ridiculous Toobin was back in the day and Tyler likes the idea of playing it enough that it merits having its own panel.
There is no reasonable way to play the silly game otherwise, and it appears to me that part of the challenge of the game is that the buttons layout is tricky enough that it adds to the mayhem.

My excuse for needing to make my own questionable art for this is that I have found NOwhere that I can buy a regular old original CP overlay (that won't take years to appear I think) even though we know that I just can't help myself.
Plus these panel dimensions aren't original anyway, so i may as well pour some resin on something.

I sorted out the button layout to within reasonable precision to original builds and got plywood cut, routed to round the front edge, and drilled out.
Figured it would be good to begin with a white background so started with some white pigment in 4oz cloth as a base.


Since the game and the original cabinet are really cartoony I wanted to reproduce that vibe and since I have zero skill with character illustration I thought waterfall feel was appropriate.
I really thought I took more pictures of this as I went along but I appear to have deleted anything I had between layer #1 and layer #7.
Not sure if that was the rum or the resin fumes.
Maybe both.


Suffice to say that I layered 2 different blue pigments and some purple and blue tint (along with more white) in seperate layers to get some layering and separation and this result.
A little bit of fun with pulling and swirling a brush around when the resin starts to gel a bit and you can get some very breaking wave-ish kind of shapes.

I redrilled to get through the cloth and resin so I could try to decide what to put in for button colors.
Still not sure if I like the idea of contrast or using white and blue because the tones are the same.


When this has hardened up enough tomorrow I can sand it out and it should be good to polish and wire up.

Then I really have no excuse to avoid reprogramming the U-HID and rewiring the DB25 plug setup I have already, which appears that it will be the initial wiring swap method.

Relax, all right? My old man is a television repairman, he's got this ultimate set of tools! I can fix it.

Zebidee

  • Trade Count: (+9)
  • Full Member
  • ***
  • Offline Offline
  • Posts: 3322
  • Last login:Today at 07:37:27 am
Re: I know what you're thinking... Missile Command- multi-sync, multi-panel
« Reply #37 on: August 08, 2022, 07:29:48 am »
Toobin panel! Awesome, and waves theme is perfect.
Check out my completed projects!