 JUZI SHOWCASE VIDEO
Other older gamplay videos:
Playing "
Behind... Enemy lines" New recoil mod with attached cocking handel to solenoid."
Playing "
Elevator Action Death Parade"
Playing "
Operation WOLF" + quick demo of the WIP gun."
Playing "
Aliens Extermination"
Playing "
Gundam Spirits of ZEON"
Playing "
Let's Go Island"
The beginningIt all started with my previous build of converting a original
NAMCO light gun with the re-coil kit from Ultimarc.
The arcade feel was right there with the right feedback shooting the guys in
Time Crisis or the Sharks in
Point Blank, but hey, if one would play a point and spray title like
Operation WOLF or
Terminator 2: Judgment Day, well, then the arcade feel was there too, but just for the first bullet, the rest of the massacre would be felt from the in-game sound effects as the trigger had to be released and pressed again for the solenoid to fire.
Not the guns fault really, that was just how the gun was made to work and not suited for full auto games.
Annoying, though! What if I make a gun with full auto feature with maybe a switch for single fire gaming? Put an Aimtrak in a small sub machine gun type, like an
MAC-10 or the awesome
UZI?
I browsed the net and found a great candidate for it. An faulty
mini UZI air softgun.
Price around 40$ shipped - new around 170$!!
The Gun
The gun is C02 gun from
KWC and is mostly made of metal. It is very sturdy with an impressive authentic weight in the hand.
I really do not know if I can recommend converting a Co2 gun over an electric type (AEG) as the latter have many of the needed components pre-installed already where the Co2 does not.
Though I had no choice going the UZI way as no electric 1:1 metal gun were to be found.
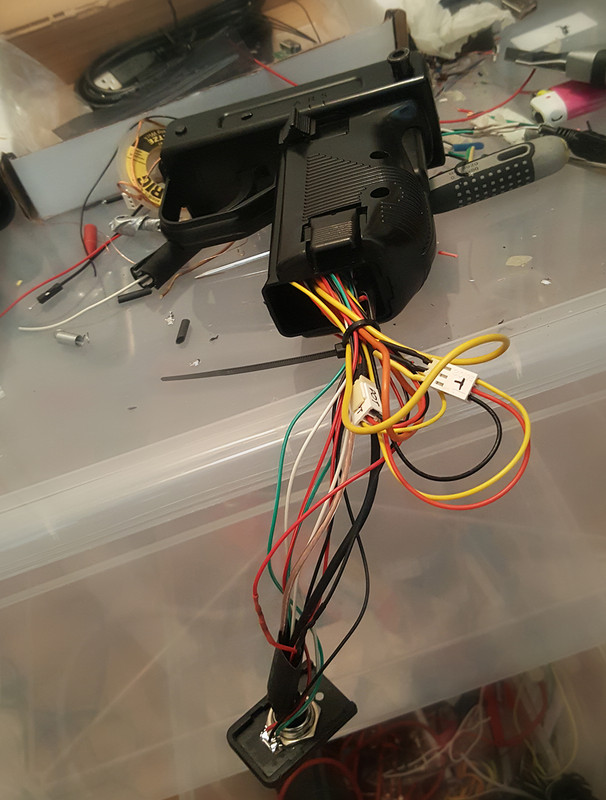
I had to gut and modify pretty much everything inside the gun and retro fit my own parts. Just to place the trigger switch right took me hours.
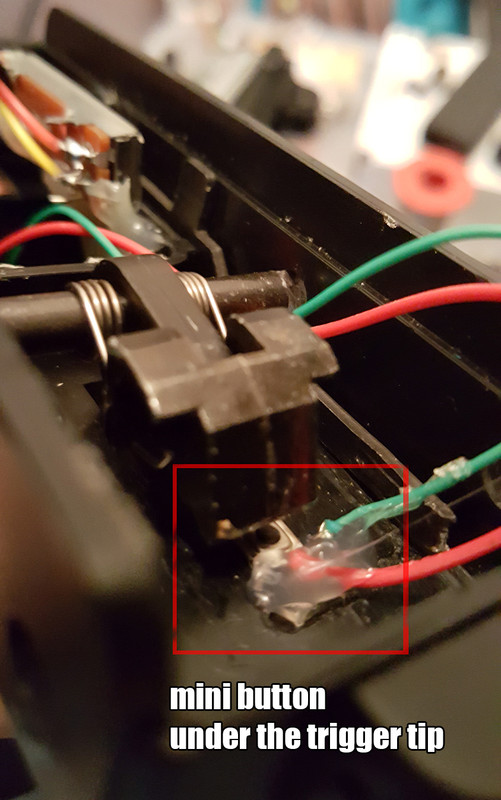
The switch for the trigger is super small and fits between the inside bottom and the mechanics of the trigger and gives signal in the right pull of the trigger - around 80% pulled state was my seet spot.
Sparks Attiny Arduino Nano cloneEarly on I reached out on Arduino forums and pitched my idea and the first guy I tried to contact turned out to be the super nice guy I needed, a true Jedi and his name was
Juice.
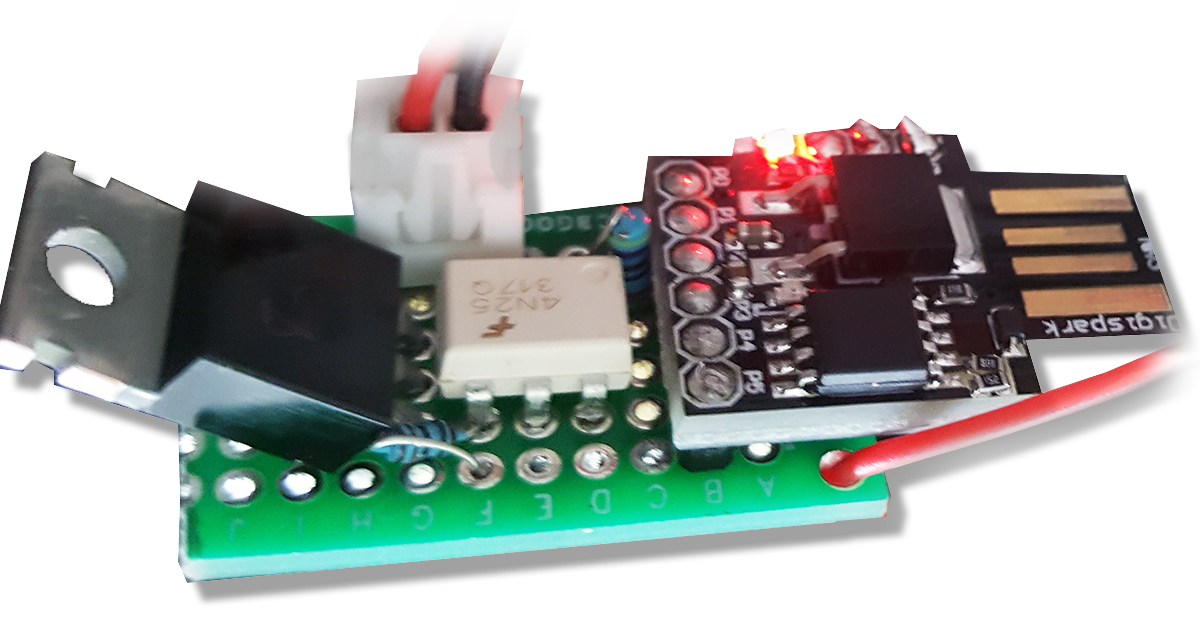
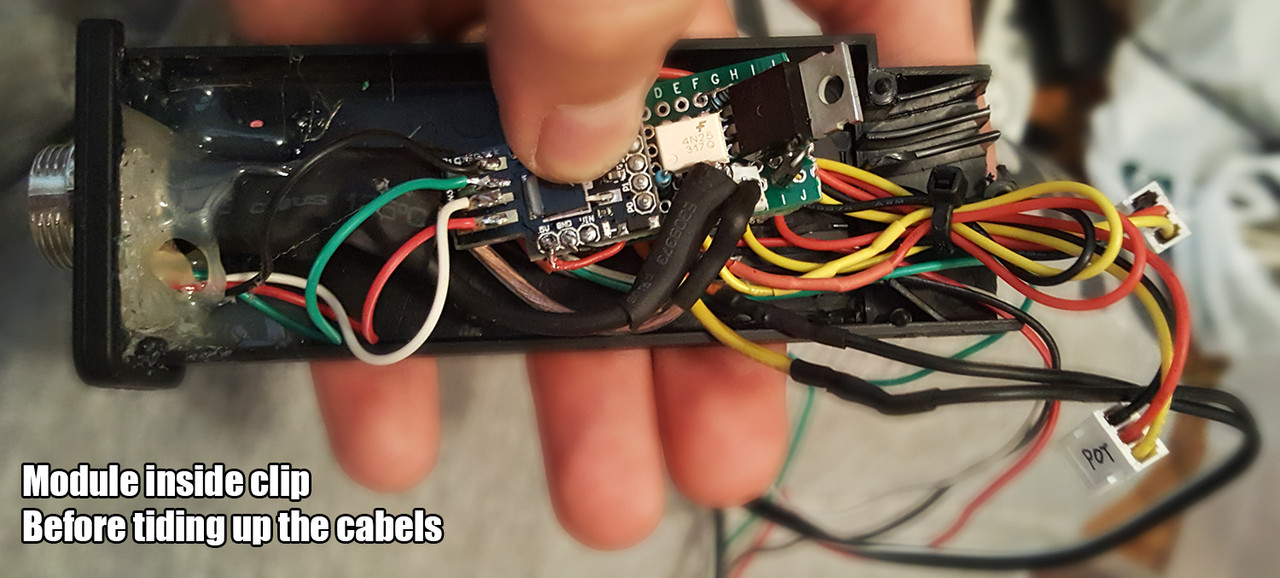
I presented my idea and after some days he send me a schematics of how to solder a module with Sparks Attiny, a super small and cheap programmable chip.
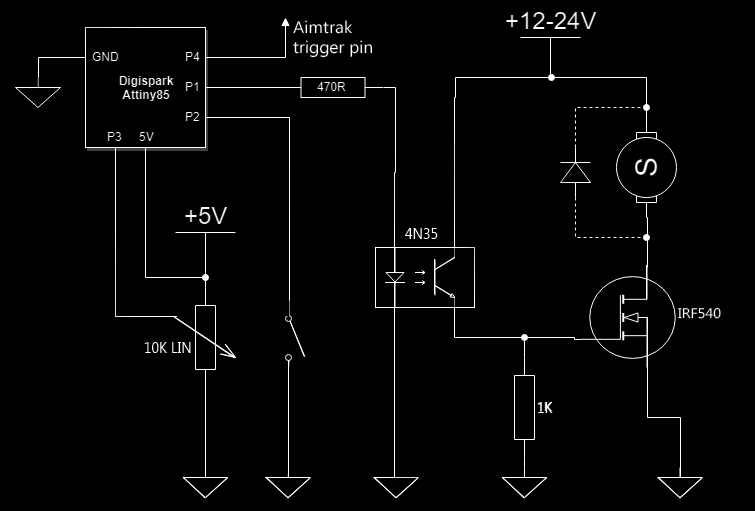
He also gave me the code in order to program the Attiny clone board and the chance for me to alter the code for the best operation of the unit.
Edit: The code is now released for all
non-commercial purpose thanx to
mr. Juice:
download the
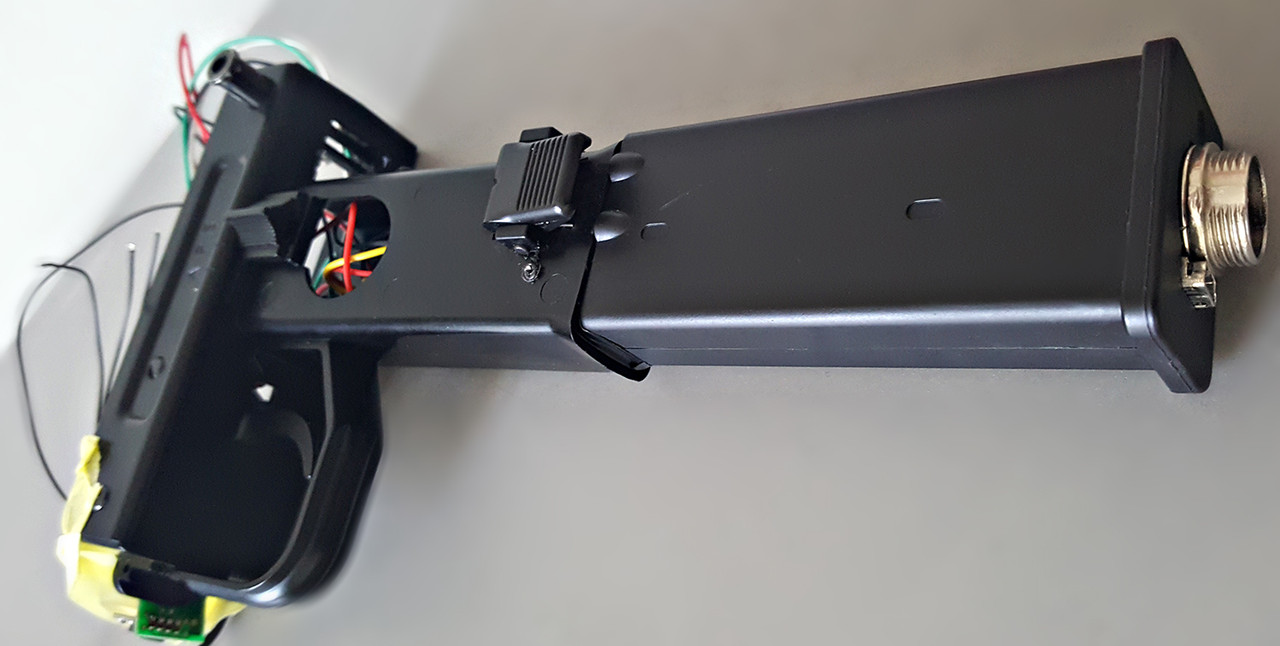
JUZI code The whole thing it powered from the same 5V+ USB as the Aimtrak and all fits inside the clip of the gun. I bought a mini uzi clip branded
WELL from eBay as the gun came without it's clip.
Cost like 15$ in ABS (original clip in metal 50$). Would have been nice in metal but not Worth the steep price.
 Fire selector mode
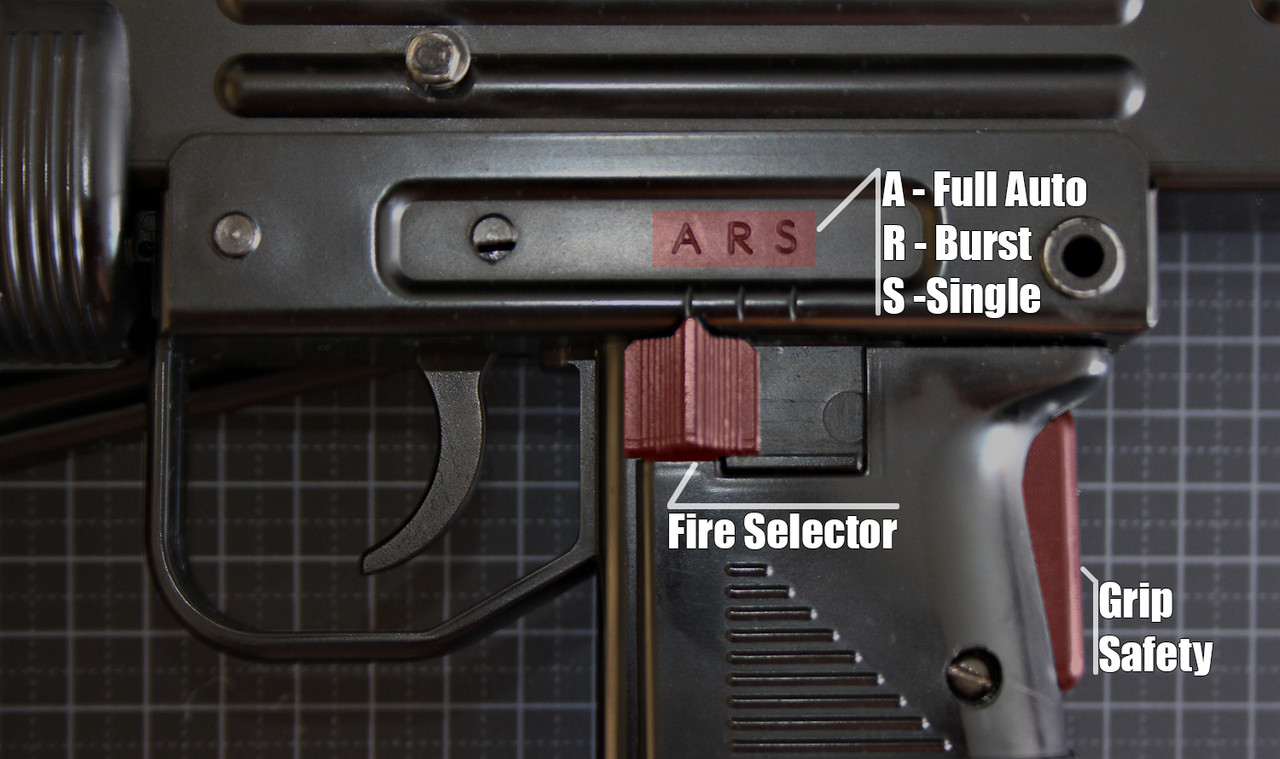
The gun had a thumb switch which sets it in S-Safe, R-Single Fire and A-Full Auto, but as the gun also have a grip safety which must be pressed before the gun can fire.
I thought I just keep that function and use the three positions of the thumb switch for three fire modes as follows:
S-Single Fire,
R-Burst and
A-Full Auto, where the single fire and full auto is the same as for what is sent to the Aimtrak - a long on signal.
The burst however, is really 3 single shots fired in an automatic fashion as long as the trigger is being hold.
The gun solenoid answers different to the signals and fires 1, 3, and auto pulses per selected mode a real gun would..
The thumb switch is read with a 10K linear potentiometer inside the gun and its limit values is selectable in the code. (This function can also be controlled via a push button if one wanted via the code)
 -- VIDEO --
Early test with the three fire modes on the
NAMCO solenoid
Here the Aimtrak module is test mounted and the recoil connected to fire for each fire modes selected
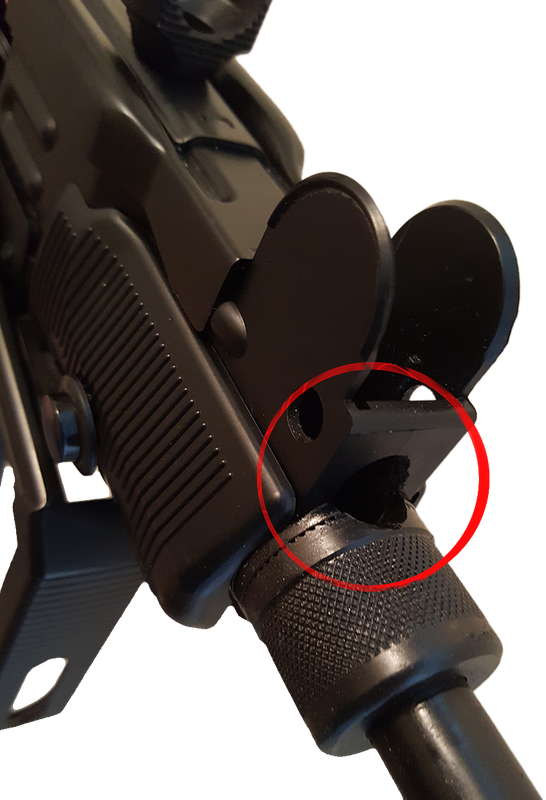
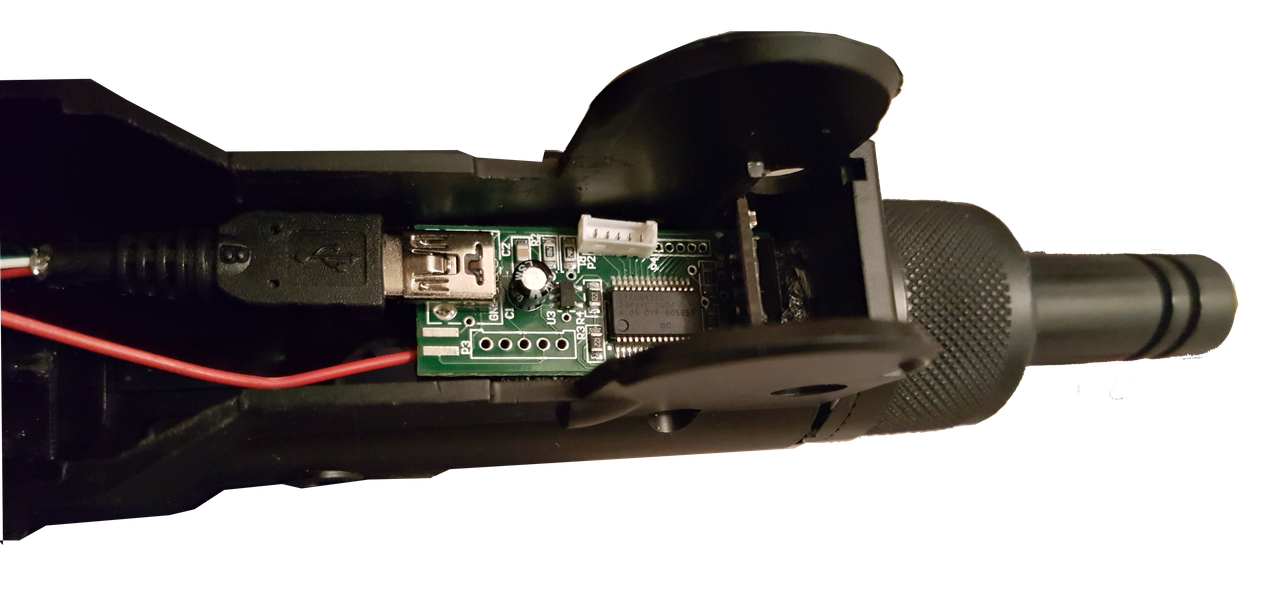
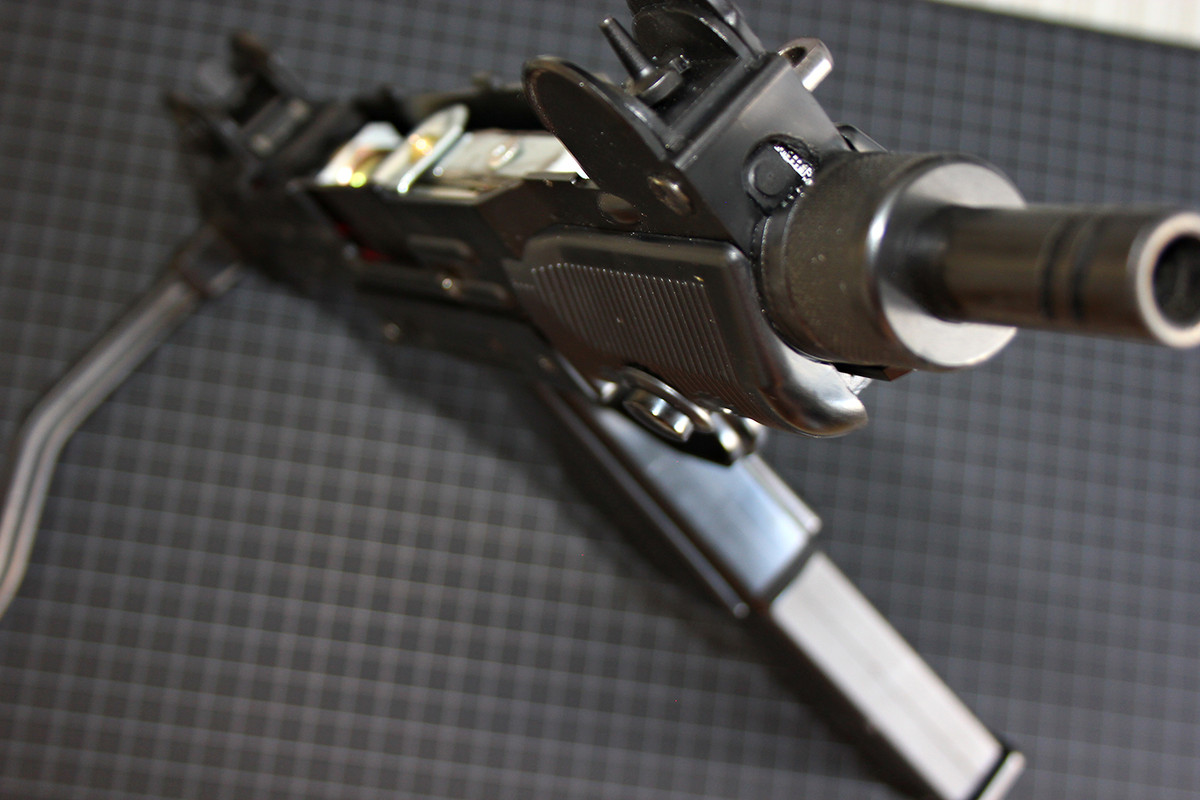
Fitting the Aimtrak ModuleAccording to my measures the Aimtrak module would fit perfectly inside under the front part of the aim tactile, I had to modify the front barrel a bit and drill a groove so that the camera from the Aimtrak would have a free sight of the IR-diodes
 Choosing the right feedback
I struggle on what to use as feedback device. I initially thought of use a vibration motor, but it was a tad too big to fit and then I had to mount it horizontally which would make the vibration goes right/left, and not kick back and forth as you like for a gun.
Also thought of using a small vibration motor and then a small solenoid in conjunction but ended up using a real
NAMCO solenoid from my second gun.
I had to modify the solenoids mount rails in order to fasten it and also lower it a bit by cutting the top part off so I could put the top back on.

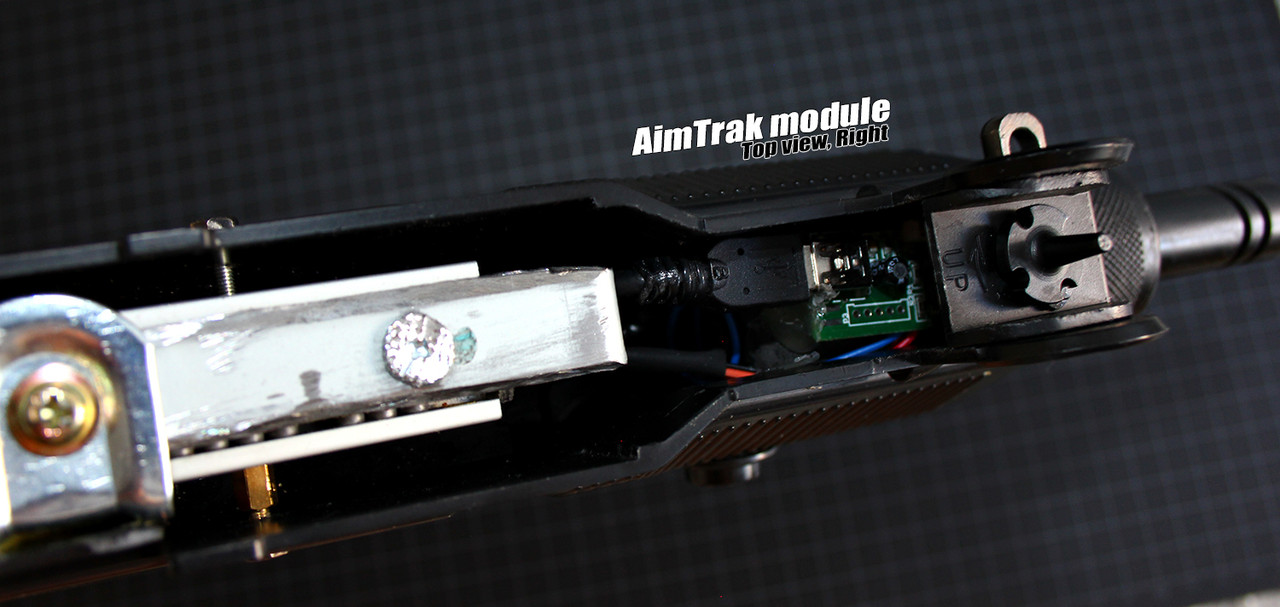
The solenoid holds up and kicks hard. I initially thought that it would be super hot but it is luke warm at most. clearing the whole first level of
Let's Go Island which is a more or less full auto all game through!
The videos of it does NOT make it justice. It kicks like an angry mule!
no-authentic upgradeAfter some heavy play-testing I thought that I had to, even though this is
NOT how the real mini UZI suppose to behave, connect the top cocking handle to the solenoid for a more arcade style of firing. This sounds more metallic, which also adds to the fun and more realistic I think!

Here is the top cover (bottom view) with the cokcing handle which from stock is connected to a spring and ony works as a pull-and-return gimmick.

I removed the spring and created a latch of a metal sting covered in shringking tube. This is just a prototyp, but I thought it can stay in there and I reinfoce this function if broken as
I intentionally just wanted to see if this was a good idea or not. (edit: It was a great idea!)

Here it is screwed tight under the
NAMCO recoil top screw. The task now is to catch the hook from the under side of the cocking handle so it stays connected.
I wanted to do this so can open this part fairly easy if needed.
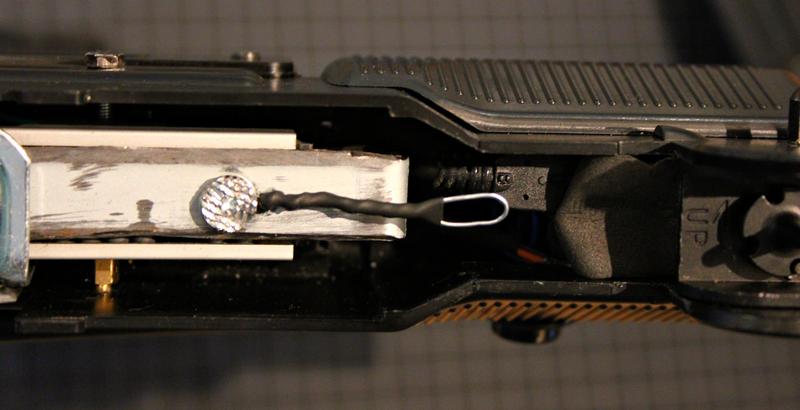
Linked together

Video of the now recoiled cocking handle
-- VIDEO --Playing "
The new feedback in action"
Playing "
Behind... Enemy lines" New recoil mod with attached cocking handel to solenoid."
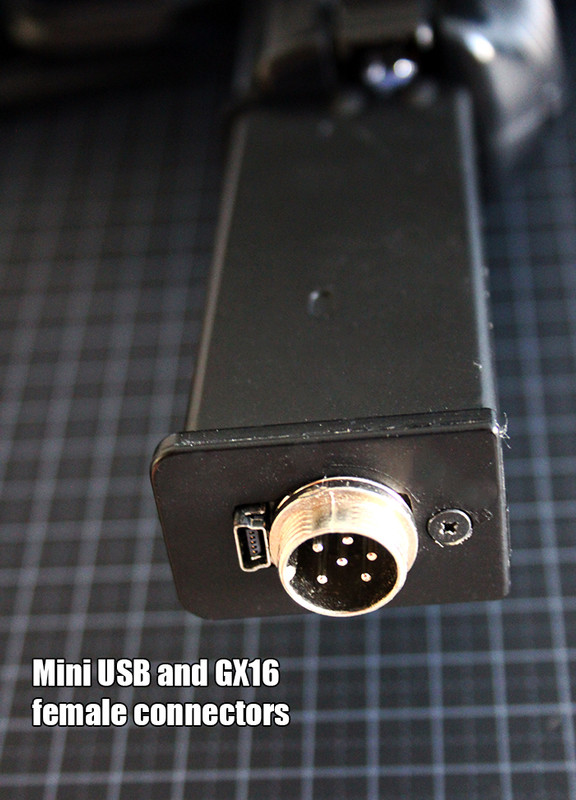
A module cordI build the cord for the gun using GX16 6 pins male/female connectors. In this way I could free the gun from the cable all together and also take the cord from the cab if needed. I ended up using 5 pins so that would have been enough for this. The cord is an electrical cable 5G with good arcade like black rubber isolation.
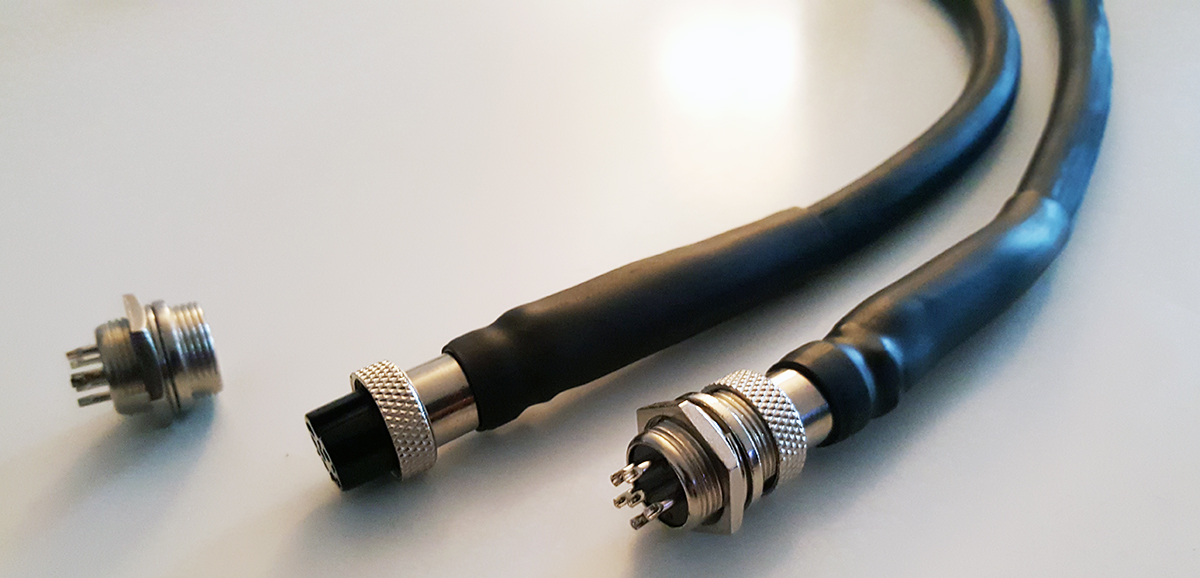
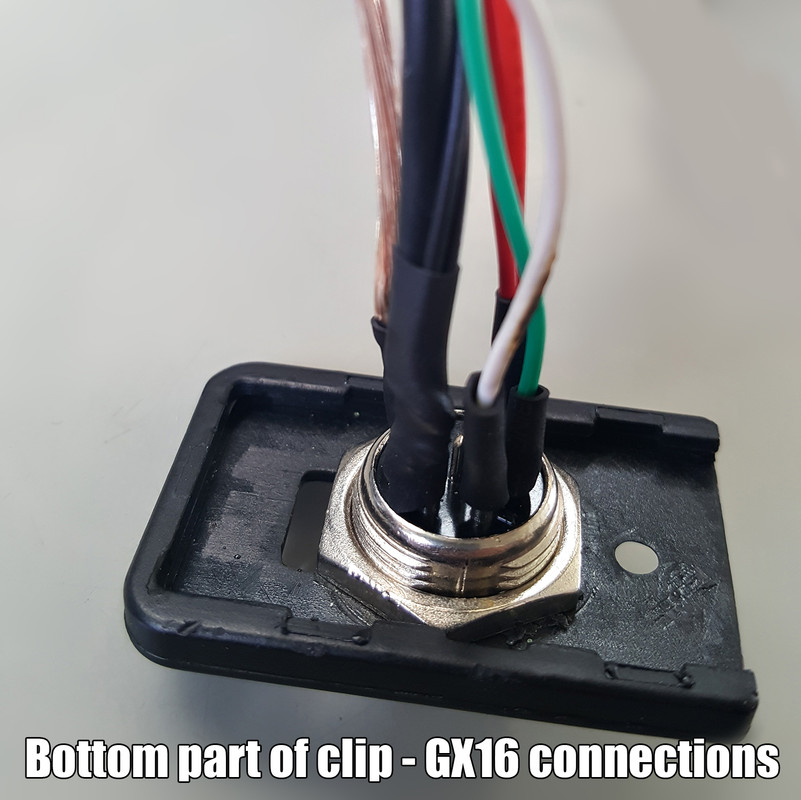 GND5V+
 (USB)
12-24V (Solenoid)
DATA1 (USB Aimtrak)
DATA2 (USB Aimtrak),
The cord also enables the gun to be used in multiple arcade setups or if one wants to use the original
NAMCO gun for one game and the switch to a full auto gun for another.
I also found it hard to mount an arcade gun to a standard cabinet. Front mount is a no go as it would poke the player and on the side would normally need a holster of some kind.
I thought they where a bit steep in price to get ithem shipped to Sweden, and also if I wanted to remove the gun they would just sit there over the vinyl artwork.
So I just mounted a long screw in the side which I then covered in shrinking tube.
Now when a gun is not connected minimal coverage is affected to the side art.
The only visible parts is the pin and the female
GX16 connector for the module cord.

Here is how it looks with each respectively gun mounted.
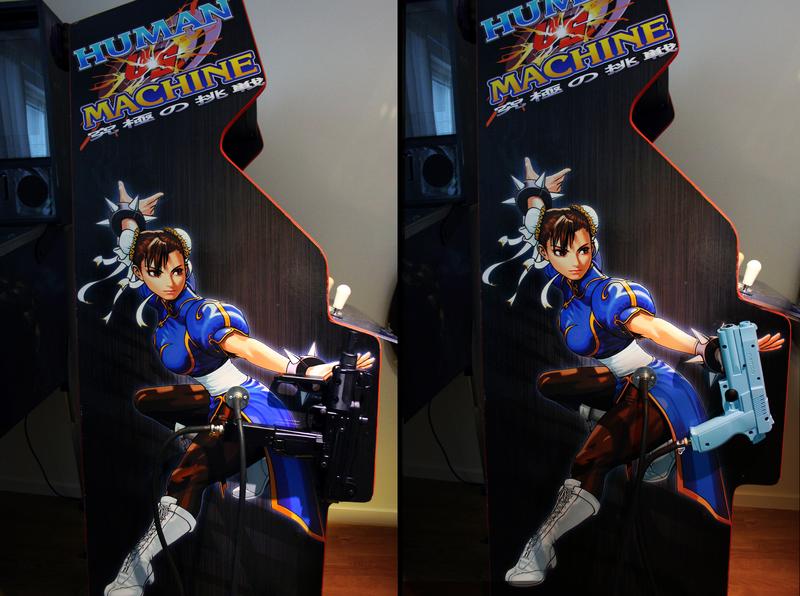
The good thing a bout the cord also beeing modular is that you can display the guns when not in use aswell as hide them for underaged players(!)


As many of the game titles have a second button like in
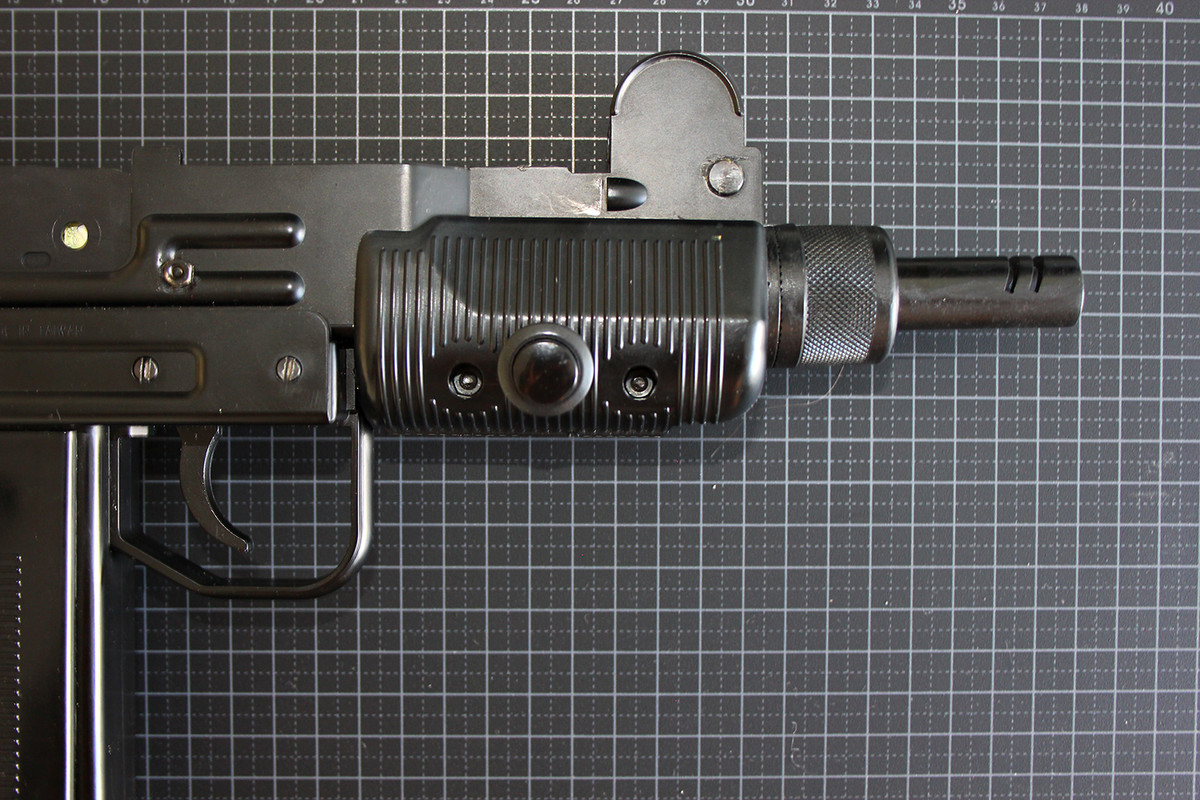
Operation WOLF you can throw a grenade I placed a button on the right side of the guns front.
Much like on Operation WOLF It thought of use a red button, but I later went with a black as I wanted as much of an authentic gun as possible.

 -- VIDEO --
Showing off the buttons
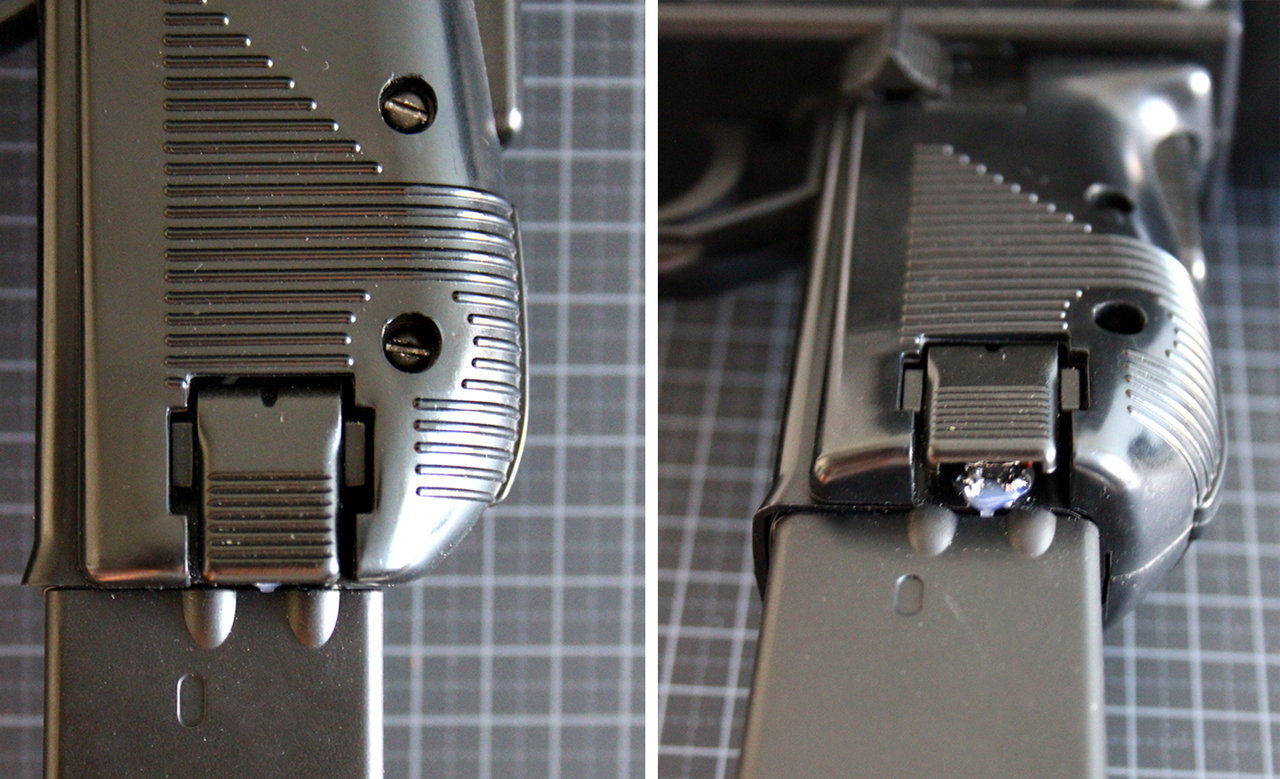
Also, the button for release the clip is used as a secondary button. I just put a small micro switch under the button which was already there. (And no, you cannot detach the clip anymore)
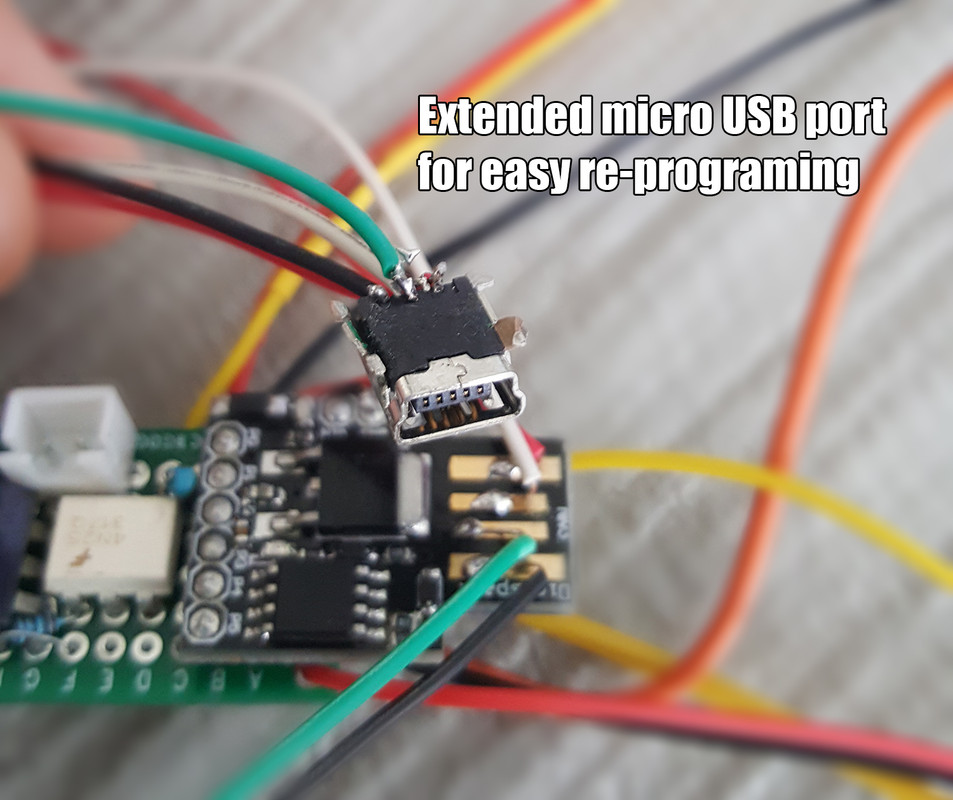
The underside of the clip have the male GX16 and also a mini USB female port which makes it super easy to re-program the JUZI module if needed. I have played a bit whit the on and off times of the solenoid in the burst and full auto modes, and this is a breeze having this extended port, though it might be overkill for some.
This gun really can play it all: Single fire shooters and also full auto titles. And the burst mode is just a great bonus mode, like in
Virtua Cop,
House of the Dead or in games that require you to shoot like crazy like
Point Blank.
I don't know if this is the first gun ever made with switchable fire modes and recoil feedback, but I have not seen a finished project when searched around which proceeded me into writing this short story.
I absolutely love my gun to bits and sometimes find myself posing with it in the mirror with a bare torso like when you were Little just finished watching a Rambo flic.
Best 200$+ ever spend if you ask me, although my wife might tell you different.
Lock and load!


 Home
Home Help
Help Search
 Login
Login Register
 Send this topic
 Print
Print


