Main Restorations Software Audio/Jukebox/MP3 Everything Else Buy/Sell/Trade
Project Announcements Monitor/Video GroovyMAME Merit/JVL Touchscreen Meet Up Retail Vendors
Driving & Racing Woodworking Software Support Forums Consoles Project Arcade Reviews
Automated Projects Artwork Frontend Support Forums Pinball Forum Discussion Old Boards
Raspberry Pi & Dev Board controls.dat Linux Miscellaneous Arcade Wiki Discussion Old Archives
Lightguns Arcade1Up Try the site in https mode Site News

Unread posts | New Replies | Recent posts | Rules | Chatroom | Wiki | File Repository | RSS | Submit news


Author Topic: Donkey Kong scratch build, my first cabinet!  (Read 35872 times)

0 Members and 1 Guest are viewing this topic.

PixelPaul

  • Trade Count: (0)
  • Full Member
  • ***
  • Offline Offline
  • Posts: 77
  • Last login:October 26, 2020, 08:10:46 am
Re: Donkey Kong scratch build, my first cabinet!
« Reply #40 on: January 16, 2014, 09:33:52 am »
1. 22"
2. 40 degrees
3. The tube is 3 3/4" away from the bezel block and a tad higher. (see pic)

Thanks Chopper, much appreciated!

PixelPaul

  • Trade Count: (0)
  • Full Member
  • ***
  • Offline Offline
  • Posts: 77
  • Last login:October 26, 2020, 08:10:46 am
Re: Donkey Kong scratch build, my first cabinet!
« Reply #41 on: January 16, 2014, 02:12:34 pm »
Spent some time transferring the layout from the Jackobud plans to the cabinet sides. As the old saying goes, "measure twice and cut once". A large drywall T-square was very handy - use the straight and square sides as a reference.


Made a full size mockup of the bezel and marquee last night at work. Just a cheap inkjet print attached to a piece of cardboard. Important that the cabinet fit these two pieces in their correct size.


Hope to start assembling the cabinet this weekend!

PixelPaul

  • Trade Count: (0)
  • Full Member
  • ***
  • Offline Offline
  • Posts: 77
  • Last login:October 26, 2020, 08:10:46 am
Re: Donkey Kong scratch build, my first cabinet!
« Reply #42 on: January 16, 2014, 06:06:38 pm »
I have one more measurement question, #4 in the updated image below. The distance from the front of the marquee to the back where the light would mount.


chopperthedog

  • Trade Count: (0)
  • Full Member
  • ***
  • Offline Offline
  • Posts: 1049
  • Last login:Today at 09:26:16 am
Re: Donkey Kong scratch build, my first cabinet!
« Reply #43 on: January 16, 2014, 06:11:53 pm »
4. 5 3/4"

good day.

Meph

  • Trade Count: (0)
  • Full Member
  • ***
  • Offline Offline
  • Posts: 157
  • Last login:December 12, 2024, 02:00:40 am
Re: Donkey Kong scratch build, my first cabinet!
« Reply #44 on: January 19, 2014, 08:51:19 am »
Subscribed.  I am planning to do a Nintendo cab for my next project so I am loving this thread.  Looks great so far.

PixelPaul

  • Trade Count: (0)
  • Full Member
  • ***
  • Offline Offline
  • Posts: 77
  • Last login:October 26, 2020, 08:10:46 am
Re: Donkey Kong scratch build, my first cabinet!
« Reply #45 on: January 20, 2014, 07:03:34 pm »
Got a bit of work done this weekend, but not as much as I would have liked :-(

Cut bottom cabinet floor shelf to size and attached to base skirt. Drilled holes for wheels, to be attached later.


Cut top shelf to size and used round-over router bit to match profile of top marquee bracket.


Attached bottom shelf cleat to both cabinet sides.


When fastening MDF, used some yellow Titebond glue and screws. Drywall screws for MDF to poplar attachment. Pilot holes are recommended, a countersink drill bit will make a pilot hole for the screw and a recess hole for the screw head (later to be covered with bondo) in one simple step.


MDF has a tendency to tear-out on the underside of the hole, so a slight recess using a straight countersink bit will help eliminate that and make for a nice tight joint.


Time spent ~3:00, total time to date 6:30.

On a slightly more exciting note, email has informed me that FedEx has left me a package of parts. Can't wait to get home and have a look!
« Last Edit: January 20, 2014, 07:05:45 pm by PixelPaul »

jdbailey1206

  • Trade Count: (+1)
  • Full Member
  • ***
  • Offline Offline
  • Posts: 2656
  • Last login:March 11, 2023, 01:32:56 pm
  • No. It's your top score on Pole Position.
Re: Donkey Kong scratch build, my first cabinet!
« Reply #46 on: January 21, 2014, 09:08:55 am »
Clamping your cleats probably isn't necessary if you position them correctly.  The screws will act as clamps and hold your cleats in place.  Also check out these countersink bits from Dewalt.  They are a lifesaver and you don't need to keep switching between drill bit and countersink bit.  A tad expensive but I've had mine for over a year and they are well worth their weight in gold.  Keep at it everything looks nice and clean.

AND QUIT COUNTING YOUR HOURS!!!    :lol

mcseforsale

  • Trade Count: (0)
  • Full Member
  • ***
  • Offline Offline
  • Posts: 1471
  • Last login:April 09, 2024, 03:07:41 pm
  • Creepy Mario Dude

thehammer12

  • Trade Count: (0)
  • Full Member
  • ***
  • Offline Offline
  • Posts: 294
  • Last login:October 24, 2021, 01:46:34 pm
  • Arcade Breaking Specialist
Re: Donkey Kong scratch build, my first cabinet!
« Reply #48 on: January 21, 2014, 03:58:31 pm »
Awesome job man, cant wait to see the final results.

PixelPaul

  • Trade Count: (0)
  • Full Member
  • ***
  • Offline Offline
  • Posts: 77
  • Last login:October 26, 2020, 08:10:46 am
Re: Donkey Kong scratch build, my first cabinet!
« Reply #49 on: January 21, 2014, 04:57:04 pm »
Indespensible:
http://www.homedepot.com/p/Ryobi-SpeedLoad-Plus-No-8-Drill-and-Driver-Kit-AR1890/100520880#

That is very cool. If I would stop loaning out tools, I'd have 3 drills and could use a bit in each drill. But I guess I haven't yet learned my lesson and continue to loan out my tools, only to have to put in way to much effort to get them back.

PixelPaul

  • Trade Count: (0)
  • Full Member
  • ***
  • Offline Offline
  • Posts: 77
  • Last login:October 26, 2020, 08:10:46 am
Re: Donkey Kong scratch build, my first cabinet!
« Reply #50 on: January 22, 2014, 01:35:45 pm »
On Monday the T-molding arrived. On a Donkey Kong cabinet, the cabinet side edges and the front edge of the control panel gets the white colored t-molding. I ended up ordering from t-molding.com. It is sold in 20' coils, purchased 3/4" to match the width of the MDF I am using to build the cabinet. Was not able to find a definitive answer on if 20' was enough the complete a cabinet (it seems it is), but given the relatively cheap cost (compared to the cost of shipping), I went ahead and ordered 2 coils (40') to be safe. I can always use any leftovers on a future project.


It wasn't until after I placed my order that I learned that the original DK cabinet had a flat profile t-molding compared to the rounded profile I ordered. Turns out this is no big deal at all for me, as I plan to make a few modifications to my cabinet anyway, but for those of you looking to be as authentic as possible, take note. It turns out that t-molding.com has the flat profile also. Note it is 9/16", I am assuming this is the material thickness of an original DK cabinet?

Cost for 40' t-molding+shipping ~$30, total spent to date: $145
« Last Edit: January 22, 2014, 01:37:25 pm by PixelPaul »

PixelPaul

  • Trade Count: (0)
  • Full Member
  • ***
  • Offline Offline
  • Posts: 77
  • Last login:October 26, 2020, 08:10:46 am
Re: Donkey Kong scratch build, my first cabinet!
« Reply #51 on: January 22, 2014, 01:54:11 pm »
The t-molding gets installed in a grove that is made with a router using a slot-cutter bit. One of the reasons I ordered from t-molding.com is that they also sold Whiteside router bits. As a hobbyist woodworker I have learned over the years that Whiteside router bits are as good as it gets. Always buy the best tools you can afford and you won't be sorry.


A slot-cutter router bit is usually sold as two parts: the shank and the cutter head. The cutter can be swapped out for different sizes while using the same shank. T-molding.com made it easy to select the correct sized cutter based on the size of the t-molding you were using.


The shank and cutter head ship in different packages, so you will have to assemble. There are two washers, a bearing and a nut on the shank. Assemble as shown in the picture. You don't need to fret about having the top nut being super tight. Tighten best you can with a wrench and the nut will self tighten itself when the router is started, it will not come flying off.


Very important note about installing the cutter head on the shank. Look at the photo above and note the direction of the carbide cutters. It is a common mistake to install the cutter head on backwards. You will know you have if when trying to router the slot you smell burning or need a lot of force to push the bit through the wood. When installed correctly, the slot cutter should cut like a hot knife through butter.

PixelPaul

  • Trade Count: (0)
  • Full Member
  • ***
  • Offline Offline
  • Posts: 77
  • Last login:October 26, 2020, 08:10:46 am
Re: Donkey Kong scratch build, my first cabinet!
« Reply #52 on: January 22, 2014, 02:04:19 pm »
Cutting the slot is actually a very simple process. You will however want to practice on a scrap piece of wood first. Since I am using 3/4" MDF for the cabinet, we want the slot cut exactly in the center, so 3/8" for my application. Draw a center line at 3/8" on a scrap piece of wood.


Adjust the router bit height on the router so it aligns with the center-line and make a test cut. A nice touch from the folks at t-molding.com, they included a half dozen scrap pieces of molding to "test" with on the practice cut. T-molding gets tapped into the slot with a rubber mallet and is perfectly centered. Ready to route the actual cabinet.


Next just clamp the cabinet sides on a flat surface and follow around the edges with the router. The bearing on the router bit shank will guide you along the cabinet edge as the cutter creates the slot to the correct depth. A simple and quick process. T-molding won't get installed until the very end, but the slots is done.


Duh! Just realized I forgot to the do the front edge of the control panel (don't even have it cut yet). Save some time and trouble and do the control panel piece at the same time as the sides while the router is setup. Oh, and by popular demand I have stopped tracking my time   :)
« Last Edit: January 22, 2014, 02:30:16 pm by PixelPaul »

jmike

  • Trade Count: (+10)
  • Full Member
  • ***
  • Offline Offline
  • Posts: 1018
  • Last login:June 24, 2025, 04:54:36 pm
Re: Donkey Kong scratch build, my first cabinet!
« Reply #53 on: January 22, 2014, 02:31:27 pm »
 :applaud:
Love the progress and Q&A. You laying the ground work for most of us who are planning a Nintendo build.
Can't wait to start my Fix it Felix cab. Looking forward to your next update.
By the way you'll have to adjust T-molding slot for your control panel piece because of the plexi (+ 1/4).

 :cheers:


PL1

  • Global Moderator
  • Trade Count: (+1)
  • Full Member
  • *****
  • Offline Offline
  • Posts: 9671
  • Last login:Today at 12:54:53 pm
  • Designated spam hunter
Re: Donkey Kong scratch build, my first cabinet!
« Reply #54 on: January 22, 2014, 04:22:27 pm »
Oh, and by popular demand I have stopped tracking my time   :)
Use the spoiler icon so the haters don't have to look at it.   :lol

Also, Chomping Quarters has the flat 15mm Nintendo t-molding, if anyone is interested.


Scott
« Last Edit: January 22, 2014, 04:36:28 pm by PL1 »

chopperthedog

  • Trade Count: (0)
  • Full Member
  • ***
  • Offline Offline
  • Posts: 1049
  • Last login:Today at 09:26:16 am
Re: Donkey Kong scratch build, my first cabinet!
« Reply #55 on: January 22, 2014, 05:01:59 pm »
It wasn't until after I placed my order that I learned that the original DK cabinet had a flat profile t-molding compared to the rounded profile I ordered. Turns out this is no big deal at all for me, as I plan to make a few modifications to my cabinet anyway, but for those of you looking to be as authentic as possible, take note. It turns out that t-molding.com has the flat profile also. Note it is 9/16", I am assuming this is the material thickness of an original DK cabinet?
I sorta did the same thing http://forum.arcadecontrols.com/index.php/topic,128979.msg1320326.html#msg1320326. On the plywood DK cabs they used 5/8 thick ply with an actual thickness of 9/16". Not sure how the flat will be on the 3/4 mdf though, might wanna stick with what you already have.

:applaud:
Love the progress and Q&A. You laying the ground work for most of us who are planning a Nintendo build.
Can't wait to start my Fix it Felix cab. Looking forward to your next update.
By the way you'll have to adjust T-molding slot for your control panel piece because of the plexi (+ 1/4).

 :cheers:


The original and repro screen printed plexi cpo's are only 1/8" thick and do not go to the edge of the wood of the control panel. Nintendo used the same plywood and tmolding that the sides have to make the control panel with a centered slot.


good day.

PixelPaul

  • Trade Count: (0)
  • Full Member
  • ***
  • Offline Offline
  • Posts: 77
  • Last login:October 26, 2020, 08:10:46 am
Re: Donkey Kong scratch build, my first cabinet!
« Reply #56 on: January 22, 2014, 07:20:51 pm »
I sorta did the same thing http://forum.arcadecontrols.com/index.php/topic,128979.msg1320326.html#msg1320326. On the plywood DK cabs they used 5/8 thick ply with an actual thickness of 9/16". Not sure how the flat will be on the 3/4 mdf though, might wanna stick with what you already have.

Yes, I going to use the rounded t-molding I already have. Checked out your link, awesome job on your restore!

SORHP

  • Trade Count: (0)
  • Full Member
  • ***
  • Offline Offline
  • Posts: 178
  • Last login:July 14, 2025, 12:28:55 am
Re: Donkey Kong scratch build, my first cabinet!
« Reply #57 on: January 23, 2014, 02:30:17 am »
Great work so far! Your top marquee piece of wood routing is unnecessary, neat, but the originals don't have that, it may cause an issue with the top marquee metal mounting flush , maybe not :)
Games: Super Punch Out, Fix It Felix Jr, DK, DKjr, DK3, PC10, UMK3, TRON, MS-Pac, Pac, Centipede (2x), Robotron, Galaga, Space Invaders, Street Fighter 2 CE, X-Men vs SF, BuckHunter HD, 2X Custom Vewlix, Custom Nintendo VS 3/4, Atomiswave

jdbailey1206

  • Trade Count: (+1)
  • Full Member
  • ***
  • Offline Offline
  • Posts: 2656
  • Last login:March 11, 2023, 01:32:56 pm
  • No. It's your top score on Pole Position.
Re: Donkey Kong scratch build, my first cabinet!
« Reply #58 on: January 23, 2014, 08:38:50 am »
Great work so far! Your top marquee piece of wood routing is unnecessary, neat, but the originals don't have that, it may cause an issue with the top marquee metal mounting flush , maybe not :)


Paul - The preceding picture shows how the original DK cabs were built regarding the marquee.  I don't think you should have a problem if you test fit everything.  The top marquee retainer should hang low enough to catch and hold your marquee glass.  Words of wisdom on test fitting also.  If something doesn't fit don't force it.  Or you could break the male end of your usb port off of your encoder like I did last night.   :banghead:  Oh well.  Back to painting for a week.   :D

I also sent you a pm about a certain part you may need in the foreseeable future.
« Last Edit: January 23, 2014, 08:42:02 am by jdbailey1206 »

PixelPaul

  • Trade Count: (0)
  • Full Member
  • ***
  • Offline Offline
  • Posts: 77
  • Last login:October 26, 2020, 08:10:46 am
Re: Donkey Kong scratch build, my first cabinet!
« Reply #59 on: January 23, 2014, 11:46:30 am »

Paul - The preceding picture shows how the original DK cabs were built regarding the marquee.  I don't think you should have a problem if you test fit everything.  The top marquee retainer should hang low enough to catch and hold your marquee glass.

Thanks for the photo. I have the marquee and bezel clips on order and waiting their arrival. Not going to start cabinet assembly until I can confirm it will all fit together correctly.

PixelPaul

  • Trade Count: (0)
  • Full Member
  • ***
  • Offline Offline
  • Posts: 77
  • Last login:October 26, 2020, 08:10:46 am
Re: Donkey Kong scratch build, my first cabinet!
« Reply #60 on: January 23, 2014, 11:54:40 am »
Another package arrived today, this time from twistedquarter.com. Contents:


Coin bucket (I think an original DK cabinet had a wooden box?), power cord, 4-way joystick, handles for back of cabinet, CP buttons, wiring kit and clips for control panel.


Also ordered a coin door with mechanicals. I know, all you DK purists will call "foul", this is not the coin door from an original cabinet. Seems like those are getting harder and harder to find. I thought about getting a new coin door that has the elongated shape more like the original, but in the end I decided to go with this one so I would have some room underneath it for some artwork.

Total spent on this order: $153, total spent to date: $298

jdbailey1206

  • Trade Count: (+1)
  • Full Member
  • ***
  • Offline Offline
  • Posts: 2656
  • Last login:March 11, 2023, 01:32:56 pm
  • No. It's your top score on Pole Position.
Re: Donkey Kong scratch build, my first cabinet!
« Reply #61 on: January 23, 2014, 01:50:15 pm »

Total spent on this order: $153, total spent to date: $298

Yeah but how many hours have you spent on it?  Kidding!  KIDDING!   :lol

PixelPaul

  • Trade Count: (0)
  • Full Member
  • ***
  • Offline Offline
  • Posts: 77
  • Last login:October 26, 2020, 08:10:46 am
Re: Donkey Kong scratch build, my first cabinet!
« Reply #62 on: January 27, 2014, 06:01:24 pm »
Received another order late last week (it was like Christmas all week!), this time from Mikes Arcade. Ordered the top marquee bracket, bottom marquee/bezel bracket and speaker.


Cost of this order ~$70, total spent to date $368.

PixelPaul

  • Trade Count: (0)
  • Full Member
  • ***
  • Offline Offline
  • Posts: 77
  • Last login:October 26, 2020, 08:10:46 am
Re: Donkey Kong scratch build, my first cabinet!
« Reply #63 on: January 27, 2014, 06:11:16 pm »
Finally started the cabinet assembly this weekend. Wasn't sure what was the best way to assemble...on the floor or standing up? Decided on top of the workbench, nice and flat and a good working height. Assembly is pretty basic stuff - drill some pilot holes, a little yellow glue, screw and clamp.


Clamped base with rafter square, trying to keep things nice and square.


Same process with cabinet top.


An extra hand would have been useful, but the wife was not home and I didn't want to waste a work day. Used some scrap 2x6 pieces to make a "I" support to hold the other cabinet side while I positioned, drilled and squared things up.


wp34

  • Trade Count: (+3)
  • Full Member
  • ***
  • Offline Offline
  • Posts: 4794
  • Last login:April 10, 2022, 09:48:19 pm
Re: Donkey Kong scratch build, my first cabinet!
« Reply #64 on: January 27, 2014, 06:36:25 pm »
Looking good.  It is always exciting to see the main carcass go together.   :cheers:

I don't blame you on the coin door.  I just overpaid for one for my Fix-it-Felix build.  Not sure if that was smart or not but like you said they are getting hard to find.

Let us know how you like that joystick from Twisted Quarter.

PixelPaul

  • Trade Count: (0)
  • Full Member
  • ***
  • Offline Offline
  • Posts: 77
  • Last login:October 26, 2020, 08:10:46 am
Re: Donkey Kong scratch build, my first cabinet!
« Reply #65 on: January 27, 2014, 07:04:41 pm »
Thought I would continue the construction by working from the top-down. I figured most important was to get the marquee and bezel to fit correctly, and if I had to fudge some dimensions later on, no big deal. Hit my first snag in the build thus far, not sure if this is an error in the Jackobud plans or something I'm figuring wrong. I was going to install what I call the marquee shelf, which according to my plans says should be 5.2" down from the cabinet top. Did a dry fit with it in that position, but then it seems the gap is to big for the marquee. The bracket that holds the bottom of the marquee and the top of the bezel should mount from the bottom of the shelf, correct? I don't have the actual marquee yet, but made a mockup based on the dimensions show at Mikes Arcade as 22-3/8" x 5-7/8". Can somebody confirm what the measurement should be from the underside of the cabinet top, to the top surface of the marquee shelf.


jdbailey1206

  • Trade Count: (+1)
  • Full Member
  • ***
  • Offline Offline
  • Posts: 2656
  • Last login:March 11, 2023, 01:32:56 pm
  • No. It's your top score on Pole Position.
Re: Donkey Kong scratch build, my first cabinet!
« Reply #66 on: January 28, 2014, 09:22:58 am »
If the marquee is 5 7/8 then I wouldn't let the space between my the bottom of my top piece of mdf and the top of my bottom piece exceed that amount.  I posted a picture of how it should sit.  I will bet you money too if you look at any picture of the marquee that space between the bottom of Nintendo icon and bottom of the actual marquee should be equal to the top space of your bottom marquee holder if that makes sense. 

Sorry for my ghetto picture too.  Me art good.   :)

Automark

  • Trade Count: (0)
  • Full Member
  • ***
  • Offline Offline
  • Posts: 169
  • Last login:October 24, 2023, 03:55:08 pm
  • Arcade in Spain ?
Re: Donkey Kong scratch build, my first cabinet!
« Reply #67 on: January 28, 2014, 09:55:12 am »
...this is not the coin door from an original cabinet. Seems like those are getting harder and harder to find. ...

Here's one: http://www.ebay.com/itm/Nintendo-Coin-Door-/331114555471 and there are now some really good reproductions.
And these mechs are almost like the real ones, but really cheap, im sure you can find them in the US as well
« Last Edit: February 02, 2014, 05:17:39 pm by Automark »

chopperthedog

  • Trade Count: (0)
  • Full Member
  • ***
  • Offline Offline
  • Posts: 1049
  • Last login:Today at 09:26:16 am
Re: Donkey Kong scratch build, my first cabinet!
« Reply #68 on: February 02, 2014, 03:35:56 pm »
The bottom part of the marquee box looks to thick. When the bottom bracket is installed the tip of the marquee bracket is level to the box so that it doesn't cast a shadow when lit. You may need to notch out the bottom of the marquee box so that the 4 mounting tabs for that bracket allow it to be at the right height to avoid that shadow.

The measurement you were asking about 2 posts up is 5 1/8".

In the last week or so I've seen 4 original Nintendo coin doors for sale on klov all for around 50 bucks. They are still out there.


good day.

PixelPaul

  • Trade Count: (0)
  • Full Member
  • ***
  • Offline Offline
  • Posts: 77
  • Last login:October 26, 2020, 08:10:46 am
Re: Donkey Kong scratch build, my first cabinet!
« Reply #69 on: February 05, 2014, 01:35:12 pm »
Confident enough now that I have the marquee shelf in the correct position, let's continue. Working on the marquee shelf and back piece. Drilled a hole with a forstner bit, which gives a nicer hole when compared to a spade bit.


Make the hole just big enough for the fluorescent light plug to fit through. Attached the shelf and back with some yellow glue and screws.


PixelPaul

  • Trade Count: (0)
  • Full Member
  • ***
  • Offline Offline
  • Posts: 77
  • Last login:October 26, 2020, 08:10:46 am
Re: Donkey Kong scratch build, my first cabinet!
« Reply #70 on: February 05, 2014, 01:52:04 pm »
Next on to the the coin door panel, essentially need to cut out where the coin door will fit. There are a number of ways to accomplish this, the easiest would be just to cut the hole with a jigsaw. The opening doesn't need to be perfect, as there is a ~3/4" "lip" around the coin door that would mask some sloppy cutting. But this is where my OCD kicks in, I need to do better even though no one would ever see it.
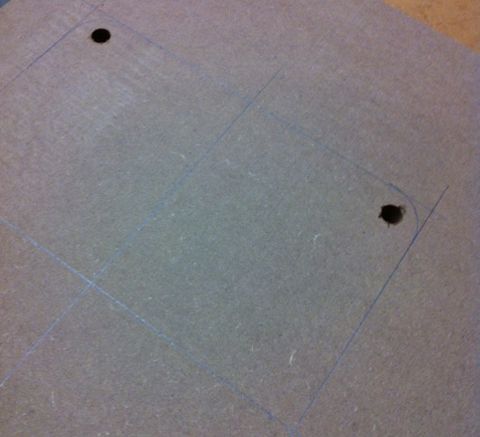

Trace the size opening needed onto the wood, and drill a hole in each corner to start the jigsaw.
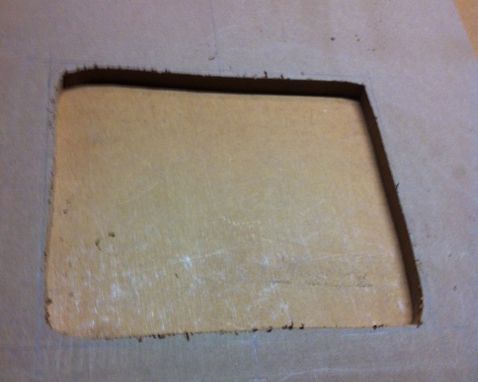

Cut out the opening with the jigsaw to within about 1/8" inside the line. No style points here, I'll clean it up with the router.


I made a template out of some heavy duty cardboard, oversized 1/8" larger than the final hole size. Center template over opening and tape into position.
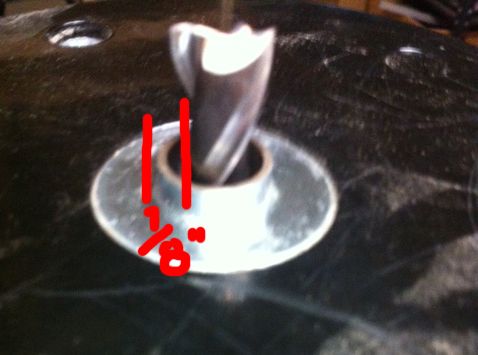

Installed a bushing on the plunge router with a 1/2" spiral bit. The outside edge of the metal bushing collar will trace around the template edge while the router bit cleans up the wood edge. Made three passes, lowering the bit 1/4" each time.
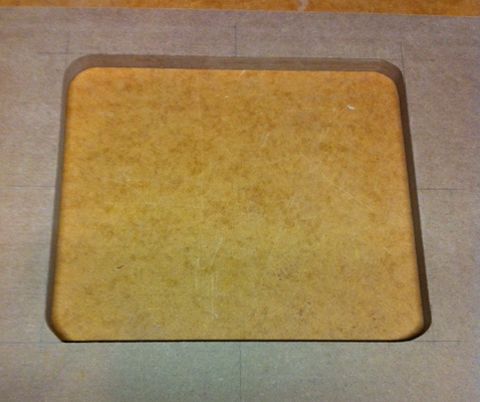

A nice smooth opening when completed, coin door fits perfectly. No additional filing or sanding needed!
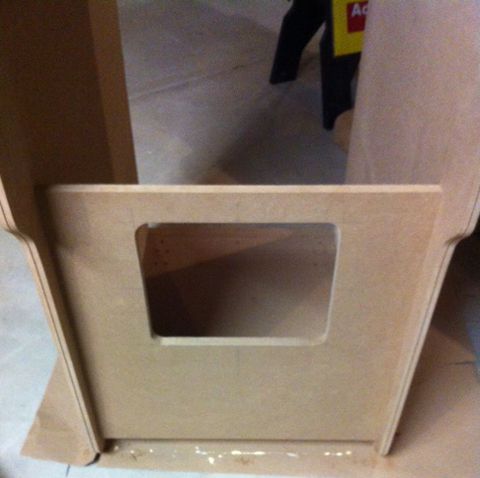

Drill some pilot holes, some screws and yellow glue and the coin door panel is in position. Took a bit longer than it needed to, but my OCD has been satisfied.

« Last Edit: February 05, 2014, 02:25:18 pm by PixelPaul »

mcseforsale

  • Trade Count: (0)
  • Full Member
  • ***
  • Offline Offline
  • Posts: 1471
  • Last login:April 09, 2024, 03:07:41 pm
  • Creepy Mario Dude
Re: Donkey Kong scratch build, my first cabinet!
« Reply #71 on: February 05, 2014, 03:17:21 pm »
Wow.  Cardboard as a template?  BALLS!

AJ

PixelPaul

  • Trade Count: (0)
  • Full Member
  • ***
  • Offline Offline
  • Posts: 77
  • Last login:October 26, 2020, 08:10:46 am
Re: Donkey Kong scratch build, my first cabinet!
« Reply #72 on: February 05, 2014, 05:49:39 pm »
Wow.  Cardboard as a template?  BALLS!

Actually I'm not sure what it is exactly. We have it at work. I call it cardboard but a co-worker calls it "chipboard". It is about 3/32" thick and very dense. It can be cut with a boxcutter, but not easily. Whatever it is, it works great as a router template.

opt2not

  • Trade Count: (+15)
  • Full Member
  • ***
  • Offline Offline
  • Posts: 6173
  • Last login:April 02, 2024, 07:42:30 pm
Re: Donkey Kong scratch build, my first cabinet!
« Reply #73 on: February 05, 2014, 05:51:43 pm »
Whatever it is, it works great as a router template.
I think it's called Hardboard.  :cheers:

mcseforsale

  • Trade Count: (0)
  • Full Member
  • ***
  • Offline Offline
  • Posts: 1471
  • Last login:April 09, 2024, 03:07:41 pm
  • Creepy Mario Dude
Re: Donkey Kong scratch build, my first cabinet!
« Reply #74 on: February 05, 2014, 09:24:07 pm »
In that case, +1.  I use hardboard, too.  My router-fu is very weak, even hardboard is a challenge for me.  I'm about to make all my templates out of 3/4"  :applaud:

AJ

pinballsmith

  • Trade Count: (0)
  • Full Member
  • ***
  • Offline Offline
  • Posts: 32
  • Last login:May 13, 2024, 06:34:56 pm
  • I want to build my own arcade controls!
Re: Donkey Kong scratch build, my first cabinet!
« Reply #75 on: February 05, 2014, 09:34:51 pm »
I have a few Nintendo coin doors leftover from my Fix-it Felix Jr. project. There really is no point in keeping them now. Anyone interested?

adanthang

  • Trade Count: (0)
  • Jr. Member
  • **
  • Offline Offline
  • Posts: 4
  • Last login:April 03, 2018, 10:28:43 am
  • I want to build my own arcade controls!
Re: Donkey Kong scratch build, my first cabinet!
« Reply #76 on: February 06, 2014, 09:21:14 am »
Subscribed.  I was thinking about doing this myself.  Thanks for the detailed thread.  I will be following it closely.

Where did you grow up?  I grew up in Kimberly.

PixelPaul

  • Trade Count: (0)
  • Full Member
  • ***
  • Offline Offline
  • Posts: 77
  • Last login:October 26, 2020, 08:10:46 am
Re: Donkey Kong scratch build, my first cabinet!
« Reply #77 on: February 06, 2014, 11:47:47 am »
Where did you grow up?  I grew up in Kimberly.

I grew up in Hartland. Welcome to the forum!

PixelPaul

  • Trade Count: (0)
  • Full Member
  • ***
  • Offline Offline
  • Posts: 77
  • Last login:October 26, 2020, 08:10:46 am
Re: Donkey Kong scratch build, my first cabinet!
« Reply #78 on: February 24, 2014, 03:25:28 pm »
My build has suffered an unfortunate setback. On February 8 we lost our beloved dog Gizmo. The couple of weeks that followed found me listless without much ambition or desire to much of anything but grieve. I'm sure some of you are rolling your eyes, but for those who you who have welcomed a pet into your lives as a member of the family and not just an animal, I'm sure you can understand. For 14+ years Gizmo was the very definition of "man's best friend", the most loyal of companions until the very end. He loved it when I worked in the shop, as he enjoyed the laying on the cool concrete floor. Little did I know when I started this build it would be our last project together. Miss you Momo, miss you alot.


PixelPaul

  • Trade Count: (0)
  • Full Member
  • ***
  • Offline Offline
  • Posts: 77
  • Last login:October 26, 2020, 08:10:46 am
Re: Donkey Kong scratch build, my first cabinet!
« Reply #79 on: February 24, 2014, 03:42:49 pm »
On with the build....I was strolling through the Home Depot tool aisle a few weeks ago and saw a Dewalt benchtop saw on clearance, marked down from $369 to $229. Used some HD gift cards I had accumulated over time, and left the store with the new saw for only $80 out of pocket. I'm sure it has its limitations compared to a full size cabinet saw, but for the price it sure beats using a circular saw and straight-edge like I have been. It made easy work in cutting smaller pieces like the underside of the speaker panel.


Rippped to length on the new saw, glue and screw into place.