Main Restorations Software Audio/Jukebox/MP3 Everything Else Buy/Sell/Trade
Project Announcements Monitor/Video GroovyMAME Merit/JVL Touchscreen Meet Up Retail Vendors
Driving & Racing Woodworking Software Support Forums Consoles Project Arcade Reviews
Automated Projects Artwork Frontend Support Forums Pinball Forum Discussion Old Boards
Raspberry Pi & Dev Board controls.dat Linux Miscellaneous Arcade Wiki Discussion Old Archives
Lightguns Arcade1Up Try the site in https mode Site News

Unread posts | New Replies | Recent posts | Rules | Chatroom | Wiki | File Repository | RSS | Submit news


Author Topic: DARKADE - Imperial Bartop COMPLETE with VIDEO  (Read 54264 times)

0 Members and 1 Guest are viewing this topic.

Le Chuck

  • Saint, make a poll!
  • Wiki Contributor
  • Trade Count: (+6)
  • Full Member
  • ***
  • Offline Offline
  • Posts: 5509
  • Last login:June 14, 2025, 06:26:06 pm
  • <insert personal text here>
DARKADE - Imperial Bartop COMPLETE with VIDEO
« on: December 13, 2011, 12:06:37 am »
    Darkade the Imperial Bartop is complete

    Features
    • HP Pavilion DV9000 with 1gb RAM and 500gb HD running TinyXP
    • Boots to MALA and currently runs
      • MAME
      • DAPHNE
      • ZINC (it's an older computer okay ;) )
      • NESTOPIA
      • FUSION
      • ZSNES
      • Frets on Fire
    • auto rotate 4way to 8way GGG Omni2 via Joy Choose calling a servo
    • GGG Turbo Twist High Low spinner
    • dual Aimtrak lightgun systems in Airsoft 1911s Removed for another project better suited to gun games
    • wireless hot-swappable triggerstick
    • manual rotate monitor (requires opening back panel)
    • in game autoswitching between 8way and 4way for TRON
    • MAME uses Mala's orientation so I can play all games either way

    Flies in the ointment: I have a few alibis but I'm sticking a fork in this project for now  Alibi's have been p@wned or ignored
    • Old aimtrak LED bar location needs to be covered more betterer Fixed
    • Get white vinyl 1P, 2P, $, and $$ button decals from Pongo Pongo delivered and they are awesomesauce on toast
    • Need to procure powered USB hub as aimtraks are spotty Procured & Installed
    • Wireless guitar would be a nice upgrade Meh, plugging it in hasn't been that bad.
    • Add selected console emulators NES SNES GEN support added.  No further consoles as I don't think they play well on this cab past 6 button

    A few notes:  Darkade is a tricked out Weecade.  When I saw that design two things crossed through my head... "Great lines, looks like a fun project" and "That's would totally be awesome with a [insert above list]."  With that in mind I decided to stop lurking and start participating in the forums that have fed me knowledge and ideas for the past 7 years.  I was also heavily inspired by Chris' awesome idea to do a wireless triggerstick, DMWorking24/7's Alien Bartop, and countless other amazing projects on these threads.  This was not my first build but it is the first build that I am 100% satisfied with and I really appreciate the advice and encouragement I received from art and theme development all the way through construction.  Build thread follows.  


    [/list]
    « Last Edit: February 08, 2012, 12:06:11 am by Le Chuck »

    BobA

    • Trade Count: (+14)
    • Full Member
    • ***
    • Offline Offline
    • Posts: 5943
    • Last login:July 11, 2018, 09:52:14 pm
    • What Me Worry?
    Re: DARKADE - Imperial Bartop under construction
    « Reply #1 on: December 13, 2011, 12:24:03 am »
    Looks like a great start.  Sounds like you are going to have some interesting features. Will be following your build closely.  :applaud: :applaud:

    yaksplat

    • Trade Count: (0)
    • Full Member
    • ***
    • Offline Offline
    • Posts: 551
    • Last login:March 13, 2021, 03:50:10 pm
      • Random Projects
    Re: DARKADE - Imperial Bartop under construction
    « Reply #2 on: December 13, 2011, 02:24:35 pm »
    Quote
    I'll try and update every 48 hours providing there is sufficient progress to justify

    Sure, give yourself an out on that promise.  ;D

    life always tends to get in the way, unless you live alone and have no kids
    Check out my current 3 machine build:
    http://yaksplat.wordpress.com

    Custom Control Panels: http://forum.arcadecontrols.com/index.php?topic=121245

    TopJimmyCooks

    • Trade Count: (+1)
    • Full Member
    • ***
    • Offline Offline
    • Posts: 2097
    • Last login:March 26, 2024, 01:18:39 pm
    Re: DARKADE - Imperial Bartop under construction
    « Reply #3 on: December 13, 2011, 03:20:12 pm »
    comment edited, due to first post edited to remove applicable picture.

      nice bartop anyway

    « Last Edit: February 12, 2012, 09:31:55 pm by TopJimmyCooks »

    gbeef

    • Trade Count: (0)
    • Full Member
    • ***
    • Offline Offline
    • Posts: 325
    • Last login:October 22, 2018, 03:32:26 pm
      • arcadepix.com
    Re: DARKADE - Imperial Bartop under construction
    « Reply #4 on: December 13, 2011, 04:13:11 pm »
    this is going to be a sweet, can wait to see everything together with the artwork


    My cabs
    4 Player Arcade
    X-men Arcade Remixed
    My Pin Cab Attack of the PINZ cab
    My Racing Cabinet Cab [URL=http://forum.arcadecontrols.com/index.php?topic=

    wp34

    • Trade Count: (+3)
    • Full Member
    • ***
    • Offline Offline
    • Posts: 4794
    • Last login:April 10, 2022, 09:48:19 pm
    Re: DARKADE - Imperial Bartop under construction
    « Reply #5 on: December 13, 2011, 06:09:33 pm »
    Looks awesome.  Makes me glad I gave up on my Star Wars theme plans.  No way it would look that good.   :cheers:

    SammyWI

    • Trade Count: (+2)
    • Full Member
    • ***
    • Offline Offline
    • Posts: 457
    • Last login:August 16, 2022, 07:58:00 pm
    Re: DARKADE - Imperial Bartop under construction
    « Reply #6 on: December 14, 2011, 08:23:33 pm »
    Nice.  Clamps are a builder's best friend.

    n88n

    • Trade Count: (0)
    • Full Member
    • ***
    • Offline Offline
    • Posts: 55
    • Last login:February 12, 2020, 11:46:46 am
    Re: DARKADE - Imperial Bartop under construction
    « Reply #7 on: December 14, 2011, 09:26:36 pm »
    The CP artwork really caught my eyes.  Awesome!

    Le Chuck

    • Saint, make a poll!
    • Wiki Contributor
    • Trade Count: (+6)
    • Full Member
    • ***
    • Offline Offline
    • Posts: 5509
    • Last login:June 14, 2025, 06:26:06 pm
    • <insert personal text here>
    Re: DARKADE - Imperial Bartop under construction
    « Reply #8 on: December 15, 2011, 01:01:21 am »
    Thanks for the ups from everybody, really appreciate the encouragement.  Big thanks to yaksplat for highlighting my well crafted loophole  ;).  Obstacles have been encountered, overcome, and overall progress has been made.  Yesterday morning I did this:


    I have built more CPs than I care to mention and in some form or fashion I end up destroying about 75% of them.  Usually it's a freak accident but this was my fault for rushing, wanting to get on to other things.  Murphy taught me a lesson and then I had to come up with this:


    One thing about destroying the first CP is that I decided to topmount, which I think will end up better for my purposes (don't tell me I could have done that anyway with the original CP as it will just break my heart).  This pic also is the test fit for my rotatable bezel.  Here it is with the screen in it:


    And here is the cab in Vert mode: 


    I'm opting for a pop-the-back-to-rotate approach rather than a pull from the front as I don't want guests to try it and I go through long stretches of just playing one genre so it isn't much of an issue for me.  I think the mechanics of it should be pretty sweet though once complete.  One issue is that my Aimtrak LED bar really should be underneath the monitor to give the best viewing angle based on how the Marquee is set up, has anyone done this and should I have any concerns?  What's nice is that if it's a no-go I can just flip it around.

    Also I got my servo set-up and hooked up for a test run to the GGG Omni2.  I will continue to tweak that setup as I don't like some of the stresses I'm seeing (I'll get video up later) but all that will be fleshed out in the CP assy.  Teaser pics on the servo setup, please don't stare at the atrocity that is the underside of my CP.  My routing skills for CP2 are far less than I had motivation for on CP1:


    I have started fabricating my marquee brackets and will try to get the cab prepped for primer tomorrow if all stays on track.  After that base black coating and whatever else I get done.  Should be a fun couple of days.  Thanks for putting up with the long update post!

    yaksplat

    • Trade Count: (0)
    • Full Member
    • ***
    • Offline Offline
    • Posts: 551
    • Last login:March 13, 2021, 03:50:10 pm
      • Random Projects
    Re: DARKADE - Imperial Bartop under construction Day 4 Update
    « Reply #9 on: December 15, 2011, 08:27:41 am »
    Looks great.  I love the art, but then again i still miss the monkey island theme.  You definately need to make a SCUMMVM bartop as well.

    Are you using forstner bits or paddle bits?

    I was concerned about MDF's long term handling of the stresses from the joystick in the CP.  Anyone ever have any issues with that?

    I just mounted my joysticks in with wood inserts.  Those things really hold for a back mount.

    http://yaksplat.wordpress.com/2011/12/14/joystick-mounting-with-inserts/

    Check out my current 3 machine build:
    http://yaksplat.wordpress.com

    Custom Control Panels: http://forum.arcadecontrols.com/index.php?topic=121245

    Unstupid

    • Trade Count: (+2)
    • Full Member
    • ***
    • Offline Offline
    • Posts: 997
    • Last login:September 08, 2021, 08:46:34 am
    Re: DARKADE - Imperial Bartop under construction Day 4 Update
    « Reply #10 on: December 15, 2011, 06:19:17 pm »
    You know what part of this build impresses me the most....  This:


    Nice Work!!!   :applaud:

    Le Chuck

    • Saint, make a poll!
    • Wiki Contributor
    • Trade Count: (+6)
    • Full Member
    • ***
    • Offline Offline
    • Posts: 5509
    • Last login:June 14, 2025, 06:26:06 pm
    • <insert personal text here>
    Re: DARKADE - Imperial Bartop under construction Day 4 Update
    « Reply #11 on: December 15, 2011, 07:20:36 pm »
    Yak, I'm using a half inch forstner to do all the panel routing.  For the Aimtrak PCB sensor I used the slot cutter for T-molding and just made multiple passes.  Everything gets cleaned up with chisels for corners and whatnot.  I think that the MDF will hold as there is a 1/2 inch after the routing and I'm using flush-mount bolts that go clean through rather than screws.  After this build I will take a bit of a break from fabrication but I'll start desiging.  I don't know if I'm going to try and do a virtual pin or a SCUMMVM setup first.  I'd like to do a battery powered panel (much like an IPAD) but able to play all the SCUMM games from the couch.  Monkey Island on my IPAD is sweet but it just makes me long for Grim Fandango, DOTT, Sam and Max, and all the other great titles. 

    Unstupid, the mounting footprint for the high-low from GGG is crazy and was a crazy pain in the ass, both times I had to make it, though the second one is much nicer on close inspection.  I really wanted to do an all metal bottom mount CP but the nearest metal shop wanted 300 just to do two bends and a few holes in some 16g rolled stock that I brought them.  I decided not to attempt the bends myself as I didn't want to commit to a panel that would end up half-assed.


    Le Chuck

    • Saint, make a poll!
    • Wiki Contributor
    • Trade Count: (+6)
    • Full Member
    • ***
    • Offline Offline
    • Posts: 5509
    • Last login:June 14, 2025, 06:26:06 pm
    • <insert personal text here>
    Re: DARKADE - Imperial Bartop under construction Day 4 Update
    « Reply #12 on: December 17, 2011, 01:13:54 am »
    More progress on Darkade.  Things have been sanded, primered, sanded, painted, sanded, and painted.  Tomorrow morning I will likely sand and paint and perhaps make it to clear coat.  All that is nug work though, real work was done on my Plexi CP overlay which is bent and drilled and the hot-swappable wireless triggerstick.  If the art comes in tomorrow from Basement Arcade GrafX I'll get start CP assembly which is a big step in my mind for when the project starts going from pieces to a unit.  USPS promised yesterday so we shall hope.  Let's do some pics.

    Primered cab.  The aluminum L bracket is to support the manual rotate bezel and monitor.
     

    Pieces in black awaiting inspection for further paint or clear coat


    This is always the most stressful part of my build.  Every cab I've done has had a wrap-around plexi cover for my CP.  This time I made it all the way through on the first piece.  I went deadly slow and made sacrifices to Murphy along the the process by occasionally torching myself... totally worth it.


    To make a hot-swappable ball-top I used a 14 barrel rare earth magnet, drilled out the threads of an extra GGG Hand Candy ball-top, drilled out the ball another 1/8 of an inch, superglued the mag in then made a super-thin spacer to account for the waggle do to the missing threads.  This allowed me to not strip the threads on the joy stick so if I want to screw on the other top I still can, however it is super secure yet still easily removable.  Once I play test I'll post up but I think it's going to work out well.  Sleeve is pictured partially exposed for clarity.


    Same deal was done on the trigger stick.  For those unfamiliar you can check out the initial build at the bottom of this thread.  I used a 14-20 female screw insert which I drilled out and inserted another magnet.  Then I used a slow dry putty to set everything up.


    The finished product.  It sends a pg-up and pg-down signal which I'll map to button one and two.  I can change between ball-top and trigger stick in a matter of seconds and the larger LED button up top goes to the battery in the unit so I don't have have it on until I want to play.  Once on the dongle registers after the second button press.  This is a very niche device, for those who want to play TRON, DOT, etc but want to avoid the outward appearance of a Frankenpanel.  I don't mind having it there all the time, I embrace my Frankenpanel longings (this whole cab is an emulation Swiss army knife) but really wanted to get a working plan out there for this kind of mod. 


    That's it for the last 48.  Hopefully the next will be equally productive.

    SammyWI

    • Trade Count: (+2)
    • Full Member
    • ***
    • Offline Offline
    • Posts: 457
    • Last login:August 16, 2022, 07:58:00 pm
    Re: DARKADE - Imperial Bartop under construction Day 6 Update
    « Reply #13 on: December 18, 2011, 09:17:05 am »
    Love the ball top attachment with magnets.  I may have to try that in the future.  I have done some work drilling out the brass threaded inserts in ball tops and I had a lot of trouble with the drill bit grabbing in the brass and spinning the ball top in whatever soft vise I tried (ruining the ball top).  This was for countersinking the ball top to get adjustable stick heights.  What did you use for a drill setup?  What kind of vice or clamp?  Fast or slow drill speed, etc?  I ended up using a Dremel with an abrasive bit for mine but it was kind of tricky making the hole fairly round with an undersized bit.

    Le Chuck

    • Saint, make a poll!
    • Wiki Contributor
    • Trade Count: (+6)
    • Full Member
    • ***
    • Offline Offline
    • Posts: 5509
    • Last login:June 14, 2025, 06:26:06 pm
    • <insert personal text here>
    Re: DARKADE - Imperial Bartop under construction Day 6 Update
    « Reply #14 on: December 18, 2011, 07:19:10 pm »
    Sammy, I used a roll of electrical tape laid on it's side and placed the ball on that.  The weight of the drill kept it in place and I used a slow speed to strip out the threads with a bit the same size as the shaft diameter.  To strip out more brass after that (so I could get the magnet in) I used a size larger bit and high speed.  After it bit into the brass I held the ball top in my hand and pulled back lightly on the drill to give the bit time to remove all the brass before advancing to avoid seizing.  Once I was to the plastic I set it back on the tape roll and let the drill to the work.  Good sharp bits really make the difference. 

    DaOld Man

    • Trade Count: (+4)
    • Full Member
    • ***
    • Offline Offline
    • Posts: 5158
    • Last login:May 24, 2025, 09:57:44 pm
    • Wheres my coffee?
      • Skenny's Outpost
    Re: DARKADE - Imperial Bartop under construction Day 6 Update
    « Reply #15 on: December 18, 2011, 07:37:23 pm »
    This project is looking good. I like the curved edge of the CP and the bending of the plexi. I gotta try that one of these days.

    emphatic

    • Trade Count: (0)
    • Full Member
    • ***
    • Offline Offline
    • Posts: 2017
    • Last login:Today at 09:30:53 am
    • -"Suck it, Donny!" -"No, YOU suck it.... more".
      • Emphatic's Video Game Collection
    Re: DARKADE - Imperial Bartop under construction Day 6 Update
    « Reply #16 on: December 19, 2011, 01:24:50 pm »
    That joystick mod is clever as hell. Kudos.  :notworthy:

    yaksplat

    • Trade Count: (0)
    • Full Member
    • ***
    • Offline Offline
    • Posts: 551
    • Last login:March 13, 2021, 03:50:10 pm
      • Random Projects
    Re: DARKADE - Imperial Bartop under construction Day 6 Update
    « Reply #17 on: December 19, 2011, 01:52:57 pm »
    I like the servo concept, but i have a feeling there might be some torque issues there.  Now if the restrictor plate had teeth on it a worm gear would work nicely.
    Check out my current 3 machine build:
    http://yaksplat.wordpress.com

    Custom Control Panels: http://forum.arcadecontrols.com/index.php?topic=121245

    wizkid32

    • Trade Count: (0)
    • Full Member
    • ***
    • Offline Offline
    • Posts: 270
    • Last login:August 30, 2013, 07:27:03 pm
    • Portland Trailblazers, FTW!
    Re: DARKADE - Imperial Bartop under construction Day 6 Update
    « Reply #18 on: December 19, 2011, 07:44:14 pm »
    Looks great!  I already knew about that awesome art!
    (\__/)
    (='.'=) This is Bunny. Copy and paste him into your
    (")_(") signature and help him on his quest for world domination.

    Best,
    Wizkid32

    Le Chuck

    • Saint, make a poll!
    • Wiki Contributor
    • Trade Count: (+6)
    • Full Member
    • ***
    • Offline Offline
    • Posts: 5509
    • Last login:June 14, 2025, 06:26:06 pm
    • <insert personal text here>
    Re: DARKADE - Imperial Bartop under construction Day 6 Update
    « Reply #19 on: December 19, 2011, 10:26:32 pm »
    Closing out Day 9 on the build and I couldn't be happier with where I am.  Still have a long way to go but definitely starting to get a warm fuzzy about the whole deal.  Left to resolve:  Limited space for power distribution - intend on cutting down a smart strip to just three outlets unless anybody knows how to build one from scratch, need to install USB ports on pack panel, need to wire up the CP, need to test the aimtrak system, take care of some detail work on the monitor plexi, order 1" 1/8 diameter shorty buttons with built in micros as the happs are just too long and I don't what to chisel on the CP anymore... as I'm a nervous wuss. The buttons are for the front panel of the CP and preferably with 1P, 2P $, $$ art already installed... I need a source please!

    Jim, the plate is toothed.  I am unfamiliar with gearing anything and need to figure out what kind of controller I could hook that up with, or if can I run it from the servo.  On the topic of the torque I'll be playing with that once I get the buttons wired up tomorrow but in initial testing I wasn't too concerned because the servo is attached to the handle made for switching.  If the worm gear offers some nice direct contact tho and could create a really elegant solution.  We'll see. 

    So I got the computer installed, the art installed, the CP built and ready for wiring, and 1 of 2 light guns made.  I decided against the Mavericks as they are just too clunky for me.  I had been looking at building replica Storm Trooper blasters and have a great set of plans but each one will run about 20 to 30 hours to build before wiring and I just don't want to commit to that level for a light gun right now.  Let's do some pics.

    On Saturday I was bummed that the art didn't arrive so I started wiring up the marquee.  Because I'm using an old HP laptop for the computer I didn't want to wire the 12v needed for the marquee into that so I ran a separate plug for it.  Easy enough, two wires to solder and done.  Look, working lights!
     

    Then I went to WM for the wife and saw this for $9.  Only two left... it's a sign.


    Got it apart, painted, and installed very easily, so much that I had the handle on before I took a pic, I'll get a better build pic on the second one. 


    Here's the finished product.  I intend to change the USB to a female and recess it into the mag well when I build the second.  I killed the red dot laser that came with the unit and wired the aux button to the pressure switch so when I need to reload I have a totally sweet pressure switch button to do it with.  I was going to wire one up to the mag release but the button would require some serious ingenuity and I haven't figured it out yet (funny angles).


    Dropping my son off at school this morning I drove by this.  I took it as a good sign and right before I went to pick him up the art arrived from Basement Arcade GrafX.
     

    I couldn't be happier with the art, great print quality at a great price!


    With the trigger stick, can't wait to throw down on some DOT!


    Here's what I'll be doing tomorrow:


    Thanks for all the ups, hopefully I'll be "complete" in the next four days but we'll see how it rolls.   

    Nephasth

    • Guest
    • Trade Count: (0)
    Re: DARKADE - Imperial Bartop under construction Day 9 Update - ART INSTALLED
    « Reply #20 on: December 19, 2011, 11:25:25 pm »
    This is one impressive little bartop! Well thought out control placements. Very nice! :applaud:

    dandare

    • Trade Count: (0)
    • Full Member
    • ***
    • Offline Offline
    • Posts: 226
    • Last login:March 25, 2013, 08:43:44 am
    Re: DARKADE - Imperial Bartop under construction Day 9 Update - ART INSTALLED
    « Reply #21 on: December 19, 2011, 11:47:16 pm »
    err... this is some seriously awesome s**t!!

    love it!!

    Bender

    • Trade Count: (+1)
    • Full Member
    • ***
    • Offline Offline
    • Posts: 1919
    • Last login:November 28, 2016, 08:12:21 pm
      • Happ to Tron Conversion tutorial
    Re: DARKADE - Imperial Bartop under construction Day 9 Update - ART INSTALLED
    « Reply #22 on: December 20, 2011, 12:39:24 am »
    This is looking great! A lot of nice innovations cleanly applied :cheers: :cheers:

    one question, how do you prevent the trigger-stick from spinning?

    Le Chuck

    • Saint, make a poll!
    • Wiki Contributor
    • Trade Count: (+6)
    • Full Member
    • ***
    • Offline Offline
    • Posts: 5509
    • Last login:June 14, 2025, 06:26:06 pm
    • <insert personal text here>
    Re: DARKADE - Imperial Bartop under construction Day 9 Update - ART INSTALLED
    « Reply #23 on: December 20, 2011, 12:49:04 am »
    Bender, I don't... yet.  Still working on that one.  I know that on original concept build by Chris you had the same concerns.  He was using 360s and didn't have a lot of spin but my Omni2 spins like crazy.  I was playing around with it and noticed the spin but until I fire up a game I won't know how much it will affect gameplay, I'm thinking it maybe more of a quirk than a deal breaker, unless I'm sliding though the corners on 4 way it isn't that noticable.

    Maybe just a brass shim to tighten the stick up to the boot.     

    dextercf

    • Trade Count: (0)
    • Full Member
    • ***
    • Offline Offline
    • Posts: 432
    • Last login:October 05, 2024, 06:30:51 pm
    • [thisispersonal]
    Re: DARKADE - Imperial Bartop under construction Day 9 Update - ART INSTALLED
    « Reply #24 on: December 20, 2011, 03:43:18 am »
    <3

    DaOld Man

    • Trade Count: (+4)
    • Full Member
    • ***
    • Offline Offline
    • Posts: 5158
    • Last login:May 24, 2025, 09:57:44 pm
    • Wheres my coffee?
      • Skenny's Outpost
    Re: DARKADE - Imperial Bartop under construction Day 9 Update - ART INSTALLED
    « Reply #25 on: December 20, 2011, 07:51:16 am »
    Great job. Its looking really good.

    TopJimmyCooks

    • Trade Count: (+1)
    • Full Member
    • ***
    • Offline Offline
    • Posts: 2097
    • Last login:March 26, 2024, 01:18:39 pm
    Re: DARKADE - Imperial Bartop under construction Day 9 Update - ART INSTALLED
    « Reply #26 on: December 20, 2011, 10:09:09 am »
    very fine work.  looks great.  i need to investigate the wireless trigger stick- great innovation.  Airsoft 1911's are tasty.   :cheers:

    Le Chuck

    • Saint, make a poll!
    • Wiki Contributor
    • Trade Count: (+6)
    • Full Member
    • ***
    • Offline Offline
    • Posts: 5509
    • Last login:June 14, 2025, 06:26:06 pm
    • <insert personal text here>
    Re: DARKADE - Imperial Bartop under construction Day 9 Update - ART INSTALLED
    « Reply #27 on: December 22, 2011, 12:02:29 am »
    Huge thanks for the comments and encouragement again.  Really keeps me going and motivates me to try and raise the bar on this cab.   :cheers:

    Wiring is the bane of Darcade's existence.  I love the cab, it's small.  I wanted a really small do-it-all cab.  Well I got it, and the :censored: of wire that comes along with it.

    CP is wired, and Ultimarc gold leaf buttons are ordered and hopefully en route for the front panel.  Shipping ran me double the price of the buttons but I couldn't find any built-ins stateside that weren't convex.  Once the buttons get in it'll be a quick install as I already ran the leads for them and have microswitches hanging off out a few button holes. 

    I need white player 1, 2, $, and $$ button decals if anybody knows where to score them.

    I picked up some small USB speakers by Onn and I really like them, lot of punch for the size, and got the holes cut in the back panel.  I also installed the USB plate in the back panel which for some reason took me hours as I decided to do all the wood removal using a 6mm and a 14mm wood chisel... because I'm dumb and selectively obsessive.  Clear coat is drying on the panel and I'll be able to wire everything up.  Speaking of wire...

    I bought a Belkin Smart Strip at HD and hacked it down to one master and two slave outlets as the power strip out of the box is longer than my cab.  The Belkin has the master and slaves right near the cable and switch so I didn't have to rewire anything, just dewire.  The others I looked at all would have required surgery rather than simple amputation.  Pic below shows the innards incase anybody was thinking of doing something similar.  Just cut after the board and clean up the contacts and everything will be copacetic.  The Belkin has the proprietary triangular screw pattern and rather than order a bit I used a small flat head screwdriver and it worked a charm.  Take that Belkin!

    Once that was done I shortened the monitor power cable, the computer power cable, and rewired the marquee adapter so everything would fit all hunky-dory.  I also started hot-gluing wiring in place and made sure that it will infact all fit together.  It does but she's a fat chick in tight pants... I just hope the zipper holds.  So why am I bitching about wiring? Because I have about 35 feet of USB cabling that I need to turn into less than 7 feet tomorrow  :cry:.  Seven cables is 28 splices and for me is just ponderous work.  The monitor cable is about 4 feet longer than it needs to be so I'll splice that as well, although I reserve the right to just leave that bastard zip tied as is because after the USB I probably won't have the heart to do it.  Once I do all that I can finally turn on the cab and start making all the parts work.  I was going to post something about being finished soon but realized that I may as well just shoot myself in the foot and be done with it so I won't  ;D


    dextercf

    • Trade Count: (0)
    • Full Member
    • ***
    • Offline Offline
    • Posts: 432
    • Last login:October 05, 2024, 06:30:51 pm
    • [thisispersonal]
    Re: DARKADE - Imperial Bartop under construction Day 11 Update
    « Reply #28 on: December 22, 2011, 07:38:24 am »
    Nice touch with that plastic holding the monitors pcb.

    DaOld Man

    • Trade Count: (+4)
    • Full Member
    • ***
    • Offline Offline
    • Posts: 5158
    • Last login:May 24, 2025, 09:57:44 pm
    • Wheres my coffee?
      • Skenny's Outpost
    Re: DARKADE - Imperial Bartop under construction Day 11 Update
    « Reply #29 on: December 22, 2011, 08:44:12 am »
    Looks like that barstool knows your project up close and personal.  ;D

    Tiouko

    • Trade Count: (0)
    • Full Member
    • ***
    • Offline Offline
    • Posts: 17
    • Last login:August 14, 2023, 11:19:10 pm
    Re: DARKADE - Imperial Bartop under construction Day 11 Update
    « Reply #30 on: December 22, 2011, 11:33:12 am »
    Jaw Dropping Impressive  :applaud:nuff said.

    TopJimmyCooks

    • Trade Count: (+1)
    • Full Member
    • ***
    • Offline Offline
    • Posts: 2097
    • Last login:March 26, 2024, 01:18:39 pm
    Re: DARKADE - Imperial Bartop under construction Day 11 Update
    « Reply #31 on: December 22, 2011, 02:11:57 pm »
    On the usb shortening:  just cutting a section of cable out of the middle and splicing back together?

    Le Chuck

    • Saint, make a poll!
    • Wiki Contributor
    • Trade Count: (+6)
    • Full Member
    • ***
    • Offline Offline
    • Posts: 5509
    • Last login:June 14, 2025, 06:26:06 pm
    • <insert personal text here>
    Re: DARKADE - Imperial Bartop under construction Day 11 Update
    « Reply #32 on: December 22, 2011, 02:34:56 pm »
    Yeah, Jimmy, doing a middle splice on the USB as I didn't want to order new ends and can't find them locally   :badmood:

    It's going relatively quickly though.

    BobA

    • Trade Count: (+14)
    • Full Member
    • ***
    • Offline Offline
    • Posts: 5943
    • Last login:July 11, 2018, 09:52:14 pm
    • What Me Worry?
    Re: DARKADE - Imperial Bartop under construction Day 11 Update
    « Reply #33 on: December 22, 2011, 10:48:35 pm »
    Some really nice innovative details in your small cab.   Great work and your grafix are awesome.
     :applaud: :applaud:

    wizkid32

    • Trade Count: (0)
    • Full Member
    • ***
    • Offline Offline
    • Posts: 270
    • Last login:August 30, 2013, 07:27:03 pm
    • Portland Trailblazers, FTW!
    Re: DARKADE - Imperial Bartop under construction Day 11 Update
    « Reply #34 on: December 23, 2011, 03:56:06 am »
    Sweet guns!!!!
    (\__/)
    (='.'=) This is Bunny. Copy and paste him into your
    (")_(") signature and help him on his quest for world domination.

    Best,
    Wizkid32

    Le Chuck

    • Saint, make a poll!
    • Wiki Contributor
    • Trade Count: (+6)
    • Full Member
    • ***
    • Offline Offline
    • Posts: 5509
    • Last login:June 14, 2025, 06:26:06 pm
    • <insert personal text here>
    Re: DARKADE - Imperial Bartop under construction Day 11 Update
    « Reply #35 on: December 26, 2011, 01:46:05 pm »
    I hope everyone had a wonderful Christmas!  I shelved the cab for two days so I could put together bikes, playmobile castle sets, and other assorted toys and then kicked back with my kinder, watched some Holiday Favs and put some extra nog in my egg.  Progress since my last update:
    • Wireless hot-swap Trigger Stick working flawlessly to included mid game on and off
    • Frets on Fire controller installed and all resolution synched to cab for smooth transition
    • GGG High-Low is AWESOME but having to spend 20 minutes to remember to turn on mice in mame.ini not so awesome.  Haven't felt that dumb since... nevermind
    • 4way to 8way auto switching is working wonderfully (larger write-up further down)
    • Darkade MALA theme font switched to fix weird uppercase mapping of StarJedi font
    • Manual screen rotation is smooth thanks to MALA's option to have MAME copy MALA's orientation
    • XP shelled, decided I didn't like it, unshelled and setup to run FE on startup
     

    Still to do:
    • Re-route, drill, and install Aimtrak LED bar as it is infact impossible to run it below the monitor, even if it's upside down and you switch the Y-axis (can't just flip the monitor in the bezel because the board is drilled too far from the screen anyway)  DOH!
    • Re-paint bezel after I get through monkeying around because I didn't test that part of the build first...like I should have
    • Complete the second gun
    • Screw around with Daphne until I figure out how to map the controls to match my native set... or write a batch for Joy2Key to start with Daphne and do it for me
    • install the back panel USB ports - shear laziness explains why this isn't done... I have to plug in two whole cables!
    • Bask in the glory of a complete project
    • Undergo therapy for the "what will I do with my life now" depression that follows completion of anything

    I thought I would do a write-up on my servo controlled 4way to 8way joystick mod as there are few write-ups out there and I thought I could add to the conversation.  The two most helpful are DarthPaul's and Terrahwk's but there were still a lot of issues that I ran into so I'll outline what I used and how I got it working.  

    Hardware

    Software
    if using MALA; if HS then see Terrahwk's
    Win and Linux both available
    • two super simple batch files to run USCCMD (which we'll use to control your Servo)

    Hardware Setup:  

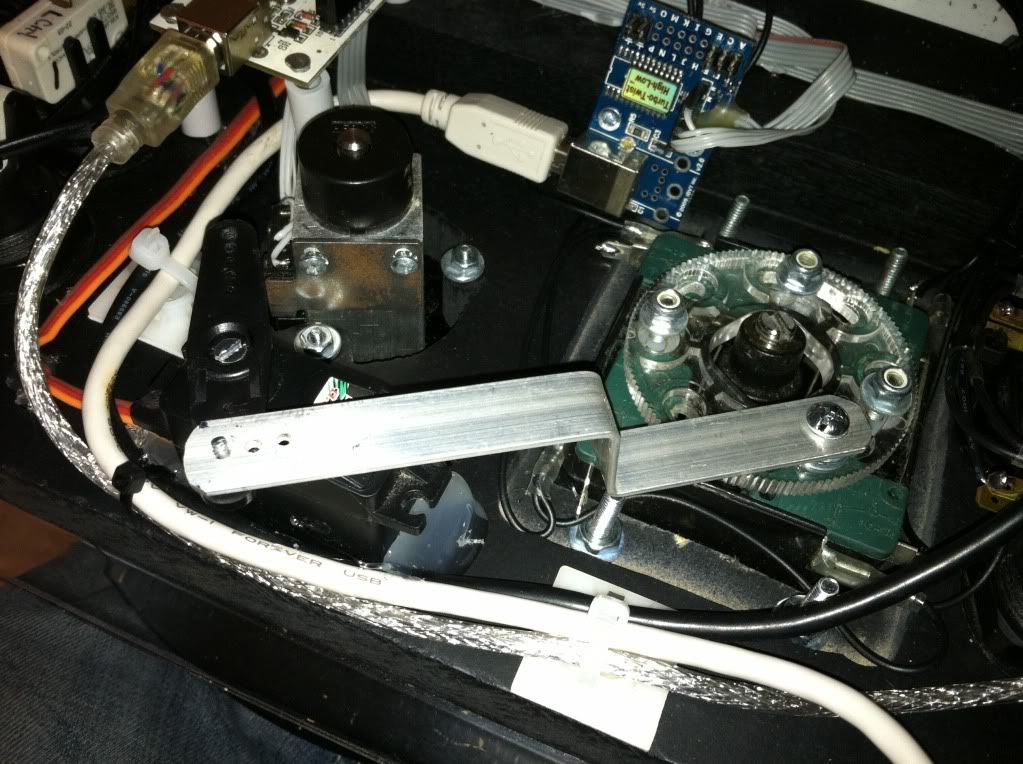
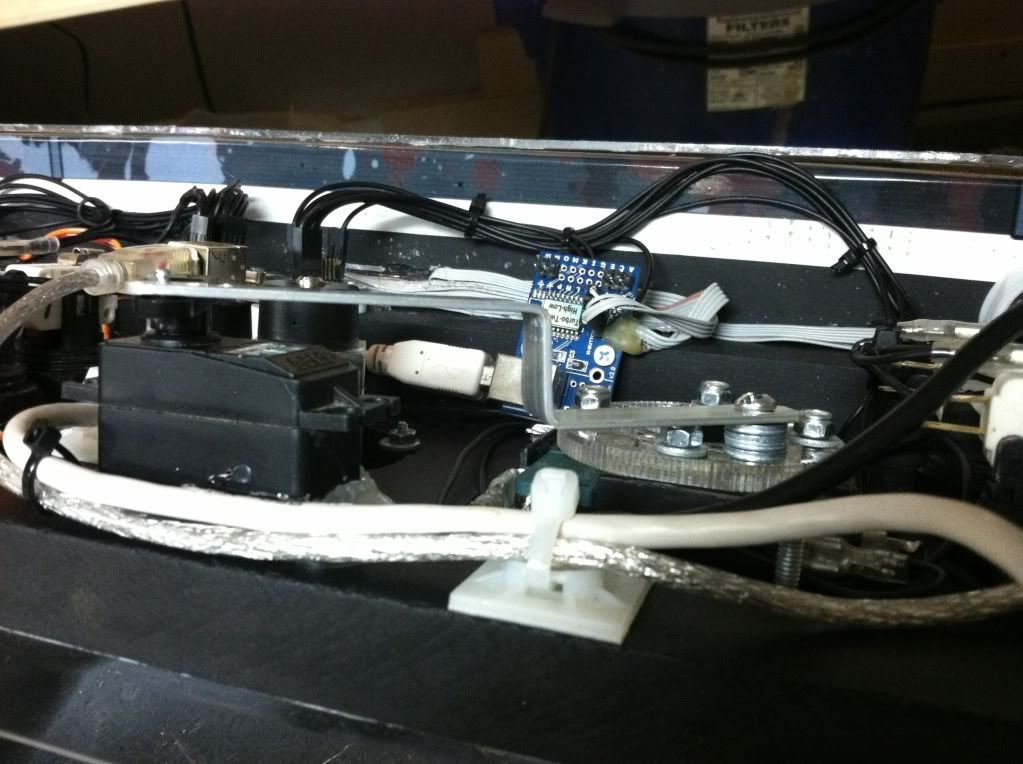
    Take your Omni2 apart install additional washers below the restrictor plate so that have washers on both side of the plate on all four bolts.  Mount your Omni2 however you see fit for your CP.  The Omni2 uses a small bolt on the underside to rotate the plate.  This is what we'll be hooking the control arm to so we need to position the plate where you have about 4 to 6 inches of standoff in a straight line.  The plate only have about 1 1/2" of travel so we just need to find the angle where the push and pull of the servo will match the travel of the plate.  Once you have that you'll want to route in your servo, I sunk mine below the control wire then hot-glued the hell out of it.

    You should remove the switch bolt from the Omni2 and install a shorter bolt.  I used washers to get me just over the mounting nut then cut the bolt to fit with a jeweler saw.  You'll want to bend your flat bar so that the servo and bolt both attach to a parallel plane to avoid torque in a direction we don't need.  At this point your plate should move smoothly and very easily between positions.  The servo will hold it in place so this isn't an issue.  This entire explanation is really confusing.  How about a few pics.  


    Hopefully that will get you 90% of the way there for your CP.  If not post or PM me and I'll try to help along if you're doing something similar.

    Software Setup:

    Assuming you're using XP and MaLa:  Unscrew the servo arm from the servo as the unit will auto center when you first hook it up.  Install the Maestro program and plug in your controller to the computer.  Maestro should see the Servo.  If not then make sure that the servo is plugged into the controller and that you remembered to jumper the 5v power out to the servo power pin on the board (this servo listed can run off USB just fine but many can't so that's why they make it optional).  If you can see and move your servo then we're in business.  If not please use the Pololu servo forum and those guys will get you up and running ricky-tick.  From center screw your control arm back on with the restrictor plate set between 4way and 8way.  Enable your servo on the status tab and use the channel settings tab to set your limits.  I used speed as 100 and started moving the servo limit 100 units at a time for left and right of center for the servo.  Then use the slide bar on the status tab and and see how far the restrictor moves right and left.  Continue to adjust until you are smoothly transitioning from 4way to 8way.  In theory the servo should shut off right after it reaches the limit but it took a lot of fiddling to get mine there.

    Now go into DOS and ensure that USCCMD is in your path.  If not double click on the USCCMD.exe in the Pololu system folder and it should add the utility.  USCCMD only controls the servo when Maestro isn't so you'll need to disable the servo and close completely out of maestro.  USCCMD is pretty easy to use.  What is nice is that the channel settings from Maestro are preserved so you can tell USCCMD to move to extremes and if you set your channels then the arm will only move within it's range.  

    The batch files I used look like this:

    "4way"
    usccmd --servo 0,1000

    and

    "8way"
    usccmd --servo 0,8000
      
    That's it.  Your numbers will likely differ.  If you only have one servo you don't need to worry about scripting, naming your servo, or targets.  Just tell the controller move left and right and because USCCMD is in your path you don't even have to use a file location.  

    Once you have that working smoothly open up the MaLa configuration menu, go to plugins, and tell JoyChoose where to find your two batch files.  Restart MaLa and when you run games you should hear your servo switch or confirm setting then power off.  

    If the servo continues to buzz it is because your channels are not set right or your hardware connection has too much or too little play in the servo arm and isn't getting to the target.  Address the issue until fixed or you determine that the arm is as good as you can get it and is just going to buzz.  If you reach that point there is a very simple addition to your batch files to get the servo to shut off.  This will save your servo from burn-out.  You can do it several different way, but basically you're executing a wait command and then a target 0 command in USCCMD.  Target 0 disables the servo without having to kill power.  This was plainly written several places in Pololu and in the Maestro software but took me weeks to identify... which wasn't helped by a Pololu admin saying it couldn't be done.  :dizzy: My batch commands now look like this

    Code: [Select]
    "4way"
    @echo off
    usccmd --servo 0,4000
    sleep 2
    usccmd --servo 0,0

    I also tried it with TIMEOUT, Pause, and a Ping to nowhere string and all worked satisfactorily to give the servo time to hit the target then shut off.

    One last issue that I ran into is that the Servo Controller didn't like my Onn USB hubs and started throwing all kinds of error codes so I had to give it a dedicated port, it was still spotty after that so I installed a powered USB hub by Belkin ($19) and it's purring like a kitten, as are my light guns and guitar controller so definitely worth the cash.  Something to consider.  

    This project is not easy and I wanted to give up multiple times.  So glad I didn't and hopefully this will help somebody else tackle the great mod.  Huge thanks to Terrahwk, DarthPaul, and DaOld Man for his awesome plug-in!  

    <edited to update Batch commands on how to shut off your servo and auxiliary power recommendation for the servo>
    « Last Edit: January 07, 2012, 12:16:16 am by Le Chuck »

    wp34

    • Trade Count: (+3)
    • Full Member
    • ***
    • Offline Offline
    • Posts: 4794
    • Last login:April 10, 2022, 09:48:19 pm
    Re: DARKADE - Imperial Bartop under construction 4way to 8way instructions
    « Reply #36 on: December 26, 2011, 02:54:18 pm »
    Thanks for the writeup Le Chuck!  You make it look easy.  That rotating joystick is one sweet mod.

    Le Chuck

    • Saint, make a poll!
    • Wiki Contributor
    • Trade Count: (+6)
    • Full Member
    • ***
    • Offline Offline
    • Posts: 5509
    • Last login:June 14, 2025, 06:26:06 pm
    • <insert personal text here>
    Re: DARKADE - Imperial Bartop under construction 4way to 8way instructions
    « Reply #37 on: December 27, 2011, 01:34:28 am »
    Thanks man  :cheers:, they say it's easy to do something hard but it's hard to make it look easy.  I don't know how close to that mark I am but I've made good time getting there at least.  ;D

    Bender, I spent the better half of the morning playing Tron, DOT, Satan's Hollow, and a few other trigger stick games and have conclusively determined for me that trigger stick rotation is a non issue.  When my knuckles are pointed at the screen the stick stays in the same orientation.  This is not to say it's identical to a regular flight-stick, there is definitely more play than in a fixed stick but after the fist trigger squeeze it leaves your mind completely.  If there is ever a 4 to 8 way physically restricted switchable rotary stick that looks ripe for a hot swap I'll probably upgrade but it will have to have good travel.  That's why I went with the Omni2 over the Mag plus for this build.

    I completed the second gun this evening and remembered to take a build pic half way through.  Pretty standard, no real shocks here, but I think these airsoft cheap-os have a lot of potential. If I ever do a special deployment build (HEPA filters, dual voltage, enclosed projector, shock absorbing housing, etc I'll probably build it into a rifle case so I can have M4s available for gun games... providing Andy releases a wireless aimtrak system with a wireless LED bar (HINT HINT).  Tomorrow morning while paint is drying on the bezel I'll play around with Joy2Key batch execution for Daphne. 


    Le Chuck

    • Saint, make a poll!
    • Wiki Contributor
    • Trade Count: (+6)
    • Full Member
    • ***
    • Offline Offline
    • Posts: 5509
    • Last login:June 14, 2025, 06:26:06 pm
    • <insert personal text here>
    Re: DARKADE - Imperial Bartop hates the Aimtrak
    « Reply #38 on: December 27, 2011, 03:30:33 pm »
    Failure!  I remounted the LED bar for the Aimtrak but the overhang of the marquee is just too great to overcome.  I will try increasing the angel of the LED bar to see if that gets me in the ball park but I think that I may need to try mounting it under the Marquee.  First I'm going to resolve all my other small issues then figure out how to get my guns a-blazin.  Who knew something as simple as this would be where I hit a serious engineering wall on trying to cram so much into a bartop.   :badmood:

    Le Chuck

    • Saint, make a poll!
    • Wiki Contributor
    • Trade Count: (+6)
    • Full Member
    • ***
    • Offline Offline
    • Posts: 5509
    • Last login:June 14, 2025, 06:26:06 pm
    • <insert personal text here>
    Re: DARKADE - Imperial Bartop hates the Aimtrak
    « Reply #39 on: December 27, 2011, 05:46:51 pm »
    Just got MaLa setup to start JoytoKey when I open a Daphne rom and shutoff when I exit.  What seems weird to me is that the batch file when called from the folder containing the config file and J2K executable (c:\arcade\J2KD for me) opens correctly but when MALA, which is pointed at that folder opens the same batch it kept showing a blank configuration.  I fixed it by dropping a copy of the config file for Daphne controls in the same folder as the Mala executable.  So, the $64,000 question (since I am terrible at batch files) is why should this matter if the batch points at the executable?  Incidentally I used a seperate batch to close J2K rather than messing with a wait process.  

    Batch File text:

    @echo off
    start c:\arcade\J2KD\joytokey.exe

    and

    @echo off
    tskill joytokey

    Le Chuck

    • Saint, make a poll!
    • Wiki Contributor
    • Trade Count: (+6)
    • Full Member
    • ***
    • Offline Offline
    • Posts: 5509
    • Last login:June 14, 2025, 06:26:06 pm
    • <insert personal text here>
    Re: DARKADE - Imperial Bartop COMPLETE
    « Reply #40 on: December 29, 2011, 02:43:33 am »
    Okay, mounted the LED bar just under the front lip of the Marquee and things are working swell.  By the way, has anyone else noticed that the 3 middle pin outs to USB on the aimtrak LED bar aren't used?  It makes sense since the bar just provides IR, I snipped the middle three when I removed the bracket for a more low profile installation since the LED bar is no longer hidden within my bezel.  I ran the 5v and ground cables along the marquee brackets and wrapped the LED bar in black elec tape.  It's kinda ghetto but it's pretty much invisible.  I may come up with a better solution later but this one works quite well.  Having the LED bar so far in front of my screen hasn't been an issue as it's level with the top but I'll come up on the net if anything goes pear-shaped.   

    tsaylor

    • Trade Count: (+1)
    • Full Member
    • ***
    • Offline Offline
    • Posts: 94
    • Last login:April 20, 2019, 05:16:20 pm
    Re: DARKADE - Imperial Bartop COMPLETE
    « Reply #41 on: December 29, 2011, 05:00:58 pm »
    Wow, impressive work!  :notworthy:

    So much to like about this, from the artwork to all the little innovative details!  Love the switchable joystick tops, the servo, and the rotatable bezel.  The overall look with that art in place is just excellent.

    wizkid32

    • Trade Count: (0)
    • Full Member
    • ***
    • Offline Offline
    • Posts: 270
    • Last login:August 30, 2013, 07:27:03 pm
    • Portland Trailblazers, FTW!
    Re: DARKADE - Imperial Bartop COMPLETE
    « Reply #42 on: December 29, 2011, 07:41:56 pm »
    Wow, impressive work!  :notworthy:

    So much to like about this, from the artwork to all the little innovative details!  Love the switchable joystick tops, the servo, and the rotatable bezel.  The overall look with that art in place is just excellent.

    I agree.  Most innovative.
    (\__/)
    (='.'=) This is Bunny. Copy and paste him into your
    (")_(") signature and help him on his quest for world domination.

    Best,
    Wizkid32

    Le Chuck

    • Saint, make a poll!
    • Wiki Contributor
    • Trade Count: (+6)
    • Full Member
    • ***
    • Offline Offline
    • Posts: 5509
    • Last login:June 14, 2025, 06:26:06 pm
    • <insert personal text here>
    Re: DARKADE - Imperial Bartop COMPLETE
    « Reply #43 on: December 29, 2011, 08:03:33 pm »
    Thanks guys. I really wanted to push the limits on what a bartop can do without beefing the size. This build is almost two inches narrower than the weecade but copies the side panel measurements exactly. If I had to start over I wouldn't change much. Still want to do a worm gear driven joy rotation someday because gears are cool.  The screen rotation isn't "slick" per se but does show what you can do with a 17" monitor in a small area. I have had such a good time building it.

    yaksplat

    • Trade Count: (0)
    • Full Member
    • ***
    • Offline Offline
    • Posts: 551
    • Last login:March 13, 2021, 03:50:10 pm
      • Random Projects
    Re: DARKADE - Imperial Bartop COMPLETE
    « Reply #44 on: December 29, 2011, 09:35:03 pm »
    +1 for the worm gear :)

    Awesome work man.  I wish i had your free time.
    Check out my current 3 machine build:
    http://yaksplat.wordpress.com

    Custom Control Panels: http://forum.arcadecontrols.com/index.php?topic=121245

    dekar24k

    • Trade Count: (0)
    • Full Member
    • ***
    • Offline Offline
    • Posts: 378
    • Last login:April 28, 2019, 03:50:11 pm
      • ArcadeForum.com
    Re: DARKADE - Imperial Bartop COMPLETE
    « Reply #45 on: January 01, 2012, 01:01:02 pm »
    Just had to bump this one. Must be one of the sweetest bartops I've seen ever!

    Great work!  :applaud:
    Finished project: "The Saloon Arcade" - 2 player upright cabinet

    Joystick.net - Retro gaming news and reviews

    SammyWI

    • Trade Count: (+2)
    • Full Member
    • ***
    • Offline Offline
    • Posts: 457
    • Last login:August 16, 2022, 07:58:00 pm
    Re: DARKADE - Imperial Bartop COMPLETE
    « Reply #46 on: January 01, 2012, 01:14:20 pm »
    Thanks guys. I really wanted to push the limits on what a bartop can do without beefing the size. This build is almost two inches narrower than the weecade but copies the side panel measurements exactly. If I had to start over I wouldn't change much. Still want to do a worm gear driven joy rotation someday because gears are cool.  The screen rotation isn't "slick" per se but does show what you can do with a 17" monitor in a small area. I have had such a good time building it.

    Turned out great.  Wish I worked as fast as you.  ;D  A worm drive would be a good choice for screen rotation.  (I design gears in my job, although I've never designed worm gears.)

    darthpaul

    • Trade Count: (0)
    • Full Member
    • ***
    • Offline Offline
    • Posts: 449
    • Last login:July 08, 2025, 08:50:10 pm
    • Join, It's your duty
    Re: DARKADE - Imperial Bartop COMPLETE
    « Reply #47 on: January 01, 2012, 04:57:58 pm »
    Beautiful cabinet, you have taken it to the next level. :notworthy:
    "You don't know the power of the Dark Side"
    Automated Cabinet
    Nintendo Pi
    PiCubed

    wizkid32

    • Trade Count: (0)
    • Full Member
    • ***
    • Offline Offline
    • Posts: 270
    • Last login:August 30, 2013, 07:27:03 pm
    • Portland Trailblazers, FTW!
    Re: DARKADE - Imperial Bartop COMPLETE
    « Reply #48 on: January 03, 2012, 11:21:32 pm »
    One would think that, given the guns, you would have lots of gun games...   ???
    (\__/)
    (='.'=) This is Bunny. Copy and paste him into your
    (")_(") signature and help him on his quest for world domination.

    Best,
    Wizkid32

    Le Chuck

    • Saint, make a poll!
    • Wiki Contributor
    • Trade Count: (+6)
    • Full Member
    • ***
    • Offline Offline
    • Posts: 5509
    • Last login:June 14, 2025, 06:26:06 pm
    • <insert personal text here>
    Re: DARKADE - Imperial Bartop COMPLETE
    « Reply #49 on: January 04, 2012, 12:39:47 am »
    One would think that, given the guns, you would have lots of gun games...   ???

    I didn't list every ROM and every program. Don't worry there is plenty to keep me occupied. The guns are a feature, not the star attraction.  No sense in building a custom cab and stopping at the guns ya know.  ;D
    « Last Edit: January 04, 2012, 12:47:37 am by Le Chuck »

    TopJimmyCooks

    • Trade Count: (+1)
    • Full Member
    • ***
    • Offline Offline
    • Posts: 2097
    • Last login:March 26, 2024, 01:18:39 pm
    Re: DARKADE - Imperial Bartop COMPLETE
    « Reply #50 on: January 04, 2012, 08:56:56 am »
    Le Chuck - how fun are the aimtracks with the smaller monitor?  can you do two shooters or do you bump elbows a lot?  I'm trying to decide if it's worth it to do them on a 19" display. 

    Le Chuck

    • Saint, make a poll!
    • Wiki Contributor
    • Trade Count: (+6)
    • Full Member
    • ***
    • Offline Offline
    • Posts: 5509
    • Last login:June 14, 2025, 06:26:06 pm
    • <insert personal text here>
    Re: DARKADE - Imperial Bartop COMPLETE
    « Reply #51 on: January 04, 2012, 09:17:25 am »
    Le Chuck - how fun are the aimtracks with the smaller monitor?  can you do two shooters or do you bump elbows a lot?  I'm trying to decide if it's worth it to do them on a 19" display. 

    It's not an issue if you have the standoff.  Just need to be back three or four feet and you're golden for two player.  The monitor size (17" on mine) hasn't bothered me at all, but I grew up on duckhunt with a tiny tv.  If I was doing a dedicated gun cab I wouldn't go small form but for occasional play it's great. 

    dekar24k

    • Trade Count: (0)
    • Full Member
    • ***
    • Offline Offline
    • Posts: 378
    • Last login:April 28, 2019, 03:50:11 pm
      • ArcadeForum.com
    Re: DARKADE - Imperial Bartop COMPLETE
    « Reply #52 on: January 04, 2012, 09:44:51 am »
    Really sweet looking bartop you've made there man. Great woodworking skills also!  :applaud:
    Finished project: "The Saloon Arcade" - 2 player upright cabinet

    Joystick.net - Retro gaming news and reviews

    Le Chuck

    • Saint, make a poll!
    • Wiki Contributor
    • Trade Count: (+6)
    • Full Member
    • ***
    • Offline Offline
    • Posts: 5509
    • Last login:June 14, 2025, 06:26:06 pm
    • <insert personal text here>
    Re: DARKADE - Imperial Bartop COMPLETE
    « Reply #53 on: January 04, 2012, 10:04:20 am »
    Really sweet looking bartop you've made there man. Great woodworking skills also!  :applaud:

    Thanks man, I just browsed your builds and WOW!  Great stuff.  :notworthy: I will probably steal the bartop base you did for Glory Days.  Good idea... until I have a bar for my bartop.   :cheers:

    dekar24k

    • Trade Count: (0)
    • Full Member
    • ***
    • Offline Offline
    • Posts: 378
    • Last login:April 28, 2019, 03:50:11 pm
      • ArcadeForum.com
    Re: DARKADE - Imperial Bartop COMPLETE
    « Reply #54 on: January 04, 2012, 10:06:52 am »
    Really sweet looking bartop you've made there man. Great woodworking skills also!  :applaud:

    Thanks man, I just browsed your builds and WOW!  Great stuff.  :notworthy: I will probably steal the bartop base you did for Glory Days.  Good idea... until I have a bar for my bartop.   :cheers:

    Thank you! Unfortunately my woodworking skills suck, so all my builds are based on kits or pre-built cabs.  ::)
    Finished project: "The Saloon Arcade" - 2 player upright cabinet

    Joystick.net - Retro gaming news and reviews

    RetroBorg

    • Trade Count: (0)
    • Full Member
    • ***
    • Offline Offline
    • Posts: 818
    • Last login:July 06, 2022, 09:22:13 am
    • Your arcade games will be assimilated!
    Re: DARKADE - Imperial Bartop COMPLETE
    « Reply #55 on: January 04, 2012, 03:40:46 pm »
    Love the project, I'm really interested in how you rate the joystick?

    Gray_Area

    • -Banned-
    • Trade Count: (+1)
    • Full Member
    • ***
    • Offline Offline
    • Posts: 3363
    • Last login:June 23, 2013, 06:52:30 pm
    • -Banned-
    Re: DARKADE - Imperial Bartop COMPLETE
    « Reply #56 on: January 05, 2012, 08:34:15 pm »
    I'm not seeing how you connected the buttons of the flight stick. ?
    -Banned-

    Le Chuck

    • Saint, make a poll!
    • Wiki Contributor
    • Trade Count: (+6)
    • Full Member
    • ***
    • Offline Offline
    • Posts: 5509
    • Last login:June 14, 2025, 06:26:06 pm
    • <insert personal text here>
    Re: DARKADE - Imperial Bartop COMPLETE
    « Reply #57 on: January 05, 2012, 11:58:02 pm »
    RetroBorg, both joys came from GGG.  The 8 way is the Spitfire and has good travel and I like the feel better than my HAPPs, but there isn't a huge improvement for playability, better reaction in the diagonals perhaps but nothing to write home about.  A bit easier to pull off some of the more advanced moves in the fighters for me, YMMV.  The Omni2 is fantastic.  If I had to do it again I would probably have installed dual Omni2's and added a second servo for auto switching (unlike the one's from Andy I don't think there is a way to get them in line switching off one servo - something to consider).  It has good travel and solid hits in both 4 and 8 way.  The hand candy balltops are great looking and really set off the CP.  I will eventually get a Mag Stick Plus to play around with, it would save me the trouble of servos, but I do like the longer throw I get on my current joys.  I really like sliding along the restrictor plate and don't play a bunch of analogs so I haven't felt the need for 360s.  Ideally I'll figure out how to do a physical restriction rotation from the top of the panel without a switch on an Omni2 but I'm not there yet.  I think it involves being able to stick my hand through the fourth dimension but my wife only let's me do that on my birthday.  >:D 

    Gray Area, the flight stick is wireless.  It contains a gutted presentation pointer powered by a small 9v camera battery.  I wired the trigger and thumb button to the up and down (pg up/pg down) clicker buttons and then mapped those buttons in MAME for P1B1 and P1B2.  The USB dongle is just left in one of the USB hub ports inside the cab.  I wired a battery interrupt switch onto the face of the trigger stick and installed magnets in one ball top and the triggerstick so I can hot swap.  Basically when I want to play Zwackery, Tron, DOT, Satan's Hollow, etc I just yank the balltop off, plug on the trigger stick, and press the battery button.  I usually make the change while the game is loading and loose no time in getting rolling.  That's a great explanation if you meant how it's wired globally, if you meant locally I can take some better pictures but basically you solder a wire directly onto either side of the micro switch on the clicker and then solder those wires onto the boards that came with the flight stick for each button.  I stared at the board to figure out which side was COM on the clicker (the left as facing the buttons) and then wired appropriately, though it probably doesn't matter. 

    Dekar24k, kit cabs or not - not everybody can end up with your results. 

    Knievel

    • Trade Count: (+3)
    • Full Member
    • ***
    • Offline Offline
    • Posts: 965
    • Last login:July 10, 2016, 10:29:09 pm
    • Who's up for a game of Stunt Cycle??
      • Knievel Kustoms
    Re: DARKADE - Imperial Bartop COMPLETE
    « Reply #58 on: January 07, 2012, 12:05:10 pm »
    Wow, just beautiful. Very professional finished product.

    I really need to try a bartop one of these days.

    darthpaul

    • Trade Count: (0)
    • Full Member
    • ***
    • Offline Offline
    • Posts: 449
    • Last login:July 08, 2025, 08:50:10 pm
    • Join, It's your duty
    Re: DARKADE - Imperial Bartop under construction Day 11 Update
    « Reply #59 on: January 07, 2012, 01:57:06 pm »
    Quote
    Software Setup:

    Assuming you're using XP and MaLa:  Unscrew the servo arm from the servo as the unit will auto center when you first hook it up.  Install the Maestro program and plug in your controller to the computer.  Maestro should see the Servo.  If not then make sure that the servo is plugged into the controller and that you remembered to jumper the 5v power out to the servo power pin on the board (this servo listed can run off USB just fine but many can't so that's why they make it optional).  If you can see and move your servo then we're in business.  If not please use the Pololu servo forum and those guys will get you up and running ricky-tick.  From center screw your control arm back on with the restrictor plate set between 4way and 8way.  Enable your servo on the status tab and use the channel settings tab to set your limits.  I used speed as 100 and started moving the servo limit 100 units at a time for left and right of center for the servo.  Then use the slide bar on the status tab and and see how far the restrictor moves right and left.  Continue to adjust until you are smoothly transitioning from 4way to 8way.  In theory the servo should shut off right after it reaches the limit but it took a lot of fiddling to get mine there.

    Now go into DOS and ensure that USCCMD is in your path.  If not double click on the USCCMD.exe in the Pololu system folder and it should add the utility.  USCCMD only controls the servo when Maestro isn't so you'll need to disable the servo and close completely out of maestro.  USCCMD is pretty easy to use.  What is nice is that the channel settings from Maestro are preserved so you can tell USCCMD to move to extremes and if you set your channels then the arm will only move within it's range.  

    The batch files I used look like this:

    "4way"
    usccmd --servo 0,1000

    and

    "8way"
    usccmd --servo 0,8000
      
    That's it.  Your numbers will likely differ.  If you only have one servo you don't need to worry about scripting, naming your servo, or targets.  Just tell the controller move left and right and because USCCMD is in your path you don't even have to use a file location.  

    Once you have that working smoothly open up the MaLa configuration menu, go to plugins, and tell JoyChoose where to find your two batch files.  Restart MaLa and when you run games you should hear your servo switch or confirm setting then power off.  

    If the servo continues to buzz it is because your channels are not set right or your hardware connection has too much or too little play in the servo arm and isn't getting to the target.  Address the issue until fixed or you determine that the arm is as good as you can get it and is just going to buzz.  If you reach that point there is a very simple addition to your batch files to get the servo to shut off.  This will save your servo from burn-out.  You can do it several different way, but basically you're executing a wait command and then a target 0 command in USCCMD.  Target 0 disables the servo without having to kill power.  This was plainly written several places in Pololu and in the Maestro software but took me weeks to identify... which wasn't helped by a Pololu admin saying it couldn't be done.  :dizzy: My batch commands now look like this

    Code: [Select]
    "4way"
    @echo off
    usccmd --servo 0,4000
    sleep 2
    usccmd --servo 0,0

    I also tried it with TIMEOUT, Pause, and a Ping to nowhere string and all worked satisfactorily to give the servo time to hit the target then shut off.

    One last issue that I ran into is that the Servo Controller didn't like my Onn USB hubs and started throwing all kinds of error codes so I had to give it a dedicated port, it was still spotty after that so I installed a powered USB hub by Belkin ($19) and it's purring like a kitten, as are my light guns and guitar controller so definitely worth the cash.  Something to consider.  

    This project is not easy and I wanted to give up multiple times.  So glad I didn't and hopefully this will help somebody else tackle the great mod.  Huge thanks to Terrahwk, DarthPaul, and DaOld Man for his awesome plug-in!  

    <edited to update Batch commands on how to shut off your servo and auxiliary power recommendation for the servo>


    I would just like to add one thing, if you are using more than one Maestro servo controller like I am, you will need to add the Device command.
    USCCMD --DEVICE 0001430 --SERVO 1,6000
    You would use your Maestro device number in place of 0001430 in the code above.
    « Last Edit: January 07, 2012, 02:02:30 pm by darthpaul »
    "You don't know the power of the Dark Side"
    Automated Cabinet
    Nintendo Pi
    PiCubed

    Le Chuck

    • Saint, make a poll!
    • Wiki Contributor
    • Trade Count: (+6)
    • Full Member
    • ***
    • Offline Offline
    • Posts: 5509
    • Last login:June 14, 2025, 06:26:06 pm
    • <insert personal text here>
    Re: DARKADE - Imperial Bartop COMPLETE
    « Reply #60 on: January 07, 2012, 05:30:38 pm »
    Thanks again for all the positive feedback everybody.  I am having to make a few software tweaks and will update with any hurdles that are overcome.  Current issue is ye olde USB mapping in MAME for removable devices issue.  Basically, if I leave my guns plugged in all the time I'm good to go, but as soon as I unjack to play some Frets on Fire, or just not have the guns hanging there, I have to point MAME back at them when I plug them back in.  I'll be working with DRVenture's Controller Remap Utility to get it straightened out.  I'm also getting some odd interfence from JoytoKey in Frets on Fire.  I think MALA is turning the app on too often, or its not being closed properly.  Should be an easy fix, just have to drag out a keyboard. 

    I got in my vinyl button decals from Pongo today and they are slick.  They're all installed and looking great.  I will get picks up of that shortly.  They really are a nice touch. 

    kb84

    • Trade Count: (0)
    • Full Member
    • ***
    • Offline Offline
    • Posts: 51
    • Last login:September 10, 2012, 01:10:42 pm
    Re: DARKADE - Imperial Bartop COMPLETE
    « Reply #61 on: January 07, 2012, 05:38:27 pm »
    This is such an awesome build. I love the theme and attention to detail here.  :cheers:

    RetroBorg

    • Trade Count: (0)
    • Full Member
    • ***
    • Offline Offline
    • Posts: 818
    • Last login:July 06, 2022, 09:22:13 am
    • Your arcade games will be assimilated!
    Re: DARKADE - Imperial Bartop COMPLETE
    « Reply #62 on: January 08, 2012, 06:31:58 am »
    Thanks for the feedback on the joysticks Le Chuck, I think I may look at some Omni2's for a project coming up.

    Look forward to seeing your pics with Pongo's decals.

    greystone

    • Trade Count: (0)
    • Jr. Member
    • **
    • Offline Offline
    • Posts: 5
    • Last login:March 12, 2012, 06:23:20 pm
    Re: DARKADE - Imperial Bartop COMPLETE
    « Reply #63 on: February 05, 2012, 04:21:52 pm »
    I really like this build, it's a great inspiration for me! I am now sold on going the extra mile to make my screen rotatable. I may have missed it in your posts, can you expand on how this is setup? Looks like a thin (1/2"?) MDF bezel is attached to the monitor, and a plexi cover is on top of that? Is the MDF glued to the monitor?

    What's the process for rotating it?

    Thanks!
    Paul

    DaOld Man

    • Trade Count: (+4)
    • Full Member
    • ***
    • Offline Offline
    • Posts: 5158
    • Last login:May 24, 2025, 09:57:44 pm
    • Wheres my coffee?
      • Skenny's Outpost
    Re: DARKADE - Imperial Bartop COMPLETE
    « Reply #64 on: February 05, 2012, 04:57:05 pm »
    I really like this build, it's a great inspiration for me! I am now sold on going the extra mile to make my screen rotatable.

    Sweet! Another rotate project, good luck on it, and cant wait to see it.

    Johns Uncle

    • Trade Count: (0)
    • Full Member
    • ***
    • Offline Offline
    • Posts: 12
    • Last login:April 18, 2020, 12:20:50 pm
    Re: DARKADE - Imperial Bartop COMPLETE
    « Reply #65 on: February 06, 2012, 04:49:38 pm »
    Thats very impressive congrats on a beautiful bartop  :applaud:

    Louis Tully

    • Trade Count: (+5)
    • Full Member
    • ***
    • Offline Offline
    • Posts: 1800
    • Last login:February 13, 2015, 09:41:03 pm
    Re: DARKADE - Imperial Bartop COMPLETE
    « Reply #66 on: February 06, 2012, 05:24:03 pm »
    .
    « Last Edit: February 12, 2015, 05:21:27 am by Louis Tully »

    DaOld Man

    • Trade Count: (+4)
    • Full Member
    • ***
    • Offline Offline
    • Posts: 5158
    • Last login:May 24, 2025, 09:57:44 pm
    • Wheres my coffee?
      • Skenny's Outpost
    Re: DARKADE - Imperial Bartop COMPLETE
    « Reply #67 on: February 07, 2012, 06:39:21 am »
    Great job LeChuck!! Love the way this project turned out!
     :applaud: :applaud: :applaud: :applaud:

    Le Chuck

    • Saint, make a poll!
    • Wiki Contributor
    • Trade Count: (+6)
    • Full Member
    • ***
    • Offline Offline
    • Posts: 5509
    • Last login:June 14, 2025, 06:26:06 pm
    • <insert personal text here>
    Re: DARKADE - Imperial Bartop COMPLETE
    « Reply #68 on: February 08, 2012, 12:05:04 am »
    Thanks for all kudos guys.  I couldn't have done it without being pulled kicking and screaming by this community!

    So Update:  Darkade now switches from 8way to 4way while playing TRON so no more zigzag ---That which is odiferous and causeth plants to grow--- on light bikes!  All I have left is to take a few more screenshots so it does it when played vertically. 

    Took a video, it is here.  It should answer any burning questions but if not ask and I will do my best to clearly explain what it does and why I chose that way of doing it. 


    Le Chuck

    • Saint, make a poll!
    • Wiki Contributor
    • Trade Count: (+6)
    • Full Member
    • ***
    • Offline Offline
    • Posts: 5509
    • Last login:June 14, 2025, 06:26:06 pm
    • <insert personal text here>
    Re: DARKADE - Imperial Bartop COMPLETE
    « Reply #69 on: February 08, 2012, 12:18:04 am »
    I really like this build, it's a great inspiration for me! I am now sold on going the extra mile to make my screen rotatable. I may have missed it in your posts, can you expand on how this is setup? Looks like a thin (1/2"?) MDF bezel is attached to the monitor, and a plexi cover is on top of that? Is the MDF glued to the monitor?

    What's the process for rotating it?

    Thanks!
    Paul


    You can see my bassackwards process in the video.   ;D  Only way I could figure to do it in a Weecade - which was the point of the build (well one of them), to prove it can be done.  The bezel is 3/4" and is routed down to a 1/4 for the screen drop in.  No glue, not brackets, held in by the fact that it barely fit.  I had planned on adding corner brackets on the back but it wasn't necessary so I left them off.  The Bezel itself is square and fits between two runners and sits on a piece of angle iron, that way I can take it out and rotate it any which way for a clean fit.  In the back are two brackets up top and I use a bar to hold the monitor in from the back - kinda like the locking system on a castle gate. 

    TopJimmyCooks

    • Trade Count: (+1)
    • Full Member
    • ***
    • Offline Offline
    • Posts: 2097
    • Last login:March 26, 2024, 01:18:39 pm
    Re: DARKADE - Imperial Bartop COMPLETE with VIDEO
    « Reply #70 on: February 08, 2012, 08:13:29 am »
    I really like the display switch setup.  gets the job done while keeping it simple.  I give approval to move the project from the workshop to the house. 

    Vigo

    • the Scourage of Carpathia
    • Global Moderator
    • Trade Count: (+24)
    • Full Member
    • *****
    • Offline Offline
    • Posts: 6417
    • Last login:June 25, 2025, 03:09:16 pm
    Re: DARKADE - Imperial Bartop COMPLETE with VIDEO
    « Reply #71 on: February 08, 2012, 11:52:44 am »
    I've been following your progress, I really have to say this is an all around impressive build. From the artwork to the attention to detail and impressive features, I have to say that this is hands down one of the most impressive bartops I have seen.  :applaud:

    Saicho

    • Trade Count: (0)
    • Full Member
    • ***
    • Offline Offline
    • Posts: 29
    • Last login:February 27, 2014, 03:20:24 pm
    Re: DARKADE - Imperial Bartop COMPLETE with VIDEO
    « Reply #72 on: February 11, 2012, 09:26:38 am »
    This really looks like an awesome build, Le Chuck! Great job on it all and thanks for the inspiration ;-)

    Well Fed Games

    • Trade Count: (+6)
    • Full Member
    • ***
    • Offline Offline
    • Posts: 1884
    • Last login:January 07, 2025, 04:42:47 pm
    • Delicious!
    Re: DARKADE - Imperial Bartop COMPLETE with VIDEO
    « Reply #73 on: February 11, 2012, 11:46:36 am »
    This is why I feel that MAME cabs can be a work of art, beyond just a venue to play games. Incredible work, visually and technically!  :notworthy:
    Completed projects: Pac bartop (Plug & Play), 30th Anniversary Pac cab (MAME), Point Blank (PS1), Centipede (arcade hardware- light restore), VS. Super Mario Bros (arcade hardware- light restore) Tetris Cocktail (SNES), Arcade Classics upright (60-in-1, then MAME), Multi-Raiden (arcade hardware). Pac Man vs.(Gamecube),

    Working on: Pinball Re-theme, Homebrew arcade arena shooter

    Le Chuck

    • Saint, make a poll!
    • Wiki Contributor
    • Trade Count: (+6)
    • Full Member
    • ***
    • Offline Offline
    • Posts: 5509
    • Last login:June 14, 2025, 06:26:06 pm
    • <insert personal text here>
    Re: DARKADE - Imperial Bartop COMPLETE with VIDEO
    « Reply #74 on: February 11, 2012, 12:07:31 pm »
    Thanks guys, lot of love in the room   :cheers:

    I really wanted to meld several other builds I've seen on here into a small nice to look at package.  There weren't very many new ideas (I think sawing the smartstrip in half was it  :lol) but I did try to improve on/customize a few ideas that were already floating around.  They all came together pretty well - the hotswap trigger stick might be what I'm most proud of on the build, well that combined with the ingame 8way to 4way, that was new.  

    I just hope my next cab can build on what I've learned and accomplished here.    ;D
    « Last Edit: February 13, 2012, 12:41:10 pm by Le Chuck »

    TopJimmyCooks

    • Trade Count: (+1)
    • Full Member
    • ***
    • Offline Offline
    • Posts: 2097
    • Last login:March 26, 2024, 01:18:39 pm
    Re: DARKADE - Imperial Bartop COMPLETE with VIDEO
    « Reply #75 on: February 13, 2012, 12:18:55 pm »
    How did you do the Tron in-game switch? Joychoose is probably normally looking at controls.ini, which doesn't give 8way v/s 4 way for tron. 

    Le Chuck

    • Saint, make a poll!
    • Wiki Contributor
    • Trade Count: (+6)
    • Full Member
    • ***
    • Offline Offline
    • Posts: 5509
    • Last login:June 14, 2025, 06:26:06 pm
    • <insert personal text here>
    Re: DARKADE - Imperial Bartop COMPLETE with VIDEO
    « Reply #76 on: February 13, 2012, 12:33:19 pm »
    How did you do the Tron in-game switch? Joychoose is probably normally looking at controls.ini, which doesn't give 8way v/s 4 way for tron.  

    Right you are, Tron is an 8way in the controls.ini so I went hunting for suggestions and Nitz came to the rescue with a great image-search AHK script.  The development of the project is here.  In short a script runs in the background and hunts for some very small images that are unique to Tron and the lightbikes level.  When it sees these images the script calls my servo.  So far I have had no issues with this script/hack and I am running a fairly low speed system.  I was going to set the script to only begin running when I run Tron but is was so smooth in testing that I left it in the start-up folder and it runs all the time.  

    <edit for syntax>
    « Last Edit: February 13, 2012, 12:39:09 pm by Le Chuck »

    TopJimmyCooks

    • Trade Count: (+1)
    • Full Member
    • ***
    • Offline Offline
    • Posts: 2097
    • Last login:March 26, 2024, 01:18:39 pm
    Re: DARKADE - Imperial Bartop COMPLETE with VIDEO
    « Reply #77 on: February 13, 2012, 12:38:21 pm »
    Holy crap that's awesome.  That is a great solution and Nitz is a heck of a guy and to implement it. 

    kahlid74

    • Trade Count: (+1)
    • Full Member
    • ***
    • Offline Offline
    • Posts: 1366
    • Last login:January 01, 2021, 12:42:56 pm
    • Gaming for a better future!
      • GamersAnon
    Re: DARKADE - Imperial Bartop COMPLETE with VIDEO
    « Reply #78 on: February 14, 2012, 09:48:22 am »
    Great looking bartop.  The graphics blend well and I like the design of controls.  Any reason the second player only has 2 buttons and not three?

    Le Chuck

    • Saint, make a poll!
    • Wiki Contributor
    • Trade Count: (+6)
    • Full Member
    • ***
    • Offline Offline
    • Posts: 5509
    • Last login:June 14, 2025, 06:26:06 pm
    • <insert personal text here>
    Re: DARKADE - Imperial Bartop COMPLETE with VIDEO
    « Reply #79 on: February 14, 2012, 10:12:54 am »
    Great looking bartop.  The graphics blend well and I like the design of controls.  Any reason the second player only has 2 buttons and not three?

    It's not exactly a two player bartop, it's two player capable.  Since I only have one 8way to 4way stick I tossed a few buttons over to that stick to fill a gaming gap and add limited 2 player support.  Thanks for the kuddos 

    Santoro

    • Purveyor of Shiny Arcade Goodness
    • Santoro
    • Trade Count: (+32)
    • Full Member
    • *
    • Offline Offline
    • Posts: 3055
    • Last login:July 14, 2025, 03:43:29 pm
    • Boycott Quarters!!!
      • ArcadeReplay!
    Re: DARKADE - Imperial Bartop COMPLETE with VIDEO
    « Reply #80 on: April 14, 2012, 02:37:49 pm »
    Missed this project till now... Holy cow... Great job!

    lokesen

    • Trade Count: (0)
    • Full Member
    • ***
    • Offline Offline
    • Posts: 242
    • Last login:August 12, 2013, 12:17:33 pm
      • WeeCade & Project MAME
    Re: DARKADE - Imperial Bartop COMPLETE with VIDEO
    « Reply #81 on: April 14, 2012, 05:47:54 pm »
    This is by far the most advanced Weecade build I have seen - And probably will see. You are very skilled and creative!
    Weecade, Nanocade, Verticade, Project MAME and Taitorama

    More to come...

    Le Chuck

    • Saint, make a poll!
    • Wiki Contributor
    • Trade Count: (+6)
    • Full Member
    • ***
    • Offline Offline
    • Posts: 5509
    • Last login:June 14, 2025, 06:26:06 pm
    • <insert personal text here>
    Re: DARKADE - Imperial Bartop COMPLETE with VIDEO
    « Reply #82 on: April 14, 2012, 09:55:23 pm »
    This is by far the most advanced Weecade build I have seen - And probably will see. You are very skilled and creative!

    Thanks man, I can't say enough thanks for putting up your weecade plans and all you've done for the community through your various projects.  I really liked the weecade from the start and wanted to do an homage with my own multifunctional take on it.  Glad you liked the results.

    Missed this project till now... Holy cow... Great job!

    Word, good stuff bro  :cheers:

    dandare

    • Trade Count: (0)
    • Full Member
    • ***
    • Offline Offline
    • Posts: 226
    • Last login:March 25, 2013, 08:43:44 am
    Re: DARKADE - Imperial Bartop COMPLETE with VIDEO
    « Reply #83 on: April 15, 2012, 05:41:41 pm »
    Indeed. lokesen has been a major inspiration for me, and is a top bloke for sharing such detailed build plans.

    (though his aversion to t-molding is a mystery. each to their own i guess)  ;D

    Darkade is definitely the number one weecade homage.

    sho

    • Trade Count: (0)
    • Full Member
    • ***
    • Offline Offline
    • Posts: 47
    • Last login:February 10, 2022, 10:44:00 am
    Re: DARKADE - Imperial Bartop COMPLETE with VIDEO
    « Reply #84 on: May 22, 2012, 03:48:39 pm »
    Do I see correctly that the marquee / speaker area is wedge shaped to accommodate for the rotation (vertical aspect)?
    Bubble Bobble YAWN

    Le Chuck

    • Saint, make a poll!
    • Wiki Contributor
    • Trade Count: (+6)
    • Full Member
    • ***
    • Offline Offline
    • Posts: 5509
    • Last login:June 14, 2025, 06:26:06 pm
    • <insert personal text here>
    Re: DARKADE - Imperial Bartop COMPLETE with VIDEO
    « Reply #85 on: May 22, 2012, 04:34:36 pm »
    Do I see correctly that the marquee / speaker area is wedge shaped to accommodate for the rotation (vertical aspect)?

    Yes.  I removed the speakers from that area entirely and went with a rear panel installation to make the spacing work a bit better.  Probably wasn't necessary as I think there was room but it certainly helped with light dispersion.  The panel above the screen (floor of marquee area) is not parallel to the bottom of the build.   

    sho

    • Trade Count: (0)
    • Full Member
    • ***
    • Offline Offline
    • Posts: 47
    • Last login:February 10, 2022, 10:44:00 am
    Re: DARKADE - Imperial Bartop COMPLETE with VIDEO
    « Reply #86 on: July 07, 2012, 08:22:54 am »
    Looks like the Sith are gaining traction: http://www.gamoover.net/Forums/index.php?topic=25746
    Bubble Bobble YAWN

    Le Chuck

    • Saint, make a poll!
    • Wiki Contributor
    • Trade Count: (+6)
    • Full Member
    • ***
    • Offline Offline
    • Posts: 5509
    • Last login:June 14, 2025, 06:26:06 pm
    • <insert personal text here>
    Re: DARKADE - Imperial Bartop COMPLETE with VIDEO
    « Reply #87 on: July 14, 2012, 11:56:54 pm »
    I'm a bit past the 6 month mark since completing this build, almost 8 now.  

    I've decided to redo the CP.  It works great as a single player but this cab has been getting a lot more two player action than I thought it would.  That is probably due to the absence of a full size multiplayer rig in my house at this time.  

    I have been so pleased with the auto 4-way 8-way I'm adding a second one.  Now both joys will have the functionality opening up a few other games and allowing me not to have to switch to the P2 position to play the classics.  

    Moving from a 6+2 to a 4 & 4 player button set-up.  This will cut down on guest confusion and open up all the two player games minus a few fighters.  I'm losing my MvsC and SVII but I'm not overly heart broken.  Besides I'll probably just program both those titles to play MP MK HP HK only and lose the soft hits because I'm a masher and don't use those first two wussy buttons anyway.  Already put in the order for the servo and Omni2 and have completed the updated CPO.  Going to try one of those cheap-o overseas print services and see how I like the product.

    Here's the art:


    Here's another version, I like the above, having the vertical lines not be symmetrical helps move the eye around the CP and with four I think it is over crowded.  Always open to suggestion and recommendation or course.


    Oh, and I've got a black DOT knob coming because the red wasn't a good match for the ball-tops and always bugged me.  Changing that knob is what motivated me to redo everything.  
    « Last Edit: July 15, 2012, 12:10:12 am by Le Chuck »

    Nephasth

    • Guest
    • Trade Count: (0)
    Re: DARKADE - Imperial Bartop COMPLETE with VIDEO
    « Reply #88 on: July 15, 2012, 04:18:59 pm »
    This will cut down on guest confusion...  

    Nothing you do will help with this. Even when when the only usable controls are lit, I get "what does what?" C'mon, it's 2 buttons and a joystick, not too hard to figure out. When the screen says "Insert Coin", the coin rejects are lit, and there's a pile of tokens in my gameroom, I get "how do I start this thing?"

    Anyways, art looks good! Looking forward to seeing your retrofit! :cheers:

    fantoboy

    • Trade Count: (0)
    • Full Member
    • ***
    • Offline Offline
    • Posts: 187
    • Last login:May 24, 2017, 02:02:13 pm
    • I'm a mushroom cloud layin' motha fu($@!
    Re: DARKADE - Imperial Bartop COMPLETE with VIDEO
    « Reply #89 on: August 24, 2012, 07:54:49 pm »
    I love this project.  The Imperial logos make such a great graphic for the base of a joystick.  That's so perfect.

    I'm interested in the less cool stuff: rear panel.  Is that MDF with a grill put into it? With magnets holding it in? Do you not have case fans in there?

    Le Chuck

    • Saint, make a poll!
    • Wiki Contributor
    • Trade Count: (+6)
    • Full Member
    • ***
    • Offline Offline
    • Posts: 5509
    • Last login:June 14, 2025, 06:26:06 pm
    • <insert personal text here>
    Re: DARKADE - Imperial Bartop COMPLETE with VIDEO
    « Reply #90 on: August 24, 2012, 09:27:45 pm »
    Is that MDF with a grill put into it?
    Yup

    With magnets holding it in?
    Yup. The manual rotation for the monitor makes a lock and key a PTA.

    Do you not have case fans in there?
    Nope.  No need.  It's a laptop and a small monitor.  There is ventilation from the bottom and out the back.  Had it running for days with no spike in temp on the CPU. 


    edekoning

    • Trade Count: (0)
    • Full Member
    • ***
    • Offline Offline
    • Posts: 591
    • Last login:November 10, 2022, 02:21:38 pm
    Re: DARKADE - Imperial Bartop COMPLETE with VIDEO
    « Reply #91 on: August 31, 2012, 06:13:36 am »
    As the woodworking part of my own full size cab is almost done, my 6 year old son is starting to get really interested and excited about it. So I sorta promised him his own bartop after mine is done ;D Anyways, I showed him a short list of what I consider excellent bartop builds from this forum. As soon as he saw the DARKADE, he was sold. There was no need to show him anything else.

    So there you go, a big thumbs up from my son  :applaud:

    Vaderforce

    • Trade Count: (0)
    • Newbie
    • *
    • Offline Offline
    • Posts: 1
    • Last login:May 29, 2013, 01:15:12 pm
    Re: DARKADE - Imperial Bartop COMPLETE with VIDEO
    « Reply #92 on: May 29, 2013, 08:45:46 am »
    Hi, Great cab could you pm me the artwork and mala layout.

    opt2not

    • Trade Count: (+15)
    • Full Member
    • ***
    • Offline Offline
    • Posts: 6173
    • Last login:April 02, 2024, 07:42:30 pm
    Re: DARKADE - Imperial Bartop COMPLETE with VIDEO
    « Reply #93 on: May 29, 2013, 02:56:43 pm »
    Hi, Great cab could you pm me the artwork and mala layout.

    Great first post.  :dizzy:   :whap

    leapinlew

    • Some questionable things going on in this room with cheetos
    • Trade Count: (+4)
    • Full Member
    • ***
    • Offline Offline
    • Posts: 7919
    • Last login:July 12, 2025, 10:33:20 pm
    Re: DARKADE - Imperial Bartop COMPLETE with VIDEO
    « Reply #94 on: May 31, 2013, 08:52:35 am »
    Don't do it Chuck! Vaderforce is Disney lawyers code name.

    BorgDog

    • Trade Count: (0)
    • Full Member
    • ***
    • Offline Offline
    • Posts: 436
    • Last login:August 22, 2021, 02:22:52 pm
    • Not a hipster for over 50 years!
    Re: DARKADE - Imperial Bartop COMPLETE with VIDEO
    « Reply #95 on: January 04, 2015, 07:23:45 pm »
    Hey Le Chuck, I know this is old, but did you ever update to your new control panel layout?  pics....

    Looking to do a similar CP layout for my next project.
    My Projects:
    MisSpent Youth a Vigolix bartop,  Little Bastard a rotating tablet/display bartop,
    Pin-Dog a mini pin-cab on vpforums.org  Star Wars a wedgehead pincab on vpinball.com

    Le Chuck

    • Saint, make a poll!
    • Wiki Contributor
    • Trade Count: (+6)
    • Full Member
    • ***
    • Offline Offline
    • Posts: 5509
    • Last login:June 14, 2025, 06:26:06 pm
    • <insert personal text here>
    Re: DARKADE - Imperial Bartop COMPLETE with VIDEO
    « Reply #96 on: January 04, 2015, 07:51:03 pm »
    Hey Le Chuck, I know this is old, but did you ever update to your new control panel layout?  pics....

    Looking to do a similar CP layout for my next project.
    Can't say as I did.  Had all intention too but it's hard to rip down a full working machine - and the kids love it so...

    spudzaiah

    • Trade Count: (0)
    • Full Member
    • ***
    • Offline Offline
    • Posts: 14
    • Last login:May 09, 2017, 08:46:32 am
    • I want to build my own arcade controls!
    Re: DARKADE - Imperial Bartop COMPLETE with VIDEO
    « Reply #97 on: November 05, 2016, 05:17:14 pm »
    I know this is an old topic, but I really like your build! I was also wondering if you had any tips on bending Plexi such as you did. I love the waterfall control panel.

    Le Chuck

    • Saint, make a poll!
    • Wiki Contributor
    • Trade Count: (+6)
    • Full Member
    • ***
    • Offline Offline
    • Posts: 5509
    • Last login:June 14, 2025, 06:26:06 pm
    • <insert personal text here>
    Re: DARKADE - Imperial Bartop under construction Day 4 Update
    « Reply #98 on: November 05, 2016, 08:21:05 pm »
    I know this is an old topic, but I really like your build! I was also wondering if you had any tips on bending Plexi such as you did. I love the waterfall control panel.

    This is always the most stressful part of my build.  Every cab I've done has had a wrap-around plexi cover for my CP.  This time I made it all the way through on the first piece.  I went deadly slow and made sacrifices to Murphy along the the process by occasionally torching myself... totally worth it.


    Thanks!  Okay, so as you can see I had the panel all the way off and bit of plexi the right width but longer than a needed.  Really that part is optional, but it makes it easier to clamp.  When you're done you can just hit the sides with a flush-trim bit. 

    So what you wanna do it get the wood panel all done and rounded out the way you like it.  Clamp the plexi to the panel and then heat the plexi.  Recommend using a heat gun but a propane torch can work if you keep that flame moving super fast - else you'll bubble or yellow the plexi.  Move the heat back and forth over the length for even heat and don't start bending until the plexi droops under its own weight.  If you need a bend past your CP, like I had, then do that with a dowel rod of the right radius if it's smooth, or if it's a sharper angle just use the edge of a table. 

    I keep a clean piece of MDF to help push my bends.  I'm going over these hillbilly techniques because I figure you, like me, don't have a bending table.  Anyway, once you do your bends, I recommend doing them over two or three heat sessions.  Don't try to finish the bend all at once or you'll get too much pull, then edges, and it'll get out of whack.  Just go slow and keep clamping your way around. 

    Do not route your button holes until after your bends are complete or they won't match up.