Main Restorations Software Audio/Jukebox/MP3 Everything Else Buy/Sell/Trade
Project Announcements Monitor/Video GroovyMAME Merit/JVL Touchscreen Meet Up Retail Vendors
Driving & Racing Woodworking Software Support Forums Consoles Project Arcade Reviews
Automated Projects Artwork Frontend Support Forums Pinball Forum Discussion Old Boards
Raspberry Pi & Dev Board controls.dat Linux Miscellaneous Arcade Wiki Discussion Old Archives
Lightguns Arcade1Up Try the site in https mode Site News

Unread posts | New Replies | Recent posts | Rules | Chatroom | Wiki | File Repository | RSS | Submit news


Author Topic: Battletoads - It's back together again. This time with artwork!  (Read 53862 times)

0 Members and 1 Guest are viewing this topic.

Santoro

  • Purveyor of Shiny Arcade Goodness
  • Santoro
  • Trade Count: (+32)
  • Full Member
  • *
  • Offline Offline
  • Posts: 3055
  • Last login:July 14, 2025, 03:43:29 pm
  • Boycott Quarters!!!
    • ArcadeReplay!
Re: Outlaw Star Arcade - Finally back to work
« Reply #80 on: May 06, 2012, 09:44:53 am »
Don't forget you need to mod the mechs for your new tokens :)

AlienInferno

  • Trade Count: (0)
  • Full Member
  • ***
  • Offline Offline
  • Posts: 516
  • Last login:June 24, 2025, 12:14:27 am
Re: Outlaw Star Arcade - Finally back to work
« Reply #81 on: May 06, 2012, 10:54:09 am »
Don't forget you need to mod the mechs for your new tokens :)

Allready done.  Just needed to move the little sliding sizer thing over a bit.  Thanks again man.

SammyWI

  • Trade Count: (+2)
  • Full Member
  • ***
  • Offline Offline
  • Posts: 457
  • Last login:August 16, 2022, 07:58:00 pm
Re: Outlaw Star Arcade - Finally back to work
« Reply #82 on: May 06, 2012, 11:28:37 am »
Glad to hear you are back on this.  Keep up with the updates.

UncleArgyle

  • Trade Count: (0)
  • Full Member
  • ***
  • Offline Offline
  • Posts: 35
  • Last login:September 23, 2019, 12:45:36 pm
Re: Outlaw Star Arcade - Finally back to work
« Reply #83 on: May 07, 2012, 10:16:12 am »
Excellent job. I am building out a MAME cab on an NFL Blitz cab that I got...same dimensions/style as yours.  Did you mount the trackball yet? I am going back and forth on my control panel layout, so pictures of a similar sized panel would be helpful.

Mike.

AlienInferno

  • Trade Count: (0)
  • Full Member
  • ***
  • Offline Offline
  • Posts: 516
  • Last login:June 24, 2025, 12:14:27 am
Re: Outlaw Star Arcade - Finally back to work
« Reply #84 on: May 07, 2012, 12:36:23 pm »
Excellent job. I am building out a MAME cab on an NFL Blitz cab that I got...same dimensions/style as yours.  Did you mount the trackball yet? I am going back and forth on my control panel layout, so pictures of a similar sized panel would be helpful.

Mike.

Thanks.

I have not mounted the trackball yet.  If you look on page two you will see a mockup control panel with the joysticks and buttons installed.  I was originally going to put the trackball dead square in the center because I thought it looked better but after sitting in front of it and pretending to spin the trackball fast I kept hitting the monitor.  If I move the trackball as low as I can get it in the center position that will give me an extra couple of inches that should keep me from hitting the screen.

Main reason I haven't mounted it yet though is because I need to shave 1/8" off the top of the panel to allow for the thickness of the plexi I will be using on top.  As soon as that's done the panel will be assembled and complete.

AlienInferno

  • Trade Count: (0)
  • Full Member
  • ***
  • Offline Offline
  • Posts: 516
  • Last login:June 24, 2025, 12:14:27 am
Re: Outlaw Star Arcade - Finally back to work
« Reply #85 on: May 14, 2012, 10:40:55 pm »
Finally had an off day where it wasn't trying to rain so I got some work done.  Actually rain wouldn't have mattered as I forked out the cash and purchased 200 feet of extension cords today to run power from a small shed to my garage.  But here we go....

First thing I did today was slice my finger open on a brand new straight router bit.  That was great.  Then I proceeded to make a tool for my tool.  A router planer jig.  Got the idea from this webpage on WoodZone.com.  (I have more pics of this if anyone might need a how-to written up but I think the webpage I linked too does a pretty good job of explaining things)


Testing the jig by practicing shaving 1/8" off some scrap MDF.


After a couple tests I got it setup about right.


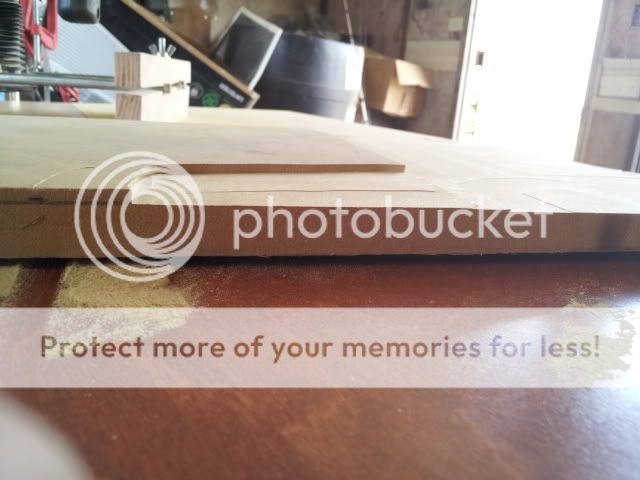
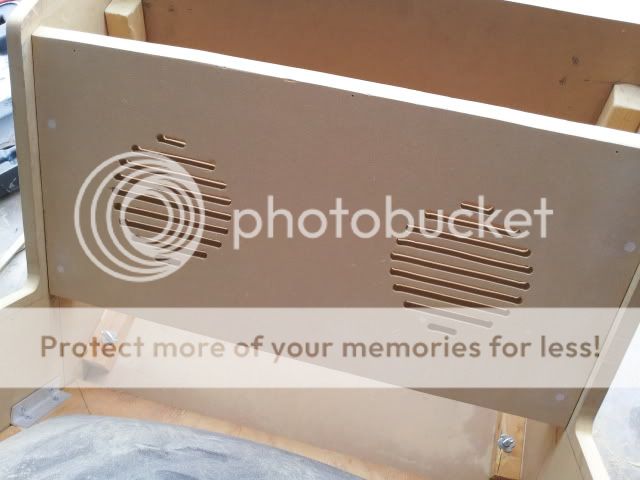
Then I proceeded to shave 1/8" off the bottom side of my control panel.  Made a couple mistakes as can be seen.  Just managed to dig the bit in a little too far somehow.


After some light sanding to get rid of some ridges I was pretty happy with how the rest of the panel turned out, bondo'd my mistakes, and sanded them down.


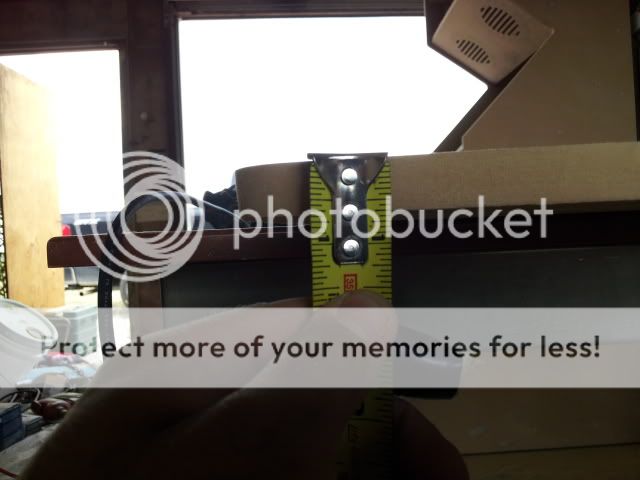
Here's a pic of me checking the measurements of the MDF.  And my taped up finger.  It didn't really bleed any but I wanted to keep MDF dust out of the cut.  The 3/4" MDF is now 5/8" MDF.


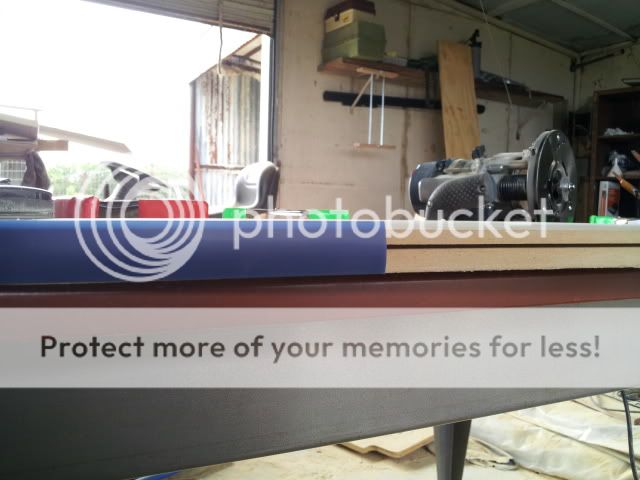
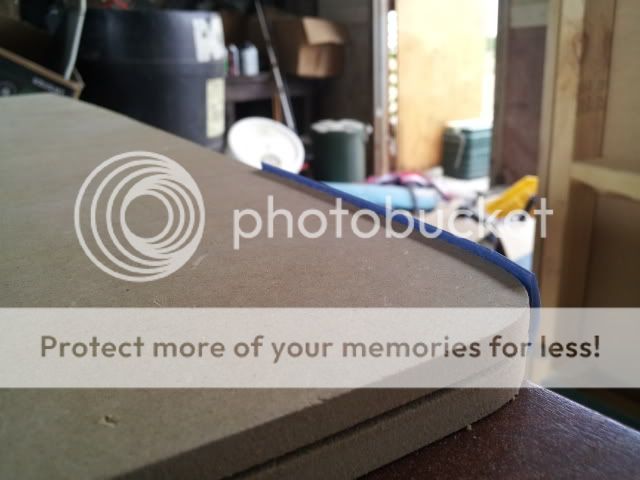
Also cut the T-molding slot for the control panel top.  It left a perfect 1/8" overhang.  Once I get the plexi for the top the T-molding should cover the entire side of the plexi and the mdf.


After all this I just worked on the main body of the cab.  Bondo'd up some pin holes I had in some previous bondo work and sanded everything.  I got all sides sanded except the back and the right side.  This upcoming weekend I will be busy so it might end up being 2 weeks before I can work on this again but all I have left before paint now is:

T-molding slots on main cab
Monitor plexi mounts
Bottom back door
Air vents (think I'm going to router some air vents in the top of the cab and the bottom back door as well)

Here's the rest of the pics.


Threw these in here just because I made a crap ton of MDF dust.  Even with a mask, and both of the big doors open, I still ended up with brown snot.


AlienInferno

  • Trade Count: (0)
  • Full Member
  • ***
  • Offline Offline
  • Posts: 516
  • Last login:June 24, 2025, 12:14:27 am
Re: Outlaw Star Arcade - Still working (update 5/14/12)
« Reply #86 on: May 21, 2012, 10:27:32 pm »
Allright so let's see what we have here. 

Nothing much really.   :dunno  Thursday after work I got a little more work done on the cab.  Cut the t-molding slot in the main cab body and routered off a bit of a lip that was keeping me from getting the rear door #3 from sitting flush.  Still have to add in the VGA out, a RJ45 connector, a usb connector, and possibly a ps2 connector for a keyboard as well.  I figure it's easier doing updates with an external monitor as opposed to a TV that doesn't look that great when I'm actually using it as a PC.

Haven't really done much to the cab itself since then.  I've been busy all weekend at a club event.  Setting up a small fireworks show.


But during my off time and a little bit today I've been trying to figure out my button layout.  I've gotten my joystick locations, trackball location, and player buttons input into illustrator but for the life of me I can not figure out a layout for the two admin buttons (Exit and Pause).  I've tried putting them in the middle but that didn't look right so I'll move them around a bit and see what I can come up with.  I'll take input though.  Also going to try and finish all the cab except for paint this week but depends on when I get off work and how long it takes a few parts to get here.  So we'll see.

Here's the layout minus the two admin buttons.


AlienInferno

  • Trade Count: (0)
  • Full Member
  • ***
  • Offline Offline
  • Posts: 516
  • Last login:June 24, 2025, 12:14:27 am
Re: Outlaw Star Arcade - Miniscule Rambling Update (5/21/12)
« Reply #87 on: May 21, 2012, 11:00:14 pm »
Just to add I figured out something else I forgot to add to my CP.  A volume knob and headphone jack.  Yes you might hear the button smashing but I still want headphones.  So adding those two things might make it alittle more symetrical.

AlienInferno

  • Trade Count: (0)
  • Full Member
  • ***
  • Offline Offline
  • Posts: 516
  • Last login:June 24, 2025, 12:14:27 am
Re: Outlaw Star Arcade - Miniscule Rambling Update (5/21/12)
« Reply #88 on: June 05, 2012, 09:38:47 pm »
I had gotten some supplies in for my cabinet last week so spent the three full days of my weekend (well as close to full days as I could muster) working on my machine.  Got a lot done and at the same time made a lot of work for myself.  It's the old, "One step forward, Two steps back" deal.

Friday night after work I finalized the layout of my control panel and printed out a full size template to aid in marking my drill points.

Saturday I marked the locations for the buttons, joysticks, and trackball and proceeded to drill/cut/route out the locations for the buttons and the joysticks.  After this I used the router to trim the plexi flush with the control panel and route out the circles for the buttons, etc.  Here's where the "two steps back" comes into play.  I used a drill bit for the two joystick holes in the plexi.  The first one went like butter.  The second (and last hole), it hung and cracked the plexi.   :badmood:  It sucked but it happens.  Ordered another piece of plexi and called it a night.  NOTE: I have not done the trackball yet just because I decided (for ease of install) to use the trackball mounting plate sold by GGG.

Here's a shot of the plexi installed and you can see the crack in player 1's joystick location.
 

Closeup of crack.


Temporary Artwork installed (Super Mario Wii poster)


Here is that same artwork with one of the joysticks installed. The dustwasher covers most of the cracking so for now this will work.  A new piece will be cut using the cracked plexi as a template.

AlienInferno

  • Trade Count: (0)
  • Full Member
  • ***
  • Offline Offline
  • Posts: 516
  • Last login:June 24, 2025, 12:14:27 am
Re: Outlaw Star Arcade - Miniscule Rambling Update (5/21/12)
« Reply #89 on: June 05, 2012, 09:47:56 pm »
Sunday I proceeded to work on the rest of the plexiglass items for my cab.  Starting with the marquee retainer. 

I made a quick line bender using a heating element strip I purchased from tapplastics.com using the element strip, a 2x4 with a 1/4" deep, 3/4" wide channel routed out down the middle, and a couple screws/nails, and some fiberglass tape.  I need to add some foil underneath the tape to help protect the wood underneath the element.

After this was made I cut the piece of 1/16" black plexi I had in half.  AND again to the "two steps back" thing.  It snapped in half about two inches two short while cutting.  Was a bit p/o'd at this one.   :banghead:   :angry:   :censored:  Again I ordered another piece of plexi and proceeded to bend the broken pieces with my line bender.  Found out it works well for 1/16", 1/8", and 3/16" plexi.  Got the pieces bend and used them to hold the marquee in place.  Other then the cracked POS's I think it will look good with the final product on the machine.

Here's the line bender thingy I made.


AND the busted up marquee retainers.


Here's a view of the CP and the marquee.

AlienInferno

  • Trade Count: (0)
  • Full Member
  • ***
  • Offline Offline
  • Posts: 516
  • Last login:June 24, 2025, 12:14:27 am
Re: Outlaw Star Arcade - Miniscule Rambling Update (5/21/12)
« Reply #90 on: June 05, 2012, 09:54:58 pm »
And finally on Monday I worked on the monitor plexi.  It's 3/16" solar gray plexi from TapPlastics.  This time I had zero problems with the plexi.  Used a straight edge and a router to trim it to the correct size as well as shave a small lip into the bottom to fit into a groove I made in the back of the control panel.  It took several tries to line everything up and work like I wanted but finally everything fell into place and it works great.

After that I took apart my eensy-weensy computer speakers and mounted them over the GIGANTIC speaker slots I cut out.  It looks funny right now but will eventually be covered with either black speaker cloth or just plain black cloth.

Plexi with protective film still on.


A brace I put along the top to keep it from sagging in the center.


A view of the bracing/rails/whatever from the front.


Trying to show the slot in the back of the control panel as well as the lip I shaved in the plexi.


The speakers.  LOL.


A view of the speakers slots from down low (looks like eyes to me)

AlienInferno

  • Trade Count: (0)
  • Full Member
  • ***
  • Offline Offline
  • Posts: 516
  • Last login:June 24, 2025, 12:14:27 am
Re: Outlaw Star Arcade - Miniscule Rambling Update (5/21/12)
« Reply #91 on: June 05, 2012, 09:59:47 pm »
And now to the current affairs.

I braved the heat and dripping sweat to pull the protective film of the monitor plexi, hook up my laptop to everything, run power, and see what it looked like.  I must admit I like it quite a lot.  I will need to paint the area around the monitor either flat black or the same color I'm painting the outside in (semi-gloss) to help hide the inside of the cab but overall with the lights low you really can't see anything unless you actually look for it.

Still need to fill in a few holes I made while installing the monitor plexi, install the volume control, and the back admin panel but should be able to move onto paint within the next two weeks.   :)

Here's a shot of the cab with it running Super Mario Kart from the SNES.

UncleArgyle

  • Trade Count: (0)
  • Full Member
  • ***
  • Offline Offline
  • Posts: 35
  • Last login:September 23, 2019, 12:45:36 pm
Thanks for the updates. I have a similar, if not identical cabinet, NFL Blitz 2000. I also cracked the plexi trying to use a regular drill bit. I switched to a small diameter hole saw and finished with a router trim bit and had much better results. Luckily for me the cracks were small enough to be eliminated by the router.

Keep the update coming.

Mike.

AlienInferno

  • Trade Count: (0)
  • Full Member
  • ***
  • Offline Offline
  • Posts: 516
  • Last login:June 24, 2025, 12:14:27 am
Had yet another small hiccup.  I didn't realize I ordered the wrong size plexi for my marquee retainers until after I was all geared up to get that part of the cab finished.   :banghead:  Now to make yet another order.

mcseforsale

  • Trade Count: (0)
  • Full Member
  • ***
  • Offline Offline
  • Posts: 1471
  • Last login:April 09, 2024, 03:07:41 pm
  • Creepy Mario Dude
If I can make a suggestion, you can use the clear plastic edge guards from Lowes/HD from the walpaper section.  They're a buck and a half and you can paint them from the inside.  I'll have a movie about this tonight on my build thread:

http://forum.arcadecontrols.com/index.php?topic=117977.msg1275073#msg1275073

Here they are...

http://www.homedepot.com/h_d1/N-5yc1v/R-202061350/h_d2/ProductDisplay?catalogId=10053&langId=-1&keyword=corner+guard&storeId=10051


AJ

AlienInferno

  • Trade Count: (0)
  • Full Member
  • ***
  • Offline Offline
  • Posts: 516
  • Last login:June 24, 2025, 12:14:27 am
If I can make a suggestion, you can use the clear plastic edge guards from Lowes/HD from the walpaper section.  They're a buck and a half and you can paint them from the inside.  I'll have a movie about this tonight on my build thread.

AJ

I haven't checked your build yet but I had actually tried some of that early on. There may be a picture of it somewhere in a past post. Allthough it worked I couldn't get it to bend to the angles I needed without it showing tiny stress fractures around the bends and screw holes.  So I went this route because I can bend it to the shape I need.

Sent from my SAMSUNG-SGH-I997 using Tapatalk 2

AlienInferno

  • Trade Count: (0)
  • Full Member
  • ***
  • Offline Offline
  • Posts: 516
  • Last login:June 24, 2025, 12:14:27 am
So I got the trackball installed today.  I realized that I was off by about 1/8 of an inch so I had to move the trackball that distance towards the monitor but overall the install wasn't bad.  The trackball mounting plate made it super easy to install.  The hardest part I found was cutting the hole in the plexi.

But what I did was cut out a square big enough to slide the trackball through, drill the holes for the mounting plate, and install.  This is when I realized my measurement was off.  The bottom bolts on the plate hit the inside of the control panel.  I further drilled out the holes so that the bolts could fit but then soon realized that I wouldn't be able to get the nuts on.  So I grabbed the router and cut out a couple notches in the side of the contral panel.  This worked quite well and the hinge covers it nicely.  I might put alittle weather stripping in this location to block out light from the LED buttons and trackball but I'll have to wait and see what it looks like.  After I got this finished I removed the trackball.  Routed the control panel so the mounting plate would sit flush.  Clamped on a new piece of plexi and used a pattern bit to cut it to shape.  All the holes were routed out as well to keep from cracking the plexi again.  I barely had enough of a lip on the mounting plate to use it as a pattern but it worked.  Reinstalled the trackball, added my temporary art, and put the plexi on with some buttons holding it on. 

All I have left to do to complete the CP is cut out the button holes for the pinball flippers and one in front for a plunger. 

Hopefully tommorrow I can finsh the admin panel on the back and the volume control.  Shouldn't take long as all I have to do is cut out a square hole, cut some holes for the connectors, and glue them into place.

Trackball mounted with temp. artwork and plexi.


The mutiliation on the inside of the CP.  It's not real pretty but you won't be able to see it so I'm allright with that.


AlienInferno

  • Trade Count: (0)
  • Full Member
  • ***
  • Offline Offline
  • Posts: 516
  • Last login:June 24, 2025, 12:14:27 am
Re: Outlaw Star Arcade - Almost ready for paint - 6/17/12
« Reply #97 on: June 17, 2012, 08:54:33 pm »
Today I finished the control panel.  All I had left to do was drill out the pinball flippers buttons and the plunger button.  That took a couple minutes but the control panel is now ready for paint.  All holes have been filled and sanded in the cab.  All I have left to do is install the volume control and glue the connectors to the bottom back panel.  I would have had it completly ready for paint today but it started to rain so it will have to wait until tommorrow.

AlienInferno

  • Trade Count: (0)
  • Full Member
  • ***
  • Offline Offline
  • Posts: 516
  • Last login:June 24, 2025, 12:14:27 am
After a couple days in the garage messing around in 100* + heat I dragged the arcade machine into the house and started painting. Got the first layer of prime on. Tommorrow I sand and throw another layer of prime on. But I will admit it looks good in white.


Sent from my SAMSUNG-SGH-I997 using Tapatalk 2

AlienInferno

  • Trade Count: (0)
  • Full Member
  • ***
  • Offline Offline
  • Posts: 516
  • Last login:June 24, 2025, 12:14:27 am
Re: Outlaw Star Arcade - Started Painting - 6/25/12
« Reply #99 on: July 01, 2012, 07:59:29 pm »
Got a few more coats of paint on over the past couple days.  Now I've only got one more layer of black to go.  Will get that finished later today and can start putting it together tommorrow.  It won't be 100% because I still haven't recieved my lights for the marquee from China.  LOL.  Just some cheap LED strips.  There is a few more other little things that need done but that's mainly for me.  Gonna be fun playing it with my family and a few friends come Friday.  I'm excited.

EDIT:  Forgot to add picture.   :-[  This was taken before I put on the second coat.

« Last Edit: July 01, 2012, 08:01:51 pm by AlienInferno »

AlienInferno

  • Trade Count: (0)
  • Full Member
  • ***
  • Offline Offline
  • Posts: 516
  • Last login:June 24, 2025, 12:14:27 am
Re: Outlaw Star Arcade - Started Painting - 6/25/12
« Reply #100 on: July 01, 2012, 08:04:35 pm »
For some reason it just dawned on me that I forgot to drill the hole for the power button on the top.  FUUUUUUUUUU....................

Owell.  That shouldn't cause too much trouble.  Just some sawdust.

AlienInferno

  • Trade Count: (0)
  • Full Member
  • ***
  • Offline Offline
  • Posts: 516
  • Last login:June 24, 2025, 12:14:27 am
Re: Outlaw Star Arcade - Started Painting - 6/25/12
« Reply #101 on: July 15, 2012, 02:47:11 am »
Allright so I had gotten all the coats of paint on.  Found out if I build another machine I should give myself just slightly bigger gaps on things that need to move (either the plexi or doors, etc) because the paint made some things a rather tight fit.  The plexi rubbed in a couple spots so I have to touch up a few things but overall my cab is pretty much done.  It's all control wiring, LED wiring, software related from here on out.  But I got the coin door in and wired up so the lights work and got my marquee lighting installed and wired.  I'm quite happy with the way it turned out so far.  My marquee looks great. 


Woodshop Flunky

  • Trade Count: (0)
  • Full Member
  • ***
  • Offline Offline
  • Posts: 681
  • Last login:August 20, 2017, 05:24:57 am
Re: Outlaw Star Arcade - Started Painting - 6/25/12
« Reply #102 on: July 16, 2012, 09:37:49 am »
+1  I really like your marquee!  :badmood:

Complete mini arcade cabinet plans available.

Le Chuck

  • Saint, make a poll!
  • Wiki Contributor
  • Trade Count: (+6)
  • Full Member
  • ***
  • Offline Offline
  • Posts: 5509
  • Last login:June 14, 2025, 06:26:06 pm
  • <insert personal text here>
Re: Outlaw Star Arcade - Started Painting - 6/25/12
« Reply #103 on: July 16, 2012, 10:38:12 am »
+1  I really like your marquee!  :badmood:

 :badmood: is right next to  :applaud: so I'm assuming a fat finger unless I'm missing some wit here?

mcseforsale

  • Trade Count: (0)
  • Full Member
  • ***
  • Offline Offline
  • Posts: 1471
  • Last login:April 09, 2024, 03:07:41 pm
  • Creepy Mario Dude
Re: Outlaw Star Arcade - Started Painting - 6/25/12
« Reply #104 on: July 16, 2012, 12:47:58 pm »
+1.  Marquee are is nice.  You should try a couple difference colors of light behind it.  4 in CCFLs are really cheap and use less power.  Plus, you can wire them at 12V.  I'm using blue in mine.  Big difference:

18" white florescent:


Blue CCFLs:


AJ


AlienInferno

  • Trade Count: (0)
  • Full Member
  • ***
  • Offline Offline
  • Posts: 516
  • Last login:June 24, 2025, 12:14:27 am
Re: Outlaw Star Arcade - Started Painting - 6/25/12
« Reply #105 on: July 16, 2012, 01:22:09 pm »
+1.  Marquee are is nice.  You should try a couple difference colors of light behind it.  4 in CCFLs are really cheap and use less power.  Plus, you can wire them at 12V.  I'm using blue in mine.  Big difference:
AJ

Right now my marquee lights are three 72cm white LED strips wired to the PC's 12 volt line.  It looks good to me.

Woodshop Flunky

  • Trade Count: (0)
  • Full Member
  • ***
  • Offline Offline
  • Posts: 681
  • Last login:August 20, 2017, 05:24:57 am
Re: Outlaw Star Arcade - Started Painting - 6/25/12
« Reply #106 on: July 16, 2012, 02:43:43 pm »
+1  I really like your marquee!  :badmood:

 :badmood: is right next to  :applaud: so I'm assuming a fat finger unless I'm missing some wit here?

 :banghead:  Nope... no missed wit, just fat fingers. :)

Complete mini arcade cabinet plans available.

Seith

  • Trade Count: (0)
  • Full Member
  • ***
  • Offline Offline
  • Posts: 402
  • Last login:September 08, 2018, 10:50:41 am
Re: Outlaw Star Arcade - Started Painting - 6/25/12
« Reply #107 on: March 05, 2013, 01:50:10 pm »
Any update on the control panel artwork/software/etc. for this project?  Status report?

AlienInferno

  • Trade Count: (0)
  • Full Member
  • ***
  • Offline Offline
  • Posts: 516
  • Last login:June 24, 2025, 12:14:27 am
Re: Outlaw Star Arcade - Started Painting - 6/25/12
« Reply #108 on: March 09, 2013, 06:44:19 pm »
Any update on the control panel artwork/software/etc. for this project?  Status report?

Nothing really new.  Between bills, life, and other hobbies I haven't had much time to work on it.  Me and my stepson play it from time to time though.  On artwork in general allthough I really like the way the Outlaw Star marquee came out I am having a horendous (spelling?) time finding artwork that matches and has decent enough quality to work.  I've seriously been considering picking a couple of my favorite games and getting someone to custom draw me some artwork.  But that's still aways away.  Probably going to rewire the machine with beefier wire, the stuff I used breaks too easily, and add a spare PSU as a dedicated power source for the LED's. 

AlienInferno

  • Trade Count: (0)
  • Full Member
  • ***
  • Offline Offline
  • Posts: 516
  • Last login:June 24, 2025, 12:14:27 am
Re: Outlaw Star Arcade - Started Painting - 6/25/12
« Reply #109 on: July 18, 2013, 08:29:14 pm »
Welp.  I've been away from the scene for a while and am starting to get into the mood to start another build. So what's a guy to do?  Finish the first one he started.  And what's the best way to do that?  By deciding to do a slight rebuild on the control panel, steal a page out of Nephasth's Two-Headed Beast build on how he did his wiring, and get some new artwork.  This is my third redesign on the artwork.   :dunno  I've decided for long term use/durability/lifespan of the machine I'm going with a       ?      theme.  Have several ideas running through my head.  The Outlaw Star marquee will be put into a lit box to mount on the wall. 

I will start on the control panel sometime this weekend.
« Last Edit: July 18, 2013, 09:08:23 pm by AlienInferno »

Rick

  • Trade Count: (+1)
  • Full Member
  • ***
  • Offline Offline
  • Posts: 2787
  • Last login:May 19, 2025, 11:21:11 am
  • Bartop, Cocktail and Pinball Arcade Cabinets
    • Gameroom Designs Canada
Re: (Formerly) Outlaw Star Arcade - New plans - 7/18/13
« Reply #110 on: July 19, 2013, 01:17:19 pm »
Welp.  I've been away from the scene for a while and am starting to get into the mood to start another build. So what's a guy to do?

"Another" build. Sheesh. Some of us are still working on our first!

;)

AlienInferno

  • Trade Count: (0)
  • Full Member
  • ***
  • Offline Offline
  • Posts: 516
  • Last login:June 24, 2025, 12:14:27 am
Re: (Formerly) Outlaw Star Arcade - New plans - 7/18/13
« Reply #111 on: July 19, 2013, 09:48:36 pm »
Welp.  I've been away from the scene for a while and am starting to get into the mood to start another build. So what's a guy to do?

"Another" build. Sheesh. Some of us are still working on our first!

;)

I haven't even finished my first (this being it) and allready have 3 new cabs I'm wanting to build and a token machine.

AlienInferno

  • Trade Count: (0)
  • Full Member
  • ***
  • Offline Offline
  • Posts: 516
  • Last login:June 24, 2025, 12:14:27 am
Re: (Formerly) Outlaw Star Arcade - Dead PC - 10/12/13
« Reply #112 on: October 12, 2013, 10:11:18 pm »
Small update.

The pc that was in this machine died. Well the motherboard did anyway.  So that gave me the opportunity to build a pc for it. There are a few games I wanted that the current setup couldn't handle.  I'm thinking something along the lines of a Intel I3 and at least 4 gigs of ram with a video card that supports S-video out. (As that will allow me to remove the pc-to-tv converter box) I'll have to look into this a bit more before I pull the trigger.

Because of this I've also decided to keep the pinball buttons on the panel. For now anyway.  I've decided on a theme and have commissioned a fellow BYOAC'er to create the artwork.  That should be getting started next week.  And I'll probably be changing up my controls a bit. I think I'll be removing the Electric Ice 2 buttons and replacing them with buttons from Paradise Arcade.  Also might be changing out the U360's for sticks from them as well.  I'll decide that after I see the final artwork.
 
Next update will be after the artwork is finished so stay tuned.

Sent from my SAMSUNG-SGH-I747 using Tapatalk 2


AlienInferno

  • Trade Count: (0)
  • Full Member
  • ***
  • Offline Offline
  • Posts: 516
  • Last login:June 24, 2025, 12:14:27 am
Re: (Formerly) Outlaw Star Arcade - New PC Is Here - 10/16/2013
« Reply #113 on: October 16, 2013, 08:18:59 pm »
MY WIFE IS AWESOME!!!!

She went to visit one of her friends and somehow found out her neighbor was in need of cash and willing to sell there PC for $60.  She called me, explained everything, and then I told her to pick it up. 

It's one of the thinner desktop types from HP/Dell.  Windows 7.  3.0Ghz processor with 2GB of RAM.  Came with keyboard, mouse, and a widescreen monitor.  Not bad IMO for $60.  The onboard graphics are OK for MAME but a couple of the games I want to run, run pretty crappy with it so I decided to upgrade a few things.  I ordered a 1GB video card which should help with the graphic situation and I also decided to upgrade the RAM to 4GB.  Motherboard can handle up to 16 but figure that's way overkill for anything I'm going to do with it.  Also ordered a USB to IDE thing-ama-jig so that I can get a few things off of the old hard drive.

Now I'm just working on downloading, copying, changing files, etc.  This is the fun but boring part. 

Nephasth

  • Guest
  • Trade Count: (0)
Re: Outlaw Star Arcade - Started Painting - 6/25/12
« Reply #114 on: October 17, 2013, 08:02:10 am »
I will start on the control panel sometime this weekend.

How'd it turn out?

AlienInferno

  • Trade Count: (0)
  • Full Member
  • ***
  • Offline Offline
  • Posts: 516
  • Last login:June 24, 2025, 12:14:27 am
Re: Re: Outlaw Star Arcade - Started Painting - 6/25/12
« Reply #115 on: October 17, 2013, 07:50:35 pm »
I will start on the control panel sometime this weekend.

How'd it turn out?

Didn't even have a chance to touch it.  Didn't get to start on it when I wanted and then the old pc died.  After I get this new video card I'm gonna see how good this new table runs VP tables. If it does OK I'll keep the panel the way it is until I start on a virtual pinball.

BTW I'll be visiting your build thread a lot over the next couple months. Probably going to switch out my buttons with something like you did once my artwork gets here. Probably copy the wiring of everything as well. Well as far as using molex connectors anyway.

Sent from my SAMSUNG-SGH-I747 using Tapatalk 2
« Last Edit: October 17, 2013, 07:52:58 pm by AlienInferno »

DarakuTenshi

  • Trade Count: (0)
  • Full Member
  • ***
  • Offline Offline
  • Posts: 307
  • Last login:February 04, 2022, 11:39:46 am
    • Card Fighters Project
Re: (Formerly) Outlaw Star Arcade - New PC Is Here - 10/16/2013
« Reply #116 on: October 19, 2013, 02:13:00 pm »
I know it's been a while since you posted it, but thanks for posting that info on the "Router Planer" I've been trying to figure out how I was going to do that.
My past arcade builds - Click to enlarge and get a closer look

AlienInferno

  • Trade Count: (0)
  • Full Member
  • ***
  • Offline Offline
  • Posts: 516
  • Last login:June 24, 2025, 12:14:27 am
Re: Re: (Formerly) Outlaw Star Arcade - New PC Is Here - 10/16/2013
« Reply #117 on: October 19, 2013, 10:19:47 pm »
I know it's been a while since you posted it, but thanks for posting that info on the "Router Planer" I've been trying to figure out how I was going to do that.

No problem man. Just make sure you have a big enough work area. It's easy to forget about where the arms are and just walk one of them off the table

Sent from my SAMSUNG-SGH-I747 using Tapatalk 2


AlienInferno

  • Trade Count: (0)
  • Full Member
  • ***
  • Offline Offline
  • Posts: 516
  • Last login:June 24, 2025, 12:14:27 am
So it has been a long time since my last post in this thread.  It has jumped everywhere to say the least in terms of a theme.  It started with the evil clown theme, then went to the Outlaw Star theme.  I must admit that the marquee I made turned out very good.  I might eventually return to that theme for something like a bartop build but for now i unveil the final (and I do mean FINAL) theme change. 

I hereby unveil Battletoads!

Thanks to one of our local artists for hire, opt2not and his partner BitterP, I now have brand new artwork themed around the Battletoads.  I must say that it turned out far better then I could have imagined.  I am quite happy with it and while I wait for funds to build so I can send it to the printer, I am going to be rethinking my buttons and trackball.  I still want to have RGB buttons but I am probably going to go with something similiar to Nephasth's buttons.  The clear ring with the black plunger.  I also might go with a green plunger and a simple LED lit green trackball but all that will hinge on what I think after I buy a few buttons to see what they look like in person.

Now onto the pictures.

MARQUEE


CONTROL PANEL


SIDE ART


« Last Edit: March 05, 2014, 08:51:50 pm by AlienInferno »

Louis Tully

  • Trade Count: (+5)
  • Full Member
  • ***
  • Offline Offline
  • Posts: 1800
  • Last login:February 13, 2015, 09:41:03 pm
.
« Last Edit: February 12, 2015, 04:23:55 pm by Louis Tully »