Main Restorations Software Audio/Jukebox/MP3 Everything Else Buy/Sell/Trade
Project Announcements Monitor/Video GroovyMAME Merit/JVL Touchscreen Meet Up Retail Vendors
Driving & Racing Woodworking Software Support Forums Consoles Project Arcade Reviews
Automated Projects Artwork Frontend Support Forums Pinball Forum Discussion Old Boards
Raspberry Pi & Dev Board controls.dat Linux Miscellaneous Arcade Wiki Discussion Old Archives
Lightguns Arcade1Up Try the site in https mode Site News

Unread posts | New Replies | Recent posts | Rules | Chatroom | Wiki | File Repository | RSS | Submit news


Author Topic: Centipede Bartop: Slow and Steady (5/3/14)  (Read 52323 times)

0 Members and 1 Guest are viewing this topic.

Ryglore

  • Trade Count: (+1)
  • Full Member
  • ***
  • Offline Offline
  • Posts: 779
  • Last login:November 16, 2021, 05:49:39 pm
  • Likes to make things difficult.
    • The Brush Wizard
Re: Centipede Bartop: Base problem solved, and Final CP artwork (7-11-11)
« Reply #120 on: July 11, 2011, 10:07:59 pm »
Spent the slow times at work devising a way to safely fix the base problem. Originally I was going to leave it in place and Jigsaw the gap I needed, but instead I got crafty with my pocket knife and a paint can opener. After some gentle persuasion with my pocket knife I was able to slowly pry the two pieces apart with the lid opener and viola! Fixed problem!

That's how it should have been...


and another view.


Also, I finished up the Control Panel artwork in Illustrator this afternoon. Now all the spacings are figured out properly and I'll be able to print a copy to use as my hole template for the CP top.


What's this? 3 days of work in a row.... crazyness.  :laugh:

opt2not

  • Trade Count: (+15)
  • Full Member
  • ***
  • Offline Offline
  • Posts: 6173
  • Last login:April 02, 2024, 07:42:30 pm
Re: Centipede Bartop: Base problem solved, and Final CP artwork (7-11-11)
« Reply #121 on: July 11, 2011, 10:56:53 pm »
Craziness indeed!

Nice mulligan on the initial gluing. Lucky you were able to get it off before the glue solidified.
The artwork is looking sharp too!

Glad you got the motivation to continue. Maybe seeing your progress will help get me motivates to finish a few projects. Maybe. ;)

Ryglore

  • Trade Count: (+1)
  • Full Member
  • ***
  • Offline Offline
  • Posts: 779
  • Last login:November 16, 2021, 05:49:39 pm
  • Likes to make things difficult.
    • The Brush Wizard
Re: Centipede Bartop: Base problem solved, and Final CP artwork (7-11-11)
« Reply #122 on: July 11, 2011, 11:13:25 pm »
Lucky you were able to get it off before the glue solidified.

Oh the glue was quite solid, it sat for a little over a day before I realized I screwed up. It pulled some bits of mdf from the side, but nothing crazy though.  Thanks on the art, I'm still dreading the vector job for the side art....  :cry:

LeedsFan

  • Trade Count: (0)
  • Full Member
  • ***
  • Offline Offline
  • Posts: 1042
  • Last login:January 17, 2021, 06:14:23 am
Re: Centipede Bartop: Base problem solved, and Final CP artwork (7-11-11)
« Reply #123 on: July 12, 2011, 02:07:47 am »
This project is coming along very nicely indeed! I'm loving the controls with the cone buttons. The finished article with all the artwork is gonna be excellent.

I also have problems rectifying mistakes on my projects. Something goes slightly wrong or isn't quite right and it bugs you a bit. Then during some quiet moments at work or wherever and you get to thinking about how to fix said problem that you were originally going to live with. But you can't live with it because you KNOW it will bug the hell out of you if you leave it.  :P

Anyway keep up the good work. I wanna see how this turns out.

Ryglore

  • Trade Count: (+1)
  • Full Member
  • ***
  • Offline Offline
  • Posts: 779
  • Last login:November 16, 2021, 05:49:39 pm
  • Likes to make things difficult.
    • The Brush Wizard
Re: Centipede Bartop: Base problem solved, and Final CP artwork (7-11-11)
« Reply #124 on: July 12, 2011, 01:38:16 pm »
This project is coming along very nicely indeed! I'm loving the controls with the cone buttons. The finished article with all the artwork is gonna be excellent.

Thanks, for awhile I'd look at the parts and sigh because I never moved forward with it. I'm really getting back into the swing of things now and I hope to keep the up the steam. I was originally going to go with the red lighted cones found here, since that was what was on the real CP. On a real Centipede machine they only light up after you insert your coin, but since I'm going free-play now I don't see the reason to spring for the lighted ones.

opt2not

  • Trade Count: (+15)
  • Full Member
  • ***
  • Offline Offline
  • Posts: 6173
  • Last login:April 02, 2024, 07:42:30 pm
Re: Centipede Bartop: Base problem solved, and Final CP artwork (7-11-11)
« Reply #125 on: July 12, 2011, 02:38:21 pm »
On a real Centipede machine they only light up after you insert your coin, but since I'm going free-play now I don't see the reason to spring for the lighted ones.
They also light up when in free-play. Actually, they blink in free-play.

Ryglore

  • Trade Count: (+1)
  • Full Member
  • ***
  • Offline Offline
  • Posts: 779
  • Last login:November 16, 2021, 05:49:39 pm
  • Likes to make things difficult.
    • The Brush Wizard
Re: Centipede Bartop: Base problem solved, and Final CP artwork (7-11-11)
« Reply #126 on: July 12, 2011, 02:42:59 pm »
On a real Centipede machine they only light up after you insert your coin, but since I'm going free-play now I don't see the reason to spring for the lighted ones.
They also light up when in free-play. Actually, they blink in free-play.

Oh do they? I've never played on a free-play cab, so I wouldn't know. You think the 60-in-1 would emulate either of these?

Yvan256

  • Trade Count: (0)
  • Full Member
  • ***
  • Offline Offline
  • Posts: 1039
  • Last login:June 20, 2017, 08:35:41 am
    • Yvan256
Re: Centipede Bartop: Base problem solved, and Final CP artwork (7-11-11)
« Reply #127 on: July 12, 2011, 02:49:07 pm »
Oh do they? I've never played on a free-play cab, so I wouldn't know. You think the 60-in-1 would emulate either of these?

If you have them, use them! I think always-on buttons would look great, especially if the real cab also had them. If you need a small blinking circuit for the lights, I'm sure someone will be able to help you.

LeedsFan

  • Trade Count: (0)
  • Full Member
  • ***
  • Offline Offline
  • Posts: 1042
  • Last login:January 17, 2021, 06:14:23 am
Re: Centipede Bartop: Base problem solved, and Final CP artwork (7-11-11)
« Reply #128 on: July 12, 2011, 03:38:28 pm »
I'm not so sure about blinking lights. Wouldn't that get on your nerves after a while? I would deffo go for the always on mode myself. If the original had lighted buttons when playing then I don't see why you should not go that route. How difficult would it be to get them to light only after a credit has been input in mame? Is that not possible? Perhaps somehow wire in the credit input button with the earth to the lights?

EDIT:  Wait a minute... that may work but the hard part is getting the lights to go out on Game Over.   :-[

Ryglore

  • Trade Count: (+1)
  • Full Member
  • ***
  • Offline Offline
  • Posts: 779
  • Last login:November 16, 2021, 05:49:39 pm
  • Likes to make things difficult.
    • The Brush Wizard
Re: Centipede Bartop: Base problem solved, and Final CP artwork (7-11-11)
« Reply #129 on: July 12, 2011, 04:30:34 pm »
I can't remember if the player lights stayed on the whole time you were playing or not. Kinda wishing I knew a local place where I could check out a real Centipede cab.

opt2not

  • Trade Count: (+15)
  • Full Member
  • ***
  • Offline Offline
  • Posts: 6173
  • Last login:April 02, 2024, 07:42:30 pm
Re: Centipede Bartop: Base problem solved, and Final CP artwork (7-11-11)
« Reply #130 on: July 12, 2011, 04:37:25 pm »
Yeah, the player light (P1 or P2, depending on who's turn it is) stays on during gameplay.

edit: found a good video on it.


Lights blink when credit is inserted (or in freeplay).  Player 1 light is lit while in gameplay.
« Last Edit: July 12, 2011, 04:41:17 pm by opt2not »

Ryglore

  • Trade Count: (+1)
  • Full Member
  • ***
  • Offline Offline
  • Posts: 779
  • Last login:November 16, 2021, 05:49:39 pm
  • Likes to make things difficult.
    • The Brush Wizard
Re: Centipede Bartop: Base problem solved, and Final CP artwork (7-11-11)
« Reply #131 on: July 12, 2011, 04:40:35 pm »
Yeah, the player light (P1 or P2, depending on who's turn it is) stays on during gameplay.

Interesting. I'll have to figure out how to get that to work for sure...

Actually I just found out, there is an arcade 3 blocks from my house (!), I'm going to go there soon and see what they have on the floor. If they have a Centipede I'll be doing some research for sure. If not, looks like a trip to Cedar Point is in the future, I know for certain, they have 2 working cabs.

opt2not

  • Trade Count: (+15)
  • Full Member
  • ***
  • Offline Offline
  • Posts: 6173
  • Last login:April 02, 2024, 07:42:30 pm
Re: Centipede Bartop: Base problem solved, and Final CP artwork (7-11-11)
« Reply #132 on: July 12, 2011, 07:02:35 pm »
Just realized something...those boards are Jamma.
If you're going with a 60-in-1 board, you'll have to wire your cabinet up to the Jamma standard (which isn't really that hard, but it is an extra wiring step).


Here's a Jamma pinout:


On atari boards, the start button outputs supply enough power to the button lights...I wonder how it would be done through a jamma connection? There are jamma converters for centipede boards out there, but I wonder if those converters have the 1P/2P Start connections supply power to the button lighting?

The the question remains, do these 60-in-1 boards power up the lights through the 1P/2P Start jamma connections? And does mame emulate that (since they run an older version of mame....)

Ryglore

  • Trade Count: (+1)
  • Full Member
  • ***
  • Offline Offline
  • Posts: 779
  • Last login:November 16, 2021, 05:49:39 pm
  • Likes to make things difficult.
    • The Brush Wizard
Re: Centipede Bartop: Base problem solved, and Final CP artwork (7-11-11)
« Reply #133 on: July 12, 2011, 07:12:33 pm »
Hmm, this is getting super technical very quickly, but the added detail would be worth it 10 fold.

emphatic

  • Trade Count: (0)
  • Full Member
  • ***
  • Offline Offline
  • Posts: 2017
  • Last login:June 17, 2025, 10:21:02 am
  • -"Suck it, Donny!" -"No, YOU suck it.... more".
    • Emphatic's Video Game Collection
Re: Centipede Bartop: Base problem solved, and Final CP artwork (7-11-11)
« Reply #134 on: July 12, 2011, 07:22:08 pm »
JAMMA is pretty easy stuff. You can buy a working harness and just attach the wires for controls, power, audio and video (unless you're using the VGA on the PCB).

Ryglore

  • Trade Count: (+1)
  • Full Member
  • ***
  • Offline Offline
  • Posts: 779
  • Last login:November 16, 2021, 05:49:39 pm
  • Likes to make things difficult.
    • The Brush Wizard
Re: Centipede Bartop: Base problem solved, and Final CP artwork (7-11-11)
« Reply #135 on: July 12, 2011, 08:01:00 pm »
Found this on KLOV.

There is a specific pin-out record on file for Centipede:

Centipede
---------

--------------------------------|-----------------------------------
        GND                    | A | 1 |      Ground
        + 5 V                  | B | 2 |      + 5 V
        + 12 V                 | C | 3 |      + 22 V DC
        - 5 V                    | D | 4 |      - 22 V DC
                                   | E | 5 |      Center Coin Counter
        Left Coin Counter   | F | 6 |      Right Coin Counter
                                  | H | 7 |
        Start 1 LED            | J | 8 |
                                   | K | 9 |      Fire Button 2
        Start 2                  | L | 10|      Fire Button
        Start 1                  | M | 11|      Tball Horiz Clock 2
        Tball Horiz. Clock     | N | 12|      Tball Vert. Clock 2
        Tball Vert. Clock      | P | 13|      Self Test *
        Left Coin Slot         | R | 14|      Right Coin Slot *
        Start 2 LED            | S | 15|      Cocktail (Tie to GND)
        Center Coin Slot      | T | 16|      Horiz. Dir. 2
        Tball Horiz. Dir.       | U | 17|      Vert. Dir. 2
        Reset (N. C.)          | V | 18|      Tball Vert. Dir.
                                   | W | 19|
        Ground (Coin Door)  | X | 20|
        + 5 V (Controls)      | Y | 21|      + Sense
                                   | Z | 22|      - Sense
------------------------------------------------------------------

Notice the P1 and P2 LEDs are their own output, and the LED pushbuttons are a 5 wire button, according to the PDF file of the service manual. I'm still trying to wrap my head around all of it.


opt2not

  • Trade Count: (+15)
  • Full Member
  • ***
  • Offline Offline
  • Posts: 6173
  • Last login:April 02, 2024, 07:42:30 pm
Re: Centipede Bartop: Base problem solved, and Final CP artwork (7-11-11)
« Reply #136 on: July 12, 2011, 09:11:14 pm »
I'm guessing converting a centipede board to Jamma loses the lighting output, since that separate line isn't on the Jamma pinout. That being said, going Jamma won't give you the lit buttons, but it does help support with installing that 60-in-1 board. Which is less hardware than a mini-itx PC.

 But if you wanted to have them constantly lit, you could tap the 5v line off the Jamma connection.

Ryglore

  • Trade Count: (+1)
  • Full Member
  • ***
  • Offline Offline
  • Posts: 779
  • Last login:November 16, 2021, 05:49:39 pm
  • Likes to make things difficult.
    • The Brush Wizard
Re: Centipede Bartop: Base problem solved, and Final CP artwork (7-11-11)
« Reply #137 on: July 12, 2011, 10:09:28 pm »
I'm guessing converting a centipede board to Jamma loses the lighting output, since that separate line isn't on the Jamma pinout. That being said, going Jamma won't give you the lit buttons, but it does help support with installing that 60-in-1 board. Which is less hardware than a mini-itx PC.

I would figure that would happen when you convert it, since they have a unique wiring scheme. and it seems like a random wire.. actually I kind of doubt there is going to be a way to get the lights to react properly even running a PC w/ mame.  I don't think there is a signal that would be getting sent via the ROM that would indicate when to blink, go solid and then switch between players.

Unless, of course, I cut a real Centipede pcb to pieces and shrink it down to fit in the box. ;)

Quote
But if you wanted to have them constantly lit, you could tap the 5v line off the Jamma connection.

Ya, which is prolly the easiest solution. Unless some of our circuit building friends have any other suggestions.
« Last Edit: July 12, 2011, 11:07:18 pm by Ryglore »

DillonFoulds

  • Trade Count: (0)
  • Full Member
  • ***
  • Offline Offline
  • Posts: 605
  • Last login:August 27, 2019, 05:04:44 am
Re: Centipede Bartop: Base problem solved, and Final CP artwork (7-11-11)
« Reply #138 on: July 12, 2011, 11:00:35 pm »
I vote a 555 timer circuit, with varistors. Make the LEDs blink at whatever speed you want, based on the varistor. Either that or try to find a circuit that can make them blink at random intervals, for random durations.

Yvan256

  • Trade Count: (0)
  • Full Member
  • ***
  • Offline Offline
  • Posts: 1039
  • Last login:June 20, 2017, 08:35:41 am
    • Yvan256
Re: Centipede Bartop: Base problem solved, and Final CP artwork (7-11-11)
« Reply #139 on: July 12, 2011, 11:13:02 pm »
I vote a 555 timer circuit, with varistors. Make the LEDs blink at whatever speed you want, based on the varistor. Either that or try to find a circuit that can make them blink at random intervals, for random durations.

A 555 timer circuit? Too complex, too big... I vote Atmel ATtiny25.  :D

BobA

  • Trade Count: (+14)
  • Full Member
  • ***
  • Offline Offline
  • Posts: 5943
  • Last login:July 11, 2018, 09:52:14 pm
  • What Me Worry?
Re: Centipede Bartop: Base problem solved, and Final CP artwork (7-11-11)
« Reply #140 on: July 13, 2011, 09:13:39 am »
Great to see your project on the right path again.   Keep the momentum going. :applaud: :applaud:

Ryglore

  • Trade Count: (+1)
  • Full Member
  • ***
  • Offline Offline
  • Posts: 779
  • Last login:November 16, 2021, 05:49:39 pm
  • Likes to make things difficult.
    • The Brush Wizard
Re: Centipede Bartop: Base problem solved, and Final CP artwork (7-11-11)
« Reply #141 on: July 13, 2011, 12:48:39 pm »
I vote a 555 timer circuit, with varistors. Make the LEDs blink at whatever speed you want, based on the varistor. Either that or try to find a circuit that can make them blink at random intervals, for random durations.

A 555 timer circuit? Too complex, too big... I vote Atmel ATtiny25.  :D

I know nothing about circuitry, but totally willing to learn. I'm wondering if it would even be possible to replicate the real thing. As in, Blinking, then solid for P1, swap to P2 and back with turns and back to blinking on game over. Though I don't know if there is even a way to let it know when those factors happen.

Great to see your project on the right path again.   Keep the momentum going. :applaud: :applaud:

Thanks! I hope to get as much done as possible, at least until I get to the point where I need to save for hardware components.

DillonFoulds

  • Trade Count: (0)
  • Full Member
  • ***
  • Offline Offline
  • Posts: 605
  • Last login:August 27, 2019, 05:04:44 am
Re: Centipede Bartop: Base problem solved, and Final CP artwork (7-11-11)
« Reply #142 on: July 13, 2011, 04:31:04 pm »
I really don't think you'll be able to recover that as a feature, and if you do it'd likely only ever work on one game. If MAME even does the outputs, you'll need to build a custom interface (LPT likely?), and even then it would be good for one game, and one game only.

The random on/off lights has my vote.

Ryglore

  • Trade Count: (+1)
  • Full Member
  • ***
  • Offline Offline
  • Posts: 779
  • Last login:November 16, 2021, 05:49:39 pm
  • Likes to make things difficult.
    • The Brush Wizard
Re: Centipede Bartop: Base problem solved, and Final CP artwork (7-11-11)
« Reply #143 on: July 13, 2011, 04:35:00 pm »
Actually it was decided awhile back to either be Only Centipede or Centipede/Millipede. So having only work for a single game isn't a big deal, as this project is all about novelty anyway. I've got my full size SHMUP cab for playing everything else I would want.

Ryglore

  • Trade Count: (+1)
  • Full Member
  • ***
  • Offline Offline
  • Posts: 779
  • Last login:November 16, 2021, 05:49:39 pm
  • Likes to make things difficult.
    • The Brush Wizard
Re: Centipede Bartop: Control Panel Woes (7-19-11)
« Reply #144 on: July 19, 2011, 10:51:08 pm »
After spending a few days trying, unsuccessfully, to wrap my head around the lit player 1 and 2 buttons.  I may just go the solid light route, or leave them unlit. I finally decided to put it aside for the time being and get back to work on the body itself.

I'm currently working on the control panel area, since I now have the exact measurements figured out, thanks to finishing my artwork. Working with the metal control panel has provided it's own interesting obstacles. All ideas I have come up with up to today have been subpar. All day I was tempted to ditch the idea of the metal control panel top, though I doubt the 1/4" mdf would handle the stress well, especially if routed out to accept the buttons and the trackball.

Tonight while looking over everything I took the piece of wood I had cut earlier and was laying pieces on top of it, testing things. Noticed that there is plenty of space around the edges to allow for 4 carriage bolts in the corners to hold the CP in place, I just need to build up an frame underneath for the CP to sit on and bolt to, simple.

Hopefully I'll have some new progress pics soonish.

Ryglore

  • Trade Count: (+1)
  • Full Member
  • ***
  • Offline Offline
  • Posts: 779
  • Last login:November 16, 2021, 05:49:39 pm
  • Likes to make things difficult.
    • The Brush Wizard
Re: Centipede Bartop: Control Panel Woes Continued (7-27-11)
« Reply #145 on: July 27, 2011, 12:15:22 am »
Kind of a long update ahead.

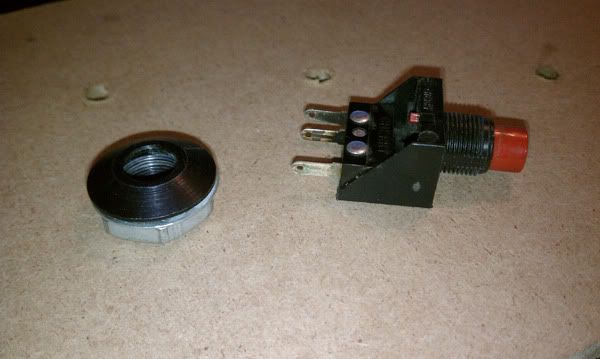
Work continues on the Control Panel. Finally got back to work on it after last week's heat wave, which left me completely drained of energy. Ordered a few buttons on ebay while I was doing planning, though originally I had thought they were lighted buttons... turns out they are just red capped push buttons, with extremely shallow cones. Nice condition for being used stock, I'll save them for something, or maybe sell them off. I have since ordered a set of lighted Atari buttons from a dude on ebay, double checking to make sure they were legit. They were NOS and 1/4 of the price of ordering lighted buttons from RAM.

Red-Capped Non-Lit buttons w/ Shallow cones.

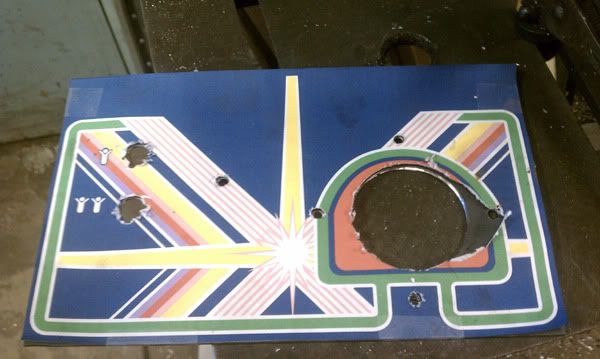
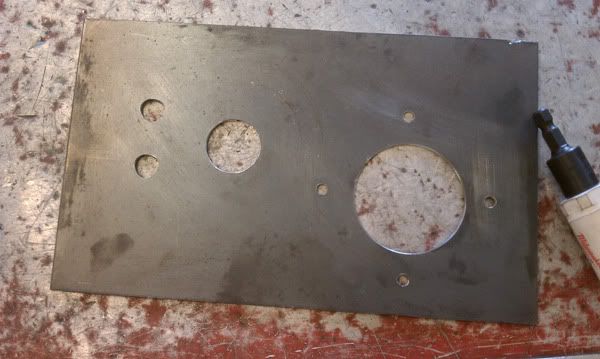
Anyway, today was a metal work day, and I spent it cutting and drilling the  (3rd) piece of scrap metal for the panel. I printed off the CPO and used it as the drill guide. I was able to use all the tools at work to get it all drilled and cut out, except I was missing an 1 1/8" hole saw for the Fire button. Luckily, I was sent on an errand later and was able to pick one up while I waited for a parts order to get filled.

All holes, Except the Fire button are drilled.

Fire Button cut out.

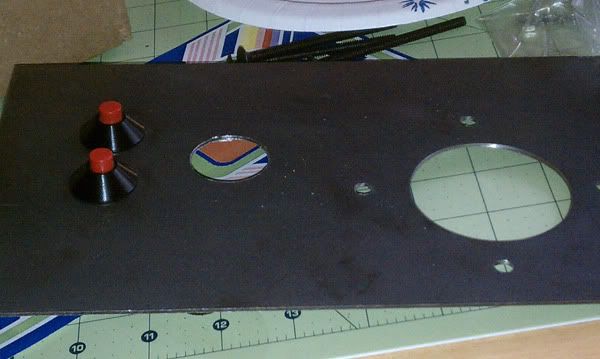
Everything was looking great seemed to be 100% in my favor, until I got home that is. Sadly, I was a work when I did all the drilling and did not have my parts with me to double check everything. As soon as I got home, I set everything on the table and started test fitting parts.

Player Buttons, With the Red Capped push buttons in place of my original black ones.

Fire Button test fit.
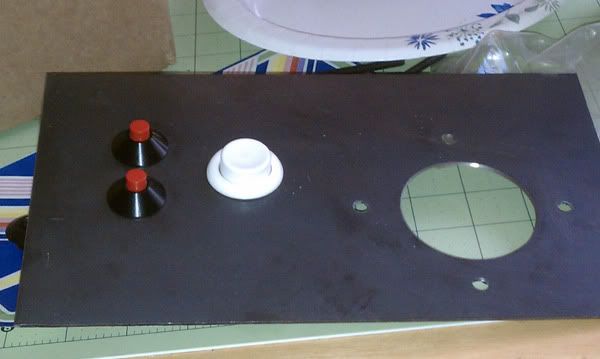

Trackball Test fit, notice the single carriage bolt holding it in place.
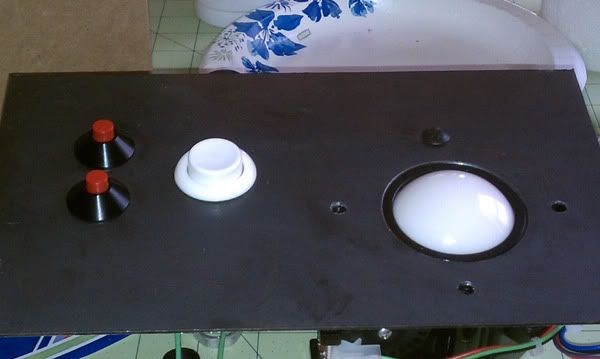

When it came to this point I realized something was very wrong. The holes for the carriage bolts didn't line up. At first I wasn't sure how this happened and I knew my measurements on the Control Panel Art were correct, they had to be. Originally I was thinking of drilling them out to make them "work", but I'm not half-assing this project. So another (4th) CP will need to be made. Yay for scrap metal in abundance!
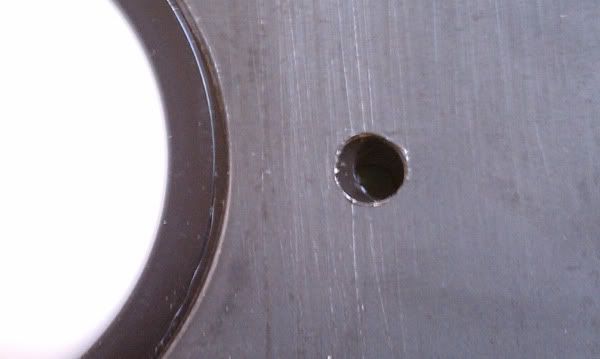

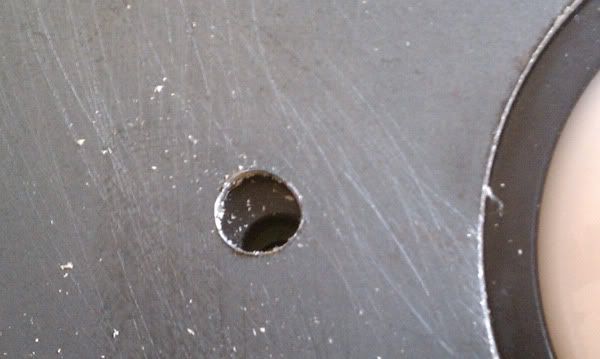


I left things set and went out to dinner with some friends and forgot about it for a few hours. After returning, I remembered I had taken the printed CPO and laid it out on top of my MDF test piece, marking the hole locations with a Sharpie. Went to the basement and found it, drilled all the holes in it. These holes in the MDF all line up with the trackball perfectly, unlike the crappy metal CP. So the only thing I can guess, is, the paper warped or moved enough to throw things off while I was drilling, thus giving me issues with my hole locations. Even though it was secured in place.

This MDF Template is right.... the metal one... not-so-much.
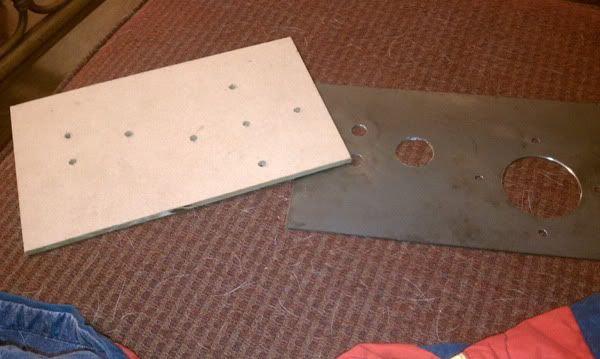

So, there we go, tomorrow I will take this piece of MDF to work and make and new-new CP. hopefully from there I can get it test fit into the cab and I can move on to the light box and speaker panel. There are quite a few more things I need to do before I can start painting yet. But, like I said, I'm not going to cut corners just to rush things.

Ryglore

  • Trade Count: (+1)
  • Full Member
  • ***
  • Offline Offline
  • Posts: 779
  • Last login:November 16, 2021, 05:49:39 pm
  • Likes to make things difficult.
    • The Brush Wizard
Re: Centipede Bartop: Control Panel Fixed, and New Cone Buttons (7-28-11)
« Reply #146 on: July 28, 2011, 10:33:39 pm »
After a day of sickness, I was able to knock out a new control panel at work today. This time I took my MDF test piece and used it as a guide. All cuts were made at work, except the Fire button (forgot my hole saw at home). Afterwards I double checked my measurements against Happ's online templates and everything looked spot on.

When I got home, I had a present waiting in the mail... lighted Atari cones from ebay! So I cracked them open and started test fitting everything again. The cones themselves were plastic, so I'll be using my aluminum cones from RAM Controls in place of them. The trackball fits nicely now that all the measurements are correct. Tomorrow I'll cut the hole for the fire button and clean any sharp edges off of it. Finally I'll paint it black and work on mounting it into the cab.

Lighted buttons


Test fitting the new cones and the Trackball into the panel.


I don't like how high the buttons stand above the cones, so I'm prolly going to toss a few washers underneath them to bring them down a bit. Other than that, I'm pretty happy with the way it's finally come together. I'm hoping this is the last super annoying snag I hit in this build.

muttieb

  • Trade Count: (+1)
  • Full Member
  • ***
  • Offline Offline
  • Posts: 12
  • Last login:July 31, 2012, 04:34:53 pm
Re: Centipede Bartop: Control Panel Fixed, and New Cone Buttons (7-28-11)
« Reply #147 on: September 01, 2011, 09:39:17 pm »
Love how its looking! Where did you find the plans for this style can, its exactly what i was looking for.

Ryglore

  • Trade Count: (+1)
  • Full Member
  • ***
  • Offline Offline
  • Posts: 779
  • Last login:November 16, 2021, 05:49:39 pm
  • Likes to make things difficult.
    • The Brush Wizard
Re: Centipede Bartop: Control Panel Fixed, and New Cone Buttons (7-28-11)
« Reply #148 on: September 02, 2011, 05:07:41 pm »
The measurements are based off of Carlos' Centipede's measurements.  Everything was shrunk down to as close to scale as possible. As for actual construction, layout and the build goes, much like the SHMUP, I am doing all of that from scratch as I go.

I've not been able to get much work done on this lately, I hope to  post some new pics and progress soon. Unfortunately after I get the control panel mounted in place, I am at a stand still until I can afford the monitor and build the monitor mount/bezel area.

taylormadelv

  • Trade Count: (+1)
  • Full Member
  • ***
  • Offline Offline
  • Posts: 377
  • Last login:February 18, 2019, 05:46:59 pm
Re: Centipede Bartop: Control Panel Fixed, and New Cone Buttons (7-28-11)
« Reply #149 on: September 04, 2011, 12:47:44 pm »
The Led buttons can be lit with 5v DC with a resistor in line, otherwise they POP with stright 5v. The 2 connectors that run parallel to the button housing are 5v and ground, the 3 connections that run perpendicular are your button ground, nc and no connections. You could run 5v from your power supply to the jamma board or even hack 5v out of your PC, which will work fine.
The multiboard version of Millipede has serious sound issues, in fact, I find it unplayable and I run Millipede in mame perfectly. Centipede on the multi is OK.

Ryglore

  • Trade Count: (+1)
  • Full Member
  • ***
  • Offline Offline
  • Posts: 779
  • Last login:November 16, 2021, 05:49:39 pm
  • Likes to make things difficult.
    • The Brush Wizard
Re: Centipede Bartop: Control Panel Fixed, and New Cone Buttons (7-28-11)
« Reply #150 on: October 26, 2011, 08:52:36 am »
Good news on the Centipede front. I've recently paid off my car, so now I'll have a bit of extra cash each month. If that's the case I may be able to explore monitor and game board options soon!

Unstupid

  • Trade Count: (+2)
  • Full Member
  • ***
  • Offline Offline
  • Posts: 997
  • Last login:September 08, 2021, 08:46:34 am
Re: Centipede Bartop: Control Panel Fixed, and New Cone Buttons (7-28-11)
« Reply #151 on: November 16, 2012, 05:21:52 pm »
Did this project ever come to fruition?  It looked awesome!

Ryglore

  • Trade Count: (+1)
  • Full Member
  • ***
  • Offline Offline
  • Posts: 779
  • Last login:November 16, 2021, 05:49:39 pm
  • Likes to make things difficult.
    • The Brush Wizard
Re: Centipede Bartop: Control Panel Fixed, and New Cone Buttons (7-28-11)
« Reply #152 on: November 16, 2012, 05:24:12 pm »
Not yet. I'd like to return to it soon though, just was showing it to the girlfriend last night. I may need to look into monitor and PC options soon. If I can come up with an estimate on parts, I may drop the money on it come tax return time.

Ryglore

  • Trade Count: (+1)
  • Full Member
  • ***
  • Offline Offline
  • Posts: 779
  • Last login:November 16, 2021, 05:49:39 pm
  • Likes to make things difficult.
    • The Brush Wizard
Re: Centipede Bartop: Side Art Complete & PC Acquired (4/23/14)
« Reply #153 on: April 23, 2014, 11:46:14 am »
Hey All. Long Time. VGCollect has been growing and growing, and taking up a lot of my free time. But I thought I'd post a small update on this project's status, since I have had a few things come up lately regarding it and with Spring here, I'm getting that good ol' project bug again.

First of all, a big hurdle has been leaped as I've acquired a old desktop PC that looks like it will be perfect. In December, my Dad gave me one of the old work PCs that he didn't need any more. It's an old XP machine and the motherboard is rather small inside. It should be no problem getting it into the Bartop at all. I've not torn it down yet to see if it'll all fit, but some quick eyeballing and measuring makes me feel pretty positive about it.  I plan on doing some tests with it and hopefully get it all set up this weekend.

I still need to paint the cabinet, but I can't really do anything with it until I solve the screen issue. I've been eyeing a couple of LCD screen solutions, but the money isn't there currently. I've found some 8" 4:3 ration USB monitors, which would be excellent since I wouldn't need to plug it into a power port, saving space inside. Hopefully once Summer gets here I'll have some extra expendable income (Winter destroyed me).

Another big move forward is that I finally completed the side artwork. The complex nature of the Centipede's artwork was really really intimidating and as such I had trouble focusing on it. After I got the PC in hand and realized that the board would work for the Bartop, I got hyped and over the course of a couple of nights I was able to knock out the side art. This means that all the artwork should be good to go! The artwork, like the Control Panel and all my other arcade art was done in Illustrator.


So, there we go. I'm hoping that the Centipede can get finished this year, finally. I have another empty upright cabinet sitting in my Shed right now too. But I'm not touching it until I get this one done. I have some cool ideas for that one too.

My To-Do list for the weekend looks something like this:

- Double check the measurements and see how it fits
- Clean up PC to bare essentials
- Install MAME and get it running
- Hide Windows
- Check ROM and see if it'll allow for Free Play mode
- Wire the 2.25 Trackball to the Opti-Wiz and Test
« Last Edit: April 23, 2014, 12:57:13 pm by Ryglore »

Ryglore

  • Trade Count: (+1)
  • Full Member
  • ***
  • Offline Offline
  • Posts: 779
  • Last login:November 16, 2021, 05:49:39 pm
  • Likes to make things difficult.
    • The Brush Wizard
Re: Centipede Bartop: PC Work Starts (4/26/14)
« Reply #154 on: April 26, 2014, 09:15:40 am »
Not really a huge amount of progress happened last night. But at this point, any progress I make is good progress.

Here's the PC, it's an old HP. It's a little on the weak side of things. But I'm hoping that if it's only running something as simple as Centipede, that it should work no problem.


Before I hooked it all up, I cracked the case open to check out the board again. Using a tape measure I reached in and took a couple dimensions from it and found that it came out to be 9" x 7.5". I had done a quick measurement before, but that was months ago... So I grabbed a sheet of paper and cut it down to size for a test fit template.


With the paper in hand, I pulled out the ol' Centipede and put all the parts back into place. So I could see how the inside should look. Having it all sitting there dry fit together totally built up the hype level too. It just screams "finish me"!


After that was all done, I set to work on the PC. I set it up on my painting table in my spare bedroom. That way the whole set up was out of the way and not taking up space in the kitchen/dining room.  But I didn't get very far with it. There was a ton of stuff on it that needed to go and I decided that it really needed a good defrag. So after about an hour of deleting programs and cleaning up the unneeded files. I set it to defrag and let it simmer for the rest of the night.


I had to laugh after it was all set up. Cause it really reminds me of my old bedroom at my folk's house. Covered in PC and painting stuff.

I work until 3pm today and after that I'm going to get back to work on it. The plan for tonight is to finish setting up the PC and toss all my arcade files onto it. Then before I get to work hiding any UIs or anything, I'll do some test runs of MAME and Centipede to make sure that it'll all run nice.

By the end of the weekend, I hope to have the PC all ready to go. Then it's only a matter of wiring up the trackball and finding a screen.


Ryglore

  • Trade Count: (+1)
  • Full Member
  • ***
  • Offline Offline
  • Posts: 779
  • Last login:November 16, 2021, 05:49:39 pm
  • Likes to make things difficult.
    • The Brush Wizard
Re: Centipede Bartop: PC Work Starts (4/26/14)
« Reply #155 on: April 27, 2014, 12:13:07 am »
After work I started transferring my arcade files to the PC. I monkeyed with Mala for about 45 mins without being able to get my file to work. After troubleshooting for awhile, I said to hell with it and I downloaded the newest version of Mala. That got that up and running with no more problems. But, I couldn't seem to get my rom files for Centipede to agree though. I don't get why, I've been using the same rom set and version of MAME for every project thus far. I had copied the files to their own folder years back and I'm not sure if they just bad files or what.

So instead I decided to drop the files from the SHMUP into the PC for the Centipede, since I know that ROM works on SHMUP no problem. I've been letting the PC idle over the last few hours while they copy over to the "new" PC.  With the SHMUP's roms  being transferred to the HDD that way I can run through everything and find a file that works. As of right now, it still says it's got a while to go before it's finished copying, so I guess I won't be getting any more work done tonight.

Kinda a bummer...  :-[

But I did some fooling around with the Centipede rom on SHMUP and started playing with the game settings. After looking up the options menu for the game, I found that there is indeed a freeplay setting for it! That's a bonus. Cause I can set the game to freeplay and do away with needing a coin up option. That should mean that I can stick with the Opti-Wiz's 3 mouse buttons and won't need to come up with a secondary encoder to handle extra buttons. :D

Tomorrow looks like there are some family plans happening. So I doubt I'll be getting any work done on the PC tomorrow at all. But Monday looks like a possibility. Hopefully the PC stuff starts to agree with me and I can get to work wiring the Opti-Wiz to the 2.25" trackball next.

The hype train keeps on a rollin'.  :cheers:

Ryglore

  • Trade Count: (+1)
  • Full Member
  • ***
  • Offline Offline
  • Posts: 779
  • Last login:November 16, 2021, 05:49:39 pm
  • Likes to make things difficult.
    • The Brush Wizard
Re: Centipede Bartop: PC Work Starts (4/26/14)
« Reply #156 on: April 28, 2014, 04:50:02 pm »
Quickie Update:

Sunday morning before I started doing family stuff, I loaded the PC back up and looked into the MAME issue. Turns out that the reason the MAME wouldn't load was because my display output is not compatible... Which basically means I need to pick up a video card for this thing.  :angry:

So I'll need to look at the board and see what kind of socket I have in there and start looking for cheap video card solutions. I'm pretty sure it's going to be a old style PCI port, pre-PCI express.

sigh.

Yvan256

  • Trade Count: (0)
  • Full Member
  • ***
  • Offline Offline
  • Posts: 1039
  • Last login:June 20, 2017, 08:35:41 am
    • Yvan256
Re: Centipede Bartop: PC Work Starts (4/26/14)
« Reply #157 on: April 28, 2014, 06:27:07 pm »
Quickie Update:

Sunday morning before I started doing family stuff, I loaded the PC back up and looked into the MAME issue. Turns out that the reason the MAME wouldn't load was because my display output is not compatible... Which basically means I need to pick up a video card for this thing.  :angry:

So I'll need to look at the board and see what kind of socket I have in there and start looking for cheap video card solutions. I'm pretty sure it's going to be a old style PCI port, pre-PCI express.

sigh.

The good thing is, older PCI cards with various video outputs such as composite or S-Video are relatively easy to find on eBay. You don't need a powerful card either, as long as it's VGA.

Ryglore

  • Trade Count: (+1)
  • Full Member
  • ***
  • Offline Offline
  • Posts: 779
  • Last login:November 16, 2021, 05:49:39 pm
  • Likes to make things difficult.
    • The Brush Wizard
Re: Centipede Bartop: PC Work Starts (4/26/14)
« Reply #158 on: April 29, 2014, 10:41:53 am »
Yeah, or you can have a good buddy like Opt2not tell you he's got an extra PCI card laying around that he'd be willing to donate to my cause! Thanks bud!

Now I just need to check and make sure it's a PCI slot for certain. Possible
setback averted? !

EDIT: It's got PCI slots for certain. Yay!
« Last Edit: April 29, 2014, 12:12:45 pm by Ryglore »

Ryglore

  • Trade Count: (+1)
  • Full Member
  • ***
  • Offline Offline
  • Posts: 779
  • Last login:November 16, 2021, 05:49:39 pm
  • Likes to make things difficult.
    • The Brush Wizard
Re: Centipede Bartop: Slow and Steady (5/3/14)
« Reply #159 on: May 03, 2014, 11:23:04 pm »
I'm currently at a stand still with the PC. So I started working on the cabinet again. So far this weekend not really done a lot of work. But, I did order a a part and began the work on how I want start filling the cabinet.

The part I ordered was a inlet plug with a power switch. It's a standard PC cable 3 prong job. I'll mount this low on the back panel and run a cord into it. This will keep things nice and clean, by having a removable cord, in case I want to transport it some where. I'm planning on wiring either a 3 way extention cord plug or the smallest surge protector known to man into the back of it. Plus the built in switch will act as a main power switch for the entire cabinet, much like the switch I have mounted on top of the SHMUP to cut power to everything. Next to this, I'll take one of my original Radio Shack black pushbuttons and use that for the power up button for the actual PC.

Power Inlet


Also, before I left today to hang out with some friends and play board games all night, I mounted a new-ish LED light in the marquee box.  It's actually an LED licence plate light from my work. It's only 3 LEDs, but I'm thinking it should be fine. I want the marquee lit for sure, but I don't want it to be overwhelming either. So I tested it out with a marquee I had printed off on some brochure paper, and it looked pretty solid. I might paint the inside white though to help the light bounce a bit better.

Mounted LED light (the darkness on the right side of the light tube is actually black paint overspray from another project)


Unlit Marquee


Lit Marquee


Next up I plan on wiring my Trackball to the Opti-Wiz and running tests on that. I have some wire left over from the other arcade builds, so I will be able to wire in the 3 buttons on the CP as well and test those. I still need to decide how I want to secure the control panel into place and I'm thinking of a few viable options. And once I figure out what that plan is I can decide where I need to bend the metal panel to allow the bezel art to slide behind it and keep the art and plexi in place. I think I've solved the screen issue too and now it's just a matter of paying for it.

So far this project is looking like it could be falling together nicely, which is nice. Especially since it's taken this long to get here. :)