Main Restorations Software Audio/Jukebox/MP3 Everything Else Buy/Sell/Trade
Project Announcements Monitor/Video GroovyMAME Merit/JVL Touchscreen Meet Up Retail Vendors
Driving & Racing Woodworking Software Support Forums Consoles Project Arcade Reviews
Automated Projects Artwork Frontend Support Forums Pinball Forum Discussion Old Boards
Raspberry Pi & Dev Board controls.dat Linux Miscellaneous Arcade Wiki Discussion Old Archives
Lightguns Arcade1Up Try the site in https mode Site News

Unread posts | New Replies | Recent posts | Rules | Chatroom | Wiki | File Repository | RSS | Submit news


Author Topic: Scratch Build Donkey Kong MAME Cab (completed 10/23/09)  (Read 23098 times)

0 Members and 1 Guest are viewing this topic.

Sledgehammer

  • Trade Count: (0)
  • Full Member
  • ***
  • Offline Offline
  • Posts: 50
  • Last login:March 30, 2017, 04:48:08 pm
  • "Trust me, I know what I'm doing..."
Scratch Build Donkey Kong MAME Cab (completed 10/23/09)
« on: September 15, 2009, 01:32:16 am »
I started on my third cab a few days ago. Some of you may recall I just finished a Donkey Kong themed bartop a few weeks ago (http://forum.arcadecontrols.com/index.php?topic=95934.0).

Well, I had a gallon of blue Donkey Kong paint laying around, so I figured what the hell…let’s scratch build a full size DK cabinet.
Now, before everyone gets all heated over this…let me be clear…my skills are limited! So, I will do my best to make this thing look as close to real as possible, but based on my talents, and the fact that no one that will ever see if will ever know if it looks like a real DK or not (other than you folks!), I am just going to try and have fun with this. I got the plans from Jakobud and am trying to remain faithful to original dimensions where I can…but if I’m off a ¼” here and an 1/8” there….that is ok with me. I have seen some sick restores and scratch builds posted here and elsewhere and I commend any of you folks that have done that work because it takes some real skill to pull it off!

Ok…so this will be a MAME cab of course, with two player controls, six buttons each. I have the Mini-Pac, Sanwa ball top sticks, and buttons coming in this week. I am also going to add a Happ coin door and will rig it up to function off quarters (just because it sounds fun). Just won that on ebay and hope to see it by the end of this week as well. Once the cab is built I will order my art from mamemarquees.com and then begin paint.

I am still debating on the monitor. I usually use a 19” dell Ultrasharp LCD, but the size of this cab is begging for something a little bigger. I refuse to use a CRT due to weight and such…so maybe I will just get a 20” LCD for now.

Here are some pics of where I started and how far along I am so far:

Side cut out of 3/4” MDF:


Attaching the bottom:


Attaching the left side:


Test fitting the base and casters:


Painting the base:


Base attached:


On her feet for the first time:


Test fitting the front panel…soon to be cut out for the coin door. Also you can see my other two cabs in the background:


And here is where I’m at today:


Coin door cutout is next, then front panel (with slots for speaker) and CP are next up.

Will try to keep putting updates out as I move along.

Jason

« Last Edit: October 23, 2009, 09:26:22 pm by Sledgehammer »

GaryMcT

  • Trade Count: (+2)
  • Full Member
  • ***
  • Offline Offline
  • Posts: 745
  • Last login:September 24, 2014, 11:19:27 am
    • GaryMcT's arcade blog
Re: Scratch Build Donkey Kong MAME Cab
« Reply #1 on: September 15, 2009, 02:31:20 am »
Cool!  I'm definitely watching.  I want to do a scratch build at some point.
My blog on learning how to develop FPGA versions of arcade boards: http://garymct.blogspot.com


emphatic

  • Trade Count: (0)
  • Full Member
  • ***
  • Offline Offline
  • Posts: 2017
  • Last login:July 16, 2025, 10:52:58 am
  • -"Suck it, Donny!" -"No, YOU suck it.... more".
    • Emphatic's Video Game Collection
Re: Scratch Build Donkey Kong MAME Cab
« Reply #2 on: September 15, 2009, 05:03:42 am »
That shape is probably the sexiest of all mass produced cab out there.  :applaud:

Encryptor

  • Trade Count: (+34)
  • Full Member
  • ***
  • Offline Offline
  • Posts: 1287
  • Last login:December 21, 2023, 08:01:18 pm
Re: Scratch Build Donkey Kong MAME Cab
« Reply #3 on: September 15, 2009, 06:03:22 am »
Looking very nice! Keep the pics coming.

That shape is probably the sexiest of all mass produced cab out there.  :applaud:

While I do love the shape of these cabs the Tron cab is a bit sexier for me.


Encryptor

jmike

  • Trade Count: (+10)
  • Full Member
  • ***
  • Offline Offline
  • Posts: 1018
  • Last login:June 24, 2025, 04:54:36 pm
Re: Scratch Build Donkey Kong MAME Cab
« Reply #4 on: September 15, 2009, 07:24:57 am »
 :applaud: looks great so far. Will definitely keep an eye on this one.
Keep the pics coming.


 :cheers:

severdhed

  • Trade Count: (0)
  • Full Member
  • ***
  • Offline Offline
  • Posts: 2975
  • Last login:December 14, 2024, 05:01:52 pm
  • RIP Dinosaur Hippo
Re: Scratch Build Donkey Kong MAME Cab
« Reply #5 on: September 15, 2009, 02:27:25 pm »
awesome.  keep posting lots of pics...it is so awesome to see all of the DK projects on here lately...they are inspiring me to make mine better
Current Projects:      Zak-Man | TMNT Pedestal | SNES Pi | N64 Odroid
Former Projects:     4 Player Showcase | Donkey Kong | iCade

Sledgehammer

  • Trade Count: (0)
  • Full Member
  • ***
  • Offline Offline
  • Posts: 50
  • Last login:March 30, 2017, 04:48:08 pm
  • "Trust me, I know what I'm doing..."
Re: Scratch Build Donkey Kong MAME Cab
« Reply #6 on: September 15, 2009, 07:27:02 pm »
Thanks for the feedback guys!

I have a quick question for you all.

I just cut my CP out of 1/2" MDF. I am thinking of going 1/2" MDF with 1/4" of plexi on top (and artwork sandwiched between).

The question is....if I use 1/2" MDF plus 1/4" Plexi (for a 3/4" thick CP), and router my t-moulding groove dead center of the sandwiched pieces, will the 3/4" T-moulding I am using for the sides of the cab have a flush fit/look?

On my last cab I just routed the 1/2" MDF and used 1/2" T moulding, and then 1/8" plexi on top. The plexi edge is showing (i.e. the t-moulding doesn't cover it).

Will the plan I mentioned above work out or should I just leave the exposed plexi edge?

Hope I am making sense here.

Thanks

J

severdhed

  • Trade Count: (0)
  • Full Member
  • ***
  • Offline Offline
  • Posts: 2975
  • Last login:December 14, 2024, 05:01:52 pm
  • RIP Dinosaur Hippo
Re: Scratch Build Donkey Kong MAME Cab
« Reply #7 on: September 15, 2009, 07:32:57 pm »
thats how i did my control panel..only i used 5/8" MDF and 1/8" plexi, 3/4" tmolding worked great
Current Projects:      Zak-Man | TMNT Pedestal | SNES Pi | N64 Odroid
Former Projects:     4 Player Showcase | Donkey Kong | iCade

Ryglore

  • Trade Count: (+1)
  • Full Member
  • ***
  • Offline Offline
  • Posts: 779
  • Last login:November 16, 2021, 05:49:39 pm
  • Likes to make things difficult.
    • The Brush Wizard
Re: Scratch Build Donkey Kong MAME Cab
« Reply #8 on: September 15, 2009, 08:36:33 pm »
Awesome work! Can't wait to see how it progresses

That shape is probably the sexiest of all mass produced cab out there.  :applaud:

I'm still partial to the Xevious and Centipede cabs.


javeryh

  • Trade Count: (+1)
  • Full Member
  • ***
  • Offline Offline
  • Posts: 7959
  • Last login:Yesterday at 06:40:27 am
Re: Scratch Build Donkey Kong MAME Cab
« Reply #9 on: September 15, 2009, 09:23:27 pm »
The t-molding is 9/16" all the way around - for my CP I went with 1/2" MDF + 1/16" ABS black plastic.  Worked great. 

You are really doing a great job so far!   :cheers:

severdhed

  • Trade Count: (0)
  • Full Member
  • ***
  • Offline Offline
  • Posts: 2975
  • Last login:December 14, 2024, 05:01:52 pm
  • RIP Dinosaur Hippo
Re: Scratch Build Donkey Kong MAME Cab
« Reply #10 on: September 15, 2009, 11:38:53 pm »
The t-molding is 9/16" all the way around - for my CP I went with 1/2" MDF + 1/16" ABS black plastic.  Worked great. 

You are really doing a great job so far!   :cheers:

maybe on a real DK...but he made this one out of 3/4" MDF for the sides...so he will need larger t molding
Current Projects:      Zak-Man | TMNT Pedestal | SNES Pi | N64 Odroid
Former Projects:     4 Player Showcase | Donkey Kong | iCade

jmike

  • Trade Count: (+10)
  • Full Member
  • ***
  • Offline Offline
  • Posts: 1018
  • Last login:June 24, 2025, 04:54:36 pm
Re: Scratch Build Donkey Kong MAME Cab
« Reply #11 on: September 16, 2009, 08:27:57 am »
Great job so far. Can't wait to see the finished product.  :cheers:

You're definitely in good hands with "Severdhead" and "Javeryh" (awesome work guys). What most people usually recommend is using a scrap piece of wood and making a couple of t-molding grooves until you're happy with the location. That's actually what I did.


Sledgehammer

  • Trade Count: (0)
  • Full Member
  • ***
  • Offline Offline
  • Posts: 50
  • Last login:March 30, 2017, 04:48:08 pm
  • "Trust me, I know what I'm doing..."
Re: Scratch Build Donkey Kong MAME Cab
« Reply #12 on: September 16, 2009, 12:32:13 pm »
Thanks for the kind words and advice guys.

I cut my CP out yesterday and printed a black and white sample of the overlay I am considering (photo attached). I stole the art from an earlier thread on this site so thanks to the OP that provided it the first time.


I am happy with the layout and I think there is enough room for some comfortable two player play (CP width is 22 1/4").

I am considering removing the black instruction card that is in the upper left corner. I removed it with MS Paint (see attached color photo) but now the area in the upper left is sort of bare.


Any suggestions for what I can put there? Maybe another Nintendo Logo?  I thought maybe I could put some admin buttons (pause and escape) but what I originally was planning was hide those admin buttons underneath the speaker grill section (on the 2 1/2" piece that joins the front panel and the speaker panel).

I am interested in your opinions on this...

Epyx

  • Trade Count: (+1)
  • Full Member
  • ***
  • Offline Offline
  • Posts: 1961
  • Last login:December 25, 2023, 07:56:36 pm
  • "You're an oddity"
Re: Scratch Build Donkey Kong MAME Cab
« Reply #13 on: September 16, 2009, 01:33:16 pm »
Quote
I am considering removing the black instruction card that is in the upper left corner. I removed it with MS Paint (see attached color photo) but now the area in the upper left is sort of bare.

Why not leave it for appearance and just change the content to match your own requirements? That way you make it look that much more authentic but still have it meet your unique requirements.
Last Project


Epyx Tutorials:
Tutorials

Sledgehammer

  • Trade Count: (0)
  • Full Member
  • ***
  • Offline Offline
  • Posts: 50
  • Last login:March 30, 2017, 04:48:08 pm
  • "Trust me, I know what I'm doing..."
Re: Scratch Build Donkey Kong MAME Cab
« Reply #14 on: September 16, 2009, 01:54:54 pm »
The problem I am having is that when I print the artwork out to my scale the content of the black instruction section in the upper left is not legible. I used this same artwork for my bartop and you can't read what the instructions say.

I figured on this new cab I would just remove it all together.

Maybe the problem is that I am not printing it to a high enough quality. On my bartop I just had kinkos print the artwork out for me. Maybe if I send the file off to mamemarquees.com and they print it, the instruction card will be legible...

I'm just not sure and don't want to spend $20 to $30 to have it printed and find out it still doesn't look good!   ???

Epyx

  • Trade Count: (+1)
  • Full Member
  • ***
  • Offline Offline
  • Posts: 1961
  • Last login:December 25, 2023, 07:56:36 pm
  • "You're an oddity"
Re: Scratch Build Donkey Kong MAME Cab
« Reply #15 on: September 16, 2009, 03:44:32 pm »
Good point although it's probably only the resolution of the original image...im sure a re-scanned/better capture would be fine but your statement is correct and if you prefer the aesthetics without the image then just stick with that :)
Last Project


Epyx Tutorials:
Tutorials

javeryh

  • Trade Count: (+1)
  • Full Member
  • ***
  • Offline Offline
  • Posts: 7959
  • Last login:Yesterday at 06:40:27 am
Re: Scratch Build Donkey Kong MAME Cab
« Reply #16 on: September 16, 2009, 04:22:47 pm »
Honestly, if I were you I'd do a complete redesign of the CP art instead of trying to shoehorn bits from the original into a 2 player 6-button layout which was never intended.  You could keep the colors and even the style but I would do more than just rearrange existing graphics.  With Photoshop you are only limited by your imagination - for example, you could actually make the three characters in the lower right much larger but sort of transparent and overlapping the button holes... I don't know.

The art is probably the most important part of any cab so I wouldn't rush into anything.  There are a lot of talented people in the artwork forum - maybe ask around there?   :cheers:

severdhed

  • Trade Count: (0)
  • Full Member
  • ***
  • Offline Offline
  • Posts: 2975
  • Last login:December 14, 2024, 05:01:52 pm
  • RIP Dinosaur Hippo
Re: Scratch Build Donkey Kong MAME Cab
« Reply #17 on: September 16, 2009, 04:58:22 pm »
i have the control panel overlay, and instruction cards in high quality PDF format if that would help you...see attached.  I'm sure there are some good vector versions around too...


i agree with Javeryh..since you arent sticking with the original controls, dont limit yourself with the artwork.  i just started working on making a new instruction card for mine...i want to keep the controls panel original, but i think  i am going to make a custom instruction card to explain how to work everythign on my cab.

Current Projects:      Zak-Man | TMNT Pedestal | SNES Pi | N64 Odroid
Former Projects:     4 Player Showcase | Donkey Kong | iCade

Chicken McNobody

  • Trade Count: (+4)
  • Full Member
  • ***
  • Offline Offline
  • Posts: 171
  • Last login:April 30, 2021, 01:01:06 pm
  • I poop too much. . .
Re: Scratch Build Donkey Kong MAME Cab
« Reply #18 on: September 16, 2009, 07:49:21 pm »
Unless there is somebody out there with the exact same idea as me, that is my CPO that I made up.  I have a super high quality copy available in PDF form that is over 9GB that you are more than welcome to.  I got mine printed at MameMarquees, and the card is 100% clear and legible.

Also the extra white line at the bottom is to simulate T-Molding, my CP is metal, and it looked better this way than trying to Glue on real T-Molding, it is the exact same dimensions, so it blends perfectly.  If you give me your measurements, I can resize it to exactly what you need.  Mine is 22 1/4" long as well, and it's a comfortable but snug fit for two players.  As long as you are playing with someone who won't get piffed if you brush shoulders from time to time in the heat of the game.

See "project" thread here
« Last Edit: September 17, 2009, 07:57:37 am by Chicken McNobody »

dweebs0r

  • Trade Count: (+21)
  • Full Member
  • ***
  • Offline Offline
  • Posts: 944
  • Last login:January 16, 2025, 02:40:36 pm
  • Ascendo tuum!
Re: Scratch Build Donkey Kong MAME Cab
« Reply #19 on: September 16, 2009, 08:58:28 pm »
Great start.  I will be following this thread.  Here is one of my favorites:  http://mariobrosarcade.blogspot.com/
Check this guys site out for inspiration.  He did a DK3 and Mario Bros from scratch and they look perfect.

-D

Sledgehammer

  • Trade Count: (0)
  • Full Member
  • ***
  • Offline Offline
  • Posts: 50
  • Last login:March 30, 2017, 04:48:08 pm
  • "Trust me, I know what I'm doing..."
Re: Scratch Build Donkey Kong MAME Cab
« Reply #20 on: September 17, 2009, 01:49:18 am »
Chicken McNobody,

Yes...I stole your design. You are THE MAN and your cab is what inspired me to have a full size DK replica but have it run MAME with the 6 button layout!

If you could share the full file with me somehow, I would really appreciate it. I am going to work with Scott at Mamemarquees for my artwork so I would grately appreciate if you could share your CP file with me...then I can just order the marquee, bezel and side art all together from Scott as a package.

My CP dimensions are 8" by 22 1/4". I will be doing T-Moulding so I don't need the same extra white line as you had on your layout.

Thanks so much for offering your help...everyone on this forum is so helpful...it's a great group of guys on here!

Jason

Chicken McNobody

  • Trade Count: (+4)
  • Full Member
  • ***
  • Offline Offline
  • Posts: 171
  • Last login:April 30, 2021, 01:01:06 pm
  • I poop too much. . .
Re: Scratch Build Donkey Kong MAME Cab
« Reply #21 on: September 17, 2009, 07:51:54 am »
Glad you like my work, thanks!

I can E-mail it to you, just PM your E-mail address to me, and I should have that all worked up within the next couple of days. 

I have a question though.  Since I had the metal control panel, I faked the idea of the original CP with the artwork being slightly smaller than the CP panel itself (hence the black border.)  I wasn't going to do anything involving the top plexi layer.  In other words, the CPO is the entire size of the CP area, rather than it being smaller and resting on top of the black painted piece of wood. 

Which way would you prefer to have it sized?  The reason I went with Metal is because the way the guy who started the cab had done it that way.  I could have done wood, but it would have involved tearing apart the inside brackets to move them a little lower for a flush fit.  I was OK with the metal since I could in the end make it look how I wanted. 

Maybe some others can chime in here and let me know what the border dimensions should be, or you could figure it out based on your needs.

Also the Mario Bros/DK3 are what inspired my project, so it's like a domino effect right now I guess.
« Last Edit: September 17, 2009, 07:53:41 am by Chicken McNobody »

Sledgehammer

  • Trade Count: (0)
  • Full Member
  • ***
  • Offline Offline
  • Posts: 50
  • Last login:March 30, 2017, 04:48:08 pm
  • "Trust me, I know what I'm doing..."
Re: Scratch Build Donkey Kong MAME Cab
« Reply #22 on: September 17, 2009, 02:00:34 pm »
Thanks Chicken. I just PM'd you. Let me know if you got it...I provided my email address for you.

I was able to cut out the spot for my coin door today and check it for fitment. Here are some pics.

Jason

jmike

  • Trade Count: (+10)
  • Full Member
  • ***
  • Offline Offline
  • Posts: 1018
  • Last login:June 24, 2025, 04:54:36 pm
Re: Scratch Build Donkey Kong MAME Cab
« Reply #23 on: September 17, 2009, 02:54:47 pm »
You're doing an awesome job. Keep those pics coming.

If I may ask where did you get the coin mechanism? I've been looking to buy one.

 :cheers:

leapinlew

  • Some questionable things going on in this room with cheetos
  • Trade Count: (+4)
  • Full Member
  • ***
  • Offline Offline
  • Posts: 7919
  • Last login:July 12, 2025, 10:33:20 pm
Re: Scratch Build Donkey Kong MAME Cab
« Reply #24 on: September 17, 2009, 03:58:34 pm »
Any reason you didn't go with a Nintendo coin door?

Sledgehammer

  • Trade Count: (0)
  • Full Member
  • ***
  • Offline Offline
  • Posts: 50
  • Last login:March 30, 2017, 04:48:08 pm
  • "Trust me, I know what I'm doing..."
Re: Scratch Build Donkey Kong MAME Cab
« Reply #25 on: September 17, 2009, 04:10:31 pm »
I got the coin door off of eBay. It is a brand new Suzo Happ door with the coin mechs.

I went with this door rather than a nintendo door because I didn't want to restore a used door and I heard the Nintendo doors are hard to find.

Can you buy the Nintendo doors as a new assembly? Or is used the only option?

Jason

Chicken McNobody

  • Trade Count: (+4)
  • Full Member
  • ***
  • Offline Offline
  • Posts: 171
  • Last login:April 30, 2021, 01:01:06 pm
  • I poop too much. . .
Re: Scratch Build Donkey Kong MAME Cab
« Reply #26 on: September 17, 2009, 06:49:38 pm »
CPO file sent, let me know if it works out for you. . .

I flattened it as a JPEG rather than send it out as a PDF, since that way it is only almost 4GB Vs. Almost 10GB.  My E-mail is cheap and only allows up to 4GB attachments right now, so I would have send it from a different source if you would prefer the PDF.  But hey, up until about a year ago, the had a 1GB cap, so it is getting better.

Swatwolf

  • Trade Count: (0)
  • Full Member
  • ***
  • Offline Offline
  • Posts: 90
  • Last login:April 18, 2020, 02:27:44 am
Re: Scratch Build Donkey Kong MAME Cab
« Reply #27 on: September 17, 2009, 09:53:01 pm »
Are you going to paint the DK colors as well??
Video Games Currently owned and running: Mania Challenge, X-Men (Children of the Atom), A.P.B.

In the works Mame Trek (Scratch Built), Donkey Kong Jr. (Just got a PCB for)

Sledgehammer

  • Trade Count: (0)
  • Full Member
  • ***
  • Offline Offline
  • Posts: 50
  • Last login:March 30, 2017, 04:48:08 pm
  • "Trust me, I know what I'm doing..."
Re: Scratch Build Donkey Kong MAME Cab
« Reply #28 on: September 18, 2009, 03:22:24 pm »
I plan on painting it Donkey Kong blue because I have leftover paint from my bartop project. But...the few Donkey Kong red cabs I have seen are kind of appealing. Maybe I should try the red.

For the black paint on the interior and top, do you guys recommend flat or semi gloss paint?

Jason

Sledgehammer

  • Trade Count: (0)
  • Full Member
  • ***
  • Offline Offline
  • Posts: 50
  • Last login:March 30, 2017, 04:48:08 pm
  • "Trust me, I know what I'm doing..."
Re: Scratch Build Donkey Kong MAME Cab
« Reply #29 on: September 23, 2009, 03:03:53 pm »
Did some work on the cabinet this week. I cut the front panel and routed out the slots for the speaker grill. It took a few attempts and pushed my patience to a new level trying to cut these damn slots.

I drilled 1/4" holes and then used a 1/4" straight bit on the router to make the slot. It took three wasted front panels...including one that I proceeded to smash into pieces after I botched yet another slot cut.  :angry:

Anyways, I got it done and mounted. I still need to file out the slots to make them smooth but I need to pickup a file to do that.

J

severdhed

  • Trade Count: (0)
  • Full Member
  • ***
  • Offline Offline
  • Posts: 2975
  • Last login:December 14, 2024, 05:01:52 pm
  • RIP Dinosaur Hippo
Re: Scratch Build Donkey Kong MAME Cab
« Reply #30 on: September 23, 2009, 03:11:32 pm »
looking good.  i'm sure that speaker grill was alot of fun.  the blue laminate is all chipped off of mine, i'm not looking forward to trying to repair that section
Current Projects:      Zak-Man | TMNT Pedestal | SNES Pi | N64 Odroid
Former Projects:     4 Player Showcase | Donkey Kong | iCade

Sledgehammer

  • Trade Count: (0)
  • Full Member
  • ***
  • Offline Offline
  • Posts: 50
  • Last login:March 30, 2017, 04:48:08 pm
  • "Trust me, I know what I'm doing..."
Re: Scratch Build Donkey Kong MAME Cab
« Reply #31 on: September 23, 2009, 06:56:10 pm »
Ok, during my break today (AKA my 18 month old daughter's nap time) I was able to mount my admin panel and test fit my CP.

The admin panel is basically the strip that goes between the front panel that houses the coin door and the front panel with the speaker grill. From what I can tell on the original cab, this is just a filler piece to cover the gap between the two panels.
 
I figured it would be a nifty place to have my power, pause, and escape buttons hidden so they don't reside on the CP or the back of the cab.

I attached some shots.

Jason

severdhed

  • Trade Count: (0)
  • Full Member
  • ***
  • Offline Offline
  • Posts: 2975
  • Last login:December 14, 2024, 05:01:52 pm
  • RIP Dinosaur Hippo
Re: Scratch Build Donkey Kong MAME Cab
« Reply #32 on: September 23, 2009, 09:59:02 pm »
that panel seems like a perfect place for admin buttons...just be aware that while that location is out of site to you, those buttons will be very visible and very tempting to your 18month old daughter.

i thought about putting admin buttons there on mine...then my 8month old son walked over to the cabinet and started playing with the coin door....i quickly changed my mind.
Current Projects:      Zak-Man | TMNT Pedestal | SNES Pi | N64 Odroid
Former Projects:     4 Player Showcase | Donkey Kong | iCade

Sledgehammer

  • Trade Count: (0)
  • Full Member
  • ***
  • Offline Offline
  • Posts: 50
  • Last login:March 30, 2017, 04:48:08 pm
  • "Trust me, I know what I'm doing..."
Re: Scratch Build Donkey Kong MAME Cab (Rear door installed)
« Reply #33 on: September 27, 2009, 10:14:58 pm »
@severdhed, thanks for the tip on the admin buttons. I will try my best to keep the kid away from them! My cab will reside in the garage and she doesn't get to play in there...

I was able to put the back together on my cab today. I did a top piece with handles, a bottom piece, and the door which has a Happ barrel lock with key.

I also bought the smoked lexan for the bezel, but it was to wide and tall to fit in the cab, so I routed a bit off the sides with my flush trim bit.....and now it is not wide enough and I have an ugly gap! So it's back to Tap Plastics tomorrow for yet another bezel.

I ordered my CP art, marquee and side art from Mamemarquees.com so I hope to have that soon...holding off ordering the bezel art until I get a bezel that fits properly and can give Scott the right dimensions!

Jason

Sledgehammer

  • Trade Count: (0)
  • Full Member
  • ***
  • Offline Offline
  • Posts: 50
  • Last login:March 30, 2017, 04:48:08 pm
  • "Trust me, I know what I'm doing..."
Re: Scratch Build Donkey Kong MAME Cab
« Reply #34 on: October 01, 2009, 02:40:01 pm »
Quick update:

Monitor has been mounted.


Primer and paint done.


T-moulding applied.


Need to start on the CP. Just received the CP artwork from Scott at Mamemarquees. I hope to have the marquee and side art this week as well.

Jason

leapinlew

  • Some questionable things going on in this room with cheetos
  • Trade Count: (+4)
  • Full Member
  • ***
  • Offline Offline
  • Posts: 7919
  • Last login:July 12, 2025, 10:33:20 pm
Re: Scratch Build Donkey Kong MAME Cab
« Reply #35 on: October 02, 2009, 12:28:50 am »
Is the inside of the speaker grill vents painted black on a DK? If not, they should be.

Looking good.

Epyx

  • Trade Count: (+1)
  • Full Member
  • ***
  • Offline Offline
  • Posts: 1961
  • Last login:December 25, 2023, 07:56:36 pm
  • "You're an oddity"
Re: Scratch Build Donkey Kong MAME Cab
« Reply #36 on: October 02, 2009, 12:49:13 am »
Aye looking really good!  :applaud:
Last Project


Epyx Tutorials:
Tutorials

Sledgehammer

  • Trade Count: (0)
  • Full Member
  • ***
  • Offline Offline
  • Posts: 50
  • Last login:March 30, 2017, 04:48:08 pm
  • "Trust me, I know what I'm doing..."
Re: Scratch Build Donkey Kong MAME Cab
« Reply #37 on: October 05, 2009, 10:22:42 pm »
Got alot of work done today so I thought I'd share some pics.

I managed to get the side art on last night, and today I cut my CP (big thank you to Chciken McNobody for his help on the artwork!), I installed the overlay and all the buttons. I am in the middle of wiring up the mini-pac right now. I also put on a few more of the decals (like the instruction card above the CP and the coin sticker by the speaker grille. Also mounted the marquee today...

Tomorrow I will work on the bezel and hopefully get this thing running by the weekend.

CP prior to overlay install:


Rear of the CP showing the MiniPac and wiring (to be completed):


CP:


Test fitting the CP in the cab:


A shot with the monitor in place. I am using some foamboard to surround the monitor. I will eventually make a bezel to cover the Dell logo and power button on the monitor:


Will post some more shots once I get the bezel in place.

Jason

Chicken McNobody

  • Trade Count: (+4)
  • Full Member
  • ***
  • Offline Offline
  • Posts: 171
  • Last login:April 30, 2021, 01:01:06 pm
  • I poop too much. . .
Re: Scratch Build Donkey Kong MAME Cab
« Reply #38 on: October 05, 2009, 10:48:47 pm »
Looks like the cp image turned out great for you, is everything clean and legible?

Glad I could help with the file.  I won't deny it warms my arcade heart to see my hard work, looking great on somebody elses hard work. 

Sledgehammer

  • Trade Count: (0)
  • Full Member
  • ***
  • Offline Offline
  • Posts: 50
  • Last login:March 30, 2017, 04:48:08 pm
  • "Trust me, I know what I'm doing..."
Re: Scratch Build Donkey Kong MAME Cab
« Reply #39 on: October 05, 2009, 10:56:07 pm »
It came out great, the instruction card is 100% clear and ledgible. Thanks again!

J

LeedsFan

  • Trade Count: (0)
  • Full Member
  • ***
  • Offline Offline
  • Posts: 1042
  • Last login:January 17, 2021, 06:14:23 am
Re: Scratch Build Donkey Kong MAME Cab
« Reply #40 on: October 06, 2009, 03:41:51 am »
This is looking really cool! You've done a really good job replicating that cabinet design. I read somewhere that the inside slots of the speaker grille are supposed to be black. I reckon that would be awkward and niggly to do. I certainly didn't do that with my bartop... I painted the insides blue to match. Some might say don't bother painting them at all.

jmike

  • Trade Count: (+10)
  • Full Member
  • ***
  • Offline Offline
  • Posts: 1018
  • Last login:June 24, 2025, 04:54:36 pm
Re: Scratch Build Donkey Kong MAME Cab
« Reply #41 on: October 06, 2009, 07:44:59 am »
It came out great, the instruction card is 100% clear and ledgible. Thanks again!

J

Yes really awesome work on the cab Jason.  :applaud: You can really see the dedication that went into this project.

Sledgehammer awesome work! You know I was thinking of doing a mini DK machine for my twin boys, maybe you wouldn't mind helping me in the future? ;D

 :cheers:

Sledgehammer

  • Trade Count: (0)
  • Full Member
  • ***
  • Offline Offline
  • Posts: 50
  • Last login:March 30, 2017, 04:48:08 pm
  • "Trust me, I know what I'm doing..."
Re: Scratch Build Donkey Kong MAME Cab
« Reply #42 on: October 08, 2009, 01:31:39 am »
Thanks for the kudos guys.

I don't plan to paint the inside of the speaker slots. My painting skills suck and I can just see myself painting the slots black and bleeding black paint onto the blue front panel, then having to touch that up. No thanks...

I wanted to post some updated pics.

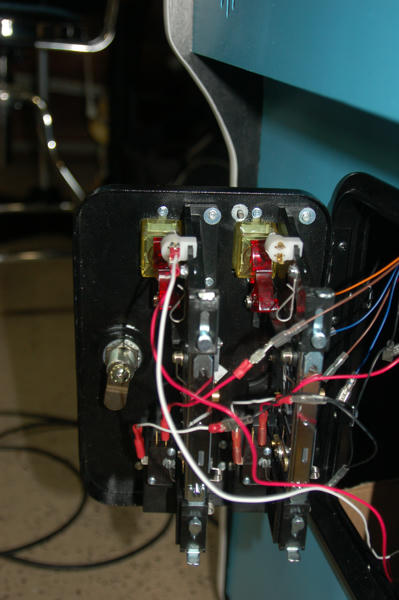
I got the coin door wired up after multiple attemps on both the lighting and the mechs. One mech worked fine, the other didn't. Turns out I did a crappy crimp job on a couple of my wires on the Coin 1 mech. Fixed that then starting messing with the lights.

I didn't understand that daisy chaining the lights had to be done a very specific way. I basically came out of the molex connector on my PSU (12V line) to a wire that I split into two leads...one for each light (12V plus ground). When I fired everything up, the lights worked...but when I shut down the PC, it tripped my GFI on the outlet in the garage.

I rewired the lights so as to properly daisy chain them (12V and ground straight to the 1st light, then out of that connection and into the second light) and all was well.

Nothing like spending 2 hours working on the coin door at 8pm at night! Sometimes you get so far into these cab projects, you forget this is an arcade game and you're supposed to play the thing and have fun. I think I like building cabs more than I like playing games! (same with guns...I like reloading my own ammo more than I like going to the range to shoot!).

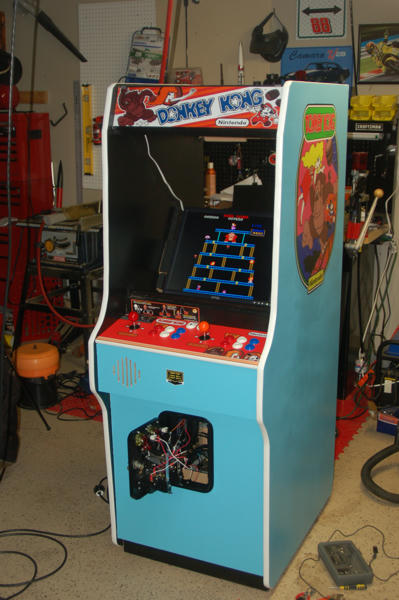
Anyways, everything is done except for mounting the bezel and wiring up power to the marquee light. I am waiting on bezel artwork from Scott and also need to track down a top marquee retainer (I only have the bottom one so far) in order to finish up.

Here are some updated photos:

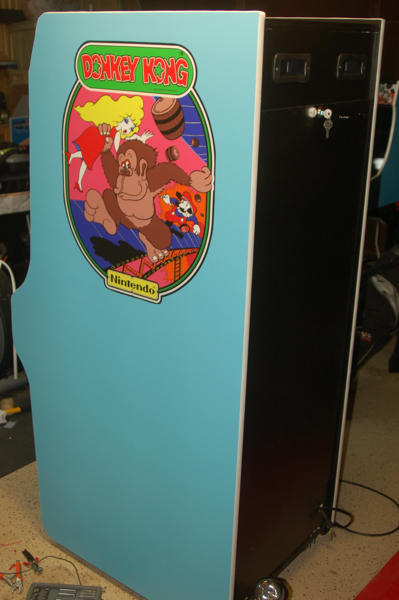
Rear shot with the door installed:


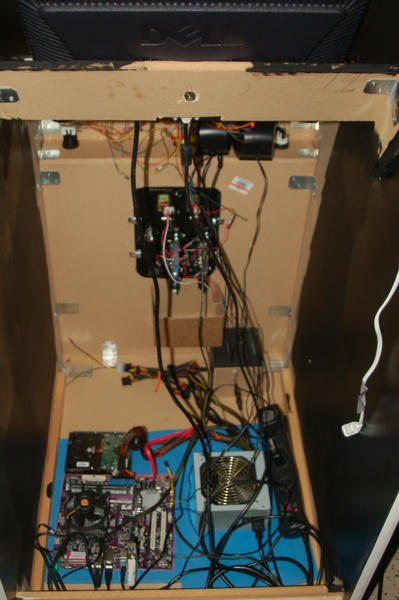
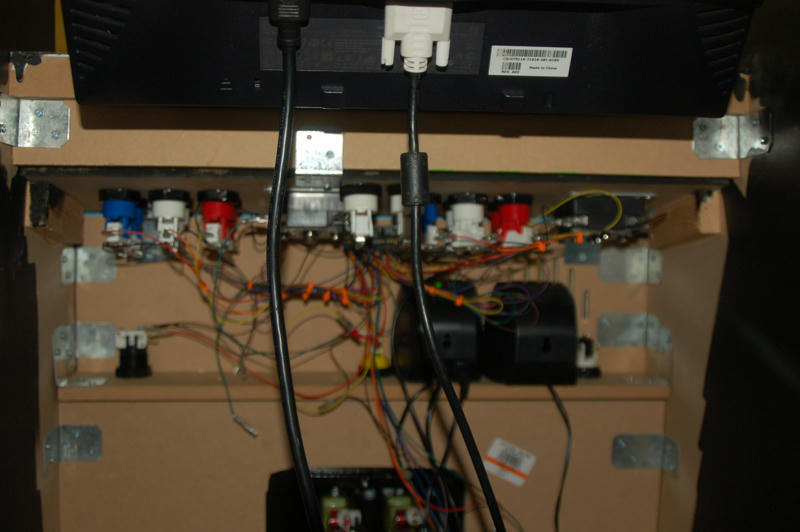
Interior shot (what a mess) with the PC and coin door wiring:


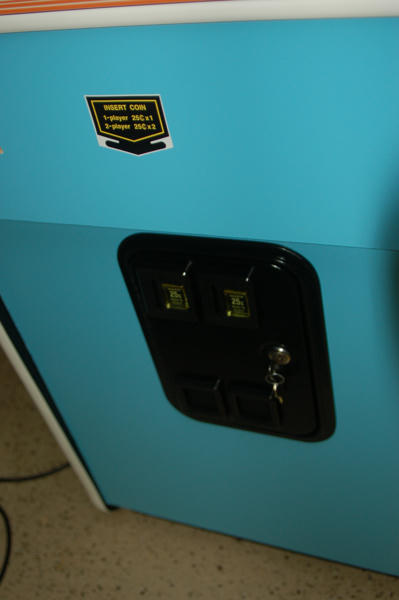
Coin door from the outside:


Back of coin door (prior to fixing my wiring woes):


Running some DK. Need to get a bezel around that monitor so it doesn't look so naked:


A blurry shot but you can see the underside of the CP:


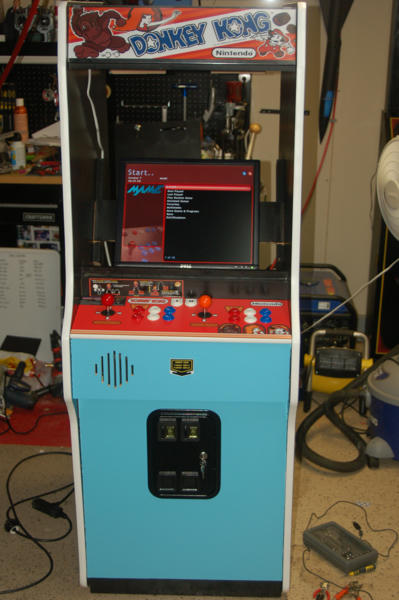
Running GameEx, and awesome front end!:


Once I get the bezel artwork I will post some final pics of the completed project.

I am going to be bored to death once I am done with this. I have been thinking about building a Future Pinball cab....just haven't had the guts to buy a 40" LCD yet....maybe soon...

Jason

smalltownguy

  • Trade Count: (+1)
  • Full Member
  • ***
  • Offline Offline
  • Posts: 924
  • Last login:February 13, 2023, 10:48:26 am
Re: Scratch Build Donkey Kong MAME Cab
« Reply #43 on: October 08, 2009, 07:46:28 am »
Thanks for the kudos guys.

I don't plan to paint the inside of the speaker slots. My painting skills suck and I can just see myself painting the slots black and bleeding black paint onto the blue front panel, then having to touch that up. No thanks...

Here's an easy way to get your black slots, if you can get behind the grille: put painter's tape over your grille, and spray it from the back. Just make sure the tape is pressed on well, and spray lightly with a few coats, from a few directions (stay 12" away if you can). You should get the effect you need.
Man, will my cab EVER be finished?

Silas (son of Silas)

  • Trade Count: (0)
  • Full Member
  • ***
  • Offline Offline
  • Posts: 524
  • Last login:July 04, 2024, 06:28:39 am
Re: Scratch Build Donkey Kong MAME Cab
« Reply #44 on: October 09, 2009, 04:02:35 am »
That's looking really good. Job nicely done!

I have always tinkered with the idea of a scratch build look-alike cab, but worried that if i didn't get it quite right it would bug me. I think you've pulled off the allusion really well.
" ਜਿਹੜਾ ਲਾਓ ਜਰਦਾ ਉਹ ਸੌ ਸਾਲ ਨੰਈ ਮਰਦਾ " (he who chews tobacco would live to be a hundred )

My Project MAME clone
Who is Silas?

Sledgehammer

  • Trade Count: (0)
  • Full Member
  • ***
  • Offline Offline
  • Posts: 50
  • Last login:March 30, 2017, 04:48:08 pm
  • "Trust me, I know what I'm doing..."
Re: Scratch Build Donkey Kong MAME Cab (completed 10/23/09)
« Reply #45 on: October 23, 2009, 09:34:46 pm »
Ok after a long wait for my bezel artwork, my cab is now 99% complete (I say 99% because I have a few upgrades to make like accessible usb ports for my NES and Genesis modified controllers).

Here are some shots now that I have the bezel art in.


The flash on this shot makes the bezel color look faded but it's not...it's very bright....


I had fun building this cab and maybe one day hope to build another scratch built replica...maybe a Ms. Pac Man or something like that. For now I think I am going to get started on a Pinball cab with a 40" LCD to run some Future Pinball.

I hope you guys enjoyed my thread about this build.

Jason

Chicken McNobody

  • Trade Count: (+4)
  • Full Member
  • ***
  • Offline Offline
  • Posts: 171
  • Last login:April 30, 2021, 01:01:06 pm
  • I poop too much. . .
Re: Scratch Build Donkey Kong MAME Cab (completed 10/23/09)
« Reply #46 on: October 23, 2009, 10:56:38 pm »
Looks familiar. . .

I love at as you could probably guess, I'm glad the whole thing came together as you had hoped in the end. 

Great job!

Sledgehammer

  • Trade Count: (0)
  • Full Member
  • ***
  • Offline Offline
  • Posts: 50
  • Last login:March 30, 2017, 04:48:08 pm
  • "Trust me, I know what I'm doing..."
Re: Scratch Build Donkey Kong MAME Cab (completed 10/23/09)
« Reply #47 on: October 24, 2009, 12:06:21 am »
Looks familiar. . .

I love at as you could probably guess, I'm glad the whole thing came together as you had hoped in the end. 

Great job!


Thanks again for your help with the CP artwork!!!

Jason

IG-88

  • Trade Count: (+7)
  • Full Member
  • ***
  • Offline Offline
  • Posts: 2042
  • Last login:July 06, 2025, 09:21:45 am
  • Posts: 48,764
Re: Scratch Build Donkey Kong MAME Cab (completed 10/23/09)
« Reply #48 on: October 24, 2009, 10:08:35 pm »
Got a pic of the bartop and fullsize side by side?
"I know what a HAL 9000 is... I was wondering if HAL 7600 was his retarded cousin or something..."
-HarumaN

Sledgehammer

  • Trade Count: (0)
  • Full Member
  • ***
  • Offline Offline
  • Posts: 50
  • Last login:March 30, 2017, 04:48:08 pm
  • "Trust me, I know what I'm doing..."
Re: Scratch Build Donkey Kong MAME Cab (completed 10/23/09)
« Reply #49 on: October 25, 2009, 12:57:09 am »
Got a pic of the bartop and fullsize side by side?

Sure, here is a pic....kinda blurry but it gives you an idea of the bartop size vs. the full size cab.

J

danny_galaga

  • Grand high prophet of the holy noodle.
  • Trade Count: (+1)
  • Full Member
  • ***
  • Offline Offline
  • Posts: 8522
  • Last login:Today at 01:09:20 am
  • because the mail never stops
    • dans cocktail lounge
Re: Scratch Build Donkey Kong MAME Cab (completed 10/23/09)
« Reply #50 on: October 25, 2009, 01:21:39 am »

Excellent work! Certainly looks the part (",)


ROUGHING UP THE SUSPECT SINCE 1981

hayabusa_fmw

  • [Provisionally returned]
  • Trade Count: (0)
  • Full Member
  • ***
  • Offline Offline
  • Posts: 130
  • Last login:December 30, 2014, 03:24:56 pm
  • [Provisionally returned]
Re: Scratch Build Donkey Kong MAME Cab (completed 10/23/09)
« Reply #51 on: October 25, 2009, 12:37:43 pm »
damn that's an amazing job you did there sir! , Simply wow ,

have fun!
[Provisionally returned]

jeff412

  • Trade Count: (0)
  • Full Member
  • ***
  • Offline Offline
  • Posts: 101
  • Last login:April 04, 2012, 09:53:56 pm
Re: Scratch Build Donkey Kong MAME Cab (completed 10/23/09)
« Reply #52 on: October 27, 2009, 09:46:43 am »
What are the dimensions on the speaker grill slots?  I've got an old cabinet that I need to redo the front of the CP box.

Jeff

Sledgehammer

  • Trade Count: (0)
  • Full Member
  • ***
  • Offline Offline
  • Posts: 50
  • Last login:March 30, 2017, 04:48:08 pm
  • "Trust me, I know what I'm doing..."
Re: Scratch Build Donkey Kong MAME Cab (completed 10/23/09)
« Reply #53 on: October 27, 2009, 11:16:28 am »
Jakobud.com has a drawing of the DK speaker grill slots with dimensions

If you have trouble finding it just PM me and I will email you the file.

Jason

ccmathome

  • Trade Count: (0)
  • Full Member
  • ***
  • Offline Offline
  • Posts: 179
  • Last login:February 25, 2021, 12:40:52 am
Re: Scratch Build Donkey Kong MAME Cab (completed 10/23/09)
« Reply #54 on: October 27, 2009, 01:48:13 pm »
I used to have that cab but it was converted to excitebike had to toss the cab it was so beat man that thing was heavy still have the vs. excitebike board and marquee paid 20 for it anyway looks like the real thing
« Last Edit: October 27, 2009, 01:52:22 pm by ccmathome »