Main Restorations Software Audio/Jukebox/MP3 Everything Else Buy/Sell/Trade
Project Announcements Monitor/Video GroovyMAME Merit/JVL Touchscreen Meet Up Retail Vendors
Driving & Racing Woodworking Software Support Forums Consoles Project Arcade Reviews
Automated Projects Artwork Frontend Support Forums Pinball Forum Discussion Old Boards
Raspberry Pi & Dev Board controls.dat Linux Miscellaneous Arcade Wiki Discussion Old Archives
Lightguns Arcade1Up Try the site in https mode Site News

Unread posts | New Replies | Recent posts | Rules | Chatroom | Wiki | File Repository | RSS | Submit news


Author Topic: Nvts’s mountain’s Jukebox (revealed!)  (Read 16179 times)

0 Members and 1 Guest are viewing this topic.

Nvts

  • Trade Count: (0)
  • Full Member
  • ***
  • Offline Offline
  • Posts: 76
  • Last login:September 15, 2010, 02:30:14 pm
Nvts’s mountain’s Jukebox (revealed!)
« on: October 10, 2008, 11:26:24 am »

I saw Mountains build of his Jukebox, and I thought I would like to make one to give to my girlfriend for Christmas.  She knows I am working on a project for her, but does not have a clue what it is.  I told her it was a monkey powered beer tap.

I’m not that particularly handy and have never made much, but I can follow instructions and have some tools.  I haven’t done much routing at all, but I have a nifty little attachment for my dremmel that sounds like it should help with the detail work a lot.  I am a bit concurred that this is out of my league, but I recall that I had the same sort of trepidation when I pulled the rear suspension out of the vette and rebuilt it.  It all worked out well, and this is much less dangerous to mess up.  ;)  I expect the same kind of documentation process that I did with that, so we should get the How To Build A Mountain Bartop fairly well documented between all the builds.

I just got the last part that was slowing the planning down and I’m ready to start cutting stuff up.  I just got the speakers last night and hooked my ipod up to them, and I’m quite impressed with the sound that they had without having a subwoofer in them.

The basic plan is the same as javeryh’s, as I have no need for the rotating base either.  I didn’t get a mini motherboard, I just went with a cheap but fairly ok system on craigslist, and will shove a bigger HD in for media.  I also believe that I will toss in an AM/FM radio device so she can listen to the radio as well. I plan to have larger speakers inside than the soundbars, as the system will not be plugged into a better set of speakers often.  Between bigger speakers, the larger MB, seeing how both Mountain and javeryh both had to route too much on the sides of the display, and wanting to have more room to work with, I am planning to make mine a little larger than theirs ended up.  I believe mine will be 24x17x12 ( vs. Mountains 20.75x16x11.5)

I have no idea what software I’ll end up using yet, but I figure that I can always go in later on and change it out.  I plan to have the audio ports poking through the back, and have a door that lets me poke around inside, use a CD Rom, as well as hooking up the other computer stuff for temporary other use


Parts List

Speakers - Klipsch Groove PM20 2.0 Speaker System- Black - $88
Computer – small form Dell OptiPlex GX260 – Craigslist - $85
ELO Touchscreen ET1545L – Ebay - $99
Powermate volume knob – Amazon - $36
Groovy Game Gear NovaMatrix Marquee Light (with wire harness) - $29
640 GB HD – Interweb - $76
TMolding – tmolding.com - $22
Plexiglass – Black 2025 1/8" 24" x 24" Acrylic - usplastic.com - $21
Wood, and stuff.

Here is the plan I had.  The extra inch I have under the volume knob looks oddly drawn, but I couldn’t get all the dimensioning stuff to attach to a rectangle with rounded corners, and I didn’t feel like mess with it any longer.  I haven’t cut anything yet, so I’ll take suggestions. I expect a lot of questions when I get to the wiring section unless javeryh keeps up with the steps that Mountain omitted.

« Last Edit: January 01, 2009, 06:12:09 pm by Nvts »
"A common mistake that people make when trying to design something completely foolproof was to underestimate the ingenuity of complete fools."

Martijn

  • Trade Count: (0)
  • Full Member
  • ***
  • Offline Offline
  • Posts: 822
  • Last login:January 25, 2024, 10:34:36 am
  • Akira!
    • ModMyBox
Re: Nvts’s adaption of javeryh’s adaption of mountain’s Jukebox
« Reply #1 on: October 10, 2008, 11:35:29 am »
Lol, another one , Good luck !  :)

javeryh

  • Trade Count: (+1)
  • Full Member
  • ***
  • Offline Offline
  • Posts: 7959
  • Last login:June 19, 2025, 11:24:08 am
Re: Nvts’s adaption of javeryh’s adaption of mountain’s Jukebox
« Reply #2 on: October 10, 2008, 11:44:22 am »
Sweet!  I'm like the middleman or something... I can't wait to see this thing unfold!   :cheers:

Franco B

  • Trade Count: (+10)
  • Full Member
  • ***
  • Offline Offline
  • Posts: 3766
  • Last login:February 15, 2024, 09:14:06 am
Re: Nvts’s adaption of javeryh’s adaption of mountain’s Jukebox
« Reply #3 on: October 10, 2008, 12:00:05 pm »
Awesomes  :)

Good luck! Im building mine for my girlfriend for christmas too, heres hoping we get some extra eggnog on christmas night  ;)

Nvts

  • Trade Count: (0)
  • Full Member
  • ***
  • Offline Offline
  • Posts: 76
  • Last login:September 15, 2010, 02:30:14 pm
Re: Nvts’s adaption of javeryh’s adaption of mountain’s Jukebox
« Reply #4 on: October 13, 2008, 10:12:04 pm »
Updates are more for my own blogging so that I can kind of keep track...
Saturday. Make a sawboard (as seen in the woodworking forum).  and get the template cut


Practicing my drawing skills on the template.  Like my arc maker?  Wooden rulers are great.

Cutting the template out

I don’t have a circle jig, but I do have the attachment for my dremmel.  Might as well try it out.  It worked fairly well.


Time to make the frame parts.


I did the same thing on both the front and back.  I got farther away from my arc cut the farther into it I go, and the scraps show it.

Set up for cleaning the edges.

And away we go.

All done

I don’t have foerstner blades, but I do have a hole cutting kit.

They sure make a mess


Monday.  Cut a bottom, then make a couple spacers out of the wood I have around.  I would have liked a bit larger pieces, but I use what I have….

Time to put the whole thing together.  Its hard to hold everything alone, ain’t it?

It’s ready.

The first side 1/8 sheet goes on.  Much chaos entails.   I hope it holds.

« Last Edit: October 16, 2008, 09:53:40 am by Nvts »
"A common mistake that people make when trying to design something completely foolproof was to underestimate the ingenuity of complete fools."

Nvts

  • Trade Count: (0)
  • Full Member
  • ***
  • Offline Offline
  • Posts: 76
  • Last login:September 15, 2010, 02:30:14 pm
Re: Nvts’s adaption of javeryh’s adaption of mountain’s Jukebox
« Reply #5 on: October 14, 2008, 08:03:32 pm »
The first layer is done, and seems like it would hold just fine. I have some carpet tacks though, might as well make sure it will hold.


I routered the skin off


Trimmed the edges smooth, sanded the sides.  All ready for the second layer.


I had a bunch of trouble getting all four corners covered this time. Is there a trick to getting the thing lined up straight?  I had troubles on both layers, but more on the second layer. It’s on though.

I ended up having a 1/4 inch space on one corner that I slapped a little wood filler on, though I shouldn't need it.


Can't wait to start with the infamous front panel tomorrow.   :D
« Last Edit: October 16, 2008, 10:00:58 am by Nvts »
"A common mistake that people make when trying to design something completely foolproof was to underestimate the ingenuity of complete fools."

mountain

  • Trade Count: (+9)
  • Full Member
  • ***
  • Offline Offline
  • Posts: 1205
  • Last login:January 29, 2025, 08:31:47 am
    • Mountain Jukeboxes
Re: Nvts’s adaption of javeryh’s adaption of mountain’s Jukebox
« Reply #6 on: October 14, 2008, 10:24:44 pm »
Cool! Another link to send to my Dad ;)

Looking forward to watching you build this thing. Of course  :pics would make it much easier to track

Nvts

  • Trade Count: (0)
  • Full Member
  • ***
  • Offline Offline
  • Posts: 76
  • Last login:September 15, 2010, 02:30:14 pm
Re: Nvts’s adaption of javeryh’s adaption of mountain’s Jukebox
« Reply #7 on: October 15, 2008, 08:56:42 am »
yeah, I will, it's just that I took my external DVD player to someones house and I take my pictures on my DVD camcorder.  So far though, they look exactly like the two built before me, except a bit less polished  :cheers:
"A common mistake that people make when trying to design something completely foolproof was to underestimate the ingenuity of complete fools."

Nvts

  • Trade Count: (0)
  • Full Member
  • ***
  • Offline Offline
  • Posts: 76
  • Last login:September 15, 2010, 02:30:14 pm
Re: Nvts’s adaption of javeryh’s adaption of mountain’s Jukebox
« Reply #8 on: October 15, 2008, 09:53:01 pm »

Tonight's work.  Trim off the second side skin to show the finished shell


Make the front panel.  (just like making the front and back frames, so no pics)


Used my square to make quick lines and gutted out the frame


rough cut the front and back panels off


Then I cut a board for the motherboard to mount on to.

Pictures tomorrow.  really. :banghead:  I can't believe I own four computers, and they are all too old to have a dvd drive.

I do have a issue perhaps.  My bit lost the bearing, and chewed a little bit of the edge away.  It looks huge in the picture, but its actually really tiny.  Think it will affect anything?


« Last Edit: October 16, 2008, 10:28:00 am by Nvts »
"A common mistake that people make when trying to design something completely foolproof was to underestimate the ingenuity of complete fools."

Nvts

  • Trade Count: (0)
  • Full Member
  • ***
  • Offline Offline
  • Posts: 76
  • Last login:September 15, 2010, 02:30:14 pm
Updated my posts now that I have pics.  Adding in some computer gut shots.


"A common mistake that people make when trying to design something completely foolproof was to underestimate the ingenuity of complete fools."

javeryh

  • Trade Count: (+1)
  • Full Member
  • ***
  • Offline Offline
  • Posts: 7959
  • Last login:June 19, 2025, 11:24:08 am
Finally some pics!  Looks great!  You are moving fast too.  As for the part where the router got away from you, I think some bondo would do the trick.  I'd put some on there and sand it flush with the front and sides.   :cheers:

Martijn

  • Trade Count: (0)
  • Full Member
  • ***
  • Offline Offline
  • Posts: 822
  • Last login:January 25, 2024, 10:34:36 am
  • Akira!
    • ModMyBox
Great work, as i want to build one myself someday, its great to see more ways of doing it :cheers:

Its a race  ;D

Kaytrim

  • I'm too nice a guy
  • Trade Count: (+4)
  • Full Member
  • ***
  • Offline Offline
  • Posts: 2095
  • Last login:September 22, 2015, 04:11:30 pm
Great work, as i want to build one myself someday, its great to see more ways of doing it :cheers:

Its a race  ;D

I have a different way of doing this stage.  As soon as I have some time I need to snap some pics and start updating my thread.

Nvts

  • Trade Count: (0)
  • Full Member
  • ***
  • Offline Offline
  • Posts: 76
  • Last login:September 15, 2010, 02:30:14 pm
I spent a lot of time trying to get stuff done, but nothing really got done.  <sigh>

How do you jig up cleaning the inside of the frame straight? 
"A common mistake that people make when trying to design something completely foolproof was to underestimate the ingenuity of complete fools."

javeryh

  • Trade Count: (+1)
  • Full Member
  • ***
  • Offline Offline
  • Posts: 7959
  • Last login:June 19, 2025, 11:24:08 am
How do you jig up cleaning the inside of the frame straight? 

I was wondering how you were going to do it myself.  Before removing the material I used my router and circle cutting jig to make the circle part nice.  Now there's nothing to pivot the circle cutting jig on.  You can still do it but you'll have to make a 1/2 circle pattern and use a pattern cutting bit - that's how I did the sides and bottom (using a straight edge as my patten).   :cheers:

Nvts

  • Trade Count: (0)
  • Full Member
  • ***
  • Offline Offline
  • Posts: 76
  • Last login:September 15, 2010, 02:30:14 pm
I'm still having trouble visualizing how to clean the sides off.  You end up just having something the same height as the shell next to it?
"A common mistake that people make when trying to design something completely foolproof was to underestimate the ingenuity of complete fools."

javeryh

  • Trade Count: (+1)
  • Full Member
  • ***
  • Offline Offline
  • Posts: 7959
  • Last login:June 19, 2025, 11:24:08 am
I'm still having trouble visualizing how to clean the sides off.  You end up just having something the same height as the shell next to it?

Nope - the attached pictures show how I did it.  You will have to reposition the clamps as you move along the straight edge with the router (and use more than the three I have shown) since the clamps will be in the way as you go.  Hopefully this clears it up.

You can do the same thing for the curved part but you will have to make a template for the router bit to ride against since you can't just use the circle cutter.

Nvts

  • Trade Count: (0)
  • Full Member
  • ***
  • Offline Offline
  • Posts: 76
  • Last login:September 15, 2010, 02:30:14 pm
that is what I did at first, but it seemed too flimsy and things got messed up a bit.  I ended up doing both, kinda.   I made a surface that was the same height, roughly, and clamped a board on to it, but it didn't get as clean as you guys did.  Good thing no one will ever see it.

Off to start working on the front panel.
"A common mistake that people make when trying to design something completely foolproof was to underestimate the ingenuity of complete fools."

Nvts

  • Trade Count: (0)
  • Full Member
  • ***
  • Offline Offline
  • Posts: 76
  • Last login:September 15, 2010, 02:30:14 pm
Feel like it was a good day. 

De-cased the monitor


There sure are a lot of these clips.  They don't need to be reused, right?


Methinks that I will not like this wire thingie...


I made my panel jig

and since I have a circle jig for the dremmel, and not the router, I used the dremmel.  I feel much more in control of it then the router.


The dremmel cant quite do a 2 inch radius, so I changed it to it's minimum.


I cut out the speaker hole

and the monitor hole, so now it's all out, and looking great.  I did a once over with the dremmel with a sanding drum to smooth everything down a little, now its time to hand sand everything perfect.

"A common mistake that people make when trying to design something completely foolproof was to underestimate the ingenuity of complete fools."

Martijn

  • Trade Count: (0)
  • Full Member
  • ***
  • Offline Offline
  • Posts: 822
  • Last login:January 25, 2024, 10:34:36 am
  • Akira!
    • ModMyBox
going fast !


Nvts

  • Trade Count: (0)
  • Full Member
  • ***
  • Offline Offline
  • Posts: 76
  • Last login:September 15, 2010, 02:30:14 pm
Blah, I screwed up. 

I trying to make life easier by just making the entire unit 24 inches tall. (the width of the precut MDF at the store), I now have an issue with the plastic sheet.  since it started 24 inches tall, adding the two 1/8 inch outer shell sheets, now its ~1/4 over 24 inches..  I should be able to router the bottom of the frame down a smidge to make it fit better, I would imagine.   :censored:
"A common mistake that people make when trying to design something completely foolproof was to underestimate the ingenuity of complete fools."

Nvts

  • Trade Count: (0)
  • Full Member
  • ***
  • Offline Offline
  • Posts: 76
  • Last login:September 15, 2010, 02:30:14 pm
I managed to shorten the shell. 

I took apart the volume knob.
The top knob slides off, but has a little bit of glue stuff in there.  I took a vice grips and pulled the plastic spacer off.

there is a felt washer in between and a washer and nut holding the pot to the shell.

I slide a blade between the plastic base and the metal body.

The next bit took some force.  the two halves of the knob are not glued, but are quite snug.  I stuck the smaller part into a vice, and a big plumber wrench on the large part, and managed to get the two parts apart.  The wire then slips out of the grove in the shell.


Traced out the pattern, and cut the backing off the spots, sanded them up, and glued it together.


Where can you pick up Nexus polish local?  I can swear that I saw it somewhere before, but I have not seen it in the places that I have been looking.
« Last Edit: October 21, 2008, 06:28:06 pm by Nvts »
"A common mistake that people make when trying to design something completely foolproof was to underestimate the ingenuity of complete fools."

javeryh

  • Trade Count: (+1)
  • Full Member
  • ***
  • Offline Offline
  • Posts: 7959
  • Last login:June 19, 2025, 11:24:08 am
I got my Novus online for $18 or so (three 8oz bottles).  I don't know where they would sell it locally but you could try NAPA or some other car parts store - that's where I go to get high grit sandpaper.

Your project is looking good - sorry to hear about your measuring mishap.  Is there enough room at the bottom opening to route away material for the speaker grill?   I also wish I used your method of taking the powermate apart.  Mine is completely ripped to shreds and I don't know how to solder.  :cheers:
« Last Edit: October 22, 2008, 11:28:24 am by javeryh »

Neverending Project

  • Trade Count: (+3)
  • Full Member
  • ***
  • Offline Offline
  • Posts: 851
  • Last login:April 06, 2015, 10:07:43 pm
    • Arcade Fixer
I found Novus at a local TAP Plastics. Not sure if they have one near you, but I wouldn't have thought to look there. Just happened upon it.

Nvts

  • Trade Count: (0)
  • Full Member
  • ***
  • Offline Offline
  • Posts: 76
  • Last login:September 15, 2010, 02:30:14 pm
I read that moto shops have it to keep helmets clean.

Today's update:
Time to make a mess.  Plexi routering is messing and stinky.


Added in the bevels.  I was worried about routering the plexi, but it was easy, fast, and looks like it worked great.


Got the  bevels done and made the standard pose.


I got about a third done with the routering behind the plexi.  This scares me as I really dont want to mess up here.  I'll get close, and hand sand the rest down, methinks.


"A common mistake that people make when trying to design something completely foolproof was to underestimate the ingenuity of complete fools."

javeryh

  • Trade Count: (+1)
  • Full Member
  • ***
  • Offline Offline
  • Posts: 7959
  • Last login:June 19, 2025, 11:24:08 am
You work so fast.  You are going to finish before I do for sure.

Lookin' good.   :afro:

Nvts

  • Trade Count: (0)
  • Full Member
  • ***
  • Offline Offline
  • Posts: 76
  • Last login:September 15, 2010, 02:30:14 pm
I have a goodly amount of time I can work on.  I don't work all that fast.  Plus, I can't finish before you, as I don't quite know how to finish it yet.  ;D

I found the Novus kit at the local Harley place, $20.  Cheapest I could find online was like $25, with shipping.

Today's update has no pics, as I am working on the backside of the panel with the monitor mount, and me and my dremmel are having too much fun to stop
"A common mistake that people make when trying to design something completely foolproof was to underestimate the ingenuity of complete fools."

Nvts

  • Trade Count: (0)
  • Full Member
  • ***
  • Offline Offline
  • Posts: 76
  • Last login:September 15, 2010, 02:30:14 pm
Still working on the back of the front panel.  I think if I was to make another one, I would clamp the plexi to the panel, and route the inside stuff.  Then I could do all the detail work without worrying about the plexi.  Then only glue it and shape the outside edge once the back was ready.  Is there a reason that would not work that I am missing?

I now have it ready to start the buffing.  Slow going.
"A common mistake that people make when trying to design something completely foolproof was to underestimate the ingenuity of complete fools."

DaOld Man

  • Trade Count: (+4)
  • Full Member
  • ***
  • Offline Offline
  • Posts: 5158
  • Last login:May 24, 2025, 09:57:44 pm
  • Wheres my coffee?
    • Skenny's Outpost
looking real good  Nvts!!!

I am sure glad Mountain isnt charging a royalty fee for all these copies of his juke!

(oops, maybe I shouldnt say that. Disregard this post Mountain!)

mountain

  • Trade Count: (+9)
  • Full Member
  • ***
  • Offline Offline
  • Posts: 1205
  • Last login:January 29, 2025, 08:31:47 am
    • Mountain Jukeboxes
looking real good  Nvts!!!

I am sure glad Mountain isnt charging a royalty fee for all these copies of his juke!

(oops, maybe I shouldnt say that. Disregard this post Mountain!)


Nvts

  • Trade Count: (0)
  • Full Member
  • ***
  • Offline Offline
  • Posts: 76
  • Last login:September 15, 2010, 02:30:14 pm
Couple days of sanding the plexi, and I'm now on the verge of using the Nexus polish.  The mecromesh Kaytrim posted on javeryh's post worked wonderfully.  Every different grit I used made me think it can't get any better looking, until I started on the next one.

I can't wait to see the polish work, and get some real work done.  All this detail work is annoying.  :P
"A common mistake that people make when trying to design something completely foolproof was to underestimate the ingenuity of complete fools."

Kaytrim

  • I'm too nice a guy
  • Trade Count: (+4)
  • Full Member
  • ***
  • Offline Offline
  • Posts: 2095
  • Last login:September 22, 2015, 04:11:30 pm
I'm glad you were to use the micromesh sanding cloths.  I use them when ever I put a minor scratch in the pleiglas tops on my sticks.  They have saved me quite a few times.  I need to get myself some of that polish though as there is still a slight haze after the last grit of the Micromesh.

Nvts

  • Trade Count: (0)
  • Full Member
  • ***
  • Offline Offline
  • Posts: 76
  • Last login:September 15, 2010, 02:30:14 pm
I finished with the plexi detail work, and it's an amazing difference that pictures cant really show the amount of improvement.  But I can try.


Next up, I was trying to fart around with making the backing of the monitor and the spacing for the touch screen wires.  I decided to not even fart with the spacing, and put a small strip of weatherstripping in as my spacer.  It appears to work great.


I then tried out DaOld Man's trick of putting the motherboard mounted onto the back of the monitor.  I added in some nuts to keep a little space between the two.


Now to read the threads again, and see what the next steps are.  I know I need to router a little room for the monitor on the shell walls, and I need to actually secure the monitor to the panel, but it's a job for tomorrow.
"A common mistake that people make when trying to design something completely foolproof was to underestimate the ingenuity of complete fools."

DaOld Man

  • Trade Count: (+4)
  • Full Member
  • ***
  • Offline Offline
  • Posts: 5158
  • Last login:May 24, 2025, 09:57:44 pm
  • Wheres my coffee?
    • Skenny's Outpost
Looking good nvts!
Im off my looong stretch of midnights, and tomorrow is supposed to be beautiful weather wise, so I am going to try to knock out some major steps on my juke.

Nvts

  • Trade Count: (0)
  • Full Member
  • ***
  • Offline Offline
  • Posts: 76
  • Last login:September 15, 2010, 02:30:14 pm
lets see.  this weekend I didn't get to work on it much, but after working on the front panel so long, even little things feel like actual progress.

I made the volume plexi spacer.  I didn't bother gluing a washer to the plexi, I just used two washers. it was a real quick item to make, especially with a dremmel to sand the excess off.


Got rid of the area for the volume guts.  the hole bit (taped off to measure depth) and the dremmel cleared the bit that was left.


I didn't know that I needed to push the volume guts through the plexi, so I needed to dremmel a little of the plexi out of the way.  I made the cut for the knob on the volume guts.  The spacer is not pretty, but works just fine, and no one will ever see it.


I then dremmel sanded a few areas inside the shell to fit the monitor parts inside the shell.  It's about ready to glue the front panel to the shell.

I then made a template for the marquee plexi.

"A common mistake that people make when trying to design something completely foolproof was to underestimate the ingenuity of complete fools."

javeryh

  • Trade Count: (+1)
  • Full Member
  • ***
  • Offline Offline
  • Posts: 7959
  • Last login:June 19, 2025, 11:24:08 am
Looking good!  I like seeing the different ways people are approaching the same problems...   :cheers:

Nvts

  • Trade Count: (0)
  • Full Member
  • ***
  • Offline Offline
  • Posts: 76
  • Last login:September 15, 2010, 02:30:14 pm
Yesterday I ordered the laminate ($52 <sigh>) and some speaker cloth.  I picked up a piece of clear Lexan Polycarbonate from Home depot to made the marquee holders.  I was able to get the front and back from the same 12x24 sheet. Took a bit longer than I expected, but since this was a part that can be visible, I took my time on it.


I cut out the pieces a bit larger than I needed, and dremmel sanded them down to fit better.  I used a marker to color the edge where I needed to trim, and sanded only till the color was gone.  That allowed me to do very small changes.
It's all in now, and ready for some art. :)


I posted a request for artwork in the artwork section.
My girlfriend is a big fan of Jackie Chan, the Simpsons, and beer.  I was thinking it would be neat to scan one of her autographed items from Jackie, and perhaps a shot of Homer and Jackie fighting, or one of Jackie strangling homer like Bart or something.
"A common mistake that people make when trying to design something completely foolproof was to underestimate the ingenuity of complete fools."

DaOld Man

  • Trade Count: (+4)
  • Full Member
  • ***
  • Offline Offline
  • Posts: 5158
  • Last login:May 24, 2025, 09:57:44 pm
  • Wheres my coffee?
    • Skenny's Outpost
Looking good Nvts!

drawfull

  • Trade Count: (0)
  • Full Member
  • ***
  • Offline Offline
  • Posts: 463
  • Last login:May 18, 2012, 09:30:14 am
Must've missed this one somehow - it looks sweet nvts, great job on the plexi routing.

I either didn't read the thread properly, or it's not been mentioned - have you considered what software you're going to use? Forgive me if it's in the first thread or something, but I can't seem to see all the way back when I write this :P

Keep up the great work, can't wait to see the finished product!

Nvts

  • Trade Count: (0)
  • Full Member
  • ***
  • Offline Offline
  • Posts: 76
  • Last login:September 15, 2010, 02:30:14 pm
I either didn't read the thread properly, or it's not been mentioned - have you considered what software you're going to use? Forgive me if it's in the first thread or something, but I can't seem to see all the way back when I write this :P
I have not really worried about the software that much.  I figure that it's one of those things I can test out more after it is completed.  I have a hard deadline of Christmas. ;)  I can always change the software once I try it out more, and my girlfriend tries some of them out.  I currently have Freebox on there, I believe.
"A common mistake that people make when trying to design something completely foolproof was to underestimate the ingenuity of complete fools."

Nvts

  • Trade Count: (0)
  • Full Member
  • ***
  • Offline Offline
  • Posts: 76
  • Last login:September 15, 2010, 02:30:14 pm
I haven't been working on mine all that much, but I have been looking into getting a panel for the back.  Would the 1/8 pressed pegboard panel that I used for the shell be sturdy enough to do the back panel?  the thinnest wood / MDF I can find is 1/4, and I would like the t-molding to work like Mountains did.
"A common mistake that people make when trying to design something completely foolproof was to underestimate the ingenuity of complete fools."

MameDownUnder

  • Trade Count: (0)
  • Full Member
  • ***
  • Offline Offline
  • Posts: 44
  • Last login:October 31, 2010, 03:46:23 pm
    • Mamer DownUnder
im making something similar to mountains as well, although mine is alot bigger as i have a 19" screen sub and 2 speakers

my question is what are you using for the grill at the front? im a little stuck as to what to use?

Cheers

DaOld Man

  • Trade Count: (+4)
  • Full Member
  • ***
  • Offline Offline
  • Posts: 5158
  • Last login:May 24, 2025, 09:57:44 pm
  • Wheres my coffee?
    • Skenny's Outpost
I haven't been working on mine all that much, but I have been looking into getting a panel for the back.  Would the 1/8 pressed pegboard panel that I used for the shell be sturdy enough to do the back panel?  the thinnest wood / MDF I can find is 1/4, and I would like the t-molding to work like Mountains did.

Im thinking of doing the same for the back on mine. I have 1/8" hardwood that I plan to double up for the skin. I may double it for the back too, make it a 1/4" thick.
Im also planning to laminate it like javeryh did on his, so that should make it a lot stronger.
Im hoping one 1/8" piece with the laminate will be strong enough.

Nvts

  • Trade Count: (0)
  • Full Member
  • ***
  • Offline Offline
  • Posts: 76
  • Last login:September 15, 2010, 02:30:14 pm
I ended up finding some 1/8th plywood for the back, and I am still working on it, but I have a little more progress finally.

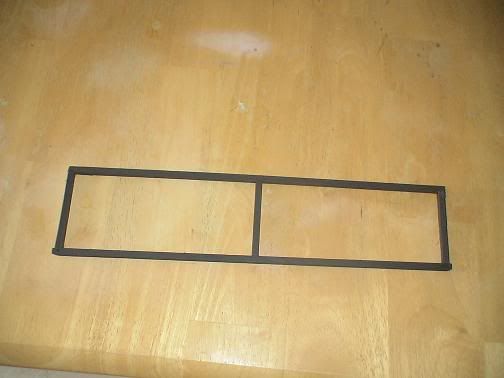
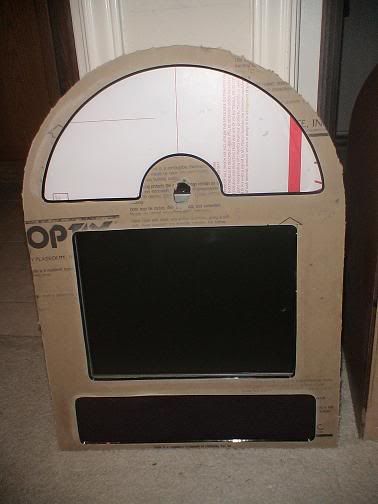
I went with a 1/4 frame for the speaker grill.  I didn't bother with the metal mesh, as I don't like how they look as much as plain speaker cloth.


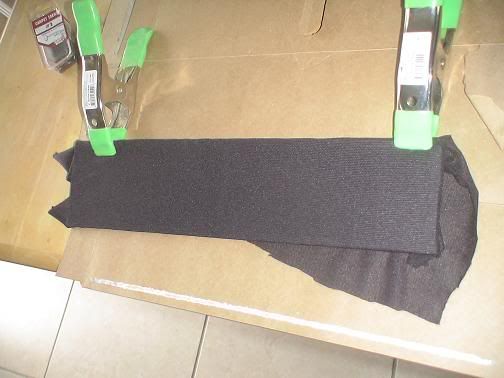
I used some speaker cloth and some spray adhesive that I had to cover the frame and used a couple carpet tacks to hold it onto the panel a little better, though I doubt it would have moved.


I then mounted the glass


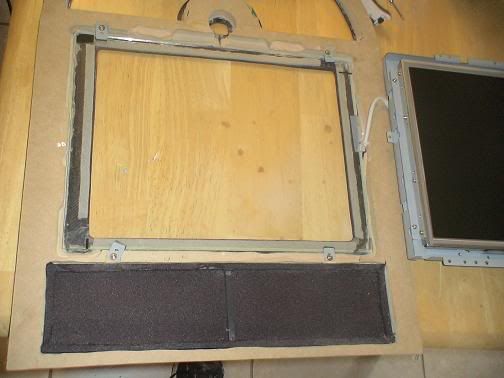
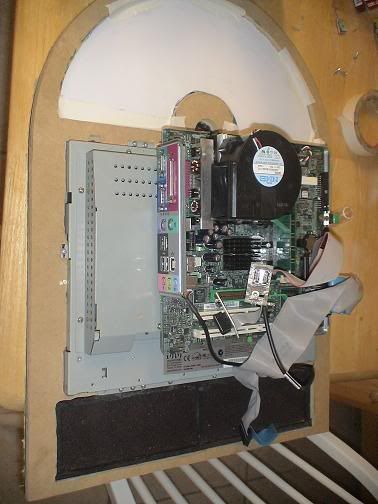
Followed by the rest of the screen, and the motherboard spaced from it as I tested earlier.


I have the front ready to go other than artwork.  Really wish I was better at that stuff so I could have gotten that out of the way as well before assembling it, but oh well.  I'll likely change it once the GF sees it anyway, right? ;) 

I do notice that the screen opening is just a little bit too big, and you can see a little of the silver strip along the edges.  ah well.


The money shot.


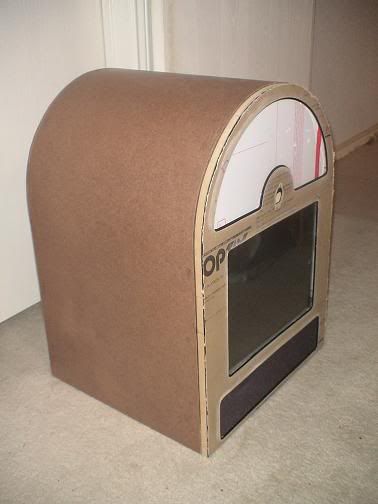
I'm working on something for the back panel as well before I mount the shell to it that should be really snazzy. 

To Do list

Figure out what parts to get and order a FrontX panel
Finish back of shell to handle back panel idea.
Mount front panel to shell.
add laminate
Make Tmolding slot
Add fan
Add  speakers
Add light
Add light box
Add slots for USB connections on the side
Find a copy of XP and reformat new drive and hope the IDE <=> SATA adapter I found works
Mount HD
Try to understand how to replace the start button, make an external speaker switch, power stuff, and other assorted wiring.
Make heat vents like drawfull did on his. (wish I had a router template tool like he showed...)
Finish marquee
Mount back
Work on software

15 other things I forgot.


"A common mistake that people make when trying to design something completely foolproof was to underestimate the ingenuity of complete fools."

DaOld Man

  • Trade Count: (+4)
  • Full Member
  • ***
  • Offline Offline
  • Posts: 5158
  • Last login:May 24, 2025, 09:57:44 pm
  • Wheres my coffee?
    • Skenny's Outpost
Looking great NVTS!

I didnt know the glass would come off the monitor like that.

Nvts

  • Trade Count: (0)
  • Full Member
  • ***
  • Offline Offline
  • Posts: 76
  • Last login:September 15, 2010, 02:30:14 pm
From what I understand it should be stuck with some sort of double sided tape type stuff.  Mine was never all that stuck, though it has a strip of something between the glass and the screen.
"A common mistake that people make when trying to design something completely foolproof was to underestimate the ingenuity of complete fools."

drawfull

  • Trade Count: (0)
  • Full Member
  • ***
  • Offline Offline
  • Posts: 463
  • Last login:May 18, 2012, 09:30:14 am
Make heat vents like drawfull did on his. (wish I had a router template tool like he showed...)

The one we used came from rutlands

http://www.rutlands.co.uk/cgi-bin/psProdDet.cgi/VARIJIG

Looks great nvts by he way!

Nvts

  • Trade Count: (0)
  • Full Member
  • ***
  • Offline Offline
  • Posts: 76
  • Last login:September 15, 2010, 02:30:14 pm
I played around in Gimp and posted a prelim marquee, if anyone has any suggestions.
"A common mistake that people make when trying to design something completely foolproof was to underestimate the ingenuity of complete fools."

edge

  • Trade Count: (0)
  • Full Member
  • ***
  • Offline Offline
  • Posts: 370
  • Last login:May 08, 2025, 09:08:47 am
  • AttractMode and GroovyArcade rock!
Re: Nvts’s mountain’s Jukebox (12/5 Pics. 12/6 Marquee feedback)
« Reply #48 on: December 09, 2008, 05:16:02 pm »
nvts - have you taken apart your speakers yet?  I am curious as to how you will relocate the volume knob?

I am (as is everyone else on this board) looking to create another mountain/nvts/drawfull/oldman/etc clone and am struggling on the speakers.  I want it to sound good on its own (so no soundbar) and want to have it flush against the front grille (ie, challenging with knob).

Keep up the great work.
Edge

Martijn

  • Trade Count: (0)
  • Full Member
  • ***
  • Offline Offline
  • Posts: 822
  • Last login:January 25, 2024, 10:34:36 am
  • Akira!
    • ModMyBox
Re: Nvts’s mountain’s Jukebox (12/5 Pics. 12/6 Marquee feedback)
« Reply #49 on: December 10, 2008, 04:09:57 am »
nvts - have you taken apart your speakers yet?  I am curious as to how you will relocate the volume knob?

I am (as is everyone else on this board) looking to create another mountain/nvts/drawfull/oldman/etc clone and am struggling on the speakers.  I want it to sound good on its own (so no soundbar) and want to have it flush against the front grille (ie, challenging with knob).

Keep up the great work.
Edge


my thought on this for my project is to have a small logitech x240 set.
Its a 2.1 system with a small sub what sounds nice.
I will put the woofer on the bottom, and put the pipe to the back
take apart the speakers
open up the audio control and replace the pot for audio control and just place it where everybody has the audio control knob
also the subwoofer level control will be in the back

dont know if it will fit, i just commenced building the clone

drawfull

  • Trade Count: (0)
  • Full Member
  • ***
  • Offline Offline
  • Posts: 463
  • Last login:May 18, 2012, 09:30:14 am
Re: Nvts’s mountain’s Jukebox (12/5 Pics. 12/6 Marquee feedback)
« Reply #50 on: December 10, 2008, 08:28:54 am »
nvts - have you taken apart your speakers yet?  I am curious as to how you will relocate the volume knob?

I am (as is everyone else on this board) looking to create another mountain/nvts/drawfull/oldman/etc clone and am struggling on the speakers.  I want it to sound good on its own (so no soundbar) and want to have it flush against the front grille (ie, challenging with knob).

Keep up the great work.
Edge


We used a speaker set with separate volume control on a flying lead, which was straightforward. We had to extend the spindle of the subwoofer volume by a few inches thoughfor the knob to reach the rear of the base. See this post in my thread for pics


Nvts

  • Trade Count: (0)
  • Full Member
  • ***
  • Offline Offline
  • Posts: 76
  • Last login:September 15, 2010, 02:30:14 pm
Re: Nvts’s mountain’s Jukebox (12/5 Pics. 12/6 Marquee feedback)
« Reply #51 on: December 10, 2008, 01:26:49 pm »
nvts - have you taken apart your speakers yet?  I am curious as to how you will relocate the volume knob?

I am (as is everyone else on this board) looking to create another mountain/nvts/drawfull/oldman/etc clone and am struggling on the speakers.  I want it to sound good on its own (so no soundbar) and want to have it flush against the front grille (ie, challenging with knob).

I'm using these klipsch speakers.  (damn, they are on sale for $60 now...)  I have them hooked up to my ipod now, and they sound wonderful.  Goodly amounts of bass for a set without a subwoofer.  When they lose power, they will turn off.  when the power comes back on, you have to push the knob to turn them on.  When they turn on, they are at a very low volume and you have to turn them up.   Oh, and it sounds like a normal crappy 2 inch speaker when the front is pulled off from the body.  :P


 I pulled them apart to take a peek inside, and the volume knob/led are mounted on a tiny circuit board. The other end is hooked up into an 8x2 connector that slides right out (Looks like its a 16-Pin Edge Connector, yes?  didn't see one on the Radio shack site.  Would hate to have to order one )  and extend the whole board up where I expected the powermate board to go.  Unless someone can make a suggestion how to make the powermate work, I think I might just use it on my computer, and find a replacement knob.  Perhaps I can make a plexiglass one.   :-\


You could easily use them and extend the knob and have the volume on the bottom.  the front of the speakers are almost flat up and down ( they curve about 1/4 an inch like this \_____/. I thought they were indeed flat before I put it against the table.) and they have quite the curve side to side, but the volume is in the middle so it wouldn't be an issue at all.  When I find a edge connector thingie, I'll see how easy it is to extend the cable and let you know.
"A common mistake that people make when trying to design something completely foolproof was to underestimate the ingenuity of complete fools."

DaOld Man

  • Trade Count: (+4)
  • Full Member
  • ***
  • Offline Offline
  • Posts: 5158
  • Last login:May 24, 2025, 09:57:44 pm
  • Wheres my coffee?
    • Skenny's Outpost
Re: Nvts’s mountain’s Jukebox (12/10 Speaker guts pics)
« Reply #52 on: December 10, 2008, 04:25:47 pm »
Looking good nvts!
You might extend those wires by cutting them and soldering in an ide cable between the two cut pieces, or since there are eight wires, a cat-5e Ethernet cable may work. That would be a lot neater and take up less space.

Im worried about my powermate too.
I can fall back on a regular pot if need be. But Im quickly running out of time, so for now if it doesnt work, wife will have to cycle juke on and off. May have to install a regular pot after Christmas.

Im looking at that volume board you have, and it looks like it is just a pot with an led.
You might could use just a regular pot too, just measure the resistance on the pot on the board and buy a audio stereo pot the same value. Just a thought.

Nvts

  • Trade Count: (0)
  • Full Member
  • ***
  • Offline Offline
  • Posts: 76
  • Last login:September 15, 2010, 02:30:14 pm
Re: Nvts’s mountain’s Jukebox (12/10 Speaker guts pics)
« Reply #53 on: December 10, 2008, 04:48:55 pm »
I actually think it will be easier than that.  I think all I have to do is get a 16 pin connector and a piece of 10 wire flat ribbon cable and make an extension.  The socket slipped right out of the master board on the other side.


If that connector fits on the other board, it's actually an easy, cheap solution...  I would need to slice a small hole in the bottom of the speaker for the ribbon.

I wouldn't use the powermate, so I would just have to find a big snazzy knob to use instead.  I'll pick up a connector tonight, and try to get it to work tomorrow.   Right now, I am trying to figure out out how to add a SATA drive to my IDE only system.  it's not liking the converter that I have, so it does not recognize the drive.
"A common mistake that people make when trying to design something completely foolproof was to underestimate the ingenuity of complete fools."

DaOld Man

  • Trade Count: (+4)
  • Full Member
  • ***
  • Offline Offline
  • Posts: 5158
  • Last login:May 24, 2025, 09:57:44 pm
  • Wheres my coffee?
    • Skenny's Outpost
Re: Nvts’s mountain’s Jukebox (12/10 Speaker guts pics)
« Reply #54 on: December 10, 2008, 08:55:59 pm »
That sounds like a better idea.
Can you use an IDE cable? You can pull apart all the wires but 10. Just make sure it is the older 40 wire IDE cable, not the newer 80 wire. (40 wire is bigger gauge, I think.)
I have some old ones lying around I can send you, if you want.

Not sure about your sata problem, thats why I didnt go with a sata drive, since my MB doesnt have sata. Did the adapter come with any software drivers? Maybe you need to google the adapter model and see if others have fixed it.

mpm32

  • Cheesecake Master
  • Trade Count: (0)
  • Full Member
  • ***
  • Offline Offline
  • Posts: 4121
  • Last login:November 20, 2018, 09:25:14 pm
  • I want to Build My Own Arcade Controls!!
Re: Nvts’s mountain’s Jukebox (12/10 Speaker guts pics)
« Reply #55 on: December 11, 2008, 11:26:46 am »
Are you going to mount the speakers without the cabinet backs?  If so, you should try them out, all that bass you talked about will most likely be gone without the entire plastic cabinet, which is where they get the bass when using the small drivers.

Nvts

  • Trade Count: (0)
  • Full Member
  • ***
  • Offline Offline
  • Posts: 76
  • Last login:September 15, 2010, 02:30:14 pm
Re: Nvts’s mountain’s Jukebox (12/10 Speaker guts pics)
« Reply #56 on: December 12, 2008, 05:55:12 pm »
Are you going to mount the speakers without the cabinet backs?  If so, you should try them out, all that bass you talked about will most likely be gone without the entire plastic cabinet, which is where they get the bass when using the small drivers.
Nah, I'm going to leave the speakers as they naturally are, other than the volume knob extension.

Picked up some 16 pin edge connectors, and a 16 wire ribbon wire and  a couple packages of D-sub crimp shell contacts male ( ) and went about making the ribbon cable.  I don't have what I assume are proper tools to crimp the ribbon cables together, and I ended up braking one of the edge connectors, so I'll have to pick another one up.  I can't seem to find any male edge connectors, so I made a couple of 2 inch wires with a contact on each side for the gender change. 

I'll pick another connector Monday.  If I do get any more time until then, I can keep working on the back panel. 
The plan will indeed work though, I'm fairly sure.  I was able to test for continuity between the pins that were working, and the board. 
« Last Edit: December 12, 2008, 07:08:43 pm by Nvts »
"A common mistake that people make when trying to design something completely foolproof was to underestimate the ingenuity of complete fools."

DaOld Man

  • Trade Count: (+4)
  • Full Member
  • ***
  • Offline Offline
  • Posts: 5158
  • Last login:May 24, 2025, 09:57:44 pm
  • Wheres my coffee?
    • Skenny's Outpost
Re: Nvts’s mountain’s Jukebox (12/10 Speaker guts pics)
« Reply #57 on: December 13, 2008, 11:08:34 am »
Could you solder those connectors instead of crimping them?
I know they can be a real pain even if you have the proper crimping tool.

Nvts

  • Trade Count: (0)
  • Full Member
  • ***
  • Offline Offline
  • Posts: 76
  • Last login:September 15, 2010, 02:30:14 pm
Re: Nvts’s mountain’s Jukebox (12/10 Speaker guts pics)
« Reply #58 on: December 13, 2008, 04:24:18 pm »
eh, no worries, it can wait till Monday till I get a new end.  They are cheap.

Today, I got the rear panel working almost as well as I could want.  I did not want to have visible hinges, so I tried out a hidden hinge.

I cut out the panel and a door from my 1/8 plywood.


I put a 1/4 MDF behind the door, and laminated the whole back panel.  I trimmed the door to 1/4 inch with a dremmel cutoff wheel, a dremmel sander block, and a metal bar.


When I made my mock up with 1/2 inch mdf, it all seemed like it was going to work great, but I ended up needing 3/4 of an inch, so I rigged up a thicker door.  Installed the hinges to a 1 1/2 inch board that was screwed and glued to the frame.


I added another 1 1/2 board (and a extra bit...) to the other side for a double magnet catch.


Door guts:

I temporarily mounted the back panel to do the rough adjustments. It's a little rough, and I'll need to fine tune it once the back is attached the the shell, since the back panel is a bit warped and not cooperating properly.   It almost works great though. almost.


I have a feeling that I will just make a new cleaner looking door once time permits, but I am worried about the deadline.
« Last Edit: December 13, 2008, 04:28:23 pm by Nvts »
"A common mistake that people make when trying to design something completely foolproof was to underestimate the ingenuity of complete fools."

Nvts

  • Trade Count: (0)
  • Full Member
  • ***
  • Offline Offline
  • Posts: 76
  • Last login:September 15, 2010, 02:30:14 pm
Re: Nvts’s mountain’s Jukebox (12/13 Rear panel and door pics)
« Reply #59 on: December 18, 2008, 02:00:30 pm »
I had glued and screwed the front panel to the shell, and found a few things that made me end up ripping the screen and speaker grill out.  Since I didn't keep the inside shell the same width as the front panel shell, this was a whole lot of work.  :p  I was planning to have the screen held down with a metal strap that was screwed between the two parts.  It worked really well, and the screen was much more solid, but it got some dust inside of the screen, and I knew that it would drive me nuts.


I also got the volume knob relocated and working wonderfully.  i used those little pins next to the wires to make the swap over.


Stuck it up where it would go.


The little board next to the volume control slides over and wedges the board into place without having to worry about mounting the control board itself to anything.  the pot does not have a screw on part like a powermate.

I tried to use the powermate knob on it, and the plastic spacer fits over the LED perfectly.  I now can have the glowie effects of the volume control.  it's not as snazzy as the powermate ones, but its still kind of cool.


It seems a waste to get a powermate just for the knob, and not even the guts, so I sent Griffen an email asking if I could buy the knob and plastic spacer, and they said no.  :cry:  Anyone have an extra pair of parts, by chance? :p

Next up, rebuild the speaker grill, and remount the screen and innards.
"A common mistake that people make when trying to design something completely foolproof was to underestimate the ingenuity of complete fools."

mountain

  • Trade Count: (+9)
  • Full Member
  • ***
  • Offline Offline
  • Posts: 1205
  • Last login:January 29, 2025, 08:31:47 am
    • Mountain Jukeboxes
Re: Nvts’s mountain’s Jukebox (12/18 pics)
« Reply #60 on: December 18, 2008, 03:18:24 pm »
Lookin' good  :cheers:

I found a big aluminum knob on ebay that may work for you here.

Martijn

  • Trade Count: (0)
  • Full Member
  • ***
  • Offline Offline
  • Posts: 822
  • Last login:January 25, 2024, 10:34:36 am
  • Akira!
    • ModMyBox
Re: Nvts’s mountain’s Jukebox (12/18 pics)
« Reply #61 on: December 18, 2008, 04:21:13 pm »
good find mountain, but just not nice enough to replace the powermate.

The little screw hole really does it  :'(

mountain

  • Trade Count: (+9)
  • Full Member
  • ***
  • Offline Offline
  • Posts: 1205
  • Last login:January 29, 2025, 08:31:47 am
    • Mountain Jukeboxes
Re: Nvts’s mountain’s Jukebox (12/18 pics)
« Reply #62 on: December 18, 2008, 05:02:02 pm »
good find mountain, but just not nice enough to replace the powermate.

The little screw hole really does it  :'(

Have a look at these then.  ;)

example 1

example 2

example 3

example 4

example 5

example 6


facesmiths

  • Trade Count: (0)
  • Full Member
  • ***
  • Offline Offline
  • Posts: 142
  • Last login:April 10, 2011, 07:53:05 pm
  • nemo goggles
    • Borg Steam Factory
Re: Nvts’s mountain’s Jukebox (12/18 pics)
« Reply #63 on: December 18, 2008, 06:17:09 pm »
are you going to mount that computer on the back of your monitor? I don't know about the elo units but my krystal units get kinda warm so I would keep a little distance between the two. at the very least use some aluminum spacers and a bit of longer bolts. this would ofcourse give room to mount some sort of cooling system to pull air from between them and maybe add to the other fans on the units effectiveness. just my two cents. I'm going to go back to reading the rest of the thread :D

Nvts

  • Trade Count: (0)
  • Full Member
  • ***
  • Offline Offline
  • Posts: 76
  • Last login:September 15, 2010, 02:30:14 pm
Re: Nvts’s mountain’s Jukebox (12/18 pics)
« Reply #64 on: December 18, 2008, 07:23:54 pm »
I have a couple nuts for spacers between the two, so the distance would be about 1/2 an inch.  I will also have a fan underneath, pushing air upwards and out the top.  Would this be enough, or should I add some extra space in there?  Is there anything else that I could do to make sure that it stays cool enough?


on an aside, I never thought that ebay has an entire section for knobs.   :P
"A common mistake that people make when trying to design something completely foolproof was to underestimate the ingenuity of complete fools."

Nvts

  • Trade Count: (0)
  • Full Member
  • ***
  • Offline Offline
  • Posts: 76
  • Last login:September 15, 2010, 02:30:14 pm
Re: Nvts’s mountain’s Jukebox (12/18 pics)
« Reply #65 on: December 18, 2008, 09:02:29 pm »
Managed to get the laminate on today before I had to pack it up.

I laid the sheet on the ground, and put a piece of painters tape over where the line would be.  I made a line on the tape, then taped a straight edge on it and scored it a few times with a utility blade.  I then used some scissors and cut it like I had been.  However, it worked much better this time.  :p

I had a hell of a time getting the first two layers onto the shell properly, so I knew I wanted to do the laminate better.  I put a spacer under the shell, and glued it up, then pulled both ends around the curved part at the same time towards the bottom, then used the J roller and got it all stuck.  It worked so much better then trying to start at one end and get it straight.

Concept test


Glued


I know I don't need to weight it down, but I cant help it...
"A common mistake that people make when trying to design something completely foolproof was to underestimate the ingenuity of complete fools."

Martijn

  • Trade Count: (0)
  • Full Member
  • ***
  • Offline Offline
  • Posts: 822
  • Last login:January 25, 2024, 10:34:36 am
  • Akira!
    • ModMyBox
Re: Nvts’s mountain’s Jukebox (12/18 laminate pics)
« Reply #66 on: December 19, 2008, 02:42:12 am »

Franco B

  • Trade Count: (+10)
  • Full Member
  • ***
  • Offline Offline
  • Posts: 3766
  • Last login:February 15, 2024, 09:14:06 am
Re: Nvts’s mountain’s Jukebox (12/18 laminate pics)
« Reply #67 on: December 19, 2008, 04:33:24 am »
She's really taking shape now :)

I could make you a nice knob (oo-er  :laugh:) if you like.

DaOld Man

  • Trade Count: (+4)
  • Full Member
  • ***
  • Offline Offline
  • Posts: 5158
  • Last login:May 24, 2025, 09:57:44 pm
  • Wheres my coffee?
    • Skenny's Outpost
Re: Nvts’s mountain’s Jukebox (12/18 laminate pics)
« Reply #68 on: December 19, 2008, 05:32:42 am »
Good job Nvts! She's really starting to take shape now.

You beat me to the idea of the led shining through to the bottom of the volume knob.
I'm trying to do that with the powermate.
I still dont have a warm fuzzy feeling about the powermate.

I sure hope the monitor doesnt run hot, Im mounting my motherboard the same way.
I dont see any vent holes in the very back of the monitor, and there will be a plate between it and the motherboard, so Im sure hoping it will be ok.

Keep up the good work. Maybe when we are all done with these jukes we can have a "Mountain jukebox copy team" party.  :laugh:

Nvts

  • Trade Count: (0)
  • Full Member
  • ***
  • Offline Offline
  • Posts: 76
  • Last login:September 15, 2010, 02:30:14 pm
Re: Nvts’s mountain’s Jukebox (12/18 laminate pics)
« Reply #69 on: December 19, 2008, 10:36:14 am »
I'm setting up to flush trim the laminate and I am apprehensive that I will scratch it with the router.  Is there something I should do special, or would it not be an issue if its smooth?  I'll tape the front panel to try to not get a devastating scratch like javeryh had.  Never mind, I went ahead and cleaned everything off really good, and had no issues at all.

You beat me to the idea of the led shining through to the bottom of the volume knob.
I'm trying to do that with the powermate.

Perhaps try to put a aluminum foil / mirror like surface behind the board and make the hole up to the knob wider so that light can get out. 

I stuck a mini dvd into a cup and held the powermate about half an inch above the DVD, and it seemed like it would get a nice glow upwards.  I would imagine making the spacer out of clear plexi would help (mountains pic)


I could make you a nice knob (oo-er  :laugh:) if you like.
Perhaps after the holidays and I can get some feedback. I'll use the powermate one for now, but I would really like to just use it on my desk instead since I dont need the guts anymore. 

I have a thought of what might work and look really nice.  Stack a couple layers of clear plexiglass up and drill out the hole and flat edge to hold the pot.  Then mill a knob that fits around that so that you have a lighted center, something like this in concept, but in a volume knob format  :D


The other thought is using that plastic that bends light out to the edge, and using that is the bottom layer, and milling something over that.  that would make a knob that works like a powermate.
« Last Edit: December 19, 2008, 12:58:25 pm by Nvts »
"A common mistake that people make when trying to design something completely foolproof was to underestimate the ingenuity of complete fools."

DaOld Man

  • Trade Count: (+4)
  • Full Member
  • ***
  • Offline Offline
  • Posts: 5158
  • Last login:May 24, 2025, 09:57:44 pm
  • Wheres my coffee?
    • Skenny's Outpost
Re: Nvts’s mountain’s Jukebox (12/18 laminate pics)
« Reply #70 on: December 19, 2008, 06:23:58 pm »
I have already cut out some clear plexi for the PM to mount to.
I drilled the hole in a square of plexi and fastened a 3/8" bolt to it.
I then chucked the bolt in a drill and ran it against a belt sander. I had to take it easy and measure a few times until I got the 1-5/8" diameter in the clear plexi.
I drilled my hole wider (1-1/2") than the round circuit board on the PM.
Im planning on putting a mirror behind the PM to reflect the light from the blue led around the PM guts to the front plexi.
Looks like we had the same idea. Great minds think alike.

Nvts

  • Trade Count: (0)
  • Full Member
  • ***
  • Offline Offline
  • Posts: 76
  • Last login:September 15, 2010, 02:30:14 pm
Re: Nvts’s mountain’s Jukebox (12/18 laminate pics)
« Reply #71 on: December 19, 2008, 10:04:43 pm »
I'm getting ready to cut the Tmolding slot, and I noticed that Mountain cut his to 1/4, which is the depth of the Tmolding part.  I notice that the set that I got using a bearing that makes a 1/2 cut, which is default, I guess.   I can go halfway across town to get a larger bearing (1-3/8" Outside D x 5/16" Inside D) for $15.  I'm running out of time, and money, so I was expecting to use the router table fence to set the cutting depth.  Is that as easy as it sounds, or would it be wise of me to get the extra bearing?  Is the difference between the default 1/2 cut and the 1/4 cut worth bothering over?  I know on a arcade machine, there is loads of extra wood, but these things are flimsy.
"A common mistake that people make when trying to design something completely foolproof was to underestimate the ingenuity of complete fools."

mountain

  • Trade Count: (+9)
  • Full Member
  • ***
  • Offline Offline
  • Posts: 1205
  • Last login:January 29, 2025, 08:31:47 am
    • Mountain Jukeboxes
Re: Nvts’s mountain’s Jukebox (t molding question)
« Reply #72 on: December 19, 2008, 10:28:07 pm »
Make a mark on you're blade with a Sharpie that represents 1/4". Turn on your router (assuming that it is mounted upside down on a table) The mark will make make a faint circle as it spins. Touch the Sharpie to the mark on the blade, as it is running. Then just eyeball it and take your time. This is what I did.

If you don't do this, the wood may split as you hammer the T-molding in.

DaOld Man

  • Trade Count: (+4)
  • Full Member
  • ***
  • Offline Offline
  • Posts: 5158
  • Last login:May 24, 2025, 09:57:44 pm
  • Wheres my coffee?
    • Skenny's Outpost
Re: Nvts’s mountain’s Jukebox (t molding question)
« Reply #73 on: December 20, 2008, 05:29:54 pm »
I used your method of marking the depth on the slot bit and it worked great. Thanks Mountain!!
 :applaud:

Nvts

  • Trade Count: (0)
  • Full Member
  • ***
  • Offline Offline
  • Posts: 76
  • Last login:September 15, 2010, 02:30:14 pm
Re: Nvts’s mountain’s Jukebox (t molding question)
« Reply #74 on: December 20, 2008, 05:53:31 pm »
Here is my preliminary slot location test.  It looks like the molding fits right exactly on the edge, but I want it just a smidgen closer to the edge so that the edge of the tmolding will grab the front and back a tiny bit, right?


That new bit was so sharp that I didn't even feel it cutting into the test board.... :o
« Last Edit: December 20, 2008, 07:38:38 pm by Nvts »
"A common mistake that people make when trying to design something completely foolproof was to underestimate the ingenuity of complete fools."

Nvts

  • Trade Count: (0)
  • Full Member
  • ***
  • Offline Offline
  • Posts: 76
  • Last login:September 15, 2010, 02:30:14 pm
Re: Nvts’s mountain’s Jukebox (t molding test pic)
« Reply #75 on: December 21, 2008, 07:55:59 pm »
I had some issues with my router table not being quite big enough for keeping the shell straight enough.  I kind of messed up a little on the front side, and pulled the router out of the table for the back.  The back went way better. 

So I am putting stuff together, and I decide to do a demo test, and the touch screen does not work now.  I'm not sure what happened.  If i touch the metal tabs in the very corner, I can make the pointer jump around, so I don't think it's a connection issue.  How do these things tell where my finger is?
"A common mistake that people make when trying to design something completely foolproof was to underestimate the ingenuity of complete fools."

mountain

  • Trade Count: (+9)
  • Full Member
  • ***
  • Offline Offline
  • Posts: 1205
  • Last login:January 29, 2025, 08:31:47 am
    • Mountain Jukeboxes
Re: Nvts’s mountain’s Jukebox (Screen not working!)
« Reply #76 on: December 21, 2008, 08:08:50 pm »
Make sure nothing is touching the diagonal lines around the edges of the touch overlay. They are SAW (Surface Acousical Wave) technology. Anything touching them will throw it off. I am pretty sure this is your problem if the unit worked before mounting it.

Nvts

  • Trade Count: (0)
  • Full Member
  • ***
  • Offline Offline
  • Posts: 76
  • Last login:September 15, 2010, 02:30:14 pm
Re: Nvts’s mountain’s Jukebox (Screen not working!)
« Reply #77 on: December 21, 2008, 09:09:01 pm »
I pulled the monitor back out, and cleaned off the screen and I still get nothing.  I did have some weatherstripping on the glass and removed it, but I still get nothing.  Hope i didn't hose the screen up.  :banghead:
"A common mistake that people make when trying to design something completely foolproof was to underestimate the ingenuity of complete fools."

DaOld Man

  • Trade Count: (+4)
  • Full Member
  • ***
  • Offline Offline
  • Posts: 5158
  • Last login:May 24, 2025, 09:57:44 pm
  • Wheres my coffee?
    • Skenny's Outpost
Re: Nvts’s mountain’s Jukebox (Screen not working!)
« Reply #78 on: December 21, 2008, 09:12:56 pm »
I just hooked mine up for a test run and had the same problem.
I had to remove the foam rubber weatherstripping I had put around the edge of the monitor opening in the acrylic.
It was touching the lines Mountain talked about.
I removed the weatherstripping and now it works good.
I wish I could easily remove the acrylic and make another one. I would extend the edge of the acrylic about another 1/2" all the way around the monitor, I think that would allow me to use the weatherstripping. It looks a lot better with the weatherstripping filling the gap between the monitor glass and the acrylic. Plus if I could re-do the acrylic, I could fix that one corner I screwed up.
Oh well..

DaOld Man

  • Trade Count: (+4)
  • Full Member
  • ***
  • Offline Offline
  • Posts: 5158
  • Last login:May 24, 2025, 09:57:44 pm
  • Wheres my coffee?
    • Skenny's Outpost
Re: Nvts’s mountain’s Jukebox (Screen not working!)
« Reply #79 on: December 21, 2008, 09:15:09 pm »
I think I posted about the same time as you.
So nothing is touching the glass and it's still not working?
You had the glass off the monitor, didn't you?
Do you think you might have a plug loose between the glass and the monitor works?

mountain

  • Trade Count: (+9)
  • Full Member
  • ***
  • Offline Offline
  • Posts: 1205
  • Last login:January 29, 2025, 08:31:47 am
    • Mountain Jukeboxes
Re: Nvts’s mountain’s Jukebox (Screen not working!)
« Reply #80 on: December 21, 2008, 09:16:44 pm »
I just hooked mine up for a test run and had the same problem.
I had to remove the foam rubber weatherstripping I had put around the edge of the monitor opening in the acrylic.
It was touching the lines Mountain talked about.
I removed the weatherstripping and now it works good.
I wish I could easily remove the acrylic and make another one. I would extend the edge of the acrylic about another 1/2" all the way around the monitor, I think that would allow me to use the weatherstripping. It looks a lot better with the weatherstripping filling the gap between the monitor glass and the acrylic. Plus if I could re-do the acrylic, I could fix that one corner I screwed up.
Oh well..

I attached the foam tape to the back side of the acrylic and then mounted the monitor accordingly. I left a gap about 1/32" between the foam tape and the monitor.

DaOld Man

  • Trade Count: (+4)
  • Full Member
  • ***
  • Offline Offline
  • Posts: 5158
  • Last login:May 24, 2025, 09:57:44 pm
  • Wheres my coffee?
    • Skenny's Outpost
Re: Nvts’s mountain’s Jukebox (Screen not working!)
« Reply #81 on: December 21, 2008, 09:23:06 pm »
Ok, I will try that. I had the weather stripping stuck to the back of the acrylic like you said, but it was thick enough to touch the screen. Is it possible to cut that stuff down?
I think it might not have been touching at the top, cause on my screen calibration I could move the cursor on the top half of the screen, but not the bottom.
I noticed that the monitor mounts are a little off from top and bottom, but I thought it would angle the screen back a tad bit, maybe make it better to see, so I didnt try to even it up on the MDF mount.
This may be why the foam wasnt touching the top??

Nvts

  • Trade Count: (0)
  • Full Member
  • ***
  • Offline Offline
  • Posts: 76
  • Last login:September 15, 2010, 02:30:14 pm
Re: Nvts’s mountain’s Jukebox (Screen not working!)
« Reply #82 on: December 22, 2008, 04:36:07 pm »
I can tell that the connection is functional, as I can touch between the two contacts in the bottom left corner, and see movement on the screen.  I cleaned the hell out of it, and still cant get a normal touch to work.  <sigh>  I'm starting to think I am hosed.
"A common mistake that people make when trying to design something completely foolproof was to underestimate the ingenuity of complete fools."

Nvts

  • Trade Count: (0)
  • Full Member
  • ***
  • Offline Offline
  • Posts: 76
  • Last login:September 15, 2010, 02:30:14 pm
Re: Nvts’s mountain’s Jukebox (Screen not working!)
« Reply #83 on: January 01, 2009, 06:11:48 pm »
I gave up on the touch screen, and ordered another one.  It got here last Saturday, and I spent a couple days getting it into shape.

Last night I revealed the Project to the GF, and she really loved it.   I didn't have any of the wiring done, and had the three cords coming out the back door and the back panel was not glued in, and the rear T Molding was not one, and the system still has the old hard drive (with 2000 on it), and the Marquee was still a test print on paper...  and this and that and etc...


But it was truly a huge hit.  Many thanks to Mountain for the original, and everyone else who is working on one or helped out. 

I'll still update it as I finish it, but here it was as I pulled the sheet off of it.  Using Freebox as the front end at the moment, but we will check out a few other ones and see what she likes best.


"A common mistake that people make when trying to design something completely foolproof was to underestimate the ingenuity of complete fools."

DaOld Man

  • Trade Count: (+4)
  • Full Member
  • ***
  • Offline Offline
  • Posts: 5158
  • Last login:May 24, 2025, 09:57:44 pm
  • Wheres my coffee?
    • Skenny's Outpost
Re: Nvts’s mountain’s Jukebox (revealed!)
« Reply #84 on: January 02, 2009, 08:48:36 am »
Looks real good Nvts! Cant wait for more pictures.
Since I was cutting it very close on time, I printed out my marquee on my PC printer, with plans of getting someone in the art department to re-do it for me, make it look professional.
But my wife says there is no way we are getting it re-printed, says she wants it original.
I guess that has its pluses and minuses. I dont have to worry about it, but still I know it would look better with better artwork.
Anyway, great job! It's truly a relief (and a great joy) to get a project like this finished.

Did you decide to go with the dvd drive?

drawfull

  • Trade Count: (0)
  • Full Member
  • ***
  • Offline Offline
  • Posts: 463
  • Last login:May 18, 2012, 09:30:14 am
Re: Nvts’s mountain’s Jukebox (revealed!)
« Reply #85 on: January 02, 2009, 04:19:16 pm »
Eck, I want a black glossy one - great job!

Can you let me know (or the post!) how you get on with Freebox, I have lotsa bugs with Touchtone Audio :( ?

kizer

  • Trade Count: (0)
  • Full Member
  • ***
  • Offline Offline
  • Posts: 200
  • Last login:January 30, 2012, 07:25:30 pm
    • Links4jeeps.com
Re: Nvts’s mountain’s Jukebox (revealed!)
« Reply #86 on: January 03, 2009, 04:15:03 pm »
Just try Freebox a lot of us have and still use it. ;)

That Marquee cracks me up.

Franco B

  • Trade Count: (+10)
  • Full Member
  • ***
  • Offline Offline
  • Posts: 3766
  • Last login:February 15, 2024, 09:14:06 am
Re: Nvts’s mountain’s Jukebox (revealed!)
« Reply #87 on: January 03, 2009, 05:09:46 pm »
Great Job Nvts  :)  :applaud:  :)

Are you not getting on well with your Touchtone software drawfull? I was thinking of giving it a go after seeing it on your build but I won't bother if you don't rate it.

drawfull

  • Trade Count: (0)
  • Full Member
  • ***
  • Offline Offline
  • Posts: 463
  • Last login:May 18, 2012, 09:30:14 am
Re: Nvts’s mountain’s Jukebox (revealed!)
« Reply #88 on: January 04, 2009, 12:42:58 am »
Are you not getting on well with your Touchtone software drawfull? I was thinking of giving it a go after seeing it on your build but I won't bother if you don't rate it.

There's a screwy playlist bug which is the main issue. It might only be when using iTunes as the back-end player, but if you have a lot of songs stacked for no reason it suddenly deletes them one by one and plays random songs from that point. Developer recommended I try the beta, but prob persists and only a restart of the software (temporarily) fixes it.

I'm going to give some others, including freebox a try. But now I'm back to the iTunes DRM issue :(


Barry Barcrest

  • I'm only in it for the lack of money
  • Trade Count: (+2)
  • Full Member
  • ***
  • Offline Offline
  • Posts: 1620
  • Last login:November 09, 2021, 09:54:17 am
  • Simple Plan
    • E-Touch Jukebox
Re: Nvts’s mountain’s Jukebox (revealed!)
« Reply #89 on: January 05, 2009, 12:17:19 am »
I think mountain is using freebox as well now but i am not sure. This design is realy nic, there is just no way i have the skills to pull anything off like this, well done sir.