Main Restorations Software Audio/Jukebox/MP3 Everything Else Buy/Sell/Trade
Project Announcements Monitor/Video GroovyMAME Merit/JVL Touchscreen Meet Up Retail Vendors
Driving & Racing Woodworking Software Support Forums Consoles Project Arcade Reviews
Automated Projects Artwork Frontend Support Forums Pinball Forum Discussion Old Boards
Raspberry Pi & Dev Board controls.dat Linux Miscellaneous Arcade Wiki Discussion Old Archives
Lightguns Arcade1Up Try the site in https mode Site News

Unread posts | New Replies | Recent posts | Rules | Chatroom | Wiki | File Repository | RSS | Submit news


Author Topic: Pinky McJuke - Believe it or not, work continues =)  (Read 50091 times)

0 Members and 1 Guest are viewing this topic.

thatitalian

  • Don't worry about the chicken, I feed my friends human all the time...
  • Trade Count: (0)
  • Full Member
  • ***
  • Offline Offline
  • Posts: 887
  • Last login:March 27, 2018, 10:52:37 am
  • The Revolution Is Coming...
Re: Dalmation McJuke =D
« Reply #160 on: November 26, 2008, 07:12:59 am »
I will pass on the message..........  >:D

drawfull

  • Trade Count: (0)
  • Full Member
  • ***
  • Offline Offline
  • Posts: 463
  • Last login:May 18, 2012, 09:30:14 am
Re: Dalmation McJuke =D
« Reply #161 on: November 26, 2008, 12:22:31 pm »
It looks absolutely superb Franco, it really does. The overall shape works so well and the whole thing screams shop-bought. Kudos

DaOld Man

  • Trade Count: (+4)
  • Full Member
  • ***
  • Offline Offline
  • Posts: 5158
  • Last login:May 24, 2025, 09:57:44 pm
  • Wheres my coffee?
    • Skenny's Outpost
Re: Dalmation McJuke =D
« Reply #162 on: November 26, 2008, 01:45:32 pm »
I agree.
I like the dalmation look.

Franco B

  • Trade Count: (+10)
  • Full Member
  • ***
  • Offline Offline
  • Posts: 3766
  • Last login:February 15, 2024, 09:14:06 am
Re: Dalmation McJuke =D
« Reply #163 on: November 29, 2008, 04:46:14 am »
Thanks drawfull, that means a lot coming from you! If I end up developing a quarter of you and your dads skills I will be more then happy!  :)

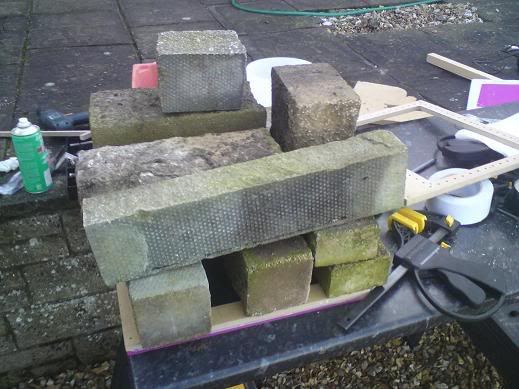
Got a fair bit more done yesterday.

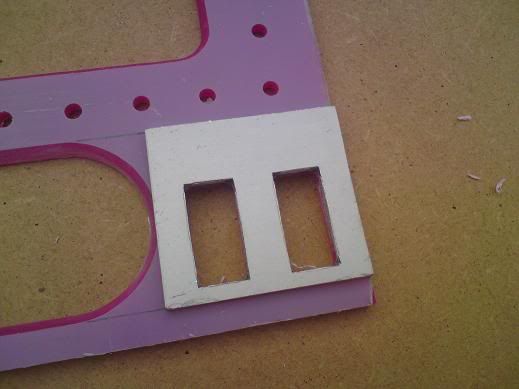
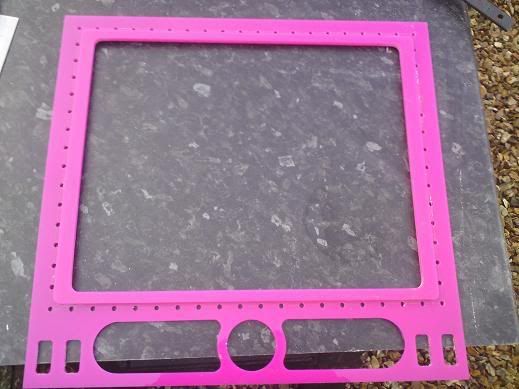
I'm using those touch sensitive PCBs on the front of the cab for volume up, volume down, LED sequence change and exit. I tested the PCBs with +5v from a PSU and a multimeter. I found that the PCBs will work through around 1.5mm of acrylic. Obviously my front panel is 5mm thick so they wont work through that. I was going to route some of the front of so It was only 1.5mm think but I didn't want to risk scrapping the whole thing without having a 1/4" pattern bit.

Instead I have decided to route out a relief for the buttons completely and then mount them to lozenge shape pieces of 1.5mm acrylic that is larger than the relief. Ill get some stickers made to stick to the acrylic to denote what they are and match the panels with the cab.

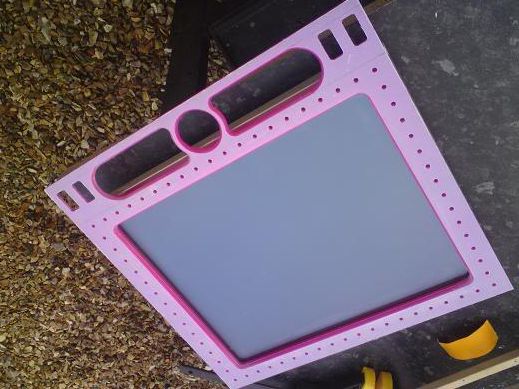
With that in mind I made a template to route out the reliefs for the buttons:


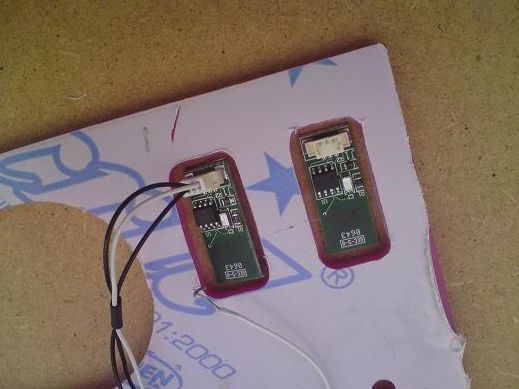
You can see the PCBs are not central to speaker vent, this is because the touch sensor part is at the top of the PCB so I cut the reliefs so that the touch sensor part is central to the speaker vent. The lozenge shaped acrylic will be almost twice the size of the PCBs so the touch part will be in the center of the button. Hope that makes sense  :P

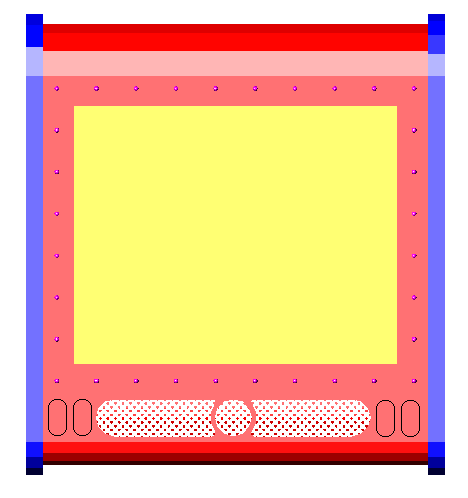
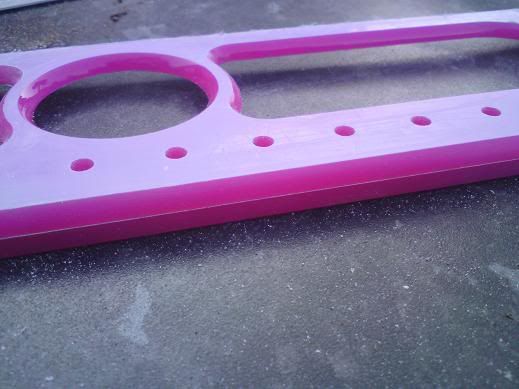
The buttons should look something like this shape wise, excuse the paint edit:


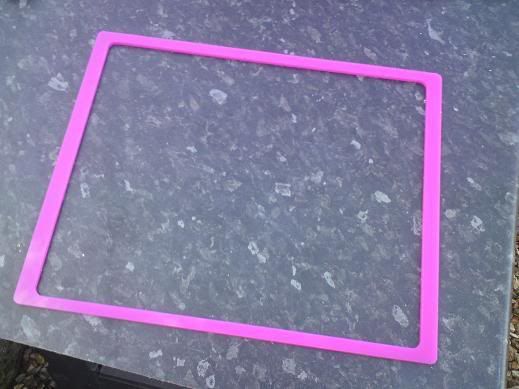
I had to do some further work to the bezel to aid the LED mounting. I decided to make a inner bezel to mount on the back of the front piece. I needed to do this to give some room for the LEDs and wiring.

This is the spacer bezel I made:


I used some contract adhesive to stick it to the front section, I don't think it will move under this lot :)


I only gave it about 30 mins to stick but it turned out pretty well. This is a picture of the back:


I used some 120 grit to bland the two pieces, it looks like I may have a slight white line where the adhesive is but its no big deal, it will give a little contrast on the bezel. It may come out when i polish the bezel but I'm not fussed if It doest. You can see the white line here.


You can also see where I polished the speaker vents a couple of days ago. I used P320, P600, P800 and P1200 grades before using the Novus polishing kit I got from the states, it works so well!  :)

Final shot of the bezel/front piece on the monitor:


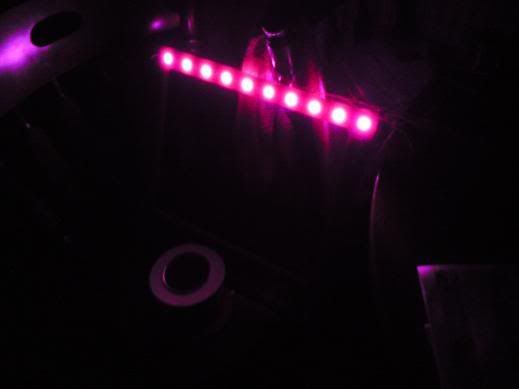
I also started wiring up some of the LEDs, I think I may have to turn the intensity's down a little in LEDBlinky!


thatitalian

  • Don't worry about the chicken, I feed my friends human all the time...
  • Trade Count: (0)
  • Full Member
  • ***
  • Offline Offline
  • Posts: 887
  • Last login:March 27, 2018, 10:52:37 am
  • The Revolution Is Coming...
Re: Pinky McJuke (Bezel Work + LEDs)
« Reply #164 on: November 29, 2008, 05:36:28 am »
Awesome!

DaOld Man

  • Trade Count: (+4)
  • Full Member
  • ***
  • Offline Offline
  • Posts: 5158
  • Last login:May 24, 2025, 09:57:44 pm
  • Wheres my coffee?
    • Skenny's Outpost
Re: Pinky McJuke (Bezel Work + LEDs)
« Reply #165 on: November 29, 2008, 10:27:53 am »
Wow Franco!
This is very good.

OTTOgd

  • Trade Count: (0)
  • Full Member
  • ***
  • Offline Offline
  • Posts: 39
  • Last login:October 02, 2019, 10:45:16 pm
Re: Pinky McJuke (Bezel Work + LEDs)
« Reply #166 on: November 30, 2008, 10:37:24 am »
Your uncomprimising attention to detail and patience is inspirational, Franco. This and the concktail are fantastic design solutions; can't wait to see the final pics and videos.

javeryh

  • Trade Count: (+1)
  • Full Member
  • ***
  • Offline Offline
  • Posts: 7959
  • Last login:June 19, 2025, 11:24:08 am
Re: Pinky McJuke (Bezel Work + LEDs)
« Reply #167 on: November 30, 2008, 10:42:04 am »
Amazing work.

Jimbo

  • Trade Count: (+1)
  • Full Member
  • ***
  • Offline Offline
  • Posts: 1014
  • Last login:January 04, 2025, 12:18:10 pm
  • I have no idea what I'm doing.
    • Wood Finishes Direct
Re: Pinky McJuke (Bezel Work + LEDs)
« Reply #168 on: November 30, 2008, 12:05:04 pm »
You make me sick!   :P

Seriously, though... awesome work, dude.

Franco B

  • Trade Count: (+10)
  • Full Member
  • ***
  • Offline Offline
  • Posts: 3766
  • Last login:February 15, 2024, 09:14:06 am
Re: Pinky McJuke (Bezel Work + LEDs)
« Reply #169 on: December 03, 2008, 11:49:37 am »
Thanks guys :)

Thatittallian sent my GP-Wiz, LED Wiz and a few other goodies through today so Ive been able to test the touch PCBs. I was a bit apprehensive about how well they would work but I'm pleased to say they work brilliantly!  ;D

There are three wires coming from the touch PCBs, one goes to the GP-Wiz ground, one goes to the GP-Wiz input terminal and the other requires 5v. Luckily the GP-Wiz has a 5v tap so I hooked the wires up that.

When the switch is open the PCBs give out 5v. When you touch the sensor it drops the voltage to nearly 0v. The GP-Wiz then reads this as the circuit being completed (i.e. pressing a normal button) and then sends out the appropriate joystick command.

I'm using a program called [Volume Tray] as you can configure it to use any keyboard key/combo to use as a hotkey to control the system volume. As the GP-Wiz is a gamepad interface I used [JoyToKey] to change the gamepad commands into keystokes.

I configured all of the keys etc and ghetto mounted the PCBs to the inside of a CD case to test them, here is the result:


Each touch of the PCB raises/lowers the volume by 5% (also configurable with Volume Tray)

Its only a little update but I wanted to share :)

javeryh

  • Trade Count: (+1)
  • Full Member
  • ***
  • Offline Offline
  • Posts: 7959
  • Last login:June 19, 2025, 11:24:08 am
Re: Pinky McJuke (Touch PCB testing)
« Reply #170 on: December 03, 2008, 11:59:39 am »
That is so cool!

mountain

  • Trade Count: (+9)
  • Full Member
  • ***
  • Offline Offline
  • Posts: 1205
  • Last login:January 29, 2025, 08:31:47 am
    • Mountain Jukeboxes
Re: Pinky McJuke (Touch PCB testing)
« Reply #171 on: December 03, 2008, 12:11:55 pm »
Glad to see them working. You will really enjoy it once they are mounted and you have to touch the plexi for it to work. Are you going to apply a Vol + and Vol – sticker on there?

+ and – etching would be cool too.

Franco B

  • Trade Count: (+10)
  • Full Member
  • ***
  • Offline Offline
  • Posts: 3766
  • Last login:February 15, 2024, 09:14:06 am
Re: Pinky McJuke (Touch PCB testing)
« Reply #172 on: December 03, 2008, 12:30:30 pm »
Thatitallian is going to design me some artwork to go on each button. I'm thinking a large clef for volume up, a small one for volume down (to match the clefs on the other artwork), a picture of an LED or something for the LED sequence change button and probably one that just says exit. Any thoughts?

mountain

  • Trade Count: (+9)
  • Full Member
  • ***
  • Offline Offline
  • Posts: 1205
  • Last login:January 29, 2025, 08:31:47 am
    • Mountain Jukeboxes
Re: Pinky McJuke (Touch PCB testing)
« Reply #173 on: December 03, 2008, 12:33:22 pm »
Any thoughts?

Yes...send me the juke and I will sort it out for you.  ;D

Franco B

  • Trade Count: (+10)
  • Full Member
  • ***
  • Offline Offline
  • Posts: 3766
  • Last login:February 15, 2024, 09:14:06 am
Re: Pinky McJuke (Touch PCB testing)
« Reply #174 on: December 03, 2008, 12:36:36 pm »
Oi greedy! Go steal your dads ;)


DaOld Man

  • Trade Count: (+4)
  • Full Member
  • ***
  • Offline Offline
  • Posts: 5158
  • Last login:May 24, 2025, 09:57:44 pm
  • Wheres my coffee?
    • Skenny's Outpost
Re: Pinky McJuke (Touch PCB testing)
« Reply #175 on: December 03, 2008, 01:08:29 pm »
This is looking really good Franco.
I like the touch sensors.

Ive got a unrelated question, maybe I just havent search the right area of this board yet, but how do you make your videos?

Franco B

  • Trade Count: (+10)
  • Full Member
  • ***
  • Offline Offline
  • Posts: 3766
  • Last login:February 15, 2024, 09:14:06 am
Re: Pinky McJuke (Touch PCB testing)
« Reply #176 on: December 03, 2008, 02:14:47 pm »
Ive got a unrelated question, maybe I just havent search the right area of this board yet, but how do you make your videos?

I just shot mine with my camera phone (hense the bad quality), register if needs be and upload it to youtube and then just paste the URL in your reply and it will appear :)

NIVO

  • Global Moderator
  • Trade Count: (+1)
  • Full Member
  • *****
  • Offline Offline
  • Posts: 1256
  • Last login:March 20, 2025, 03:33:34 pm
  • danny_galaga is my mail man.
    • N.A.M.E. - arcade cabinet project
Re: Pinky McJuke (Touch PCB testing)
« Reply #177 on: December 05, 2008, 12:01:08 am »
Im disgusted by this project!


Disgusted that it isnt mine! Outstanding job Franco, im very impressed by the craftsmanship put into this one.  :cheers:

Franco B

  • Trade Count: (+10)
  • Full Member
  • ***
  • Offline Offline
  • Posts: 3766
  • Last login:February 15, 2024, 09:14:06 am
Re: Pinky McJuke (Touch PCB testing)
« Reply #178 on: December 10, 2008, 05:53:52 am »
Cheers NIVO  :)

Ive been working on a platform to mount the LED Wiz, GP Wiz and a piece of acrylic to mount some d-subs in. I wanted to do this as once I have the bezel all wired up and I attach it to the cab, there will be very little room to screw the wires into the Wiz's terminals. Using this method, all I have to do is plug the mating d-subs from the bezels LEDs and I/O panel into the platform. If an LED ever goes or I have other problems it will be much easier to remove and troubleshoot/fix.

I made a platform out of some sheet metal to hold the LED Wiz, GP Wiz and the acrylic mount:


I soldered all the d-subs up to connect to the boards. There are four 15 pin dubs for the LED Wiz (using 8 pins each), two for the GP Wiz (using 13 pins each, U,D,L,R, eight action/admin buttons and one ground) and one 9 pin d-sub for the touch sensitive buttons (using 6 pins, four button outputs, +5v and ground)


I forgot to take my 3rd hands to work so I improvised with some plasticine  :laugh:


The d-subs were mounted in a piece of routed pink 5mm acrylic I had spare and the wires were cut to the approx lengths:


I'm using one of the new LED Wiz's with the voltage bank selects. After reading the [documentation] I took it that I needed to daisy chain the banks to the USB 5v output but after reading one of Randy's comments in another thread I'm not sure if this is correct and/or necessary.


Anyone have any ideas about this? I may PM/email Randy if not.

The last step was to terminate the wire into the boards. Damn it was fiddly! I JUST had enough slack in the wires to get it all in. I didn't want to have really long wires and have it look too messy.

Final money shot:


Ive tested the continuity from the d-subs to the top of each screw terminal and all seem good! Phew!

You can see some nylon standoffs I made that screw onto the bottom machine screws, this will allow it to straddle the HDD in the bottom on the case.


Kaytrim

  • I'm too nice a guy
  • Trade Count: (+4)
  • Full Member
  • ***
  • Offline Offline
  • Posts: 2095
  • Last login:September 22, 2015, 04:11:30 pm
Re: Pinky McJuke (LED/GP Wiz d-sub mount)
« Reply #179 on: December 10, 2008, 09:22:16 am »
That is some slick work there Franco.  Very neat, clean and compact.  You keep amazing me with your skills.

 :cheers:
Michael

javeryh

  • Trade Count: (+1)
  • Full Member
  • ***
  • Offline Offline
  • Posts: 7959
  • Last login:June 19, 2025, 11:24:08 am
Re: Pinky McJuke (LED/GP Wiz d-sub mount)
« Reply #180 on: December 10, 2008, 11:34:21 am »
Just unbelievable.  :notworthy: 

Does it get any better than this?  No, it can't.

drawfull

  • Trade Count: (0)
  • Full Member
  • ***
  • Offline Offline
  • Posts: 463
  • Last login:May 18, 2012, 09:30:14 am
Re: Pinky McJuke (LED/GP Wiz d-sub mount)
« Reply #181 on: December 10, 2008, 11:41:28 am »
Jaw=floor

Absolutely awesone Franco, attention-to-detail gone mad!

 :applaud:

mountain

  • Trade Count: (+9)
  • Full Member
  • ***
  • Offline Offline
  • Posts: 1205
  • Last login:January 29, 2025, 08:31:47 am
    • Mountain Jukeboxes
Re: Pinky McJuke (LED/GP Wiz d-sub mount)
« Reply #182 on: December 10, 2008, 11:45:04 am »
Now you're just showin' off!  ;D

Fantastic job Franco. You are a true craftsman.

Kaytrim

  • I'm too nice a guy
  • Trade Count: (+4)
  • Full Member
  • ***
  • Offline Offline
  • Posts: 2095
  • Last login:September 22, 2015, 04:11:30 pm
Re: Pinky McJuke (LED/GP Wiz d-sub mount)
« Reply #183 on: December 10, 2008, 12:01:12 pm »
You are a true craftsman.

That goes without saying.  btw he has a nice little care package on the way to me for my juke and some special tools for my joystick business.  Franco's metal working skills out weigh my wood working skills.  Speaking of which I have got to start the build on my wife's juke and my MAME machine.

TTFN
Michael

Franco B

  • Trade Count: (+10)
  • Full Member
  • ***
  • Offline Offline
  • Posts: 3766
  • Last login:February 15, 2024, 09:14:06 am
Re: Pinky McJuke (LED/GP Wiz d-sub mount)
« Reply #184 on: December 10, 2008, 12:46:31 pm »
Thanks. It means a lot coming from you guys and what you do.

I brought the bezel in to work this evening to finish blending the inner bezel and polish the rest of the cut outs. I only have my camera phone but you get the idea:


You can still see a slight whitish line where the two pieces meet but at least its uniform and doesn't look too bad.

I'm hoping to get the rest of the LEDs wired up tomorrow and pretty much have the thing finished bar the artwork by the end of the week. Things always seem to take about four times longer than they should though so I'm not going to hold my breath!  :laugh:

Bender

  • Trade Count: (+1)
  • Full Member
  • ***
  • Offline Offline
  • Posts: 1919
  • Last login:November 28, 2016, 08:12:21 pm
    • Happ to Tron Conversion tutorial
Re: Pinky McJuke (LED/GP Wiz d-sub mount)
« Reply #185 on: December 10, 2008, 01:05:53 pm »
SICK! :blowup:

Damn you make me sick!

Nice F%$#*$ng work
that is some of the nicest wiring I seen plus everything else, just sick!!!

Franco B

  • Trade Count: (+10)
  • Full Member
  • ***
  • Offline Offline
  • Posts: 3766
  • Last login:February 15, 2024, 09:14:06 am
Re: Pinky McJuke (LED/GP Wiz d-sub mount)
« Reply #186 on: December 11, 2008, 10:15:44 am »
True craftsman you say, attention to detail was that?

Well apparently this 'craftsman' can't count.

I had a dream last night that I had ---fouled up beyond all recognition--- the bezel up and its kinda come true  :'(

I had a nice early start this morning and started to wire up the LEDs for the bezel. I have been doing them in groups of 8 for the d subs. I got round to the last set of 'eight' and noticed that there are two extra LED positions!  :banghead:

This is a bit of a problem as the LED only has 32 outputs yet I have 34 LED positions  :-\

If you take a look at this picture you can see the LED positions ringed in red and blue:


Count em, 34  ::)

I thought about connecting each pair of blue ringed LEDs together to bring the count down but the whole point of having the LED Wiz is to have some nice sequences and bridging the two will just make the sequences look ---steaming pile of meadow muffin---.

I have a Pac Drive laying about somewhere and I thought about using that but you cannot vary the LED intensity with the Pac Drive and I plan on varying the intensity's for sweeping fades etc so once again it would look crap.

My only real option is to use another (sob) LED Wiz to control the extra two LEDs.

There is no way I can get another LED Wiz from the US in time for Xmas but I do have a Device No 2 Led Wiz from my cocktail build, it just means I'm going to have to strip it out of one of these and then wire a replacement back in  :-\


This is the only real solution I can think of so that it looks as I intended, I don't want to have put all this time, effort and £££ to scrimp out at the last minute.

At least the upside (if there is one) to this is that I can use the 2nd LED Wiz to control the eight down lighting LEDs in the bottom of the case for some Knightrider-esque effects.

As you can imagine, I'm fairly pissed off but hey, these things happen. I just cant believe I managed to make such a stupid mistake.

Kaytrim

  • I'm too nice a guy
  • Trade Count: (+4)
  • Full Member
  • ***
  • Offline Offline
  • Posts: 2095
  • Last login:September 22, 2015, 04:11:30 pm
Re: Pinky McJuke (I CAN'T COUNT!!!)
« Reply #187 on: December 11, 2008, 10:27:32 am »
Hey buddy, look at it this way.  With the second LEDWiz you now have more outputs for even more bling. :dizzy:

Michael :cheers:

drawfull

  • Trade Count: (0)
  • Full Member
  • ***
  • Offline Offline
  • Posts: 463
  • Last login:May 18, 2012, 09:30:14 am
Re: Pinky McJuke (I CAN'T COUNT!!!)
« Reply #188 on: December 11, 2008, 01:01:38 pm »
Ouch! I know the feeling when overlooking something so simple. It's like you're so involved sometimes the obvious slips right by. I figure once you use the extra wiz you won't even notice it's not symettrical with the patterns you're planning. I can't wait to see that bit of the build particularly.

Cheers

Franco B

  • Trade Count: (+10)
  • Full Member
  • ***
  • Offline Offline
  • Posts: 3766
  • Last login:February 15, 2024, 09:14:06 am
Re: Pinky McJuke (I CAN'T COUNT!!!)
« Reply #189 on: December 11, 2008, 01:23:54 pm »
Cheers guys.

It will still be symmetrical once I have the other LED Wiz in thank god.

I'm just wiring up the LEDs at the moment and all seems to be going well. I have the day off tomorrow and I was going to get a load done but I think I'm going to take a break for a day. I have been working 24/7 on it in one way or another for the past couple of months and I need a break other wise I'm going to get hacked off with it.

I 'may' not get it 100% done for Xmas (mainly as I dont think ill get the artwork printed in time) but I would rather give it to her a week or two late and have it as perfect as I can rather than rush it and end up regretting not taking the extra time. I'm sure she would prefer it that way too.

Epyx

  • Trade Count: (+1)
  • Full Member
  • ***
  • Offline Offline
  • Posts: 1961
  • Last login:December 25, 2023, 07:56:36 pm
  • "You're an oddity"
Re: Pinky McJuke (I CAN'T COUNT!!!)
« Reply #190 on: December 11, 2008, 04:14:56 pm »
FrancoB, I LOVE so many aspects of your project.  The cases for the Wiz units...the clean fabrication for the DB panels...man. Great job! Can't wait to see the finished product and certainly won't look at my printer hack metal the same lol.
Last Project


Epyx Tutorials:
Tutorials

thatitalian

  • Don't worry about the chicken, I feed my friends human all the time...
  • Trade Count: (0)
  • Full Member
  • ***
  • Offline Offline
  • Posts: 887
  • Last login:March 27, 2018, 10:52:37 am
  • The Revolution Is Coming...
Re: Pinky McJuke (I CAN'T COUNT!!!)
« Reply #191 on: December 11, 2008, 04:49:17 pm »
If you are desperate you can have mine?

I can get it up to you in 2 days!

I think it is a device number 1 though!

Still haven't got that piece you sent!

Franco B

  • Trade Count: (+10)
  • Full Member
  • ***
  • Offline Offline
  • Posts: 3766
  • Last login:February 15, 2024, 09:14:06 am
Re: Pinky McJuke (I CAN'T COUNT!!!)
« Reply #192 on: December 11, 2008, 05:12:20 pm »
Thanks for the offer buddy but I need a device ID 2.

Hmmm, fooking Royal Mail  ::) Ill send you another sample out tomorrow.

Bender

  • Trade Count: (+1)
  • Full Member
  • ***
  • Offline Offline
  • Posts: 1919
  • Last login:November 28, 2016, 08:12:21 pm
    • Happ to Tron Conversion tutorial
Re: Pinky McJuke (I CAN'T COUNT!!!)
« Reply #193 on: January 02, 2009, 10:15:26 pm »
Update Please.... :pics

koolmoecraig

  • Trade Count: (+2)
  • Full Member
  • ***
  • Offline Offline
  • Posts: 1433
  • Last login:April 05, 2014, 07:07:20 pm
    • My Intervention
Re: Pinky McJuke (I CAN'T COUNT!!!)
« Reply #194 on: January 02, 2009, 10:51:23 pm »
Very nice work man.

mccoy178

  • It's hard to work with a straight jacket on
  • Trade Count: (+9)
  • Full Member
  • ***
  • Offline Offline
  • Posts: 3127
  • Last login:September 03, 2021, 10:23:42 am
  • Go Bucks!
Re: Pinky McJuke (I CAN'T COUNT!!!)
« Reply #195 on: January 03, 2009, 02:51:40 am »
Franco this is wonderful work!  I can truly respect all the routing work.  Also wanted to take a second to commend you on your attention to detail.  Very impressive indeed! :cheers:

Franco B

  • Trade Count: (+10)
  • Full Member
  • ***
  • Offline Offline
  • Posts: 3766
  • Last login:February 15, 2024, 09:14:06 am
Re: Pinky McJuke (I CAN'T COUNT!!!)
« Reply #196 on: January 03, 2009, 05:19:44 am »
Cheers guys!

No pics I'm afraid due to no progress. I kinda had to let the cat out of the bag and told my girlfriend that she would have to wait until after Xmas for her present. I did buy her some earrings so that she had something to open :)

I have sent thatitallian a sample of the acrylic so he can check the colour and make any changes if necessary. I also got thatitallian to make the changes to the artwork profile and I had them plotted again and I checked the sizes. The new profile is much closer but is still a couple of mm out in places. I think what I'm going to do is get the new artwork printed out and then make two new side panels to suit the artwork. The change of size of profile wont affect the build but the artwork needs to fit the side panels 100% for it to look right.

I'm going to get the artwork sent off this week to get the ball rolling. I also need to buy another LED Wiz for the remaining LEDs (doh!!), Ill get that on route this week too.

Ive nearly wired up all the LEDs for the bezel now, I just need to terminate them in the d-subs. I've also received some white speaker cloth to go behind the mesh.

More progress/pics soon I promise!  :)

Kaytrim

  • I'm too nice a guy
  • Trade Count: (+4)
  • Full Member
  • ***
  • Offline Offline
  • Posts: 2095
  • Last login:September 22, 2015, 04:11:30 pm
Re: Pinky McJuke (I CAN'T COUNT!!!)
« Reply #197 on: February 10, 2009, 03:32:50 pm »
I don't know if I want to be creepy  :burgerking: :burgerking: :burgerking: or concerned.  ???  No updates in a month  What's happening Franco?

TTFN :cheers:
Michael

Franco B

  • Trade Count: (+10)
  • Full Member
  • ***
  • Offline Offline
  • Posts: 3766
  • Last login:February 15, 2024, 09:14:06 am
Re: Pinky McJuke (I CAN'T COUNT!!!)
« Reply #198 on: February 11, 2009, 02:13:53 am »
No need to send out a search party, I'm still here!  :) Thanks for the concern tho.

There has been little progress I'm afraid. We have found a house and we're moving in at the end of the month so my little work space I had before has been reduced to nothing as its now full of things we have bought for the house. My GF has been quite understanding and doesn't mind waiting until we have moved in.

I have received the second LED Wiz to light the other two LEDs. After shipping and import taxes etc its cost me about £50 just two light the extra LEDs (and under juke lighting). Talk about and expensive ---fudgesicle--- up, oh well.

I'm just making another metal/acrylic d-sub enclosure to hold the second LED Wiz at the moment. One thing I'm going to have to do is add a 2.5mm DC socket to the rear of the case. Now that I have the extra LED Wiz in I'm not going to have room to house the LCD PSU inside the case so I'm going to wire the inlet to the LCD and then plug the PSU in to the back of the juke. It's not ideal but its not the end of the world either.

I should have something to post in a couple of weeks once we are moved in and I have the garage/workshop set up.  :)

parag0n

  • Trade Count: (0)
  • Full Member
  • ***
  • Offline Offline
  • Posts: 16
  • Last login:February 18, 2010, 05:13:24 am
Re: Pinky McJuke
« Reply #199 on: February 11, 2009, 07:35:40 am »
i'd personally have taken out the center-top and center-bottom LEDs, then either mounted a bigger SS/Ally decoration, or a constantly-on white led in their place.

Or gone the hacker way and wired the two extras directly to the PC's Parallel port  >:D