Main Restorations Software Audio/Jukebox/MP3 Everything Else Buy/Sell/Trade
Project Announcements Monitor/Video GroovyMAME Merit/JVL Touchscreen Meet Up Retail Vendors
Driving & Racing Woodworking Software Support Forums Consoles Project Arcade Reviews
Automated Projects Artwork Frontend Support Forums Pinball Forum Discussion Old Boards
Raspberry Pi & Dev Board controls.dat Linux Miscellaneous Arcade Wiki Discussion Old Archives
Lightguns Arcade1Up Try the site in https mode Site News

Unread posts | New Replies | Recent posts | Rules | Chatroom | Wiki | File Repository | RSS | Submit news


Author Topic: Pinky McJuke - Believe it or not, work continues =)  (Read 50194 times)

0 Members and 1 Guest are viewing this topic.

Franco B

  • Trade Count: (+10)
  • Full Member
  • ***
  • Offline Offline
  • Posts: 3766
  • Last login:February 15, 2024, 09:14:06 am
Re: Pinky McJuke (Front plexi 'finished')
« Reply #120 on: October 31, 2008, 12:35:06 pm »
Lol, cheers Jav, hang on tho there is plenty of chance for me to fubar it yet!  :)

Nvts, the speaker openings had a quick rub over with some 150 grit, only about 20 seconds or so though. I used a 1/4" bit to finish the openings before beveling and that left an awesome finish. However the finish got worse when I beveled it, probably to do with the increased blade contact and change in cutting plane. I did find though if I did another pass and went super slow the finish improved no end. By the way I did all the routing with the router upside down in my router table I made, it makes it soo much easier to control and see what you are doing. If anyone doesn't have one I would suggest buying or making one.

drawfull

  • Trade Count: (0)
  • Full Member
  • ***
  • Offline Offline
  • Posts: 463
  • Last login:May 18, 2012, 09:30:14 am
Re: Pinky McJuke (Front plexi 'finished')
« Reply #121 on: October 31, 2008, 01:41:17 pm »
That really is great-looking Franco, I was a little skeptical about the metal LEDs but they fit really well with the theme.

I think after the juke for my partner (living room) is complete, there has to be a shiny pink one in the works for somewhere else in the house... Might even find a use for my Apple TV in that one.

fantastic!

 :cheers:

Nvts

  • Trade Count: (0)
  • Full Member
  • ***
  • Offline Offline
  • Posts: 76
  • Last login:September 15, 2010, 02:30:14 pm
Re: Pinky McJuke (Front plexi 'finished')
« Reply #122 on: October 31, 2008, 01:44:20 pm »
I guess I went too fast when I did mine.  It sure cut through like butter, so I think I was thinking it would be smooth.  I paid for it in the sanding work, but its all good now.
"A common mistake that people make when trying to design something completely foolproof was to underestimate the ingenuity of complete fools."

javeryh

  • Trade Count: (+1)
  • Full Member
  • ***
  • Offline Offline
  • Posts: 7959
  • Last login:June 19, 2025, 11:24:08 am
Re: Pinky McJuke (Front plexi 'finished')
« Reply #123 on: October 31, 2008, 02:24:54 pm »
By the way I did all the routing with the router upside down in my router table I made, it makes it soo much easier to control and see what you are doing. If anyone doesn't have one I would suggest buying or making one.

I knew it!  I've been avoiding making one because I don't want to kill an afternoon not making progress.

Kaytrim

  • I'm too nice a guy
  • Trade Count: (+4)
  • Full Member
  • ***
  • Offline Offline
  • Posts: 2095
  • Last login:September 22, 2015, 04:11:30 pm
Re: Pinky McJuke (Front plexi 'finished')
« Reply #124 on: October 31, 2008, 02:41:23 pm »
By the way I did all the routing with the router upside down in my router table I made, it makes it soo much easier to control and see what you are doing. If anyone doesn't have one I would suggest buying or making one.

I knew it!  I've been avoiding making one because I don't want to kill an afternoon not making progress.

Taking a little time now will save you a lot of time and frustration later.  Having a router table is well worth the effort to build.  I know I couldn't do some of the things I do now without one.

Kaytrim

DaOld Man

  • Trade Count: (+4)
  • Full Member
  • ***
  • Offline Offline
  • Posts: 5158
  • Last login:May 24, 2025, 09:57:44 pm
  • Wheres my coffee?
    • Skenny's Outpost
Re: Pinky McJuke (Front plexi 'finished')
« Reply #125 on: October 31, 2008, 09:48:22 pm »
I agree about the router table. My wife bought me one for my BD, but it is really too small to do big jobs like trimming laminate on a juke (dont tell her I said that!).
The simple upside down router attached to a table or a piece of MDF worked real good on my first juke.

Kaytrim

  • I'm too nice a guy
  • Trade Count: (+4)
  • Full Member
  • ***
  • Offline Offline
  • Posts: 2095
  • Last login:September 22, 2015, 04:11:30 pm
Re: Pinky McJuke (Front plexi 'finished')
« Reply #126 on: October 31, 2008, 10:25:07 pm »
Trimming laminate is better suited by a hand held router.

Franco B

  • Trade Count: (+10)
  • Full Member
  • ***
  • Offline Offline
  • Posts: 3766
  • Last login:February 15, 2024, 09:14:06 am
Re: Pinky McJuke (Front plexi 'finished')
« Reply #127 on: November 07, 2008, 09:59:38 am »
By the way I did all the routing with the router upside down in my router table I made, it makes it soo much easier to control and see what you are doing. If anyone doesn't have one I would suggest buying or making one.

I knew it!  I've been avoiding making one because I don't want to kill an afternoon not making progress.

Taking a little time now will save you a lot of time and frustration later.  Having a router table is well worth the effort to build.  I know I couldn't do some of the things I do now without one.

Kaytrim

Couldn't have said it better myself :)

Well the weather has been awful this week, so I haven't had any chance to work until today. I seem to have spent a few hours working but with little progress, that's the way sometimes I suppose. Anyway, I have been working on the back panel some more.

I need a ventilation duct at the top of the juke to vent the air sucked in from the bottom. I used the two semi-circular templates (that I used to cut out the speaker section) to make a basic cut out:


The back of the juke is going to be covered in 3mm pink acrylic and the vent mesh will sit between the two. I then recessed the vent so that the acrylic and MDF will sit flush. I had to screw the back section to a larger piece of MDF and then screw some other pieces to the large piece so that I could screw a parallel in place to guide the router:


Finished recess:


Couple more pics with the mesh in situ:


The only other things I have to do to finish the back is mount the power socket and the I/O plate.

I've made a couple of templates to help me to route the acrylic/MDF to mount the I/O plate:


The one on the right is a negative I made of the I/O plate (the other I/O plate is sat in it in that picture). I will use that one to route out the acrylic so that the plate and acrylic sit flush. I will then mark out the position on the back panel and use the template on the left to route out the material for clearance for the mounted I/O components. I have left material in the four corners so the plates can be screwed to the back panel.


thatitalian

  • Don't worry about the chicken, I feed my friends human all the time...
  • Trade Count: (0)
  • Full Member
  • ***
  • Offline Offline
  • Posts: 887
  • Last login:March 27, 2018, 10:52:37 am
  • The Revolution Is Coming...
Re: Pinky McJuke (Back panel progression)
« Reply #128 on: November 07, 2008, 10:22:15 am »
Very very nice!

javeryh

  • Trade Count: (+1)
  • Full Member
  • ***
  • Offline Offline
  • Posts: 7959
  • Last login:June 19, 2025, 11:24:08 am
Re: Pinky McJuke (Back panel progression)
« Reply #129 on: November 07, 2008, 10:39:04 am »
Wow.  Stunning as usual.  Your lines are so crisp.   :cheers:

Martijn

  • Trade Count: (0)
  • Full Member
  • ***
  • Offline Offline
  • Posts: 822
  • Last login:January 25, 2024, 10:34:36 am
  • Akira!
    • ModMyBox
Re: Pinky McJuke (Back panel progression)
« Reply #130 on: November 07, 2008, 10:40:21 am »
Great work, you create these templates at work?

Franco B

  • Trade Count: (+10)
  • Full Member
  • ***
  • Offline Offline
  • Posts: 3766
  • Last login:February 15, 2024, 09:14:06 am
Re: Pinky McJuke (Back panel progression)
« Reply #131 on: November 07, 2008, 11:02:04 am »
Thanks guys. Its coming together slowly, Im hoping to get plenty done next week as i'm working the afternoon shift so I can get up early and try to get plenty done before I start at 2pm. I work earlies/lates alternate weeks and I get home about 3pm when im on earlies (like this week). My GF gets home about 5pm so it give me no time to work on it by the time I have got all the tools out etc.

Yeah I made the templates at work Martijn, one of the (very few) perks of being in engineering.  :)

Martijn

  • Trade Count: (0)
  • Full Member
  • ***
  • Offline Offline
  • Posts: 822
  • Last login:January 25, 2024, 10:34:36 am
  • Akira!
    • ModMyBox
Re: Pinky McJuke (Back panel progression)
« Reply #132 on: November 07, 2008, 11:28:28 am »
ooh! jalous !!  :hissy: Thats a real plus for routing anything  ;D

drawfull

  • Trade Count: (0)
  • Full Member
  • ***
  • Offline Offline
  • Posts: 463
  • Last login:May 18, 2012, 09:30:14 am
Re: Pinky McJuke (Back panel progression)
« Reply #133 on: November 07, 2008, 11:29:57 am »
My GF gets home about 5pm so it give me no time to work on it by the time I have got all the tools out etc.


You mean you put them AWAY?! In all seriousness it looks absolutely excellent as always - can't wait to see it pinked up!

javeryh

  • Trade Count: (+1)
  • Full Member
  • ***
  • Offline Offline
  • Posts: 7959
  • Last login:June 19, 2025, 11:24:08 am
Re: Pinky McJuke (Back panel progression)
« Reply #134 on: November 07, 2008, 11:47:22 am »
I do 90% of all my work in my unlit detached garage from 8pm to 10pm on nights that the wife wants to watch her girly shows.  It is painful.... and slow.

Franco B

  • Trade Count: (+10)
  • Full Member
  • ***
  • Offline Offline
  • Posts: 3766
  • Last login:February 15, 2024, 09:14:06 am
Re: Pinky McJuke (Back panel progression)
« Reply #135 on: November 07, 2008, 11:56:28 am »
My GF gets home about 5pm so it give me no time to work on it by the time I have got all the tools out etc.


You mean you put them AWAY?! In all seriousness it looks absolutely excellent as always - can't wait to see it pinked up!

Yeah I have to get them out and put them away. There's an hour gone already  :-\

Plus I still with the 'rents so I have no propper work space, you can add on another 1/2 hour for looking for tools in plastic storage boxes. We're getting our own place in a couple of months, I can't wait to get a proper work area. I have already claimed the garage as my space  >:D

Franco B

  • Trade Count: (+10)
  • Full Member
  • ***
  • Offline Offline
  • Posts: 3766
  • Last login:February 15, 2024, 09:14:06 am
Re: Pinky McJuke (1st FUBAR)
« Reply #136 on: November 10, 2008, 05:01:24 am »
Well I royally FUBAR'd today  :-\

I started by routing the relief for the fan vent mesh:


All was well.

I then started to work on the 3mm pink acrylic to cover the back. The first thing I had to do was to cut the large piece to size. I marked out the rough size and started to jigsaw the material. It started to cut ok but then CRACK, the jigsaw grabbed the material and cracked a small piece of the acrylic. I think it happened as the blade doesn't have enough TPI (teeth per inch).

It was no biggie though as I still had plenty of material to play with. I was wondering how I could cut the acrylic without it breaking again. I decided to stick a straight edge to the acrylic and then route a slot leaving 0.2mm of material to snap off:


You can see the cracked section where I started jigsawing.

I then proceeded to route the acrylic so size and all went well. I then needed to stick the acrylic to the MDF back piece and template route the openings. as I couldn't jigsaw the excess I thought I would drill a hole for the bit to fit over and then just route the thing in one go. I think it would have worked ok but I put the piece over the bit of the router table and turned it on, DOUBLE CRACK! The router grabbed and shattered one of the corners  :'(

I didn't manage to get a photo of it as sods law the heavens opened up and I had to get all of the tools etc inside.

It just goes to show you what happens if you take short cuts. I going to get a finer jigsaw blade and try to remove the excess with that. If that fails ill use the router method I used before to trim the excess out of the vents etc.


Martijn

  • Trade Count: (0)
  • Full Member
  • ***
  • Offline Offline
  • Posts: 822
  • Last login:January 25, 2024, 10:34:36 am
  • Akira!
    • ModMyBox
Re: Pinky McJuke (1st FUBAR)
« Reply #137 on: November 10, 2008, 05:10:01 am »
maybe use a router with hand. i used this for my plexi and lexan pieces. 1straight mdf piece on the bottom for router and put the plexi on top. clamp everything tight and then i use a handrouter with flush cutting bit to make a straight line.

but i love the pink snow :)

javeryh

  • Trade Count: (+1)
  • Full Member
  • ***
  • Offline Offline
  • Posts: 7959
  • Last login:June 19, 2025, 11:24:08 am
Re: Pinky McJuke (1st FUBAR)
« Reply #138 on: November 10, 2008, 11:12:29 am »
Ugh.  Franco - I definitely feel your pain.  I also cracked some acrylic with the jigsaw trying to rough cut it to size.  I don't think it was made for that no matter how fine of a blade you use.  I have a 1/4" straight cutting bit which I use exclusively to cut acrylic now.  It goes through it like butter.  At least the worst case for you is that you can order another piece of acrylic and your mistake won't show up on the final product.

Keep your head up  - these projects are challenging which is why I think we are all drawn to them in the first place.  Overcoming these types of mistakes will make the finished jukebox that much sweeter!   :cheers:

Franco B

  • Trade Count: (+10)
  • Full Member
  • ***
  • Offline Offline
  • Posts: 3766
  • Last login:February 15, 2024, 09:14:06 am
Re: Pinky McJuke (1st FUBAR)
« Reply #139 on: November 10, 2008, 12:07:44 pm »
Cheers guys.

Yeah I think the router route is the best idea, I think I have a 1/4" or so straight bit, ill give that a whirl.

I have another bit of acyrlic on the way so im hoping to get the back piece finished off then.

Your right, these projects wouldnt be the same if they were easy. You have to push yourself and learn new things, often by your mistakes. :)

leapinlew

  • Some questionable things going on in this room with cheetos
  • Trade Count: (+4)
  • Full Member
  • ***
  • Offline Offline
  • Posts: 7919
  • Last login:June 22, 2025, 05:13:59 pm
Re: Pinky McJuke (1st FUBAR)
« Reply #140 on: November 10, 2008, 02:14:37 pm »
Cheers guys.

Yeah I think the router route is the best idea, I think I have a 1/4" or so straight bit, ill give that a whirl.

I have another bit of acyrlic on the way so im hoping to get the back piece finished off then.

Your right, these projects wouldnt be the same if they were easy. You have to push yourself and learn new things, often by your mistakes. :)

Your lack of cussing, throwing things, and pouting is infuriating.  :)

Franco B

  • Trade Count: (+10)
  • Full Member
  • ***
  • Offline Offline
  • Posts: 3766
  • Last login:February 15, 2024, 09:14:06 am
Re: Pinky McJuke (1st FUBAR)
« Reply #141 on: November 10, 2008, 02:27:05 pm »
Well, I did throw the back MDF section/acrylic piece onto the gravel which broke the acrylic into a few more pieces! :) Luckily I can still scavenge some acrylic from it for another piece I need.

I don't usually see red but I was pissed off after losing three hours. A hangover didn't help either, maybe the previous nights indulgence was the problem!

leapinlew

  • Some questionable things going on in this room with cheetos
  • Trade Count: (+4)
  • Full Member
  • ***
  • Offline Offline
  • Posts: 7919
  • Last login:June 22, 2025, 05:13:59 pm
Re: Pinky McJuke (1st FUBAR)
« Reply #142 on: November 10, 2008, 02:53:33 pm »
Well, I did throw the back MDF section/acrylic piece onto the gravel which broke the acrylic into a few more pieces! :) Luckily I can still scavenge some acrylic from it for another piece I need.

I don't usually see red but I was pissed off after losing three hours. A hangover didn't help either, maybe the previous nights indulgence was the problem!
Thats the spirit!

Franco B

  • Trade Count: (+10)
  • Full Member
  • ***
  • Offline Offline
  • Posts: 3766
  • Last login:February 15, 2024, 09:14:06 am
Re: Pinky McJuke (1st FUBAR)
« Reply #143 on: November 10, 2008, 03:07:47 pm »
That was the spirit!

Martijn

  • Trade Count: (0)
  • Full Member
  • ***
  • Offline Offline
  • Posts: 822
  • Last login:January 25, 2024, 10:34:36 am
  • Akira!
    • ModMyBox
Re: Pinky McJuke (1st FUBAR)
« Reply #144 on: November 11, 2008, 05:37:23 am »


sure is a beautifull pink gap  :laugh2:

DaOld Man

  • Trade Count: (+4)
  • Full Member
  • ***
  • Offline Offline
  • Posts: 5158
  • Last login:May 24, 2025, 09:57:44 pm
  • Wheres my coffee?
    • Skenny's Outpost
Re: Pinky McJuke (1st FUBAR)
« Reply #145 on: November 11, 2008, 06:11:58 am »
I feel your pain man.. my stupid mistake (properly defined) has set me back at least a day.

But this thing is looking real good! I like that back panel, i may have to duplicate that on mine.

Franco B

  • Trade Count: (+10)
  • Full Member
  • ***
  • Offline Offline
  • Posts: 3766
  • Last login:February 15, 2024, 09:14:06 am
Re: Pinky McJuke (Back acrylic complete)
« Reply #146 on: November 15, 2008, 09:56:55 am »
Cheers DaOld Man, duplicate away!  :)

Had a better day today, got a lot done in a couple of hours.

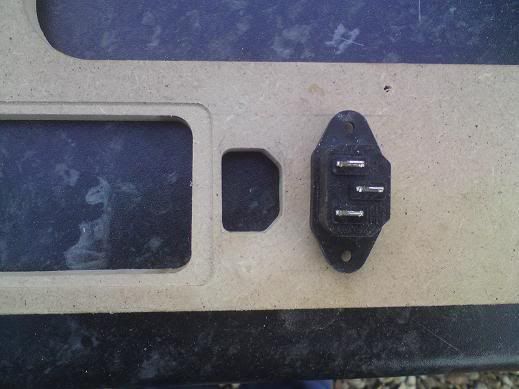
I made a template to cut out a relief for the power inlet and the used that to route the opening:


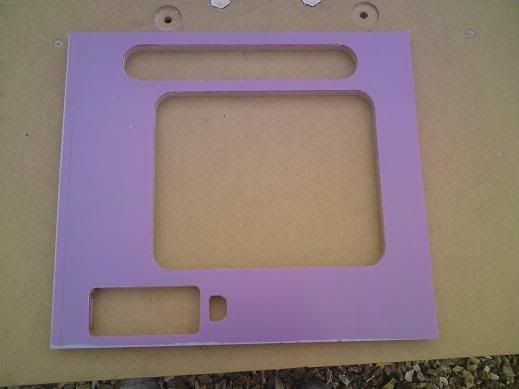
I then used some carpet tape to stick the new piece of 3mm acrylic to the MDF back panel and cut out the openings (no cracking this time :)):


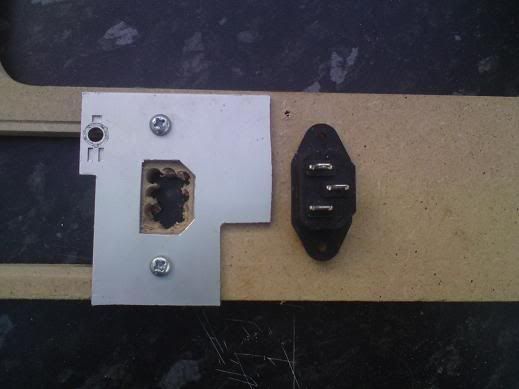
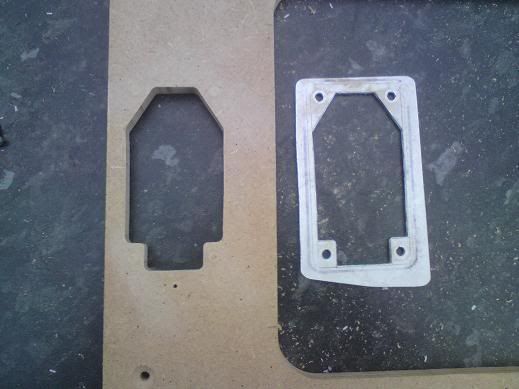
Once that was done I used one of the I/O plate templates to cut out the acrylic so that the plate will be flush with the acrylic:


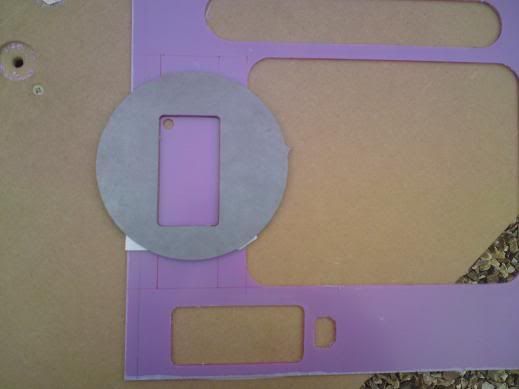
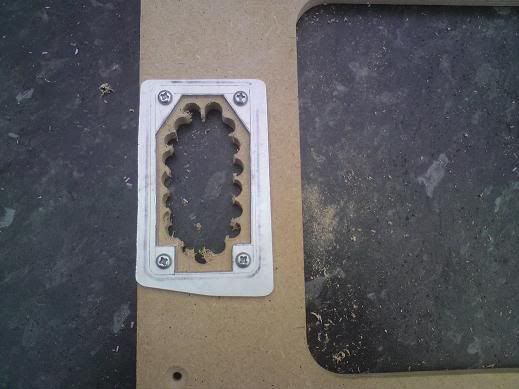
I then marked the mounting hole positions and then used the other template to cut out the relief in the MDF for the components:


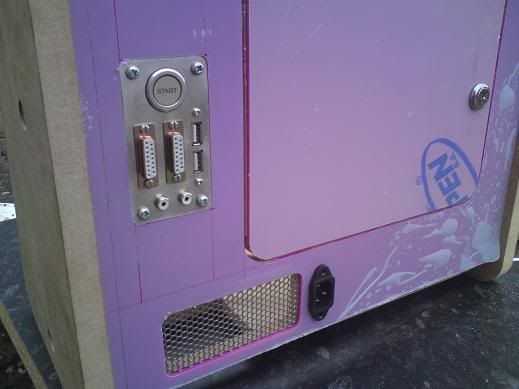
I recycled the FUBAR acrylic from my 1st attempt and used it to cover the back door and I  drilled a hole for the cam lock:


Couple of assembled pics:


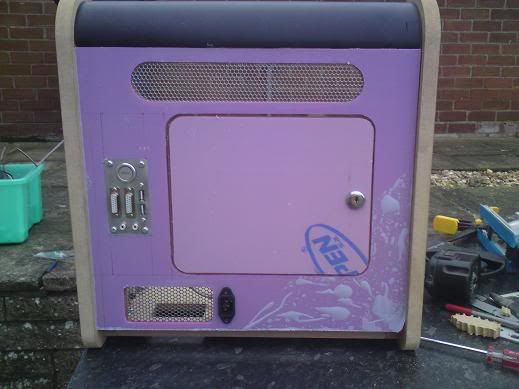
I was soo tempted to remove the protective film but I still need to polish the routed sections. I have a novus kit on the way over from the states so I should be able to get it the back completely finished then.

I also got a new toy this week :)


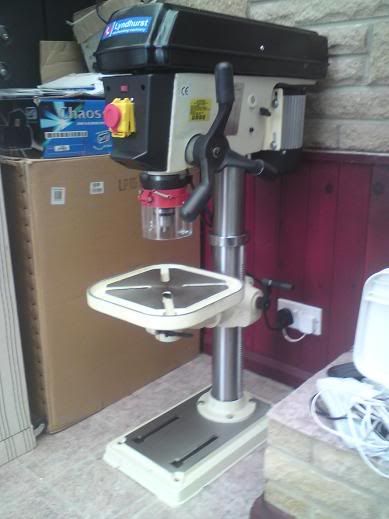
Heavy duty 650w (0.87HP) single phase pillar/press bench drill. It has a 16mm cluck on a MT2 taper which is handy as ill be able to use taper shank drills as well as straight shank. It also has a rack and pinion crank table which it great. ---fudgesicle--- me the thing is heavy though! Its 86kg (13.5 stone)! I could barely lift the head on it own when assembling it.

I got it off ebay for an absolute bargain price of £142 :) 
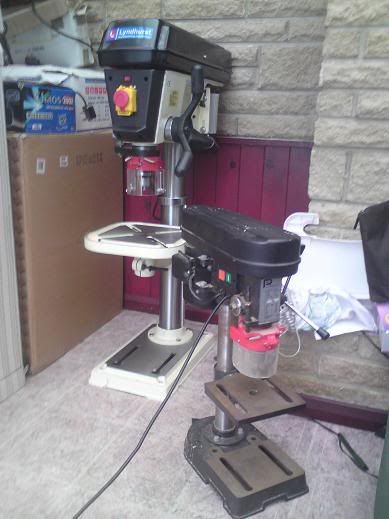
I bought a smaller pillar drill from machine mart last week but it was crap, you could stop the spindle with your hand (not advisable ;)). This one is much more powerful and should hopefully last me forever.

This is it next to the one I had been borrowing off a friend:


That's it for today, I'm off to play some Call of Duty 5 :)


javeryh

  • Trade Count: (+1)
  • Full Member
  • ***
  • Offline Offline
  • Posts: 7959
  • Last login:June 19, 2025, 11:24:08 am
Re: Pinky McJuke (Back acrylic complete)
« Reply #147 on: November 17, 2008, 03:57:59 pm »
I love it.  Everything is well laid out and you have such clean lines where you routed away the material.  That acrylic is going to look sooooooooooo nice when you pull off the protective paper.   :cheers:

mountain

  • Trade Count: (+9)
  • Full Member
  • ***
  • Offline Offline
  • Posts: 1205
  • Last login:January 29, 2025, 08:31:47 am
    • Mountain Jukeboxes
Re: Pinky McJuke (Back acrylic complete)
« Reply #148 on: November 17, 2008, 04:10:43 pm »
Looking really good Franco! Looks like somebody got a little too curious and pulled the protective film from the bottom left corner for a peek

Franco B

  • Trade Count: (+10)
  • Full Member
  • ***
  • Offline Offline
  • Posts: 3766
  • Last login:February 15, 2024, 09:14:06 am
Re: Pinky McJuke (Final Artwork?)
« Reply #149 on: November 24, 2008, 07:07:54 am »
Cheers guys, yeah I did get a little over excited and had a sneaky peak :)

I'm getting to the stage now where I'm going to need to get the artwork printed. I'm not sure whether to use mamemarquees or emdkay. I think Ill get a price from each and see what they come back with.

I got thatitallian to make me some artwork to cover the top black pipe section and bottom of the case. This is both section plus the sideart from before:


Any thoughts before I send it off for printing? I think I'm going to put "To Katie from Fran, Xmas '08" on the artwork on the top at the back somewhere.

I'm going to get some black and white prints from www.copycentre.org to check the sizes before the final prints just to make sure everything lines up ok.

I did a little work on the bottom panel today. I cut the relief for the fan and I also routed a channel towards the front and I drilled some 5mm holes along it. The plan is to put some pink LEDs in the to shine down to give a little under lighting.


Pic of the 2.5" 250GB SATA drive (with IDE adapter), 80mm fan and PSU in their locations:


javeryh

  • Trade Count: (+1)
  • Full Member
  • ***
  • Offline Offline
  • Posts: 7959
  • Last login:June 19, 2025, 11:24:08 am
Re: Pinky McJuke (Final Artwork?)
« Reply #150 on: November 24, 2008, 11:01:32 am »
Franco - looks great.  One thing I noticed is that the vent on the bottom for the power supply was cut at a 90 degree angle compared to the vent on top.  I ended up doing this myself for the my speaker grill which is the only reason I noticed.  The top vent is the style I'd keep - it looks better, IMO.  I'd re-cut the bottom one if you have enough left over material.   :cheers:

Franco B

  • Trade Count: (+10)
  • Full Member
  • ***
  • Offline Offline
  • Posts: 3766
  • Last login:February 15, 2024, 09:14:06 am
Re: Pinky McJuke (Final Artwork?)
« Reply #151 on: November 24, 2008, 11:19:51 am »
I'm not sure I understand bud. Both vents are parallel to each other, the only difference is the top vent has a full width radii's where as the bottom one has 1/4" radii's in the corners.

javeryh

  • Trade Count: (+1)
  • Full Member
  • ***
  • Offline Offline
  • Posts: 7959
  • Last login:June 19, 2025, 11:24:08 am
Re: Pinky McJuke (Final Artwork?)
« Reply #152 on: November 24, 2008, 11:48:11 am »
Look at the pattern of the holes of the mesh.  The top one has the little circles lined up in rows.  The bottom one has the little circles in columns.  Do you see it?  If not then I guess I'm the only one who will notice!  :cheers:

Franco B

  • Trade Count: (+10)
  • Full Member
  • ***
  • Offline Offline
  • Posts: 3766
  • Last login:February 15, 2024, 09:14:06 am
Re: Pinky McJuke (Final Artwork?)
« Reply #153 on: November 24, 2008, 12:40:09 pm »
Ah, I get ya  :)

I only just managed to get the three pieces out of the piece that mountain kindly sent me. I agree it would look better if they were lined up the same but I'll just have to make do with what I have. Ill just have to hope everyone isn't as eagled eyed as you  :cheers:

Franco B

  • Trade Count: (+10)
  • Full Member
  • ***
  • Offline Offline
  • Posts: 3766
  • Last login:February 15, 2024, 09:14:06 am
Re: Pinky McJuke (Final Artwork?)
« Reply #154 on: November 24, 2008, 03:45:56 pm »
I hope I'm not jinxing myself here but it looks like I should finish the juke before xmas. If so I'm hopefully going to make her a CP for it and eventually one for me too.

I'm just going to make a simple rectangular CP with a joystick (duh!) 6 buttons and a couple of admin buttons.

Ive been having a look through deviantart and I found this artwork which I quite like:


Ive sent the artist a message to see if I can get a higher resolution version.

I'm thinking of using a Sanwa JLF with a pink Seimitsu bubbletop like this:


I'm going to see if I can some SS button bezels water cut like the ones I made for my cocktail and ill make her a stainless dustwasher to match:


For the buttons I'm thinking of using the Seimitsu PS-14-GN-CP's which have translucent plungers that you can cut artwork out (from the CP art) to place inside the buttons. (Is that correct, Kaytrim?)


Any thoughts? 

javeryh

  • Trade Count: (+1)
  • Full Member
  • ***
  • Offline Offline
  • Posts: 7959
  • Last login:June 19, 2025, 11:24:08 am
Re: Pinky McJuke (CP Artwork/Controls)
« Reply #155 on: November 24, 2008, 04:18:15 pm »
I like the art, I think.  It's a little busy but since it is going to be a separate part of the juke I think you can get away with it.  If you can't get a higher res version, just do what I'm doing for my marquee and run it through a vectorization program - you can blow it up to any size you want and it distorts the image just enough to give it a more cartoony look which might tie into the juke art a little better.


Franco B

  • Trade Count: (+10)
  • Full Member
  • ***
  • Offline Offline
  • Posts: 3766
  • Last login:February 15, 2024, 09:14:06 am
Re: Pinky McJuke (CP Artwork/Controls)
« Reply #156 on: November 24, 2008, 04:27:39 pm »
Thanks for the tip buddy. I thought about running it through vector magic but I wasn't sure how it would turn out, I quite like the look of that, it looks a little softer.  :cheers:

I know what you mean about it being a little busy, but like you said as it wont be part of the actual juke I think I can get away with it.

I think I will give her the CP first before the juke at xmas and see what her reaction is. She will probably think I'm giving her a present a'la Homers bowling ball gift to Marge  :D

Timoe

  • Trade Count: (+2)
  • Full Member
  • ***
  • Offline Offline
  • Posts: 1662
  • Last login:July 14, 2009, 09:50:12 am
  • Team-Oh-tAy-Oh
    • Rattlin' Trash
Re: Pinky McJuke (CP Artwork/Controls)
« Reply #157 on: November 25, 2008, 08:30:52 am »
Seimitsu now makes a button like the one pictured above but it has a white bezel and a clear plunger with a pink piece inside the plunger. 

The white bezel might offer a nice contrast to the pink.

thatitalian

  • Don't worry about the chicken, I feed my friends human all the time...
  • Trade Count: (0)
  • Full Member
  • ***
  • Offline Offline
  • Posts: 887
  • Last login:March 27, 2018, 10:52:37 am
  • The Revolution Is Coming...
Re: Pinky McJuke (CP Artwork/Controls)
« Reply #158 on: November 25, 2008, 09:16:40 am »
Wouldn't be hard to match it either with the artwork. Just add in a few notes purple and white for a bit of contrast.

Franco B

  • Trade Count: (+10)
  • Full Member
  • ***
  • Offline Offline
  • Posts: 3766
  • Last login:February 15, 2024, 09:14:06 am
Re: Pinky McJuke (CP Artwork/Controls)
« Reply #159 on: November 26, 2008, 06:50:16 am »
Thanks Timoe. I may get three of each and mix it up a bit.

@thatitalian: Good idea, I wonder who would be doing that for me  :)

The author is going to send me a higher resolution image so all is good on that front.

The b&w artwork came this morning and I applied it to the juke to check the dimensions/profiles.


Woof!! lol

Looks pretty good to me, even in black and white  :)

I do need to change the dimensions of the artwork slightly but that was expected. I didnt want to order the colour artwork and find out that it didn't fit 100%. Ill ask my good buddy thatitalian (nudge, nudge) to make the changes to the artwork and ill get another set of prints done to check the changes. I would rather spend another £15 for the b&w prints than waste a load of £££ on the colour prints.