Main Restorations Software Audio/Jukebox/MP3 Everything Else Buy/Sell/Trade
Project Announcements Monitor/Video GroovyMAME Merit/JVL Touchscreen Meet Up Retail Vendors
Driving & Racing Woodworking Software Support Forums Consoles Project Arcade Reviews
Automated Projects Artwork Frontend Support Forums Pinball Forum Discussion Old Boards
Raspberry Pi & Dev Board controls.dat Linux Miscellaneous Arcade Wiki Discussion Old Archives
Lightguns Arcade1Up Try the site in https mode Site News

Unread posts | New Replies | Recent posts | Rules | Chatroom | Wiki | File Repository | RSS | Submit news


Author Topic: Franco's Custom Cocktail (UPDATE: Wood cutting commences!! =) )  (Read 64811 times)

0 Members and 1 Guest are viewing this topic.

Franco

  • Guest
  • Trade Count: (0)
Franco's Custom Cocktail (UPDATE: Wood cutting commences!! =) )
« on: October 10, 2007, 02:23:31 pm »
Hey y'all.

I've been a bit quite round these parts of late, especially in the arcade side of things but I have been bitten by the cab building bud again!

I built a cab a couple of years ago for a college project (theres a couple of pics below) but I had to move to a place where I cannot fit my full size cab and I had it in storage collecting dust for ages. Ive decided to build a cocktail cab as I have room for one and so decided to part out my cab and sold some of the parts on ebay and I am going to recycle some of the parts. My once beautiful cab is now just a shell of happy memories  :'(

I have a few ideas so far but as of now im thinking of building a cab with two player head to head vertical controls (Joy and three buttons each probably) and also having two  players side by side on one of the horizontal sides (Joy and six buttons each).

I wanted to hinge the monitor/top near the horizontal side by side controls which would allow be to elevate the screen which would be a nice feature both for horizontal arcade gaming and also If I have any consoles or emulated consoles inside for which I could use the screen as a 'standard' screen. I think I am going to have to forget about tis tho as realistialy I would have to use an LCD for this and I dont think im going to be able to get a large (22"+) 4:3 LCD in my price range. I think viewing angles would also be a problem when looking down onto the cocktail top. I havent looked into LCD's for a while now though so I dont know how if the viewing angels are any better than they used to be.

I think i am going to have to go down the CRT monitor route, I already have a 22" CRT that I had in my cab so I will probably use that.

As for colour schemes I think im going to keep it simple and go for black melamine with chrome t-moulding and then alluminium joys, stainless feet and a other few stainless accents here and there. Im a CNC machinist by trade so I will be making alot of custom parts myself, just as I did my other cab. I have some clear FX buttons that I bought and never used so I think I am going to use those with some multicoloured LEDS. Last time i looked into it Buddabing was building a LED driver board but I dont know if this ever got produced? I think that there are some other products on the market for lighting LEDs, are there any that could light/control all 18 buttons? If I use three colour LEDs obviously that will greatly increase the amount of outputs required on the board.

What is the state of play as regards to controling the LEDs nowadays? Is it possible to have attract modes and also somehow light up the designated controls for the game being played (heres hoping!)

Im going to take plenty of photos this time. I didnt actuall realise this forum existed (doh) until I had completed 95% of my 1st cab, the only forum I knew of at the time was the mame.net hardware one.

Im just going to get cracking now and get some ideas down onto paper and CAD. Im sure ill be back with more info and will be asking for much more help too soon!

If anyone could answer my LED driver/conrtol questions then that would be great. Thanks for listening and heres a couple of pics of by old upright (R.I.P)  :'(


« Last Edit: December 27, 2007, 11:50:18 am by Franco »

polaris

  • You're a genius! Sheer genius!
  • Wiki Contributor
  • Trade Count: (+1)
  • Full Member
  • ***
  • Offline Offline
  • Posts: 1405
  • Last login:May 21, 2012, 05:18:59 pm
  • veni vidi congai
Re: 2nd Project - Its cocktail time!
« Reply #1 on: October 10, 2007, 03:06:30 pm »
look at randyt's stuff at groovygamegear, the ledwiz is what your'e looking for i believe.
got COLOR codes from projects, post them here

add stuff to the uk wiki section

WCBoudreaux

  • Trade Count: (+5)
  • Full Member
  • ***
  • Offline Offline
  • Posts: 202
  • Last login:February 15, 2022, 07:20:41 pm
Re: 2nd Project - Its cocktail time!
« Reply #2 on: October 10, 2007, 03:48:12 pm »
Ahhh Cool! Definately post many pics, as I too will be building a cocktail soon... I'm not really sure how soon I'll get started on mine, but trust me, it will be done...

It would be nice to have this thread to look back on when I start mine...

Good Luck!  :cheers:

rockin_rick

  • Trade Count: (+3)
  • Full Member
  • ***
  • Offline Offline
  • Posts: 495
  • Last login:May 27, 2017, 09:20:20 am
Re: 2nd Project - Its cocktail time!
« Reply #3 on: October 10, 2007, 10:44:07 pm »
What is the state of play as regards to controling the LEDs nowadays? Is it possible to have attract modes and also somehow light up the designated controls for the game being played (heres hoping!)

This is now possible.  Most common (and what I'd recommend) method is using a LEDwiz along with Mala front end.  Together you can light your buttons up so that only the used ones light up, and that they light up in the colour that the game originally had the button coloured.  It can also speak the button's label (function) on game start.  I believe that other front ends may also support this, but Mala also has very good cocktail features.

Rick
If I do not respond to your post in a timely manner, feel free to PM me.

Franco

  • Guest
  • Trade Count: (0)
Re: 2nd Project - Its cocktail time!
« Reply #4 on: October 11, 2007, 02:28:26 am »
Thanks for your help guys! Yeah it sounds like the LED WIZ is just what im after, its a shame the GGG site seems to be down at the moment but I managed to read the retroblast review. Are they still $45? Sounds like a bargain to me!

I was thinking about having RBG LEDs but I think im just going to stick with 'plain' blue other wise the amount of outputs im going to need is going to get silly.

What im thinking is having a LED in each control button (2x6 + 2x3 = 18 outputs). I would also like to have a ring of 8 LEDs around each joystick to show which joystick directions are used on each game (2 way, 4 way, 8way etc). Is this possible with Mala? If so that would be another 16 outputs for two joysticks (I would connect the 'vertical' and 'horizontal' 8 LED rings together to save on dedicated outputs.

This would give a total of 18 + 16 =34 outputs which is obviously more than the 32 that the LED WIZ supports. I think I will probably connect the three buttons of each player on the 'vertical' mini CPs to the first three buttons of each player on the 'horizontal' CPs. This would reduce the amount of dedicated LED WIZ outputs by 6 which would bring the total outputs required under 32 and also give me four spare (maybe for start buttons?? hmm)

I hope that lot makes sense and is possible!

I will be definitely be taking lots of photos on the way and will be documenting the build as much as possible. Its something I didnt do the first time around and im really looking forward to getting some advice and imput along the way  :)

Im not looking at rushing into builing this cab (even though I cant wait to get cracking!) as I wasnt to make sure its perfect (as possible) before I start. Im also going to take my time building it as I want to produce a cocktail that looks like it was 'shop bought'.

Right, im off to get sketching to start getting some ideas down on paper. Thanks for the help so far!

Green Giant

  • Trade Count: (0)
  • Full Member
  • ***
  • Offline Offline
  • Posts: 1124
  • Last login:September 29, 2016, 06:50:57 pm
Re: 2nd Project - Its cocktail time!
« Reply #5 on: October 11, 2007, 05:20:09 pm »
Try this link for GGG, http://groovygamegear.com/webstore/ .

Also, you seem to be getting back into this after a while, so you probably don't know about the U360 joysticks.  They are analog sticks that automatically switch through software to whatever the original game used.  You wouldn't need led's as the cab would auto set your sticks to 2/4/8/49/analog/etc.  They are sold here, http://www.ultimarc.com/ .

Mala is able to light each direction if you placed lights around the sticks, but I am not sure if it would show diagonals, just up down left right.

But the ledwiz is an amazing product, if you went all out and did the rgb buttons, then mala can light the original game controls in the original colors.
"He lives down there in his valley,
The cat stands tall and green,
Well, he ain't no prize, and there's no women his size,
And that's why the cat's so mean"
Toxic Arcade, my first build

Franco

  • Guest
  • Trade Count: (0)
Re: 2nd Project - Its cocktail time!
« Reply #6 on: October 12, 2007, 01:51:08 am »
Thanks for your post Green Giant.

I hadnt really heard about the U360's, thankyou for pointing me towards them. I think I am going to go with 'standard' joysticks though although im not sure which joys to use at present. I had T-sticks on my last cab but they were a little too stiff for me so I think im going to try something a bit lighter this time.

I do want to include the LED rings, for pure bling if nothing else. Even if Mala can only control the U,D,L+R LEDs I think I will still include the diagonals as I will be able to program some nice attract sequences with chasing rings etc.

I didnt know about Mala being able to replicate the original game colours, thats pretty cool! I think im going to stick with blue LEDs though.

I started designing the table in CAD last night. 3 hours into it it decided to crash on me and I lost all my work up to that point, that will teach me not to save regually! However a little help from my good friend Grolsch calmed me down and I got back to work again.  :cheers:  I was hoping to post some images last night but I didnt get enough done but im going to carry on tonght and Ill get something up for you guys to look at rather than posts and posts of words!

I have had a litte luck in the way of a PC to run things. I have been offered a Dell SX270 for £75 delivered to me. Its a 2.8ghz, 512mb ram small form factor PC which I think would be ideal for my project as I would be able to use it inside the cab without having to decase it. The only thing I am slightly concerned about is that they are known to run hot and pop capacitors. I was planning on having at least two fans sucking air in at the bottom and a couple sucking air out at the top and I think that this may keep the PC even cooler than it would be when used normally in an open space. Any thoughts on this?

EDIT: This is a picture of the PC in question.

« Last Edit: October 12, 2007, 01:55:24 am by Franco »

theCoder

  • Trade Count: (0)
  • Full Member
  • ***
  • Offline Offline
  • Posts: 1035
  • Last login:September 20, 2010, 10:48:47 pm
  • I'll clean up my mess, Honey, when I'm done...
Re: 2nd Project - Its cocktail time!
« Reply #7 on: October 12, 2007, 10:03:49 am »
I'm going LED crazy on my current project.  One component of which involves CNC.  Rather than buying GGG, I'm learning to make my own LED controllers.  You might get some ideas giving my TimeSink thread a read (referenced below).

You mentioned lighting the JS, indicating whether it is a 4 / 8 way game.  You could do this by inlaying Plexiglas in the CP.  I recently picked up a bunch of various diameter round Plexiglas stock to play with for a similar application.  It comes in 1/8" diameter increments.

Good luck on your project & welcome to the forum.

XyloSesame

  • Trade Count: (+10)
  • Full Member
  • ***
  • Offline Offline
  • Posts: 358
  • Last login:September 17, 2024, 05:57:04 pm
  • the creepy prince guy...
    • The Nightingale Theater
Re: 2nd Project - Its cocktail time!
« Reply #8 on: October 12, 2007, 10:27:13 am »
I have had a litte luck in the way of a PC to run things. I have been offered a Dell SX270 for £75 delivered to me. Its a 2.8ghz, 512mb ram small form factor PC which I think would be ideal for my project as I would be able to use it inside the cab without having to decase it. The only thing I am slightly concerned about is that they are known to run hot and pop capacitors. I was planning on having at least two fans sucking air in at the bottom and a couple sucking air out at the top and I think that this may keep the PC even cooler than it would be when used normally in an open space. Any thoughts on this?
My old company had a number of 270s in the small form chassis; they did run hot and, on occasion, fry a cap. The fans are a good idea...

Kaytrim

  • I'm too nice a guy
  • Trade Count: (+4)
  • Full Member
  • ***
  • Offline Offline
  • Posts: 2095
  • Last login:September 22, 2015, 04:11:30 pm
Re: 2nd Project - Its cocktail time!
« Reply #9 on: October 12, 2007, 10:49:12 am »
I would at least open the case once you put it in the cab.  That way the heat will be able to dissipate better.

TTFN

Franco

  • Guest
  • Trade Count: (0)
Re: 2nd Project - Its cocktail time!
« Reply #10 on: October 12, 2007, 11:50:57 am »
I'm going LED crazy on my current project.  One component of which involves CNC.  Rather than buying GGG, I'm learning to make my own LED controllers.  You might get some ideas giving my TimeSink thread a read (referenced below).

You mentioned lighting the JS, indicating whether it is a 4 / 8 way game.  You could do this by inlaying Plexiglas in the CP.  I recently picked up a bunch of various diameter round Plexiglas stock to play with for a similar application.  It comes in 1/8" diameter increments.

Good luck on your project & welcome to the forum.

Thanks for your input theCoder, I have seen your thread before and you are doing some awesome work. There is plenty of info that will be of great use to me.

I like your plexiglass idea but I think i know how im going to mount the LEDS, actually whilst typing this sentance I have had an idea which will incorperate my idea and yours, thanks!

Thanks for the welcome too, I have been around for a couple of years tho - Ive just been in hiding!  :)

My old company had a number of 270s in the small form chassis; they did run hot and, on occasion, fry a cap. The fans are a good idea...

I would at least open the case once you put it in the cab.  That way the heat will be able to dissipate better.

TTFN

Thanks for the advice too. Ive decided against the 270, I dont want to run the risk of overheating plus it will be hard to upgrade in regards to video etc. Not to worry though, the same guy has offered me a 3.1Ghz Dimension 4600 with 2GB DDR for the same price! (£75)  :D  It means I will have to decase but that isnt a problem.

Wooo, im getting really excited about this project now  :D Im going to stay in tonight and carry on with some CAD with help from mans best friend (the cold, fizzy kind) and I hope to get some preliminary designs up later on.

Thanks again all, watch this space....

XyloSesame

  • Trade Count: (+10)
  • Full Member
  • ***
  • Offline Offline
  • Posts: 358
  • Last login:September 17, 2024, 05:57:04 pm
  • the creepy prince guy...
    • The Nightingale Theater
Re: 2nd Project - Its cocktail time!
« Reply #11 on: October 12, 2007, 04:08:33 pm »
I would at least open the case once you put it in the cab.  That way the heat will be able to dissipate better.

TTFN
Be mindful of airflow, whether you decase or not. In most modern cases, airflow is designed to pass over heat-sensitive devices. Decasing and randomly placed fans do not, by themselves, guarantee heat dissipation; make sure airflow actually passes over your components...

Franco

  • Guest
  • Trade Count: (0)
Re: 2nd Project - Its cocktail time!
« Reply #12 on: October 12, 2007, 05:32:17 pm »
This has been taken in mind. The original motherboard has a 90 degree bend tunnel which draws air directly onto the CPU. I cannot easily recreate such direct airflow towards the CPU/motherboard but my plan is to posistion the fans so that they provide as much airflow as possible towards the CPU/motherboard.

Im still undecided whether to have four fans pulling in air around the CPU/monitor and have enough ventilation at the top of the enclosure to release the air or should I have two fans pulling air in around the CPU etc (at the bottom) and then have two fans to expel the air at the top. Any thoughts?

By the way the design is coming along a treat, its just taking longer than I expected it to.

Quote
Damn UCS positioning with polylines, i swear that should create a single line, what do you mean it wasnt drawn locked to the axis, i could swear there wasnt a gap before either!


 :D

EDIT: I seem to have noticed some kind or relationship between the amount of vino/grolsch drunk and the amount of CAd errors occuring!  :dizzy:  :D
« Last Edit: October 12, 2007, 05:36:36 pm by Franco »

Green Giant

  • Trade Count: (0)
  • Full Member
  • ***
  • Offline Offline
  • Posts: 1124
  • Last login:September 29, 2016, 06:50:57 pm
Re: 2nd Project - Its cocktail time!
« Reply #13 on: October 12, 2007, 08:29:38 pm »
A really simple thing for a fan to cool off the cpu is a cheap 10" vortex fans.  They push more air than any form of computer case fans, along with being quiet.  A duct from the outside to the back of the fan would suffice in creating plenty of air flow to the whole cab, hot air rising and all. 

If you are pulling in enough air from the bottom, you won't need much of anything at the top unless you are worried about your monitor warming up.
"He lives down there in his valley,
The cat stands tall and green,
Well, he ain't no prize, and there's no women his size,
And that's why the cat's so mean"
Toxic Arcade, my first build

Franco

  • Guest
  • Trade Count: (0)
Re: 2nd Project - Its cocktail time! (UPDATE: 1st CAD models)
« Reply #14 on: October 13, 2007, 05:05:43 pm »
Thanks for your post Green Giant. You will see from the models below that space is going to be at a premium so I dont think I will have enough room for ducting. Im pretty sure of what I am going to do cooling wise which I will post at a later date.

I have started to make a CAD model of the type of thing im looking to make. Ignore the colour scheme, im thinking of doing the whole thing in black vinyl (possibly textured) with chrome t-moulding and stainless other parts, I am quite liking the blue/chrome though! Ive diplayed it in blue as it is hard to make out alot of the image with black panels.

These are a couple of views of my design so far:


I have decided to have quite a chunky top on the cab. I quite like the profile as it looks almost space invader'ish. There will be chrome t-moulding around the top but I have not added it to the drawing so far. Also note I havent added the glass as yet (ive modeled it but it seems to mask the raster SF2 image).


This is a close up of the CP areas:


Im going to make some button bezels out of stainless steel to surround the control buttons as well as the buttons on the front of the CPs (Player start and credit). Im also going to make some stainless dustwashers to match.

The eight white dots around each joystick are going to be short cylinders of perspex laid into the CP with a LED mounted from the rear side to light them (thanks for some inspiration on that one theCoder!)

The CP buttons are all going to be clear with LEDs controlled by a LED WIZ and Mala.

Im also going to make some heavy duty stainless steel feet to raise the cab off the floor. Im going to turn some wheels and mount them in on of the legs so that one end of the cab can be lifted slightly to whell the cab around.

Im going to use a 22" flatscreen CRT monitor in the cab. I made a rough model of the monitor and based the cab around it. You can see from the picture below that there isnt going to be much spare space but this was planned as I want to have a large screen to cab size ratio.


The white/grey areas behind each CP are going to be made from some UV reactive perspex that I have and are going to be backlit with UV LEDs.

Please ignore the 1 and 2 on the front of the CPs, im going to have some 1 and 2 player 'man' images instead.

I think that there is plenty more that I have forgotten to post but im quite tired due to the amount of time I have soent on CAD this weekend. Ill update the thread tomorrow when I have remembered anything and when I have updtaed the models.

Any thoughts/suggestions etc so far?


« Last Edit: October 31, 2007, 07:41:58 am by Franco »

ARTIFACT

  • Trade Count: (0)
  • Full Member
  • ***
  • Offline Offline
  • Posts: 757
  • Last login:June 07, 2025, 01:02:12 pm
    • ARTIFACT - my scratch designed & built arcade cabinet
Re: 2nd Project - Its cocktail time! (UPDATE: 1st CAD models)
« Reply #15 on: October 13, 2007, 11:13:12 pm »
Are the joystick balltops to scale? they appear much bigger than I would think they'd be.

Looks great though!
I like the slopped shape.

It seems that the top panel may get "in the way" when moving the sticks and playing... what do you think?

Franco

  • Guest
  • Trade Count: (0)
Re: 2nd Project - Its cocktail time! (UPDATE: 1st CAD models)
« Reply #16 on: October 14, 2007, 01:33:38 am »
No, you are right the ball tops are not to scale. I didnt have any dimentions to hand when I modelled them and just guessed them and they do look on the large side. Ill get some propper dimentions today and update it.

You are also right about the top looking as though it will 'get in the way. Im going to lower the CP height and I may also make the CP deeper to give a little more room inside. Ill model the internals of the buttons and the joystick bases to see exactly what room I need.

On the subject of joysticks im not really sure what to use. I have a pair of T-sticks left over from my previous build and im thinking of using these for the smaller vertical panels. At least then I could switch to 4-way mode for the 4way games. They currently have blue bat tops but I think I will make some stainless or ally ball tops for them. Its the horizontal 'fighter' panel that Im not sure about what to do joystick wise. Ive heard alot of good things about Sanwa sticks and im thinking about using those. How stiff are they? I used t-sticks on my old cab and I liked the short throw of them but found them a little too stiff. Are the Sanwas any lighter? Once again whatever choice I do make I think i will make stome stainless/ally ball tops.

I think that is all for now. Its 6,30 in the morning here and im at work, i have 6 hours 'free' today whilst I am here so im going to crack on with some more modelling. Ill update later once I have made some more progress.

Franco

  • Guest
  • Trade Count: (0)
Re: 2nd Project - Its cocktail time! (UPDATE: 1st CAD models)
« Reply #17 on: October 15, 2007, 08:31:03 pm »
I have made some more progress, mainly with the modelling but I have actually done some physical work too  :)

This is the stage im at with the design/model:


As you can see I have added the glass, t-mouding around the top and the glass clips. I have also lowered the horizontal CP by 50mm to give a little more vertical hand clearance. I have left the vertical CPs how they were (although they will be the same height as the horizontal one) so you can see the difference.

This is a picture off one of the button bezels that I am going to mill out of 3mm stainless steel plate:


I have also modelled the feet which I am going to CNC mill from solid stainless steel bar:


Im going to mill two 12mm slots in one of the feet and mount two wheels on spindels to allow the cab to be lifted up at one end wheeled around. This is a closer view of the foot with the wheels in:


I had a little free time at work this evening so I produced the two wheels on a CNC lathe:


Im still undecided on the colour scheme at the moment. Im either thinking of black with chrome t-mouding, blue with chrome t-moulding or blue with white t-moulding. Any thoughts? Ill try and get some pictures up tomorrow of the different colour schemes.


« Last Edit: October 31, 2007, 07:40:19 am by Franco »

Franco

  • Guest
  • Trade Count: (0)
Re: Franco's Custom Cocktail (UPDATE: CAD Models + CNC Turned Wheels)
« Reply #18 on: October 31, 2007, 08:18:13 am »
Its been a while with no update purley because I dont have much more info to post. I dont know if its the same with you guys though but all the time whilst im planning building a cab there is normally something on my brain about how im going to solve a certain problem or what im going to do graphics wise etc etc, it seems to take over you (which isnt necessarily a bad thing  :) )

Anyway I will  update with a little info.

This is the monitor that I am going to me using:


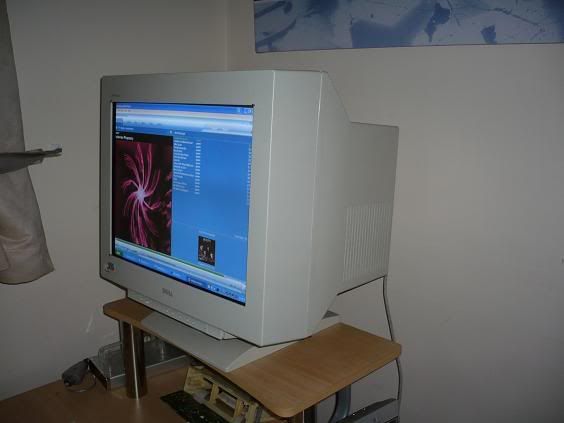
Its a Dell 21" flatscreen CRT that i used in my old project. Its a bit on the large size and is freaking heavy but its also free :) I would like to use a LCD but you cant seem to get one over 19" or so thats 4:3.

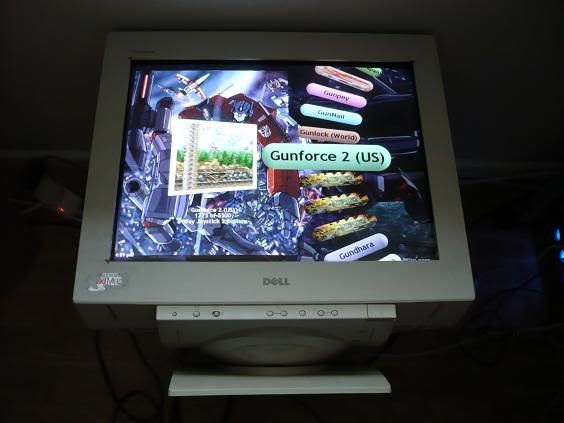
Ive tried it on its back and it seems to work fine. I didnt want to get down the road after I had built the cab and find out that it didnt like being on its back. I wanted to test it on its back for a while but i was just a bit worried about it getting hot in the case on its back with no ventilation so I just gave it a ten minute test. The finished cocktail will have plenty of ventilation.


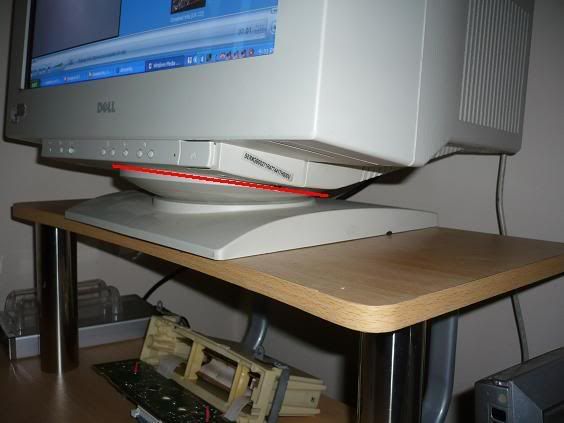
I dont really want to decase the monitor if I can help it as I have heard stories of the breaking so im going to try and keep it intact if possible. It does have rather a large stand/foot though which is going to have to come off for it to fit in the case. Im thinking that at least the section below the line will have to come off:


I was originally planning on having a black cocktail with chrome t-moulding and accents but I have been using blue for the panels as I have been modelling it as it is easier to see what is going on and the blue realy has grown on me so I think im going to go for blue with white t-moulding and stainless accents.

Im going to add some pinball buttons to the cocktail for Pinmame etc and I remembered that I had blue buttons with a white plastic bezel on my old cab and I thought these would compliment the colour scheme nicely. The buttons on the main CPs are going to have CNC lazer cut bezels around them so I thought I would make some mini bezels for these single buttons to match:


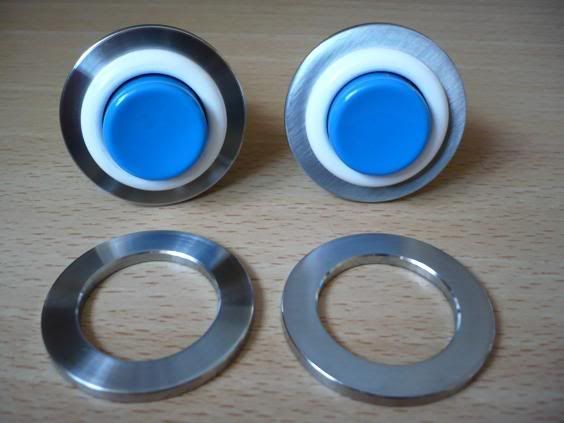
The ones on the left came off the machine with a polished turned finish and the ones on the right I used some 320 grit emery to give a brushed finsh. Im not sure which I am going to use yet.

Ive just finished the dimensioned drawing for the feet and Im going to take them to work later to get programmed ready to be CNC milled.

The only other updates are a few parts that I have bought. I got 100 Superbright LEDs with resistors from ebay for a bargain £10 delivered to me, Ive also bought 5mmx1M of clear plastic tube for the lights around the joys.

Im going to order my Sanwas from Gremlin Solutions today along with a couple more one and two player start buttons. Ive also had to get a credit card soley so I can purchase from the GGG site  ::) . Once it arrives im going to order two LED Wizs, 20 button diffusers and some microleaf switches.

Whilst im waiting for that lot to arrive im going to get some hardboard to do a mock up of the cab before I get stuck in to the main build.

I think thats about it for now!
« Last Edit: November 06, 2007, 11:17:34 am by Franco »

SithMaster

  • Lets see how happy you are when you need to use a lawn mower and it keeps turning off when you want to cut up zombies.
  • Trade Count: (+4)
  • Full Member
  • ***
  • Offline Offline
  • Posts: 1781
  • Last login:January 12, 2014, 03:52:59 pm
  • The brightest light casts the darkest shadow.
Re: Franco's Custom Cocktail (UPDATE: Few bits & Stainless button bezels)
« Reply #19 on: October 31, 2007, 02:46:14 pm »
So will Optimus be in your cocktail front end?

For my 21inch monitor i cut part of the case so i can drive a bolt through the mounting tabs but the other end screws into the back case.  This way its protected and securely fastened.  Not sure if it makes a difference but mine was for a galaxian setup (which i should work on).
Back in MY day we lived on the moon and we had to build a rocket ship from scratch to get to the Earth before we suffocated.

mccoy178

  • It's hard to work with a straight jacket on
  • Trade Count: (+9)
  • Full Member
  • ***
  • Offline Offline
  • Posts: 3127
  • Last login:September 03, 2021, 10:23:42 am
  • Go Bucks!
Re: Franco's Custom Cocktail (UPDATE: Few bits & Stainless button bezels)
« Reply #20 on: October 31, 2007, 02:53:07 pm »
Wow, I like those rings.  You wouldn't be willing to sell a few like the ones on the left wouldya? :)

Franco

  • Guest
  • Trade Count: (0)
Re: Franco's Custom Cocktail (UPDATE: Few bits & Stainless button bezels)
« Reply #21 on: October 31, 2007, 03:02:35 pm »
So will Optimus be in your cocktail front end?

For my 21inch monitor i cut part of the case so i can drive a bolt through the mounting tabs but the other end screws into the back case.  This way its protected and securely fastened.  Not sure if it makes a difference but mine was for a galaxian setup (which i should work on).

He he, im not sure what im doing yet graphics wise, that Transformers background is what I had on my old cab. I think im going to go for some kind of Spacies theme (got a few good ideas) so ill proably have some kind of Spacies FE theme too.

I do like your idea for the monitor mounting. This has been one of the aspects that has been troubling me. Do all monitors have mounting tabs? What part of the casing did you cut away? Is there any way you could take a picture for me?

Wow, I like those rings.  You wouldn't be willing to sell a few like the ones on the left wouldya? :)

I dont see why not. I cant make millions of them as I dont have much bar stock but I dont mind making a few for you. How many are you after?

mccoy178

  • It's hard to work with a straight jacket on
  • Trade Count: (+9)
  • Full Member
  • ***
  • Offline Offline
  • Posts: 3127
  • Last login:September 03, 2021, 10:23:42 am
  • Go Bucks!
Re: Franco's Custom Cocktail (UPDATE: Few bits & Stainless button bezels)
« Reply #22 on: October 31, 2007, 03:10:43 pm »
Probably in the neighborhood of a dozen. :cheers:

Franco

  • Guest
  • Trade Count: (0)
Re: Franco's Custom Cocktail (UPDATE: Few bits & Stainless button bezels)
« Reply #23 on: October 31, 2007, 03:26:05 pm »
Yeah shouldnt be a problem, PM incoming.  :)

SithMaster

  • Lets see how happy you are when you need to use a lawn mower and it keeps turning off when you want to cut up zombies.
  • Trade Count: (+4)
  • Full Member
  • ***
  • Offline Offline
  • Posts: 1781
  • Last login:January 12, 2014, 03:52:59 pm
  • The brightest light casts the darkest shadow.
Re: Franco's Custom Cocktail (UPDATE: Few bits & Stainless button bezels)
« Reply #24 on: October 31, 2007, 03:33:37 pm »
I can try and get a pic or two taken tonight of the monitor.  I used a hack saw to cut the case (after i removed it first) and cut the corners where the tabs are.  As far as i know all monitors have these tabs.

Those rings are pretty slick.  Mmm metal.
Back in MY day we lived on the moon and we had to build a rocket ship from scratch to get to the Earth before we suffocated.

Franco

  • Guest
  • Trade Count: (0)
Re: Franco's Custom Cocktail (UPDATE: Few bits & Stainless button bezels)
« Reply #25 on: October 31, 2007, 03:51:55 pm »
That would be great if you could take a couple of pictures, there is no rush though as it will be a while before I am at that stage, just whenever is a good time for you, thankyou.  :cheers:

Those rings are just to tie in with a few other stainless parts I have got planned, everyone likes a bit of metal bling  ;)

Franco

  • Guest
  • Trade Count: (0)
Re: Franco's Custom Cocktail (UPDATE: Few bits & Stainless button bezels)
« Reply #26 on: November 01, 2007, 06:08:56 am »
I made these console adapter plates (controller extesion to USB) a while a go which I would have liked to use but I cant see me playing many games using control pads due to the angle of the screen. This is one of the reasons I wanted to be able to flip the monitor up. Oh well, maybe for the next project...


Franco

  • Guest
  • Trade Count: (0)
Re: Franco's Custom Cocktail (UPDATE: CNC Milling Stainless Feet)
« Reply #27 on: November 06, 2007, 10:58:32 am »
I started making the stainless steel feet for the cocktail today.

I extracted the dimensions of the feet from my CAD model and got some stainless bar cut off to the right length.


The two sections were placed on top of each other and CNC milled. One was milled 10mm shorter than the other to give clearance for the wheels. The added height of the wheels when in place will make the table level.


Tomorrow I am going to mill the 12mm slots to house the wheels I turned and I also need to drill, ream and tap the hole that will hold the spindle which the wheels will run on. I am tapping the end of the hole as I have made some M12 grub screws to  hold the spindle in place.


SithMaster

  • Lets see how happy you are when you need to use a lawn mower and it keeps turning off when you want to cut up zombies.
  • Trade Count: (+4)
  • Full Member
  • ***
  • Offline Offline
  • Posts: 1781
  • Last login:January 12, 2014, 03:52:59 pm
  • The brightest light casts the darkest shadow.
Re: Franco's Custom Cocktail (UPDATE: CNC Milling Stainless Feet)
« Reply #28 on: November 06, 2007, 08:33:47 pm »
That looks expensive.

I checked my monitor and I now remember that i wasnt going to use the rear case since mine had a metal cage around it.  I still can if i use a harness or something to hold it onto the supports.

since your making a cocktail then you can just cut away the case from the metal tabs and have them rest on wooden supports.  the case can then remain around the monitor but it wont be attached and the monitor wont be resting on it for support.

ill try and get my monitor pics up tomorrow and also a paint diagram.

also i just looked over your design again and im wondering if maybe it would make things easier if you have a box shape on top with the tapered part under it.  kinda like a nintendo table but bigger.  it might make the cp mounting easier (90degree angles) and maybe some more space for internals (also in case replacement parts are larger).
Back in MY day we lived on the moon and we had to build a rocket ship from scratch to get to the Earth before we suffocated.

Franco

  • Guest
  • Trade Count: (0)
Re: Franco's Custom Cocktail (UPDATE: CNC Milling Stainless Feet)
« Reply #29 on: November 07, 2007, 01:28:59 am »
Thanks for the monitor help SithMaster. That seems to make sense. Really I need to get my dremel out and attack my monitor to see what im dealing with but I need to get a replacement monitor first. I should be able to pick up a free/v.cheap smaller CRT of ebay locally hopefully.

I see what you are saying about the case design and I think you may be right. Having a box shape on top would definitely give me more space which is one thing I was worried about in case I need to replace the monitor at a later date. Ill have another play with CAD later on.

The tapping of the holes in the legs didnt go quite so well as I managed to snap the M12 tap in one of the holes so I need to get it spark eroded out and get another tap. To be fair the tap I used was rather ancient and had seen better days but I thought I would try my luck. Oh well....

Franco

  • Guest
  • Trade Count: (0)
Re: Franco's Custom Cocktail (UPDATE: CNC Milling Stainless Feet)
« Reply #30 on: November 07, 2007, 02:41:55 pm »
Whohooo! Well I had a look on ebay this morning for a replacement monitor for the one going into my cocktail and I stumbled upon an auction for a pair of CRT monitors, one of which is the exact same model as mine but is in black. I thought it would be handy to have at the very least to store incase my current one dies in the future. This way I could just swap the monitors over without having to adjust any of the table.

Anyway I bidded in the last few minutes and won them both for £3.91 (about $8)  :D

Its going to cost me a little more to et them to me as they are 30kg and 500mm x 500mm x 500mm but Im really happy to have a spare.  :)


davieboynj

  • Trade Count: (0)
  • Full Member
  • ***
  • Offline Offline
  • Posts: 269
  • Last login:June 16, 2011, 01:32:09 am
  • Eating your legs solves lifes little problems.
Re: Franco's Custom Cocktail (UPDATE: CNC Milling Stainless Feet)
« Reply #31 on: November 07, 2007, 02:49:19 pm »
I'm bummed i didn't find this thread earlier.  my cocktail is very very similar to this (Dave's Not-So Classic Cocktail), down to the K (with the hole) shaped top, and running ultrastyle.  

but...  your metal work is really going to put this over the top, and the taper you have in the cabinet looks great, and hopefully will make it more comfortable to sit at.  


If you like, here are some things that you might find will make the unit more comfortable to play on:

- lower the monitor about an inch, and open up the hole on top significantly (and make a bezel), to help get better perspective on your screen.  I seriously regret not doing this, and it's too late for me.  The portal effect is much more impressive than the flush.  Trace the sight lines to make sure that nobody ever has to lean over.  The top will always look great as it all just looks black.  

- flip your monitor upside down, as the top of the monitor is thinner than the bottom.  this, along with dropping the monitor will make a huge difference when you're playing horizontal games.  any decent video card will be able to flip the image to accomplish this, and mame/daphne/zinc don't know the difference.  

- on the horizontal side, i would keep the CP height the same and just manufacture the clearance by using shorter sticks, and opening up the top more.  knee space is important!  :)

- make sure the side CP's are centered on the screen, not the monitor.  my earlier one was centered on the monitor and it just always looked wrong.  

-and whenever you can get away with not decasing a monitor...  don't (learned that one the hard way).  

SithMaster

  • Lets see how happy you are when you need to use a lawn mower and it keeps turning off when you want to cut up zombies.
  • Trade Count: (+4)
  • Full Member
  • ***
  • Offline Offline
  • Posts: 1781
  • Last login:January 12, 2014, 03:52:59 pm
  • The brightest light casts the darkest shadow.
Re: Franco's Custom Cocktail (UPDATE: CNC Milling Stainless Feet)
« Reply #32 on: November 07, 2007, 03:39:09 pm »


Heres a pic of what i did though the angle kinda sucks.  Nice score on the monitor (got mine for 10 dollars and got a ride to pick it up about 5 miles away).  Before cutting open the back and see how everything is placed.

What frontend did you use in the optimus pics?  Im using mala and i really like how the names curve like that.
Back in MY day we lived on the moon and we had to build a rocket ship from scratch to get to the Earth before we suffocated.

Franco

  • Guest
  • Trade Count: (0)
Re: Franco's Custom Cocktail (UPDATE: CNC Milling Stainless Feet)
« Reply #33 on: November 07, 2007, 03:41:01 pm »
I'm bummed i didn't find this thread earlier.  my cocktail is very very similar to this (Dave's Not-So Classic Cocktail), down to the K (with the hole) shaped top, and running ultrastyle. 

but...  your metal work is really going to put this over the top, and the taper you have in the cabinet looks great, and hopefully will make it more comfortable to sit at. 

Hi Davie, thanks very much for your input. Have you got a link to your cocktail? I would love to see it.

Im not actually going to be running Ultrastyle (even though I love it), Im going to use Mala for the LED WIZ support.


- lower the monitor about an inch, and open up the hole on top significantly (and make a bezel), to help get better perspective on your screen.  I seriously regret not doing this, and it's too late for me.  The portal effect is much more impressive than the flush.  Trace the sight lines to make sure that nobody ever has to lean over.  The top will always look great as it all just looks black. 

Hmmm, I like the idea of this, Ill have to have a little play around with it  :)


- flip your monitor upside down, as the top of the monitor is thinner than the bottom.  this, along with dropping the monitor will make a huge difference when you're playing horizontal games.  any decent video card will be able to flip the image to accomplish this, and mame/daphne/zinc don't know the difference. 

Im not sure if I am going to have room in my table to install a decent video card due to the height of them and am just planning on using on board video at the moment as im not intending on playing anything too intensive. At the same time though it would be a good idea to flip the monitor as suggested. Im receiving the PC for the build this week and im planning on doing a hardboard mockup so this will give me an idea of the space I have to play with. I would like to be able to get a video card in for future upgrades etc. I dont suppose it is possible to get a female AGP> male AGP 'extension' so that I could mount the video card at 90 degress if I am tight on space?


- on the horizontal side, i would keep the CP height the same and just manufacture the clearance by using shorter sticks, and opening up the top more.  knee space is important!  :)

Yeah this is another thing I am going to sort out with the mock-up, the CP heights are just at a random height that 'looked right' when I modelled it. Im going to machine some joystick shafts for the perfect height required for the panels though, I thought I would have to do this as I am rear mounting the sanwas from under the MDF CP (there is a reason for this rather than sinking them into the top of the CP, Ill get to this later).


- make sure the side CP's are centered on the screen, not the monitor.  my earlier one was centered on the monitor and it just always looked wrong. 

Thanks, ill make sure I do that, I dont know if I would have thought of that.


-and whenever you can get away with not decasing a monitor...  don't (learned that one the hard way). 

Can you tell me why you dont suggest decasing the monitor? I have heard some people have had problems but I havent heard what.

Thanks again for your input, its gave me some really good points to think about.  :cheers:

Franco

  • Guest
  • Trade Count: (0)
Re: Franco's Custom Cocktail (UPDATE: CNC Milling Stainless Feet)
« Reply #34 on: November 07, 2007, 03:44:11 pm »
Thanks for the pic SithMaster  :cheers:

The frontend is Ultrastyle, I really liked it and would carry on using it but I need the LED support from Mala.

I dont know what your requirements are but give it a go!  :)

davieboynj

  • Trade Count: (0)
  • Full Member
  • ***
  • Offline Offline
  • Posts: 269
  • Last login:June 16, 2011, 01:32:09 am
  • Eating your legs solves lifes little problems.
Re: Franco's Custom Cocktail (UPDATE: CNC Milling Stainless Feet)
« Reply #35 on: November 07, 2007, 04:37:38 pm »
I have ABSOLUTLEY nothing against mala, but if there is a command line tool for the ledwiz you can easily make ultrastyle work with it.  If you're interested, I can send you some scripts...  they make it so you can launch snes (Super Ghouls and Ghosts, anyone?) DAPHNE, and Zinc from Ultrastyle, and they could also light up controls for each game (by adding some lines).  I remember once HowardCasto said that ultrastyle was a one-trick pony - - he's right, but a couple scripts can make things manageable.  I just like toggling through the marquees, and never really was happy with many other frontends. 

Also, chances are, your onboard video card will support screen flipping (i would never suggest a full-size video card other than the ArcadeVGA, as onboard is more than adequate)  You'll want to check first, but anything made in the last few years, especially if by Nvidia or ATI will rotate just fine.  If you have an Nvidia, make sure you try a wide range of drivers, as they vary greatly based on date.  I found everything -mame- runs smoother on some of the older drivers.  ATI drivers are quite a bit less ornery. 

De-casing...  ugh.  I got shocked pretty good twice, and ultimately shorted out my first monitor by decasing.  I really had no choice with that particular monitor, the case was a lot of fluff and it got significantly smaller by removing it - - but i know the dell model you have, and it's pretty lean.  you won't save much space, and will always have to be super-careful.  I should have just used a different monitor.  I understand the temptation, especially with your taper, but try not to...  running the monitor upside down should help you get the taper you want, at least on the player's horizontal side.  I'm not opposed to taking off anthing plastic, but at some poing you're going to start having exposed circuitboard and glowing stuff.  that's where i draw the line now.  :)

Finally - - it is my great shame that i never put up a formal page for my arcade - - I may have to quickly put something up on photobucket. 


SithMaster

  • Lets see how happy you are when you need to use a lawn mower and it keeps turning off when you want to cut up zombies.
  • Trade Count: (+4)
  • Full Member
  • ***
  • Offline Offline
  • Posts: 1781
  • Last login:January 12, 2014, 03:52:59 pm
  • The brightest light casts the darkest shadow.
Re: Franco's Custom Cocktail (UPDATE: CNC Milling Stainless Feet)
« Reply #36 on: November 07, 2007, 09:04:12 pm »
I also appreciate the idea for lowering the monitor.  its going to come in handy when i get my own cocktail made.

So ultrastyle is capable of lighting up say volcano buttons as described in another thread on the forums?  someone wanted to have them light up when a credit was entered is this possible?

There is an adapter to have a video card at 90degrees dont know where to get it but i know they exist. :cheers:
Back in MY day we lived on the moon and we had to build a rocket ship from scratch to get to the Earth before we suffocated.

danny_galaga

  • Grand high prophet of the holy noodle.
  • Trade Count: (+1)
  • Full Member
  • ***
  • Offline Offline
  • Posts: 8519
  • Last login:June 13, 2025, 09:58:02 pm
  • because the mail never stops
    • dans cocktail lounge
Re: Franco's Custom Cocktail (UPDATE: CNC Milling Stainless Feet)
« Reply #37 on: November 08, 2007, 06:17:15 am »

wow, thats gonna be one heavy mofo! love the bits youve made so far  :)


ROUGHING UP THE SUSPECT SINCE 1981

Franco

  • Guest
  • Trade Count: (0)
Re: Franco's Custom Cocktail (UPDATE: CNC Milling Stainless Feet)
« Reply #38 on: November 08, 2007, 10:55:44 am »
I have ABSOLUTLEY nothing against mala, but if there is a command line tool for the ledwiz you can easily make ultrastyle work with it.  If you're interested, I can send you some scripts...  they make it so you can launch snes (Super Ghouls and Ghosts, anyone?) DAPHNE, and Zinc from Ultrastyle, and they could also light up controls for each game (by adding some lines).  I remember once HowardCasto said that ultrastyle was a one-trick pony - - he's right, but a couple scripts can make things manageable.  I just like toggling through the marquees, and never really was happy with many other frontends.

Thats good to know Davie. Im going to have a play with Mala as I havent checked it out yet but if I decide its not for me I may ask you for some help with the scripts for Ultrastyle if you dont mind.

Also, chances are, your onboard video card will support screen flipping (i would never suggest a full-size video card other than the ArcadeVGA, as onboard is more than adequate)  You'll want to check first, but anything made in the last few years, especially if by Nvidia or ATI will rotate just fine.  If you have an Nvidia, make sure you try a wide range of drivers, as they vary greatly based on date.  I found everything -mame- runs smoother on some of the older drivers.  ATI drivers are quite a bit less ornery. 

Fingers x'd I should be able to flip the screen then. Ill have a play once I recieve the PC im going to use, it was posted yesterday so it should be here in the next couple of days.

De-casing...  ugh.  I got shocked pretty good twice, and ultimately shorted out my first monitor by decasing.  I really had no choice with that particular monitor, the case was a lot of fluff and it got significantly smaller by removing it - - but i know the dell model you have, and it's pretty lean.  you won't save much space, and will always have to be super-careful.  I should have just used a different monitor.  I understand the temptation, especially with your taper, but try not to...  running the monitor upside down should help you get the taper you want, at least on the player's horizontal side.  I'm not opposed to taking off anthing plastic, but at some poing you're going to start having exposed circuitboard and glowing stuff.  that's where i draw the line now.  :)

Im thinking about leaving the case on now. You are right, there isnt much space to be gained by decasing it, I was just struggling with ideas of how to mount it and I thought It way be easier if it was decased but I had a good think last night and I think I have found a good solution.

Finally - - it is my great shame that i never put up a formal page for my arcade - - I may have to quickly put something up on photobucket. 

I saw the post you have put up, loving it mate  8)

-----------------------------------------------------------------------------------------------------------------------------

I also appreciate the idea for lowering the monitor.  its going to come in handy when i get my own cocktail made.

So ultrastyle is capable of lighting up say volcano buttons as described in another thread on the forums?  someone wanted to have them light up when a credit was entered is this possible?

There is an adapter to have a video card at 90degrees dont know where to get it but i know they exist. :cheers:

Im not sure about Ultrastlye and lighting buttons but I assume the question was aimed at Davie and im sure he will be able to answer.  :)

I had a look for the 90 degrees video card adapter things and found out that they are called AGP risers or AGP right angle extenders (you can also get them for PCI etc). They are only a few pounds so I will be able to get on if needs be but I am going to try the standard on board graphics for a start.


-------------------------------------------------------------------------------------------------


wow, thats gonna be one heavy mofo! love the bits youve made so far  :)

Yeah, is going to be heavy indeed! At least it should be nice and stable (depending on my cabinet building of course)  ;)

Ive decided to change the wheels I have made as I think there is going to be too much weight for such thin wheels and they may end up damaging the carpet or marking the laminate floor. The ones I have made already are 10mm wide, im going to make some wider ones at about 40mm wide to spead the load.


davieboynj

  • Trade Count: (0)
  • Full Member
  • ***
  • Offline Offline
  • Posts: 269
  • Last login:June 16, 2011, 01:32:09 am
  • Eating your legs solves lifes little problems.
Re: Franco's Custom Cocktail (UPDATE: CNC Milling Stainless Feet)
« Reply #39 on: November 08, 2007, 12:28:00 pm »
So ultrastyle is capable of lighting up say volcano buttons as described in another thread on the forums?  someone wanted to have them light up when a credit was entered is this possible?

Ultrastyle can't, but i feed it a mame.exe that silently runs a cmd script, which then sends the commands to the emulator that i want to use.  When you run "mame dlair", the script redirects to dapne.  when you run "mame sghouls" it redirects to zsnes.  when you run "mame mrdrillr" it redirects to zinc.   having it light up the correct buttons for each game would be easy as adding more lines to the script to light up the buttons used in the game.  This still assumes there is a command line for the LEDWiz. 

as far as making individual buttons blink when a credit is entered, i'd have no idea how to do that.   ???