Main Restorations Software Audio/Jukebox/MP3 Everything Else Buy/Sell/Trade
Project Announcements Monitor/Video GroovyMAME Merit/JVL Touchscreen Meet Up Retail Vendors
Driving & Racing Woodworking Software Support Forums Consoles Project Arcade Reviews
Automated Projects Artwork Frontend Support Forums Pinball Forum Discussion Old Boards
Raspberry Pi & Dev Board controls.dat Linux Miscellaneous Arcade Wiki Discussion Old Archives
Lightguns Arcade1Up Try the site in https mode Site News

Unread posts | New Replies | Recent posts | Rules | Chatroom | Wiki | File Repository | RSS | Submit news


Author Topic: MetaCab(s) - Preparing for Takeoff  (Read 7239 times)

0 Members and 1 Guest are viewing this topic.

metaHipster

  • Trade Count: (0)
  • Full Member
  • ***
  • Offline Offline
  • Posts: 80
  • Last login:January 10, 2010, 06:09:19 pm
  • Taking the next level to the next level
    • MetaHipster's Arcade Blog
MetaCab(s) - Preparing for Takeoff
« on: January 06, 2006, 01:32:41 pm »
Well, now that I've discovered this sweet forum, I figured I should make the announcement here that I've begun work on my first cabinet.  More accurately, I'm currently at a stage in which I've begun work on the computer and planning for my first cabinet.  I've got the computer (Celeron 500Mhz, 512MB RAM, GeForce4 Ti4600, 21" CRT) up & running and MameWah all running for MAME and Atari2600.  More emus and artwork/rom customization to come.

In any event, I've got a blog rollin' with lots of stream-of-consciousness hoo-hah and pics.  I'm also keeping it up to date with my process progress. 

http://metacab.blogspot.com
My blog is open to blogspot users' comments so if you have a free account go ahead & comment there (in addition to any updates I post here).  Sorry it's not fully public but I've gotten spammed in blogs in the past.

As is mentioned there, I'm on the cusp of starting my first proof-of-concept control panel and am still trying to work out the best CP layout design.  The only CP I've posted so far is already obsolete -- I'll try to post a new one as soon as I get a revision that I'm happy with.  I'm currently working out a new background and a better spinner/trackball config. 

I'm hoping the cabinet woodworking itself will start early February (my Brother-in-law is in charge of woodworking, whereas I'm putting all the time into the computer/design/electronics).  I'll make sure we take lots of pics as we work...  Our goal is to both build one at the same time so he'll build two cabinets and I'll config two CP's/Computers.

Thanks to everyone for all the great info you've been providing and I look forward to hearing your thoughts on my cab as it evolves.  I'm hoping that by telling the world about it here it will make sure I don't allow the project to drift off into the ether the way some have :).
« Last Edit: January 31, 2006, 08:48:05 am by metaHipster »

metaHipster

  • Trade Count: (0)
  • Full Member
  • ***
  • Offline Offline
  • Posts: 80
  • Last login:January 10, 2010, 06:09:19 pm
  • Taking the next level to the next level
    • MetaHipster's Arcade Blog
Re: MetaCab - Preparing for Takeoff
« Reply #1 on: January 09, 2006, 10:53:57 am »
Update -- in far less time than I expected I've assembled a proof of concept control panel out of a spare chunk of countertop.  This was a great chance to see how big of a retard I am and learn what not to do when I am wiring up the final version.
http://metacab.blogspot.com/2006/01/metacab-reaches-v01a.html

I've also posted a brief tutorial on how to install a button for the truly ignorant.
http://metacab.blogspot.com/2006/01/how-to-install-button-with-microswitch.html

I'll be posting photos of how the wiring went once I get a chance (my camera ran out of battery).  Needless to say I did it the dumb way since I didn't have any quick connects kicking around to crimp on my extension wires.  Thus I was splicing up the wazoo in order to use the quick connects that came on the ultimarc harness and ground chain and managed to hose some things up.  The board is currently only working for P1/Coin1/Joy1/P1Btns1-2 as well as Menu buttons, and left/right mouse but once I get a chance to rewire it properly, things should go more smoothly.

I've also learned that 5 utility/menu buttons may be too many.  I've currently got the top row set up as follows:
Coin1 | P1 | ??? | Pause | Esc | Tab | F3 | Coin2 | P2

If anyone has any other suggestions of what might be useful to have in the top row of functions (for Mamewah or Mame), let me know.  Otherwise I'm thinking I only need 4 utility buttons on the final design.

metaHipster

  • Trade Count: (0)
  • Full Member
  • ***
  • Offline Offline
  • Posts: 80
  • Last login:January 10, 2010, 06:09:19 pm
  • Taking the next level to the next level
    • MetaHipster's Arcade Blog
Re: MetaCab - Preparing for Takeoff
« Reply #2 on: January 18, 2006, 09:33:03 pm »
Update:  I just found an empty arcade cabinet by the dumpster at work today!?!  Apparently some other business in our building was getting rid of it.  What are the odds?  In that it's missing monitor/cp/cpu and I have all that at home, it seemed a perfect match.

Does anyone recognize the cabinet?  or is it a DIY?  I'm inclined to believe the latter since no coin door/marquee...  Yet the side art is super professional (albeit old & peeling).
 My Blog entry for the new cabinet find (includes photos) 

I want to paint it something other than Blue and add some orange T-Molding.  I'm hoping to add a final control panel to it and mount the monitor next weekend.  Any suggestions for mounting a marquee on this would be appreciated too.  I'm guessing I'll need to remove the backpiece of wood to make it deep enough?  Or do you think building out wouldn't look dumb?


Brax

  • Trade Count: (0)
  • Full Member
  • ***
  • Offline Offline
  • Posts: 1426
  • Last login:January 06, 2009, 09:03:48 am
  • Bring on the power tools!
Re: MetaCab - Preparing for Takeoff
« Reply #3 on: January 18, 2006, 09:58:24 pm »
Dear god. It's one of those awful cabinets by Big Electronic Games. Check out the Retroblast review of a Midway version.
http://www.retroblast.com/reviews/biggames.html

It's no surprise somebody junked that steaming pile.
Uh... no offence. heh.

Edit: As for utility buttons... I loath them. Nothing says MAME cabinet like a control panel that looks like a button factory exploded. Clean is good in my opinion. My preference for control panels is as follows:
- A dedicated Exit button. It's easier for guests to exit games and can be tastfully incorporated into a panel.
- 2 players with Street Fighter layout buttons... no issue with that.
-NO mouse buttons. Player 1 fire button 1 and 2 wired up for mouse buttons. Heck, MAME by default is set up for this. They're hidden to the world but easily used when you need them.
- Player 1 and 2 button and one coin button for each.
- I mapped the pause function to Player 1 shift and all directions of either joystick. It makes it pretty easy for either player to pause and it doesn't take away from the control panel.

This makes it look pretty clean and once your cabinet is initially set up you shouldn't need any admin buttons. If once in a blue moon you need to do any admin work pull out a keyboard from inside the cabinet.
« Last Edit: January 19, 2006, 12:20:22 am by Brax »
If you build a frankenpanel, chances are I don't care for you as a person.

Brax

  • Trade Count: (0)
  • Full Member
  • ***
  • Offline Offline
  • Posts: 1426
  • Last login:January 06, 2009, 09:03:48 am
  • Bring on the power tools!
Re: MetaCab - Preparing for Takeoff
« Reply #4 on: January 19, 2006, 12:19:33 am »
Thinking about it some more I suppose that cabinet isn't an awful starting point. Most of the things that made that cabinet truly horrific have already been gutted for you. It looks like the wood is wider than the 1/2" junk in the Midway version. Is it? I'd be a little concerned building it up with only 1/2" wide stock. It's up to you though.

3 4 things I'd address:

1. The control panel, while compact, is just a bit too small. I'd knock off the front panel and build out the control panel 4" or so.
2. The thing is too darn short. I'd build a base of 2x6's and raise it up 6". Paint it black and you'll hardly notice it. It'll just look like a kick plate.
3. I'd add a coin door. Remove the shelf and move the door to the back, screw on a new front panel and you're good to go. I'd paint all the blue areas black as well. There's a lot of red in the artwork. Red t-molding would really set it off.
Edit: 4. Knock out the panel that covers the marquee area and add a real marquee. I'm not sure how sturdy this cab is. The shelf and "marquee" board might be structural. You might have to add some wooden supports to stiffen up the cab. Judge that after you remove them.

Now that I've spouted off, it's up to you. Have fun with it.

« Last Edit: January 19, 2006, 12:25:46 am by Brax »
If you build a frankenpanel, chances are I don't care for you as a person.

metaHipster

  • Trade Count: (0)
  • Full Member
  • ***
  • Offline Offline
  • Posts: 80
  • Last login:January 10, 2010, 06:09:19 pm
  • Taking the next level to the next level
    • MetaHipster's Arcade Blog
Re: MetaCab - Preparing for Takeoff
« Reply #5 on: January 19, 2006, 08:52:00 pm »
well, turns out the behemoth of a monitor i have (21" CRT from back when they all weighed 4000lbs) is way too big for the little cabinet I found and I highly doubt i'll use that empty atari cab for my current (1st) project.  Judging by the Midway cab review you posted, it was no winner *with* its monitor/etc but without it, it's a clean slate, albeit a tiny one that's less sturdy than I'd like.

There were all manner of detail issues I didn't particularly approve of which would have been gutted if I opted to do so.  (after looking closer I think I'd pitch the sideart if I could afford to replace it with my own).  The side walls are 3/4" but pretty much everything else is 1/2".  the CP mount is way too small for the functionality I want.  marquee would need to be overhauled to add a lighted (real) marquee, needed t-molding,  etc. etc.  I don't think I'll use it for my first cab but, miracle of miracles, I've convinced the wife to let me stash it until I have the time/excess computer to use it as a fun starter for a second bare-bones dedicated cabinet for 1player games that need a vertical monitor.  Maybe get by on a single 4-way joystick, 3 buttons plus p1/coin1?

Thanks for all your feedback on my CP!  At this point there are only 4 functions I really had for those green buttons at the top... pause, exit, (mame) menu, and enter.  The 5th I have is nothing I'll keep in the final CP.  I think you're right that I coudl do away with the menu/enter ones (I was originally of the mind that any use of keyboard/mouse was destroying the illusion that this thing gives me all the control to the computer I could need).  That would bring me down to only 2 admin buttons.

As for using the 3 buttons by the trackball, they definitely do give it a more "MAME Cab" vibe in their excessiveness, but it doesn't bother me since for some games they make things feel more like the original.  The fact that 2 of them are mouse buttons in disguise doens't bother me a bit and I'll keep that functionality since it means I'll have virtually no need for a mouse (great for when someone accidentally quits Mamewah back to windows and/or I use winamp behind Mamewah).

I definitely would love to get a coin door some day but they're an expense I think I can do without in round 1 (even though it's a huge way to add the authentic vibe back). Same reason I had to forfeit a full 3" Trackball for one of the little Ultimarc ones.  I figure most things can be upgraded if/whenever I win the lottery and build a second cab.


metaHipster

  • Trade Count: (0)
  • Full Member
  • ***
  • Offline Offline
  • Posts: 80
  • Last login:January 10, 2010, 06:09:19 pm
  • Taking the next level to the next level
    • MetaHipster's Arcade Blog
Re: MetaCab - Preparing for Takeoff
« Reply #6 on: January 22, 2006, 08:25:20 pm »
Here's a new control panel layout idea I'm toying with, this one for the overhaul I'm going to give to that Big Electronic Games empty cabinet I found..... Again, I will be dedicating that cab to vertical games that ahve 1p at a time (e.g. pacman, dig dug, etc).

Click to enlarge


Very Elevator Action-inspired, still going for the retro vibe.


I've envisioned this being a wrap around a beveled control panel ala defender's CP. Main controls on top half, 1p/2p and 1coin/2coin on bottom half.

Anyone have any tips/examples of doing the control panel this way? Where I can get some CP overlay printed that's durable enough to not need plexiglass over it, but flexible enough to wrap the corner (or, if there's a way to have plexi wrap the corner, tips on how to do that? Seems like the wood is just a joint that's been routered round at the corner.


This will be a very shallow (~6") angled CP reminiscent of the Defender, yet ideally versatile enough for a wide variety of vertical games. Mag-Stik Plus with 3 action buttons. Do you think I'll be OK with only one bank of 3 buttons? Or should I save room for a redundant set for lefty's? and/or using trackball or spinner?

Given limited space, do you think I should include trackball as pictured? or instead a spinner? both? If anyone can tell me how to see what vertical games use trackball vs spinner, that'd be cool.

here's a before & after mockup of what I may do initially to the cabinet. Eventually I will remove the atari art in favor of my own.

Before


After?  (click to enlarge)

« Last Edit: July 11, 2006, 10:23:54 pm by metaHipster »

Timoe

  • Trade Count: (+2)
  • Full Member
  • ***
  • Offline Offline
  • Posts: 1662
  • Last login:July 14, 2009, 09:50:12 am
  • Team-Oh-tAy-Oh
    • Rattlin' Trash
Re: MetaCab - Preparing for Takeoff
« Reply #7 on: January 22, 2006, 11:28:48 pm »
The colour scheme is rad.

metaHipster

  • Trade Count: (0)
  • Full Member
  • ***
  • Offline Offline
  • Posts: 80
  • Last login:January 10, 2010, 06:09:19 pm
  • Taking the next level to the next level
    • MetaHipster's Arcade Blog
Re: MetaCab - Preparing for Takeoff
« Reply #8 on: January 30, 2006, 09:08:18 pm »
Metacab Sr. is on hold until my brother-in-law gets time to build it.  In the mean time, I'm gutting that Big electronic games cab (aka "Metacab Jr.").  I'm still working on finalizing the CP (trying to figure out trackball/spinner/joy1 layout that I'm most happy with, though i'm set on the color scheme/look & feel.

Lots of pics of the cab overhaul in my most recent blog post...
http://metacab.blogspot.com/2006/01/metacab-jr-gets-facelift-part-1_30.html

Hopefully 1-2 more weekends and it will be done!

Brax

  • Trade Count: (0)
  • Full Member
  • ***
  • Offline Offline
  • Posts: 1426
  • Last login:January 06, 2009, 09:03:48 am
  • Bring on the power tools!
Re: MetaCab - Preparing for Takeoff
« Reply #9 on: January 30, 2006, 09:18:08 pm »
You're doing a great job with it. You're pretty much rebuilding the thing from scratch and doing a superior job to the factory I might add. It just makes it glaringly obvious what a giant steaming pile of poo the Big Electronic Games machine is.
If you build a frankenpanel, chances are I don't care for you as a person.

metaHipster

  • Trade Count: (0)
  • Full Member
  • ***
  • Offline Offline
  • Posts: 80
  • Last login:January 10, 2010, 06:09:19 pm
  • Taking the next level to the next level
    • MetaHipster's Arcade Blog
Re: MetaCab - Preparing for Takeoff
« Reply #10 on: January 31, 2006, 08:47:38 am »
steaming pile of poo is perhaps the most accurate term I can think of for a design in which you screw into the edges of 1/2" MDF.  I can't believe those things still retail for $450+!!

Well I'm off on vacation this week/end so further progress will have to wait at least a week :(  Hopefully I can wrap up those final details and get to the stage of painting/detailing (i'm an artist, not a carpenter :)

Any suggestions on where to get a vinyl laminate cp overlay printed so I can stick it on the cp and wrap it around that front edge?  And those who've done it, will it still need some acrylic clearcoat on it to protect the colors from wear? 

metaHipster

  • Trade Count: (0)
  • Full Member
  • ***
  • Offline Offline
  • Posts: 80
  • Last login:January 10, 2010, 06:09:19 pm
  • Taking the next level to the next level
    • MetaHipster's Arcade Blog
Re: MetaCab(s) - Preparing for Takeoff
« Reply #11 on: April 03, 2006, 11:43:03 am »
Well, after a mere 2 months of apparent inactivity I finally have some updated pics and progress on the
MetaCab Jr.  To recap, this is that crappy Big Electronic Games cabinet I found empty, gutted, and am nearing completion on my overhaul to make it a vert mame cab.  Pics and everything at my blog, but I welcome comments. 

In particular, what are peoples thoughts to replacing the spinner region with a trackball?  Do you think vert games are more likely to require a TB or a spinner?  What location do you think would work best for the spinner if i was to move it?  I've had suggestions to place it above-right or below-right the joystick but am still undecided...

http://metacab.blogspot.com

 :blah:

nullb0y

  • Trade Count: (+5)
  • Full Member
  • ***
  • Offline Offline
  • Posts: 1307
  • Last login:November 17, 2024, 04:06:05 pm
  • Slow In Fast Out
    • WAT Racing
Re: MetaCab(s) - Preparing for Takeoff
« Reply #12 on: April 04, 2006, 11:08:07 pm »
looks pretty good make shure to cover the back of the monitor with a wooden box lol
you could allways make the angle the screen sits at flatter so its facing upwards more
Slow In Fast Out

metaHipster

  • Trade Count: (0)
  • Full Member
  • ***
  • Offline Offline
  • Posts: 80
  • Last login:January 10, 2010, 06:09:19 pm
  • Taking the next level to the next level
    • MetaHipster's Arcade Blog
Re: MetaCab(s) - Preparing for Takeoff
« Reply #13 on: April 06, 2006, 06:05:11 pm »
Haha re: hiding the bareassed monitor, but i think I'm just going to put it in the corner so you won't see it much but will hopefully still see the sideart well.  Plus the hole works well and is tight enough that it provides even more support.

here's the latest pics from the blog for the people who've been too lazy to click in ;)


I will post more pics as soon as I can - I've already got the interior/front painted black now and the first round of side art stenciling painted brown (probably 2-3 more rounds to go for the orange & brown sideart).  CP Overlay will be ordered once I get a sample from mamemarquees.com to confirm that the laminate can round the beveled corner (I've never worked with the stuff before - they seemed to think it should work!).


metaHipster

  • Trade Count: (0)
  • Full Member
  • ***
  • Offline Offline
  • Posts: 80
  • Last login:January 10, 2010, 06:09:19 pm
  • Taking the next level to the next level
    • MetaHipster's Arcade Blog
Re: MetaCab(s) - Preparing for Takeoff
« Reply #14 on: April 08, 2006, 12:56:47 pm »
 figured I'd toss up the latest pics before I go and continue the stenciling/masking/painting process...

here's the cab with the interior/front painted black. I did the first round of masking the brown in. I've got to add more brown later but first some orange.


Enlarge

as you might be able to make out, there will be far more stripes than first meets the eye.  I  am still waffling on whether I'll be having a white with red stripe in the middle (i.e. brown orange brown white red white brown orange brown) - sounds like a lot more time & effort than I'm interested in right now so I might just combine them into a third orange stripe (thus Brown, orange, brown orange brown orange brown). You can never have enough brown & orange if you're looking to do a 70's vibe.
Enlarge)

Looking back at my earlier concepts, I've tweaked the cp overlay to match the actual holes drilled.

Enlarge

I'm hoping my measurements will result in a piece of CP Overlay from mamemarquees that fits perfectly. I totally should have drilled *after* getting the CP Overlay. Duh. Well first time making a polished CP & all, so I'm bound to screw up. My other screwup is that I can't router the bottom of the board without totally dismantling the CP (which has already been puttied & sanded). Thus my joystick will either have to be top mounted & routed a bit on the top to make flush, or else just bottom mount it with no routering which results in a shorter stick. My proof of concept CP isn't routered either (and is bottom-mounted). While the sticks seem short, it's entirely playable, so not the end of the world for me. I want to be sure my final Metacab Sr. has them done properly though.

It seems like it may be a good idea to just build a whole new CP to fit the cab too - I can use the old one as a template and redrill everything and extend the side boards so that it intersects fully with the side wall (hard to see, but there's a bit of a gap as it currently stands). Would also be nice to plan the side boards differently so that i could use T-molding along the edges (the current design would cut through some wood if I do that.

But I suppose it's normal to want to start over the closer you get to completion :)
« Last Edit: April 08, 2006, 01:01:30 pm by metaHipster »

metaHipster

  • Trade Count: (0)
  • Full Member
  • ***
  • Offline Offline
  • Posts: 80
  • Last login:January 10, 2010, 06:09:19 pm
  • Taking the next level to the next level
    • MetaHipster's Arcade Blog
Re: MetaCab(s) - Preparing for Takeoff
« Reply #15 on: April 11, 2006, 11:54:03 pm »
here's after the first go around of orange. Looks like I'll need to do a bit of touchup on some edges since my masking skills leave something to be desired. Overall it's looking mighty sharp though. Aside from touchup, I'll (hopefully tomorrow?) be working on the next pair of stripes as I progress inwards: More Brown.  The good news is this striping stuff goes pretty fast so hopefully I'll be done with it by the end of the week (famous last words).


Enlarge
« Last Edit: April 11, 2006, 11:55:55 pm by metaHipster »

metaHipster

  • Trade Count: (0)
  • Full Member
  • ***
  • Offline Offline
  • Posts: 80
  • Last login:January 10, 2010, 06:09:19 pm
  • Taking the next level to the next level
    • MetaHipster's Arcade Blog
Final Metacab Jr. artwork?
« Reply #16 on: April 17, 2006, 11:23:33 pm »
I think this may finally be the end of the MetaCab jr. design process! I've got a message in to the folks at mamemarquees.com confirming that white on the marquee is translucent (I don't want it transparent lest I see the light right through!). Assuming that's as expected, I'll be ready to order!  Note that the gold text refers to MameWah, whereas the white text refers to Mame itself.  Trying to be as user-friendly as I can.

Here's the final marquee.

Enlarge

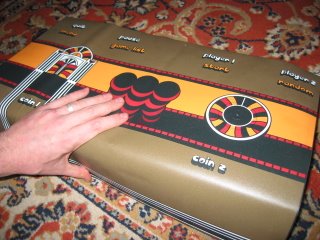
Here's the final CP Overlay (hopefully those holes line up! I won't actually be printing the circles, so if it's off a tiny bit it shouldn't matter, as long as the text doesn't need a hole cut through it).  Note that the gap between the coin labels & the coin buttons is due to the bevel -- you'll see the labels on the top face even though the buttons are on the front face as a way to make it easy to see what's where.

Enlarge
« Last Edit: April 17, 2006, 11:27:36 pm by metaHipster »

metaHipster

  • Trade Count: (0)
  • Full Member
  • ***
  • Offline Offline
  • Posts: 80
  • Last login:January 10, 2010, 06:09:19 pm
  • Taking the next level to the next level
    • MetaHipster's Arcade Blog
Re: MetaCab(s) - Preparing for Takeoff
« Reply #17 on: July 11, 2006, 10:13:40 pm »
you can still read the whole saga at the Metacab blog, but here's a quick summary in pictures of what's happened the past 3 months... (major gaps in progress aside :)

Note: click any pic below to enlarge!

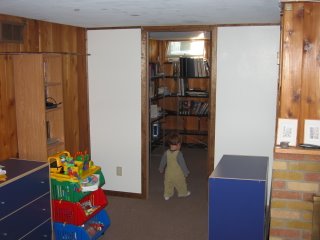
I built a wall in my basement -- the plan is to put a mame cab on either side of the door.  Metacab Jr. is going to be the first to reach completion...

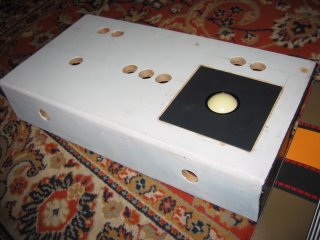
The CP finally got some holes drilled.  In retrospect, this could/should have happened *after* applying the CP overlay?  I decided to change the plan at the last minute to use a trackball instead of a spinner.

My order from mamemarquees arrived!  I now have a CP overlay & a marquee!  They're all retro-like and give me a nice warm elevator action vibe... Here's the CP overlay

Here's the Marquee (all lit up with the tube fluorescent)


I finished painting the stripes on the side (I was too cheap to buy sideart :(  I got what I paid for but it turned out well enough for a first cab!)

I applied the CP overlay and installed/wired up all the controls.  Nice simple CP design which I think helps me recreate the old-skool simple CP idea.  Same reason I chose the vert cab orientation - most of my favorite games are some of the classic verts.


I then wedged the CP into the cab -- it's a VERY tight fit and will require a bit of touchup paint but certainly won't require any screws (this is ueber solid just by the fit!).  I also scraped the paint out of my old side wall routing and hammered in the T-molding.


Just one last look for everyone to see the "before" state of this crappy Big Electronic Games cab before I totally overhauled it...


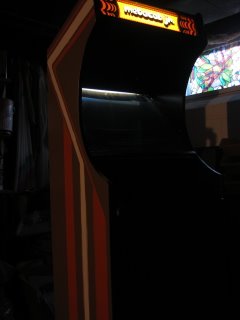
And here's the "after"!  It's all done!  Sort of.  Mostly...  Is any cab ever really "done"??  I still need to put in a monitor bezel, do a bit of touchup paint, possibly trim down the monitor plexi (it's a touch wide & bowing) and finish customizing MameWah to match the cab.


Looking forward to hear what anyone thinks of my first (mostly) finished cab....
« Last Edit: July 11, 2006, 10:25:57 pm by metaHipster »

johnperkins21

  • Trade Count: (0)
  • Full Member
  • ***
  • Offline Offline
  • Posts: 288
  • Last login:December 07, 2019, 07:02:34 pm
Re: MetaCab(s) - Preparing for Takeoff
« Reply #18 on: July 12, 2006, 01:34:38 am »
Dude, very nice. That thing would fit in perfectly if you had some nice orange shag carpet down in your basement. Oh well, at least you've got some wood paneling in there.

I dig it.  :cheers:
Bob Dole likes cheese.

versapak

  • Somewhere between a block of wood and a monkey
  • Trade Count: (+1)
  • Full Member
  • ***
  • Offline Offline
  • Posts: 1655
  • Last login:October 08, 2024, 04:40:31 am
  • I am t3h GAY!!!
Re: MetaCab(s) - Preparing for Takeoff
« Reply #19 on: July 12, 2006, 01:55:54 am »
Nicely done.


Can't say that I like the colors, but then I am not the one that has to. :)


metaHipster

  • Trade Count: (0)
  • Full Member
  • ***
  • Offline Offline
  • Posts: 80
  • Last login:January 10, 2010, 06:09:19 pm
  • Taking the next level to the next level
    • MetaHipster's Arcade Blog
Re: MetaCab(s) - Preparing for Takeoff
« Reply #20 on: July 12, 2006, 07:13:09 am »
re: orange shag... Good call!  If only the wife would dig that too....  I do have a coupla lava lamps I could put out there :) 

re: don't like the colors...  Yeah I think there's probably a good reason the 70's decorating sense has long since died.  But, as you say, as long as I like it...  I just wanted to do something outside the stereotypical blue palette used by many Mame cabs today.  I was also (mostly jokingly) considering making that in-wall rotisserie grill into my next cabinet, since I'll never use the rotisserie :P  Instead I think I'll probably go with some manner of retro sci fi game look for the next (2P fighter compatible) cab.  purples, oranges, reds, greens, etc.

CheffoJeffo

  • Cheffo's right! ---saint
  • Wiki Master
  • Trade Count: (+2)
  • Full Member
  • *****
  • Offline Offline
  • Posts: 7784
  • Last login:July 14, 2025, 12:11:49 pm
  • Worthless button pusher!
Re: MetaCab(s) - Preparing for Takeoff
« Reply #21 on: July 12, 2006, 07:52:28 am »
I like it ... it has a Taito feel to it ... and the colours work in that regard. Nice!

Cheers.
Working: Not Enough
Projects: Too Many
Progress: None

gamecreature

  • Trade Count: (0)
  • Full Member
  • ***
  • Offline Offline
  • Posts: 466
  • Last login:October 29, 2008, 08:35:37 pm
  • I'm making this up as I go along.
    • Gamecreature
Re: MetaCab(s) - Preparing for Takeoff
« Reply #22 on: July 12, 2006, 09:56:57 am »
That's some serious retro art, dude. You could do graphics for a future episode of "I Love the 80's" ;)
Make your cabinet look its best with custom art from
Gamecreature!

theCoder

  • Trade Count: (0)
  • Full Member
  • ***
  • Offline Offline
  • Posts: 1035
  • Last login:September 20, 2010, 10:48:47 pm
  • I'll clean up my mess, Honey, when I'm done...
Re: MetaCab(s) - Preparing for Takeoff
« Reply #23 on: July 12, 2006, 06:35:39 pm »
How did you get your finished cab into the Bradey Bunch's kitchen?