Main Restorations Software Audio/Jukebox/MP3 Everything Else Buy/Sell/Trade
Project Announcements Monitor/Video GroovyMAME Merit/JVL Touchscreen Meet Up Retail Vendors
Driving & Racing Woodworking Software Support Forums Consoles Project Arcade Reviews
Automated Projects Artwork Frontend Support Forums Pinball Forum Discussion Old Boards
Raspberry Pi & Dev Board controls.dat Linux Miscellaneous Arcade Wiki Discussion Old Archives
Lightguns Arcade1Up Try the site in https mode Site News

Unread posts | New Replies | Recent posts | Rules | Chatroom | Wiki | File Repository | RSS | Submit news


Author Topic: Dedicated Vertical Taito Classic Style "Satans Hollow 2"  (Read 15106 times)

0 Members and 1 Guest are viewing this topic.

Epyx

  • Trade Count: (+1)
  • Full Member
  • ***
  • Offline Offline
  • Posts: 1961
  • Last login:December 25, 2023, 07:56:36 pm
  • "You're an oddity"
Quote
Whats that stuff running you shipped to home depot per sheet?

$79 Canadian for a 48" x 96" sheet 1/16

That is about the going retail i was offered with other companies...the bonus with HD is that I don't have to pay for shipping.
Last Project


Epyx Tutorials:
Tutorials

Monkeyvoodoo

  • Trade Count: (0)
  • Full Member
  • ***
  • Offline Offline
  • Posts: 251
  • Last login:November 16, 2024, 01:36:41 am
  • I swear I can stop at one. Or two.
    • threefoldhorse Custom
Finally time to build a Vertical follow up to my Aliens Themed Cabinet
« Reply #41 on: June 03, 2013, 05:43:07 pm »

Lucky you. I was quoted 120 from Rona.

I may have to look around a bit more.

Quote
Whats that stuff running you shipped to home depot per sheet?

$79 Canadian for a 48" x 96" sheet 1/16

That is about the going retail i was offered with other companies...the bonus with HD is that I don't have to pay for shipping.


Sent from where ever I happen to be.

Epyx

  • Trade Count: (+1)
  • Full Member
  • ***
  • Offline Offline
  • Posts: 1961
  • Last login:December 25, 2023, 07:56:36 pm
  • "You're an oddity"
Ya Rona was more expensive for me as well...why not just get it through Home Depot like me? They are a Formica dealer and Formica is a good brand with a lot of options?
Last Project


Epyx Tutorials:
Tutorials

Monkeyvoodoo

  • Trade Count: (0)
  • Full Member
  • ***
  • Offline Offline
  • Posts: 251
  • Last login:November 16, 2024, 01:36:41 am
  • I swear I can stop at one. Or two.
    • threefoldhorse Custom
Finally time to build a Vertical follow up to my Aliens Themed Cabinet
« Reply #43 on: June 03, 2013, 06:34:50 pm »
I may have to drive out to the local Home Depot. Shame about Rona, they have the military discount.


Sent from where ever I happen to be.

mgb

  • Trade Count: (0)
  • Full Member
  • ***
  • Offline Offline
  • Posts: 3500
  • Last login:January 06, 2025, 09:39:00 pm
  • North East, US
Quote
Whats that stuff running you shipped to home depot per sheet?

$79 Canadian for a 48" x 96" sheet 1/16

That is about the going retail i was offered with other companies...the bonus with HD is that I don't have to pay for shipping.

When I bought my Formica laminate (1/16") from Lowes, it was like $90 but it was 4' x 12'
both Lowes and HD are nice for the fact that you order it shipped to the store and theres no shipping charge.

fablog

  • Trade Count: (0)
  • Full Member
  • ***
  • Offline Offline
  • Posts: 347
  • Last login:Yesterday at 02:27:40 pm
Test
« Reply #45 on: June 03, 2013, 10:37:50 pm »
I paid 35$+tx in Rona Laval (QC) for a 4X8 black Formica sheet. Why so expensive where you live?!?
« Last Edit: June 03, 2013, 10:44:34 pm by fablog »

Monkeyvoodoo

  • Trade Count: (0)
  • Full Member
  • ***
  • Offline Offline
  • Posts: 251
  • Last login:November 16, 2024, 01:36:41 am
  • I swear I can stop at one. Or two.
    • threefoldhorse Custom
Finally time to build a Vertical follow up to my Aliens Themed Cabinet
« Reply #46 on: June 03, 2013, 11:54:36 pm »
For me it could be because I live on Vancouver Island. Everything has to be shipped by ferry.

mgb

  • Trade Count: (0)
  • Full Member
  • ***
  • Offline Offline
  • Posts: 3500
  • Last login:January 06, 2025, 09:39:00 pm
  • North East, US
Finally time to build a Vertical follow up to my Aliens Themed Cabinet
« Reply #47 on: June 04, 2013, 09:16:15 am »
I paid 35$+tx in Rona Laval (QC) for a 4X8 black Formica sheet. Why so expensive where you live?!?

Is it possible that you got vertical grade laminate, which is thinner than 1/16"?

Epyx

  • Trade Count: (+1)
  • Full Member
  • ***
  • Offline Offline
  • Posts: 1961
  • Last login:December 25, 2023, 07:56:36 pm
  • "You're an oddity"
Taito cabinet question.

Still waiting for 2nd piece of laminate to arrive. I have some measurements for a Taito cabinet from Project Mame (Taito Rama). His cab is a slimmer version.  I also have measurements from this thread which appear standard Taito http://forum.arcadecontrols.com/index.php/topic,19558.msg156932.html#msg156932

My challenge will be mounting the 27" vertical WG D9800.  In Vertical position it will take up about 24.4". 

Anyone out there with a Taito that can tell me if using the standard 45 deg mount I can fit this in the regular Taito cab?.  IE taking into account stock CP on the Taito how much vertical space I have left for monitor?

Based on the 2nd link above the regular Taito looks like it should give me about 22 to 24". I plan on keeping the CP as free of buttons as possible...only Player 1/2 Start in addition to Joysticks (2) and 6 buttons per player but absolutely no menu buttons as I can get the same functionality with smart programming. so hopefully stock has enough space if not...I can slim up the CP a bit.  Any help would be appreciated.    As for why 6 buttons...The main focus for this machine will be vertical...but just as I play vertical on my existing horizontal I want to be able to play horizontal on this new dedicated vertical cab.

The other option if standard Taito angle doesn't work is steepening the angle...that will allow me to accommodate more vertical length but may ruin the aesthetics. 
« Last Edit: June 08, 2013, 10:27:49 pm by Epyx »
Last Project


Epyx Tutorials:
Tutorials

fablog

  • Trade Count: (0)
  • Full Member
  • ***
  • Offline Offline
  • Posts: 347
  • Last login:Yesterday at 02:27:40 pm
I paid 35$+tx in Rona Laval (QC) for a 4X8 black Formica sheet. Why so expensive where you live?!?

Is it possible that you got vertical grade laminate, which is thinner than 1/16"?

Nope, it was1/16.

Epyx

  • Trade Count: (+1)
  • Full Member
  • ***
  • Offline Offline
  • Posts: 1961
  • Last login:December 25, 2023, 07:56:36 pm
  • "You're an oddity"
Three more days of work and I take a week vacation to putter around home and work on the cab.  Still going with the Taito cab design. The only straying I will do from stock is depth to accommodate the 27" WG D9800 in vertical orientation.  I will try to keep the monitor at 45deg but will raise it as much as I can to limit the depth measurement. 

To say I am excited is an understatement.  Second laminate sheet arrived. Just need to buy another 4x8 5/8th MDF and we are good to go.  For additional parts I just need a coin door which I may just purchase from Suzo Happs.  Expect a bunch of picture updates starting Saturday when the fun begins!

One of the things I will really try this build is to include the technical aspects of the build...ie all the measurements...techniques and small work that I know I find interesting on builds and wish people would include but then don't myself! :)
« Last Edit: June 18, 2013, 11:44:30 pm by Epyx »
Last Project


Epyx Tutorials:
Tutorials

Jumpman64

  • Trade Count: (0)
  • Full Member
  • ***
  • Offline Offline
  • Posts: 164
  • Last login:October 12, 2017, 04:58:42 pm
  • I want to build my own arcade controls!
I have a Qix cabinet.  Measuring on the top surface of the bezel, I get 20.5" from the edge of the CP to the point where the back of the speaker panel touches the bezel.  To fit something with 24"+ vertical, you're going to definitely need to reposition the speaker panel and use a steeper angle for the monitor.  But I do think it can be done, with a shoe horn and some lard :-)

not_so_handy

  • Trade Count: (0)
  • Full Member
  • ***
  • Offline Offline
  • Posts: 97
  • Last login:January 20, 2016, 09:36:16 pm
I will definitely be following this build as your build and Martjins were the two I designed mine after.

I got Wilsonart laminate and it was cheap.  I paid $21 per 4x8 sheet.  Not sure what the shipping would be as I picked it up locally in Toronto.  Not that this is of any use to you anymore as you have already ordered yours....

Ond

  • Trade Count: (0)
  • Full Member
  • ***
  • Offline Offline
  • Posts: 2349
  • Last login:June 06, 2025, 05:39:15 pm
One of the things I will really try this build is to include the technical aspects of the build...ie all the measurements...techniques and small work that I know I find interesting on builds and wish people would include but then don't myself! :)

and videos, don't forget videos!  8)

Epyx

  • Trade Count: (+1)
  • Full Member
  • ***
  • Offline Offline
  • Posts: 1961
  • Last login:December 25, 2023, 07:56:36 pm
  • "You're an oddity"
@Jumpman64

Quote
I have a Qix cabinet.  Measuring on the top surface of the bezel, I get 20.5" from the edge of the CP to the point where the back of the speaker panel touches the bezel.  To fit something with 24"+ vertical, you're going to definitely need to reposition the speaker panel and use a steeper angle for the monitor.  But I do think it can be done, with a shoe horn and some lard :-)

Thanks very much.  Good call on the speaker panel but agreed definitely will steepen the angle of the monitor.  The speaker is a good call because for authenticity the monitor really was part of the Taito cab look imo...in addition to the curved upper sides of the cabinet itself.

@not_so_handy

Quote
Not that this is of any use to you anymore as you have already ordered yours...

True but regardless still nice to know thanks!  Do you have a link for your project? Would love to see it.

@Ond

Quote
and videos, don't forget videos! 

Indeed. Very good idea and will help me get better at video editing.   :cheers:
Last Project


Epyx Tutorials:
Tutorials

not_so_handy

  • Trade Count: (0)
  • Full Member
  • ***
  • Offline Offline
  • Posts: 97
  • Last login:January 20, 2016, 09:36:16 pm
cant wait to see the saw dust piles in the background of your pics :)

heres the link to my project

http://forum.arcadecontrols.com/index.php?topic=119592.0

Epyx

  • Trade Count: (+1)
  • Full Member
  • ***
  • Offline Offline
  • Posts: 1961
  • Last login:December 25, 2023, 07:56:36 pm
  • "You're an oddity"
Second to last day before vacation starts and UPS arrived at work with my coin door and mechs. I ordered these from Starburst (Playdium) in Toronto.  The mechs are Canadian quarter mechs as that is what I adjusted my other cab for.  I usually just use the coin insert buttons but sometimes it's fun to plunk a quarter in.  For example...is it even possible to enjoy Ms. Pacman without first hearing your coin plunk in before the intro and start?  :laugh:

The Aliens cab has a Williams Pinball wide coin door so with this vertical one for aesthetic I went with the slim Over/Under (Over portion only) variety. 


Last Project


Epyx Tutorials:
Tutorials

not_so_handy

  • Trade Count: (0)
  • Full Member
  • ***
  • Offline Offline
  • Posts: 97
  • Last login:January 20, 2016, 09:36:16 pm
I totally agree with you about ms pacman haha.  As for the coin door I have the same one in my cab from the playdium store.  Works like a champ :-)

Sent from my SGH-I747M using Tapatalk 2


Epyx

  • Trade Count: (+1)
  • Full Member
  • ***
  • Offline Offline
  • Posts: 1961
  • Last login:December 25, 2023, 07:56:36 pm
  • "You're an oddity"
Well...the vacation I started last week is almost over and while my wife is happy with what I have done around the house...I have done almost zero on my arcade cabinet.  Tomorrow that will change.  What I did do today is pull out my 2nd WG D9800 monitor and give some games a go in vertical as incentive to ensure I get around to building this weekend.  Thankfully with our Canada day Holiday on Monday I still have two very hot and sunny days left to work on it.

Here are a couple of videos of my 2nd WG D9800 highlighting some vertical goodness...and of course me rambling on for longer than I should...but my thread so imma blab :)

Unfortunately recording with my Iphone shows some of the scanlines being drawn in the videos. In person its a rock solid progressive signal.


Also have decided to not go with balltops on the vertical. I will stick with Sanwa as I consider them the strongest all around arcade stick on the market but have opted for the bat handles. To me Bat handle sticks are a must for vertical gaming. I will just keep the other pair of balltop Sanwa's for a CP project etc:


« Last Edit: June 29, 2013, 10:15:00 pm by Epyx »
Last Project


Epyx Tutorials:
Tutorials

Epyx

  • Trade Count: (+1)
  • Full Member
  • ***
  • Offline Offline
  • Posts: 1961
  • Last login:December 25, 2023, 07:56:36 pm
  • "You're an oddity"
Work today amounted to not much more than measuring the outline.  Again, given the size of my monitor I had to make some compromises with the original Taito cab dimensions. I have seen a project where the cab was made less deep so figured not much harm in making it a bit deeper. After carefully measuring I opted for an additional 2" of depth...rather than being 30" at the deepest point (mid cab) I am at 32".

Here is the outline with the revised depth:


And the monitor in vertical orientation (cutout as the WG is HEAVY):


My monitor cutout also takes into account depth as well...the deepest part of the monitor is a small square at the center back so with a few adjustments should fit fine:


Tomorrow the cutting begins. I will ensure I document that with video as well as pics as the router makes creating a copy of one side nice and easy.
« Last Edit: June 30, 2013, 09:39:23 pm by Epyx »
Last Project


Epyx Tutorials:
Tutorials

Le Chuck

  • Saint, make a poll!
  • Wiki Contributor
  • Trade Count: (+6)
  • Full Member
  • ***
  • Offline Offline
  • Posts: 5509
  • Last login:June 14, 2025, 06:26:06 pm
  • <insert personal text here>
Re: Finally time to build a Vertical - "Satans Hollow 2"
« Reply #60 on: July 01, 2013, 09:21:48 am »
I'm really excited about this build.  I can't wait to see that red on the sides.  Looking good!

TheShaner

  • Trade Count: (0)
  • Full Member
  • ***
  • Offline Offline
  • Posts: 451
  • Last login:December 23, 2017, 10:42:25 pm
  • Shut your noise tube filthy Taco Human!
Re: Finally time to build a Vertical - "Satans Hollow 2"
« Reply #61 on: July 01, 2013, 09:37:51 am »
Damn it Epyx, now youve got me wanting to do a vertical build!  I've got too many irons in the fire right now for this crap!

Epyx

  • Trade Count: (+1)
  • Full Member
  • ***
  • Offline Offline
  • Posts: 1961
  • Last login:December 25, 2023, 07:56:36 pm
  • "You're an oddity"
Re: Finally time to build a Vertical - "Satans Hollow 2"
« Reply #62 on: July 01, 2013, 09:12:13 pm »
Thanks guys...strange eh...when you aren't building you forget how long simple tasks take...you start believing the illusion that you can bang one of these out in a few days. Reality quickly sets back in lol.

As for TheShaner...took me 3 1/2 years to get the itch again so deal with your irons first...the cab won't go anywhere :)

So today...

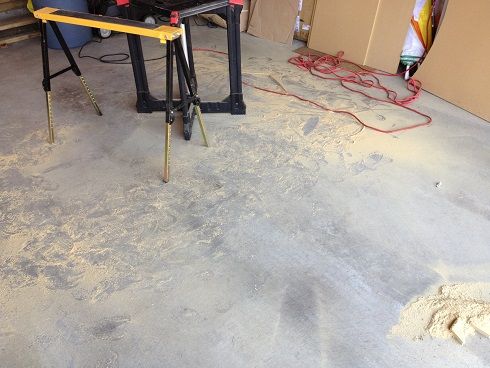
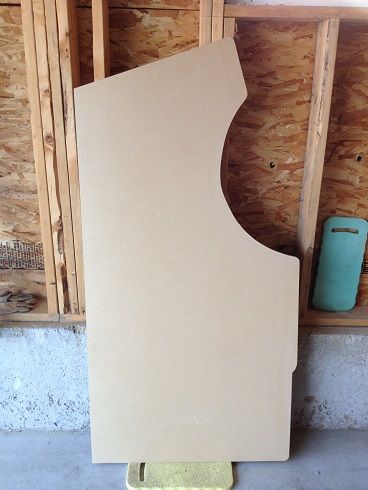
Started where I left off yesterday with the drawing about 2" deeper than a stock Taito cab.   One of the other things you tend to forget is how much ---smurfing--- dust a router bit on MDF creates...


First side cut...wasn't completely happy with the Taito semi circle but sanded it out later:


Always wear your safety goggles when working with routers or saws!  A ventilator like this one is nice for the MDF dust as well...unless you like coughing this stuff out for days! This may have been  harped to death in the years since I was last on but the easiest way to make your 2nd side is to simply rout it using your first as a template like so:


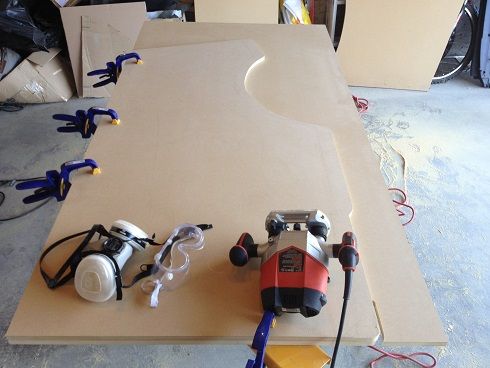
Halfway through the process the 2nd side is starting to take shape:


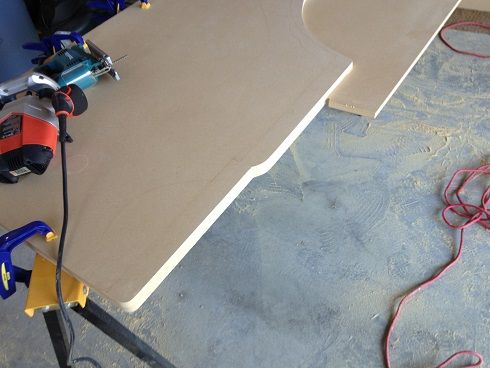
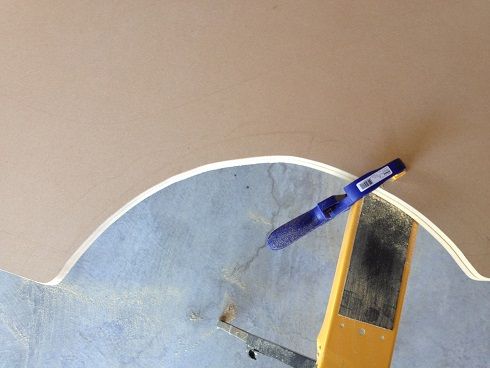
Here you can see the imperfections in the Taito semi circle:


Nothing a little sanding can't fix. I have an orbital sander that is perfect for stuff like this.  Here you can see the two sides next to Version 1 of my Alien cabinet sides. They were 3/4" MDF and when I made the decision to go with laminate over paint I opted for 5/8" MDF instead...still have these standing around.   The CP is about 4" higher on the Aliens cab because the Taito sides still don't have the 4" base and caster wheels...once those are on it will be roughly the same CP height:


Back to work tomorrow...so likely no lamination until the weekend...very excited can't wait. What is nice about the Taito design is laminating the inside will be very easy compared to what I went through with the Aliens cab.

Oh some videos that basically cover snippets of the pictures above:


« Last Edit: July 01, 2013, 09:22:45 pm by Epyx »
Last Project


Epyx Tutorials:
Tutorials

mcseforsale

  • Trade Count: (0)
  • Full Member
  • ***
  • Offline Offline
  • Posts: 1471
  • Last login:April 09, 2024, 03:07:41 pm
  • Creepy Mario Dude
Re: Finally time to build a Vertical - "Satans Hollow 2"
« Reply #63 on: July 01, 2013, 10:03:16 pm »
Looks cool.  +1 on the MDF dust.  A lot of this MDF creates some NASTY chemicals when worked, too...it's not just the dust.  I do all my cutting and routing in the driveway, then blow the dust onto the lawn and neighbor's cars when I'm done.  >:D

I also want to invest in a good leather apron, too.  Flying carbide tips from router bits would hit just about balls high!  :o

AJ

Epyx

  • Trade Count: (+1)
  • Full Member
  • ***
  • Offline Offline
  • Posts: 1961
  • Last login:December 25, 2023, 07:56:36 pm
  • "You're an oddity"
Re: Finally time to build a Vertical - "Satans Hollow 2"
« Reply #64 on: July 01, 2013, 10:12:01 pm »
Quote
I also want to invest in a good leather apron, too.  Flying carbide tips from router bits would hit just about balls high!

Haha good call! I think I will purchase one...after the accidents I have seen I should no better. As for the MDF dust...agreed. I work with my garage door open...ventilator on and even then when i sweep I wait a few mins for the air to settle down before commencing with any work.
Last Project


Epyx Tutorials:
Tutorials

Epyx

  • Trade Count: (+1)
  • Full Member
  • ***
  • Offline Offline
  • Posts: 1961
  • Last login:December 25, 2023, 07:56:36 pm
  • "You're an oddity"
Re: Dedicated Vertical Taito Classic Style "Satans Hollow 2"
« Reply #65 on: April 14, 2014, 11:31:03 pm »
Well...took a while to find my old thread. I explained my absence in my aliens build thread but basically busted my ankle bad at the beginning of the year...a few more weeks to heal and I will be back building this bad boy and documenting it all on my Youtube channel:  https://www.youtube.com/channel/UCe-LT9hCzsV4aqej1P-pEKw

Can't wait and in the meantime going to peruse the awesome projects that have appeared here in the interim.

Cheers guys it's good to be back!
Last Project


Epyx Tutorials:
Tutorials

Epyx

  • Trade Count: (+1)
  • Full Member
  • ***
  • Offline Offline
  • Posts: 1961
  • Last login:December 25, 2023, 07:56:36 pm
  • "You're an oddity"
Re: Dedicated Vertical Taito Classic Style "Satans Hollow 2"
« Reply #66 on: July 06, 2015, 09:24:36 pm »
Ok...for reals this time?!?!  Haha...sigh...NOW i understand how it can take some guys 5+ years to finish their projects.

So last year it was a broken ankle and wrist...this year much better news. When my wife and I purchased our home in 2008 we made a deal. The main floor and top were hers decor wise...the unfinished basement was mine. Now 7 years later with building permit in hand construction STARTS!!!

I will create a 2nd thread as it will be a separate project. This cab will be part of what goes into that future man cave space. To say I am excited would be an understatement.

Should have my first actual progress build update this weekend!  Just typing here to remind me and keep me accountable!
Last Project


Epyx Tutorials:
Tutorials

mcseforsale

  • Trade Count: (0)
  • Full Member
  • ***
  • Offline Offline
  • Posts: 1471
  • Last login:April 09, 2024, 03:07:41 pm
  • Creepy Mario Dude
Re: Dedicated Vertical Taito Classic Style "Satans Hollow 2"
« Reply #67 on: July 13, 2015, 04:29:39 pm »
Please link the basement thread here!

AJ

Epyx

  • Trade Count: (+1)
  • Full Member
  • ***
  • Offline Offline
  • Posts: 1961
  • Last login:December 25, 2023, 07:56:36 pm
  • "You're an oddity"
Re: Dedicated Vertical Taito Classic Style "Satans Hollow 2"
« Reply #68 on: September 07, 2015, 09:55:37 pm »
Will do...in fact going to start a thread now!
Last Project


Epyx Tutorials:
Tutorials

mcseforsale

  • Trade Count: (0)
  • Full Member
  • ***
  • Offline Offline
  • Posts: 1471
  • Last login:April 09, 2024, 03:07:41 pm
  • Creepy Mario Dude