Main Restorations Software Audio/Jukebox/MP3 Everything Else Buy/Sell/Trade
Project Announcements Monitor/Video GroovyMAME Merit/JVL Touchscreen Meet Up Retail Vendors
Driving & Racing Woodworking Software Support Forums Consoles Project Arcade Reviews
Automated Projects Artwork Frontend Support Forums Pinball Forum Discussion Old Boards
Raspberry Pi & Dev Board controls.dat Linux Miscellaneous Arcade Wiki Discussion Old Archives
Lightguns Arcade1Up Try the site in https mode Site News

Unread posts | New Replies | Recent posts | Rules | Chatroom | Wiki | File Repository | RSS | Submit news


Author Topic: Forgotten ROMs - First Build -  (Read 36205 times)

0 Members and 1 Guest are viewing this topic.

not_so_handy

  • Trade Count: (0)
  • Full Member
  • ***
  • Offline Offline
  • Posts: 97
  • Last login:January 20, 2016, 09:36:16 pm
Forgotten ROMs - First Build -
« on: April 20, 2012, 11:25:19 am »
Hello all,

I like so many before me have lurked on this site for many years jealously reading about these amazing builds you all have under taken.  I have always wanted my own MAME cabinet but was either not allowed because my folks didn't want it in the house or when I moved out didn't have the time because I was renoing my house.  Sooooooo now that those obstacles are out of the way I am finally free to start my first build.

Like I said I have been reading the project builds on this site for years and have really enjoyed them all.  But two that really stuck out for me were Martijn's Scratch Build Custom Street Fighter Arcade Cabinet and Epyx Alien Themed Cab.

My plan at this moment is to basically use the top half of Martijn's design and the bottom half of Epyx design.  So far I have bought the 3/4 mdf and a 27 inch crt tv so I guess I am committed to this build at this point  :applaud:

The plan is to do laminate just like the two builds I am following.  There will be full panel side art.  The CP will consist of two joysticks with probably 7 buttons each as well as a trackball.  I still ha vent decided on what admin buttons I will be using.  Also I will be decasing the tv  :o as I want this to be under 30 inches wide so that it fits through most doorways.  The theme for the cabinet will be Medieval as the subject states so most of the art will be pulled from games like Dragons Lair, ghouls and ghosts and gauntlet.  I will not be doing the artwork myself as I have no imagination nor can I draw  :P  So I have a friend that does online comics that will be helping me out with this  ;D

So since I also have no skills with sketchup or any other design program my gf went out at get me some foam board and cement glue and I did some arts and crafts.

Attached is what I came up with.

Any comments will be appreciated.  This will definitely be a learning process as my skills with tools are severely lacking. 
 
« Last Edit: September 11, 2012, 09:13:40 am by not_so_handy »

Le Chuck

  • Saint, make a poll!
  • Wiki Contributor
  • Trade Count: (+6)
  • Full Member
  • ***
  • Offline Offline
  • Posts: 5509
  • Last login:June 14, 2025, 06:26:06 pm
  • <insert personal text here>
Re: Medieval Times
« Reply #1 on: April 20, 2012, 10:50:57 pm »
Sweet mockup, throw a GBA in that badboy and you're done.   ;D

Welcome, looks like you've got a clear direction of where you want to get so best of luck and start making some sawdust!  Can't wait to see that theme. 

wp34

  • Trade Count: (+3)
  • Full Member
  • ***
  • Offline Offline
  • Posts: 4794
  • Last login:April 10, 2022, 09:48:19 pm
Re: Medieval Times
« Reply #2 on: April 20, 2012, 11:21:39 pm »
That's a nice mock up.  You picked two cabinets that inspired me as well.  I'm anxious to follow your build.

not_so_handy

  • Trade Count: (0)
  • Full Member
  • ***
  • Offline Offline
  • Posts: 97
  • Last login:January 20, 2016, 09:36:16 pm
Re: Medieval Times
« Reply #3 on: April 23, 2012, 09:32:21 pm »
Thanks guys,

I had thought about putting a gba in there and I actually have a spare one to do that  :laugh2:  Might have to try that after this build :)

Ok so now for my update.

The first thing I bought for this project was the tv.  I was able to find it on Kijiji Easter weekend for 20 bucks.  The other day I final built up the courage to decase it.  After 10 minutes and a few nerves I managed to end up with the following.


With the tv dismantled and the mdf purchases I needed to start picking up the rest of the supplies.  I spent alot of time trying to find matte black laminate.  The only way to get it here is by special order from Home Depot or from a cabinet store that wants to sell it for $90 a sheet.  After some more research I found a Wilsonart distributor in the Toronto area that had matte black for 0.65 cents a square foot.  Now here is the catch.  I needed to buy min 5 sheets to get that price otherwise its $2.34 a square sheet.  So either I buy the 3 sheets that i need at $75 a sheet or I buy 5 sheets even though I dont need them and pay $21 a sheet.  Well it seems like a simple answer.  So i jumped in the car to drive the 2hrs to get 5 sheets of laminate.  I got there and they rolled it up but broke the corner on one of the sheets so I ended up actually with 6 sheets for 20 bucks a sheet.  Amazing price considering the alternatives and now I have enough for two cabs  :applaud:


So over the weekend I decided to start cutting the mdf.


 I cut the first sheet and here is the result


So things were going well and I managed to sand it down but the annoying part is that my blade on my jigsaw was cutting on a slight angle.  I am praying that the t-molding will cover this up  :banghead: Otherwise I may be cutting another piece.  So I traced out the second panel and rough cut this with the intent to router it to size based off the first piece.  This is where I hit a snag  :(  turns out that the router bits I borrowed only had a half inch flush trim bit so now I dont have a bit to do the trim work on the 3/4 inch mdf  :banghead:  After looking at canadian tire Home depot  and Rona I couldnt find a bit that was that size :(.  also i am having a problem finding a slot cutter but I may just have to purchase that with the t molding from t-molding.com

So this is where I am at now


wp34

  • Trade Count: (+3)
  • Full Member
  • ***
  • Offline Offline
  • Posts: 4794
  • Last login:April 10, 2022, 09:48:19 pm
Re: Medieval Times
« Reply #4 on: April 23, 2012, 11:24:32 pm »
Looking great so far.   :cheers:

I had a similar dilemma and ended up with 5 sheets of laminate as well. Never hurts to have a little extra.

not_so_handy

  • Trade Count: (0)
  • Full Member
  • ***
  • Offline Offline
  • Posts: 97
  • Last login:January 20, 2016, 09:36:16 pm
Re: Medieval Times
« Reply #5 on: April 24, 2012, 08:03:53 am »
and the way things are going I think I will be glad for the extra just in case of mistakes.

Sparkolicious

  • Trade Count: (0)
  • Full Member
  • ***
  • Offline Offline
  • Posts: 186
  • Last login:June 21, 2024, 11:49:25 pm
  • Measure twice cut once dern it!
Re: Medieval Times
« Reply #6 on: April 24, 2012, 10:48:36 am »
Nice looking design!  :applaud:

not_so_handy

  • Trade Count: (0)
  • Full Member
  • ***
  • Offline Offline
  • Posts: 97
  • Last login:January 20, 2016, 09:36:16 pm
Re: Medieval Times
« Reply #7 on: April 24, 2012, 07:51:24 pm »
just a small update.  I was having a tough time figuring out what to do since I didnt have a 3/4 inch flush trim bit for my router, just a half inch.  So I managed to make what I had work.  Just meant i had to do two passes to cut the bottom half and then the top half of the edge.  After cutting out the second panel I kept looking at the first panel and wasnt happy with my cut work on the back curve as the jigsaw ended up cutting on an angle  :-[  So I used the second panel as the template now and moved it over a 1/4 of an inche and trimmed off enough to clean up my initial poor cut.  Then of course I had to do the same again to the second panel to even things up. phhheewww thank god cause that would have annoyed me to no end  :cheers:

heres the results.


mavsprophecy

  • Trade Count: (0)
  • Full Member
  • ***
  • Offline Offline
  • Posts: 22
  • Last login:May 29, 2014, 11:42:03 am
Re: Medieval Times
« Reply #8 on: April 24, 2012, 10:25:42 pm »
Looking good so far!  The theme sounds intriguing.  I also like how the top of the cut MDF look like shark fins...

Seith

  • Trade Count: (0)
  • Full Member
  • ***
  • Offline Offline
  • Posts: 402
  • Last login:September 08, 2018, 10:50:41 am
Re: Medieval Times
« Reply #9 on: April 24, 2012, 11:11:55 pm »
Some good progress so far (although that sucks about the router bit  :banghead:)

A fellow canadian build is always a welcome addition to the pantheon.

not_so_handy

  • Trade Count: (0)
  • Full Member
  • ***
  • Offline Offline
  • Posts: 97
  • Last login:January 20, 2016, 09:36:16 pm
Re: Medieval Times
« Reply #10 on: April 26, 2012, 03:04:29 pm »
Thanks guys, yeah the router bit issue really was annoying  :angry: but thankfully i was able to work around it  :cheers:

Just ordered my buttons trackball and j-sticks from ultimarc and my slot cutter is on the way  8)  Hopefully i can put together the base tonight.  Just have to stop by rona and pickup a countersink bit and some screws.

not_so_handy

  • Trade Count: (0)
  • Full Member
  • ***
  • Offline Offline
  • Posts: 97
  • Last login:January 20, 2016, 09:36:16 pm
Re: Medieval Times
« Reply #11 on: April 29, 2012, 09:48:59 pm »
Well I was hoping to have this update done a couple days ago but I ran into a few speed bumps that really slowed down progress.  But I finally managed to get everything cut and assembled and I now have a standing cabinet. 
Tomorrow night with some help I will be test mounting the monitor and putting the back panel together.

So here are the pics :)


not_so_handy

  • Trade Count: (0)
  • Full Member
  • ***
  • Offline Offline
  • Posts: 97
  • Last login:January 20, 2016, 09:36:16 pm
Re: Medieval Times
« Reply #12 on: April 30, 2012, 03:19:49 pm »
i dont know if you can make it out very well but the second last photo in my last post has a marking on the inside of the cab where the angle of the tv will be.  Does that look to be to steep?  Its at a 35 degree angle, not sure if thats going to be to much or not.

not_so_handy

  • Trade Count: (0)
  • Full Member
  • ***
  • Offline Offline
  • Posts: 97
  • Last login:January 20, 2016, 09:36:16 pm
Re: Medieval Times
« Reply #13 on: May 02, 2012, 07:34:51 am »
small update here.  Last night I was able to get the supports in the right place for the monitor and test fitted it.  Here is the result.  I think its looking pretty good so far :)


up next is finishing off the supports for the speakers and the back panels then on to laminating :)

kahlid74

  • Trade Count: (+1)
  • Full Member
  • ***
  • Offline Offline
  • Posts: 1366
  • Last login:January 01, 2021, 12:42:56 pm
  • Gaming for a better future!
    • GamersAnon
Re: Medieval Times
« Reply #14 on: May 02, 2012, 08:27:05 am »
Looking great.  The design is great.

not_so_handy

  • Trade Count: (0)
  • Full Member
  • ***
  • Offline Offline
  • Posts: 97
  • Last login:January 20, 2016, 09:36:16 pm
Re: Medieval Times
« Reply #15 on: May 02, 2012, 08:44:02 am »
Thanks Kahlid.  I am having a tonne of fun building this thing. 

Ok question for everyone who may be reading this thread.  I ran into a bit of a color problem.  I got my stash of goodies delivered yesterday from Ultrimarc but the balltop I ordered didnt match the color of the buttons :(  Any chance anyone knows where I can find a ball top that will match these buttons?  They are the classic push buttons from happs controls off Ultimarcs site.


Uncle Monkey

  • Trade Count: (0)
  • Full Member
  • ***
  • Offline Offline
  • Posts: 124
  • Last login:September 12, 2020, 10:16:25 pm
  • P24L
    • Project Thread
Re: Medieval Times
« Reply #16 on: May 02, 2012, 08:58:22 am »
Thanks Kahlid.  I am having a tonne of fun building this thing. 

Ok question for everyone who may be reading this thread.  I ran into a bit of a color problem.  I got my stash of goodies delivered yesterday from Ultrimarc but the balltop I ordered didnt match the color of the buttons :(  Any chance anyone knows where I can find a ball top that will match these buttons?  They are the classic push buttons from happs controls off Ultimarcs site.


I recommend these bad boys, the Deep Blue.....

not_so_handy

  • Trade Count: (0)
  • Full Member
  • ***
  • Offline Offline
  • Posts: 97
  • Last login:January 20, 2016, 09:36:16 pm
Re: Medieval Times
« Reply #17 on: May 02, 2012, 09:43:13 am »
Uncle Monkey thanks a tonne!!  I think that should be a pretty close match up color wise.  Just hope that it fits the J-stick I bought.....

SteveR

  • Trade Count: (0)
  • Full Member
  • ***
  • Offline Offline
  • Posts: 24
  • Last login:February 14, 2023, 05:17:50 pm
Re: Medieval Times
« Reply #18 on: May 02, 2012, 09:44:58 am »
I recommend these bad boys, the Deep Blue.....

I have one of those. It's not exactly the same color as the Happs button, but close enough that I'm going to go with it on my project. It's certainly a better match than that light blue he has now. In a nice bright light the Deep Blue looks pretty close to the Happs blue, but in dimmer light you can see the balltop is definitely more purplish.

And yes, it should fit the J-stick fine.

Uncle Monkey

  • Trade Count: (0)
  • Full Member
  • ***
  • Offline Offline
  • Posts: 124
  • Last login:September 12, 2020, 10:16:25 pm
  • P24L
    • Project Thread
Re: Medieval Times
« Reply #19 on: May 02, 2012, 09:47:45 am »
Uncle Monkey thanks a tonne!!  I think that should be a pretty close match up color wise.  Just hope that it fits the J-stick I bought.....
They should, they're the standard 6mm thread size, and I have them on my U360s. The Ultimarc site says that the U360 accessories will fit the J-stik, so... :cheers:

not_so_handy

  • Trade Count: (0)
  • Full Member
  • ***
  • Offline Offline
  • Posts: 97
  • Last login:January 20, 2016, 09:36:16 pm
Re: Medieval Times
« Reply #20 on: May 02, 2012, 10:03:56 am »
great that sounds like my way to go then.  Maybe I will also see if they have buttons through GGG that match that ball as well.  I really would like it all to match up.

not_so_handy

  • Trade Count: (0)
  • Full Member
  • ***
  • Offline Offline
  • Posts: 97
  • Last login:January 20, 2016, 09:36:16 pm
Re: Medieval Times
« Reply #21 on: May 04, 2012, 08:38:09 am »
ok so it may not look like I have progressed much further but it really was alot of work getting the back done.  I have been trying to do this build so that there are absolutely no exposed screws anywhere on the cabinet.  I thought about ways to do the back panels of the cabinet this way and have decided to use velcro to hold it into place along with 1/8 inche oak board.  Its pretty light and I was still able to counter sink the screws so they are flush for putting on the laminate.  I will be adding a handle on the top and bottom panel so that I can access it.  So with some supports built and velcro hot glued to the supports we have this


As you can see this doesnt go all the way to the bottom.  This is because I will be finishing that up with mdf so that I can put a switch and an outlet for a power cord.  I thought it would be easier to attach that to thicker woood and I also dont want to be able to remove that part.

and from the front :)


if the wife lets me tonight I will be finishing off the admin panel below the cp, the power section in the back and the speaker area as well as cutting the slot for the t-molding.  This should finish off all the wood working I need to do before I completely dismantle it and laminate the side panels inside and out.

not_so_handy

  • Trade Count: (0)
  • Full Member
  • ***
  • Offline Offline
  • Posts: 97
  • Last login:January 20, 2016, 09:36:16 pm
Re: Medieval Times
« Reply #22 on: May 06, 2012, 07:45:07 pm »
So  apparently i didnt take a picture of my cab while it was still together but i have completed the rough work for the cab.  So everything has been put together and is now ready to be laminated.  So now I have taken it all apart again, drew a diagram so I know where everything goes when time to put it back together. :applaud:

So now that this is done time to laminate


This turned out really well and I am super pumped with the results  :cheers:  Only crappy part is that it took almost a full thing of contact cement to do one side so now I am out  :banghead:  but the local market has it on sale for $30 bucks which is $18 cheaper then HD and Rona  :applaud:  So tomorrow night I will do the second side of the inside part of the cabinet.  Then drill the holes in the cab so that I can put the supports back in and then laminate the outside :)  Its a bit of a pain but totally worth it after seeing the results :)

not_so_handy

  • Trade Count: (0)
  • Full Member
  • ***
  • Offline Offline
  • Posts: 97
  • Last login:January 20, 2016, 09:36:16 pm
Re: Medieval Times
« Reply #23 on: May 07, 2012, 04:11:50 pm »
so my original idea was to have red buttons on one side and blue on the other.  I was hoping to have matching ball tops to the buttons as well.  But I think I have to call defeat on this one as I cant for the life of me find a proper blue balltop  :hissy:

What do you guys thing of keeping the red and blue buttons and then just going with black balltops for both controllers?

Uncle Monkey

  • Trade Count: (0)
  • Full Member
  • ***
  • Offline Offline
  • Posts: 124
  • Last login:September 12, 2020, 10:16:25 pm
  • P24L
    • Project Thread
Re: Medieval Times
« Reply #24 on: May 07, 2012, 04:14:49 pm »
so my original idea was to have red buttons on one side and blue on the other.  I was hoping to have matching ball tops to the buttons as well.  But I think I have to call defeat on this one as I cant for the life of me find a proper blue balltop  :hissy:

What do you guys thing of keeping the red and blue buttons and then just going with black balltops for both controllers?

I think you check these out before you give up on your dreams man.....
 :cheers:

not_so_handy

  • Trade Count: (0)
  • Full Member
  • ***
  • Offline Offline
  • Posts: 97
  • Last login:January 20, 2016, 09:36:16 pm
Re: Medieval Times
« Reply #25 on: May 07, 2012, 04:21:54 pm »
ok time for an update  :applaud:
« Last Edit: May 13, 2012, 04:46:53 pm by not_so_handy »

not_so_handy

  • Trade Count: (0)
  • Full Member
  • ***
  • Offline Offline
  • Posts: 97
  • Last login:January 20, 2016, 09:36:16 pm
Re: Medieval Times
« Reply #26 on: May 13, 2012, 05:03:44 pm »
Well i havent posted an updates in a while but I have been working on the cab. Just very slowely :)

Here are the pics of me finishing up the side panels.


Here is a pic of both the side panels laminated


And I was able to get the coin door mounted.  I think its about the right height.


not_so_handy

  • Trade Count: (0)
  • Full Member
  • ***
  • Offline Offline
  • Posts: 97
  • Last login:January 20, 2016, 09:36:16 pm
Re: Medieval Times
« Reply #27 on: May 13, 2012, 05:09:41 pm »
After getting the coin hole cut and laminated i was able to brind everything into the basement and finally have some of it reassembled.  Here we go :)


And here we have the coin door in and the front panel in its spot.  Though there will be admin buttons on there later.


harveybirdman

  • Trade Count: (0)
  • Full Member
  • ***
  • Offline Offline
  • Posts: 2540
  • Last login:December 28, 2024, 01:21:59 am
  • SHMUP'EM
Re: Medieval Times
« Reply #28 on: May 13, 2012, 10:23:12 pm »
looking bad ass man
 :cheers:

not_so_handy

  • Trade Count: (0)
  • Full Member
  • ***
  • Offline Offline
  • Posts: 97
  • Last login:January 20, 2016, 09:36:16 pm
Re: Medieval Times
« Reply #29 on: May 13, 2012, 10:54:09 pm »
thanks man

its coming along slowely :)

here is a couple pics of the CP layout.


AlienInferno

  • Trade Count: (0)
  • Full Member
  • ***
  • Offline Offline
  • Posts: 516
  • Last login:Yesterday at 12:14:27 am
Re: Medieval Times
« Reply #30 on: May 14, 2012, 01:16:05 am »
Nice build.  Looks great so far.

not_so_handy

  • Trade Count: (0)
  • Full Member
  • ***
  • Offline Offline
  • Posts: 97
  • Last login:January 20, 2016, 09:36:16 pm
Re: Medieval Times
« Reply #31 on: May 14, 2012, 10:26:11 am »
next up are the holes for the speakers and the two fans I will be putting on the top panel.

I am thinking about using drywall sandsheets for the grills.  Give it a coating with the mat black spray paint and cut them to size.  I have a few left  overs from the basement reno.  Thoughts?

It looks kind of like this but not used lol.


not_so_handy

  • Trade Count: (0)
  • Full Member
  • ***
  • Offline Offline
  • Posts: 97
  • Last login:January 20, 2016, 09:36:16 pm
Re: Medieval Times
« Reply #32 on: May 14, 2012, 11:03:20 pm »
got the tv in as well as the bezel cut.  Heres the result


Le Chuck

  • Saint, make a poll!
  • Wiki Contributor
  • Trade Count: (+6)
  • Full Member
  • ***
  • Offline Offline
  • Posts: 5509
  • Last login:June 14, 2025, 06:26:06 pm
  • <insert personal text here>
Re: Medieval Times
« Reply #33 on: May 14, 2012, 11:31:05 pm »
That's really coming together very nicely.  Nice clean lines.

What are the dimensions of the speaker covers you're looking to make.  I have a few different old speaker covers that I could send you if they fit, you can cut them down to size very easily with some snips and a bench grinder.  I don't thing the drywall sanding pads will look quite right.  If I don't have the right size they are always up for grabs on KLOV.  Let me know, you pay shipping and they are gratis.  How's the art coming, you going with black t-molding or are you gonna mix it up?

not_so_handy

  • Trade Count: (0)
  • Full Member
  • ***
  • Offline Offline
  • Posts: 97
  • Last login:January 20, 2016, 09:36:16 pm
Re: Medieval Times
« Reply #34 on: May 15, 2012, 09:58:27 am »
The art work unforatunately is going slow.  I havent actually seen any of it yet.  My friend thats working on it is also in the middle of a kitchen reno  :hissy:  Though I am hoping to see some mock ups this week.

The speaker grills I was hoping would look similar to the pic below with the drywall sand pads.  I am just not sure if I can accomplish that with the pads.  I am looking for a speaker hole thats probably about 3inch by 5 inch.  Do you have a pic of your grills?


Le Chuck

  • Saint, make a poll!
  • Wiki Contributor
  • Trade Count: (+6)
  • Full Member
  • ***
  • Offline Offline
  • Posts: 5509
  • Last login:June 14, 2025, 06:26:06 pm
  • <insert personal text here>
Re: Medieval Times
« Reply #35 on: May 15, 2012, 10:03:50 am »
Same material that was used on the Micro SW, which looks to be the same as in that pic.  I'll look and see if I have that much spare, you need a 5x6" sheet?

not_so_handy

  • Trade Count: (0)
  • Full Member
  • ***
  • Offline Offline
  • Posts: 97
  • Last login:January 20, 2016, 09:36:16 pm
Re: Medieval Times
« Reply #36 on: May 15, 2012, 10:09:00 am »
probably 6x8 inch just to be safe.  If you have that much.

Le Chuck

  • Saint, make a poll!
  • Wiki Contributor
  • Trade Count: (+6)
  • Full Member
  • ***
  • Offline Offline
  • Posts: 5509
  • Last login:June 14, 2025, 06:26:06 pm
  • <insert personal text here>
Re: Medieval Times
« Reply #37 on: May 15, 2012, 10:13:30 am »
probably 6x8 inch just to be safe.  If you have that much.

I have an 8x8 sheet with your name on it.  PM me your details. 

not_so_handy

  • Trade Count: (0)
  • Full Member
  • ***
  • Offline Offline
  • Posts: 97
  • Last login:January 20, 2016, 09:36:16 pm
Re: Medieval Times
« Reply #38 on: May 15, 2012, 10:23:49 am »
perfect!  :cheers:

pm sent

not_so_handy

  • Trade Count: (0)
  • Full Member
  • ***
  • Offline Offline
  • Posts: 97
  • Last login:January 20, 2016, 09:36:16 pm
Re: Medieval Times
« Reply #39 on: May 15, 2012, 12:39:42 pm »
As for the T-Molding I got black but I may change it out depending on the artwork.  Since I am not designing it myself I am not sure what color it will be  :dizzy:  Its an easy piece to change out though.

mgb

  • Trade Count: (0)
  • Full Member
  • ***
  • Offline Offline
  • Posts: 3500
  • Last login:January 06, 2025, 09:39:00 pm
  • North East, US
Re: Medieval Times
« Reply #40 on: May 15, 2012, 11:15:55 pm »
The cabinet is looking great!!! You will enjoy the laminate for a long time to come. My cab is laminated and it holds up great.

not_so_handy

  • Trade Count: (0)
  • Full Member
  • ***
  • Offline Offline
  • Posts: 97
  • Last login:January 20, 2016, 09:36:16 pm
Re: Medieval Times
« Reply #41 on: May 16, 2012, 08:52:12 am »
Thanks mgb.  I got the laminate for a great price so I couldnt not go with it.  I am not much of a painter so I think this was definitely the way to go.  Everytime I look at it I am impressed with the way the laminate looks  :cheers:  I would recommend using it to everyone.

not_so_handy

  • Trade Count: (0)
  • Full Member
  • ***
  • Offline Offline
  • Posts: 97
  • Last login:January 20, 2016, 09:36:16 pm
Re: Medieval Times
« Reply #42 on: May 25, 2012, 08:50:39 am »
Ok first off I am thinking of changing the name of the cabinet as I am thinking Medieval Times is just not cool enough for this cab.  I was thinking of changing it to Forgotten Roms, obviously a take off of Forgotten Realms.  Thoughts?  Better or worse?

Its been slow going the last week and a bit but i will have time to put towards the cab this weekend so expect a big update.  I got the tempered glass for infront of the monitor as well as the plexi for the marquee so I just need to do the speaker panel this weekend and I will be able to put in the bezel which I laminated the other day as well as the tempered glass  I should be able to get the top peice completed as well so that the Marquee plexi is in its final resting place as well.  I also got a mock up of the marquee from my buddy.  Here it is.


harveybirdman

  • Trade Count: (0)
  • Full Member
  • ***
  • Offline Offline
  • Posts: 2540
  • Last login:December 28, 2024, 01:21:59 am
  • SHMUP'EM
Re: Medieval Times
« Reply #43 on: May 25, 2012, 09:37:45 am »
Forgotton Roms is a clever name, and very cool...  I would say even slicker that Medieval Times (which is also cool, although it makes me think of Cable Guy)

The only critique I'd have of Forgotton Roms, and I feel like a complete arcade  :tool: for even suggesting it....

But do you want to theme a cab on a game that has conrols you don't plan on putting on the panel?  But maybe it would just be an homage by subtle nod and not take a big infulence on the artwork of the cab in which case carry on.

not_so_handy

  • Trade Count: (0)
  • Full Member
  • ***
  • Offline Offline
  • Posts: 97
  • Last login:January 20, 2016, 09:36:16 pm
Re: Medieval Times
« Reply #44 on: May 25, 2012, 02:46:53 pm »
Yeah I think I am going to change it to Forgotten ROMs

I'm not to concerned with the theme of the cab and the button layout.  I really just wanted a medeival fantasy theme for the artwork but of course I will be playing many games on this machine other then medieval games. 

not_so_handy

  • Trade Count: (0)
  • Full Member
  • ***
  • Offline Offline
  • Posts: 97
  • Last login:January 20, 2016, 09:36:16 pm
Re: Medieval Times
« Reply #45 on: May 31, 2012, 08:23:38 am »
Alright so since the start of the weekend I got a fair bit done so I will break this up into a couple posts I think. 

To start off with i got the bezel laminated and put into the cab.


Then I was able to put the tempered glass infront of that


not_so_handy

  • Trade Count: (0)
  • Full Member
  • ***
  • Offline Offline
  • Posts: 97
  • Last login:January 20, 2016, 09:36:16 pm
Re: Medieval Times
« Reply #46 on: May 31, 2012, 08:39:26 am »
next up was the real fun.  I got to do the speaker panel.  This i really struggled to figure out how the heck I was going to get the grill in as I didnt want to attach it from the outside.

So finally after looking at a few peoples projects I finally realized that they just cut a bigger hole and then put a template inside that hole to route out the actual speaker hole and then the grill just sat on the laminate  :applaud:

so first up was the joy of making the template.  Thank god I had borrowed my dads Dremel cause that made this job much easier.  This is what it ended up looking like


Then I cut out the holes in the panel and laminated


Next I popped in the template and routed the holes


Next i cut the grill that Le Chuck was so kind to send me and glued them into place and here is the result


there we go speaker panel completed :)


not_so_handy

  • Trade Count: (0)
  • Full Member
  • ***
  • Offline Offline
  • Posts: 97
  • Last login:January 20, 2016, 09:36:16 pm
Re: Medieval Times
« Reply #47 on: May 31, 2012, 08:50:06 am »
Next up was the top panel that I was planning to put a couple fans in that I had from an old computer.  I cut the holes and slathered on the contact cement.

I used the same template that I cut for the speakers as the hole size fit the fans perfectly and routed out all the laminate

Then i used some of the drywall sand sheets that I had originally talked about as I only had enough of the grill material from Le Chuck to do the speaker panel which was fine as this really wont be visible and this was the result.  Actually didnt turn out that bad.  Not nearly as nice as the speaker grill but its acceptable.  :cheers:

Then finally I poped it into the cabinet, only thing I have to do is throw a bit of paint at the end where I cut the laminate to hold the marquee retainer just to tidy that up.


not_so_handy

  • Trade Count: (0)
  • Full Member
  • ***
  • Offline Offline
  • Posts: 97
  • Last login:January 20, 2016, 09:36:16 pm
Re: Medieval Times
« Reply #48 on: May 31, 2012, 08:53:23 am »
Now that thats all together I was able to test fit my plexi glass in for the marquee.  I dont have any wiring setup for the marquee light so that will have to wait till tonight.  But here is the result.  I think it looks pretty good.


And finally a shot of the whole cab.


harveybirdman

  • Trade Count: (0)
  • Full Member
  • ***
  • Offline Offline
  • Posts: 2540
  • Last login:December 28, 2024, 01:21:59 am
  • SHMUP'EM
Re: Medieval Times
« Reply #49 on: May 31, 2012, 12:37:53 pm »
 :applaud:

Dude this thing is money, mad props

not_so_handy

  • Trade Count: (0)
  • Full Member
  • ***
  • Offline Offline
  • Posts: 97
  • Last login:January 20, 2016, 09:36:16 pm
Re: Forgotten ROMs.....previously Medieval Times
« Reply #50 on: June 11, 2012, 08:42:11 am »
Well a small update of what I have been doing over the past week.  I finally got to building the actual Control panel.  Here was the initial mock up.


Here is a pic with the cuts made and the buttons and trackball in place.


I also worked on getting the computer setup and the tv hooked back up as well

It really made me wish I was finished so I could start playing some games :)

I did have a question for the people that have finished cabs.  I am running into a bit of an annoyance with the task bar.  I have it set to auto hide but of course there is still a slight bit of the grey bar showing when the computer boots up.  This is extremely annoying on the tv as it flickers constantly before hyperspin loads up.  Also anyone know how to bypass the blue screen that comes up when it auto logs you into the computer.  I have it setup to just not show the windows xp load screen  and to auto log in but when it bypasses the welcome screen there is still a second or two of blue screen that shows up and just doesnt look right.  As well as the mouse showing up.  Any one have any experience bypassing these annoyances?

Uncle Monkey

  • Trade Count: (0)
  • Full Member
  • ***
  • Offline Offline
  • Posts: 124
  • Last login:September 12, 2020, 10:16:25 pm
  • P24L
    • Project Thread
Re: Forgotten ROMs.....previously Medieval Times
« Reply #51 on: June 11, 2012, 09:10:08 am »
Here is a good tutorial on shelling windows.

not_so_handy

  • Trade Count: (0)
  • Full Member
  • ***
  • Offline Offline
  • Posts: 97
  • Last login:January 20, 2016, 09:36:16 pm
Re: Forgotten ROMs.....previously Medieval Times
« Reply #52 on: September 10, 2012, 09:48:12 am »
Well its been a busy summer and I really havent done much of anything on my cabinet as I have been waiting for my slow poke friend to finish my art.  Unfortunately that seems to be a long way off still so I figured I would start finishing off a few odds and ends that i can easily do while I wait.

So the biggest dilemma I had was what the heck to do with my volume control knob that I wanted placed on the admin panel.  The issue here was extending the shaft as i couldnt from what I could see just remove the pot and mount it in the wood.


So this ended up being what I came up with. 


Now I just have to mount it to the admin panel which i was also able to start last night as well.  The admin panel will have a usb port on both sides as well as 3 buttons and the volume control.


Hopefully tonight i will be able to laminate this as well I plan to use the blanks off the back of an old computer to mount the volume circuit board.

Since I dont have the control panel art work yet as well I plan to at least wire things up and label it so that when I do get it the wiring will be good to go.  I didnt get very far but i did at least get the ipac2 mounted and an idea of how I was going to wire it.


This is where I am at right now.....hopefully things will move along from here on out.

jeff

Seith

  • Trade Count: (0)
  • Full Member
  • ***
  • Offline Offline
  • Posts: 402
  • Last login:September 08, 2018, 10:50:41 am
Re: Forgotten ROMs.....previously Medieval Times
« Reply #53 on: September 10, 2012, 08:41:29 pm »
Interesting way to extend the volume knob... for what it's worth, this is how I did mine...

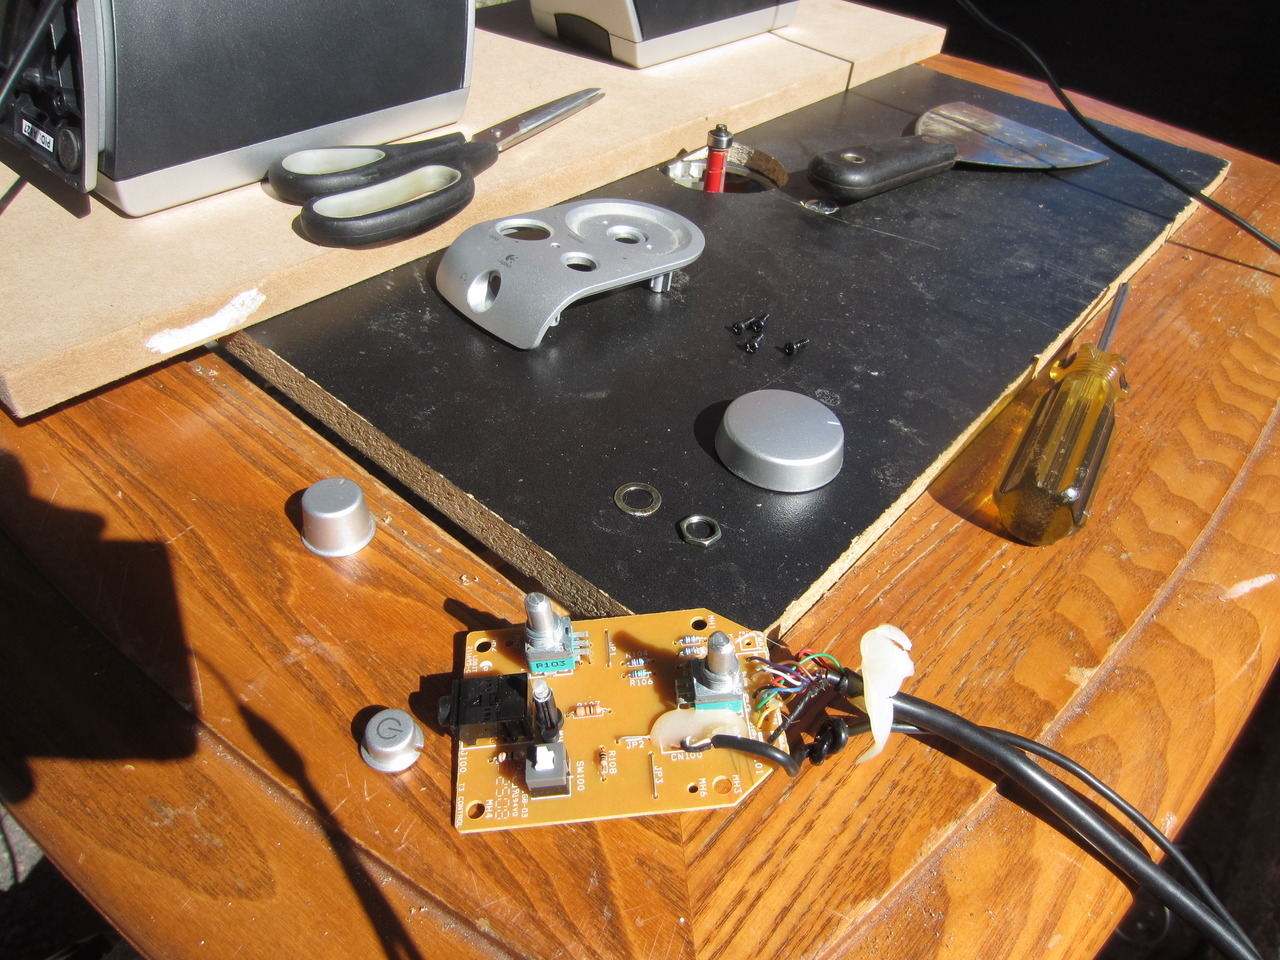
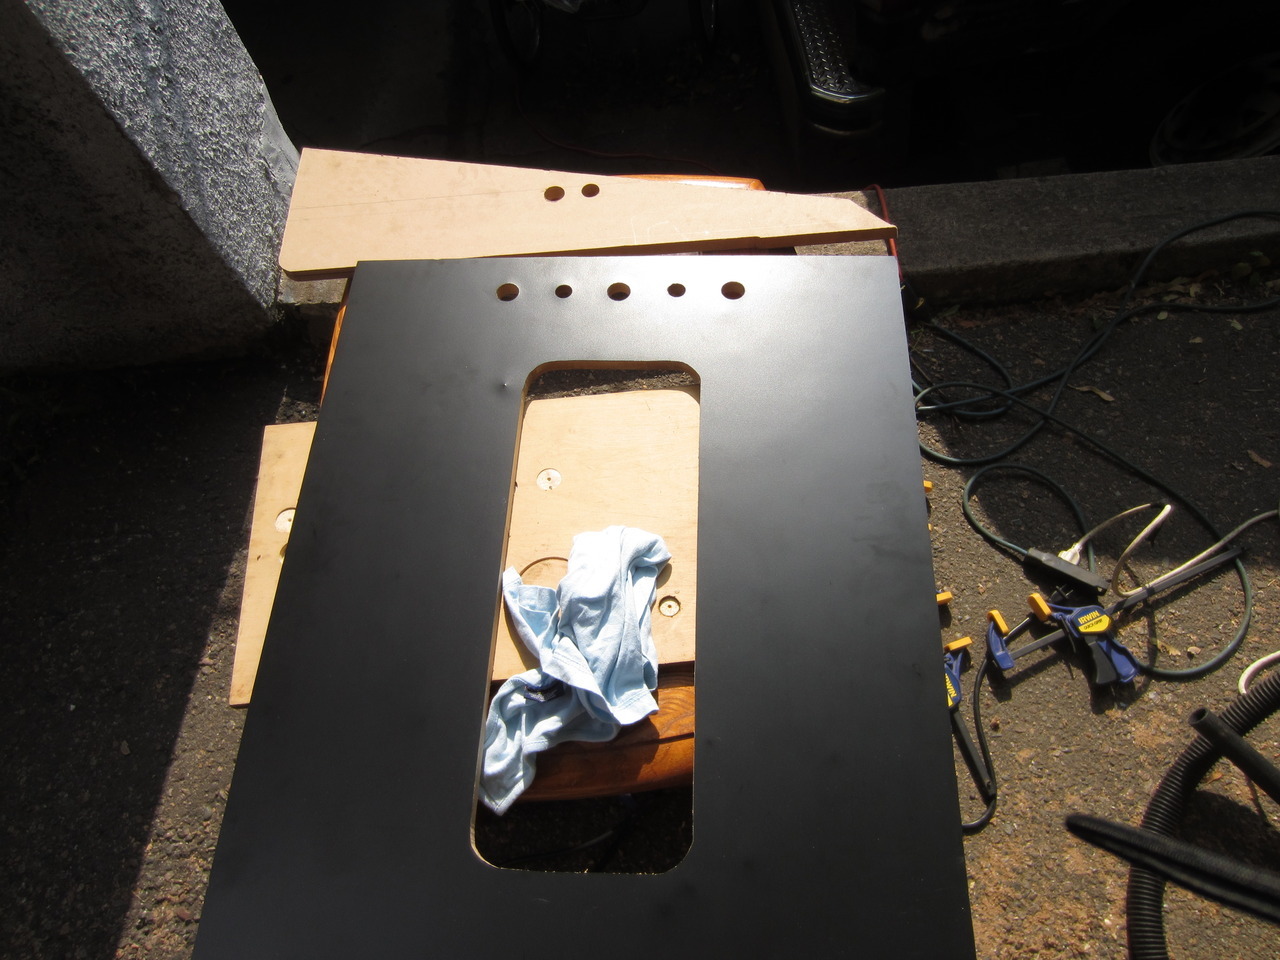
First, a shot of what I was working with, before I did anything with it:


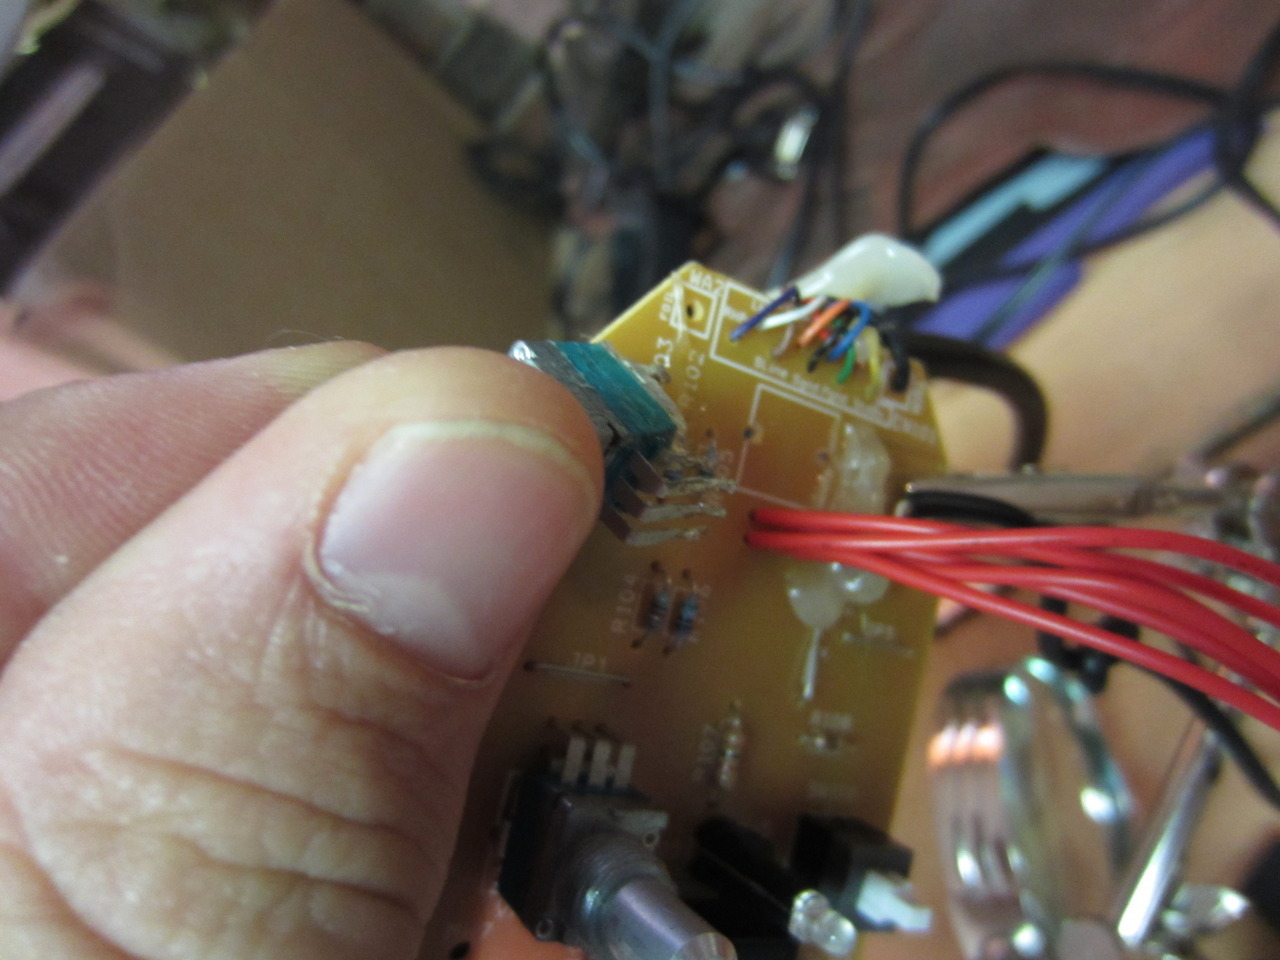
Step 1:  Take a soldering iron to the side of the PCB where the volume pot is soldered, and *carefully* heat the solder points while pulling slightly on the pot, removing each leg of the pot until it comes off of the board, like so:


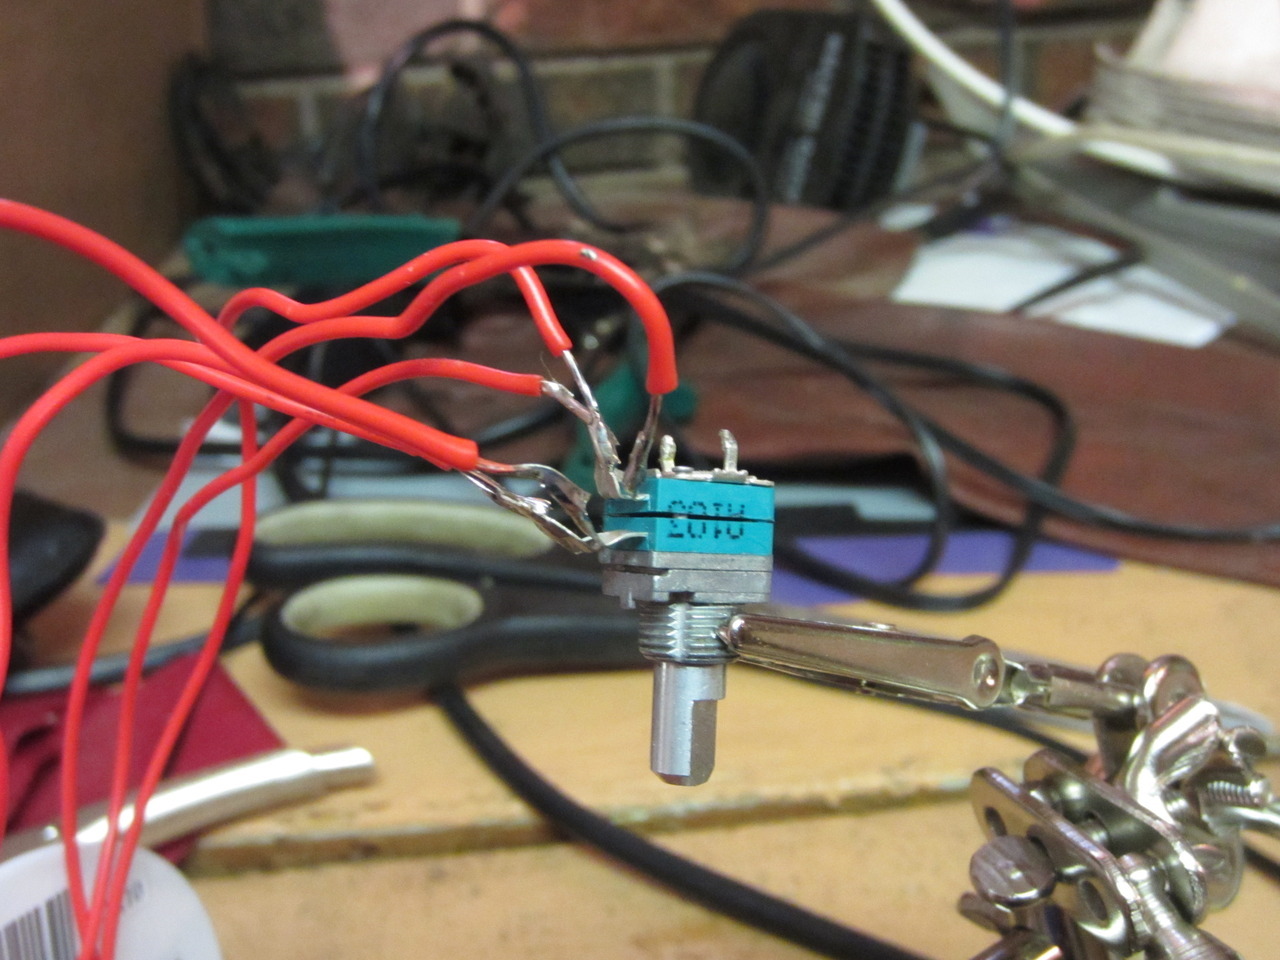
Step 2:  Cut equal lengths of wire (one for each lead) and strip the ends.
Step 3:  Solder one end of each wire to the holes left in the PCB where the pot once was, and the other end of each wire to the corresponding leg of the pot.  Your pot will look like this when done:


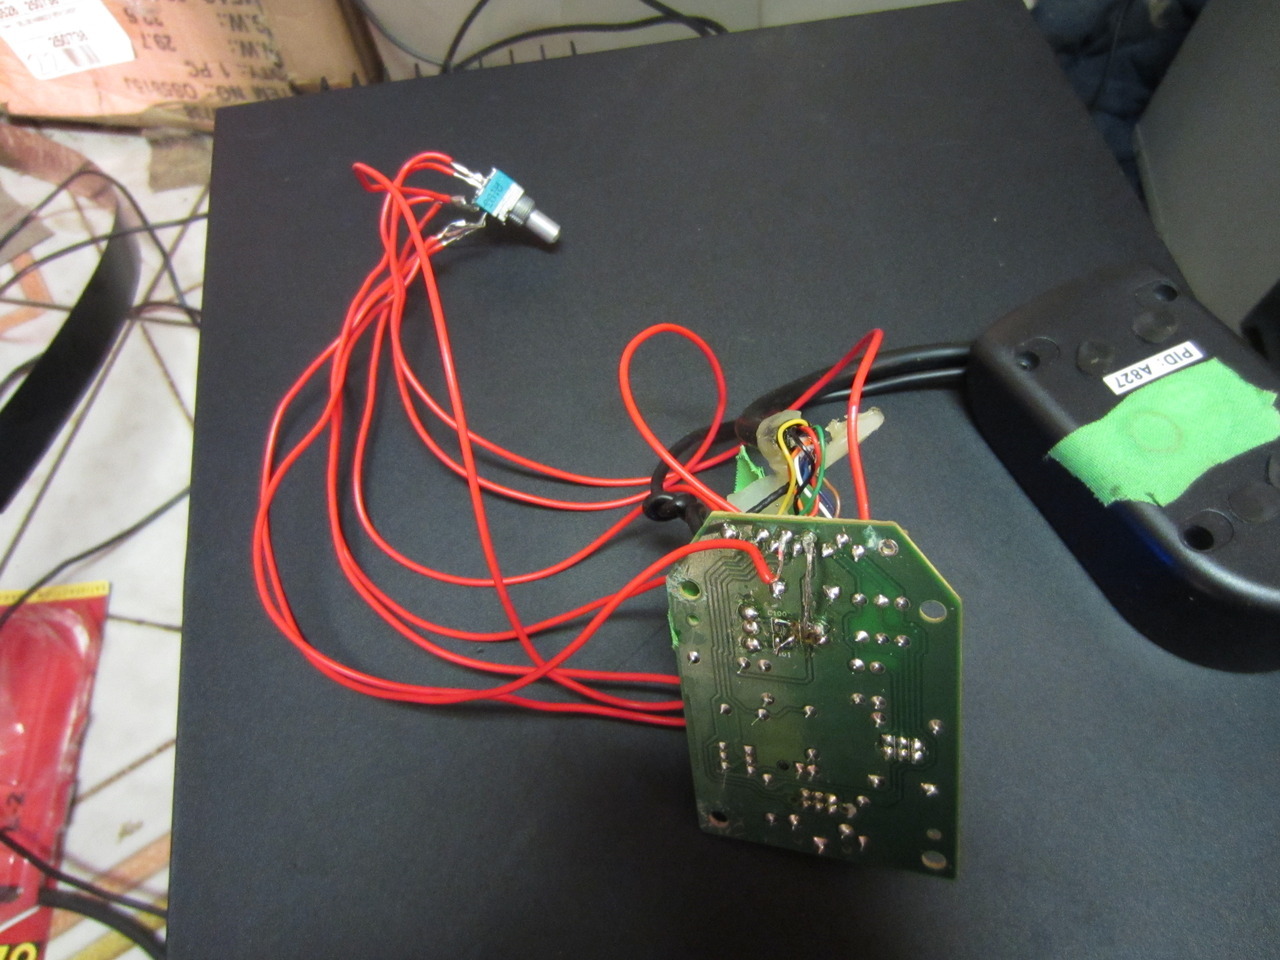
Step 4:  Test that the solder job works by powering on the sound system and running an audio source to it:


Step 5:  Drill a hole that will snugly fit the pot with its legs bent to point out the backside:


Step 6:  Put the pots into the hole, adjust to where you want them to be.  The best way to do this with a volume pot is to put the knob back on the end of it and turn it down to 0, then rotate the pot (which moves freely in the hole) until the notch on your knob is where you want 0 to be. 

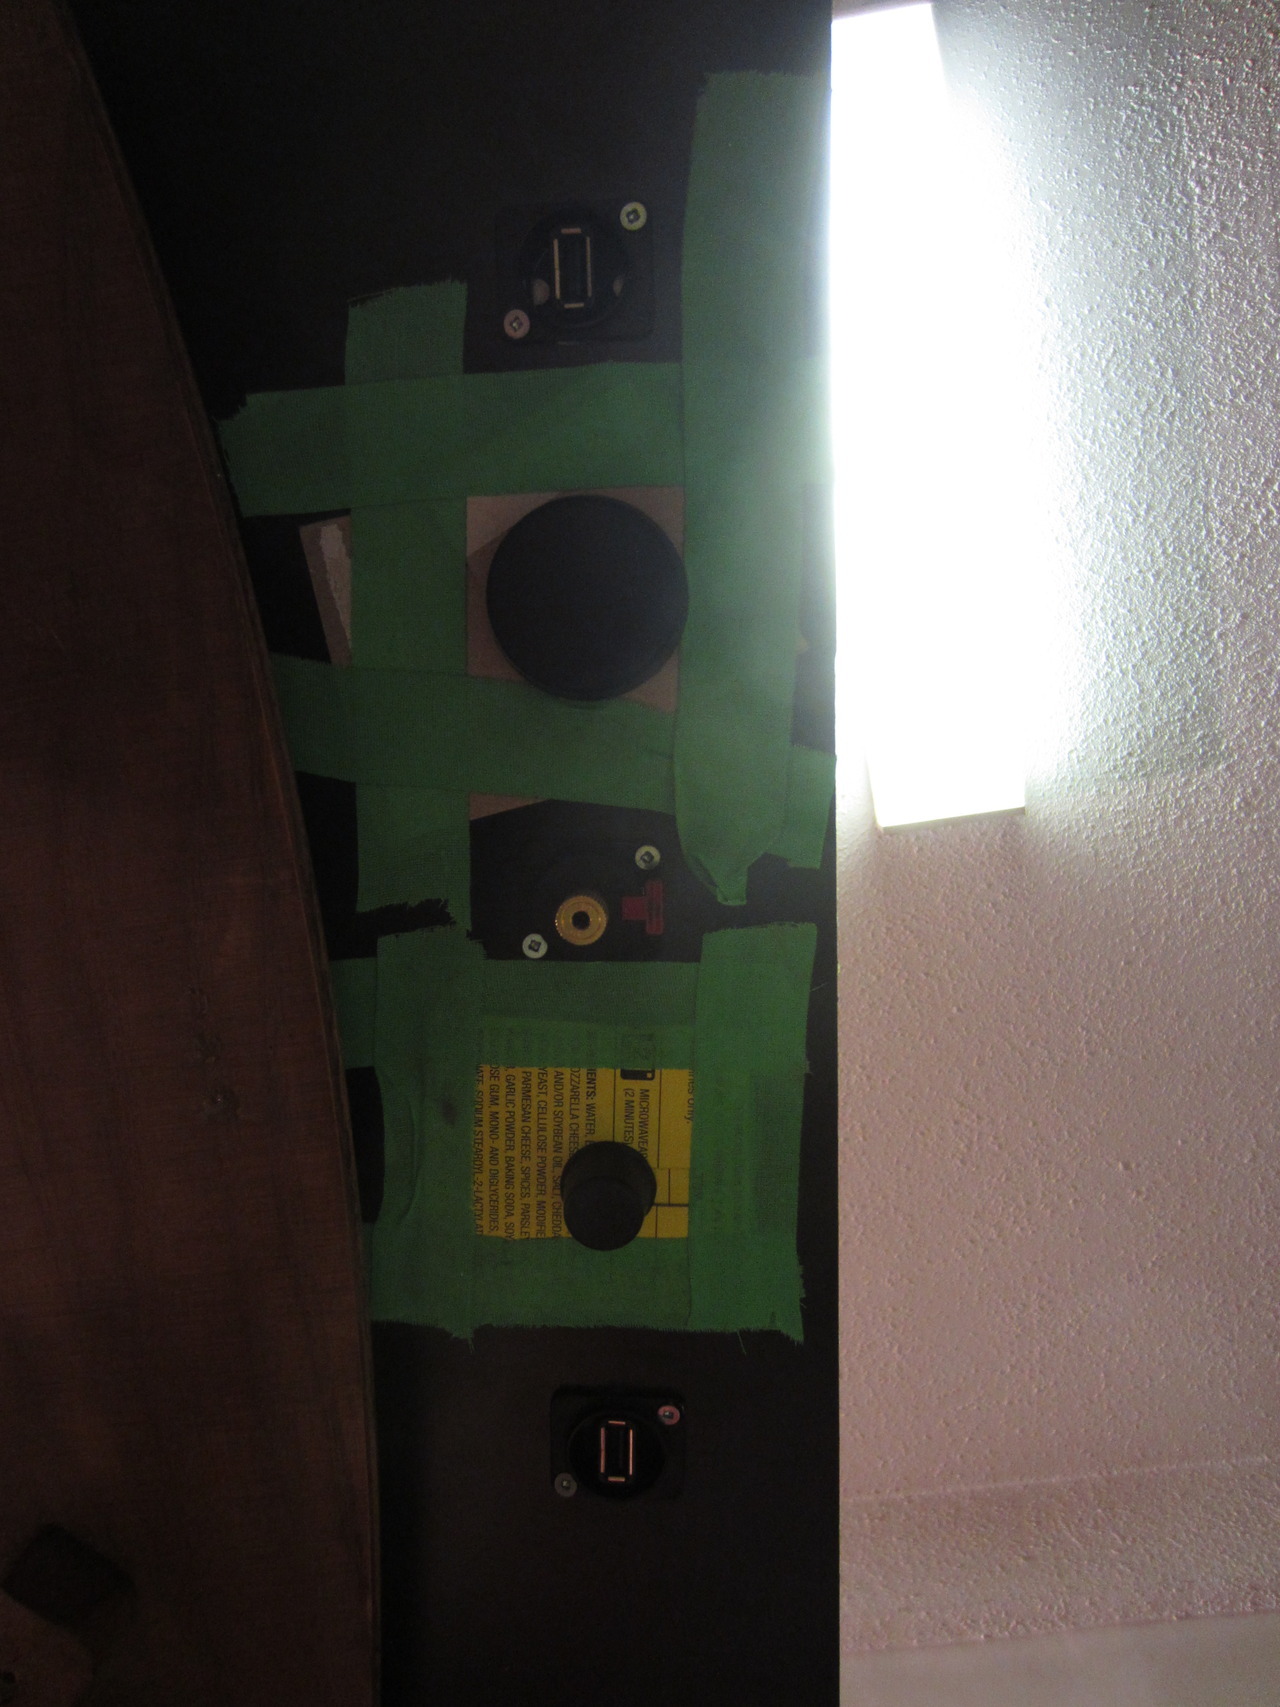
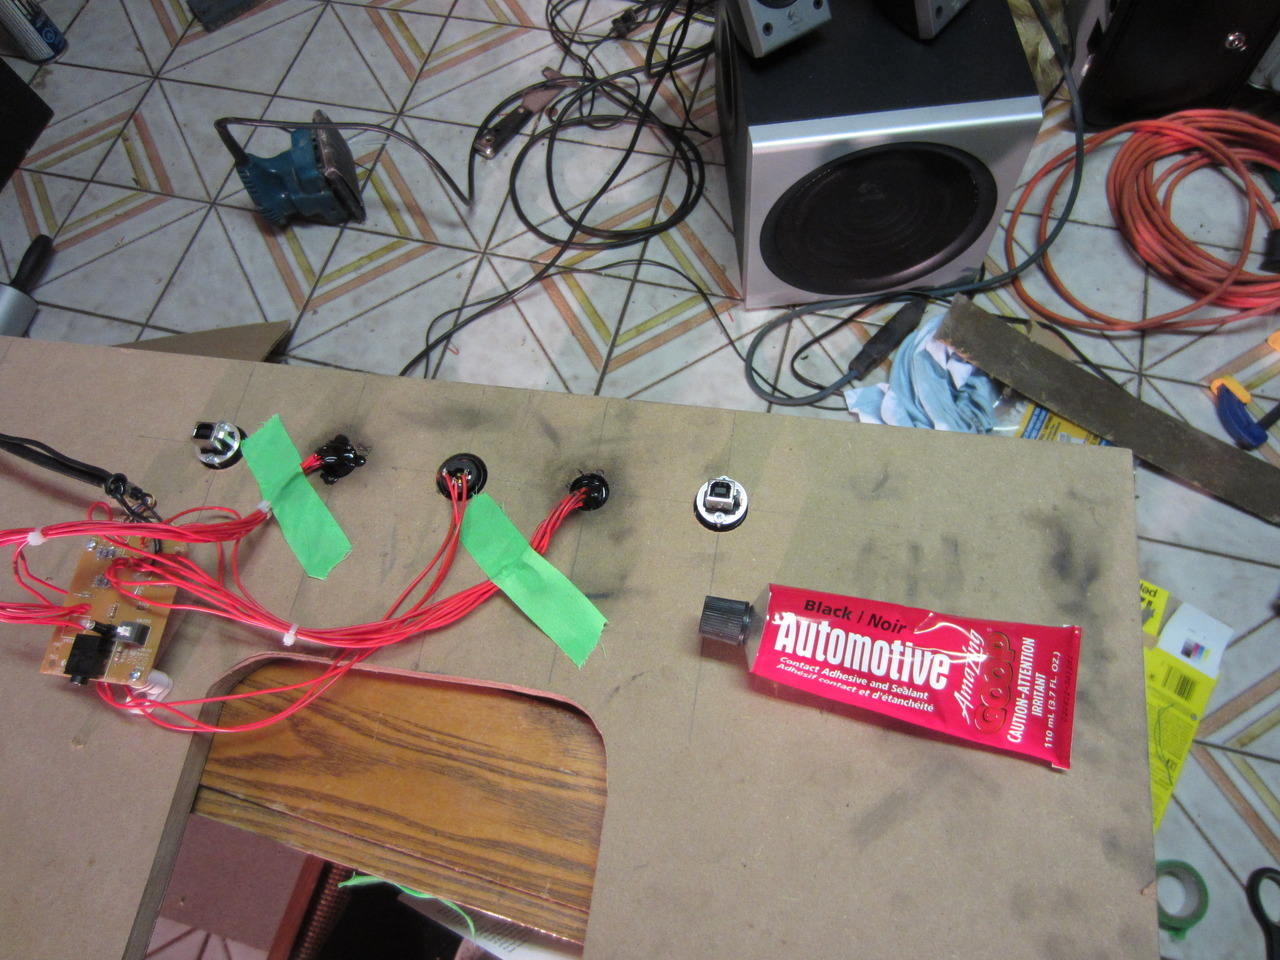
Step 7:  Take two pieces of stiff flat cardboard (cereal box tops work best) and notch them with scissors as close to the width of the metal nub at the end of the pot as you can get, then position them on the surface, and tape them down.  In my example, I put the knob on to ensure my pots didn't shift in the hole:


Step 8:  Fill hole with Automotive Goop.  This can be found at any auto body shop.  I would recommend removing your volume knob if it is still on the pot.  This stuff is very viscous and dries to a hard, black glossy rubber overnight, however, if it comes in contact with plastic it has a tendency to break down the polymers, making your knob less rigid and more flimsy.  Once the goop is in your volume pot hole, it isn't going nowhere:


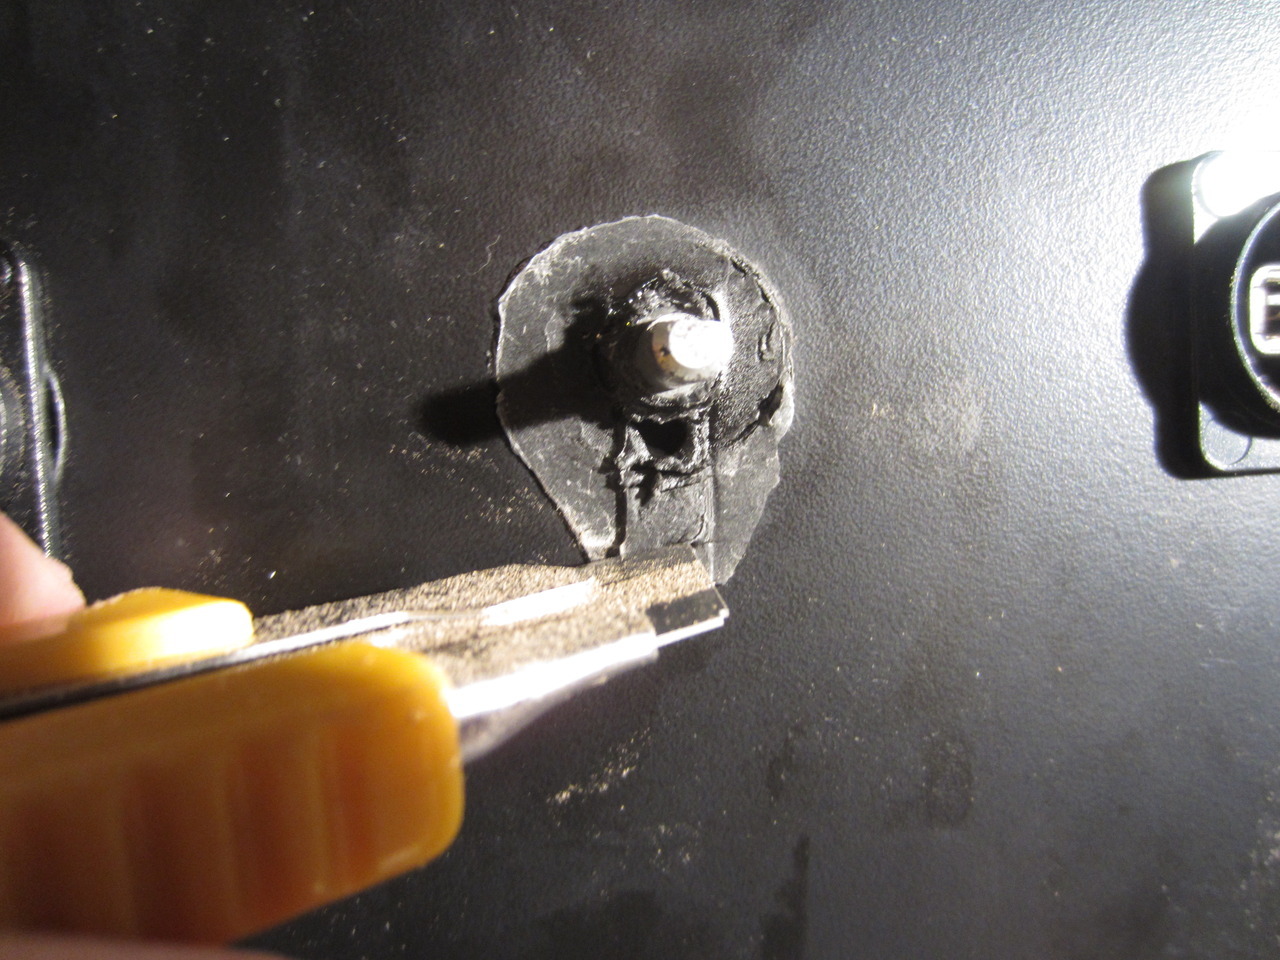
Step 9:  Remove your cardboard masks, and clean up any residue on the front of the panel with an exacto:


The finished product:


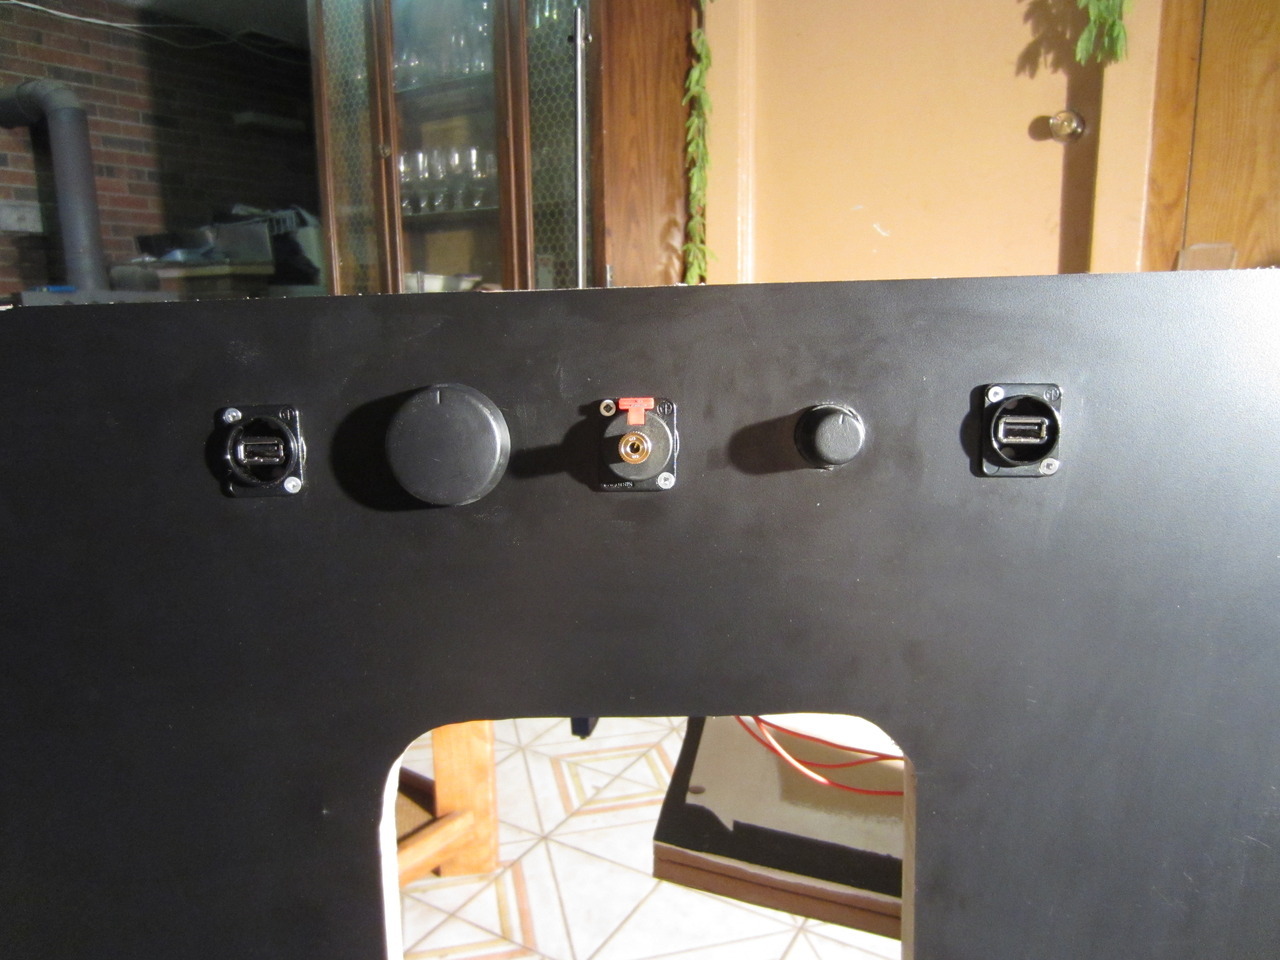
This way, I can mount the PCB using feet to the backside of the board, instead of creating a mini shelf for it to be mounted onto (as it looks like you would have to do with your current solution)

not_so_handy

  • Trade Count: (0)
  • Full Member
  • ***
  • Offline Offline
  • Posts: 97
  • Last login:January 20, 2016, 09:36:16 pm
Re: Forgotten ROMs.....previously Medieval Times
« Reply #54 on: September 11, 2012, 08:15:26 am »
wow that is a great break down of how to do this.  You dont know how many hours I spent searching for how to do just that  :hissy: Finally I broke down and did it this way.

I do plan on putting a metal bracket shelf in.  I dont think my ability to use a solder iron would produced a very good end product though  :dizzy:

My way does seem to work but if it falls apart at some point I may just revisit this.

not_so_handy

  • Trade Count: (0)
  • Full Member
  • ***
  • Offline Offline
  • Posts: 97
  • Last login:January 20, 2016, 09:36:16 pm
Re: Forgotten ROMs.....previously Medieval Times
« Reply #55 on: September 11, 2012, 08:16:41 am »
Last night my buddy sent me the "almost" finished product for the marquee.

Have a look at let me know what you think.


not_so_handy

  • Trade Count: (0)
  • Full Member
  • ***
  • Offline Offline
  • Posts: 97
  • Last login:January 20, 2016, 09:36:16 pm
Re: Forgotten ROMs - First Build -
« Reply #56 on: September 11, 2012, 10:35:24 am »
So last night I also got around to finishing up the last of the laminate on the front of the cab.  Tonight I hope to get the circuit board for the audio card mounted and the wiring down up for the speakers.


Seith

  • Trade Count: (0)
  • Full Member
  • ***
  • Offline Offline
  • Posts: 402
  • Last login:September 08, 2018, 10:50:41 am
Re: Forgotten ROMs.....previously Medieval Times
« Reply #57 on: September 11, 2012, 04:53:33 pm »
wow that is a great break down of how to do this.  You dont know how many hours I spent searching for how to do just that  :hissy: Finally I broke down and did it this way.

I do plan on putting a metal bracket shelf in.  I dont think my ability to use a solder iron would produced a very good end product though  :dizzy:

My way does seem to work but if it falls apart at some point I may just revisit this.

Metal bracket shelf, eh?  Post pics when it's done, looking forward to seeing how you approach it.

Le Chuck

  • Saint, make a poll!
  • Wiki Contributor
  • Trade Count: (+6)
  • Full Member
  • ***
  • Offline Offline
  • Posts: 5509
  • Last login:June 14, 2025, 06:26:06 pm
  • <insert personal text here>
Re: Forgotten ROMs - First Build -
« Reply #58 on: September 11, 2012, 05:37:43 pm »
About the marquee, the "Forgotten" needs more headroom as it is going to look funny running all the way to the edge when nothing else does.  Also, I'm not a huge fan of the "doom-esque" font and the yellow liquid background really doesn't go with the theme.  The character drawings look good but the guy with the mace doesn't seem to have a lower body and is kind of floating in the back ground. I understand that it isn't complete yet but those would be things I would be bringing up the artist if it was me. 

not_so_handy

  • Trade Count: (0)
  • Full Member
  • ***
  • Offline Offline
  • Posts: 97
  • Last login:January 20, 2016, 09:36:16 pm
Re: Forgotten ROMs - First Build -
« Reply #59 on: September 13, 2012, 11:27:26 am »
yes I have already spoken with him regarding the positioning of the lettering.  I will have a chat with him regarding your other thoughts.  Many thanks.

As for the metal shelf.  I just used two of the blanks from the back of a computer and drilled a hole in them so that I could mount it to the wood.  Then I tie wrapped the circuit board to the brackets and it holds it into place fairly well.

I am out of province at the moment and will take a pic of it when I get back next week.

not_so_handy

  • Trade Count: (0)
  • Full Member
  • ***
  • Offline Offline
  • Posts: 97
  • Last login:January 20, 2016, 09:36:16 pm
Re: Forgotten ROMs - First Build -
« Reply #60 on: December 04, 2012, 07:15:55 am »
ok its been a while and I finally got the marquee updated.  What are the thoughts on this version?


PL1

  • Global Moderator
  • Trade Count: (+1)
  • Full Member
  • *****
  • Offline Offline
  • Posts: 9664
  • Last login:Today at 02:30:55 am
  • Designated spam hunter
Re: Forgotten ROMs - First Build -
« Reply #61 on: December 04, 2012, 01:32:34 pm »
1.  Knight's hand blends into the barbarian's chest area.  Consider changing the barbarians chestplate color.

2.  Barbarian on the left is holding his sword like he is going to slap someone with the flat of the blade instead of cutting them with the edge.

3.  Where are the bow string and arrow?


Scott

not_so_handy

  • Trade Count: (0)
  • Full Member
  • ***
  • Offline Offline
  • Posts: 97
  • Last login:January 20, 2016, 09:36:16 pm
Re: Forgotten ROMs - First Build -
« Reply #62 on: March 03, 2013, 10:02:05 pm »
Its been a while since I have updated because I have been waiting on artwork.  I finally gave up on my friend getting me anything and decided to try my hand with photoshop myself.

Thoughts?


I am not to happy with the feet area of the second image for the right side of the cabinet but the image i found that was decent enough quality of course there were no feet so I had to improvise.
« Last Edit: March 03, 2013, 10:04:07 pm by not_so_handy »

PL1

  • Global Moderator
  • Trade Count: (+1)
  • Full Member
  • *****
  • Offline Offline
  • Posts: 9664
  • Last login:Today at 02:30:55 am
  • Designated spam hunter
Re: Forgotten ROMs - First Build -
« Reply #63 on: March 03, 2013, 11:16:39 pm »
I can tell you horizontal-flipped the image of Dirk and Daphne.

They're both left-handed now.   :lol

As long as you're happy with the background color, the rest looks pretty good.


Scott

Ond

  • Trade Count: (0)
  • Full Member
  • ***
  • Offline Offline
  • Posts: 2349
  • Last login:June 06, 2025, 05:39:15 pm
Re: Forgotten ROMs - First Build -
« Reply #64 on: March 04, 2013, 12:14:04 am »
Hmm this has potential, I mean I like it right away but, there's always a 'but'  :).  Some ideas (remember, just my opinions):

1. The text content lacks impact; consider making it larger and following the curve of the top of the cab or even more vertical text following the curve in front of the bezel.  Maybe bolder drop shadow as well.

2. Consider a border that frames the art around the complete edges of the panel or alternatively a two tone (two stripes) just along the  rear edge of the panel.

3. Maybe a drop shadow on the characters to lift them up a little from the starburst.

4. All the above but with Barbarian instead, this look great!  I'd make the Barbarian even bigger and ground the ground i.e. move the ground he's standing on flush with the bottom of the panel so he doesn't float in space.

5. One final thing,  lighten the star burst a fair bit you'll see the characters pop more and not get lost in all that orange.  You can overlay a second almost white starburst over the yellow (still behind the characters) to achieve that as well.

I don't mind having a go at all my above blather if you want any help.


Edit: Also the Barbarian fits in with the name better, it has that Lost World/ The Land That People Forgot feel.
« Last Edit: March 04, 2013, 12:26:14 am by Ond »

EMDB

  • Trade Count: (0)
  • Full Member
  • ***
  • Offline Offline
  • Posts: 865
  • Last login:September 05, 2023, 09:18:51 am
  • Project RetroCade
Re: Forgotten ROMs - First Build -
« Reply #65 on: March 04, 2013, 02:34:55 am »
Very nice build so far but the artwork needs to be spiced up to meet the same level. I would use a much thicker font for starters. It should really stand out more.

not_so_handy

  • Trade Count: (0)
  • Full Member
  • ***
  • Offline Offline
  • Posts: 97
  • Last login:January 20, 2016, 09:36:16 pm
Re: Forgotten ROMs - First Build -
« Reply #66 on: March 04, 2013, 07:25:49 am »
Thanks Ond these are all some great suggestions that I will "attempt" to incorporate. Photoshop is a mew beast for me and I have been struggling theough things so far.  I will post back with how I do. 

Sent from my SGH-I747M using Tapatalk 2


not_so_handy

  • Trade Count: (0)
  • Full Member
  • ***
  • Offline Offline
  • Posts: 97
  • Last login:January 20, 2016, 09:36:16 pm
Re: Forgotten ROMs - First Build -
« Reply #67 on: March 04, 2013, 12:39:14 pm »
ok I made some changes to the right side artwork that has the barbarian in it.  Better or worse?

You will notice that there is an outline on there.  That is the actual roughly estimated outline for the cabinet.  Since my cab isnt straight lines that are easily measured I had to put this outline in there so that I dont end up printing it off and finding that it doesnt match up in certain parts of the image.

Suggestions are DEFINITELY incouraged.

Still working on some backround coloring.


harveybirdman

  • Trade Count: (0)
  • Full Member
  • ***
  • Offline Offline
  • Posts: 2540
  • Last login:December 28, 2024, 01:21:59 am
  • SHMUP'EM
Re: Forgotten ROMs - First Build -
« Reply #68 on: March 04, 2013, 09:40:06 pm »
Consider using some negative space or slick borders.

I'm sorry but your cab is too sweet looking to end up with less than perfect artwork.

Look at some actual sideart for some ideas.

So basically the idea is that the art doesn't feel up the entire space, consider Quantum or Centipede


Or what about some sweet borders like Liberator or Gauntlet?


heck even if you go simplistic like Golden Axe, it would be more appealing in my humble opinion.

Unstupid

  • Trade Count: (+2)
  • Full Member
  • ***
  • Offline Offline
  • Posts: 997
  • Last login:September 08, 2021, 08:46:34 am
Re: Forgotten ROMs - First Build -
« Reply #69 on: March 05, 2013, 03:40:46 am »
What's a Rom?  I already forgot!   

not_so_handy

  • Trade Count: (0)
  • Full Member
  • ***
  • Offline Offline
  • Posts: 97
  • Last login:January 20, 2016, 09:36:16 pm
Re: Forgotten ROMs - First Build -
« Reply #70 on: March 06, 2013, 10:23:48 am »
Going to get back to cleaning up some of the unfinished tasks I have on this cabinet this weekend.

I installed a coin door in this cab thinking that I could access the coinbox from that door and didnt need a seperate coin door.  Well i can but I dont like it and of course a full size over under doesnt fit and I cant buy a small over under in my area so I bought just a happ door that I will put under the coin mech and use that to access the coins.  Minor problem is that its not the same width as the coin mech so thats kind of annoying but hopefully it wont look to out of place. 

Other issue is that I will have to move the current door up to fit the new one underneath so I think I will just start from scratch and build a whole new peice.  This way just in case I dont like it in the end I can just swap them out.

I will post some pics of this on the weekend when I get it done.

Dekieon

  • Trade Count: (0)
  • Full Member
  • ***
  • Offline Offline
  • Posts: 177
  • Last login:January 07, 2025, 03:17:55 pm
Re: Forgotten ROMs - First Build -
« Reply #71 on: March 06, 2013, 04:33:48 pm »
Here is my suggestions... since you are calling it forgotten roms, you could use the forgotten Realms logo and reorganize it to read Forgotten Roms, since all the letters you need would be there.

For the side artwork...If it was me, I would use some of the amazing D&D artwork from the Jeff Easley, Clyde Caldwell, and Larry Elmore. Just use Vector magic on any of the artwork you download and you should be able to get some amazing results and end up with a kick ass machine.

Ond

  • Trade Count: (0)
  • Full Member
  • ***
  • Offline Offline
  • Posts: 2349
  • Last login:June 06, 2025, 05:39:15 pm
Re: Forgotten ROMs - First Build -
« Reply #72 on: March 06, 2013, 04:58:43 pm »
I'm helping out on the sideart, nice suggestion on the forgotten realms font.

Le Chuck

  • Saint, make a poll!
  • Wiki Contributor
  • Trade Count: (+6)
  • Full Member
  • ***
  • Offline Offline
  • Posts: 5509
  • Last login:June 14, 2025, 06:26:06 pm
  • <insert personal text here>
Re: Forgotten ROMs - First Build -
« Reply #73 on: March 06, 2013, 05:27:44 pm »
Here is my suggestions... since you are calling it forgotten roms, you could use the forgotten Realms logo and reorganize it to read Forgotten Roms, since all the letters you need would be there.

For the side artwork...If it was me, I would use some of the amazing D&D artwork from the Jeff Easley, Clyde Caldwell, and Larry Elmore. Just use Vector magic on any of the artwork you download and you should be able to get some amazing results and end up with a kick ass machine.

Vector magic works for you?  I get horrendous unusable results with that program.  I either end up drawing it myself or leave it in raster and upscale and clean until I get a useable file.  Any tips?

not_so_handy

  • Trade Count: (0)
  • Full Member
  • ***
  • Offline Offline
  • Posts: 97
  • Last login:January 20, 2016, 09:36:16 pm
Re: Forgotten ROMs - First Build -
« Reply #74 on: March 06, 2013, 05:57:24 pm »
Yes Ond is giving my side art a go and I am pretty pumped to see what he comes up with.

Oddly enough I used the name based on Forgotten Realms but I never went any further.  I was pretty focused on just throwing in a mix of Medieval characters with that kind of font.  Which is kind of close to the Forgotten Realms font as it is. 

Dekieon

  • Trade Count: (0)
  • Full Member
  • ***
  • Offline Offline
  • Posts: 177
  • Last login:January 07, 2025, 03:17:55 pm
Re: Forgotten ROMs - First Build -
« Reply #75 on: March 06, 2013, 09:50:28 pm »
Here is my suggestions... since you are calling it forgotten roms, you could use the forgotten Realms logo and reorganize it to read Forgotten Roms, since all the letters you need would be there.

For the side artwork...If it was me, I would use some of the amazing D&D artwork from the Jeff Easley, Clyde Caldwell, and Larry Elmore. Just use Vector magic on any of the artwork you download and you should be able to get some amazing results and end up with a kick ass machine.

Vector magic works for you?  I get horrendous unusable results with that program.  I either end up drawing it myself or leave it in raster and upscale and clean until I get a useable file.  Any tips?

Well for me, I find the higher the resolution of the raster image the better the vector image will be. Also if something doesn't look good enough, go back and choose some different settings. For most things I choose Photograph->high->unlimited colours.

not_so_handy

  • Trade Count: (0)
  • Full Member
  • ***
  • Offline Offline
  • Posts: 97
  • Last login:January 20, 2016, 09:36:16 pm
Re: Forgotten ROMs - First Build -
« Reply #76 on: March 11, 2013, 01:01:40 pm »
i had a quick question for what everyone else does for screwing down their controllers.  I have a j-stick and after a couple days of use the screws that attach the plate to the stick come loose.  Is this a common problem or is this just me and how I play?  I dont want to put my laminate down on the CP and then have the screws come loose. 

Drnick

  • Trade Count: (+2)
  • Full Member
  • ***
  • Offline Offline
  • Posts: 1642
  • Last login:June 21, 2024, 03:32:31 pm
  • Plodding Through Life
Re: Forgotten ROMs - First Build -
« Reply #77 on: March 11, 2013, 04:40:12 pm »
Just typed a bunch of stuff up and then looked through your photos.  I think you are doing it wrong.

Looking at the pictures you have put 4 holes round the Joystick hole, these are not for mounting the sticks.  The holes around the outer edge of the plate are for mounting.  Your screws are no longer biting into the plastic of the housing.  I did this with my zippy's and they did the same thing.  Once I used the outer mouting holes it was all good.   If you have chewed up the plastic so the screws do not hold even when tightened up fully from the plate then you will want some kind of plastic filler to help the screws bind.

Grrr, ignore all of above for a bit. I see outer mountings so what are the holes around the joystick for, if the screws are going through the wood using these holes then answer above is still sort of valid. 

not_so_handy

  • Trade Count: (0)
  • Full Member
  • ***
  • Offline Offline
  • Posts: 97
  • Last login:January 20, 2016, 09:36:16 pm
Re: Forgotten ROMs - First Build -
« Reply #78 on: March 11, 2013, 10:57:01 pm »
The outer screws mount the plate to the wood.  The inner screws attach the plate to the joystick to hold it in place.

not_so_handy

  • Trade Count: (0)
  • Full Member
  • ***
  • Offline Offline
  • Posts: 97
  • Last login:January 20, 2016, 09:36:16 pm
Re: Forgotten ROMs - First Build -
« Reply #79 on: March 11, 2013, 11:04:59 pm »
I also managed to get the change door installed tonight so I dont have to go through the coin mech anymore for change.  Which was a pain in the butt with all the wires getting caught.

I also got the CP clamps installed so the CP is now secured to the cabinet as well.  Next up is to finish securing the inside parts.


not_so_handy

  • Trade Count: (0)
  • Full Member
  • ***
  • Offline Offline
  • Posts: 97
  • Last login:January 20, 2016, 09:36:16 pm
Re: Forgotten ROMs - First Build -
« Reply #80 on: March 26, 2013, 08:41:36 pm »
So I finally got my art work thanks to Ond  :notworthy:  Who did an amazing job with the side art.  So now the tricky part.....applying it :)


not_so_handy

  • Trade Count: (0)
  • Full Member
  • ***
  • Offline Offline
  • Posts: 97
  • Last login:January 20, 2016, 09:36:16 pm
Re: Forgotten ROMs - First Build -
« Reply #81 on: March 26, 2013, 08:43:07 pm »
oh also I was able to get the t-molding put on as well.   :cheers:

Dekieon

  • Trade Count: (0)
  • Full Member
  • ***
  • Offline Offline
  • Posts: 177
  • Last login:January 07, 2025, 03:17:55 pm
Re: Forgotten ROMs - First Build -
« Reply #82 on: March 27, 2013, 12:01:11 am »
very nice side art

not_so_handy

  • Trade Count: (0)
  • Full Member
  • ***
  • Offline Offline
  • Posts: 97
  • Last login:January 20, 2016, 09:36:16 pm
Re: Forgotten ROMs - First Build -
« Reply #83 on: March 27, 2013, 09:14:04 am »
Thanks.  It turned out great, Ond did an amazing job with it.  Hes also agreed to do the CP art as well as a new marquee to tie all the artwork together.

Sent from my SGH-I747M using Tapatalk 2


not_so_handy

  • Trade Count: (0)
  • Full Member
  • ***
  • Offline Offline
  • Posts: 97
  • Last login:January 20, 2016, 09:36:16 pm
Re: Forgotten ROMs - First Build -
« Reply #84 on: June 18, 2013, 08:10:01 pm »
Finally got the Marquee printed off and up.  Yet another great peice of work from Ond.  Cant thank him enough for the work hes putting in on my artwork!!  :cheers:


Full Cab image


Ond

  • Trade Count: (0)
  • Full Member
  • ***
  • Offline Offline
  • Posts: 2349
  • Last login:June 06, 2025, 05:39:15 pm
Re: Forgotten ROMs - First Build -
« Reply #85 on: June 19, 2013, 07:46:25 pm »
Finally got the Marquee printed off and up.  Yet another great peice of work from Ond.  Cant thank him enough for the work hes putting in on my artwork!!  :cheers:

In this case it's thanks enough to see my work on your cab, creating the art was a pleasure.  I'm keen to see the marquee lit though, go an dig up that SLR!  ;).  I am a fan of the Martjins cab profile, somewhere in the way-off future I'd like to look at a build based on it also.


Epyx

  • Trade Count: (+1)
  • Full Member
  • ***
  • Offline Offline
  • Posts: 1961
  • Last login:December 25, 2023, 07:56:36 pm
  • "You're an oddity"
Re: Forgotten ROMs - First Build -
« Reply #86 on: June 20, 2013, 08:33:52 pm »
 :cheers:

Nice work!!! Haha love what you did with inspiration. Turned out fantastic and Ond's artwork is fantastic as usual.

What service did you use for printing his art?  Or did I miss it in the thread?
Last Project


Epyx Tutorials:
Tutorials

not_so_handy

  • Trade Count: (0)
  • Full Member
  • ***
  • Offline Offline
  • Posts: 97
  • Last login:January 20, 2016, 09:36:16 pm
Re: Forgotten ROMs - First Build -
« Reply #87 on: June 20, 2013, 10:46:45 pm »
Onds artwork is really impressive.  I have been lucky to steal some of his time to help me out.

As for where I got it printed off I have been lucky that my father inlaw works for the school board here and has been able to get the printer guys there to print off my artwork for free.

I am hoping to get another pic this weekend with the marquee lit up.  Dealing woth some quality issues with my marquee from the printer guys.  I cant complain to much though since they aren't charging me :O

Sent from my SGH-I747M using Tapatalk 2


not_so_handy

  • Trade Count: (0)
  • Full Member
  • ***
  • Offline Offline
  • Posts: 97
  • Last login:January 20, 2016, 09:36:16 pm
Re: Forgotten ROMs - First Build -
« Reply #88 on: June 22, 2013, 10:20:31 pm »
as requested by Ond :) Pics with Marquee light on.


now if I can finish up my work around the house I can get to finishing the back of the cab!
« Last Edit: June 22, 2013, 10:27:57 pm by not_so_handy »