Main Restorations Software Audio/Jukebox/MP3 Everything Else Buy/Sell/Trade
Project Announcements Monitor/Video GroovyMAME Merit/JVL Touchscreen Meet Up Retail Vendors
Driving & Racing Woodworking Software Support Forums Consoles Project Arcade Reviews
Automated Projects Artwork Frontend Support Forums Pinball Forum Discussion Old Boards
Raspberry Pi & Dev Board controls.dat Linux Miscellaneous Arcade Wiki Discussion Old Archives
Lightguns Arcade1Up Try the site in https mode Site News

Unread posts | New Replies | Recent posts | Rules | Chatroom | Wiki | File Repository | RSS | Submit news


Author Topic: First Restore - Xybots (warning: lots of pictures)  (Read 10498 times)

0 Members and 1 Guest are viewing this topic.

Ground_Gainer

  • Trade Count: (0)
  • Full Member
  • ***
  • Offline Offline
  • Posts: 30
  • Last login:April 20, 2013, 09:18:22 pm
First Restore - Xybots (warning: lots of pictures)
« on: April 03, 2011, 06:58:26 pm »
Hey guys,

I just bought my first cab off of craigslist.  It's a Xybots that is in good enough shape to be playable.  I'm really fortunate in that I found all of the original manuals and such in the bottom of the coin tray.  The controls are kind of stiff, and the marquee is dead, so I am hoping to get it all cleaned up and looking good (maybe then my wife will let me move it out of the garage and into the basement.  ;D )

I am hoping to get a little direction from the pros here on what to do and how to do it.  Below are a lot of pictures:


My specific questions (be gentle, this is all new to me):
- The lower panel on the back has a lock to which I do not have the key.  What's the best way in here?  Drill the lock?  Do I even need to get in here?  It looks like mostly houses the power stuff.  I can get to the PCB through the coin door.
- Any recommendations on "electrical contact cleaner"?  The manual says I should clean up up the buttons every 3 months.  I think we're around 24 years overdue. ; )
-  What should I use to lubricate the pivot ball on the joystick?  The manual says something about "lithium grease" and "light oil".  Do they sell that stuff at Lowes / Radio Shack?
-  Are these joysticks hard to put back together?  They kind of work now so I'd hate to screw them up, but you can tell they need some cleaning--they are real stiff.
- The left coin release button is stuck in.  I tried to push it back out from the backside but it seems really stuck.  Am I missing something?  Is there an easy fix for this?
-  Besides cleaning the joysticks/buttons and putting a new marquee light in, is there anything else I should consider doing?  Are the coin return buttons supposed to light up?  It looks like it could use a vacuuming out.  Will any old vacuum work good or do I need to worry about sucking up parts of the PCB?  I don't want to screw it up.

I really appreciate any tips/directions you guys could give.  Hopefully one day this will get to the basement where it belongs!

Cheers,
Mike

isucamper

  • Trade Count: (+2)
  • Full Member
  • ***
  • Offline Offline
  • Posts: 633
  • Last login:November 25, 2019, 05:13:08 pm
  • I'm a slasher... of prices!!
    • my project arcade blog
Re: First Restore - Xybots (warning: lots of pictures)
« Reply #1 on: April 04, 2011, 09:29:53 am »
Can you reach through the coindoor and take apart the back lock from the inside? 
You can get "white lithium grease" from Ace hardware.  I've only used it once on a Nintendo stick and it seemed to work, but people say grease might gunk up.
Typically, joysticks are not simple to take apart and put back together.  A lot of times the manuals will have exploded views which make it easier to see where all the parts go.  You should go ahead and do it, but be prepared to learn all about the stick as you take it apart and put it back together. 
If you really want to clean out the cabinet you should consider taking it completely apart and washing it with bleach and water.  Otherwise your cabinet looks to be in great shape.  You might want to try taking a magic eraser to the control panel and see if it shines up. 
THE SYSTEM          Popeye

RayB

  • I'm not wearing pants! HA!
  • Trade Count: (+4)
  • Full Member
  • ***
  • Offline Offline
  • Posts: 11279
  • Last login:July 10, 2025, 01:33:58 am
  • There's my post
    • RayB.com
Re: First Restore - Xybots (warning: lots of pictures)
« Reply #2 on: April 04, 2011, 01:35:21 pm »
Doesn't look like it needs much more than cleaning.
NO MORE!!

Ground_Gainer

  • Trade Count: (0)
  • Full Member
  • ***
  • Offline Offline
  • Posts: 30
  • Last login:April 20, 2013, 09:18:22 pm
Re: First Restore - Xybots (warning: lots of pictures)
« Reply #3 on: April 04, 2011, 01:55:29 pm »
Doesn't look like it needs much more than cleaning.


Hey, that's ok with me.  Will help me get familiar with taking it apart, cleaning it, and putting it back together.  Needs a few new lights but that should be easy.

opt2not

  • Trade Count: (+15)
  • Full Member
  • ***
  • Offline Offline
  • Posts: 6173
  • Last login:April 02, 2024, 07:42:30 pm
Re: First Restore - Xybots (warning: lots of pictures)
« Reply #4 on: April 04, 2011, 02:30:18 pm »
Doesn't look like it needs much more than cleaning.
+1
Great looking machine you got there.

My specific questions (be gentle, this is all new to me):
- The lower panel on the back has a lock to which I do not have the key.  What's the best way in here?  Drill the lock?  Do I even need to get in here?  It looks like mostly houses the power stuff.  I can get to the PCB through the coin door.
Drill the lock, replace it with a new one.  You'll need to get in there if something happens to the power supply in the future, and I'd recommend not pulling parts out through the coin-door.

- Any recommendations on "electrical contact cleaner"?  The manual says I should clean up up the buttons every 3 months.  I think we're around 24 years overdue. ; )
Not sure what Electrical Contact Cleaner is, but whenever I clean up electrical components I use isopropanol for contacts, pcb, edge pins, etc...
For the plastic parts of the buttons, pull 'em out and wash 'em like dishes.  Warm soapy water.

-  What should I use to lubricate the pivot ball on the joystick?  The manual says something about "lithium grease" and "light oil".  Do they sell that stuff at Lowes / Radio Shack?
I use this stuff. It ain't cheap...and there is probably cheaper alternatives. Do a search on the forum here, or google it. I'm sure there are many methods of lubin' up your joystick... (that's what she said?)

-  Are these joysticks hard to put back together?  They kind of work now so I'd hate to screw them up, but you can tell they need some cleaning--they are real stiff.
Most joysticks are easy to take a part and put back together for maintenance. Best thing to do is pull it out of the CP and take a look. Either that or try to find some schematics on the joystick assembly in the manuals.

- The left coin release button is stuck in.  I tried to push it back out from the backside but it seems really stuck.  Am I missing something?  Is there an easy fix for this?
Take the coin doors apart, clean the inside edges. You'll probably need to check if the springs need replacing. Again, this is one of those things where you'll need to take the initiative and pull parts out of the cabinet to inspect the pieces.

-  Besides cleaning the joysticks/buttons and putting a new marquee light in, is there anything else I should consider doing?  Are the coin return buttons supposed to light up?  It looks like it could use a vacuuming out.  Will any old vacuum work good or do I need to worry about sucking up parts of the PCB?  I don't want to screw it up.
- Get a can of compressed air for the PCB cleaning. You can also take a q-tip dipped in isoprophenol and carefully clean up dirt/dust build-up on the board. If you don't feel comfortable doing that, just blow it with the compressed air.

- Looks like you're P1 joystick is missing the "twist to turn sticker". You could probably find a replacement somewhere. Try a google search, or just print it out yourself on some adhesive gloss paper (or something)

- Yeah, the coin return buttons light up. They probably need their bulbs replaced. You can see the quick-disconnects there in your picture of the mechs. They're probably bayonett #44 or #47 bulbs, but check the manual to confirm.

- You might want to take a look at that power cord coming out the back. Looks like there's some exposed wiring coming out of the hole of the cabinet.

- Clean as much dust out of the machine as you can. For the outside, get a magic eraser and clean up any scuffs. You'd be surprised how clean you can get it with those. Be careful not rub too much...especially on the artwork, because a magic eraser will damage it.

- The coin door has a torn sticker on there that you can get off with some Goo-gone, or any adhesive/glue remover (found at most hardware shops).

- It's too bad there is extra security L-brackets drilled into the coin/cash-door and cabinet. If you don't care for 'em, you could remove it,. But this would require you to take off that door, strip it, bondo the holes and repaint it. Also, while you're at that, I'd cover the artwork on the front using delicate painters tape or whatever, fill the holes with bondo or wood filler, sand it smooth, then repaint. Looks like there's a few scratches and a gouge on the edge you could fix up too.

- Is the monitor in that picture really that low-lit? Or is it because of the flash? If the monitor is dim, you'd might want to consider replacing the capacitors on the monitor chassis. Though, that's if you're comfortable with a soldering iron, and are willing to learn how to properly discharge a monitor and install cap-kits.


Ground_Gainer

  • Trade Count: (0)
  • Full Member
  • ***
  • Offline Offline
  • Posts: 30
  • Last login:April 20, 2013, 09:18:22 pm
Re: First Restore - Xybots (warning: lots of pictures)
« Reply #5 on: April 04, 2011, 11:32:57 pm »
First, let me thank everyone for their replies so far.

In regards to the monitor, it seemed bright enough when I was playing.  I think the flash and the bezel really dimmed it in the picture.

I got some time to work on the cab tonight (wife is out of town until Friday so trying to get as much done as I can before then  ;) ).

I managed to get the coin doors taken apart and found out why the left player coin return button was stuck in.  There were 2 quarters and a penny wedged inside of the slot.  It took a little action with a screwdriver, but I got it out.  That makes a total of $1.01 that I've found in this cab so far.  I'm making money already!!!  :D  The coin mechs themselves looked to be in great shape.


I replaced the coin door #47 light bulbs and the marque 18" fluorescent tube.  Unfortunately when I tried plugging the cab in and turning it on, neither set of lights came on.  But neither did the game ever boot up after I waited about 10 minutes either.  Should they turn on immediately if everything is working right?  I did have the joysticks disconnected at the time--is that why it maybe never came on?  It does usually take 10 minutes or so to finally boot up.  Maybe I just got impatient and should have waited longer.  I was thinking the fluorescent tube might need a new starter so I may pick one up next time I go to the hardware store.

Anyway, I took bezel off and cleaned up the monitor and the marque.  You can see a little burn in on the monitor.  Oh well.


I also drilled the lock on the back and got inside to see the power supply.  Maaaan is it dusty back there.


I did find a random QC sheet and a self-reference guide stapled onto the back door.  Thanks for the QC Steve Gray!  I bet you didn't think this would still be working 24 years later considering the warranty is only 90 days!


Found a few random screws in the bottom of the back.


There was a hole for a fan on the back panel but when I pulled it off there was no fan inside.  Is there supposed to be one?  I did see a quick disconnect that wasn't connected to anything (you can see it on the picture below sitting on the gray paper).  Maybe that was for the non-existent fan?


Looks like they put in a spot for an extra fuse.


Plan is to clean out that mess tomorrow.  What do people suggest--just get the shop vac in there and suck up that gunk?  Blow it out with compressed air?  A little of both?  Or should I try and unhook everything and take it out to give it all a real deep clean?  I just get worried I couldn't put it back together or I'd break something.

Last thing I did today was pull off the control panel and disconnect the buttons and joysticks.  I took a million pictures so hopefully it's easy to put back together.  Looks like someone left me a little message underneath the CP.


The buttons were a little grungy.  The 4 "fire" buttons had leaf switches that were attached via a screw while the two "zap" buttons had the switch attached to the plastic button itself.  I wonder why that is?  Are these cheaper buttons because you don't hit zap as much?

This one screws off:


This one doesn't:


The Xybots joysticks are really cool.  They have this extra piece on the base of the joystick with 2 more microswitches and a spring connected to the joystick shaft and a metal block.  When the shaft twists it moves that big metal block which pushes on one of the 2 microswitches.  Then the spring attached to it snaps it back in place.  I wonder if that spring is the one the guy wrote me a message about underneath the CP?


Here's the joysticks and buttons fully removed.  I had to snip a couple of cable ties to get the joysticks off.  Fortunately I didn't snip any wires (I think  ;) ).  Look at all that gunk that fell out onto the table.  GROSS.  Definitely time to clean these guys out.  That's another project for tomorrow--taking the joysticks apart for cleaning.


Thanks for reading.  Please let me know if you have any comments/tips for me.

Cheers,
Mike

Ground_Gainer

  • Trade Count: (0)
  • Full Member
  • ***
  • Offline Offline
  • Posts: 30
  • Last login:April 20, 2013, 09:18:22 pm
Re: First Restore - Xybots (warning: lots of pictures)
« Reply #6 on: April 07, 2011, 12:56:52 am »
Had a little more progress over the last couple of days.  I got the bezel and screen cleaned off.  Did some magic eraser work on the scuffs and bumps.  Ultimately I'd like to sand and repaint but it looks a little better for now.  The big project was taking the control panel off to clean all of the controls.  The buttons were no problem but these joysticks gave me no end of trouble.

Here is the "before" picture:


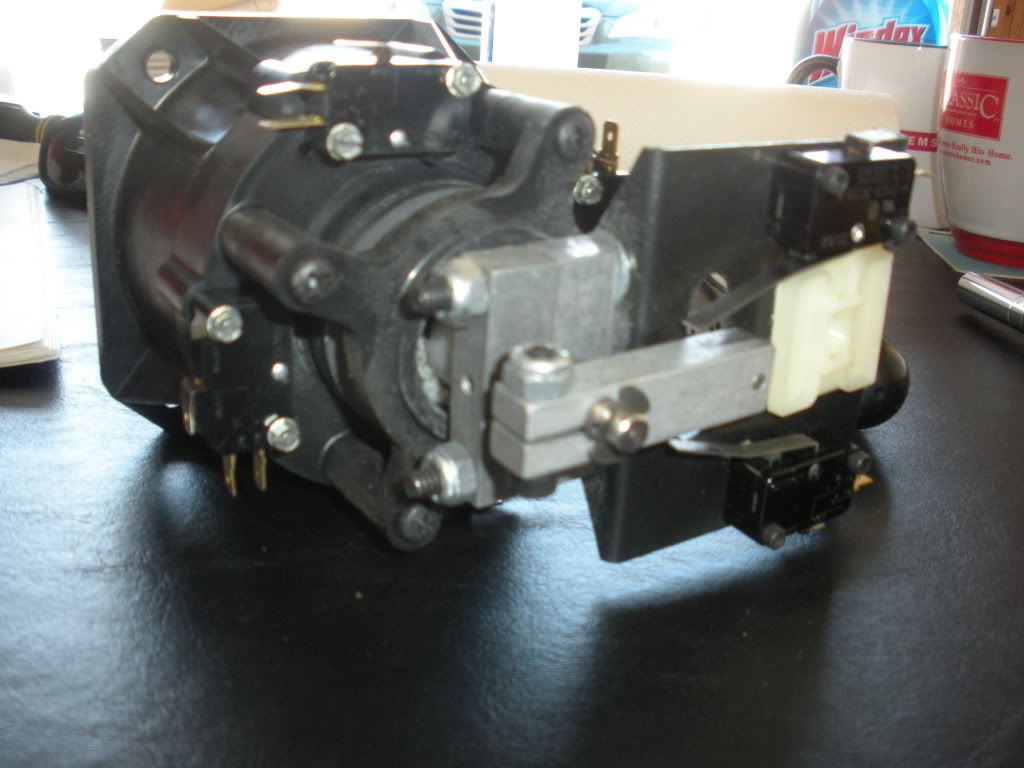
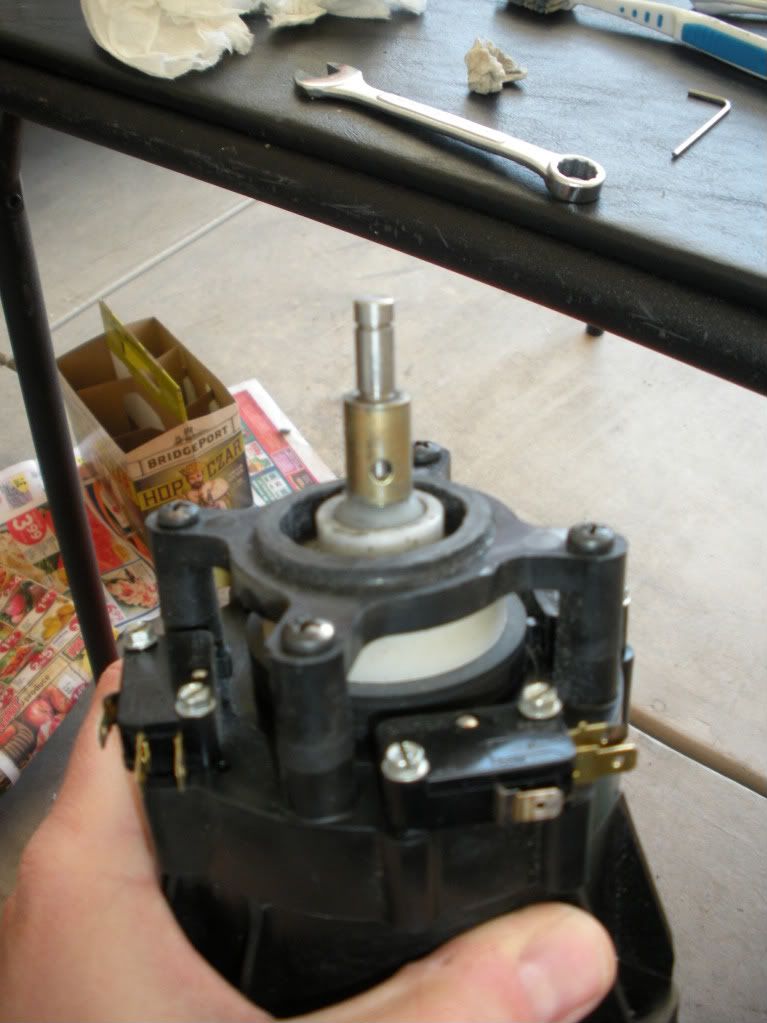
And here is the same joystick taken apart:


I almost lost those little plastic washers at least 3 times and the "u" looking metal clips flew all the way across the garage at least twice and had me on my hands and knees trying to find them.  It's a miracle I didn't lose anything.

The biggest problem was my inexperience and lack of attention-to-detail.  I got everything cleaned off alright but putting everything back together turned out to be a comedy of errors.

I had to take apart and re-assemble the joysticks at least 7 times (I think a few more but I lost count)
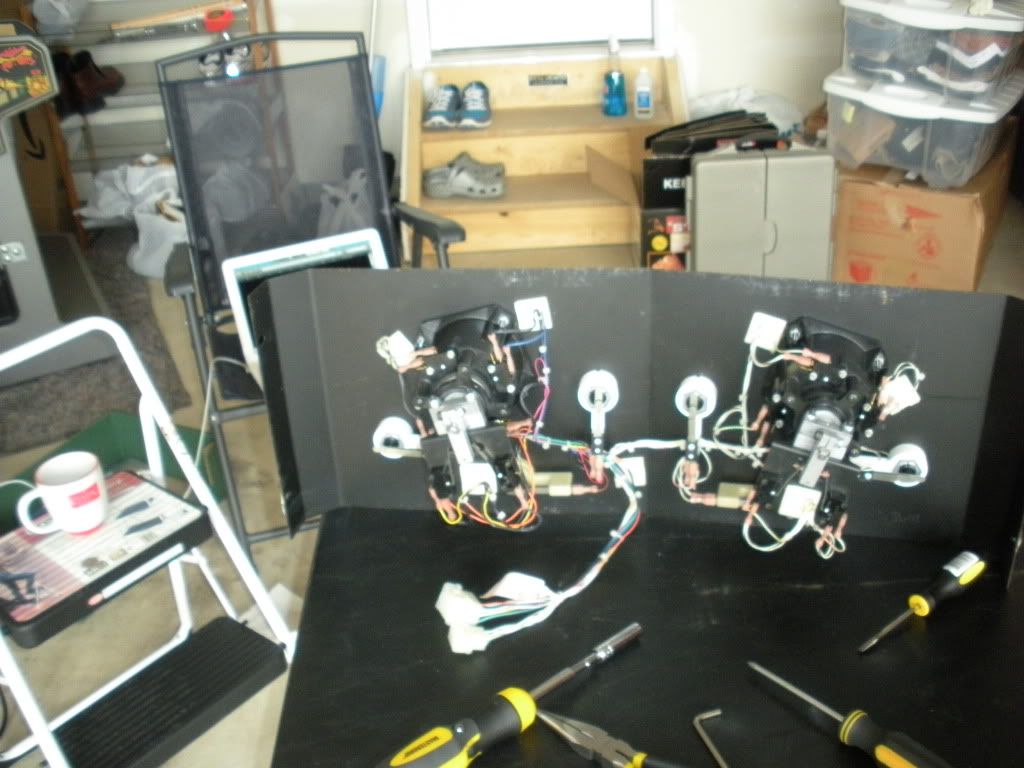
1 & 2 - Original cleanings
3 - On the first joystick, I clipped the actuator ball on the outer shaft in the wrong place and didn't realize it until I was working on the second joystick.  Both halves of the ball have a little metal stick that is supposed to fit snugly in a hole on the outer shaft (you can see them on the far end of the table, sticking up), putting the actuator ball just far enough up on the shaft to give the sticks some "springback" to center, but these metal sticks would not move AT ALL.  I finally ended up standing on one of the halves and got it to sink in a little bit.  This allowed me to "snap" them in on hole on the outer shaft so they stayed in the right place.  Problem was, I didn't have the inner shaft in at the time I snapped the metal stick into place.
4 - When I finally did try to drop the inner shaft in, the metal stick was in the way and I had to take the whole joystick apart again.'
5 - Then when I had everything in the proper place and good to go, I ended up tightening the actuator ball too much and the metal stick actually drove into the inner shaft too hard and shaved off some of the metal.  Considering that the inner shaft has to twist to make your guy turn in Xybots, this wasn't going to work.  It was SUPER hard to get the inner shaft off after this.  I did some permanent damage here and was pretty upset at myself.
6 & 7 - When I got ready to mount the thing back on the control panel I realized that the housing for the joystick is not a perfect square--it was a very slight rectangle.  And the bottom part of the joystick that holds the 2 microswitches for the twisting has to orient a certain way...  I had 50/50 odds I hooked it up right and guess what the final score was?  Yep, 0 for 2.  So I had to take both joysticks apart AGAIN to reorient the inner shaft so that the bottom part faced the right way.

I needed that stupid hole to be rotated 90 degrees!


8 - I forgot the little tiny white washers when I rebuilt Joystick for the umpteenth time 1.  I saw them sitting on the table mocking me just as I was hooking up the bottom springs.

By this time I was much faster at taking these things apart and putting them back together but my hands were sure torn up.  Those stupid little "u" shaped metal clamps are nasty to get on and off.

Considering I had never done this before I was facing some serious apprehension as I wired everything back up and then remounted the control panel.

I turned on the machine, waited for it to boot up, and then tried starting it up....


VICTORY!  Everything worked great.  The player 2 joystick feels a little loose on the springback to center.  I think it might need a new spring or something, but I do not plan on taking those joysticks apart again anytime soon. ; )  I sat down and played for like 30 minutes in celebration of clean controls.  That Master Xybot guy in level 15 totally creamed me.

Next steps/questions:
1. When I turn the power on it sits there with a blank screen for around 15 minutes and then just goes straight to the "attract" mode.  Is this normal?  I've never owned an arcade machine so I'm not really sure what "normal" is.  I thought it was supposed to boot into some kind of self-test mode?
2. Neither the coin lights or the marquee light come on.  I have replaced the bulbs, but haven't done any other troubleshooting yet.  I guess I should just follow the wires and see if anything looks amiss in the connections and/or the power supply?

Thanks for reading this far.

Cheers,
Mike

SavannahLion

  • Wiki Contributor
  • Trade Count: (+1)
  • Full Member
  • ***
  • Offline Offline
  • Posts: 5986
  • Last login:December 19, 2015, 02:28:15 am
Re: First Restore - Xybots (warning: lots of pictures)
« Reply #7 on: April 11, 2011, 02:03:25 am »
I also drilled the lock on the back and got inside to see the power supply.  Maaaan is it dusty back there.


 :laugh2: :laugh2: :laugh2:

I am soooo sorry. I couldn't help but laugh at this.

Your cabinet looks amazingly clean for being 24 years old. Some of the cabinets that come through look really bad. Rats nests inside (literally), birds nets, I even found a guy selling cabs covered in chicken and goat ---steaming pile of meadow muffin---. None of his monitors worked because the damn birds pecked at all the colorful wiring in the back. Some forum members bring in cabs icked with mold that has to be chopped off or that weird moldy smell that only KILLZ can cover up. Better to strip the metal and zap the wood with ozone, but who has that handy? :P

I only wish my current WIP is even remotely that clean.

Sorry, like I said, it's a very clean cab. I just thought it was humorous.

About your pictures.

I would strongly encourage you to upload the pictures to this site instead of linking to outside sites like photobucket. All too often I'll be digging through some really interesting old threads only to find that some crucial or useful image is toasted because the hosting service is no longer in existence or the links have changed. By uploading the photos here, you're taking advantage of BYOAC's storage and ensuring that for as long as this site exists, so will the photos.

Ground_Gainer

  • Trade Count: (0)
  • Full Member
  • ***
  • Offline Offline
  • Posts: 30
  • Last login:April 20, 2013, 09:18:22 pm
Re: First Restore - Xybots (warning: lots of pictures)
« Reply #8 on: April 11, 2011, 02:24:02 pm »

 :laugh2: :laugh2: :laugh2:

I am soooo sorry. I couldn't help but laugh at this.

Your cabinet looks amazingly clean for being 24 years old. Some of the cabinets that come through look really bad. Rats nests inside (literally), birds nets, I even found a guy selling cabs covered in chicken and goat ---steaming pile of meadow muffin---. None of his monitors worked because the damn birds pecked at all the colorful wiring in the back. Some forum members bring in cabs icked with mold that has to be chopped off or that weird moldy smell that only KILLZ can cover up. Better to strip the metal and zap the wood with ozone, but who has that handy? :P

I only wish my current WIP is even remotely that clean.

Sorry, like I said, it's a very clean cab. I just thought it was humorous.

About your pictures.

I would strongly encourage you to upload the pictures to this site instead of linking to outside sites like photobucket. All too often I'll be digging through some really interesting old threads only to find that some crucial or useful image is toasted because the hosting service is no longer in existence or the links have changed. By uploading the photos here, you're taking advantage of BYOAC's storage and ensuring that for as long as this site exists, so will the photos.

Thanks for the reply.  Yeah I admit this thing is in pretty good shape.  ;)  I'm definitely grateful for it, especially since this is my first time doing anything like this.

Regarding the pictures--I will start doing that.  I didn't notice the "additional options" part of the post where you can upload pictures.  I'll have to start using that.  I too, have looked at some older threads and been annoyed that the pictures no longer worked.

Thanks again for reading!

Cheers,
Mike

ifkz

  • Trade Count: (+2)
  • Full Member
  • ***
  • Offline Offline
  • Posts: 59
  • Last login:March 14, 2020, 09:55:44 pm
Re: First Restore - Xybots (warning: lots of pictures)
« Reply #9 on: May 09, 2011, 10:29:57 am »
Wow, Xybots was one of my first two arcade machines that I got at the same time, so this thread brings back memories.  Let me see if I can help.

First of all, your machine is in much better shape than mine arrived in.  Be thankful you have full artwork, a nice control panel, and no water damage.

You have worked on one of the hardest parts:  the custom joysticks Atari used for this one game.  Usually the rubber ring that hits the cherry switches has turned to sticky tar, but yours looks like it is still okay.  I had to get the gunk out and I replaced it with a pinball rubber.  I don't recall the exact size though.

I went to the trouble of making some replacement stickers for the joysticks.  As you can see, they are not original, but I'm happy with them.


On the machine:


Your non-lighting marquee could probably use a starter.  They come in packs of 2 for around a buck.  Available at any Lowe's or Home Depot (or Bob Roberts arcade parts site).

The game never came with a fan, just the plastic fan cover.  I assume this was just for ventilation; unless arcade games ran really hot, most used a chimney system without fans.

Your monitor should pop up fairly fast, within 20 seconds.  I recommend a cap kit.  You will need some solder, a solder sucker, the cap kit, and a soldering iron.  You can pick all of this up from Bob Roberts.

Your monitor burn is not bad, mine is much worse.

The cap kit for this monitor is regarded as one of the hardest to do.  Don't worry, it's not too bad, just complicated due to the three or so monitor boards you must remove.  When I did mine, I just kept the wires attached and flipped the main PCB over.  And I worked slowly and carefully.  Be sure to read up on how to discharge the monitor.  You'll need a bit of wire and a plastic handle screwdriver.  One way or another, that monitor will need to be pulled out of the machine to do this work.  Once you do this monitor, all others will be easy  :)

A picture of my completed Xybots.  It needed new front art, bondo for the lockbar holes and water damage, new paint, rebuilt sticks, etc.  I still have the machine:

Nothing is like stepping back, looking at your games, and thinking 'wow, I've done this, and I have these!'

Ground_Gainer

  • Trade Count: (0)
  • Full Member
  • ***
  • Offline Offline
  • Posts: 30
  • Last login:April 20, 2013, 09:18:22 pm
Re: First Restore - Xybots (warning: lots of pictures)
« Reply #10 on: May 23, 2011, 08:11:12 pm »
Thanks for the reply Ifkz.  I know I am really lucky to have a Xybots in such great shape.  I really got it for a great price too so I am doubly lucky!

I just started a new job a few weeks ago and have had to put my restoration efforts on the back burner.  I did manage to get a new starter for the marquee bulb and it now lights right up.  When I replaced the two small lightbulbs for the coin doors, however, it doesn't look like it did anything.  Maybe its a fuse problem?

There are a lot of loose wires hanging around inside the cab that are not connected to anything.  I really need to just pull everything out I think both so I can clean/sand/paint/refinish the wood and also so I can see if there is anything else missing from inside.  I want to refinish the coin door and bondo the cab-base where that big L-bolt is as well.

I still have no idea why it takes 20 minutes to "boot up".  The marquee light comes on immediately, but none of the sound or monitor stuff kicks in until like 20 min have passed.  It's really weird.

I am interested in giving a cap kit a try but I am a bit intimidated about screwing it up.  I have never soldered before.  Can anyone recommend some cheap/easy soldering projects so I can get a little experience before I mess with my working monitor?

Hopefully I can pick things up again in June!

Cheers,
Mike

Ground_Gainer

  • Trade Count: (0)
  • Full Member
  • ***
  • Offline Offline
  • Posts: 30
  • Last login:April 20, 2013, 09:18:22 pm
Re: First Restore - Xybots (warning: lots of pictures)
« Reply #11 on: June 30, 2011, 08:59:00 pm »
Hey Guys,

Did a little more work on this.  Decided to try and fix the coin door area.  There were 2 huge L brackets put on, one on the lower coin door and one attached to the cab itself.  I pulled those off and tried to use bondo to fill the holes.  It turned out better on the cab that it did on the door...  I should have used a hammer to even things out on the coin door.  It has little raised areas where the L bracket bent everything up.

I also repainted the mesh over the speakers as it had a big scratch on it.  Things are looking much better now.  Cleaned them out while I was at it.

I convinced my wife to help me adjust the monitor and got things looking MUCH better.  I guess I didn't need a cap kit after all!

Now I am trying to decide if I want to pull everything out and clean all the PCBs and the inside of the cab or just leave it alone and close things up.  It works right now and I don't want to break it, but I know all that dust in there cannot be good for it.

Outstanding issues I am hoping you guys can help me with:
1. There are some molex connectors/wires hanging off the back of the monitor.  I have no idea where they go.  They don't seem to "fit" anywhere I can see.  Maybe if I took the monitor out?  It's really hard to see the monitor PCBs.  Check the pics below.
2. The machine still takes a long time to start up.  Ever since summer arrived its only 5 min instead of the 15 it was during the winter.  I still can't figure this out though.  Maybe a power issue?  I am hoping if I take everything apart and clean it and put it back together that it might fix this issue...
3. There are some pins on the PCBs that nothing is plugged into (see pics).  Should I be worried about that?  Am I missing something?
4. The coin reject lights don't light even after I replaced the bulbs.  Fuse issue maybe?  Any idea?

That's pretty much it.  I am hoping to get everything done here soon so I can start on my next project.  I picked up a roadblasters cab last night that needs a little work... The hardest part of the whole deal was convincing my wife we had room.   ;D

I appreciate everyone's insight!

Cheers,
Mike

Ground_Gainer

  • Trade Count: (0)
  • Full Member
  • ***
  • Offline Offline
  • Posts: 30
  • Last login:April 20, 2013, 09:18:22 pm
Re: First Restore - Xybots (warning: lots of pictures)
« Reply #12 on: July 05, 2011, 09:03:18 pm »
So I messed around with Xybots s'more to try and figure out the slow boot problem.  It looks like when I turn the power on, the monitor kicks on, but only 2 of the 3 lights on the sound PCB board turn on, and the main PCB light does NOT turn on.  After a few minutes when everything "warms up", the 3rd light on the sound PCB board and the light on the main PCB board turn on, and then the game starts.

Any idea what might be causing this?  Bad capacitors?  Bad fuse?

I'll post some pictures later.

IG-88

  • Trade Count: (+7)
  • Full Member
  • ***
  • Offline Offline
  • Posts: 2042
  • Last login:July 06, 2025, 09:21:45 am
  • Posts: 48,764
Re: First Restore - Xybots (warning: lots of pictures)
« Reply #13 on: July 05, 2011, 09:20:48 pm »
Sounds like a capacitor problem to me but I have limited knowledge on the subject. Wouldn't hurt to do a cap kit on the board would it?
"I know what a HAL 9000 is... I was wondering if HAL 7600 was his retarded cousin or something..."
-HarumaN

emphatic

  • Trade Count: (0)
  • Full Member
  • ***
  • Offline Offline
  • Posts: 2017
  • Last login:July 16, 2025, 10:52:58 am
  • -"Suck it, Donny!" -"No, YOU suck it.... more".
    • Emphatic's Video Game Collection
Re: First Restore - Xybots (warning: lots of pictures)
« Reply #14 on: July 08, 2011, 02:08:35 pm »
You should also check the voltages from your PSU. Maybe the +5V is too low?

Ground_Gainer

  • Trade Count: (0)
  • Full Member
  • ***
  • Offline Offline
  • Posts: 30
  • Last login:April 20, 2013, 09:18:22 pm
Re: First Restore - Xybots (warning: lots of pictures)
« Reply #15 on: July 20, 2011, 09:12:57 pm »
So I got in there finally and pulled out the power supply to test it...  The 5V is only putting out 1.7V(???).  That sounded wrong to me so I thought maybe I was reading my meter wrong (hey this is my first time messing around with this stuff).  Seems to me that it wouldn't boot up at all with such low voltage, no matter how many minutes you wait.

I picked up a Roadblasters cab a few weeks ago so I went over and fired it up.  Those Atari System 1 machines have super easy access to all the guts so I was able to open the front door and check the voltage on its power supply real quick.  Sure enough it was putting out 5.2V on the 5V line.  I guess I wasn't reading my meter wrong.

So I am thinking I need to pick up a new power supply.  I'll keep everyone updated!

Ground_Gainer

  • Trade Count: (0)
  • Full Member
  • ***
  • Offline Offline
  • Posts: 30
  • Last login:April 20, 2013, 09:18:22 pm
Re: First Restore - Xybots (warning: lots of pictures)
« Reply #16 on: August 12, 2011, 09:22:22 pm »
I got my shipment from Groovy Game Gear in today.  Went to work installing new locks on the coin doors then set to work installing the new power supply.  Before putting everything back in the cab I got out the compressed air and blew it out, followed up by the shop vac to vacuum things out.  Much cleaner in there now.  Wired it all up and reinstalled the power supply without too much trouble (thanks to both tons of pictures and wires that have been in the same place for 25 years and now automatically move right back to their favorite position ; ) ).

Double checked everything...  Then closed my eyes, plugged it in, and flipped the switch! .....  "INTRUDER ALERT!"  Woohoo!  Everything instantly came on!  I guess it was just a bum power supply and not a board problem!

I will get some pics up of the finished cab once I get the coin door lightbulbs replaced.

Feeling real good right now!!!  I also did a ton of work on that Roadblasters cab I picked up--fixed the foot pedal (it was stuck always on/down...  just had 25 years of grime in it), got the marquee light working, replaced 2 broken microswitches in the thumb triggers, repainted the steering wheel, repainted the coin doors, and installed new locks.  That guy is looking much better now too!  Just needs a new tube...  it has serious burn in.  "INSERT COIN" indeed.

Next project is a mame cab I think...

Ground_Gainer

  • Trade Count: (0)
  • Full Member
  • ***
  • Offline Offline
  • Posts: 30
  • Last login:April 20, 2013, 09:18:22 pm
Re: First Restore - Xybots (warning: lots of pictures)
« Reply #17 on: September 06, 2011, 08:25:28 pm »
Well I finally got some casters put on, installed a 12V fan in the back with a blue LED, and ordered some coin door LED lights from unicorn electronics (http://unicornelex.com/whiteledbayonetbase2000mcd6v.aspx) .    When I got the LED lights I put them in both Roadblasters and Xybots and turned them both on.  They both lit up and looked great.  I was feeling super pleased as this was the final thing I needed to restore it all.  I let both machines run in attract mode for a few minutes and then noticed one of the lights in Xybots went off and the other had started flickering.  UH OH!  I ran over and turned it off and then opened the coin door.  The metal in there near the lights was HOT!  One of the LEDs definitely blew and the other might have.  There goes $5 up in smoke (literally).  I decided to get out my multimeter and see what kind of voltage was running through those sockets.  I let them cool off, took the lights out, then turned it back on.  As soon as I touched the leads from my multimeter to the coin door light connectors I saw sparks.  yikes.  Then I touched the leads to the socket again and read a big fat 0 on the multimeter.  Maybe I blew a fuse?  Looks like there is probably a short in the line somewhere?  Anyway, I am thinking about running new 5V lines directly from the power supply and just snipping out and removing the ones that are already there.

Any ideas on what might have shorted things out?  I am just really glad that the rest of the cab seems unaffected and was running fine.

Almost done with this!  Good thing I ordered some extra LED lights...

boardjunkie

  • Trade Count: (0)
  • Full Member
  • ***
  • Offline Offline
  • Posts: 698
  • Last login:March 05, 2019, 06:05:58 pm
Re: First Restore - Xybots (warning: lots of pictures)
« Reply #18 on: September 07, 2011, 07:59:45 am »
Heh.....dig the Quarterback conversion (has Strikers in it now). I have that same cab that I used to use for vertical games.
http://www.flickr.com/photos/62937081@N00/2634955718/#

It looks impressive with the 25" monitor, but I found it a little annoying be'n right on top of that big monitor. Kinda made gameplay more difficult....

Ground_Gainer

  • Trade Count: (0)
  • Full Member
  • ***
  • Offline Offline
  • Posts: 30
  • Last login:April 20, 2013, 09:18:22 pm
Re: First Restore - Xybots (warning: lots of pictures)
« Reply #19 on: September 16, 2011, 11:34:21 pm »
Well I finally got everything working.  The coin door lights took me forever to figure out.  I finally had to dig out the skematic.  There is a ground wire, a 17VAC line, and a 12VAC line that all connect to the coin door bulbs.  The 17V and 12V lines come from the sound board.  This is where my problem was.  Only the 17V line was bringing any juice and it was reading -16.5V on my multimeter.  So I think because it didn't have the 12V line working as well, it was pushing 16.5V through towards the ground.  That's what fried my lights.

So rather than fart around with the sound board and try to find out why the 12V line was hosed, I just hooked up a ground to the side of the coin door and ran a 5V wire directly from the power supply.  I unplugged the 2 wires that ran from the sound board and taped it all down to the inside of the cab.

I turned everything on after I ran the new wires and it all turned on....  but the game didn't boot!  I was scratching my head and couldn't figure it out.  Then I realized that I had left the skematic sitting on the CP.  It happened to be pushing down on 2 of the "fire" buttons.  As soon as I lifted it off of the fire buttons everything came to life!

WOOHOO!  It all worked!  I cranked the sound and played a round to celebrate. ; )  Here's an "after" picture.

I learned a lot fixing this bad boy up and am looking forward to a new project soon!

Total work done:
- Cleaned Joysticks
- Replaced Marquee Light & Started
- Repainted Coin doors
- Removed Large L bracket from Coin door / Cab base
- Filled in coin door and Cab L bracket holes with Bondo, repainted/sanded
- Wired up new coin door bulbs
- Hooked up a new power supply
- Removed/cleaned joysticks, speakers, bottom of cab
- Adjusted monitor
- Added 4" blue LED 12V fan for cooling in place of "open" grill in the back
- Added casters to move it around the garage (I think they are a bit big but they work alright)
- Added new locks

yotsuya

  • Trade Count: (+21)
  • Full Member
  • ***
  • Offline Offline
  • Posts: 19960
  • Last login:Yesterday at 10:00:30 pm
  • 2014 UCA Winner, 2014, 2015, 2016 ZapCon Winner
    • forum.arcadecontrols.com/index.php/topic,137636.msg1420628.html
Re: First Restore - Xybots (warning: lots of pictures)
« Reply #20 on: September 17, 2011, 12:58:48 am »
 :cheers:
***Build what you dig, bro. Build what you dig.***

wp34

  • Trade Count: (+3)
  • Full Member
  • ***
  • Offline Offline
  • Posts: 4794
  • Last login:April 10, 2022, 09:48:19 pm
Re: First Restore - Xybots (warning: lots of pictures)
« Reply #21 on: September 18, 2011, 10:46:36 pm »
Nice job!  Xybots was one of my favorites.  Glad to see one getting a little love.