Here's a little guide to install and configure Nuvee plugin with PCSX2.
Dual gun (Dual Aimtraks) for 2P games is working.
And as bonus some ideas / basic scripts to execute PCSX2 + Nuvee from a frontend
Please forgive me for not beeing extremely precise in the latest part (calibration tweaking, various game issues) as I did that several month ago and I do not remember exactly all of it.
Notes : - I based this guide on a fresh new install, so there is no old/default PCSX2 already present on my hard disk (
MyDocuments\PCSX2\ folder)
- I kept path from my system (so that scripts can be understandable) so don't forget to adapt those parts
- PCSX2 version is the latest one available :
PCSX2 1.4.0- Time Crisis 2 and Time Crisis 3 are working great without any speedhack
BUT you'll need the latest PS2 NTSC bios (2.30). Older bios have issues with i-link (for 2 players) emulation and games are too slow to be playable
Step 1 : Installation1) Download and install PCSX2 (
link here )
2) Download Nuvee plugin (
link here )
3) Extract Nuvee archive and copy the file
nuvee_ps2_usb.dll from archive's
nuvee_ps2_usb - guncon2, keyboard, mouse\bin\ folder into the
plugin folder of PCSX2
4) Install your bios files (by default,
MyDocuments\PCSX2\bios\)
5)
! Important Trick ! Manually create a folder named
inis into PCSX2 folder. Without it Nuvee won't be able to read/write config files !!
6) Now execute PCSX2, choose your language and if it's the first startup, you'll see the Plugin selection window. If it's not your first startup, open it with
Config -> Plugin/BIOS Selector menus
7a) Select LilyPad as PAD plugin and click the
Configure... button, set Keyboard API to
DirectInput and Mouse API to
Disabled7b) You can go to Pad1 and Pad2 tab and configure your keys for directionnal arrows, select, etc.... (optionnal step but recommended)
8 ) Select
nuvee ps2 usb 0.2.0 [nuvee_ps2_usb] as USB plugin
9) Click
OK and on the next window choose your bios (again, if first startup)
10) Now on the main window, open
Config -> Emulation Settings window, then select
GS Window tab.
Uncheck
Double-click toggles fullscreen mode Uncheck
Always Hide mouse cursor Uncheck
Default to fullscreen mode on openInstallation is finished, just make sure everything is working good by testing a game (let's say...End Game for example).
You'll have no lightgun controls yet, this is normal
Step 2 : 1st Nuvee GameWe'll start with a simple one, for 1P game (End Game) :
1) On the main window, open
Config -> USB -> Plugin Settings... window
Set Port1 to
Guncon 2 Set Port2 to
None UnCheck
Swap lightgun players 1-22) Don't close PCSX2, go to the previously created
inis folder, there should be a
nuvee_ps2_usb_main.ini file looking like this :
PORT1 = 1
PORT2 = 1
HIDMOUSE_API = 0
Debug = 0
Swap lightguns = 1
Snap mouse = 1
These are corresponding values of what was just modified by the GUI
This can be edited/copied manually in the future
3) Back on Nuvee plugin window, click the
Config button of the Port1
Check
use Keyboard as D-PAD Set "Left" to
Trigger Set "Right" to
Start Set "Middle" to
A (A button = pedal/cover)
Select
EndGame (U) in the dropdown list
Check
Mouse Calibration Hack Click
Acquire button and follow the procedure (close dialog window and push Aimtrak Trigger)
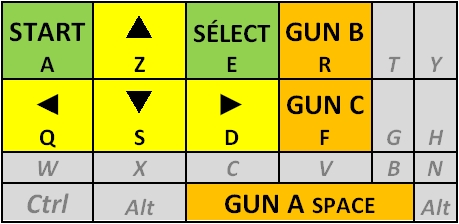
If you're using an Aimtrak, only buttons acting like mouse clicks will be recognized. Other buttons available or other buttons (real pedal, panel buttons..) will have to be set on an Autohotkey script to send keyboard input according to this model :
4) For information, the small buttons on top of the game list :
E = Open the calibration file to edit it
D = Restore default calibration values (
for all games !!!)
5) Go back to the
inis folder in PCSX2 directpry, you'll see 2 more files :
nuvee_ps2_usb_guncon_profiles.ini : calibration values file (for all games)
nuvee_ps2_usb_guncon1.ini : Port1 gun configuration (buttons, selected game, etc....)
6) Back to PCSX2, you can now launch the game and you should arrive to calibration screen. Shoot the target, it should work
If you're still in windowed mode, the mouse cursor should be aligned with PCSX2 aimtrak aim, but if you go fullscreen you'll see it going off at the borders. Now is a fun part....calibration !
7) Open your
nuvee_ps2_usb_guncon_profiles.ini and look for End Game(u) line, you'll see 4 values.
You'll have to tweak them one by one so that, according to your resolution, your mouse pointer is accurate with in-game cursor everywhere.
To do so, no need to quit PCSX2 : press ESC to pause game, modify the values, save the file and go back to PCSX2 to resume the game.
8 ) Once calibration is OK, copy both
nuvee_ps2_usb_main.ini and
nuvee_ps2_usb_guncon1.ini to a specific EndGame folder you'll have to create somewhere on your disk. It will be used later.
That's it for the 1st game !
Step 3 : Set up another game, 2P modeNow let's try to set up Virtua Cop:
1) On the main window, open
Config -> USB -> Plugin Settings... window
Set Port1 to
Guncon 2 Set Port2 to
Guncon 2 Check
Swap lightgun players 1-22) Click the
Config button of the Port1
Check
use Keyboard as D-PAD Set "Left" to
Trigger Set "Right" to
Reload Set "Middle" to
Start Select
Virtua Cop (U) in the dropdown list
Check
Mouse Calibration Hack Click
Acquire button and follow the procedure (close dialog window and push P1 Aimtrak Trigger)
Save and close
3) Click the
Config button of the Port2
Check
use Keyboard as D-PAD Set "Left" to
Trigger Set "Right" to
Reload Set "Middle" to
Start Select
Virtua Cop (U) in the dropdown list
Check
Mouse Calibration Hack Click
Acquire button and follow the procedure (close dialog window and push P2 Aimtrak Trigger)
Save and close
4) Now launch Virtua Cop Elite, and start again calibration file tweaking
5) Once calibration is over, copy
nuvee_ps2_usb_main.ini,
nuvee_ps2_usb_guncon1.ini and
nuvee_ps2_usb_guncon2.ini to a specific VirtuaCop folder you'll have to create somewhere on your disk. It will be used later.
Step 4 : Set up all other gamesNow it's up to you, set up as many games as you want and each time you finished, copy the Nuvee files to a game specific folder.
As you see, for each game you'll be able to select different config for your Aimtrak inputs (offscreen reload, pedal button....) and sometimes you'll have to check or uncheck "swap guns"....a lot of trial and errors to configure Nuvee.
You may have some issue with Crisis Zone, in my memory when I made the gun to work, it would not shoot as an automatic when I stay pressed on the trigger. There's a way to bypass that I'll talk about it later
I'm joining in a zip at the bottom (Nuvee_GameFiles.zip) all my working files, with calibration values for my 1080p display
Before going into a more advanced tutorial, now that every game is working fine on his own, you can set these option to finalize :
On the main window, open
Config -> Emulation Settings window, then select
GS Window tab.
Check
Always Hide mouse cursor Check
Default to fullscreen mode on open
Step 5 : Try to make it "frontend friendly"Ok, now you have a good understanding of how the plugin is working : you have to launch PCSX2, go into USB menu to configure you lightgun buttons, select your profile game so that the calibration is accurate, then launch a game.....
Luckily you have now a bunch of saved Nuvee files (for each game) with all those information on it.
So let's make a little Autohotkey script, let's call it
PCSX2_TC2.ahk (once again, adapt filepath to your system !) :
;Copying Nuvee configuration and TimeCrisis 2 game profile
FileCopy, D:\PS2\Jeux\Time Crisis II\nuvee_ps2_usb_guncon1.ini, D:\PS2\PCSX2 1.2.1\inis, 1
FileCopy, D:\PS2\Jeux\Time Crisis II\nuvee_ps2_usb_guncon2.ini, D:\PS2\PCSX2 1.2.1\inis, 1
FileCopy, D:\PS2\Jeux\Time Crisis II\nuvee_ps2_usb_main.ini, D:\PS2\PCSX2 1.2.1\inis, 1

Run, D:\PS2\PCSX2 1.2.1\pcsx2-r5875.exe "D:\PS2\Jeux\Time Crisis II\Time Crisis II [NTSC_US].iso" --fullscreen --nogui, D:\PS2\PCSX2 1.2.1
Execute this script, and voilà

if you want to add more buttons just add those kind of code to the script :
;P1 Pedal(optional)
1Joy5::
	Send {f Down}
	Sleep 100
	Send {f Up}
Return
I do not use Hyperspin or RocketLauncher or anything like that, so this script is
NOT MADE to be used with these frontends, bust it's just here to give you some example of what can be done to use PCSX2 and Nuvee without needing to go in the emulator menus.
I know those frontends are highly scriptable so there has to be a way to implement it, I'll let you find how !
Various issues I ran into :Guns are inverted :
In USB nuvee window, where you set Port1 and Port2 to guncon, check or unchek
Swap lightgun palyers 1-2Important note : if you're adding another mouse or USB device, it can totally screw your Nuvee config (as for TroubleShooter2 and MAME without controllerRemap utility)
Time Crisis 2 and Time Crisis 3 are horribly slowGet the latest NTSC BIOS v2.30
Time Crisis 2 and Time Crisis 3 have a white fog never disappearingFor the graphic plugin, choose
Direct3D 9 (hardware) instead of Direct3D 11
Autofire does not work in Crisis Zone, only 1 bullet is firedThis issue is linked to the "Mouse Calibration Hack" checkbox in P1 or P2 config of Nuvee :
- If checked, you can calibrate the guns when the game asks you to at start. But autofire is not working
- When unchecked, you can't calibrate the guns - and so can't go pass the calibration screen - but autofire is working
So what I did to trick the system :
1) On the main window, open
Config -> USB -> Plugin Settings... window
Set Port1 to
None Set Port2 to
None Check
Swap lightgun players 1-22) Load Crisis Zone game, it will load straight to the main title screen without going through the calibration menu. But you can't control anything yet
3) Go back to the main window, open
Config -> USB -> Plugin Settings... window
Set Port1 to
Guncon2 Click
Config button for Port1
Uncheck
Mouse Calibration Hack Set your buttons as usual (for pedal, etc...just like for time crisis 2 &3 ), acquire the gun if needed
Select the Crisis Zone profile for aligment/plugin calibration
Click
OK button
4) Back to USB Nuvee plugin config, set Port1 to
Guncon 2 [/b] and check
Reconnect USB devices (PS2 Detection) Click
OK button
This should force the Gun to be recognised, and this time autofire will work ! But as you'll see, calibration is completely off
5) To make things easier, make a savestate of your game (press F1 to save to slot 0)
6) Use impacts when fire on title menu screen to calibrate the game by changing values in the corresponding profile in
nuvee_ps2_usb_guncon_profiles.ini 7) Now your gun should be calibrated, autofire should work. To use it now, and bypass the whole NoDevice-Guncon swap thing, just keep the final Nuvee configuration, load the game and press F3 to load the savesate
8)You can now save inis files if you want to swap Nuvee configs with AHK scripts, and you can implement an auto F3 keypress a few seconds after launching the emulator to load the CirsisZone Savestate by the script


 Home
Home Help
Help Search
 Login
Login Register

 Send this topic
 Print
Print Topic: [HowTo] PCSX2, Nuvee plugin + Dual Aimtrak guide with FrontEnd Friendly methods (Read 80894 times)


