Main Restorations Software Audio/Jukebox/MP3 Everything Else Buy/Sell/Trade
Project Announcements Monitor/Video GroovyMAME Merit/JVL Touchscreen Meet Up Retail Vendors
Driving & Racing Woodworking Software Support Forums Consoles Project Arcade Reviews
Automated Projects Artwork Frontend Support Forums Pinball Forum Discussion Old Boards
Raspberry Pi & Dev Board controls.dat Linux Miscellaneous Arcade Wiki Discussion Old Archives
Lightguns Arcade1Up Try the site in https mode Site News

Unread posts | New Replies | Recent posts | Rules | Chatroom | Wiki | File Repository | RSS | Submit news


Author Topic: Franco's Custom Sticks (Update: Carbon Fibre Fun!)  (Read 12220 times)

0 Members and 1 Guest are viewing this topic.

Franco B

  • Trade Count: (+10)
  • Full Member
  • ***
  • Offline Offline
  • Posts: 3766
  • Last login:February 15, 2024, 09:14:06 am
Franco's Custom Sticks (Update: Carbon Fibre Fun!)
« on: January 17, 2009, 09:20:02 am »
Time to add some more projects to the pile  ;D

A couple of friends have asked me to build some sticks for their 360s and I want to build a couple for me for my 360 and mame etc so I'm going to start on mine first.

These are the two I am planning for me:

-----------------------------------------------------------------------------------------

Gundammed

I'm basing my sticks around the artwork for them. I buy quite alot of tee's from www.terratag.com. I have this image on a tee and they also sell artwork prints of the image:


I'm going to edit the image so its suitable for a CP to something like this:


I don't know anything about art programs (execpt paint  :D) and ive been meaning to learn so I figured this is as good a time as any. I imagine this should be a good image to use with vector magic.

I'm going to start with a basic sloped rectangular box. I'm going to use 12mm MDF and then case it with 3mm acrylic sheet. This adds up to 15mm so I can use white 5/8" t-moulding (with a ~0.4mm hangover eitherside).

I'm planning on using red and white acrylic round the edges and I'm going to cut it so that the suns rays extend onto the sides of the controller.

I'm going to use button bezels for my sticks similar to the ones I made for my cocktail:


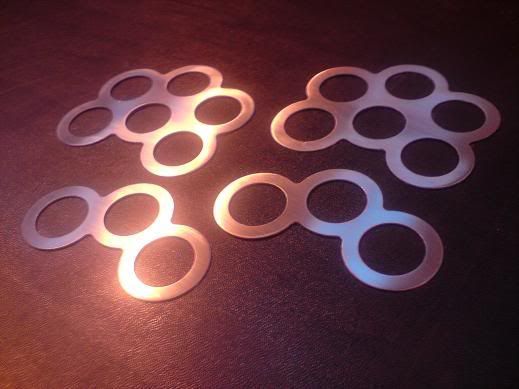
I CNC milled those ones but its too time consuming to make more. I've been getting some quotes to have them laser cut but I'm going to have to buy 20+ to make it cost effective per piece. For the mean time I'm going to make a brass template that I can use to template route some acrylic. I'm going to try some 3mm mirrored acrylic to see what that looks like. The edges will be beveled and polished.

I'll also be able to use the template to route other coloured bezels.

I'm going to use a stainless dustwasher similar to these that I made:


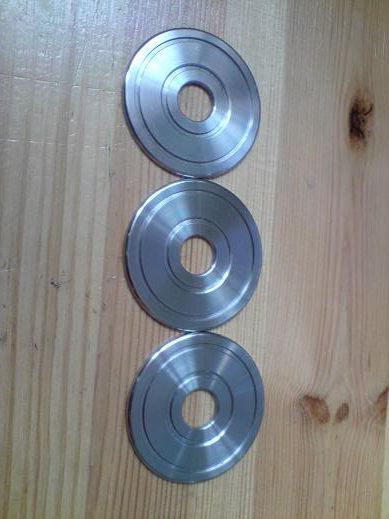
The only problem I can see is that the washer may block too much of the robots body/head, if this is the case I may make a clear acrylic washer.

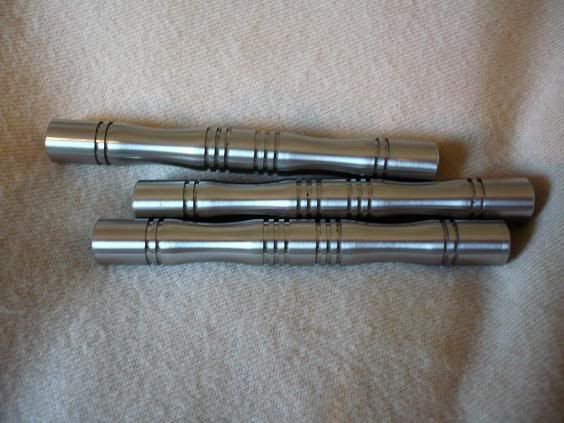
I'm also going to make some shaft covers similar to these drawer pulls I made for someone:


For controls I'm going to use a Sanwa JLF and red/white or both Seimitsu PS-14-GN-CP buttons.


I have some punches I made that I can use to punch the artwork out to place inside the button plunger.

I'm going to hack a wireless 360 controller and use a plug and charge kit and a USB pass through plate to charge it when required.

I'm also thinking of installing some red and white LEDs (possibly matching the suns ray positions) pointing downwards for some under CP downlighting. Does anyone know how much current you can draw from a 360 wireless pad?

I'm guessing I'll need three 'admin' buttons for MAME (start, coin and exit). I'll probably use the start, select and home buttons from the 360 pad. I'm going to mount these in counterbored holes in the back of the CP and I'm thinking of making some narrow stainless inset bezels to frame them.

-----------------------------------------------------------------------------------------

Celestial Being

I'm going to base this stick off a wallpaper i got from www.animepaper.net.


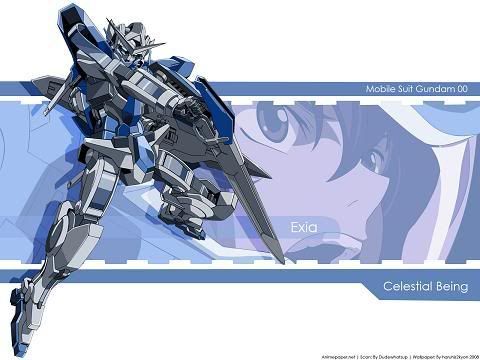
This will be similar to the other stick but I'm going to use blue and white acrylic to case the MDF. I'm going to use blue on the front and back and white on the sides.

As there is more detail on the right hand side of the image so I don't want to block it with a solid coloured button bezel. For this one I think I will make a clear or light blue tinted bezel. This is the light blue tinted acrylic:


I'll make an acrylic dustwasher out of the same material to match the button bezel

I'll use a JLF again and blue/white Seimitsu PS-14-GN-CP's and punch the artwork out for the inserts.

Ill use a hacked 360 wireless pad for this one too.

I may also install some blue and white LEDs for under lighting.

-----------------------------------------------------------------------------------------

I hoping to start the sticks in the next month or two. I'm getting my 1st house next month and I will finally have a garage workshop set up to work on these, cant wait :)

In the mean time I'm going to get the button bezel template made and play with some materials.

In the future I'm planning some more complex sticks and I'm going to get a spray booth set up to experiment with some flip and candy paints but I'm going to keep things simple(ish) for now.
« Last Edit: March 16, 2009, 10:41:34 am by Franco B »

csa3d

  • Trade Count: (+2)
  • Full Member
  • ***
  • Offline Offline
  • Posts: 872
  • Last login:March 07, 2011, 08:16:35 am
  • Will game for food
    • Galaxian Mame Conversion
Re: Franco's Custom Sticks
« Reply #1 on: January 17, 2009, 09:45:23 am »
I'm going to edit the image so its suitable for a CP to something like this:


Just be careful where you place the joystick if you use this image.  Might end up looking like the robot's  :censored:

 :laugh2:
-csa

Franco B

  • Trade Count: (+10)
  • Full Member
  • ***
  • Offline Offline
  • Posts: 3766
  • Last login:February 15, 2024, 09:14:06 am
Re: Franco's Custom Sticks
« Reply #2 on: January 17, 2009, 09:52:03 am »
 :laugh2:

He he yeah, luckily it should be a little higher so it won't look like a Robo-Dong  :D

somunny

  • Trade Count: (+8)
  • Full Member
  • ***
  • Offline Offline
  • Posts: 1618
  • Last login:June 17, 2025, 02:49:55 pm
  • Is it hot in here?
Re: Franco's Custom Sticks
« Reply #3 on: January 17, 2009, 09:57:54 am »
Wow!  Can't wait to see how these turn out.   8)

drawfull

  • Trade Count: (0)
  • Full Member
  • ***
  • Offline Offline
  • Posts: 463
  • Last login:May 18, 2012, 09:30:14 am
Re: Franco's Custom Sticks
« Reply #4 on: January 17, 2009, 11:38:18 am »
Franco, it's likely I'll have a requirement for many of these. can you pm me with ballpark costs and to discuss further please?

Cheers

thatitalian

  • Don't worry about the chicken, I feed my friends human all the time...
  • Trade Count: (0)
  • Full Member
  • ***
  • Offline Offline
  • Posts: 887
  • Last login:March 27, 2018, 10:52:37 am
  • The Revolution Is Coming...
Re: Franco's Custom Sticks
« Reply #5 on: January 17, 2009, 06:22:59 pm »
Robo-Dong  :D

 :laugh2: :laugh2: :laugh2:

What is even funnier is that I am watching Transformers!

I love those dustwashers and shafts!........ are those mine by any chance? ;D

Kaytrim

  • I'm too nice a guy
  • Trade Count: (+4)
  • Full Member
  • ***
  • Offline Offline
  • Posts: 2095
  • Last login:September 22, 2015, 04:11:30 pm
Re: Franco's Custom Sticks
« Reply #6 on: January 17, 2009, 08:44:04 pm »
Subscribing to this thread.  Franco I anxiously await your progress and updates.

Michael

Franco B

  • Trade Count: (+10)
  • Full Member
  • ***
  • Offline Offline
  • Posts: 3766
  • Last login:February 15, 2024, 09:14:06 am
Re: Franco's Custom Sticks
« Reply #7 on: February 18, 2009, 11:42:43 am »
Well still no woodwork as ever as I'm relocating next weekend and everything is packed up. I have been busy working on some tooling etc to make the CPs accurate and easier to produce.

I have made the brass template to template route the acrylic button bezels. I've been waiting ages to get this on the machine but I have finally got it done. Ignore the smaller holes for now:


The hole positions are an exact replica of the 'standard' Jap layout. (8th one down on the slagcoin layouts page IIRC). The diameter of the circles that make up the outer profile is 43mm which will leave a 5mm band between the buttons actual bezel and the acrylic button bezel.

I can use the template to template route the bezels before putting a slight bevel on the outer edge before polishing with novus.

The template will also act as a drilling jig to accurately drill the hole positions. This is important as the holes in the MDF etc need to line up perfectly with the holes in the button bezel so that the buttons go through.

I made the holes 30.1mm so that they will guide a 30mm forstner bit (for jap buttons). I may need to make some panels with Happ etc buttons that require a 1 1/4" (28mm) hole so I made some sleeves that reduce the diameter down to 28.1mm. I also made some sleeves with a 2mm hole for finding the exact center of the holes for other processes.

Pic of the template with 28mm forstner bit in 28.1mm sleeve, 30mm forstner bit in template and 2mm drill in 2mm sleeve:


The two smaller holes are for clamping the template to the MDF. When using the Jap snap in buttons there will be nothing to clamp the 3mm acrylic to the CP so I'm going to bond some flat M5 machine screws (see further down) to the back of the button bezels which will then hold the acrylic to the CP.

I'm also going to use the flat machine screws to bolt the JLF sticks to the CP. The JLF will be top mounted and the mounting plate needs to be as close to the top of the CP to maintain the joystick shaft length. I couldn't find and flat head screws with a thin enough head so I bought some M5x16 hexed dome head machine screws and faced them to leave a 1mm thick head. Here is a pic of the faced screws next to a stock one:


You can also see the M5 dome headed nut I'm using to bolt the JLFs to the CPs. They are about 5 times  more expensive than standard M5 nuts but they will look pretty :)

This is a pic of the faced M5 screws in position:


One problem I have found is that mounting the joys like this will mean that the JST connector will foul on the nuts as can be seen below:


To resolve this I'm sourcing some vertical JST pins which I'm going to solder in the place of the stock ones.

Ive also made some 11mm stainless 'candy cane' sleeves for the JLFs and matching washers. The washers have a bore of 11.5mm which allows the shaft to move freely but so that there isn't a huge gap between the two:


You can see that the scroll is offest from the middle of the stick. This is because the sleeve fits right down to the nylon elbow of the joystick:


If the scroll was central the lower part would be hidden by the 3mm acrylic CP top so I offset it so that when the acrylic is applied the scroll will be central which should look something like this:


Ive also received my buttons from arcadeshop.de. I bought six red PS-14-GN-CP's, six white PS-14-GN-CP's and twelve translucent snap in PS-14-K's as I haven't decided which colour combo's to use yet. I also picked up some PCB feet whilst I was at it. It turned out to be pretty damn expensive (~£80) for the whole lot due to the crap £>Euro rate but I didn't want to risk import taxes by going though lizard lick.


They also included a nice suprise in the package, a DK lighter which I think is the coolest thing ever  ;D (yes I'm easily pleased!):


I'm still going with the red and white gundam stick but I have changed my mind for the 2nd stick. I'm going to make a CP covered and edged with real carbon fibre. I can get some 3M self adhesive 0.012" (0.3mm) thick CF which should look pretty slick:


I'm going to use 5/8" chrome pin stripe t-moulding and stainless bits and bobs here and there. I'm also going to use the translucent PS-14-K's and cut out carbon fibre discs to fit in them. A little blue LED under CP lighting should finish it off nicely.

I've also been investing in some new tooling for my soon to be workshop! I picked up a scroll saw this morning to rough out the button bezels amongst other things:


Its only £39 at the moment from screwfix if anyone is after one.

I also picked up a pair of 1800w routers yesterday. I'm going to make a new router table to permanently mount the routers in as I'm always swapping between two or three bits and its a PITA swapping all of the time. I'm also going to add a micro adjustable fence to it and a hinged table top for ease of tool changes when required. I just need to get a table saw and then I'm good to go! :)


« Last Edit: February 18, 2009, 11:46:13 am by Franco B »

thatitalian

  • Don't worry about the chicken, I feed my friends human all the time...
  • Trade Count: (0)
  • Full Member
  • ***
  • Offline Offline
  • Posts: 887
  • Last login:March 27, 2018, 10:52:37 am
  • The Revolution Is Coming...
Re: Franco's Custom Sticks
« Reply #8 on: February 18, 2009, 12:31:38 pm »
To resolve this I'm sourcing some vertical JST pins which I'm going to solder in the place of the stock ones.

Ive also made some 11mm stainless 'candy cane' sleeves for the JLFs and matching washers. The washers have a bore of 11.5mm which allows the shaft to move freely but so that there isn't a huge gap between the two:


You can see that the scroll is offest from the middle of the stick. This is because the sleeve fits right down to the nylon elbow of the joystick:

That is exactly what I am after! :applaud:

I will anxiously await delivery  >:D

Franco B

  • Trade Count: (+10)
  • Full Member
  • ***
  • Offline Offline
  • Posts: 3766
  • Last login:February 15, 2024, 09:14:06 am
Re: Franco's Custom Sticks (Update: Tooling, JLF Sleeves etc..)
« Reply #9 on: February 18, 2009, 12:55:35 pm »
Hey buddy. I found your bits yesterday when looking through my boxes. Thats the problem I have at the moment I have about a million boxes and its so hard to find anything. I just need to get your buttons drilled this week and Ill get it all sent out to you  :cheers:

How many buttons did you send me? I seem to have about a brazillion translucents at home.

thatitalian

  • Don't worry about the chicken, I feed my friends human all the time...
  • Trade Count: (0)
  • Full Member
  • ***
  • Offline Offline
  • Posts: 887
  • Last login:March 27, 2018, 10:52:37 am
  • The Revolution Is Coming...
Re: Franco's Custom Sticks (Update: Tooling, JLF Sleeves etc..)
« Reply #10 on: February 18, 2009, 01:27:07 pm »
How many buttons did you send me? I seem to have about a brazillion translucents at home.

---fudgesicle--- knows! :dizzy:

I will have a look at my order and find out!

Stuff looks awesome btw!

Cheers bud!

EDIT: According to my calculations it should be 31? Let me know before you send though mate just to go through the items (from my previous e-mail).

This project is killing me!
« Last Edit: February 18, 2009, 01:31:48 pm by thatitalian »

javeryh

  • Trade Count: (+1)
  • Full Member
  • ***
  • Offline Offline
  • Posts: 7959
  • Last login:Today at 05:37:37 pm
Re: Franco's Custom Sticks (Update: Tooling, JLF Sleeves etc..)
« Reply #11 on: February 18, 2009, 02:06:58 pm »
Looks great as usual Franco.  The metal shaft looks really nice (and it's totally custom).  SFIV combined with all the awesome arcade stick projects going on around here are really really tempting me...

 :cheers:

MrMojoZ

  • Trade Count: (0)
  • Full Member
  • ***
  • Offline Offline
  • Posts: 291
  • Last login:June 25, 2009, 11:34:56 pm
Re: Franco's Custom Sticks (Update: Tooling, JLF Sleeves etc..)
« Reply #12 on: February 19, 2009, 10:33:13 am »
So when are you going to start selling us sleeves, dust washers and button bezels?  ;D

Kaytrim

  • I'm too nice a guy
  • Trade Count: (+4)
  • Full Member
  • ***
  • Offline Offline
  • Posts: 2095
  • Last login:September 22, 2015, 04:11:30 pm
Re: Franco's Custom Sticks (Update: Tooling, JLF Sleeves etc..)
« Reply #13 on: February 19, 2009, 10:39:35 am »
So when are you going to start selling us sleeves, dust washers and button bezels?  ;D

Give the guy a chance to get his home shop set up.  Heck give him a chance to move into his house.   :laugh2:

MrMojoZ

  • Trade Count: (0)
  • Full Member
  • ***
  • Offline Offline
  • Posts: 291
  • Last login:June 25, 2009, 11:34:56 pm
Re: Franco's Custom Sticks (Update: Tooling, JLF Sleeves etc..)
« Reply #14 on: February 19, 2009, 02:01:52 pm »
Pfft, priorities man! If he just lived on the floor of his workshop instead of needing a fancy house we wouldn't be in this mess.  :hissy:

thatitalian

  • Don't worry about the chicken, I feed my friends human all the time...
  • Trade Count: (0)
  • Full Member
  • ***
  • Offline Offline
  • Posts: 887
  • Last login:March 27, 2018, 10:52:37 am
  • The Revolution Is Coming...
Re: Franco's Custom Sticks (Update: Tooling, JLF Sleeves etc..)
« Reply #15 on: February 19, 2009, 02:43:24 pm »
Pfft, priorities man! If he just lived on the floor of his workshop instead of needing a fancy house we wouldn't be in this mess.  :hissy:

 :laugh2: :laugh2: :laugh2:

They look so awesome though! Wouldn't it be cool if you could have a plastic insert so you could add light within the shaft!

Franco B

  • Trade Count: (+10)
  • Full Member
  • ***
  • Offline Offline
  • Posts: 3766
  • Last login:February 15, 2024, 09:14:06 am
Re: Franco's Custom Sticks (Update: Tooling, JLF Sleeves etc..)
« Reply #16 on: February 19, 2009, 02:54:28 pm »
Pfft, priorities man! If he just lived on the floor of his workshop instead of needing a fancy house we wouldn't be in this mess.  :hissy:

Well I could sleep on the floor but I may get arrested as the property isn't ours yet  ;D

We move in next weekend can't wait. I think my GF is going to forget what I look like hehe.

I will be offering the bezels shortly. I can make them out of any of the clear, coloured, tinted or mirrored acrylics from [this] site. I think the mirrored 3mm will look pretty sweet, thats what im going to use for the carbon fibre sticks button bezel  8)

I'll also be including an MDF drilling template (28 or 30mm) to drill the holes in your CP so that the bezels match up exactly.

Dust washers and sleeves will also be coming soon once I have got some production quotes.  ;)

Kaytrim

  • I'm too nice a guy
  • Trade Count: (+4)
  • Full Member
  • ***
  • Offline Offline
  • Posts: 2095
  • Last login:September 22, 2015, 04:11:30 pm
Re: Franco's Custom Sticks (Update: Tooling, JLF Sleeves etc..)
« Reply #17 on: February 19, 2009, 04:56:59 pm »
What would be really neat is if the colored bezel (translucent) was inserted into a piece of clear acrylic.  Maybe also include a 1mm black barrier so the acrylic would be flush to the rest.  Then when lit from below it won't bleed light to the rest of the top.

bling bling  :dizzy:

Michael

Franco B

  • Trade Count: (+10)
  • Full Member
  • ***
  • Offline Offline
  • Posts: 3766
  • Last login:February 15, 2024, 09:14:06 am
Re: Franco's Custom Sticks (Update: Tooling, JLF Sleeves etc..)
« Reply #18 on: February 19, 2009, 05:01:48 pm »
Have you been reading my mind bud??!  :)

I'm actually making a negative profile template of the button bezel so I can make pretty much what you are talking about. I was thinking of having a solid colour CP with a backlit clear/tinted bezel  8)

Kaytrim

  • I'm too nice a guy
  • Trade Count: (+4)
  • Full Member
  • ***
  • Offline Offline
  • Posts: 2095
  • Last login:September 22, 2015, 04:11:30 pm
Re: Franco's Custom Sticks (Update: Tooling, JLF Sleeves etc..)
« Reply #19 on: February 19, 2009, 05:06:48 pm »
I love bling on joysticks buddy.  I have one stick that is in process that this just might be required.  ;)  Hit me up via MSN.

Michael

Franco B

  • Trade Count: (+10)
  • Full Member
  • ***
  • Offline Offline
  • Posts: 3766
  • Last login:February 15, 2024, 09:14:06 am
Re: Franco's Custom Sticks (Update: Carbon Fibre Fun!)
« Reply #20 on: March 16, 2009, 11:28:58 am »
Well I've finally moved into our new place and I finally have my workshop set up :)

I had to put some more power points and strip lights in but we're good to go now. I also mounted my pillar drill, scroll saw and I've just bought a table saw. I also had some old speakers kicking about so I have a nice sound system in there too.

It's not the best shop in the world but its 1000x better than what I had before :)

I thought I had a pic on my phone but its appears I haven't, I'll get one up later.

Anywaaaaaaaaay,

I've started on the carbon fibre stick first. I top mounted my JLW in some 12mm MDF. I did a little guide [here].


I've made the CP as small as compact as possible while still retaining a decent area to rest my palm etc. I think the panel is approx 8"x11".

I used the brass template I made as a jig to drill the hole positions. They're is only about 0.002" clearance between the template and the forsnter bits so the holes should be well within 0.004" of the dimensions on slagcoin:


I used the back door template from pinky to route the radius on the corners:


Ive made the four sides out of 12mm MDF too. I was going to have a 10 degree slant but it looked too steep so I went with 5 degrees in the end.


I used the age old trick of using one side of the CP base identical to the other one by template routing them:


I'm using some 0.012" thick genuine carbon fibre with a 3M adhesive backing to face the CP top and the sides. I was a bit worried about how well it would cut but it routed and drilled fairly easily. I was also worried about the edges fraying but it has held up pretty well.


It would be too expensive to cover the inside of the stick with real CF but I have some CF effect vinyl which I'll use just to keep everything pretty.

I made some hardened steel punches to punch out inserts for the buttons but I found it actually works better as a hole saw:


I made a bezel out of 3mm pink acrylic to frame the buttons. I'll be using 3mm thick mirrored acrylic but I used a spare bit of pink I had laying around to practise on:


For the two 'admin' buttons I'm going to be using two Bulgin blue LED illuminated 'vandal' buttons which will be located on the front panel:


The ball top will be blue LED lit and I'm going to try to get some JLF shafts made but with an extension on the bottom to hold a plug and 3.5mm jack so that the joystick can spin freely.


I think that's about it for now. I've bought some 360 wireless pads and I'm going to have a go at hacking them tonight, wish me luck!  :)


thatitalian

  • Don't worry about the chicken, I feed my friends human all the time...
  • Trade Count: (0)
  • Full Member
  • ***
  • Offline Offline
  • Posts: 887
  • Last login:March 27, 2018, 10:52:37 am
  • The Revolution Is Coming...
Re: Franco's Custom Sticks (Update: Carbon Fibre Fun!)
« Reply #21 on: March 16, 2009, 12:41:39 pm »
Well I've finally moved into our new place and I finally have my workshop set up :)

I officially hate you......

But I can't do anything but love your work! Awesome job as ever and well done on the move!

javeryh

  • Trade Count: (+1)
  • Full Member
  • ***
  • Offline Offline
  • Posts: 7959
  • Last login:Today at 05:37:37 pm
Re: Franco's Custom Sticks (Update: Carbon Fibre Fun!)
« Reply #22 on: March 16, 2009, 05:03:17 pm »
 :dizzy:

It's just not fair.  I love when you say things like "only about 0.002" clearance" - you know, us humans can't perceive dimensions that small!   :cheers:

Cornchip

  • Trade Count: (+1)
  • Full Member
  • ***
  • Offline Offline
  • Posts: 228
  • Last login:December 27, 2023, 10:23:11 am
  • Thinking up more crap....
Re: Franco's Custom Sticks (Update: Carbon Fibre Fun!)
« Reply #23 on: March 16, 2009, 05:11:01 pm »
  Hi Franco. You can count on adding 35-40mm to the needed mounting depth if you use an extension to mount the 3.5mm audio jack. An upside to this is soldering the wires will be a little easier. I will warn you, keep the wires as short as possible before stuffing them inside the shaft. There isn't alot of room in there! Try 30 AWG " wrapping type" wire for the best results.

 I posted some pictures of this mod. Note in picture #2 the two 3mm set screws orientated 180 degrees apart that hold the extension on. I added matching center drill dimples to the lower end of the shaft below the cir clip (only around 5mm extra material below the cir clip is needed). Also note the material I used for the extension is called Black Delrin. I used this material as is not electrically conductive and works great with steel line jacks. I doubt this will be a problem for you as I see that your female jack is plastic.

 Cheers.. :cheers:

                Cornchip

parag0n

  • Trade Count: (0)
  • Full Member
  • ***
  • Offline Offline
  • Posts: 16
  • Last login:February 18, 2010, 05:13:24 am
Re: Franco's Custom Sticks (Update: Carbon Fibre Fun!)
« Reply #24 on: March 16, 2009, 05:11:34 pm »
Where is that cable / connector from? is it a 4-core circular one as it looks?

Looks perfect for my evil RGB magstick plus plans

Cornchip

  • Trade Count: (+1)
  • Full Member
  • ***
  • Offline Offline
  • Posts: 228
  • Last login:December 27, 2023, 10:23:11 am
  • Thinking up more crap....
Re: Franco's Custom Sticks (Update: Carbon Fibre Fun!)
« Reply #25 on: March 16, 2009, 05:23:33 pm »
  That one there is a two pole. Both ends are available in 4 pole as well. I can imagine how much fun you'll have stuffing 4 wires into the shaft.   :P

 Cornchip.

Bender

  • Trade Count: (+1)
  • Full Member
  • ***
  • Offline Offline
  • Posts: 1919
  • Last login:November 28, 2016, 08:12:21 pm
    • Happ to Tron Conversion tutorial
Re: Franco's Custom Sticks (Update: Carbon Fibre Fun!)
« Reply #26 on: March 16, 2009, 06:40:35 pm »
4 wires aren't that hard to get in there and franco's got most of the hardware inside a special shaft, so only the jack will extend the length of the stick, pretty slick!

Cornchip

  • Trade Count: (+1)
  • Full Member
  • ***
  • Offline Offline
  • Posts: 228
  • Last login:December 27, 2023, 10:23:11 am
  • Thinking up more crap....
Re: Franco's Custom Sticks (Update: Carbon Fibre Fun!)
« Reply #27 on: March 16, 2009, 06:59:57 pm »
   Ok..must similar to his U360 concept shaft with the cir clip above the ball pivot. That would save an easy 20mm and be quite a bit simpler over all to make.  ;)

 Cornchip.

BASS!

  • Just have fun.
  • Trade Count: (+1)
  • Full Member
  • ***
  • Offline Offline
  • Posts: 837
  • Last login:August 10, 2013, 03:12:33 am
Re: Franco's Custom Sticks (Update: Carbon Fibre Fun!)
« Reply #28 on: March 17, 2009, 04:18:36 am »
That is so cool buddy! Carbon fiber + surrounds custom shaft and balltop, all for the love of the game! Awesome.

Bender

  • Trade Count: (+1)
  • Full Member
  • ***
  • Offline Offline
  • Posts: 1919
  • Last login:November 28, 2016, 08:12:21 pm
    • Happ to Tron Conversion tutorial
Re: Franco's Custom Sticks (Update: Carbon Fibre Fun!)
« Reply #29 on: March 17, 2009, 08:12:08 am »
   Ok..must similar to his U360 concept shaft with the cir clip above the ball pivot. That would save an easy 20mm and be quite a bit simpler over all to make.  ;)

 Cornchip.

I'm just speculating, knowing how Franco works

Cornchip

  • Trade Count: (+1)
  • Full Member
  • ***
  • Offline Offline
  • Posts: 228
  • Last login:December 27, 2023, 10:23:11 am
  • Thinking up more crap....
Re: Franco's Custom Sticks (Update: Carbon Fibre Fun!)
« Reply #30 on: July 16, 2009, 08:21:31 pm »
  Look's like we know how Franco works.  ::)

http://forum.arcadecontrols.com/index.php?topic=92736.msg991220#msg991220


 Cornchip.

Franco B

  • Trade Count: (+10)
  • Full Member
  • ***
  • Offline Offline
  • Posts: 3766
  • Last login:February 15, 2024, 09:14:06 am
Re: Franco's Custom Sticks (Update: Carbon Fibre Fun!)
« Reply #31 on: July 17, 2009, 01:19:41 am »
 ::)

That mod has nothing to do with low profile CPs such as these as the extension makes it far too long. That was just a quick and dirty mod for Haruman's cab and one of my Naomis.

A couple of months back I came up with a similar solution but the end of the plug is flush with the end of the end of the stock shaft. That was no mean feat as I had to redeisgn the whole shaft and plastic shaft components for it to work. I could have used that version for Haruman but it would have taken much longer to get all the parts together.

Edit: I forgot to add, the mod for Haruman was to get a 5mm RGB LED in the shaft.
« Last Edit: July 17, 2009, 01:22:37 am by Franco B »

Cornchip

  • Trade Count: (+1)
  • Full Member
  • ***
  • Offline Offline
  • Posts: 228
  • Last login:December 27, 2023, 10:23:11 am
  • Thinking up more crap....
Re: Franco's Custom Sticks (Update: Carbon Fibre Fun!)
« Reply #32 on: July 17, 2009, 09:00:00 am »
  Yes..your previous U360 concept  shaft (or this JLF)  was a better solution than this multi-piece mod. That's why I'm surprised you used it.  Call it quick and dirty as you will, but it is much easier to assemble when it comes to wiring the RGB and stuffing the wires back inside.

  Also don't forget to add a piece of tin foil between the plug and jack to assure a solid contact on that pole. The end pole has no spring contact inside the female socket, relying on the male end to be pulled inward by the spring contact of the first pole and others (contact is made face-to-face rather than on the diameter). The very act of moving the stick around can cause a very brief 'blink' caused by the momentary loss of contact. There is a better 4 pole socket available made completely from metal that has stronger contact force than the plastic socket. Also, there is a way to modify the metal socket so that the male end goes in with a strong 'click'. So many of these line jacks are poorly made as far as contact force is concerned for what you pay.I'll keep that to myself for now.  ;)

 Not meant to be a inflammatory post, but a helpful one. Fanboy's stay away.

 Cornchip.
« Last Edit: July 17, 2009, 09:02:26 am by Cornchip »

Franco B

  • Trade Count: (+10)
  • Full Member
  • ***
  • Offline Offline
  • Posts: 3766
  • Last login:February 15, 2024, 09:14:06 am
Re: Franco's Custom Sticks (Update: Carbon Fibre Fun!)
« Reply #33 on: July 17, 2009, 10:02:10 am »
   I have to ask myself why this is something new. I posted this mod in your 'Franco's Custom Sticks - Carbon Fiber Fun' thread. Your welcome.  ::)

 http://forum.arcadecontrols.com/index.php?topic=88571.0

 Cornchip.

Did you read the other thread completely? I never said that I had come up with anything new in in regards to using a jack. The idea has been around for ages. Slikstik we using it before they were dead and buried and I believe another member was using it before that. The whole point of that thread was getting an a bubble top lit brightly with an RGB LED.

  Yes..your previous U360 concept  shaft (or this JLF)  was a better solution than this multi-piece mod. That's why I'm surprised you used it.  Call it quick and dirty as you will, but it is much easier to assemble when it comes to wiring the RGB and stuffing the wires back inside.

I'm not sure what you mean. You say that the U360 concept shaft was a better idea but then say this version (which I called quick and dirty) is easier to wire/assemble.

If you mean that the u360 concept is easier to wire I'm think you are wrong IMO. I'm not sure if you read the thread correctly but these are not just ~3mm drilled shafts. They are new shafts with an M8 thread. The M8 thread means you can increase the bore size to ~5.2mm. This means you can slide a 5mm LED (with the shoulder removed) straight through the shaft. This makes wiring an assembly much easier than the u360 concept as you can just wire the LED>wires>socket up outside of the shaft and then just slide the whole thing through the shaft until the socket clips into position. I'm using some 4.5mm OD 4 core cable so the wirred assebly will be stiff enough to slide up the shaft.

Also don't forget to add a piece of tin foil between the plug and jack to assure a solid contact on that pole. The end pole has no spring contact inside the female socket, relying on the male end to be pulled inward by the spring contact of the first pole and others (contact is made face-to-face rather than on the diameter). The very act of moving the stick around can cause a very brief 'blink' caused by the momentary loss of contact. There is a better 4 pole socket available made completely from metal that has stronger contact force than the plastic socket. Also, there is a way to modify the metal socket so that the male end goes in with a strong 'click'. So many of these line jacks are poorly made as far as contact force is concerned for what you pay.I'll keep that to myself for now.  ;)

Thanks for the tip. I haven't wired mine up yet so I haven't had chance to test it (I've just made 174 dustwashers for an expo over here and have been flat out).  I would be surprised if the contact is lost when playing but I'll take your word for it as you have had more experience than me. Was it the Calrad sockets you had issues with?

Not meant to be a inflammatory post, but a helpful one. Fanboy's stay away.

 Cornchip.

Not taken as inflammatory. Thanks for the input/advice.

HaRuMaN

  • Supreme Solder King
  • Global Moderator
  • Trade Count: (+45)
  • Full Member
  • *****
  • Offline Offline
  • Posts: 10328
  • Last login:July 14, 2025, 02:03:34 pm
  • boom
    • Arcade Madness
Re: Franco's Custom Sticks (Update: Carbon Fibre Fun!)
« Reply #34 on: July 17, 2009, 10:51:50 am »
Did you read the other thread completely? I never said that I had come up with anything new in in regards to using a jack. The idea has been around for ages. Slikstik we using it before they were dead and buried and I believe another member was using it before that. The whole point of that thread was getting an a bubble top lit brightly with an RGB LED.

I don't think he did.   8)

(+_+)

  • Let me splain.
  • Trade Count: (0)
  • Full Member
  • ***
  • Offline Offline
  • Posts: 652
  • Last login:July 27, 2012, 09:00:32 pm
  • For I am ]{eyser Soze
Re: Franco's Custom Sticks (Update: Carbon Fibre Fun!)
« Reply #35 on: July 17, 2009, 11:28:52 am »
I knew I should have payed closer attention to what my grandfather and uncle used to do in their machine shop.

"They're is only about 0.002" clearance"

Thank god you had your micrometer handy. :lol
This plan is so perfect, it's retarded. -- Peter Family Guy