Main Restorations Software Audio/Jukebox/MP3 Everything Else Buy/Sell/Trade
Project Announcements Monitor/Video GroovyMAME Merit/JVL Touchscreen Meet Up Retail Vendors
Driving & Racing Woodworking Software Support Forums Consoles Project Arcade Reviews
Automated Projects Artwork Frontend Support Forums Pinball Forum Discussion Old Boards
Raspberry Pi & Dev Board controls.dat Linux Miscellaneous Arcade Wiki Discussion Old Archives
Lightguns Arcade1Up Try the site in https mode Site News

Unread posts | New Replies | Recent posts | Rules | Chatroom | Wiki | File Repository | RSS | Submit news


Author Topic: Power On issue - One button Start  (Read 5369 times)

0 Members and 1 Guest are viewing this topic.

thatitalian

  • Don't worry about the chicken, I feed my friends human all the time...
  • Trade Count: (0)
  • Full Member
  • ***
  • Offline Offline
  • Posts: 887
  • Last login:March 27, 2018, 10:52:37 am
  • The Revolution Is Coming...
Re: Power On issue - One button Start
« Reply #40 on: May 10, 2008, 12:54:53 pm »
OK, this is how my board looks like. I know, the quality is poor, my camera is rubbish!

So you just wired it up to the microswitch on the pushbutton as normal. That I can do!

My only concern is just soldering the wires to the correct part of the PCB. Anyone reckon they could figure out where this is?

I reckon the power is the one circled in red below and the ground is the one circled in green.

   o o o o o o o
o o o o o o o o

This is my diagram (kinda) of the solder bits at the bottom of the PCB, the one where the ribbon cable connects to.

thatitalian

  • Don't worry about the chicken, I feed my friends human all the time...
  • Trade Count: (0)
  • Full Member
  • ***
  • Offline Offline
  • Posts: 887
  • Last login:March 27, 2018, 10:52:37 am
  • The Revolution Is Coming...
Re: Power On issue - One button Start
« Reply #41 on: May 11, 2008, 04:14:53 am »
 :dunno

thatitalian

  • Don't worry about the chicken, I feed my friends human all the time...
  • Trade Count: (0)
  • Full Member
  • ***
  • Offline Offline
  • Posts: 887
  • Last login:March 27, 2018, 10:52:37 am
  • The Revolution Is Coming...
Re: Power On issue - One button Start
« Reply #42 on: May 13, 2008, 09:19:46 am »
Any takers?

You know I will get a reply when I say "well I did it, and it went wrong" lol.

Zobeid

  • Trade Count: (0)
  • Full Member
  • ***
  • Offline Offline
  • Posts: 238
  • Last login:April 21, 2021, 10:36:32 pm
Re: Power On issue - One button Start
« Reply #43 on: May 13, 2008, 01:24:27 pm »
Any takers?

You know I will get a reply when I say "well I did it, and it went wrong" lol.

In an earlier message I did suggest soldering directly to the legs of the tiny pushbutton.  That would still be the most straightforward thing.

Not sure what else you need that hasn't been covered.


thatitalian

  • Don't worry about the chicken, I feed my friends human all the time...
  • Trade Count: (0)
  • Full Member
  • ***
  • Offline Offline
  • Posts: 887
  • Last login:March 27, 2018, 10:52:37 am
  • The Revolution Is Coming...
Re: Power On issue - One button Start
« Reply #44 on: May 14, 2008, 04:40:49 am »
The only problem is what part of the legs? 2 wires (ground and the other one), 4 legs!

Excuse me if I sound like an idiot, my wiring is only as good as fitting plugs!

I'm not bad with a jig though.....

Zobeid

  • Trade Count: (0)
  • Full Member
  • ***
  • Offline Offline
  • Posts: 238
  • Last login:April 21, 2021, 10:36:32 pm
Re: Power On issue - One button Start
« Reply #45 on: May 14, 2008, 08:34:50 am »
The only problem is what part of the legs? 2 wires (ground and the other one), 4 legs!

You do realize the little traces on the circuit board carry electricity, right?  :D


When the pushbutton on the PCB is pressed it makes a connection between those two traces.  You just need to connect your button so it does likewise.


thatitalian

  • Don't worry about the chicken, I feed my friends human all the time...
  • Trade Count: (0)
  • Full Member
  • ***
  • Offline Offline
  • Posts: 887
  • Last login:March 27, 2018, 10:52:37 am
  • The Revolution Is Coming...
Re: Power On issue - One button Start
« Reply #46 on: May 14, 2008, 09:23:43 am »
Electricity! What the hell is that!?

Lol, only joking!

Right, I see what you mean. So I just split the wire to connect to the two legs i.e. 2 wires split = 4 wires to connect to the legs.

Or just strip the wire to run and connect to both legs.

Am I right?
« Last Edit: May 14, 2008, 09:29:10 am by thatitalian »

Zobeid

  • Trade Count: (0)
  • Full Member
  • ***
  • Offline Offline
  • Posts: 238
  • Last login:April 21, 2021, 10:36:32 pm
Re: Power On issue - One button Start
« Reply #47 on: May 14, 2008, 10:16:30 am »
You're making it more complicated than it needs to be.  Just connect your wire A to one of the spots marked in red -- any of them, doesn't matter which one.  Then connect your wire B to one of the spots marked in black.  Then you're done.


thatitalian

  • Don't worry about the chicken, I feed my friends human all the time...
  • Trade Count: (0)
  • Full Member
  • ***
  • Offline Offline
  • Posts: 887
  • Last login:March 27, 2018, 10:52:37 am
  • The Revolution Is Coming...
Re: Power On issue - One button Start
« Reply #48 on: May 14, 2008, 11:37:55 am »
Okey dokey! Thanks for the help! Much appreciated! :cheers:

wbassett

  • Trade Count: (0)
  • Full Member
  • ***
  • Offline Offline
  • Posts: 424
  • Last login:October 05, 2024, 02:18:42 am
Re: Power On issue - One button Start
« Reply #49 on: May 17, 2008, 04:57:19 pm »
Maybe I'm looking at this in a very simplistic manner...

Right now my cab is running on an old AMD Thunderbird 1.2Ghz PC.  I bought it years ago when 1.2Ghz was pretty fast and one of the 'faster CPUs out there.  Unfortunately the motherboard has a PC Chips chipset, which aren't the best in the world. 

Anyway, my son gave me a PC that he couldn't get working, and ended up breaking one of the heatsink/fan mounts.  It's an Asus P5G-MX no frills motherboard with 2GB of ram and a 3.33GHz Celeron CPU, so this will be quite a jump in performance.  I spent $15 for a new heatsink/fan and it's sitting here formatting the 160GB drive I tossed in it. 

What I really like about it is it has an APM configuration in the BIOS that allows you to set the PC to automatically boot when power is restored.

When I put my cab together I knew I didn't want a power cable constantly dangling out of the back so I got a switch/outlet combo.  You can get this in black and a nice looking rocker type switch and not just a typical looking light switch.
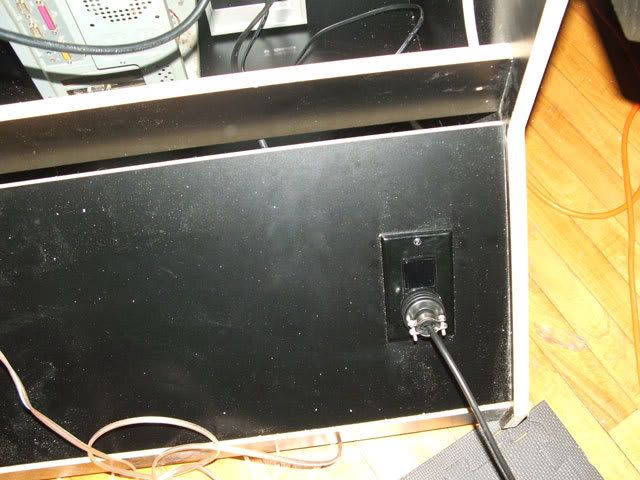

What I did was normally you can wire this up several ways, but common to all of them is AC power is connected to the terminals on the switch/outlet.  Instead what I did was I took a good but inexpensive surge protector power strip and cut the plug off and wired that to the switch.  Still, there is no power to the cab, but that's also easy and quick... take a power cord, pretty much any good quality three prong cord will do.  I used a PC power cord since I have a bazillion of them laying around.  I cut the end off that normally connects to a PC or monitor and I put another male plug on that end.

Now you can plug one end into the outlet on the switch/outlet on the back of the cab, and simply plug the other end into a wall outlet and presto... you now have power to your cab!  Flip the switch on the back of the can to turn the system on or off.

Okay for those like me and the Thunderbird (older PCs) there is still that nasty problem of having to hit the power button.  I too was ready to yank a switch out of an old PC case and wire it someplace on the cab for easy access.  I've seen some wire up relays, and other things into their power strips.  All cool and all work, but some seem a bit complicated and I know there are people out there that don't feel comfortable with some of the methods.

I believe in KISS- It's an old military term I heard over and over, Keep It Simple Stupid.  Using a PC that has APM capability is probably as easy and as simple as it gets.  I know, I know... who wants to run out and buy another PC?  Seeing that you can pick a newer PC up on Tiger or Newegg for around $150, it's something to look into.  The ones I have seen are refurbished, but I don't have any problem with a refurb as long as it has some type of return policy in case there is a problem.

TigerDirect and Newegg list the components, so you can look up the Motherboard and see if it as a power on BIOS setting, if so, you're $150-$200 will get you more than just a one button power on system, but most likely a faster CPU too.  Obviously this really only applies to those that have older PCs they are using.

So what do you do with that old PC now?  I'll use mine upstairs as a MAME testbed for roms before importing them to my cab... or... you can build another cab, after all it's already setup and running MAME right? ;)

Quick update... all formatted and I tested the 'Restore on AC Power loss' setting.  As others have mentioned, it works perfectly.  Combine this with a TV, PC monitor, or arcade monitor that comes on as soon as power is applied and you have a one button cab.

Now to get MAME and my roms loaded on this puppy and swap it out with the old PC. :)
« Last Edit: May 17, 2008, 05:59:06 pm by wbassett »