Hey guys. Sorry for my absence, for some reason my account got deleted as you may know so I will be posting from this account from now on.
dmworking247, I got the USB panel mounts from Maplin in the UK.
This is the link to them. I had a look around and found they are supplied by Neutrik USA. The part code is NAUSB.
This is the link to them on their site. They also supply them in black too.
They are in fact a USB gender changer from A>B. I got round this by buying some A>B cables so they will plug into the USB ports on the PC.
As for the stainless button bezels have you thought about spaying the bezels with chrome paint? I tried one quickly with some Plasticote enamel spray for you earlier and the result was quite good (I forgot to take a photo, sorry). I think with the correct surface prep and correct spaying they would look really nice, especially if lacquered afterwards.
Ok, now for the update, its fairly big as I haven't updated in a while. I haven't got a whole lot done on the main cabinet due to the weather (as anyone here in blighty will appreciate), I have also developed a rather acute Call of Duty 4 multiplayer addiction which I am trying to wean myself off! (My gamertag is Franimal 1 if anyone wants a kicking

)
I have managed to get some bits done where I can though (mainly at work where I seem to have more free time, or rather I haven't got an xbox, lol)
Ive got the three LED Wiz's mounted in the enclosures. They have been quite a slog but I'm really happy with the result. Here is a pic of them with their big bro IPAC4 enclosure:
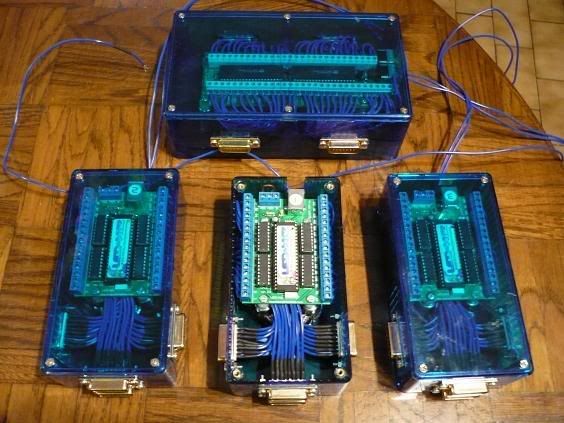
If anyone is doing this make sure you have a) Plenty of spare time, b) A dremel with lots of bits, c) small hands (no sausage fingers here!) and d) the patience of a saint!)
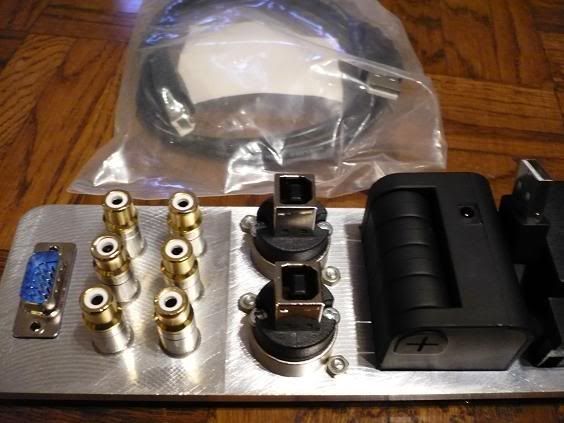
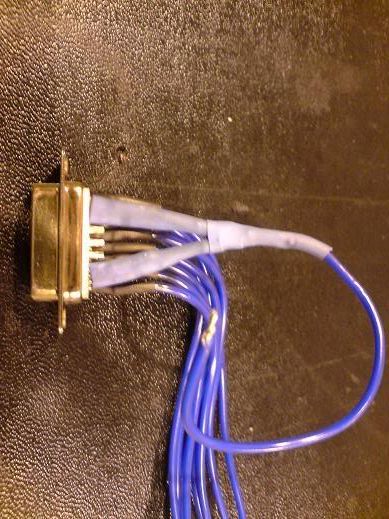
After discussing concerns of sending the daisy chained return from the cathodes through just one pin of the d subs I decided to bridge four spare contacts of each d sub together to increase the conductive area (thanks Daoldman, I believe I have you to thank for that idea, or possibly Unclet)
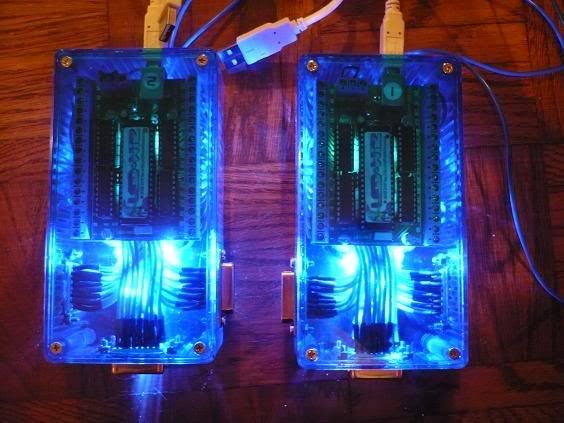
Ive got a gracious shot of a couple of them lit up too
It has been a lot of work doing them but It should save me time in the future if I need to do any maintenance on any part of the wiring. It will also allow me to easily swap CPs if I decide to make any extra CPs in the future (for trackball/spinners etc).
It will also make it easier to test the enclosures before I add them to the cab, which leads me nicely on to the other part that I have been working on (since yesterday, we'll forget about the other 5 weeks since my last post
lol)
I decided to make a test CP for a few reasons. Ill be able to use it to configure and test the LED Wiz's/enclosures and Ill also be able to use it as a wiring jig so I can wire each wire set up before transferring it to the final CPs. I thought it would also give me chance to try out a CP in case it brings up any problems which I can rectify before I build the final ones. I'm glad I did as it has already taught me one or two things.
Ok here's a few pics etc of the test CP build.
The first thing I did was to design a button array in Autocad. Once I was happy with how it looked I printed it out to 1:1 scale and then laid my fingers on it to test the spacing etc before tweaking it to suit. This is the array I finished with:
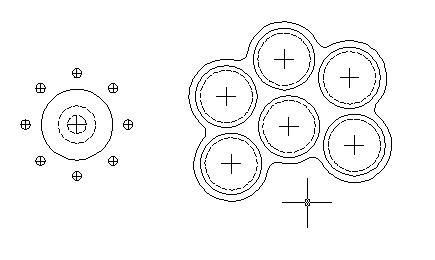
The offset profile around the buttons is the shape of the stainless button bezels I am going to make. They should look something like this when finished:
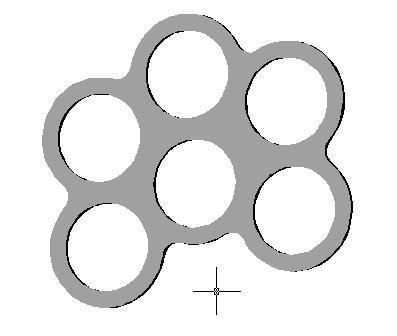
(Kinda looks like an alien knuckled duster! lol

)
I originally planned to have fairly thin panels but after placing the printed out template on a work surface I wasn't happy as there would be no wrist support which could get both annoying after extended play, plus I think it would affect the game play. Cocktails are not the most comfortable things to play at the best of the time so I think its best to make it as comfortable as possible.
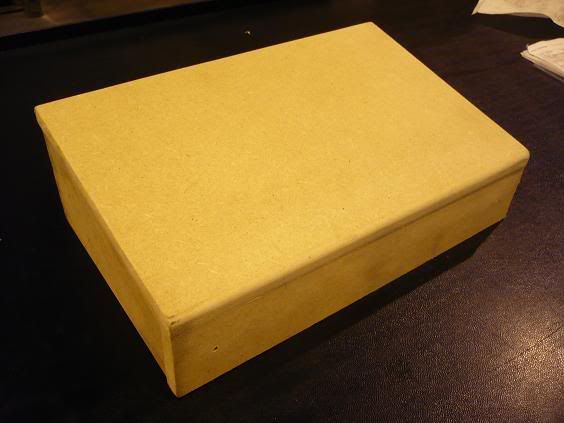
I placed the paper template on a work surface and adjusted it until I had enough wrist support. I then measured the distance and made a quick and dirty CP:
The panels are going to be bigger than first anticipated but the cab its self is going to be fairly big and should still look in proportion I think. Ill do a revised 3D model of the whole cab before I commit to anything.
The width of that panel is A4 sized, the horizontal CPs width will obviously be longer and I think the vertical CPS width will be slightly shorter, I just chose 'depth' A4 as some kind of happy medium. The button and joystick placement will still be the same so it will still function as a wring jig for all three panels.
I taped the 1:1 scale template to the CP and center punched the centers through the paper. I then drilled the holes on a pillar drill using some Forstner bits. I really am impressed with them, you get lovely clean cuts (especially for such a cheap set). The buttons are 27.8mm over the thread and so I used a 28mm (1/4" or thereabouts) cutter and the buttons slid in beautifully

I also drilled the holes for the Plexiglas tubes (5mm or so length) to be backlit by LEDs. I was expecting the plexiglass rod to be somewhere close to 5mm in diameter but it turns out in fact that it is 5.25mm which is a pain in the ass as the diameter of the LEDs s 4.9mm and so there is no real viable option in between. I ended up drilling the holes 5.2mm and the plexiglass tapped in nicely but obviously the LEDs were baggy. I wanted both to be a nice tight fit (without glue etc) so I have come up with a better idea.
I am going to insert 10mm plexi rod into the CP but have a hole to push fit the LEDs from the other side of the CP, this cross section will give you an idea:

I am going to have vinyl overlay over the top of the CP. I am going to get arrows printed on the overlay and then I will cut them out of the vinyl, revealing the plexi beneath:

(Imagine the dotted line is the hidden plexi circumference and the arrrow is the cut out section)
It should then look something like this once arrayed round the joystick:

I'm quite happy the LEDs and plexi rod are different sizes, otherwise I don't thing I would have thought of this.
Don't sweat guys, nearly finished now!
This is a pic of the 'finished' test CP:
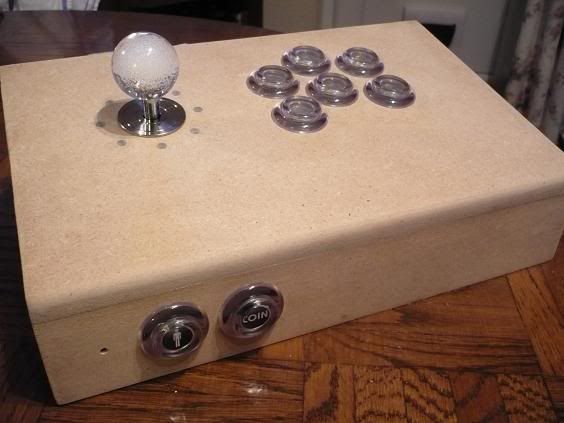
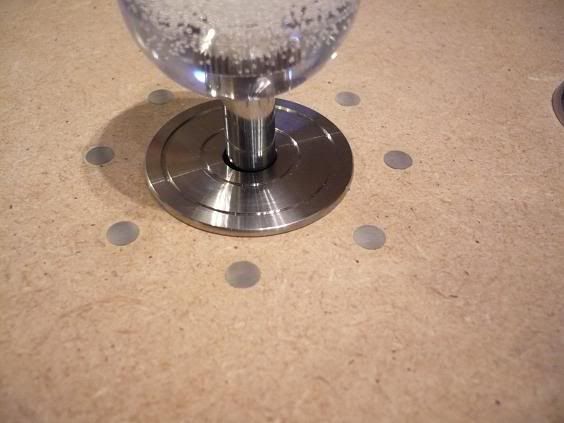
I also made some stainless dustwashers to replace the plastic fantastic stock ones:
Well I think that's about it, Ive probably forgotten something though. The only danger now is I will soon have a functional control panel which coud affect the progress of the rest of the build


 Home
Home Help
Help Search
 Login
Login Register

 Send this topic
 Print
Print Topic: Franco's Custom Cocktail (UPDATE: Wood cutting commences!! =) ) (Read 75585 times)


