Main Restorations Software Audio/Jukebox/MP3 Everything Else Buy/Sell/Trade
Project Announcements Monitor/Video GroovyMAME Merit/JVL Touchscreen Meet Up Retail Vendors
Driving & Racing Woodworking Software Support Forums Consoles Project Arcade Reviews
Automated Projects Artwork Frontend Support Forums Pinball Forum Discussion Old Boards
Raspberry Pi & Dev Board controls.dat Linux Miscellaneous Arcade Wiki Discussion Old Archives
Lightguns Arcade1Up Try the site in https mode Site News

Unread posts | New Replies | Recent posts | Rules | Chatroom | Wiki | File Repository | RSS | Submit news


Author Topic: Franco's Custom Cocktail (UPDATE: Wood cutting commences!! =) )  (Read 55165 times)

0 Members and 1 Guest are viewing this topic.

Franco

  • Guest
  • Trade Count: (0)
Re: Franco's Custom Cocktail (UPDATE: New wheels made and graphics idea)
« Reply #40 on: November 10, 2007, 08:42:16 am »
Another hard day at the office this morning ;)

As I said I wasnt really happy with the wheels I made previously so I made some wider ones as well as the threaded shafts that will screw into one of the cabs feet:


(apologies for the picture quality, I had to use my camera phone for these)

I also milled the slot in the cab foot to suit the wheels. The foot here is as it came off the machine after the profiling etc, I still need to mill/grind the sides and file/emery finish it. They will be nicely polished when they are complete  :)


(Note the ghetto bic spindle in place here, smooth! lol)

Im much happier with the chunkier wheels, I think they will look much nicer as well as supporting the table better and sholdnt damage the floor as easily as the thin ones would have.

My PC arrived today that I am using in the table so I had a quick looksie inside before firing it up.


Its a 3Ghz P4 with 512MB DDR RAM and a 80GB HDD that I got off a friend for a bargain £75 :) It should be plenty powerful enough for my needs. The MB is fairly small and should fit in my cab nicely.

Ive also had a couple of ideas for some graphics. If you look at the picture below you can see the white area behind the CP (ignore the CP/joystick heights etc for the moment)


Im thinking of using some 5mm blue tinted acrylic similar to this for it:


Im then thinking of having some white vinyl stuck to it with space invaders cut out of the vinyl to reveal the blue tinted acrylic behind it, kind of like this:


I would use different spacies, I just used the same one for speed. The vertical CPs would also have a couple of spacies on each. Im also thinking of back lighting the acrylic with an rectangular array of LEDs, controlled by one of the LED WIZs im going to use. It would have been nice to be able to light each spacey independantly but I dont have enough free outputs, even with two LED WIZs.

I thik it would be pretty cool to have the spacies gradualy pulse on and off at the start of the attract sequence before the rest of the sequence kicks in.  8)

Ive also had an idea for the coin/start bezels. Im thinking of having a space invaders 'lazer turret' vinyl on each of the bezels with the player number (1 or 2) cut out of it, kind of like this (excuse the crappy paint drawing but you will get the idea)


It would almost look like that the turrets are in position ready to zap those damn spacies!!

Any thoughts on any of this?

I was hoping to get on with the mock up today but my work mate was meant to bring me some hardboard in to use but he didnt come in so that will have to wait until next week.

At least I have the PC now so I can have a tinker with that :)

Franco

  • Guest
  • Trade Count: (0)
Re: Franco's Custom Cocktail (UPDATE: Stainless feet finished)
« Reply #41 on: November 15, 2007, 08:06:49 pm »
Well Ive finally got the feet finished just about. Ended up being more work then expected though. As I said I managed to break a tap when I was tapping one of the spindle holes. I had used an old tap that had been in the draw for god knows how long and I only found out after that we had about a dozen or so coated machine helix taps in the consignment cabinet afterwards, doh!

As I had broken a tap inside the hole I needed to get it spark eroded out to remove it beofre I could re-tap the hole. The real problem came when I went to erode the tap and I found out that the foot was too long to fit on the spark eroder and I wouldnt be able to erode it out. This gave me two options, either make a new foot from scratch or cut the foot in half, spark erode the new smaller piece and weld it back together.

I decided to go for the latter as it took almost a shift to mill the original feet out.

I cut the foot in half using a radiac disc saw which gave a nice clean 90degee cut. I also filed a nice size weld prep on the edges of the foot pieces to be welded back together:


I then spark eroded the broken tap out of one of the ends and re-tapped the hole before test fitting one of the splindles. I faced the end of the spindle off until the end of the spindle was flush with the end of the foot:


Once both spindle adjustments was complete I laid both pieces on an inspection table and clamped them together using ground parallels and G clamp to make sure they were as straight as possible:


I then took it to be welded back together. I cannot take any credit for this part but one of my work colleges did a sterling welding job and perfectly welded them back together, completely filling the weld prep and just slightly over filling it as requested so that it could be milled off in the  next operation. This is a picture of the welded foot together with the original 'plain' foot just before they were finish milled:


I then did a finish milling operation by just taking the minimum amount of mateial off each side of the feet (0.2mm, 0.008" or so) so that they would clean up to a high finish (in terms of milling). This is a picture of the finish milled feet:


The feet were then just deburred before i couldnt take it anymore and I had to have a 'mock' test of the feet in 'posistion':  :D


The 10mm gap may seem fairly big but I wanted to be able to clear any deep pile carpet etc that I come across, tilting the table to lift it will also bring the end of the foot closer to the floor.

I still need to drill and counter bore the holes that will attach it to the cab but I thought I would wait to do those until I have at least built the main shell of the cabinet so that I knw exactly where to posistion the holes.

All i need to do now is to file finish the feet (oh yeah, I need to build the cab at some point or have i forgotten that  ::)  ;D) No seriously, im itching to get on with the main build, im just enjoying the whole planning aspect so much. I know last time I built a cab as soon as I started the actual build I spent all of my time on it and finished it (fairly) fast so im just trying to get my moneys worth out of this cab.  :)  I do promise an actual build post soon though! Im just waiting for that monitor to arrive (long story) so I can start the mockups, etc.

« Last Edit: November 15, 2007, 08:14:57 pm by Franco »

leapinlew

  • Some questionable things going on in this room with cheetos
  • Trade Count: (+4)
  • Full Member
  • ***
  • Offline Offline
  • Posts: 7906
  • Last login:May 25, 2024, 06:17:23 pm
Re: Franco's Custom Cocktail (UPDATE: Stainless feet finished)
« Reply #42 on: November 16, 2007, 01:12:34 pm »
awesome work! I'm in for some rings too - maybe I can share the shipping with McCoy - you have PM!

BobbyG66

  • Trade Count: (0)
  • Full Member
  • ***
  • Offline Offline
  • Posts: 588
  • Last login:November 13, 2016, 11:52:09 am
  • Current project: Dodgeball
Re: Franco's Custom Cocktail (UPDATE: Stainless feet finished)
« Reply #43 on: November 16, 2007, 03:06:25 pm »
Very nice skillz!
Half of the people you meet are below average.

Franco

  • Guest
  • Trade Count: (0)
Re: Franco's Custom Cocktail (UPDATE: Stainless feet finished)
« Reply #44 on: November 16, 2007, 06:47:51 pm »
awesome work! I'm in for some rings too - maybe I can share the shipping with McCoy - you have PM!

PM replied  :)

Very nice skillz!

Thankyou. I can't take all the credit though, I have had some help from some work collegues but thanks  :)

Franco

  • Guest
  • Trade Count: (0)
Re: Franco's Custom Cocktail (UPDATE: Concept Art Idea)
« Reply #45 on: November 18, 2007, 10:22:58 am »
Ive been thinking about what to do in regards for art on the top of the table and Ive had a couple of ideas.

I was going to go for a blue cab with white t-moulding btu I think im going to revert to my original plan of black with chrome moulding and some blue accents to complement the blue LEDs I will be using.

With that in mind and following the space indavers ideas so far im possibly thinking of having some thing similar to the following. (Plesse note that these are just rough paint pictures, I dont have any particular graphical skills!)


(I have left the CPs blue here just so you can see them seperate to the top)

As you can see I would like to have a big space invader monster on the right hand side with possibly a score card on the left. Im also thinking of having an array of space invades at an angle some where on the surface (or possibly taking up the rest of the space). By the angular array I mean something similar to this:


I also had an idea of possible inserting 5mm frosted acrylic tubes into the table top and back lighting them behind with LEDs (the same idea as what im doing to light the rings around the joysticks) to create a star field affect kind of like this:


I will already be on my 3rd LED WIZ with the other LEDs I have planned and will have a fair few spare which I could use to light up most of the 'stars' individualy during the attract sequence.

Any thoughts on these ideas?

Grasshopper

  • Trade Count: (+1)
  • Full Member
  • ***
  • Offline Offline
  • Posts: 2380
  • Last login:November 08, 2023, 07:20:31 am
  • life, don't talk to me about life
Re: Franco's Custom Cocktail (UPDATE: Concept Art Idea)
« Reply #46 on: November 18, 2007, 11:09:53 am »
I like the graphics so far. Simple is almost always best IMHO. But personally I'd have control panels on all four sides of the table.

I know that strictly speaking you don't really need the 4th panel, and it would also add significantly to the cost, but I just think that a three sided cocktail table looks somehow unbalanced.

It also occurs to me that you could put rarely used controls like a trackball, spinner, or analogue joystick on the fourth panel. Or alternatively the fourth panel could be arranged in a Multi-Williams style layout.
"Patriotism is the last refuge of the scoundrel." - Samuel Johnson

Franco

  • Guest
  • Trade Count: (0)
Re: Franco's Custom Cocktail (UPDATE: Concept Art Idea)
« Reply #47 on: November 26, 2007, 08:12:57 pm »
Thanks for your input Grashopper, apoligies for replying late, I hadnt seen that anyone had replied to the post. Personaly I prefer the three sided look over the four. I wouldnt have a great deal of use for a fouth panel as I dont really play spinner or trackball games and the cab is going to be located against a wall which would stop it being readily used. Im hoping to make it so that the CPs can be easily removed for maintenance so I could always make another panel to swap over if needs be.

Ok, fairly big update now....

I received the monitor I bought off ebay last week. I asked the seller to package it carfully for me due to the weight of the thing and even payed him extra for packaging materials to make sure it arrived safe. I told him i wasnt too bothered about too much protection on the sides but make sure that the screen was well protected. Aparently his idea of packing a monitor is to wrap it in two layers of the smallest bubble wrap you can find, stick a couple of random pieces of thin cardboard on it and ship it with the monitor facing down!  :banghead:

Needless to say, this is how the monitor was when I unpacked it.


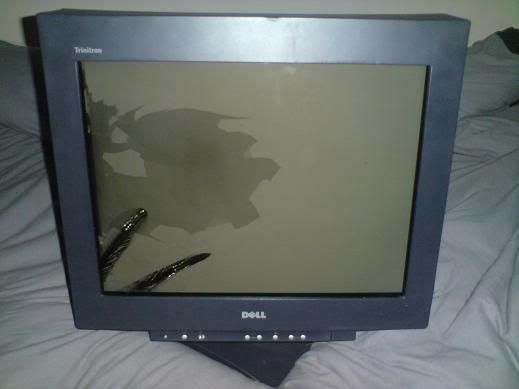
As you can see the screen has two lovely cracks it it :hissy: I spoke to the seller and he was very apologetic (for what good that does) and he offered to reimburse me of the item cost (a whole £4, woot!) I lost about £25 getting it
shipped to me but at least I can use it to practice on when test fitting the monitor and when removing the monitor stand etc before I let rip on the other identical monitor I have.

I have started to make a card board mock up of the cab but I havent uploaded the pictures yet but I will post them once I have.

Ive also purchased a few more parts for the project.

I couldnt decide between the Sanwa JLWs and the Sanwa JLFs so I bought a pair of each of them from Gremlin Solutions to compare.

Without having a CP to test them in they feel very similar just moving them in my hand apart from the JLW has a slightly longer stick. Im going to build a test CP to have a propper go with them but for the moment I think im going to use the JLWs in the vertical CPs and the JLFs in the horizontal CP. The JLWs are 4/8way adjustable so I will be able to swap them over for vertical 4way games even if it does mean i will have to remove the bottom of the CP to move the restrictor.

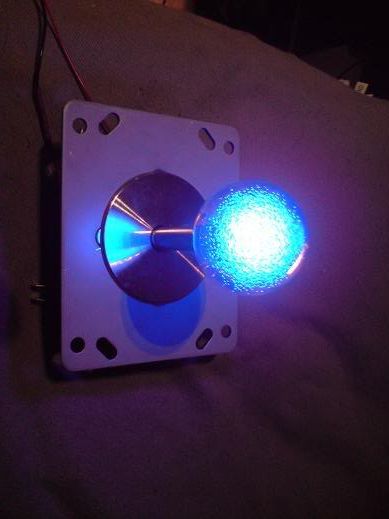
Ive also bought some clear Seimitsu ball tops from www.arcadeshop.de and I have made some hollow shafts for them to mount a blue LED in the top which will be controlled by one of the LED Wiz's. I have posted a 'how to' guide in the main forum of how to mod the shafts.


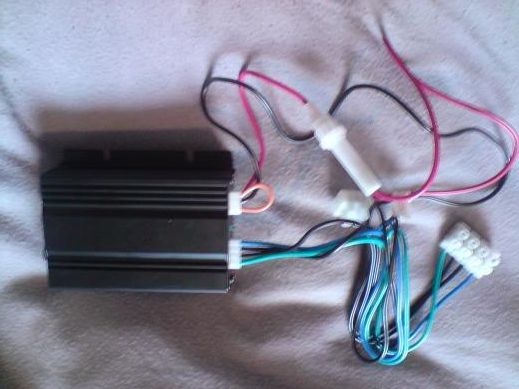
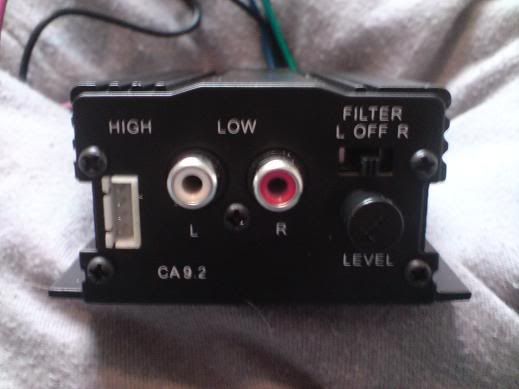
Ive bought some JBL 4" speakers for the cab. They are rated at 35w RMS and about 110 peak which should be plenty powerful enough for the cab. I also go a mini 12v amp off ebay rated at 30w RMS which will be ideal. They come ready wired with terminal blocks and Ill be able to run it off the PC PSU. I hooked it up to the speakers and a PSU and I must say they do give out decent sound for there size, im sure they will sound even better once mounted on the panel.


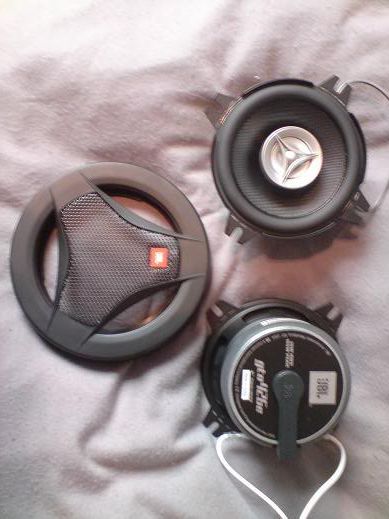
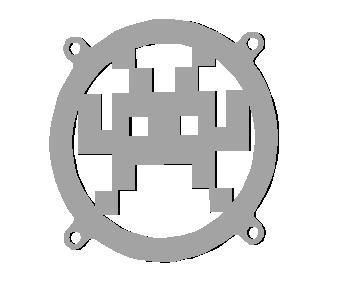
They came with some speaker grills but they dont exactly look authentic so I was thinking of putting some more plain grills on but ive kinda decided to go to the other extreme and make some space invaders grills for them.

This is just a quick mockup of what they may look like. Im going to use some 80mm case fans for cooling so I wil be able to use these as fan guards too. Im not really decided yet but im probably going to use a couple of 'spacies'
designs. Ive got some nice stainless mesh to go behind them which im planning on spraying blue.


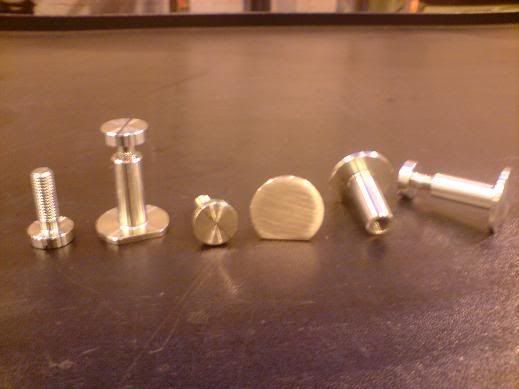
The only other progess I have made is that I have finaly once and for al finished the feet off!  :)

I made some bolts and some nuts with an over sized flange on them to secure the feet to the cab:


I test fitted the to a piece of scrap wood to show you how they will fit (imagine the wood is the base of the table) I am going to route out the area of the flange so they sit flush with the top of the base:


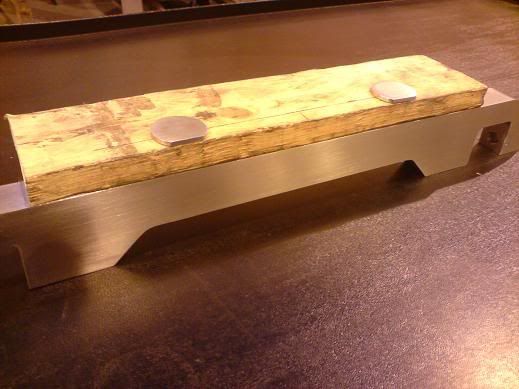
I also counterbored the bottom of the hole to hide the bolts:


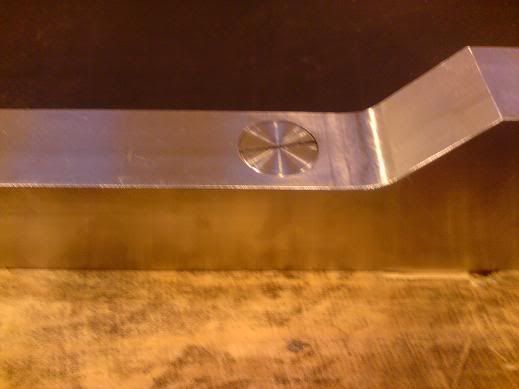
They have also had a nice emery finsh to give a brushed look and the wheels have been polished to make them stand out.

I also thought it would be a good idea to keep a record of the what I have spent. All the cost below include shipping/tax etc.

  • PC £90
  • Monitor (minus £4 back) £21
  • Amplifier £12.98
  • 100 LEDS+Resistors £10
  • JBL 4" Speakers £19.26
  • Joysticks (2x JLW, 2x JlF) £63.45
  • 4x Clear Balltops £16.23

Total = £232.92

I think thats about it for now, Ill update again once I have made some more progress....


metahacker

  • Trade Count: (0)
  • Full Member
  • ***
  • Offline Offline
  • Posts: 166
  • Last login:January 17, 2024, 03:09:39 am
Re: Franco's Custom Cocktail (UPDATE: LED Sanwas + more)
« Reply #48 on: November 26, 2007, 08:52:12 pm »
between the joysticks and base/wheel alone you are already well on your way to quite a magnificent product ;)

i really like the mini car amps with the jbl's.  do you have plans for a small sub?  that would round it out quite nicely... and it seems your small amp(s) have a cross over built in to facilitate this .... altho i'm sure the jbls will do just fine with those amps and no sub. 

im also curious to see whether power supply noise becomes an issue with the 12V line ... once hdd, vga, fans & an optical drive are added to the mix .. i think 12v car amps running off a pc psu are a great concept (something i'd like to do in my next build) , but i've seen some ppl have noise issues.


« Last Edit: November 26, 2007, 08:53:47 pm by metahacker »

Franco

  • Guest
  • Trade Count: (0)
Re: Franco's Custom Cocktail (UPDATE: LED Sanwas + more)
« Reply #49 on: November 26, 2007, 09:20:39 pm »
between the joysticks and base/wheel alone you are already well on your way to quite a magnificent product ;)

Thank you Sir  :)


i really like the mini car amps with the jbl's.  do you have plans for a small sub?  that would round it out quite nicely... and it seems your small amp(s) have a cross over built in to facilitate this .... altho i'm sure the jbls will do just fine with those amps and no sub

A sub would be nice but im pushing it space wise with those speakers as it is. For standalone speakers they should suffice quite nicely. If not then I already have planned a stainless I/O panel (RCA Audio/Video in/out, 'kettle' power plug, VGA in port for dreamcast, two/four usb ins for keyboard/mouse etc, two usb ports to connect the controls to xbox 360 pads inside the cab so I can use arcade contols but on the big screen, or even use the RCA audio video in and play xbox on the PC monitor, plus a couple of other I/O things im forgetting at this time) so I can always connect the table to the rest of my main sound system. Im quite liking the idea of the video out so people watching can watch the action on the cocktail relayed on the big screen TV  :)

im also curious to see whether power supply noise becomes an issue with the 12V line ... once hdd, vga, fans & an optical drive are added to the mix .. i think 12v car amps running off a pc psu are a great concept (something i'd like to do in my next build) , but i've seen some ppl have noise issues.

Sssssh! Dont tell me things like that!  ;)

No serioulsy I hope I wont have a problem, I had a big car amp and 6x9s in my last cab and didnt have a problem, saying that it was a much roomier cab so I may have problems on this one. Fingers x'd I wont but I will have to wait and see. Thanks for the heads up though.

theCoder

  • Trade Count: (0)
  • Full Member
  • ***
  • Offline Offline
  • Posts: 1035
  • Last login:September 20, 2010, 10:48:47 pm
  • I'll clean up my mess, Honey, when I'm done...
Re: Franco's Custom Cocktail (UPDATE: LED Sanwas + more)
« Reply #50 on: November 26, 2007, 10:58:28 pm »
You mentioned you are quickly running out of LED Wiz outputs.  Have you thought about putting two or three LEDs per line?  I think each output can handle at least 3 LEDs.

So you work in a shop that has an EDM machine?  Nice....

What about back lighting the monsters eyes with blue LEDs?

This is going to be cool.  Good luck with the build.

danny_galaga

  • Grand high prophet of the holy noodle.
  • Trade Count: (+1)
  • Full Member
  • ***
  • Offline Offline
  • Posts: 8447
  • Last login:Yesterday at 03:03:10 am
  • because the mail never stops
    • dans cocktail lounge
Re: Franco's Custom Cocktail (UPDATE: Concept Art Idea)
« Reply #51 on: November 27, 2007, 02:19:17 am »


Needless to say, this is how the monitor was when I unpacked it.


personally i would never get something like a monitor on ebay, etc if it means being freighted. just too risky. there's normally something cheap to be found locally, but i guess that's what you'll be doing now  ;)


ROUGHING UP THE SUSPECT SINCE 1981

Franco

  • Guest
  • Trade Count: (0)
Re: Franco's Custom Cocktail (UPDATE: LED Sanwas + more)
« Reply #52 on: November 27, 2007, 04:04:43 am »
You mentioned you are quickly running out of LED Wiz outputs.  Have you thought about putting two or three LEDs per line?  I think each output can handle at least 3 LEDs.

So you work in a shop that has an EDM machine?  Nice....

What about back lighting the monsters eyes with blue LEDs?

This is going to be cool.  Good luck with the build.

I had thought about doubling some of the LEDs up but its not everyday im going to build a Cocktail table so I thought I would spend the extra, its only the price of four packs of cigarattes for a third one. Personally for me it will make all the difference for me to be able to light each LED independantly. I know if I did end up cutting back I would be annoyed at myself at the end for cheaping out. FYI the LED Wiz can handle 15+ LEDs per output  :o

We actually have quite a few EDMs on site, that one was just a couple of macines down from me. About 5 minutes after I had chopped the leg in half I found out we had a large one attached to a 3m radial arm drill that would have been able to errode it as i was, doh! There are 2000+ people that work at our place. Ive been there 9 years and im still finding out about what machines etc we have.

You probably wont beleive me but I did have that same idea about lighting the spacies eyes (I thought I had posted it). Great minds think alike eh?  :) The plan is to insert acrylic etc wedges in the table top and light them the same way I have my joys.  Ill program the Wiz's so that the monsters eyes throb on and off with the other spacies at the start of the attract sequence  8)


Needless to say, this is how the monitor was when I unpacked it.


personally i would never get something like a monitor on ebay, etc if it means being freighted. just too risky. there's normally something cheap to be found locally, but i guess that's what you'll be doing now  ;)

Yeah, you live and learn  :-\ I though it would be worth a punt as I won the auction at such a low price. I did actually buy my other (identical) monitor of ebay and that came shipped in a big double walled box with loads of polystyrene etc. It just depends whos packing it, personally I take pride when im packing things for people but some people either dont have a clue or dont give a ---steaming pile of meadow muffin---. They do seem to pop up fairly frequently though so im hoping to find one I can pick up locally.

Grasshopper

  • Trade Count: (+1)
  • Full Member
  • ***
  • Offline Offline
  • Posts: 2380
  • Last login:November 08, 2023, 07:20:31 am
  • life, don't talk to me about life
Re: Franco's Custom Cocktail (UPDATE: LED Sanwas + more)
« Reply #53 on: November 27, 2007, 02:45:04 pm »
Incidentally Franco, have you ever seen GSXRMovistar’s concept pictures for his cocktail cabinet? Like you he went for the chrome and translucent buttons/joystick look.

http://forum.arcadecontrols.com/index.php?topic=11695.40

I'm not sure if he ever built it but it's been a major inspiration to me. It's a work of art. Probably the nicest looking cocktail I've ever seen.
"Patriotism is the last refuge of the scoundrel." - Samuel Johnson

Franco

  • Guest
  • Trade Count: (0)
Re: Franco's Custom Cocktail (UPDATE: LED Sanwas + more)
« Reply #54 on: November 27, 2007, 04:09:35 pm »
Wow, thats beautiful!  :o  :)

Thanks for the link, I hadnt seen it before. It gives me an idea of what mine should look like (colour wise).


Kaytrim

  • I'm too nice a guy
  • Trade Count: (+4)
  • Full Member
  • ***
  • Offline Offline
  • Posts: 2095
  • Last login:September 22, 2015, 04:11:30 pm
Re: Franco's Custom Cocktail (UPDATE: LED Sanwas + more)
« Reply #55 on: November 27, 2007, 04:39:37 pm »
Franco,

That is some serious metal work there.  :cheers:  Too bad about the monitor.  :cry:  Can't wait to see this thing get a case.

TTFN
Kaytrim

spacies

  • Trade Count: (0)
  • Full Member
  • ***
  • Offline Offline
  • Posts: 934
  • Last login:February 19, 2015, 03:40:49 am
Re: Franco's Custom Cocktail (UPDATE: LED Sanwas + more)
« Reply #56 on: November 27, 2007, 11:25:51 pm »
I agree Kaytrim.

Very nice.

From one metal guy to another, RESPECT!

I built something similar to the link posted by Grasshopper a couple of years ago.

Check it out here.: http://www.picturetrail.com/gallery/view?p=999&gid=5432451&uid=2715941

Its near the bottom.

Franco

  • Guest
  • Trade Count: (0)
Re: Franco's Custom Cocktail (UPDATE: LED Sanwas + more)
« Reply #57 on: November 28, 2007, 05:03:06 am »
Thanks for the kind words guys.  :)

Spacies, are they ALL your projects on that page?  :o If so, wow!  :applaud:

I think this is the table you are referring to:


I absolutely love this table, I came across it a couple of weeks ago somewhere but I didn't know who's it was, its beautiful. Mad props to you sir!  :cheers:

I definitely want some glass  clips off you if you are still doing them? I know you do them in 1 1/4" but I could probably do with some at about 1" if it is possible. Its just that im using 18mm MDF for the top and probably 6mm glass.

On another note, my DIY LED Joystick 'How to' has been picked up by Retroblast.  :)


spacies

  • Trade Count: (0)
  • Full Member
  • ***
  • Offline Offline
  • Posts: 934
  • Last login:February 19, 2015, 03:40:49 am
Re: Franco's Custom Cocktail (UPDATE: LED Sanwas + more)
« Reply #58 on: November 28, 2007, 02:11:33 pm »

LOL,

Yip those are all mine. And the worst thing, thats not all of them.

How about a deal on glass clips for some hollow shafts for the JLWs?

That was a nice table but I am kind of embarrassed to say so now. My machines have come a long way since I was building those. Those are actually covered with an upholstery vinyl and did look very classy.

I do have plans to do some more but I will change a few things.


Franco

  • Guest
  • Trade Count: (0)
Re: Franco's Custom Cocktail (UPDATE: LED Sanwas + more)
« Reply #59 on: November 28, 2007, 02:32:26 pm »
Your embarrassed about that cab  :o lol

Yeah im definitely going to use vinyl. I dont really know much about the different types so you may be able to help me out. How come you went for upholstery vinyl? Im guessing it has a matte finish which is what I think im going to go for. Is it self adheisive or do you need to glue it?

Yep, you have got a deal for the glass clips, ill shoot you a PM in a minute  :cheers:

spacies

  • Trade Count: (0)
  • Full Member
  • ***
  • Offline Offline
  • Posts: 934
  • Last login:February 19, 2015, 03:40:49 am
Re: Franco's Custom Cocktail (UPDATE: LED Sanwas + more)
« Reply #60 on: November 28, 2007, 02:58:17 pm »
LOL.

I shouldn't say embarressed but I used things that I shouldn't have used.
Like that crusty coin door, lol. And those glass clips  :dizzy:
Although I didn't have a decent solution back then.

I would now overhang the top a bit more and put in a step above the CP.


I used upholstery vinyl because it was a 'no paint' solution.
Its actually an fairly cheap way to do the finishing work and gives a great smooth leather look.

Like this: 


I used a spray-on contact glue to stick it down. Spray both surfaces, wait until its not sticky to touch and press them together. Job done.

For the CPs, I slotted them for T-Molding applied the contact again. Then used a heat gun to warm up the vinyl so it becomes stretchy and pulled it over the edges and stapled it down. The I ran a sharp knife along the t-molding slot for a nice straight edge. Hammer the t-molding in and she's all done. I was also doing the inside of the CPs like that but I ended up using some stick-on vinyl or painted in the end.

If you get stuck, give me a bell. Always happy to help.

Franco

  • Guest
  • Trade Count: (0)
Re: Franco's Custom Cocktail (UPDATE: LED Sanwas + more)
« Reply #61 on: November 28, 2007, 03:37:21 pm »
Thanks buddy, thats a great help. Im loving the textured look so im going to use some of that  :)

shock_

  • Wiki Contributor
  • Trade Count: (0)
  • Full Member
  • ***
  • Offline Offline
  • Posts: 354
  • Last login:January 30, 2020, 06:23:29 pm
  • In Brisbane, it's GMT+10 all the time.
Re: Franco's Custom Cocktail (UPDATE: LED Sanwas + more)
« Reply #62 on: November 28, 2007, 04:54:42 pm »
Your custom metalwork is just fantastic.  Well done.

And black/chrome for the win!!

Franco

  • Guest
  • Trade Count: (0)
Re: Franco's Custom Cocktail (UPDATE: *IPAC4 Enclosure*)
« Reply #63 on: December 08, 2007, 01:20:08 pm »
It's all about the black/chrome ;)  :D

Well, next mini update....

Apologies for not getting on with and actual cab building but I have booked 16 days off work over Crimbo so I'm planning on doing most of it then.

I have been busy for the past couple of days though.

I have been planning on using d subs to connect my controls and LEDs to my IPAC and LED wiz's and then I saw Namco's project where he had mounted his IPAC in a project box and I liked the look so I decided to mount my IPAC and LED Wiz's in project boxes too.

I picked up some of these blue project boxes from Maplins...


I had to get the largest box to fit the IPAC4 and it was a little taller than I would have liked but beggars cant be choosers. As the box was fairly tall I didn't want the IPAC to sit on the bottom with a lot of empty space above so I made some stainless steel PCB standoffs with nylon inserts....


The next task was to wire up the d subs. For the IPAC4 I'm using four 15 pin d subs. It works out quite nicely as there are 14 inputs per player and one ground which obviously equals 15. I wont be using all eight player buttons but I wired them up in case I add some crazy panel in the future where I need more inputs than I am going to use for a start. I bought a '3rd hands' soldering stand and its probably the best £10 I have ever spent, it makes it sooooo much easier to solder....


(All of the wires have 1/2" of heat shrink over the wires/solder buckets, I've just not put them on in that photo)

I then dremmeled the case to fit four 15 pin d subs, mounted the PCB standoffs, wired the d subs to each IPAC input, generally sweared a lot and then screwed the IPAC into the PCB standoffs. This is the finished result....


Gratuitous shot with the top off....


Just for some extra bling I mounted some LEDs to the standoffs. Why?... A) because I wanted to  :P and B) because people always ask to see inside the cab so it should look extra bling when I open her up. (Btw, the IPAC and LED Wiz housings are going to be mounted to the side panels which will be hinged at the bottom)


Pic of the LEDs on in the light....


and pic of them in the dark....


I'm really happy with how it came out. I would have liked the wiring to have been a little neater but I was struggling as it was. I tested continuity from the d sub pins to the IPAC terminals and some how they are all connected correctly :)

Only need to do another three now.....  ::)


waveryder

  • Trade Count: (+1)
  • Full Member
  • ***
  • Offline Offline
  • Posts: 585
  • Last login:July 14, 2011, 04:26:17 am
  • I Troop, therefore I am
    • BubbleGum Custom Art
Re: Franco's Custom Cocktail (UPDATE: *IPAC4 Enclosure*)
« Reply #64 on: December 08, 2007, 01:40:36 pm »
Holy C***  :notworthy:
I did a similar thing with my dreamcast padhack, but with clear perspex. I saw those maplins project boxes but could not find any PCB standoffs for em. When asked for em in maplins they didnt know what the hell I was talkin about! Lovin the Bling.
When pixelated clipart just wont do, just call for Betty

Franco

  • Guest
  • Trade Count: (0)
Re: Franco's Custom Cocktail (UPDATE: *IPAC4 Enclosure*)
« Reply #65 on: December 08, 2007, 01:51:54 pm »
Cheers fella  :)

By the way, I got your hollow Sanwa shafts done today, I meant to email you but I got carried away with the enclosure. Send me an email with your address and Ill get them sent out to you 1st class recorded delivery.

If you still want some standoffs give me a shout.

Franco

  • Guest
  • Trade Count: (0)
Re: Franco's Custom Cocktail (UPDATE: Power/Audio/Video In-Out Components)
« Reply #66 on: December 11, 2007, 07:08:58 pm »
All the components for my power/audio/video panel have come though so I can start planning the housing panel for them. These are the components that are going to be mounted in it:


From left to right....

Switched power block Switched fused Euro style 'kettle lead' power inlet. I am going to wire the terminals from this to a 4-way surge protected extension cable that will be inside the table.

USB Hub 4 way powered usb hub to connect any peripherals I may need. I was going to use this for the mouse/keyboard if needed for admin but I have picked up a cheap wireless mouse/keyboard combo.

Single USB Ports These will be used to connect my Xbox 360 to the cab using male>male USB cables. The cables on the inside of the cab will be connected to hacked 360 pads which will then be connected to the controls.

VGA Coupler To connect my Dreamcast (via VGA box) or 360 to the monitor. Luckily the monitor has dual VGA inputs and has a toggle switch to easily change between the two inputs.

Composite Video and Audio L/R RCA's One set of each for audio/video in and audio/video out. I have installed a PCI TV card which will take the composite video in. The audio in is for connecting the Dreamcast audio cables from the VGA box or from any other external sources. The video out will be connected to the composite video out from the PCI-e Video card I am putting in. I wanted video out so I can connect the cocktail to my big screen TV so people can watch the action from the cocktail on the big screen.

I have measured all of the components and Im just doing a CAD drawing so I can CNC mill a piece of 5mm thick aluminium to flush mount all of the components. The panel will then be located on the rear of the table.

I have also finally finished the table feet. I 'finished' them with 120 grade emery. I say 'finished' as 120 grit is normally far too rough but because of the size of the things it gave a nice brushed look which is what I was after rather than a polished finish which would have been a PITA to get spot on and would also bee an ass to keep clean.


No more feet pics now until they are mounted to the cab, i promise!  :)


Franco

  • Guest
  • Trade Count: (0)
Re: Franco's Custom Cocktail (UPDATE: Polished Aluminium Air Vents)
« Reply #67 on: December 12, 2007, 02:16:19 pm »
As normal I seem to have about 10 things on the go at once so I thought I would add another to the list  :)

Im going to use two 80mm PC case fans to draw air into the cab to keep it nice and cool. The fans will be located on the front panel of the machine, some where near the bottom. Obviously as there will be air drawn drawn in, there needs to be somewhere for it to escape. I was just going to drill some holes in the back for it to escape but I thought I would make some flanges to insert in the holes....


They are CNC machined from aluminium and polished up to 1200 grit emery before finish polishing with Brasso. They are about 60mm tall with a bore of about 35mm. There is a slight lip and the lower shoulder is 54mm (54mm is the largest Forstner bit I have so that decided the size of the flanges).

Once inserted into the cab the shoulder will butt up against the cabinet wall like so...


As for placement im thinking about something similar to below (this is the back of the cabinet)...


The motherboard is going to be located fairly centraly on the base of the cab  so I thought I had better have some vents around this area to expel heat from the CPU etc. I think im going to have the rest of them near the top of the cabinet to get rid of any heat that may accumulate near the top. The block in the bottom left is where I am intending on mounting the I/O panel.

Any thoughts on the vent placement?

quadmasta

  • Trade Count: (0)
  • Full Member
  • ***
  • Offline Offline
  • Posts: 214
  • Last login:May 18, 2022, 03:23:00 pm
    • Approximate Arcades
Re: Franco's Custom Cocktail (UPDATE: Polished Aluminium Air Vents)
« Reply #68 on: December 12, 2007, 03:16:36 pm »
I would mill pretty pieces
I could make joystick handles
If I only had a lathe..

patrickl

  • I cannot know for certain which will be tastiest
  • Trade Count: (+2)
  • Full Member
  • ***
  • Offline Offline
  • Posts: 4614
  • Last login:August 27, 2021, 09:25:30 am
  • Yo momma llama
    • PocketGalaga
Re: Franco's Custom Cocktail (UPDATE: Polished Aluminium Air Vents)
« Reply #69 on: December 12, 2007, 03:37:55 pm »
That's stunning  ...  again!
This signature is intentionally left blank

Franco

  • Guest
  • Trade Count: (0)
Re: Franco's Custom Cocktail (UPDATE: Polished Aluminium Air Vents)
« Reply #70 on: December 12, 2007, 03:46:27 pm »
Thanks  :) Luckily I have quite a few machine tools that I can use. Its one of the very few perks of being a CNC machinist. This is a picture of part of our shop. This is about a half of our department and our department is probably the smallest on site.


Franco

  • Guest
  • Trade Count: (0)
Re: Franco's Custom Cocktail (UPDATE: Enamel sprayed vent grilles)
« Reply #71 on: December 14, 2007, 12:27:05 pm »
I decided to add some mesh to the back of the air vents to stop any wandering fingers and also to make them look nicer.

I cut some mesh to size and spray painted it with Plasticote metalic blue enamel paint. This paint is really good as it dries really quickly (<15 mins) which is ideal for impatient people like me! Ive glued them to the back of the vents using Araldite.


I had thought about spraying a chrome spot in the center of the vents so I tried it out using a stencil but after confiring with my chief sounding board (Jimbo  :)) I decided to leave them blue.


I also noticed that the polished finish reflects the mesh nicely.  :)


KonkeyKong

  • Trade Count: (+5)
  • Full Member
  • ***
  • Offline Offline
  • Posts: 228
  • Last login:October 10, 2021, 09:57:07 pm
  • Monkey is my business and business is good.
Re: Franco's Custom Cocktail (UPDATE: Enamel sprayed vent grilles)
« Reply #72 on: December 14, 2007, 09:21:47 pm »
Do you even realize how high your pushing the bar on this one? Where will this madness end? Hopefully not too soon though, I'm enjoying being blown away by every update.

patrickl

  • I cannot know for certain which will be tastiest
  • Trade Count: (+2)
  • Full Member
  • ***
  • Offline Offline
  • Posts: 4614
  • Last login:August 27, 2021, 09:25:30 am
  • Yo momma llama
    • PocketGalaga
Re: Franco's Custom Cocktail (UPDATE: Enamel sprayed vent grilles)
« Reply #73 on: December 15, 2007, 06:12:45 am »
Yeah, these are great. About time you put them in that cocktail  :P
This signature is intentionally left blank

Franco

  • Guest
  • Trade Count: (0)
Re: Franco's Custom Cocktail (UPDATE: Enamel sprayed vent grilles)
« Reply #74 on: December 15, 2007, 08:41:52 am »
Sssssh!  :P

Thanks for the comments guys.

I actually picked up my MDF today  :D I got two sheets of 18mm 2.4x1.2M and one 12mm sheet of the same size. Should do me nicely for this build and a couple more projects ;)

Treated myself to a circular saw too  :)

patrickl

  • I cannot know for certain which will be tastiest
  • Trade Count: (+2)
  • Full Member
  • ***
  • Offline Offline
  • Posts: 4614
  • Last login:August 27, 2021, 09:25:30 am
  • Yo momma llama
    • PocketGalaga
Re: Franco's Custom Cocktail (UPDATE: Enamel sprayed vent grilles)
« Reply #75 on: December 15, 2007, 08:44:15 am »
must ... resist ... joke about how to transport MDF  :angel:
This signature is intentionally left blank

Franco

  • Guest
  • Trade Count: (0)
Re: Franco's Custom Cocktail (UPDATE: Aluminium I/O Panel Complete)
« Reply #76 on: December 20, 2007, 06:01:06 pm »
Managed to get the panel to house the I/O components finished tonight....


Really happy with how it came out, just a shame its going to be hidden on the back of the cab, although it could go on the side though I suppose, hmm.

The eagle eyed amongst you may notice that the top of the USB hub isn't parallel to the rest of the panel, this isn't a mistake (not on my behalf anyway), the hub actually tapers about 1.5mm along its length so I had to mill a trapezoid pocket to fit it. The main thing is that the components are a good fit (a little too good in places!) I was going to araldite the components in place but I think the only one that will need it will be the VGA port.

I also got my clear buttons drilled this week. I made a hexagonal split bush to hold them on the nut whilst they are being drilled as I am going to have a fair few buttons to drill in the near future ;).....


I have all of my wood now and Its my last morning at work tomorrow (16 days off, woot!) so I PROMISE the next pictures I post will be of some kind of wood construction.  :)

Timoe

  • Trade Count: (+2)
  • Full Member
  • ***
  • Offline Offline
  • Posts: 1662
  • Last login:July 14, 2009, 09:50:12 am
  • Team-Oh-tAy-Oh
    • Rattlin' Trash
Re: Franco's Custom Cocktail (UPDATE: Aluminium I/O Panel Complete)
« Reply #77 on: December 20, 2007, 07:09:49 pm »
Franco,

looks great as expected.  I have to find a USA distributor for those blue project boxes.

   :applaud:

polaris

  • You're a genius! Sheer genius!
  • Wiki Contributor
  • Trade Count: (+1)
  • Full Member
  • ***
  • Offline Offline
  • Posts: 1405
  • Last login:May 21, 2012, 05:18:59 pm
  • veni vidi congai
Re: Franco's Custom Cocktail (UPDATE: Aluminium I/O Panel Complete)
« Reply #78 on: December 20, 2007, 07:41:58 pm »
can someone delete this thread its really starting to piss me off now.
franco, mate , cant wait to see how this attention to detail manifests itself into a cab :cheers:
got COLOR codes from projects, post them here

add stuff to the uk wiki section

Namco

  • Trade Count: (0)
  • Full Member
  • ***
  • Offline Offline
  • Posts: 621
  • Last login:May 02, 2024, 08:30:10 pm
  • Now addicted to Williams pins... all of them.
    • Freddo Mame Project
Re: Franco's Custom Cocktail (UPDATE: Aluminium I/O Panel Complete)
« Reply #79 on: December 20, 2007, 09:18:49 pm »
Amazing work there Franco! It's an honor for me to be mentioned in a future Mamey winning project.  :applaud:

I'm inspired to add some gratuitous LEDs to my cabinet now, but milled aluminum is still a long ways off.  ;D