Main Restorations Software Audio/Jukebox/MP3 Everything Else Buy/Sell/Trade
Project Announcements Monitor/Video GroovyMAME Merit/JVL Touchscreen Meet Up Retail Vendors
Driving & Racing Woodworking Software Support Forums Consoles Project Arcade Reviews
Automated Projects Artwork Frontend Support Forums Pinball Forum Discussion Old Boards
Raspberry Pi & Dev Board controls.dat Linux Miscellaneous Arcade Wiki Discussion Old Archives
Lightguns Arcade1Up Try the site in https mode Site News

Unread posts | New Replies | Recent posts | Rules | Chatroom | Wiki | File Repository | RSS | Submit news


Author Topic: First Build - "ManorCade" Four Player Cab  (Read 18897 times)

0 Members and 1 Guest are viewing this topic.

BGoulette

  • Trade Count: (0)
  • Full Member
  • ***
  • Offline Offline
  • Posts: 192
  • Last login:March 03, 2025, 04:23:38 pm
    • lazerjoose.com
Re: First Build - "ManorCade" Four Player Cab
« Reply #40 on: July 13, 2015, 11:04:44 pm »
It was on my mind, so here's a first pass. You should be able to grab the relevant objects and do what you want with them in GIMP or whatever else can read EPS files.

Manorite

  • Trade Count: (0)
  • Full Member
  • ***
  • Offline Offline
  • Posts: 59
  • Last login:March 27, 2021, 05:40:14 pm
  • Just getting started!
Re: First Build - "ManorCade" Four Player Cab
« Reply #41 on: July 14, 2015, 08:50:29 pm »
Thanks BGoulette!!  I'll take a look at these, really appreciated!

BGoulette

  • Trade Count: (0)
  • Full Member
  • ***
  • Offline Offline
  • Posts: 192
  • Last login:March 03, 2025, 04:23:38 pm
    • lazerjoose.com
Re: First Build - "ManorCade" Four Player Cab
« Reply #42 on: July 14, 2015, 08:58:29 pm »
Yeah, no worries! Hopefully it'll be useful to you.

Manorite

  • Trade Count: (0)
  • Full Member
  • ***
  • Offline Offline
  • Posts: 59
  • Last login:March 27, 2021, 05:40:14 pm
  • Just getting started!
Re: First Build - "ManorCade" Four Player Cab
« Reply #43 on: February 09, 2016, 10:11:18 pm »
I know this has been dormant for a long time...but I'm resurrecting this arcade project!  I got frustrated with the artwork and the arcade sat in my garage for months while I built a dining room table and other things.  I've now finished the artwork after talking with Brad (Lucian045, bjbowman045@gmail.com,http://forum.arcadecontrols.com/index.php/topic,134866.0/all.html) who was extremely helpful and patient with me.  I also got my cut template for the control panel printed at FedEx/Kinkos and I'm going to get cutting that control panel next!  Hopefully more build pictures will be following in the next few weeks.

Manorite

  • Trade Count: (0)
  • Full Member
  • ***
  • Offline Offline
  • Posts: 59
  • Last login:March 27, 2021, 05:40:14 pm
  • Just getting started!
Re: First Build - "ManorCade" Four Player Cab
« Reply #44 on: February 20, 2016, 11:45:57 pm »
A bit of progress was made tonight!  I received my art from Brad, and it looks great from what I can see!  I left most of it rolled up as I wanted to keep it protected until I need to use it.  The marquee looks great though!


I tested out drilling the button holes with a hole saw on some scrap wood, and it worked it well.  I know one of the is a bit off center, but I was eyeballing the center of the holes on this scrap piece, and I hadn't drilled pilot holes on the first few, which you definitely need to do.  I used the drill half way through one side, flip it over and drill the rest of the way through the other side method.


I attached my template to the control panel top, taped it down with blue painters tape, and drilled pilot holes for every button and joystick.  As you can see, I had the center of ever hole marked on the template so that it was easier to find dead center.


I realized in the process of doing this that I didn't have the right sized hole saw to cut the hole for the trackball.  I've gone ahead and ordered one (http://smile.amazon.com/gp/product/B00005LEZN?psc=1&redirect=true&ref_=oh_aui_detailpage_o00_s00).  I've also realized that I didn't account for a large enough hole in my template.  Luckily on my CP art, I've left just enough room, so as long as I shift that hole down about an inch it will still fit.

Tomorrow I'll drill the shifted pilot hole for the trackball and start drilling out all of the button and joystick holes with the hole saw.


Manorite

  • Trade Count: (0)
  • Full Member
  • ***
  • Offline Offline
  • Posts: 59
  • Last login:March 27, 2021, 05:40:14 pm
  • Just getting started!
Re: First Build - "ManorCade" Four Player Cab
« Reply #45 on: February 21, 2016, 10:37:50 pm »
More progress made today.  I drilled all of the button and joystick holes in the control panel.  I drilled the pilot hole for the track ball, and will drill that hole out tomorrow when the hole saw arrives. 


I also finished cutting the speaker panel and the monitor bezel panel.  For the speaker holes, I'm thinking of drilling out a custom hole pattern.  I'll give it a try this week in scrap wood and see how it looks.

Manorite

  • Trade Count: (0)
  • Full Member
  • ***
  • Offline Offline
  • Posts: 59
  • Last login:March 27, 2021, 05:40:14 pm
  • Just getting started!
Re: First Build - "ManorCade" Four Player Cab
« Reply #46 on: February 22, 2016, 09:56:39 pm »
Tonight I drilled out the 3 3/8" trackballl hole, because my new hole saw arrived in the mail.


I also took a shot at drilling out a custom hole pattern for my speakers.  I thought I'd try to get a little creative here.  I drew a 5" circle in some scrap wood (I traced a 5" sanding pad), printed off the logo that I wanted to drill, and taped it to the wood.  I drilled around the image, and it didn't turn out too bad!  I think I can use this scrap attempt as a template, and just drill through it when I want to do it on the real thing.


Next I need to router out the recesses for the joysticks, and one for the u-trak, so it will mount like it would in 5/8 wood.  I also need to cut out the holes in the front panels for the coin door.

Manorite

  • Trade Count: (0)
  • Full Member
  • ***
  • Offline Offline
  • Posts: 59
  • Last login:March 27, 2021, 05:40:14 pm
  • Just getting started!
Re: First Build - "ManorCade" Four Player Cab
« Reply #47 on: February 24, 2016, 10:37:37 pm »
Tonight I cut out the holes in the two front panels for the coin door (I'm doing this OND Metropolis cab style, so the front panel has some depth for LED lights).  I screwed up the first one a little bit, as you can see below, but that was the back panel and you won't be able to see that so it was OK.  I learned for the panel that shows, and it looks much better!


The only cuts I have left:  cut the back panel to create the removable piece, drill the speaker holes, and route out the areas for the joysticks and trackball.

Manorite

  • Trade Count: (0)
  • Full Member
  • ***
  • Offline Offline
  • Posts: 59
  • Last login:March 27, 2021, 05:40:14 pm
  • Just getting started!
Re: First Build - "ManorCade" Four Player Cab
« Reply #48 on: February 28, 2016, 10:10:15 pm »
Today I routed out the recesses for the joysticks.  It was a two step procedure because of the mounting plates I bought.  First, I traced the mounting plate, and routed out 1/4" out of my 3/4" CP.  I then drew a line across the area where I needed to leave it at 1/4".


After that, I routed out the area another 1/4" (1/2" total) in the middle.  This left me with 1/2" ledges, and 1/4" in the middle, to get the joysticks to the right height:


Manorite

  • Trade Count: (0)
  • Full Member
  • ***
  • Offline Offline
  • Posts: 59
  • Last login:March 27, 2021, 05:40:14 pm
  • Just getting started!
Re: First Build - "ManorCade" Four Player Cab
« Reply #49 on: February 29, 2016, 10:58:01 pm »
Tonight I finished all the routing on the control panel, including taking 1/8" off of the area around the trackball so that I can do the "ideal" mounting, which requires a 5/8" panel.


I also drilled some vent holes in the front panel.  These are going to be the intake holes, and I have 80 mm fans I'm going to mount behind them.


What I didn't realize is how crappy it would look on the back.  This is inside the cab though, so I don't think it matters as long as I can keep the holes clean and get the fan mounted properly.  I'm guessing this will happen again when I drill the holes for the speakers.  If anyone has any tips for preventing this let me know.  I tried with and without scrap wood under the board I was drilling through, it didn't seem to make a difference.


Once I drill the speaker holes, I think I'm ready to begin construction!


Manorite

  • Trade Count: (0)
  • Full Member
  • ***
  • Offline Offline
  • Posts: 59
  • Last login:March 27, 2021, 05:40:14 pm
  • Just getting started!
Re: First Build - "ManorCade" Four Player Cab
« Reply #50 on: March 01, 2016, 11:20:27 pm »
Tonight it's started looking like an arcade!  First, I realized that the holes I drilled for the vents were too low, because the bottom of the front panel drops below the base a bit.  I filled in the old holes with wood filler, and re-drilled them a bit higher.


Next, I went ahead and attached both side panels to the base.  I left 1" of clearance above the ground, and I marked the lines where my other panels sit in a half inch, to make it easier to line those up later when I'm attaching them.  I then attached the main front panel to stabilize the whole thing.  I'm using pocket holes to construct this, so no braces were needed.


At this point I was excited because this actually looks like an arcade, so I set the control panel on there to get a good feel for how it's going to be in the end.  It looks awesome!


Manorite

  • Trade Count: (0)
  • Full Member
  • ***
  • Offline Offline
  • Posts: 59
  • Last login:March 27, 2021, 05:40:14 pm
  • Just getting started!
Re: First Build - "ManorCade" Four Player Cab
« Reply #51 on: March 02, 2016, 11:22:17 pm »
Tonight I attached the computer/monitor (it's an all-in-one) shelf.  I've been trying to do at least one thing a night on the arcade to keep it moving, even if it's a small thing like this.  I've realized my driver bit for my Kreg jig system is pretty worn out, so I've ordered a new one that will be here tomorrow (love free one day shipping on Amazon!).  I clamped some boards to hold the shelf in place while I screwed it in, which worked out pretty well.  The holes are for air flow/cable management.  I may drill one more depending on how it looks once the computer is in place.


Manorite

  • Trade Count: (0)
  • Full Member
  • ***
  • Offline Offline
  • Posts: 59
  • Last login:March 27, 2021, 05:40:14 pm
  • Just getting started!
Re: First Build - "ManorCade" Four Player Cab
« Reply #52 on: March 05, 2016, 12:43:48 pm »
A few nights ago I cut out the monitor bezel.  I put the board in place, put the monitor in place behind it, and traced around it.  I then measured an inch in from each side so as to be closer to the actual display, and cut it out with a jigsaw.  I then used a 45 degree chamfer bit with my router to cut around the window I made.  I had one slip up where a board moved, and you can see the mistake here.


I was able to just take a little extra material down there and even that mistake out, so it actually turned out looking pretty good!


The base of the computer actually stuck out a bit more than I realized and prevented the monitor from sitting flush against the bezel, so I had to route out a small hole on the bottom for that base to stick in to, and it can now sit flush:


Manorite

  • Trade Count: (0)
  • Full Member
  • ***
  • Offline Offline
  • Posts: 59
  • Last login:March 27, 2021, 05:40:14 pm
  • Just getting started!
Re: First Build - "ManorCade" Four Player Cab
« Reply #53 on: March 07, 2016, 09:33:46 pm »
Tonight I decided to run a test on the Dell XPS One 24" all-in-one computer I had planned this cab around to make sure that the remote would work to turn the computer on and off through the monitor bezel.  When I went to turn the computer on, a fan turns on full blast, the blue light comes on the power switch, and the blue light comes on the monitor, but the computer doesn't boot.  I'm not sure what to do with it at this point, and I'm thinking I may need a new computer to be the heart of this cab.  Evaluating options, if anyone has any suggestions on what I can try with this computer let me know!

Manorite

  • Trade Count: (0)
  • Full Member
  • ***
  • Offline Offline
  • Posts: 59
  • Last login:March 27, 2021, 05:40:14 pm
  • Just getting started!
Re: First Build - "ManorCade" Four Player Cab
« Reply #54 on: March 08, 2016, 11:12:02 pm »
I've been working on putting together a new dedicated MAME computer build for this arcade to replace the one that just died.  This is what I'm thinking at the moment:

PCPartPicker part list: http://pcpartpicker.com/p/pNyYVn
Price breakdown by merchant: http://pcpartpicker.com/p/pNyYVn/by_merchant/

CPU: Intel Core i5-4590 3.3GHz Quad-Core Processor  ($189.99 @ SuperBiiz)
Motherboard: ASRock H97 PRO4 ATX LGA1150 Motherboard  ($83.89 @ OutletPC)
Memory: Corsair Vengeance 8GB (2 x 4GB) DDR3-1600 Memory  ($30.99 @ Newegg)
Video Card: EVGA GeForce GT 730 1GB Video Card  ($62.99 @ SuperBiiz)
Power Supply: SeaSonic 300W 80+ Bronze Certified ATX Power Supply  ($35.99 @ SuperBiiz)
Operating System: Microsoft Windows 10 Home OEM (64-bit)  ($89.99 @ NCIX US)
Monitor: Acer G246HLAbd 60Hz 24.0" Monitor  ($129.99 @ Amazon)
Total: $623.83
Prices include shipping, taxes, and discounts when available
Generated by PCPartPicker 2016-03-08 23:09 EST-0500

I already have an old case and CD drive I can use.

This is an unfortunate increase in cost, but I will hopefully have a nice, reliable dedicated computer that can handle anything I decide to throw at it in this cab.  I'm debating ditching the graphics card because from what I've been reading CPU power is really what these games run off of.  The monitor I picked will fit right into the bezel I already created, so I won't have to redo that!

Manorite

  • Trade Count: (0)
  • Full Member
  • ***
  • Offline Offline
  • Posts: 59
  • Last login:March 27, 2021, 05:40:14 pm
  • Just getting started!
Re: First Build - "ManorCade" Four Player Cab
« Reply #55 on: March 09, 2016, 02:44:37 pm »
So I've been milling this over and it seems ridiculous to spend that much money on a new build considering what I'm using it for. I'm leaning toward this refurbished HP 8200 from Newegg now. My buddy may have a monitor that will fit my bezel, otherwise I'll still order that Acer monitor. Any thoughts?

http://www.newegg.com/Product/Product.aspx?Item=N82E16883283325


Sent from my Nexus 6P using Tapatalk


Manorite

  • Trade Count: (0)
  • Full Member
  • ***
  • Offline Offline
  • Posts: 59
  • Last login:March 27, 2021, 05:40:14 pm
  • Just getting started!
Re: First Build - "ManorCade" Four Player Cab
« Reply #56 on: March 23, 2016, 10:47:14 pm »
Big update, I've done quite a bit of work.  I think I'll split it into a few posts.

I decided I'd spent so much time and money on this I didn't want to skimp on the computer, so I bought new components to put into my old case.  I ended up getting:

CPU: Intel I5-6500 http://smile.amazon.com/gp/product/B0136JON7M?psc=1&redirect=true&ref_=oh_aui_detailpage_o05_s02
Motherboard:  Gigabyte GA-Z170-HD3 http://smile.amazon.com/gp/product/B012AQGKXC?psc=1&redirect=true&ref_=oh_aui_detailpage_o05_s02
Graphics Card:  EVGA GeForce GT 730 2GB http://smile.amazon.com/gp/product/B00L5GZG5C?psc=1&redirect=true&ref_=oh_aui_detailpage_o05_s01
Memory: Kingston HyperX FURY Black 8GB Kit (2x4GB) 2133MHz DDR4 http://smile.amazon.com/gp/product/B00TY6A1P0?psc=1&redirect=true&ref_=oh_aui_detailpage_o05_s00
Power Supply: Antec Basiq BP350 350 Watt http://smile.amazon.com/gp/product/B000H9J3ZC?psc=1&redirect=true&ref_=oh_aui_detailpage_o05_s01

I've got the computer up and running on Windows 10, but I haven't tried setting up the arcade software again yet.

Manorite

  • Trade Count: (0)
  • Full Member
  • ***
  • Offline Offline
  • Posts: 59
  • Last login:March 27, 2021, 05:40:14 pm
  • Just getting started!
Re: First Build - "ManorCade" Four Player Cab
« Reply #57 on: March 23, 2016, 11:47:40 pm »
I finished construction of the cab!  I've got vent holes in the top of the cab, the marquee box (I'll drill a hole for the LED wires to go through), all the top/back pieces, the removable back panel, and the front decorative panel. I test fit the coin door, as can be seen here in this picture.


I did run into a few issues along the way.  First, I ordered the marquee slightly wrong sized.  It was an inch too short width wise, and slightly too tall.  I created some side panels to take care of the extra room on the sides, but had to cut it down slightly so it would fit vertically.  I tried to score and snap it, but that failed miserably and left a gash in my hand.  I ended up using my circular saw, which worked perfectly!

Before I start sanding, I need to finalize how I'm going to attach the control panel to the cab.  I think I may do something similar to what ChanceKJ did on his Flynn's build, as I have almost the same CP.  I will pick up some hardware to attach it this week.  I also need to figure out how I'm going to keep the glass in place at the top (I haven't ordered the glass yet).  I failed to leave a small gap in the speaker panel for it to slot into, so it will only be held in place by the CP at the bottom.  Maybe this is enough?  Or I could use some clips at the top to hold it in place.


Jamesbeat

  • Trade Count: (0)
  • Full Member
  • ***
  • Offline Offline
  • Posts: 261
  • Last login:February 11, 2019, 06:13:39 pm
  • I want to build my own arcade controls!
Re: First Build - "ManorCade" Four Player Cab
« Reply #58 on: March 26, 2016, 12:19:43 am »
In my opinion, you definitely did the right thing by using good quality plywood instead of MDF.

I know people will disagree, but I think that the only redeeming feature of MDF is the fact that it is cheap.

Otherwise, it is $hit compared to plywood, providing the plywood is a good grade with a smooth surface.

Manorite

  • Trade Count: (0)
  • Full Member
  • ***
  • Offline Offline
  • Posts: 59
  • Last login:March 27, 2021, 05:40:14 pm
  • Just getting started!
Re: First Build - "ManorCade" Four Player Cab
« Reply #59 on: March 28, 2016, 02:12:11 pm »
Thanks Jamesbeat, I'm pretty happy with it so far!  I'm used to working with plywood, plus I had some leftover I wanted to use.

I bought my paint, and I've decided I'm going to make myself a PVC and plastic drop cloth painting booth.  Something similar to this: http://makelyhome.com/50-diy-collapsible-spray-paint-tent/.

Hopefully this week I can get on with sanding and painting the cab, provided the weather cooperates and doesn't get too cold!

Jamesbeat

  • Trade Count: (0)
  • Full Member
  • ***
  • Offline Offline
  • Posts: 261
  • Last login:February 11, 2019, 06:13:39 pm
  • I want to build my own arcade controls!
Re: First Build - "ManorCade" Four Player Cab
« Reply #60 on: April 01, 2016, 11:52:22 pm »
To answer a couple of your questions from a while ago:

Buttons will take dye because they are nylon. From the feel of it, I think T molding is polyethylene, which will not take dye successfully.

For marquee retainers, many people use plastic corner protectors for walls.
You can get transparent ones and paint them on the reverse side.
I tried this, but they felt a little flimsy, so I ended up using some aluminum angle sprayed black. I'm pleased with how they turned out.

Manorite

  • Trade Count: (0)
  • Full Member
  • ***
  • Offline Offline
  • Posts: 59
  • Last login:March 27, 2021, 05:40:14 pm
  • Just getting started!
Re: First Build - "ManorCade" Four Player Cab
« Reply #61 on: April 06, 2016, 11:21:19 pm »
Thanks Jamesbeat.  I bought some aluminum angle, hopefully it works well!

I've attached the control panel, stole the idea from ChanceKJ.  I attached a 2x6 to the cab with pocket holes, and then I drilled through the bottom of the control panel and through the board and attached the CP using carriage bolts.


I've sanded the cab and I'm ready to paint.  I bought PVC pipe, plastic sheets, and the wrong fittings (need to go get the right ones).  I hope to be painting within the week!


Manorite

  • Trade Count: (0)
  • Full Member
  • ***
  • Offline Offline
  • Posts: 59
  • Last login:March 27, 2021, 05:40:14 pm
  • Just getting started!
Re: First Build - "ManorCade" Four Player Cab
« Reply #62 on: April 06, 2016, 11:23:35 pm »
I'm also debating what frontend to use.  I set up Hyperspin on the dead computer, and I've copied those files over, but I'm not sure if it's just going to plug in and run or if I'm going to have to set it up again.  That was so time consuming, I'm looking at what other options are out there.  LaunchBox looks interesting, has anyone used it in a cab like this?

Manorite

  • Trade Count: (0)
  • Full Member
  • ***
  • Offline Offline
  • Posts: 59
  • Last login:March 27, 2021, 05:40:14 pm
  • Just getting started!
Re: First Build - "ManorCade" Four Player Cab
« Reply #63 on: August 23, 2016, 11:54:12 am »
Hello everyone, I'm back! I've finally managed to get paint on the cab. I've finished priming, and I'm ready to put the top coat of black on. Does anyone know if there is any reason to put the black topcoat down on the surfaces where I'm installing graphics, or if the killz primer is enough?

Sent from my Nexus 6P using Tapatalk


BigCurtis

  • Trade Count: (0)
  • Full Member
  • ***
  • Offline Offline
  • Posts: 65
  • Last login:April 18, 2018, 05:11:38 pm
  • Life is Game.
    • Angry Cat Entertainment
Re: First Build - "ManorCade" Four Player Cab
« Reply #64 on: August 23, 2016, 07:43:15 pm »
There are likely other sources, but for $13 you get a set of 30" marquee retainers which become your required width by adding a saw :) http://www.twistedquarter.com/index.php?main_page=product_info&cPath=219_224&products_id=222&zenid=8nvsbh92q0h94csvn54k70tdv6

I've also used painted angle aluminum from the usual shops, with no complaints, not necessarily cheaper than $13 though.

Manorite

  • Trade Count: (0)
  • Full Member
  • ***
  • Offline Offline
  • Posts: 59
  • Last login:March 27, 2021, 05:40:14 pm
  • Just getting started!
Re: First Build - "ManorCade" Four Player Cab
« Reply #65 on: August 24, 2016, 04:15:11 pm »
Thanks BigCurtis. I bought some angle iron, so I'll see how that works! Thanks for the link, if that doesn't work I'll check it out!

Sent from my Nexus 6P using Tapatalk


Manorite

  • Trade Count: (0)
  • Full Member
  • ***
  • Offline Offline
  • Posts: 59
  • Last login:March 27, 2021, 05:40:14 pm
  • Just getting started!
Re: First Build - "ManorCade" Four Player Cab
« Reply #66 on: December 27, 2016, 01:35:51 pm »
It's been quite a while since I posted an update...and I'm finished!  I'm going to try to catch up, I apologize for not doing this as I went.  I may split this into several posts.

I built my paint booth as previously described, and proceeded to paint the cab with a grey Kilz primer and black top coat.  As this was in my garage and I didn't want to build a big ventilation system, I went into the booth in my full paint gear...


I quickly found out two things.  First, the cabinet grade birch that I used for the sides was very easy to paint, and was very smooth after only 1-2 coats.  The oak that I used on the control panel did not take the paint nearly as well, due to the wood grain.  You can see it very clearly here after probably 5 coats of primer, and this does not make for a very smooth surface for the control panel overlay:


After doing a bit of searching, I decided to rub wood filler over the top of the control panel to try and fill in all that wood grain, and then sand it down and paint it again, to give myself a smooth surface.  This seemed to work really well!  Here is the surface after I used the wood filler and scraped off the extra, leaving only the bit in the depressed wood grain areas:


Unfortunately I didn't take any good pictures of the painting process.  While the primer went on very well with my critter sprayer, the top coat did not work quite as well.  I used a paint thinning product, but even with that it was very difficult to adjust the thickness of the paint and the spray gun to get the right consistency.  I had problems with dripping, and problems with too light of coverage, depending on the adjustments I made.  After many many coats of paint (I'd say 6 to 8 coats...) I gave up and decided to use a roller.  This actually worked a lot better for me.  While the cab didn't end up perfect, I had to move on because I'd wasted months trying to get the perfect paint job.  I probably needed a better spray gun than the one I was using.

Manorite

  • Trade Count: (0)
  • Full Member
  • ***
  • Offline Offline
  • Posts: 59
  • Last login:March 27, 2021, 05:40:14 pm
  • Just getting started!
Re: First Build - "ManorCade" Four Player Cab
« Reply #67 on: December 27, 2016, 01:47:29 pm »
Next I decided to attach the control panel overlay so that I could get started installing all of the buttons and doing the wiring.  My first attempt at this was a disaster.  I secured the artwork in the center of the control panel (vertically looking at the CP from the front), peeled back half of the artwork, laid it down, and realized it wasn't very well aligned.  In a panic, I stupidly tried to pull the artwork back up, and cause some very bad damage, wrinkling, and tears.  You can also see some of the misalignment even after pulling it back up:


I made a few changes to my artwork to make it less sensitive to my alignment issues, and re-ordered it.  After reapplying, it looks MUCH better, but still ended up with a few wrinkles and air bubbles on the side.  These are really annoying, but I decided to move on and just finish the arcade.    The alignment was nearly perfect this time though!  You can kind of see the wrinkles/bubbles on the sides in this photo.  I've also installed the t-molding on the CP here, as well as all the buttons and joysticks.


In the process of mounting the joysticks, I did have a little trouble.  When drilling the holes for the threaded inserts, I got a little close to the lower routed out area.  I still had enough room to thread in the insert, but I moved to the inner holes for the other 3 joysticks to give myself a little more room.


Manorite

  • Trade Count: (0)
  • Full Member
  • ***
  • Offline Offline
  • Posts: 59
  • Last login:March 27, 2021, 05:40:14 pm
  • Just getting started!
Re: First Build - "ManorCade" Four Player Cab
« Reply #68 on: December 27, 2016, 01:55:13 pm »
Next, I proceeded to wire up the control panel.  This went very well, although sitting on the floor doing this was hard on my back!  I daisy-chained all the grounds together (the black wire), and then used a different color for each player for all of the buttons and joysticks.  Hooking this all into the IPAC-4 was very easy and intuitive.  I used some Velcro strips for wire management.


I was a bit confused by the wiring on the U-Trak trackball.  The wires did not seem to match what was on the Ultimarc website, and it was even missing a wire.  I went ahead and plugged it into the USB adapter, and it worked just fine though!  I think the missing wire was a ground, so they must have hooked two ground together inside the casing.


I tested this out on a PC that isn't the one with all of the games installed, and it seemed to work from what I could tell!

Manorite

  • Trade Count: (0)
  • Full Member
  • ***
  • Offline Offline
  • Posts: 59
  • Last login:March 27, 2021, 05:40:14 pm
  • Just getting started!
Re: First Build - "ManorCade" Four Player Cab
« Reply #69 on: December 27, 2016, 02:24:11 pm »
Next, after waiting several days for someone to help me move the cabinet from my garage into the basement, I installed the speakers.  I couldn't find any good brackets to use at my local big-box hardware stores, so I bought these Scotch mounting strips, and they worked perfectly!


The speaker wires were a little short, and couldn't reach the sub in the base of the cabinet, so I had to buy an extension cable for the 3.5 mm plug.  Not a big deal.

I also installed the speaker grills, these went on fairly easily:


Next I installed the side art.  This went MUCH more smoothly than the control panel, and I had no issues whatsoever.  I laid the cabinet on its side and used the method in the "Side Art Install 101" sticky on the Main forum.  The art is beautiful, and it made the cab feel real and finally almost finished!


Next, I covered the marquee box with reflective tape, and installed the LED lights inside that box, and on the front of the cabinet.


The t-molding also went on pretty easily:


Manorite

  • Trade Count: (0)
  • Full Member
  • ***
  • Offline Offline
  • Posts: 59
  • Last login:March 27, 2021, 05:40:14 pm
  • Just getting started!
Re: First Build - "ManorCade" Four Player Cab
« Reply #70 on: December 27, 2016, 02:27:39 pm »
Next, I installed the Marquee.  I bought some angle aluminum, cut it to size, spray painted it black, and used that as brackets to mount it.  This was going really well until my last screw.  I put it in at an angle and gouged a nice hole in the artwork...


I took the brackets back off, and threw some electrical tape on the back to cover the hole.  It's not perfect, but unless you know it's there and are looking for it, you aren't going to notice:


Manorite

  • Trade Count: (0)
  • Full Member
  • ***
  • Offline Offline
  • Posts: 59
  • Last login:March 27, 2021, 05:40:14 pm
  • Just getting started!
Re: First Build - "ManorCade" Four Player Cab
« Reply #71 on: December 27, 2016, 02:34:20 pm »
I also installed the fans on the top and bottom and fan covers on the top (which no one will probably ever see...):


Next I wired up the coin door lights.  I ran all of the coin door lights to one 4-pin molex connector that I connected to the power supply in my computer.  I also wired all the fans together and into a separate connector, and the marquee lights were wired into a third connector, all attached to spare connections on my computer power supply.  This was very handy!  I didn't want to attach them all to one connector because I didn't want to put too many amps through the smaller gauge wire that the connectors (which I cut off of the fans) used.


Manorite

  • Trade Count: (0)
  • Full Member
  • ***
  • Offline Offline
  • Posts: 59
  • Last login:March 27, 2021, 05:40:14 pm
  • Just getting started!
Re: First Build - "ManorCade" Four Player Cab
« Reply #72 on: December 27, 2016, 02:46:19 pm »
I forgot to take pictures of these last few steps, but if someone wants me to please ask and I will.

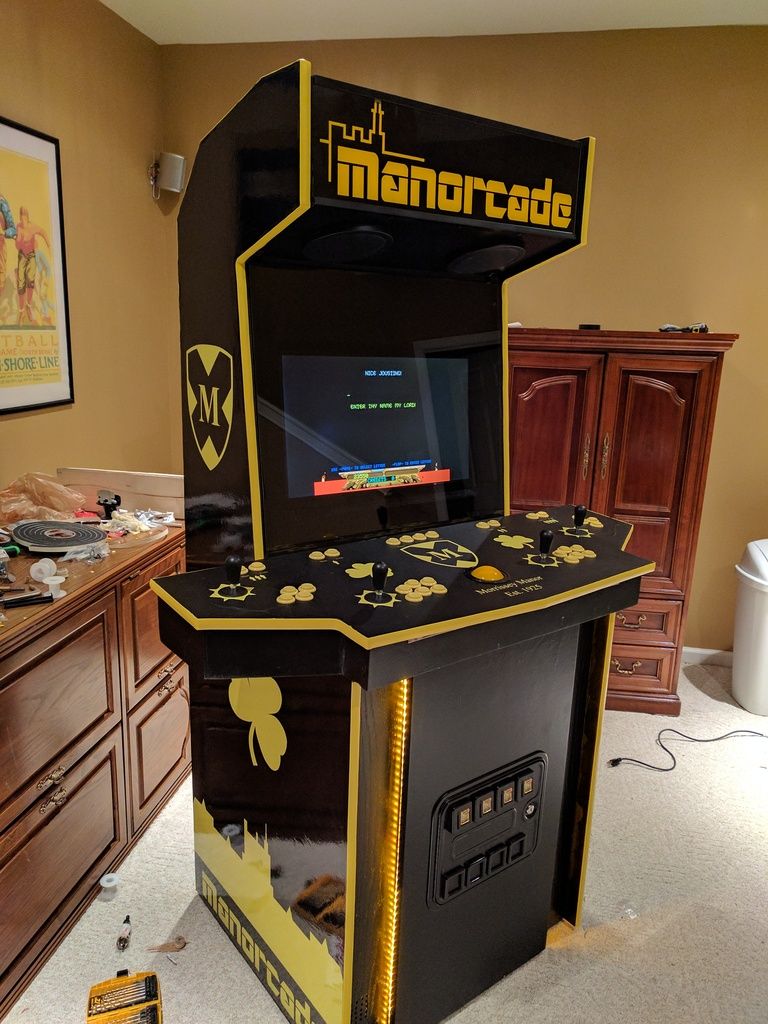
The next step was to wire up the coin door to the IPAC-4.  I had a little trouble deciding if each coin slot should go to a corresponding player (one coin slot to player 1, one to player 2, etc.).  I decided against this, because it seems that most games use common credits, and I didn't want someone to put a coin in the wrong slot and have nothing happen.  I wired all of the coin slots together and ran these to player one coin.  If a game needs separate coins, the buttons on the control panel will serve that function.  This coin door is mostly for looks, but it's nice that it is functional!

next I sliced the end off of an old 5V blackberry charger to power the LED light that I bought for my trackball.  Worked like a charm!

I then installed the glass.  I got a light grey smoked, tempered, 1/4" glass from a local glass store, and it was perfect!  I had installed wear stripping around the edge of the display to "wedge" the glass in...but it turns out it was very difficult (impossible?) to get the glass wedged in there.  It actually looked great sitting on top of the weather stripping, so I left it like that!  I bought two small brackets and sprayed them black to hold the glass in place at the top, and it is held in place on the bottom by the control panel.

Finally I installed the back panel.  After a few coats of paint it was a bit tight so I had to use the old jigsaw and trim it down a bit to fit.  I installed the handle and bolts and it worked great!

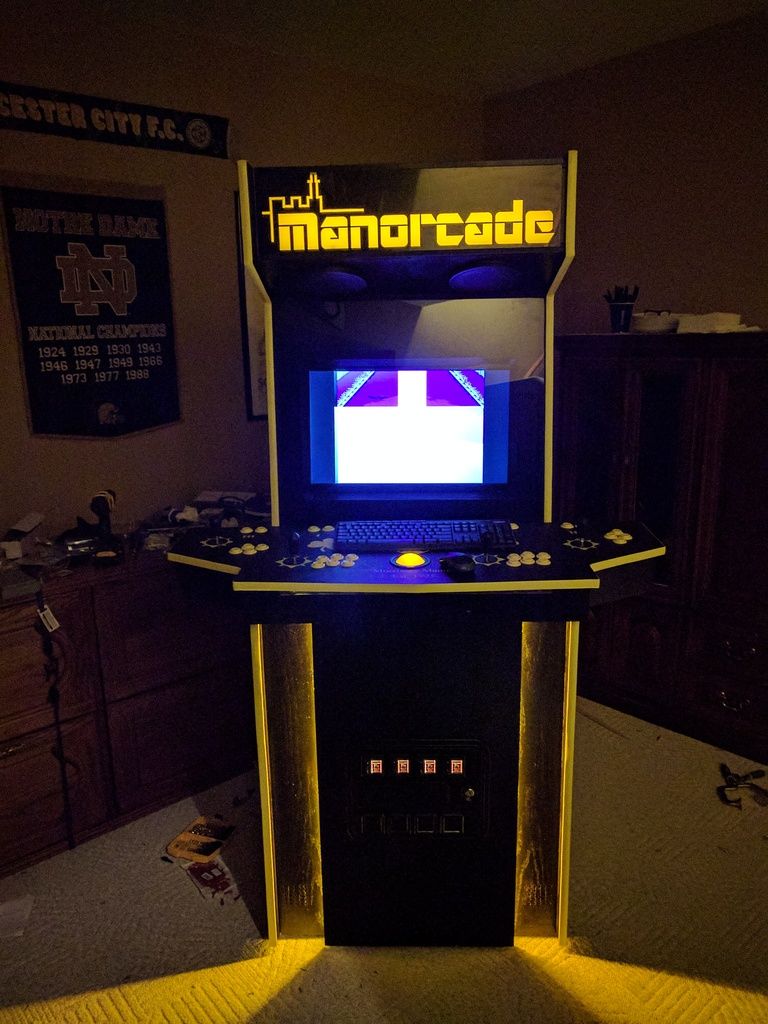
Here is the end result!  Once I get the basement cleaned up and the cab in it's final place, I'll get some better pictures and update the original post with them.

Thanks for all of your help and inspiration!