Main Restorations Software Audio/Jukebox/MP3 Everything Else Buy/Sell/Trade
Project Announcements Monitor/Video GroovyMAME Merit/JVL Touchscreen Meet Up Retail Vendors
Driving & Racing Woodworking Software Support Forums Consoles Project Arcade Reviews
Automated Projects Artwork Frontend Support Forums Pinball Forum Discussion Old Boards
Raspberry Pi & Dev Board controls.dat Linux Miscellaneous Arcade Wiki Discussion Old Archives
Lightguns Arcade1Up Try the site in https mode Site News

Unread posts | New Replies | Recent posts | Rules | Chatroom | Wiki | File Repository | RSS | Submit news


Author Topic: First Build - "ManorCade" Four Player Cab  (Read 18880 times)

0 Members and 1 Guest are viewing this topic.

Manorite

  • Trade Count: (0)
  • Full Member
  • ***
  • Offline Offline
  • Posts: 59
  • Last login:March 27, 2021, 05:40:14 pm
  • Just getting started!
First Build - "ManorCade" Four Player Cab
« on: June 01, 2015, 10:01:01 pm »
I've been reading this forum for probably 6 months now, and started my own build a few months ago.  It hasn't gone as quickly as I'd hoped due to yard work, other plans, and my main priority, my 10 month old boy.  I wasn't sure I was going to post my build on here, but I think it would be best to post my challenges and mistakes for others to learn from or help me with, and to document everything!  Because I started a little while ago it may take me a few posts to catch you up on what I've done to date.

Here were my main goals when I started:
  • I wanted it to play NBA Jam and TMNT.  These were my favorite games as a kid, and were the inspiration for building this cab
  • I wanted it to be four players.
  • I wanted to make use of what I had laying around to help save money.  This included the computer and some wood I had left over from the bar I built in my basement a year and a half ago

Aside from that I was pretty open.  I started browsing the web and these forums to find a cab shape that I liked and a control panel I wanted to emulate.  The two biggest influences (so far) have been OND's Metropolis Cabhttp://forum.arcadecontrols.com/index.php/topic,118612.0.html and ChanceKJ's Flynn's Arcade build http://forum.arcadecontrols.com/index.php/topic,135116.0.html.

Using these builds as my guide, I set off designing my cab around 2 things:  the all-in-one Dell XPS One that had been gathering dust in my basement since it hard drive had died, and making sure this thing would fit through the doors between my garage and the basement.  I have access to Microsoft Visio on my work laptop so I used that to mock up the entire thing, including the control panel.  I'll post some images of what my Visio plans once I remember to get the off that computer.  This software seemed to work really well for what I needed.

As far as artwork goes, I've decided the cab is going to be black and yellow/gold based off the dorm I lived in during college, Morrissey Manor http://morrissey.nd.edu/.  It's a beautiful building (on the outside at least) and would fit in with the sports bar theme I have going in my basement already.  I mocked up a marquee in Microsoft Project:


I also came up with a side art concept (I know the yellows don't match yet)


After pouring through these forums and looking at the games I wanted to run, I decided on 6 buttons for players 1 and 2, and 4 buttons for players 3 an 4.  I also wanted a trackball.  I considered a spinner but opted to leave it off.

Here is my Control Panel Layout.  I designed it in Visio using dimensions from Slagcoin http://www.slagcoin.com/joystick/layout.html:


As you can see I've opted for a Start and Coin button for each player, and 4 admin buttons.  I've current got one labeled as pause and one as exit, and I plan on using the other two as volume buttons (but I'm open to suggestions here).

Here are the parts I've purchased for the control panel:
From Ultimarc https://www.ultimarc.com/
32 Yellow Classic Pushbuttons
4.8 mm Crimp Connectors
I-PAC 4
4 Black Oval-Top J-Stiks
1 Joystick Mounting Kits (meant to order 4...oops.  I'll figure this out)
PCB Mounting Feet
U-TRAK FlushMount Arcade Trackball with Pearl ball (in case some day I decide to light it with LEDs)

From Arcade Emulator http://arcadeemulator.net/
Yellow Replacement Trackball
4 Player Coin Door Assembly and Cashbox

I think I'm going to call it quits for my first post.  I'll try to share more details of my cab design this week, along with pictures of my progress, and some of my questions, issues, and concerns.  I look forward to sharing this with all of you!

reptileink

  • Trade Count: (0)
  • Full Member
  • ***
  • Offline Offline
  • Posts: 524
  • Last login:July 28, 2023, 11:30:55 am
  • An 8 bit hero
Re: First Build - "ManorCade" Four Player Cab
« Reply #1 on: June 02, 2015, 04:47:47 pm »
Looks like a great start, hoping to see some build pics soon!  :cheers:

~Building Arcade Cabinets are like raising children, you always mess up your first~

Slippyblade

  • Trade Count: (+2)
  • Full Member
  • ***
  • Offline Offline
  • Posts: 3167
  • Last login:June 05, 2024, 10:30:57 am
  • And to the death god we say, "Not today!"
Re: First Build - "ManorCade" Four Player Cab
« Reply #2 on: June 02, 2015, 07:17:21 pm »
I love the aircraft carrier CP. Good start! 

Ond

  • Trade Count: (0)
  • Full Member
  • ***
  • Offline Offline
  • Posts: 2349
  • Last login:June 06, 2025, 05:39:15 pm
Re: First Build - "ManorCade" Four Player Cab
« Reply #3 on: June 02, 2015, 08:22:30 pm »
Nice to see somebody using Visio for Cab design.  I think it's a great tool to use for this purpose, it's easy to use and has plenty of snap and glue tool functions, it also has scaling features which mean you can print out control panel layouts accurately and use them as cutting guides with a router etc.

I like that you're taking what you want from other peoples designs and coming up with your own build plan.  Keen to see how it develops.

yotsuya

  • Trade Count: (+21)
  • Full Member
  • ***
  • Offline Offline
  • Posts: 19959
  • Last login:June 16, 2025, 05:43:24 pm
  • 2014 UCA Winner, 2014, 2015, 2016 ZapCon Winner
    • forum.arcadecontrols.com/index.php/topic,137636.msg1420628.html
Re: First Build - "ManorCade" Four Player Cab
« Reply #4 on: June 02, 2015, 08:29:53 pm »
***Build what you dig, bro. Build what you dig.***

Manorite

  • Trade Count: (0)
  • Full Member
  • ***
  • Offline Offline
  • Posts: 59
  • Last login:March 27, 2021, 05:40:14 pm
  • Just getting started!
Re: First Build - "ManorCade" Four Player Cab
« Reply #5 on: June 02, 2015, 08:35:21 pm »
Thanks guys!  I'll catch you up on what I've done for the build so far.  I bought two pieces of cabinet grade birch plywood from Home Depot, and the rest of the cuts were going to be made from some pieces of leftover oak plywood I had in my garage.  I figured they were both hardwood and it is all going to be painted so it didn't matter that they didn't match.  I went with wood over MDF because I already had some wood I wanted to use, and because I'm doing so much of this by myself, 4x8 sheets of MDF are ridiculously heavy.  In my mind hardwood plywood will also last longer/take more abuse, but that could just be in my mind.

Here are the build pics I have so far:

First, I drew out one of my side panels on the plywood, and using a combination of a table saw, circular saw, and jigsaw, I cut it out.  The table saw is too difficult to use for the very large sheets of plywood, even with two people, so I've mostly stuck with using the circular saw and clamping straight edges to use as a guide, and it's worked well.
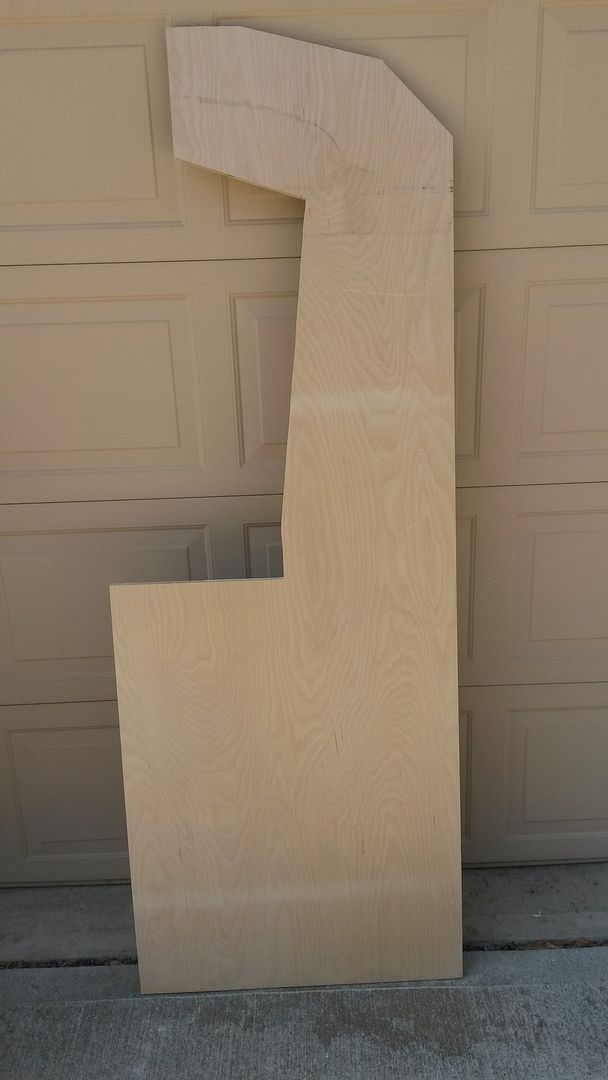


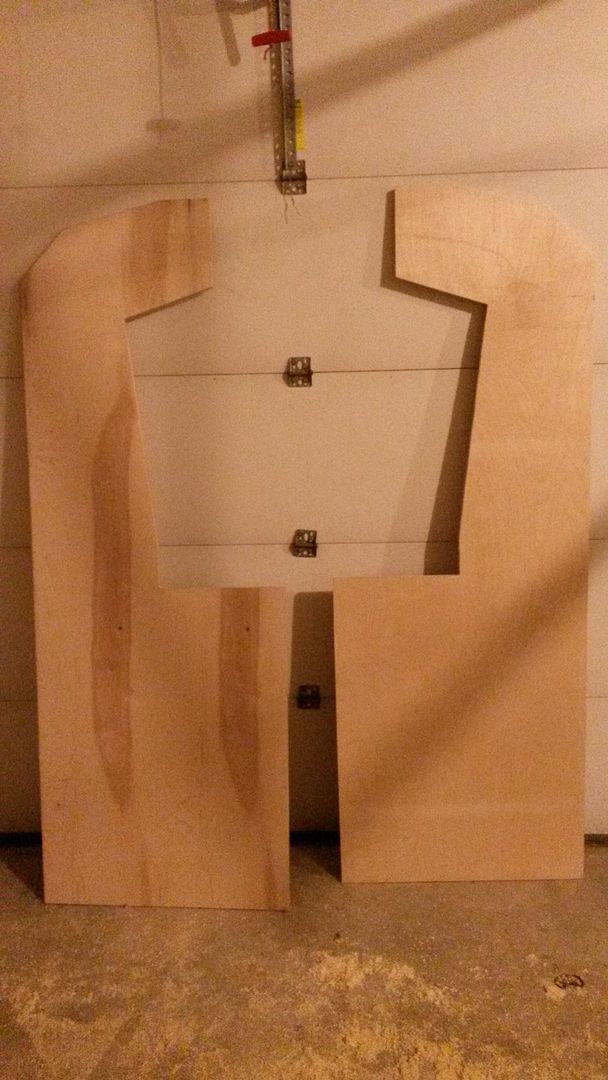
I was really happy with how that turned out, and following the guidance of other builders I bought myself a flush trim bit (or pattern bit) from Amazon http://smile.amazon.com/dp/B0000225XQ for my router to cut out the second piece.  I traced the first piece onto the plywood, and rough cut around that traced line with my jigsaw.  I then used the flush trim bit (there are a lot of videos online that show you how to use it) to make an exact copy!  This turned out way better than had I tried to cut this one out by hand again.


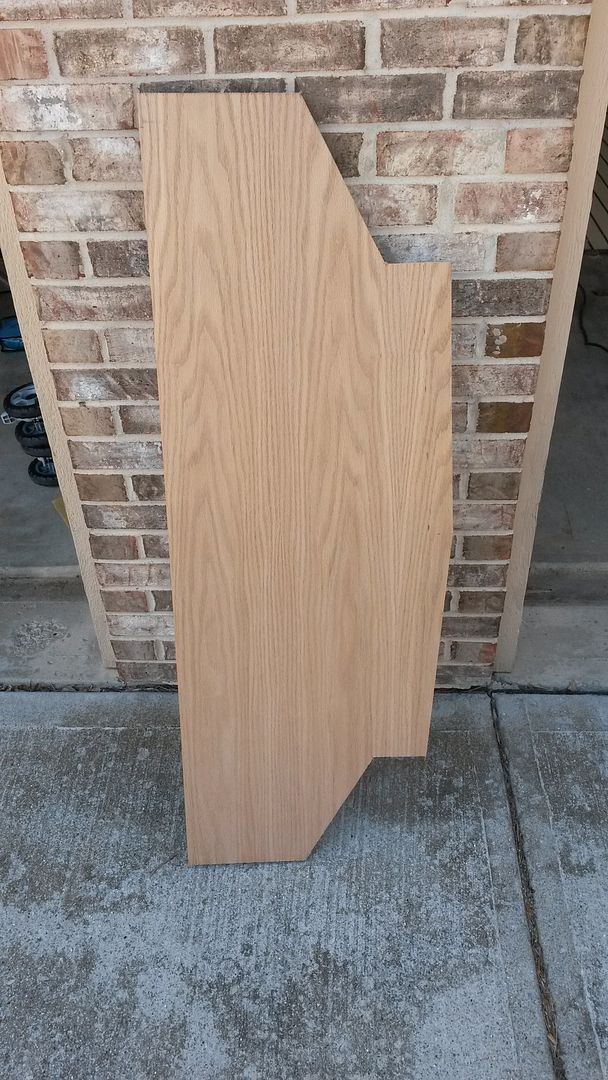
I then proceeded to cut out the top and bottom of the control panel.  This was considerably easier than cutting out the side panels.  Here is the top right after I cut it:


Now I was pretty sure I had all of the parts cut that would be receiving t-molding, so I went ahead and used my slot cutter (I got this one http://smile.amazon.com/dp/B0002TUCRA) around all the edges.  Adjusting this so that it lined up exactly in the middle of the plywood was a bit of a pain, but for the most part it went well:
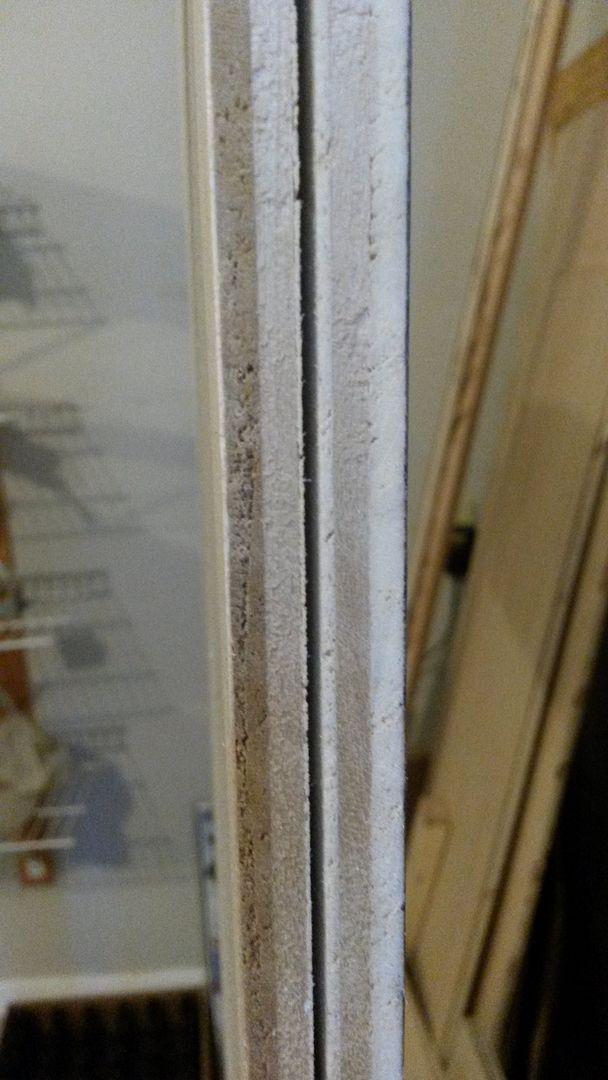


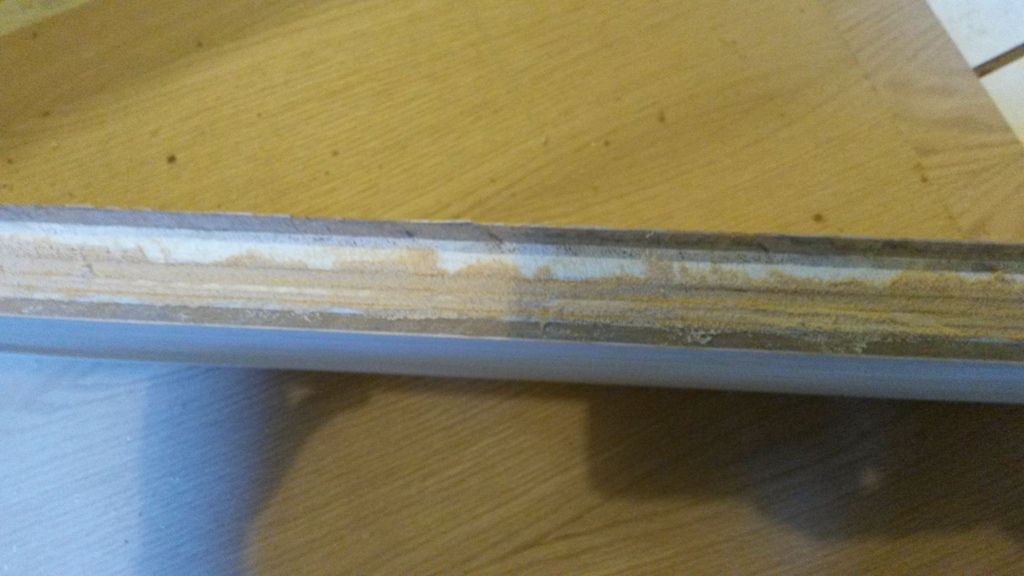
I did screw it up in a few places around the control panel, it apparently wasn't sitting flat, or i'd adjusted it wrong, or something.  I ended up filling that slot back in with wood filler, and I'm going to re-cut it.  Here is how the wood filler worked, I haven't  re-cut it yet, I'll let you know how that goes when I do:


I also cut out a few of the front panels, I haven't taken any pictures of those yet as they aren't exciting, just some squares.

Next, I cut out the sides of the control panel.  This was annoying because of the shape of my control panel, and the fact that I wanted a slight slope from back to front.  The angles weren't perfect, and I had to remake a few pieces (I still have one to remake and I need to cut the slope onto one of the others I re-made as you can see), but it worked out as well as I could hope and it's not going to be glaringly visible.  I've decided that I'm assembly this using pocket holes, so I've drilled all the pocket holes on to the inside of the bottom of the CP.  Once I re-cut that final piece I'll screw these in.
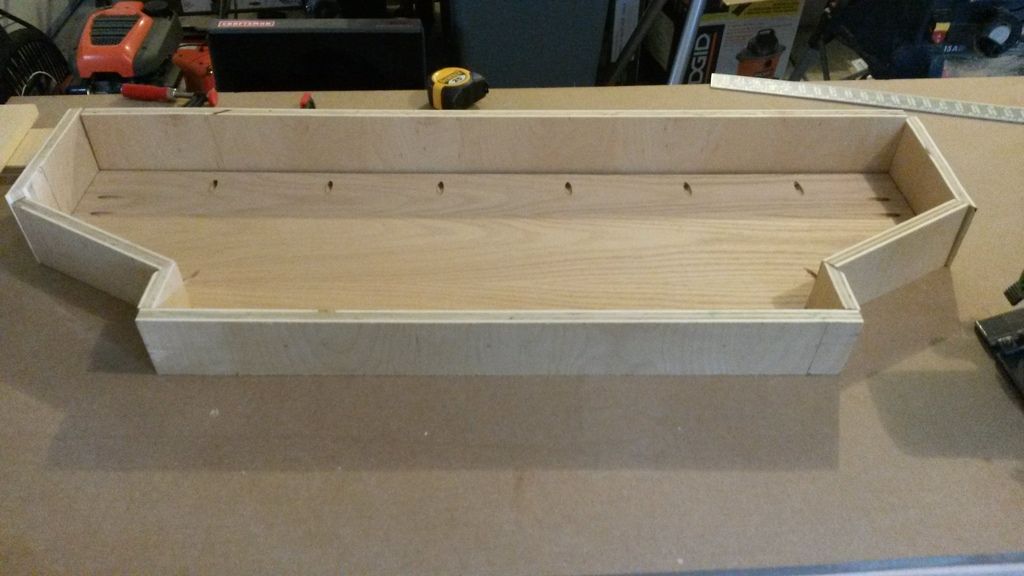


That's as far as I've gotten on my build!  After I finish the CP (aside from drilling holes), I'm going to cut out the rest of the large panels for the back, top, and bezel.


Manorite

  • Trade Count: (0)
  • Full Member
  • ***
  • Offline Offline
  • Posts: 59
  • Last login:March 27, 2021, 05:40:14 pm
  • Just getting started!
Re: First Build - "ManorCade" Four Player Cab
« Reply #6 on: June 02, 2015, 08:44:38 pm »
Does anyone have good advice on how to pick the yellow color of my CP Overlay, Marquee, and side panels?  I plan on ordering them from Game On Graphix http://www.gameongrafix.com/ soon, but I'd like the color to match the buttons as well as I can.  Would printing things out on my personal ink jet printer and comparing to the buttons get me close?  The color of my t-molding, buttons, and replacement trackball don't match exactly, but I didn't see any getting around that.


Manorite

  • Trade Count: (0)
  • Full Member
  • ***
  • Offline Offline
  • Posts: 59
  • Last login:March 27, 2021, 05:40:14 pm
  • Just getting started!
Re: First Build - "ManorCade" Four Player Cab
« Reply #7 on: June 02, 2015, 09:17:37 pm »
Here is the computer I'm going to use. 


It's a Dell XPS One, all in one computer.  It was my wife's computer from before we were married, and the hard drive had died so it's been sitting in a closet for years.  I bought a new hard drive for it, reinstalled windows, and now all it has on it is MAME, a few emulators, and HyperSpin (what a pain to set up...).  The positives of this computer are that it has a very nice looking display, I don't have to have a separate free standing tower, and all it cost me was a new hard drive.  It also has a Bluetooth keyboard and mouse, so I'm not going to build any sort of keyboard tray into the cab, I'll just store these in the back.  The downside is that I'm going to need to make sure I have good air flow through the cab, and I can't mount it using VESA brackets.

I also bought a dongle so that I can use x-box controllers wirelessly with it for any console games in which my button layout isn't ideal.

reptileink

  • Trade Count: (0)
  • Full Member
  • ***
  • Offline Offline
  • Posts: 524
  • Last login:July 28, 2023, 11:30:55 am
  • An 8 bit hero
Re: First Build - "ManorCade" Four Player Cab
« Reply #8 on: June 03, 2015, 09:42:03 am »
As far as the buttons, disassemble them, and buy a box of RIT yellow dye. Dump the whole contents of the dye into an old saucepan and bring to a boil. Back down the boil to a low simmer and place your buttons inside. Check the buttons(every couple of minutes), and let sit for approx an hour. This should get them bright yellow. Someone here did the same thing, and I've used this in the past when customizing action figures. Works great!

~Building Arcade Cabinets are like raising children, you always mess up your first~

Manorite

  • Trade Count: (0)
  • Full Member
  • ***
  • Offline Offline
  • Posts: 59
  • Last login:March 27, 2021, 05:40:14 pm
  • Just getting started!
Re: First Build - "ManorCade" Four Player Cab
« Reply #9 on: June 03, 2015, 12:17:55 pm »
That's an interesting idea. Has anyone tried that with t-molding?

yotsuya

  • Trade Count: (+21)
  • Full Member
  • ***
  • Offline Offline
  • Posts: 19959
  • Last login:June 16, 2025, 05:43:24 pm
  • 2014 UCA Winner, 2014, 2015, 2016 ZapCon Winner
    • forum.arcadecontrols.com/index.php/topic,137636.msg1420628.html
Re: First Build - "ManorCade" Four Player Cab
« Reply #10 on: June 03, 2015, 12:45:53 pm »
That's an interesting idea. Has anyone tried that with t-molding?

I dunno. Long lengths of t-molding can get really unwieldy to manage. That's probably why I don't think I've seen anyone try it.
***Build what you dig, bro. Build what you dig.***

Manorite

  • Trade Count: (0)
  • Full Member
  • ***
  • Offline Offline
  • Posts: 59
  • Last login:March 27, 2021, 05:40:14 pm
  • Just getting started!
Re: First Build - "ManorCade" Four Player Cab
« Reply #11 on: June 03, 2015, 04:28:38 pm »
That makes sense. I have a very large pot I could try it in with the T-molding coiled up, just not sure if it would hold its form and still be installable. Any experience trying to match a cp overlay color with button colors?

Manorite

  • Trade Count: (0)
  • Full Member
  • ***
  • Offline Offline
  • Posts: 59
  • Last login:March 27, 2021, 05:40:14 pm
  • Just getting started!
Re: First Build - "ManorCade" Four Player Cab
« Reply #12 on: June 03, 2015, 10:08:10 pm »
So I thought I'd list a few of the things I haven't finished/decided on/purchased yet, and see if you guys have any advice for me.  I'll probably forget something but let's give it a go:

  • The all-in-one computer I am using has built in speakers on the side of the monitor.  The speakers are pretty decent, and I originally had planned on using them.  Trying to design a bezel with speaker holes on the side has proven to be difficult, so I'm now leaning toward simply hooking up external 2.1 pc speakers like many others have done.  Thoughts?
  • I've also been debating between using plexiglass or tempered glass.  I have a trackball and some very animated friends, so I'm wondering if pelxi would be best?  And should I have it be smoked or not, as I'm using a computer monitor and not a CRT?  Not sure what it would look like with smoked plexi/glass.
  • I need to figure out how to retain my marquee.  I plan on buying my marquee from game on grafix, the ultimate with two sheets of plexi.  I feel like I should go to Lowe's or Home Depot and browse and see what I can find.
  • I bought these LEDs to go in the front of my cab (OND Metropolis Cab Style) http://smile.amazon.com/dp/B00OWKCMZ0.  Do you think these could light my marquee too, or should I find something more like a tube?  My marquee is ~27" long.
  • I was originally going to order my side art from game on grafix as well, but seeing how simple I plan on having it be, I'm now thinking about making stencils and painting the logo and building silhouette myself to save money.  If this would look like crap I won't do it.  Thoughts?
  • I'm happy with my CP overlay design, but I am worried about getting the joystick arrows centered around the joysticks, and if I'm off even slightly that it would look bad.  Are these hard to install perfectly?  Also along those lines, should I send it to print exactly as I displayed it in my original post, or should I fill in all the sides with black and print it as a full rectangle, with all of the extra just getting trimmed off?  With the size of my giant aircraft carrier CP it won't be cheap and I don't want to screw it up.

Manorite

  • Trade Count: (0)
  • Full Member
  • ***
  • Offline Offline
  • Posts: 59
  • Last login:March 27, 2021, 05:40:14 pm
  • Just getting started!
Re: First Build - "ManorCade" Four Player Cab
« Reply #13 on: June 04, 2015, 10:12:38 pm »
I made some progress on the control panel tonight.  I've got the lower box completed, it just needs a bit of sanding and touch ups.  It has a slight slope from back to front.


I bought this to attach the top panel.  http://smile.amazon.com/dp/B00GI1CWHO Hopefully it it will hold up the weight of that CP top.

Next step is to cut out the rest of the panels for the cab and start assembling that.

Manorite

  • Trade Count: (0)
  • Full Member
  • ***
  • Offline Offline
  • Posts: 59
  • Last login:March 27, 2021, 05:40:14 pm
  • Just getting started!
Re: First Build - "ManorCade" Four Player Cab
« Reply #14 on: June 06, 2015, 09:04:29 pm »
Hello all!  I'm about to get my control panel cut template printed off and get started on that, which made me realize I had a few more questions I could use some help with.  I am using 3/4" oak for the top of my control panel, no acrylic on top, and I'm also using j-sticks from ultimarc.  I know that I need to route out the underneath side of the CP for the j-stick mounting plate.  Using this page http://www.slagcoin.com/joystick/mounting_layering.html I've determined that I should leave about 1/4" of thickness to get the right joystick height.  I know I should be using threaded inserts, but I'm struggling to find any that are short enough to not go through the remaining 1/4" of wood I have left.  Can anyone point me to some I could order, or is there some other method I should be using?

Manorite

  • Trade Count: (0)
  • Full Member
  • ***
  • Offline Offline
  • Posts: 59
  • Last login:March 27, 2021, 05:40:14 pm
  • Just getting started!
Re: First Build - "ManorCade" Four Player Cab
« Reply #15 on: June 06, 2015, 09:10:49 pm »
Another downside of using this all-in-one computer is the power button.  This isn't using a typical power supply like you see in a desktop, so I'm not sure I'll be able to wire up a power button into the cab in the traditional way.


This is what the power button looks like from the outside.  I'm wondering if I can find a button with a plunger I could insert in the side and simply push this button physically.  The other option would be to hook some other component into my smart power strip, but I don't think just cutting the power to the computer and not shutting down is a great idea.


Ideas?

Manorite

  • Trade Count: (0)
  • Full Member
  • ***
  • Offline Offline
  • Posts: 59
  • Last login:March 27, 2021, 05:40:14 pm
  • Just getting started!
Re: First Build - "ManorCade" Four Player Cab
« Reply #16 on: June 06, 2015, 09:50:59 pm »
Would something like this S plate be necessary to mount these j-sticks under my CP without having any nuts/screws/bolts exposed on the top?

http://www.focusattack.com/kowal-japan-s-plate-converter/?page_context=search&faceted_search=0#

Manorite

  • Trade Count: (0)
  • Full Member
  • ***
  • Offline Offline
  • Posts: 59
  • Last login:March 27, 2021, 05:40:14 pm
  • Just getting started!
Re: First Build - "ManorCade" Four Player Cab
« Reply #17 on: June 07, 2015, 11:05:51 pm »
I've realized that this all-in-one PC came with a remote control with a power button on it, so that could be the easy solution to my power button issue!

Manorite

  • Trade Count: (0)
  • Full Member
  • ***
  • Offline Offline
  • Posts: 59
  • Last login:March 27, 2021, 05:40:14 pm
  • Just getting started!
Re: First Build - "ManorCade" Four Player Cab
« Reply #18 on: June 11, 2015, 11:52:51 pm »
I made some progress by purchasing some things I needed tonight.  I went ahead and bought 4 of those KOWAL Japan S Plate Converters from Focus Attack, so that I can mount my joysticks with no hardware on top of the CP.  I can route the main part of the plate down to about 1/4" of material, and leave 1/2" of material on the s plate lip.  I contacted Focus Attack before I purchased them asking for dimensions, and they passed along this link saying the dimensions were the same as the Seimitsu LS-32 SS-Plate if anyone is interested http://wiki.arcadeotaku.com/w/File:Seimitsu-SSMeasurement.jpg

I ordered these threaded inserts http://smile.amazon.com/dp/B00270ZSIU (my CP is oak, which is why I ordered the knife threads) which are 3/8" in length.  I ordered these machine screws http://smile.amazon.com/dp/B00F34V2ZA to mount the joysticks and s plates in the inserts.  These should work i place of the joystick mounting kits i forgot to order, and hopefully work better because of my CP material and thickness.

I also took the plunge and bought a paint sprayer.  I bought the Critter Sprayer http://smile.amazon.com/dp/B00006FRPJ because it has great reviews, is $40, and I have an air compressor that will work with it.  It's a great design with the mason jars and is supposed to be easy to clean.  I'm going to try to use it to stain my fence as well.  I bought the repair kit (for extra gaskets and other parts), a respirator, goggles, and this filter http://smile.amazon.com/dp/B001NSYV58 to help keep water from the compressor out of my paint.

I've finished my cut template for the CP, and I think I'm going to get it printed at Staples, as their website says they do "engineering prints" on 48"x36" paper for about $8.  If anyone has a better suggestion let me know.

Headed out of town for a wedding this weekend, but hopefully I can get some more boards cut on Sunday when I get back.

Manorite

  • Trade Count: (0)
  • Full Member
  • ***
  • Offline Offline
  • Posts: 59
  • Last login:March 27, 2021, 05:40:14 pm
  • Just getting started!
Re: First Build - "ManorCade" Four Player Cab
« Reply #19 on: June 17, 2015, 10:55:51 pm »
I got a few more panels cut earlier this week, and I'm trying to finalize my back panel access design before I make the final few cuts.  I'm leaning heavily toward routing a 3/4" slot in the base piece to rest the back panel in on the bottom, and using some barrel bolts on the top.  Once I've settled on that I can cut the panels around the top and start some assembly.

I received my KOWAL s-plates from Focus Attack and they fit perfectly.  This should help me under-mount my j-stiks with no hardware on top of the CP.  They also have a slightly smaller footprint, which should be good.


I went ahead and installed the yellow trackball I got from Arcade Emulator into my U-TRAK.  When I ordered it, I didn't realize it was translucent:


When I shine an LED flashlight under it...it looks awesome!  I now wish I'd ordered the LED lighting kit from Ultimarc.  I'm trying to find something I can rig up, but if I don't I may end up ordering that LED lighting kit.  Maybe I can disassemble this flashlight and re-purpose it?


yotsuya

  • Trade Count: (+21)
  • Full Member
  • ***
  • Offline Offline
  • Posts: 19959
  • Last login:June 16, 2025, 05:43:24 pm
  • 2014 UCA Winner, 2014, 2015, 2016 ZapCon Winner
    • forum.arcadecontrols.com/index.php/topic,137636.msg1420628.html
Re: First Build - "ManorCade" Four Player Cab
« Reply #20 on: June 17, 2015, 11:15:53 pm »
I got a few more panels cut earlier this week, and I'm trying to finalize my back panel access design before I make the final few cuts.  I'm leaning heavily toward routing a 3/4" slot in the base piece to rest the back panel in on the bottom, and using some barrel bolts on the top.  Once I've settled on that I can cut the panels around the top and start some assembly.

I received my KOWAL s-plates from Focus Attack and they fit perfectly.  This should help me under-mount my j-stiks with no hardware on top of the CP.  They also have a slightly smaller footprint, which should be good.


I went ahead and installed the yellow trackball I got from Arcade Emulator into my U-TRAK.  When I ordered it, I didn't realize it was translucent:


When I shine an LED flashlight under it...it looks awesome!  I now wish I'd ordered the LED lighting kit from Ultimarc.  I'm trying to find something I can rig up, but if I don't I may end up ordering that LED lighting kit.  Maybe I can disassemble this flashlight and re-purpose it?


You probably can. I did something similar with a U-Trak I had. 
***Build what you dig, bro. Build what you dig.***

Manorite

  • Trade Count: (0)
  • Full Member
  • ***
  • Offline Offline
  • Posts: 59
  • Last login:March 27, 2021, 05:40:14 pm
  • Just getting started!
Re: First Build - "ManorCade" Four Player Cab
« Reply #21 on: June 17, 2015, 11:36:53 pm »
Is this what you mean? http://forum.arcadecontrols.com/index.php/topic,131030.msg1342697.html#msg1342697

That's almost exactly what I've been searching amazon for, some kind of small, cheap LED I can mount under this u-trak.  I've found some PCBs that would probably work, but they don't come with the LEDs and I'd need to teach myself how to do that. http://smile.amazon.com/dp/B00O9VVUEQ

yotsuya

  • Trade Count: (+21)
  • Full Member
  • ***
  • Offline Offline
  • Posts: 19959
  • Last login:June 16, 2025, 05:43:24 pm
  • 2014 UCA Winner, 2014, 2015, 2016 ZapCon Winner
    • forum.arcadecontrols.com/index.php/topic,137636.msg1420628.html
Re: First Build - "ManorCade" Four Player Cab
« Reply #22 on: June 17, 2015, 11:46:06 pm »
Actually,  I hacked a cheap LED flashlight before I bought that board. That's what I was thinking of, but actually,  that little board turned out to be a better option. Go for it!
***Build what you dig, bro. Build what you dig.***

Manorite

  • Trade Count: (0)
  • Full Member
  • ***
  • Offline Offline
  • Posts: 59
  • Last login:March 27, 2021, 05:40:14 pm
  • Just getting started!
Re: First Build - "ManorCade" Four Player Cab
« Reply #23 on: June 18, 2015, 12:05:24 am »
That board does look just like what I need! Do you need to solder the power onto the board?

yotsuya

  • Trade Count: (+21)
  • Full Member
  • ***
  • Offline Offline
  • Posts: 19959
  • Last login:June 16, 2025, 05:43:24 pm
  • 2014 UCA Winner, 2014, 2015, 2016 ZapCon Winner
    • forum.arcadecontrols.com/index.php/topic,137636.msg1420628.html
Re: First Build - "ManorCade" Four Player Cab
« Reply #24 on: June 18, 2015, 01:07:59 am »
That board does look just like what I need! Do you need to solder the power onto the board?
No, it should have screw terminals.
***Build what you dig, bro. Build what you dig.***

yotsuya

  • Trade Count: (+21)
  • Full Member
  • ***
  • Offline Offline
  • Posts: 19959
  • Last login:June 16, 2025, 05:43:24 pm
  • 2014 UCA Winner, 2014, 2015, 2016 ZapCon Winner
    • forum.arcadecontrols.com/index.php/topic,137636.msg1420628.html
Re: First Build - "ManorCade" Four Player Cab
« Reply #25 on: June 18, 2015, 01:09:00 am »
Just checked. Yeah, get the complete unit.
***Build what you dig, bro. Build what you dig.***

BorgDog

  • Trade Count: (0)
  • Full Member
  • ***
  • Offline Offline
  • Posts: 436
  • Last login:August 22, 2021, 02:22:52 pm
  • Not a hipster for over 50 years!
Re: First Build - "ManorCade" Four Player Cab
« Reply #26 on: June 18, 2015, 08:50:36 am »
Just checked. Yeah, get the complete unit.

What?  What/where complete unit?

Edit:  nevermind, found the link in the linked thread
My Projects:
MisSpent Youth a Vigolix bartop,  Little Bastard a rotating tablet/display bartop,
Pin-Dog a mini pin-cab on vpforums.org  Star Wars a wedgehead pincab on vpinball.com

Manorite

  • Trade Count: (0)
  • Full Member
  • ***
  • Offline Offline
  • Posts: 59
  • Last login:March 27, 2021, 05:40:14 pm
  • Just getting started!
Re: First Build - "ManorCade" Four Player Cab
« Reply #27 on: June 18, 2015, 11:31:10 am »
Just to help others out, here is the link to the trackball light http://www.nicemite.com/LightmiteTB/LightmiteTB.htm

I think I'll give it a go! Since they don't have a white light option, I guess I don't see a reason a yellow led behind a yellow trackball wouldn't work?

yotsuya

  • Trade Count: (+21)
  • Full Member
  • ***
  • Offline Offline
  • Posts: 19959
  • Last login:June 16, 2025, 05:43:24 pm
  • 2014 UCA Winner, 2014, 2015, 2016 ZapCon Winner
    • forum.arcadecontrols.com/index.php/topic,137636.msg1420628.html
Re: First Build - "ManorCade" Four Player Cab
« Reply #28 on: June 18, 2015, 11:32:24 am »
Just to help others out, here is the link to the trackball light http://www.nicemite.com/LightmiteTB/LightmiteTB.htm

I think I'll give it a go! Since they don't have a white light option, I guess I don't see a reason a yellow led behind a yellow trackball wouldn't work?

No, go with the yellow - you'll get a more pure yellow glow.  :cheers:

Whammoed stuff is pretty good. He doesn't get much play here, but I've had good transactions with the guy.
***Build what you dig, bro. Build what you dig.***

Manorite

  • Trade Count: (0)
  • Full Member
  • ***
  • Offline Offline
  • Posts: 59
  • Last login:March 27, 2021, 05:40:14 pm
  • Just getting started!
Re: First Build - "ManorCade" Four Player Cab
« Reply #29 on: June 18, 2015, 01:35:56 pm »
Thanks yotsuya!

Here is an on-the-fly paint mock up of my back panel idea that I did over lunch. The back panel will be inset a half inch from the side panels, as will most of the rest of the panels. Those yellow things are barrel bolts, and the black area is a routed out slot in the base. This will allow me to simply remove most of the back panel completely when needed. This will expose the casters from the back, but I don't think that matters.


Manorite

  • Trade Count: (0)
  • Full Member
  • ***
  • Offline Offline
  • Posts: 59
  • Last login:March 27, 2021, 05:40:14 pm
  • Just getting started!
Re: First Build - "ManorCade" Four Player Cab
« Reply #30 on: June 18, 2015, 09:41:57 pm »
I did a little touch up work tonight on the control panel box.  As you can see, there were some areas where I didn't cut my angles right and had some overhang, so I sanded those down.


After sanding, I used some Elmer's Wood Filler to fill in the gaps between all the boards so that when I paint, it will look more like one solid box.


Hopefully once this is sanded down and painted it will look nice.

I also realized that the machine screws I ordered to install my joysticks were too small, so I jumped up to #6-32 size, and ordered new corresponding threaded inserts.  I also got a threaded rod and some nuts to help install them after seeing how ChanceKJ installed them on his Flynn build and watching a YouTube video.

Manorite

  • Trade Count: (0)
  • Full Member
  • ***
  • Offline Offline
  • Posts: 59
  • Last login:March 27, 2021, 05:40:14 pm
  • Just getting started!
Re: First Build - "ManorCade" Four Player Cab
« Reply #31 on: July 10, 2015, 10:12:29 pm »
I've been on a bit of a hiatus for summertime activities, parents visiting, and a basement flood, but I'm back at it.  I routed out the slot for my back panel tonight, and attached the casters.  I'm hoping to get most of the rest of the panels assembled this weekend.  I also need to finish up my artwork so that I can get it ordered.


It's not shown in this picture, but I used scrap 2x4 pieces on the back side of the casters to attach them to.


BGoulette

  • Trade Count: (0)
  • Full Member
  • ***
  • Offline Offline
  • Posts: 192
  • Last login:March 03, 2025, 04:23:38 pm
    • lazerjoose.com
Re: First Build - "ManorCade" Four Player Cab
« Reply #32 on: July 11, 2015, 12:14:52 am »
That routing looks pretty nice! Do you run into many voids using plywood like that? I'm designing a cab that relies on a butt-ton of rebates, and I'd like the weight savings of plywood, but I'm wary of voids.

Manorite

  • Trade Count: (0)
  • Full Member
  • ***
  • Offline Offline
  • Posts: 59
  • Last login:March 27, 2021, 05:40:14 pm
  • Just getting started!
Re: First Build - "ManorCade" Four Player Cab
« Reply #33 on: July 11, 2015, 04:16:19 pm »
Thanks!  I don't have a ton of experience with my router so I am always a little nervous when I bust it out.  I didn't notice any voids at all in this plywood, but it was left over pretty nice 3/4" oak I used as the top of my bar that I built.  Maybe if you used something cheaper you'd find voids, but I think decent plywood should be pretty void-free.  I haven't noticed any in the other plywood I've been using either.

BGoulette

  • Trade Count: (0)
  • Full Member
  • ***
  • Offline Offline
  • Posts: 192
  • Last login:March 03, 2025, 04:23:38 pm
    • lazerjoose.com
Re: First Build - "ManorCade" Four Player Cab
« Reply #34 on: July 11, 2015, 04:18:30 pm »
Nice! I might have to consider plywood for the sides. I'd been looking at Baltic birch (I think), but I'll look for oak, too. Thanks!

Manorite

  • Trade Count: (0)
  • Full Member
  • ***
  • Offline Offline
  • Posts: 59
  • Last login:March 27, 2021, 05:40:14 pm
  • Just getting started!
Re: First Build - "ManorCade" Four Player Cab
« Reply #35 on: July 11, 2015, 04:21:21 pm »
Cabinet grade Birch is what I'm using for the sides and back, I used the oak I had leftover to save myself some money. I figured they were both hardwood, and once painted should look good.

Manorite

  • Trade Count: (0)
  • Full Member
  • ***
  • Offline Offline
  • Posts: 59
  • Last login:March 27, 2021, 05:40:14 pm
  • Just getting started!
Re: First Build - "ManorCade" Four Player Cab
« Reply #36 on: July 12, 2015, 10:56:29 pm »
Tried to finish off my artwork tonight. A friend sent me the building silhouette artwork, which I vectorize. I then tried to create the full sized side art... But my laptop was struggling with an image that size. I'll have to try again tomorrow on my desktop. Also trying to figure out how to turn my text to outline using GIMP, but I may get a 30 day trial of Adobe illustrator instead, the consensus seems to be that is more suitable.

BGoulette

  • Trade Count: (0)
  • Full Member
  • ***
  • Offline Offline
  • Posts: 192
  • Last login:March 03, 2025, 04:23:38 pm
    • lazerjoose.com
Re: First Build - "ManorCade" Four Player Cab
« Reply #37 on: July 12, 2015, 11:05:51 pm »
How much text are we talking? I could toss it into Illustrator for you, see what's up. Let me know.

Manorite

  • Trade Count: (0)
  • Full Member
  • ***
  • Offline Offline
  • Posts: 59
  • Last login:March 27, 2021, 05:40:14 pm
  • Just getting started!
Re: First Build - "ManorCade" Four Player Cab
« Reply #38 on: July 13, 2015, 07:14:11 pm »
Take a look at the first post, it's the marquee that says "ManorCade", and the CP that has "Coin" and "Start" for all four players, "Pause" and "Exit", "Morrissey Manor" and "Est. 1925".  If it's easy enough I don't mind getting the trial, but if you think it would be quick for you I appreciate the help!

BGoulette

  • Trade Count: (0)
  • Full Member
  • ***
  • Offline Offline
  • Posts: 192
  • Last login:March 03, 2025, 04:23:38 pm
    • lazerjoose.com
Re: First Build - "ManorCade" Four Player Cab
« Reply #39 on: July 13, 2015, 07:55:14 pm »
I could knock that out later tonight or tomorrow without much trouble. Do you want the serif fonts for Coin and Start (looks like Times New Roman or equivalent, but I'm not sure), or would you prefer a different font? something more inline with the "manorcade" futuristic font. Also, do you want EPS files or something else? Say the word! :)