Main Restorations Software Audio/Jukebox/MP3 Everything Else Buy/Sell/Trade
Project Announcements Monitor/Video GroovyMAME Merit/JVL Touchscreen Meet Up Retail Vendors
Driving & Racing Woodworking Software Support Forums Consoles Project Arcade Reviews
Automated Projects Artwork Frontend Support Forums Pinball Forum Discussion Old Boards
Raspberry Pi & Dev Board controls.dat Linux Miscellaneous Arcade Wiki Discussion Old Archives
Lightguns Arcade1Up Try the site in https mode Site News

Unread posts | New Replies | Recent posts | Rules | Chatroom | Wiki | File Repository | RSS | Submit news


Author Topic: Micro Coleco Donkey Kong Tabletop [FINISHED]  (Read 42655 times)

0 Members and 1 Guest are viewing this topic.

vwalbridge

  • Trade Count: (0)
  • Full Member
  • ***
  • Offline Offline
  • Posts: 2082
  • Last login:July 31, 2021, 12:21:09 pm
  • Don't half-ass two things, whole-ass one thing.
Micro Coleco Donkey Kong Tabletop [FINISHED]
« on: May 29, 2015, 12:26:04 pm »
This is going to be my 2nd arcade build. You can see my first Mini Donkey Kong build here: Mini Donkey Kong

So what should I do for my 2nd build? Well...make Donkey Kong even smaller of course! I will be building a Micro Donkey Kong Coleco tabletop this time.

I want to make sure I give proper credit to those who inspired me to do this build:

Vidiot - His awesome Relic build found here: Relic Relic Coleco Tabletop

And...

nhenry1647 - His fantastic Coleco Pac-man Mame system found here: Coleco Pac-Man Mame

For me, these guys started it all so everything I do in my build, I'm giving credit to them. I might even steal a few ideas from each of them. Hopfully they don't mind!

Here is where I'll try to be different: I'm going to try and get Hyperspin stuffed into this thing.

Well here she is. Found this broken Donkey Kong Coleco on eBay for $35. These little guys are getting a bit expensive...even the broken ones!


As you can tell, it is in bad shape. Joystick broken off. Decals are faded and peeling off. Battery cover is missing. Battery terminals are totally rusted out and it doesn't power on. But that's fine because this thing is going to get totally overhauled.


I disassembled the entire machine:


De-soldered the main board from the battery terminals:


Removed all the decals:


You can see how badly the plastic discolored over 30 years. The edges almost turned green:
« Last Edit: August 26, 2015, 02:59:56 pm by vwalbridge »
If you can read this, it means Photobucket's money grab ruined my signature photos.

yotsuya

  • Trade Count: (+21)
  • Full Member
  • ***
  • Offline Offline
  • Posts: 19958
  • Last login:April 26, 2025, 06:30:57 pm
  • 2014 UCA Winner, 2014, 2015, 2016 ZapCon Winner
    • forum.arcadecontrols.com/index.php/topic,137636.msg1420628.html
Re: Micro Coleco Donkey Kong Tabletop
« Reply #1 on: May 29, 2015, 12:29:20 pm »
I'm surprised you're not going the Pi route. Or that no one has rabidly insisted you go the Pi route.  :cheers:
***Build what you dig, bro. Build what you dig.***

vwalbridge

  • Trade Count: (0)
  • Full Member
  • ***
  • Offline Offline
  • Posts: 2082
  • Last login:July 31, 2021, 12:21:09 pm
  • Don't half-ass two things, whole-ass one thing.
Re: Micro Coleco Donkey Kong Tabletop
« Reply #2 on: May 29, 2015, 12:34:44 pm »
I'm surprised you're not going the Pi route. Or that no one has rabidly insisted you go the Pi route.  :cheers:

Hi yotsuya!  Yes, looking back, the Pi would have been easier but I always wanted to see Hyperspin on something really small. It has been a real challenge to say the least.  :laugh:

Found 4.3 inch HDMI LCD screen from eBay. Looks like it will fit perfectly:


I also took apart my joystick to replace the switches with micro leaf switches just like Vidiot. The stock switches click way to loud:
If you can read this, it means Photobucket's money grab ruined my signature photos.

yotsuya

  • Trade Count: (+21)
  • Full Member
  • ***
  • Offline Offline
  • Posts: 19958
  • Last login:April 26, 2025, 06:30:57 pm
  • 2014 UCA Winner, 2014, 2015, 2016 ZapCon Winner
    • forum.arcadecontrols.com/index.php/topic,137636.msg1420628.html
Re: Micro Coleco Donkey Kong Tabletop
« Reply #3 on: May 29, 2015, 12:36:01 pm »
I like the way you think, brother!  :cheers:
***Build what you dig, bro. Build what you dig.***

vwalbridge

  • Trade Count: (0)
  • Full Member
  • ***
  • Offline Offline
  • Posts: 2082
  • Last login:July 31, 2021, 12:21:09 pm
  • Don't half-ass two things, whole-ass one thing.
Re: Micro Coleco Donkey Kong Tabletop
« Reply #4 on: May 29, 2015, 12:40:43 pm »
I like the way you think, brother!  :cheers:

Thanks yotsuya!  I think the challenge of this build has been worth it.

I wanted to see if I could power my LCD screen from USB so I found and old power plug and USB cable. I then stripped the ends off. (The green and white cables on the USB are not needed here). I just needed to match up the black and red cables.


However, the power plug I have didn't have colors so I have to use my volt meter to determine the polarity. Turns out the inside of the barrel plug was red and the outside was black:


Twisted all the wires together, plugged the USB cable into my laptop and boom!...it turns on! This makes it really easy to power my micro cab because now I only have to worry about powering the computer. Everything else will power over USB.
If you can read this, it means Photobucket's money grab ruined my signature photos.

vwalbridge

  • Trade Count: (0)
  • Full Member
  • ***
  • Offline Offline
  • Posts: 2082
  • Last login:July 31, 2021, 12:21:09 pm
  • Don't half-ass two things, whole-ass one thing.
Re: Micro Coleco Donkey Kong Tabletop
« Reply #5 on: May 29, 2015, 12:44:58 pm »
Working on my joystick and case. (all the credit goes to Vidiot for the Joystick idea...thanks!):

I center punched the ball top for my joystick:


Then wrapped it with tape so that my pliers didn't scratch it while I drilled it. Started with the smallest drill bit I had and worked my way up:


I drilled out a few if these so that I can test paint on them. I think that I'll just epoxy the ball top on when ready.


I also used my dremel to cut away the battery chamber on the Coleco base. Surprised how easy that was to remove. I was really worried that was going to difficult:
If you can read this, it means Photobucket's money grab ruined my signature photos.

vwalbridge

  • Trade Count: (0)
  • Full Member
  • ***
  • Offline Offline
  • Posts: 2082
  • Last login:July 31, 2021, 12:21:09 pm
  • Don't half-ass two things, whole-ass one thing.
Re: Micro Coleco Donkey Kong Tabletop
« Reply #6 on: May 29, 2015, 12:52:08 pm »
Removed the unnecessary posts from the upper-inside of the cab to make as much room as possible:


Cut out a piece of Kydex to become the new control panel surface:


Used a plastic scoring knife to cut out the marquee:


Cut the opening for the 4.3 inch LCD screen:


The opening for the marquee. This took some patience to ensure that I didn't crack the bottom edge:


Measured for the exact width of the existing bezel plastic:


Rounded the corners and the new bezel plastic fits right in:


I also cut out the new marquee plastic. This was really hard. I couldn't really trace anything so I had to cut it by eye and sand the edges like crazy:


I also threw in a picture of my current work space. I can't believe how many parts and tools this little project requires! You will notice the NES30 controller on the table...I'll be integrating that into this build.  ;)
If you can read this, it means Photobucket's money grab ruined my signature photos.

vwalbridge

  • Trade Count: (0)
  • Full Member
  • ***
  • Offline Offline
  • Posts: 2082
  • Last login:July 31, 2021, 12:21:09 pm
  • Don't half-ass two things, whole-ass one thing.
Re: Micro Coleco Donkey Kong Tabletop
« Reply #7 on: May 29, 2015, 01:04:08 pm »
For the brains of the arcade, I'm using a Zotac Pi320. It normally looks like this:


But I have de-cased it and it now it looks like this. (It's about the size of an iPhone 4. It's amazing this thing runs Windows 8.1  Quite frankly, I wish it didn't because I really love win7 better. I had to make MAJOR changes to get win8 to behave the way I like it. )


For my sound setup, I'm using a 5v potentiometer. So I could easily strip down a USB cable and solder the power from that to the potentiometer. I also soldered up a speaker and the mini-plug. It sounds pretty good and loud enough but I'm getting some background static. There is a GROUND pin-out on the potentiometer so maybe I need to use that. This potentiometer actually supports 2 speakers! Not sure how "stereo" it will sound in such a small space but I guess I might as well use them both.


Here is my artwork. Very happy with it! Big thanks to BYOAC member lucian045 for printing it!


I couldn't find motherboard stand-offs small enough for my computer so I had to go to my local hardware store and find some screws that were small enough. However, I needed to slightly drill out the existing holes on the board to accommodate them. I had to be super careful doing this.


The screws lift up the board just the right amount and give it a stable platform


Here it is inside the Coleco shell. I needed it raised up so that i clears the cut edge of the existing battery chamber.
If you can read this, it means Photobucket's money grab ruined my signature photos.

vwalbridge

  • Trade Count: (0)
  • Full Member
  • ***
  • Offline Offline
  • Posts: 2082
  • Last login:July 31, 2021, 12:21:09 pm
  • Don't half-ass two things, whole-ass one thing.
Re: Micro Coleco Donkey Kong Tabletop
« Reply #8 on: May 29, 2015, 01:18:19 pm »
Working on my backlit marquee. Applied glue to the back of the marquee:


Pressed aluminium foil to the glue:


Cut the edges of the aluminium foil off:


My LED strip already had adhesive material on the back so I just stuck it down:


I then used epoxy to glue the 2 sides behind the marquee. Turns out a roll off electrical tape and a rubics cube were the perfect weight to hold it in place.   ;)


Here is it is glued in place:


I then spliced an opening in the power line so as to fit it inside the case:


Ran it down the inside edge. I'll just hot glue it in place back there.


It will slide through this opening in the face-plate nicely.


I also started working on my joystick and soldering in the ground wires. I first needed to bend the pins over. I need make as much room as possible inside.


Here is most of the stuff that needs to fit inside. It's going to be a very tight fit indeed. You can see the illuminated marquee down there. It's so bright that you can see the light bleeding through the sides! Luckily the artwork will cover most of that. You can also see Hyperspin already up and running on the screen.


My first coat of paint has gone on pretty well. I was nervous to paint plastic. I've never done it before but this new plastic paint is really looking good so far:


Peeled away the tape on my marquee.


That Frog Tape did a good job keeping the paint from bleeding:


Painted control panel:


Roughly assembled:


Control switches. (I put 3 layers of paint on these and then realized it started to gum-up the movement. I might need to paint another set and tape them off this time)


Joystick ball top. This has been a royal PAIN to paint. The wood soaked up all the paint on the first 2 coats. I'm on coat number 4 right now and will still need to do another 4 at least. Then I will clear coat it.
If you can read this, it means Photobucket's money grab ruined my signature photos.

BorgDog

  • Trade Count: (0)
  • Full Member
  • ***
  • Offline Offline
  • Posts: 436
  • Last login:August 22, 2021, 02:22:52 pm
  • Not a hipster for over 50 years!
Re: Micro Coleco Donkey Kong Tabletop
« Reply #9 on: May 29, 2015, 01:21:02 pm »
Awesome little project!  I couldn't wait so headed over to bartopmainia and read it there  :applaud:
My Projects:
MisSpent Youth a Vigolix bartop,  Little Bastard a rotating tablet/display bartop,
Pin-Dog a mini pin-cab on vpforums.org  Star Wars a wedgehead pincab on vpinball.com

vwalbridge

  • Trade Count: (0)
  • Full Member
  • ***
  • Offline Offline
  • Posts: 2082
  • Last login:July 31, 2021, 12:21:09 pm
  • Don't half-ass two things, whole-ass one thing.
Re: Micro Coleco Donkey Kong Tabletop
« Reply #10 on: May 29, 2015, 01:24:40 pm »
Awesome little project!  I couldn't wait so headed over to bartopmainia and read it there  :applaud:

Thanks BorgDog! Appreciate the compliments! I see that you have built a mini pin. I've always wanted to do that. Definitely need to read your build thread.
If you can read this, it means Photobucket's money grab ruined my signature photos.

vwalbridge

  • Trade Count: (0)
  • Full Member
  • ***
  • Offline Offline
  • Posts: 2082
  • Last login:July 31, 2021, 12:21:09 pm
  • Don't half-ass two things, whole-ass one thing.
Re: Micro Coleco Donkey Kong Tabletop
« Reply #11 on: May 29, 2015, 01:39:59 pm »
I heard mixed results with Krylon so I ended up going with the Rust-oleum brand paint. This stuff is legit. Sprays so clean and leave a very smooth finish. I'll be using the "Clear" can to give my buttons and joystick ball a nice clear protective layer.


I've been spending an unhealthy amount of time thinking about how I'm going to run horizontal games on this micro vertical screen.   :dizzy:  It's a bit complicated because Windows 8.1 needs to run un-rotated, while my vertical themes are rotated 90 degrees. Thus, I needed to create my own NES horizontal theme for Hyperspin. Here is a screenshot below. It's like iTunes coverflow with box art on the bottom with a video preview on top. That's it. No text, no directions, no silly animations. Just find the game and it loads the video preview. This will allow me to have a Vertical FE that organizes horizontal games. I feel like a Hyperspin Jedi now!


Soldered the wires to my joystick. You will notice I also put some heat-shrink tubing around the solder connections. They are pretty delicate so that tubing really helps. I LOVE shrink tubing.


I've needed to make my own USB cables for this build and some need to curve at strange angles. When shrink tubing cools, it retains its shape. Here is the USB cable for my mini ipac bent at the angle I needed


Put some black electrical tape around the inside edge of the bezel. This will prevent any blue color from showing on the edges of the screen.


Applied the bezel artwork to my bezel lexan


Here it is in comparison to the real thing. You can see how much wider the screen is on mine. I had to Photoshop the snot out of it to get it to fit but still look as original as possible.


Soldering up my 3 admin buttons and attaching them with the joystick to my mini ipac for button testing. All the buttons appear to be working! My joystick ball took 8 coats of high gloss white and 2 coats of clear coat.


Hot glued my 4.3 inch LCD to the back of the bezel. I didn't go overboard with the glue. Just tacked it down in some strategic places.


I screwed the bolts onto my stand-off screws about 1/2 cm down. Then pushed them in through the bottom and tacked them in place with hot glue.


I then flipped the board over and hot glued the protruding portion into place. I couldn't just use the same bolts on the top side because there were parts of the board in the way. The final result is a home made stand for my compute to rest on. The hot side of the board is on the buttom so it will help with air-flow. Lifting it up also helps save room on the inside because it lifts it up above the edge of the battery door.


I also tacked my minipac into place and connected it via USB.


Now that I have my LCD mounted, I need to figure out where to put its control board. It has a rather large and in-flexible ribbon cable that is going to make it difficult to put anywhere but exactly inline with the connector port. I think that I have a pretty good idea the only way it will fit in there but it's going to require some strategic hot glue placement.


Finished wiring up the control board for my LCD screen. The power for the LCD comes out the left side there and then combines with the power coming from the LEDs in the marquee on the right. The are soldered together and will plug into one USB port on the computer.  The HDMI port is easily accessible. (The gold square in the middle) I had to fold my ribbon cable twice to get it to all fit in there. Then just hot glued it down.


I needed to restore Wifi and Bluetooth connectivity to the computer and the antenna was embedded in the top shell of the computer case. So I used a razor blade to pry it off:


I was careful to take all the copper tape with it as well. I assume this helps with signal strength:


I then reattached it to the computer and glued it on top of the cmos battery. It's not pretty but it will work. (I put some electrical tape on the bottom of the copper to keep it from shorting anything out.
« Last Edit: May 29, 2015, 06:34:05 pm by vwalbridge »
If you can read this, it means Photobucket's money grab ruined my signature photos.

vwalbridge

  • Trade Count: (0)
  • Full Member
  • ***
  • Offline Offline
  • Posts: 2082
  • Last login:July 31, 2021, 12:21:09 pm
  • Don't half-ass two things, whole-ass one thing.
Re: Micro Coleco Donkey Kong Tabletop
« Reply #12 on: May 29, 2015, 02:03:08 pm »
I took some really strong carpet tape and applied it to the back of my control panel.


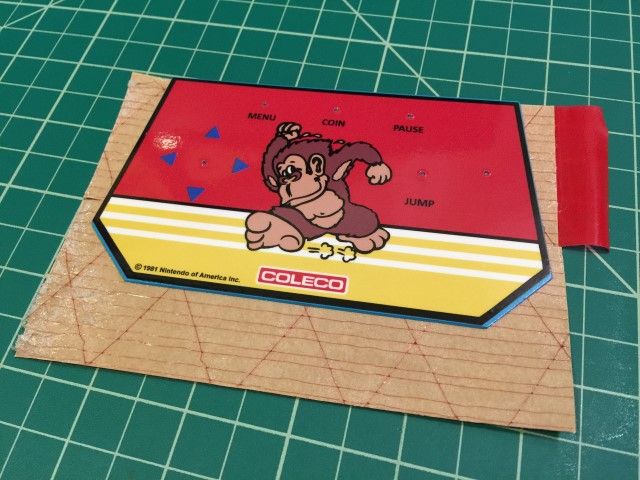
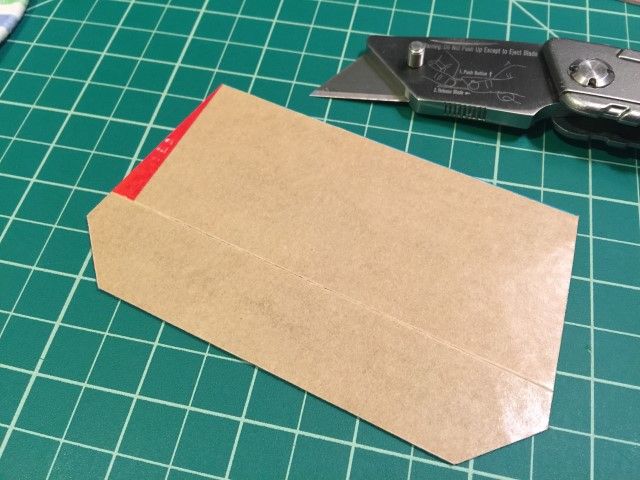
Then cut off the excess


Peeled off the backing and stuck it into place. The nice thing about this carpet tape is that is is VERY sticky but also very thin. Almost like a membrane. It doesn't add any thickness


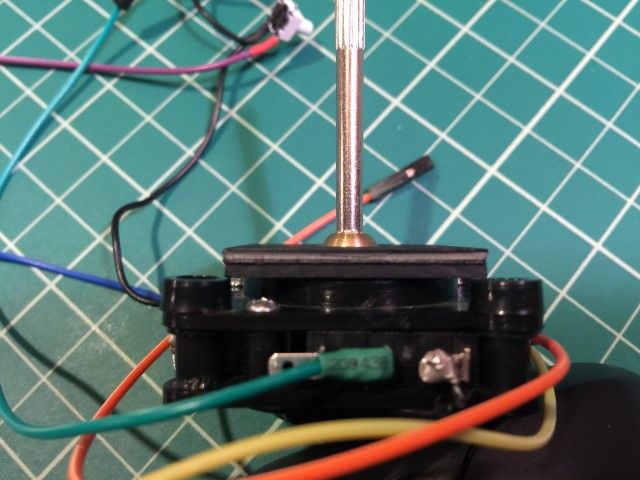
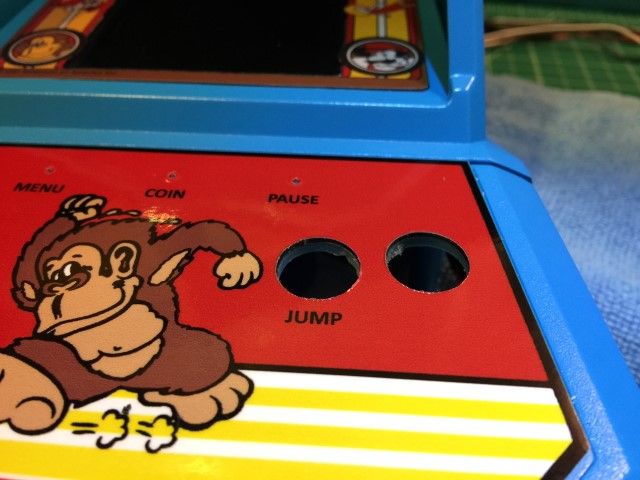
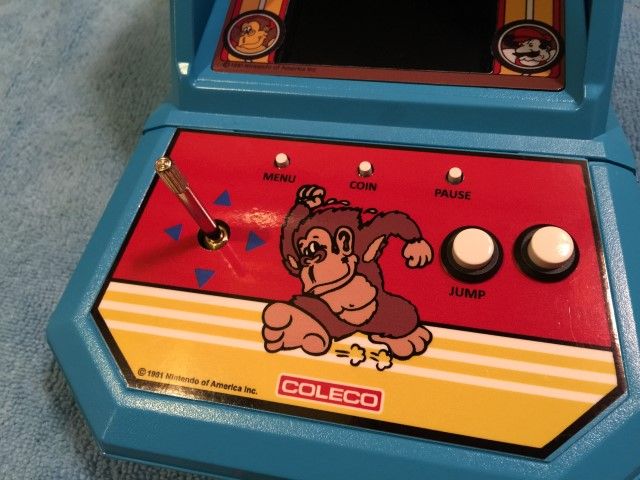
If you look at the side of my joystick, you can see that it doesn't sit flat. There is a black collar in the middle that protrudes up. I need to level that out so that I have something flat to glue to the under-side of the control panel


So I cut out 2 small squares of kydex plastic and glued them together. Then drilled a hole in the center the same diameter of the black collar.


Put it over the top and glued it into place


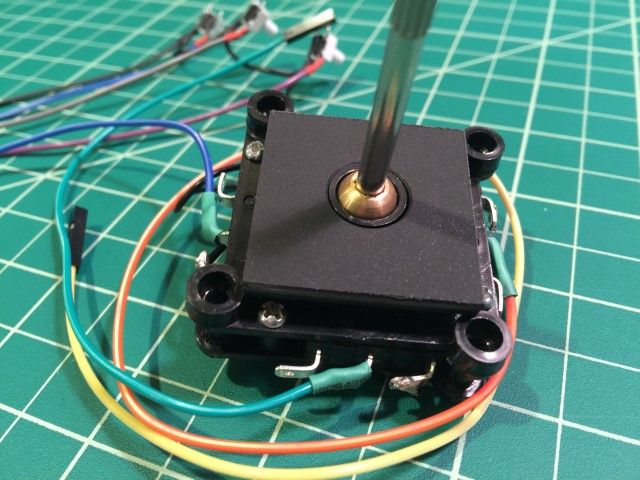
Now the joystick has a flush mounting surface.


I also needed a flush mounting surface on the under-side of the control panel. I simply filled the original coleco holes with self-leveling epoxy


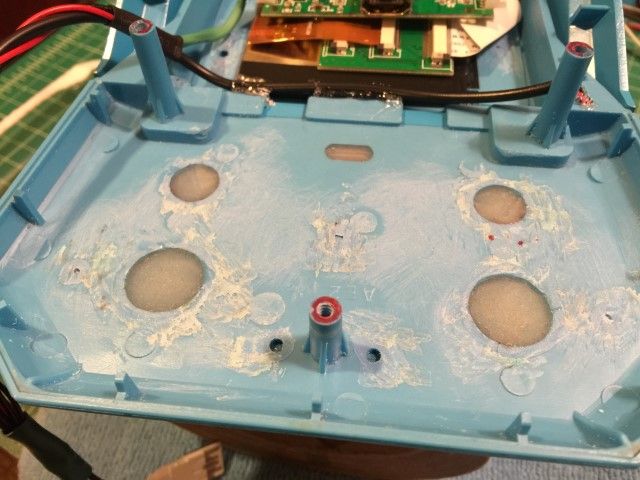
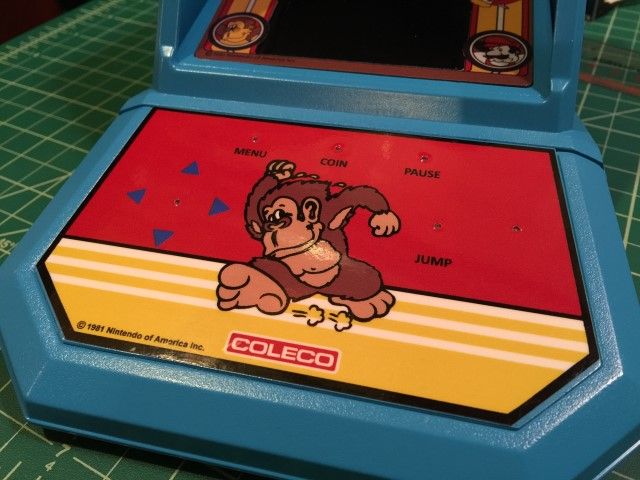
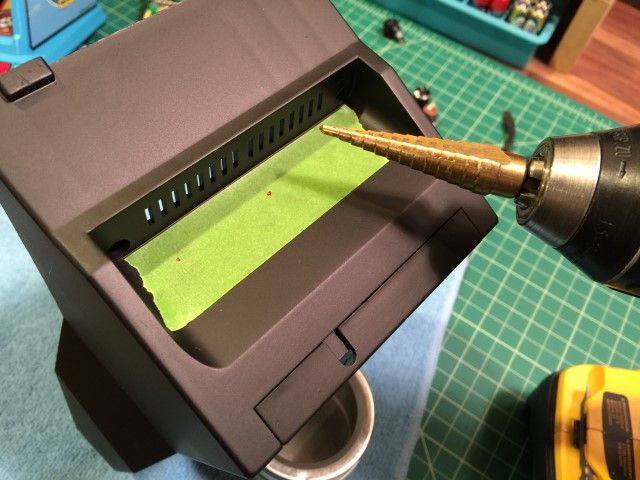
Drilled the button holes in my control panel. I was very worried about this step because I didn't want to tear the decal.


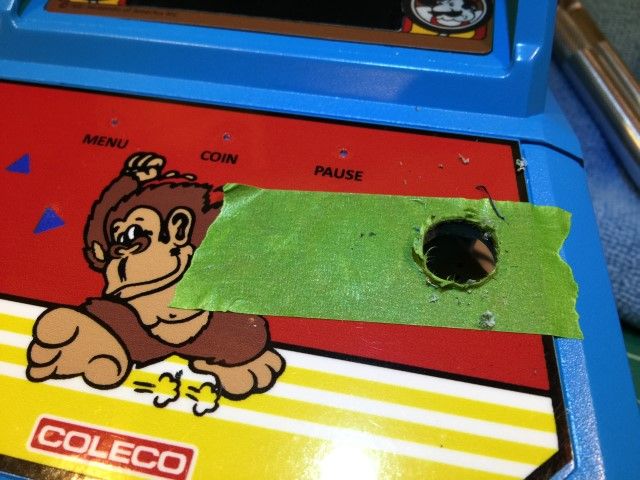
However, I used a unibit and top-layer tape and it protected the decal


I was also very pleased how well the epoxy held up on the back. Especially between the two "jump" buttons on the left.


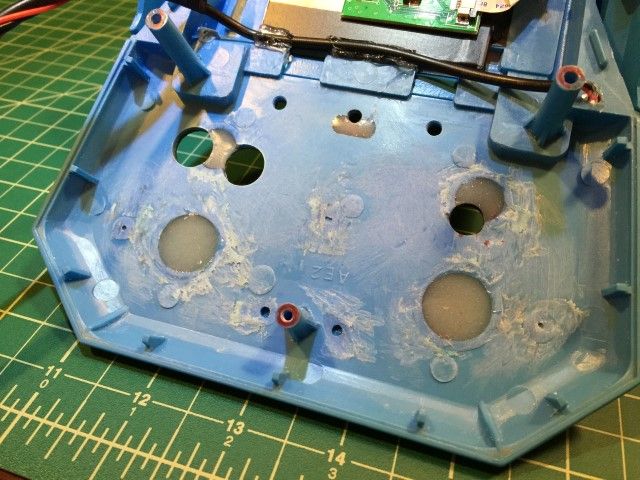
It took me nearly 2 hours to drill 6 holes because I was being so careful.


I had a very hard time finding some buttons I liked and finally settled on these. The are a bit smaller than a NES A and B button but at least they are white to match my Joystick....at least I thought they would be. Unfortunately, after I painted my joystick ball, I realized how opaque or off-white these buttons really were.


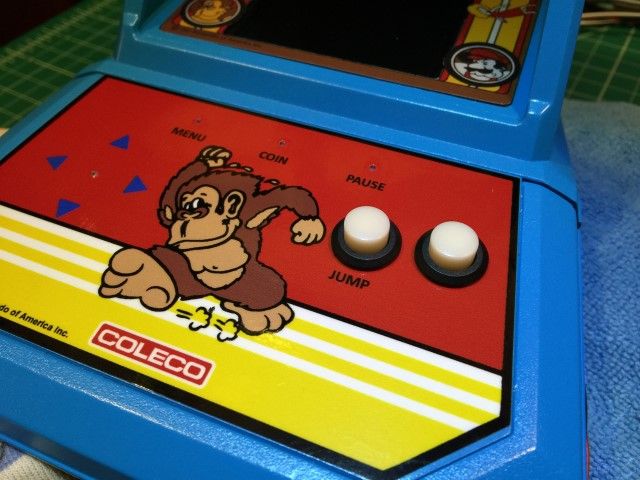
So I popped the button tops off and just sprayed them the same high-gloss white as my joystick ball. My OCD just wasn't having it!


Installed my 3 admin buttons. I decided to just use big globs of hot glue. It's not pretty but it appears to get the job done. These buttons are so tiny I had to use tweezers to hold them in place while the glue cooled.


My middle button is a bit twisted and tilted. I might have to re-mount that one. That's the great thing about hot glue, I can just peel it off and start over. If the hot glue doesn't work long-term, then I'll use epoxy. I was just too timid to commit to something permanent just yet.


I also glued down my joystick. Used hot glue here too. Just applied it to contacting surfaces and around the edges. Seems to be holding pretty good.


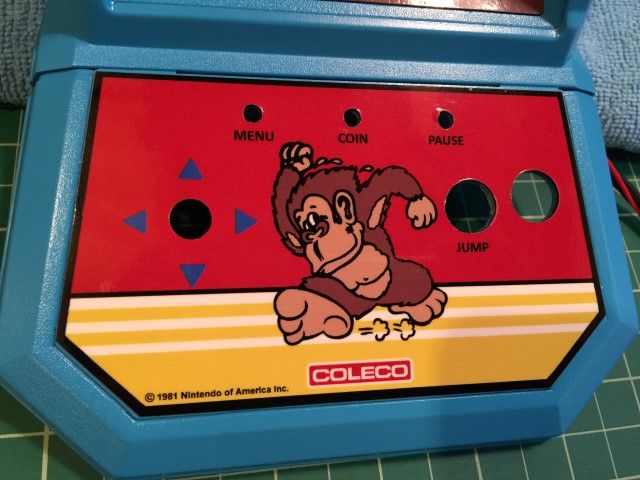
So far so good on the top side. I think the last step here is to mount the joystick ball. I didn't include a "START" button for two reasons:

1. A 4th admin button was not going to fit very well with my layout
2. I didn't think I would need it

...Well I'm starting to wish I had included a START button because I'm doing some semi-complex Hyperspin configurations and my life would be so much easier if I had. Oh, well...I think of something.


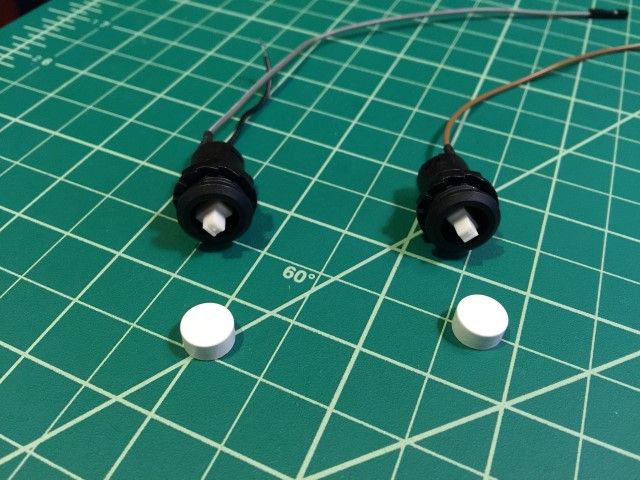
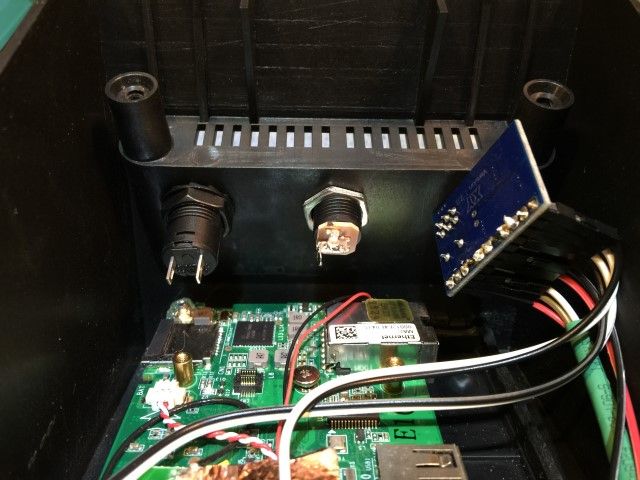
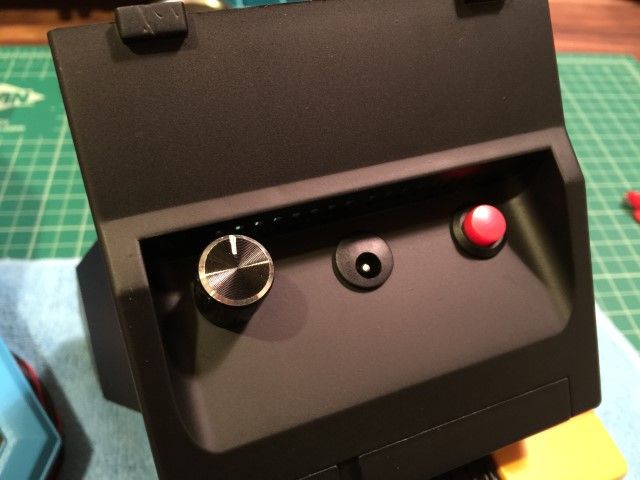
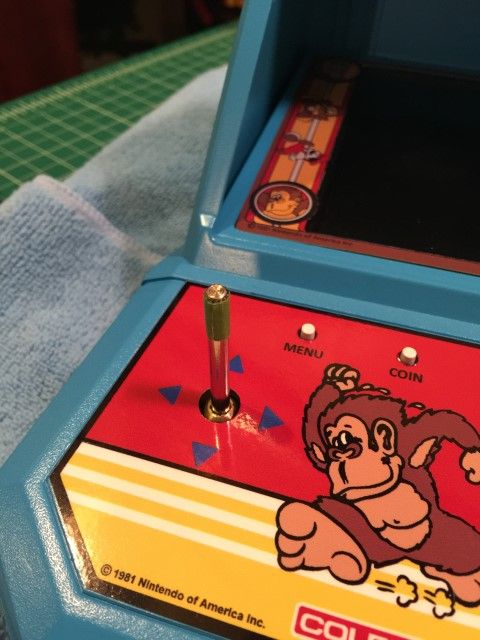
Marked the spots to drill holes for power, volume knob, and power button. Another job for the Unibit.


The Unibit does such a great job drilling holes in plastic. It makes a perfectly sized hole and doesn't "bite" into the plastic like a regular drill bit. Leaving a perfectly round and smooth hole.


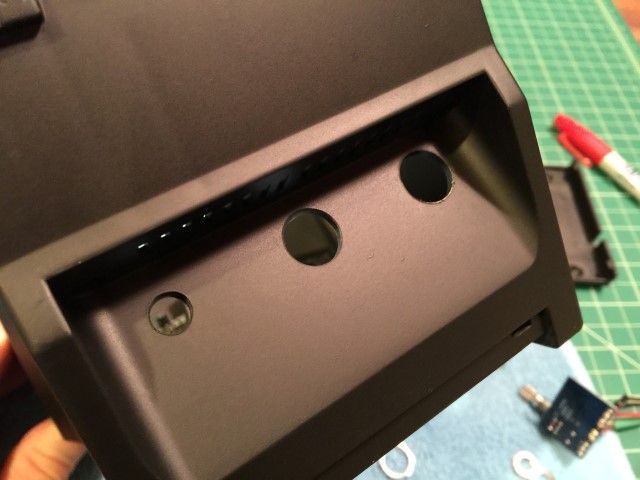
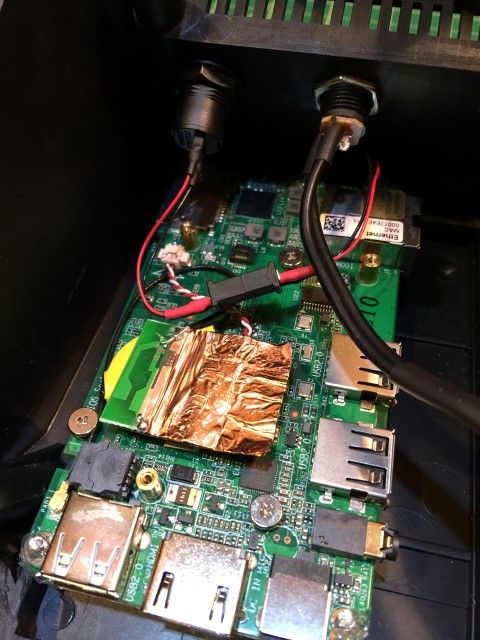
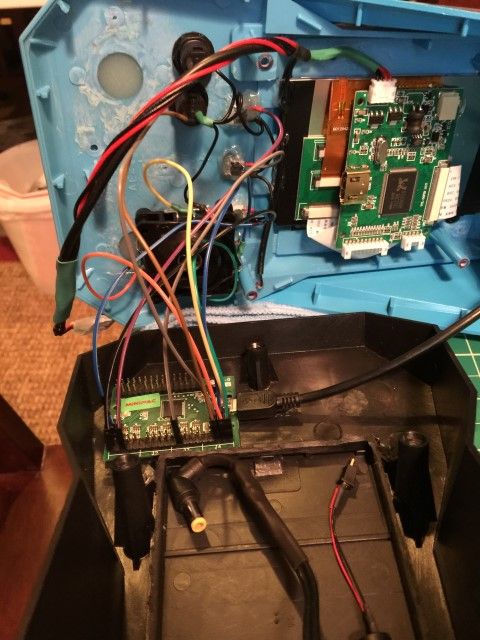
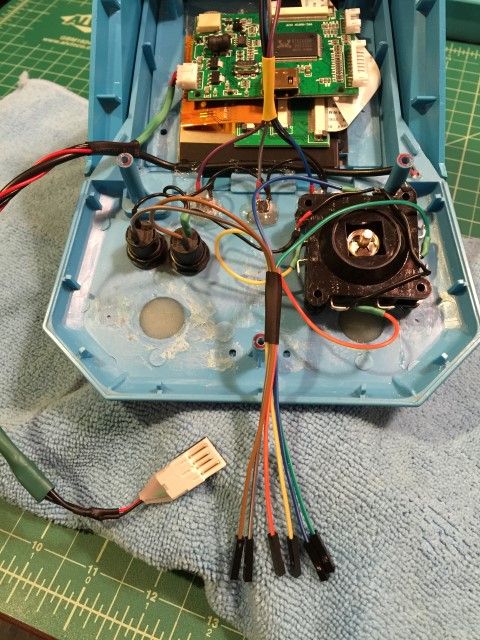
A view of the inside with the input components


A view from the outside with all the inputs installed


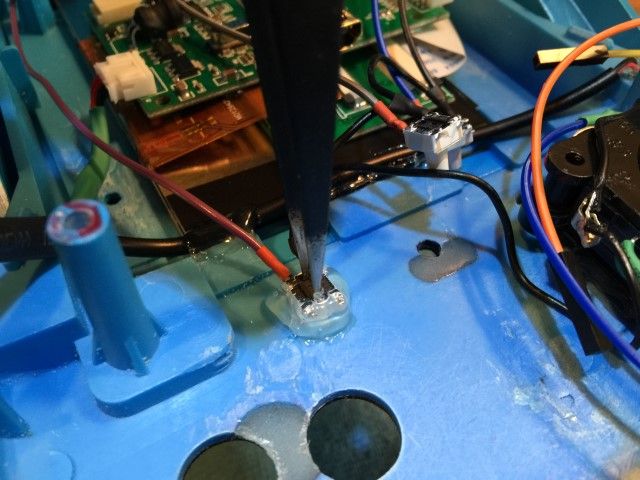
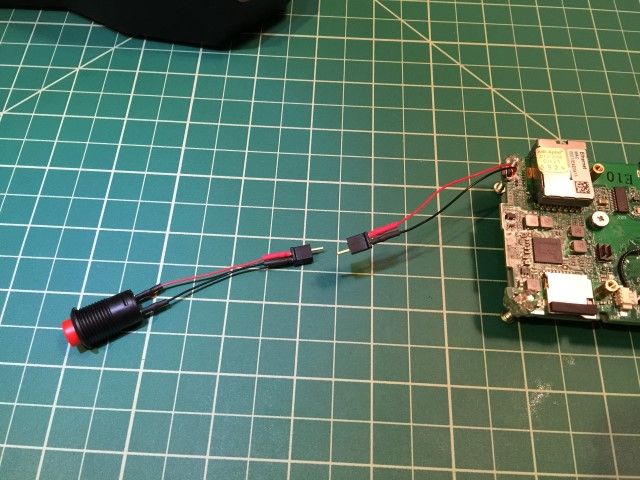
Soldered in the power cord


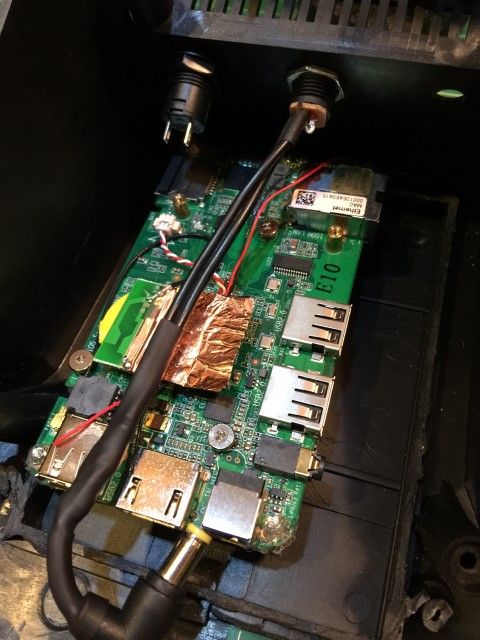
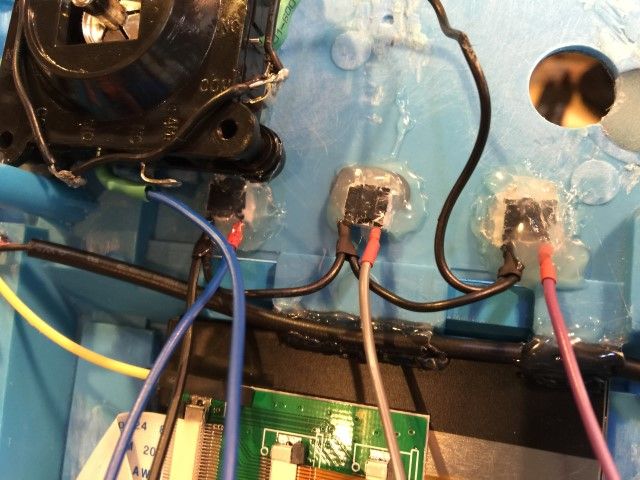
I wanted to be able to fully remove the computer from the Coleco if I needed to. So I found some very small wire "Quick Disconnects" and soldered them in-line with the power button.


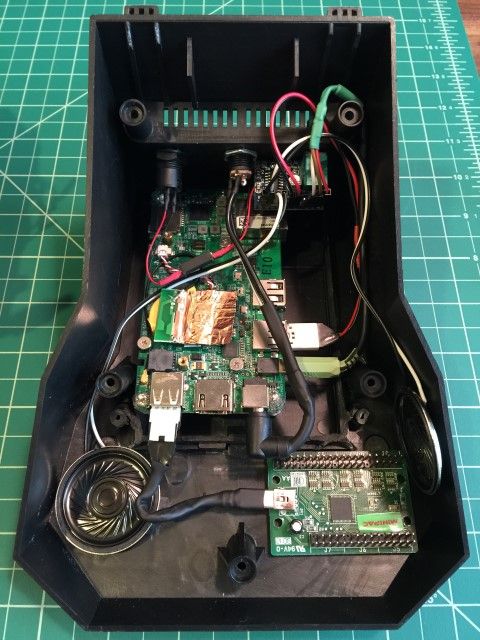
Here it is inside the case.


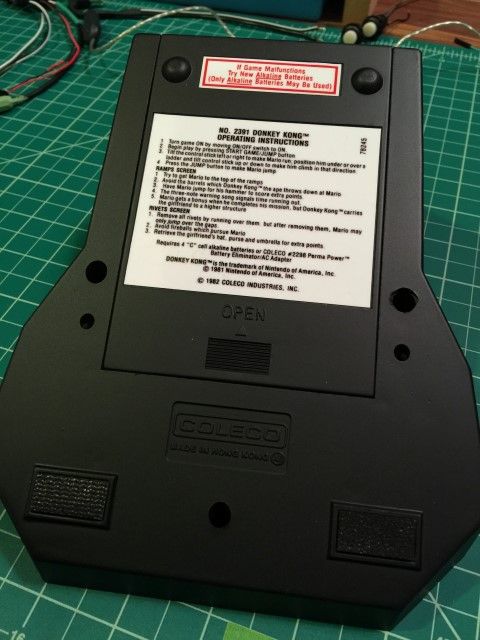
Adhered the bottom instructions and battery warning decal. Also put on some new rubber feet. Just used some left-over cabinet/drawer liner material.


Testing all my control panel buttons with my MINIPAC.  I bought the MINIPAC used on ebay months ago and never tested it when I first received it. Luckily it works but the owner before me never bothered to mention that he had completely re-mapped all the inputs. It took me 2 hours just to figure out what was going on and another hour to find the proper software to set it back to default inputs.   :banghead:


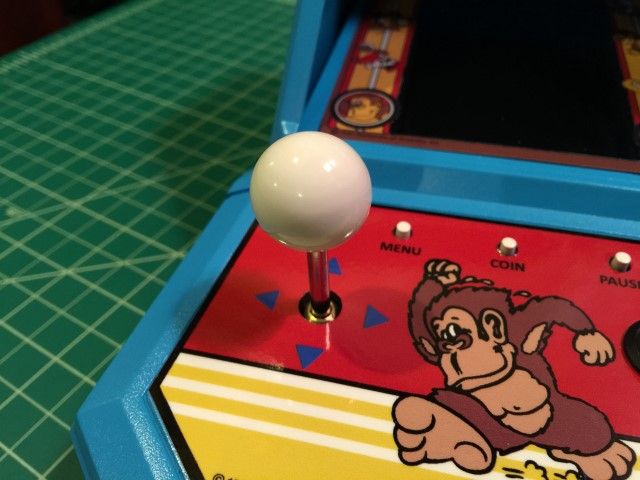
Placed a little tape around the top edge of the joystick


Then pressed the ball top down. The tape provided just enough thickness to hold down the ball top but not so much that I could never get it back off if I needed to.


I also used some shrink tubing to bundle some of the wires together. This will make it easier to plug everything in when I close it up. Also keeps everything from getting tangled.


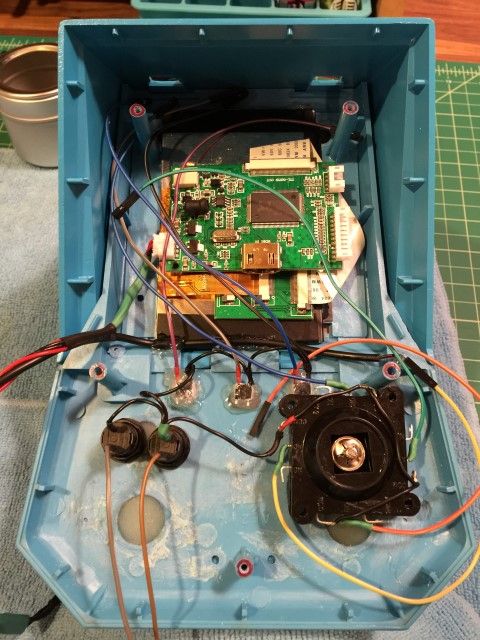
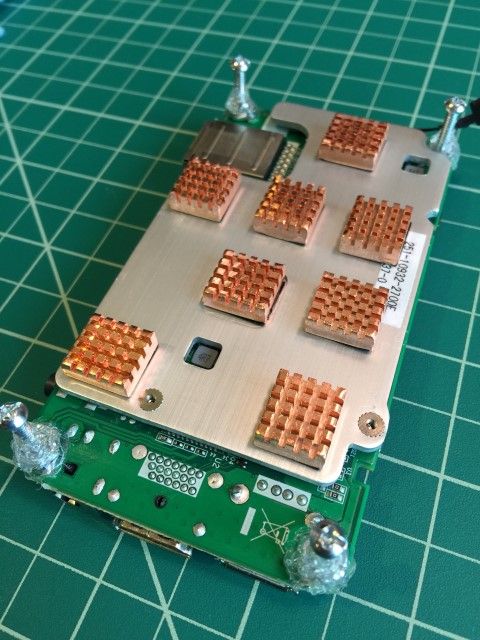
I've been doing a lot of system configuration and testing now. And while doing so, I noticed that this computer can get very hot at times. As we all know, emulating is very taxing on the CPU so the heat goes up. This little computer relies 100% on passive cooling so I picked some tiny copper heat sinks and stuck them to the bottom of the computer. I didn't think they would do much but I thought "what the heck I"ll give it a try" I was shocked how much they helped. They lowered the temp dramatically and now I don't need to worry.


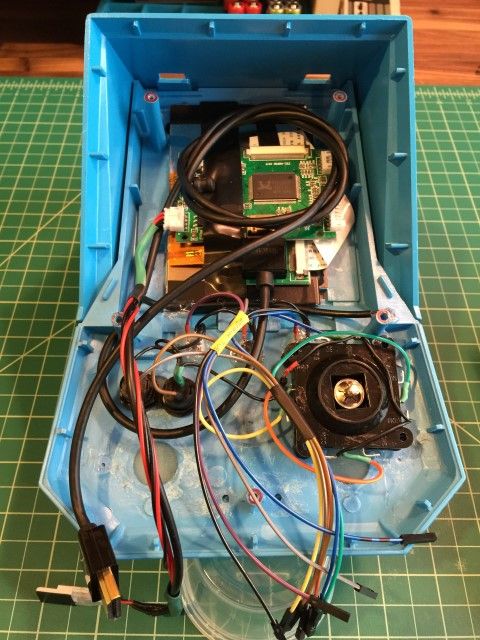
I'm finally done configuring the software and getting it to all work properly with my hardware. WOW, I spent a lot of time working on the software but I think it's finally where I want it. I'm just about ready to close up the case so here is one final look on the inside. (I should have some pictures and video of the completed project soon)

Top half:


Bottom half:

« Last Edit: May 29, 2015, 03:09:49 pm by vwalbridge »
If you can read this, it means Photobucket's money grab ruined my signature photos.

yotsuya

  • Trade Count: (+21)
  • Full Member
  • ***
  • Offline Offline
  • Posts: 19958
  • Last login:April 26, 2025, 06:30:57 pm
  • 2014 UCA Winner, 2014, 2015, 2016 ZapCon Winner
    • forum.arcadecontrols.com/index.php/topic,137636.msg1420628.html
Re: Micro Coleco Donkey Kong Tabletop
« Reply #13 on: May 29, 2015, 02:43:50 pm »
I must have missed it - what's the CPU?
***Build what you dig, bro. Build what you dig.***

vwalbridge

  • Trade Count: (0)
  • Full Member
  • ***
  • Offline Offline
  • Posts: 2082
  • Last login:July 31, 2021, 12:21:09 pm
  • Don't half-ass two things, whole-ass one thing.
Re: Micro Coleco Donkey Kong Tabletop
« Reply #14 on: May 29, 2015, 02:45:28 pm »
I must have missed it - what's the CPU?

Here are the quick specs of the Zotac zbox pi320

- Atom Z3735F Quad Core (1.33 GHz)
- 2GB DDR3 32GB eMMC SSD
- Windows 8.1 32-bit  (Yes it's bold on purpose, and good luck getting Windows 7 64 bit on it with a 32bit UEFI bios)
- Intel HD Graphics
- 10/100 LAN
- 3 USB Ports
- 1 headphone jack
- 1 micro SD/SDHC/SDXC slot
- HDMI video out
- Integrated WiFi and Bluetooth
« Last Edit: May 29, 2015, 02:56:22 pm by vwalbridge »
If you can read this, it means Photobucket's money grab ruined my signature photos.

tomstewdevine

  • Trade Count: (0)
  • Full Member
  • ***
  • Offline Offline
  • Posts: 257
  • Last login:December 21, 2024, 08:45:03 pm
  • Comics, Arcade, Family....... in that order.
    • A Comic Book Look
Re: Micro Coleco Donkey Kong Tabletop
« Reply #15 on: May 29, 2015, 02:52:53 pm »
.....Or that no one has rabidly insisted you go the Pi route.  :cheers:

 :lol
Finished: 2 bartops and a cocktail
Not-Finished: 1bartop, 2cocktails, and 2 stand ups.

yotsuya

  • Trade Count: (+21)
  • Full Member
  • ***
  • Offline Offline
  • Posts: 19958
  • Last login:April 26, 2025, 06:30:57 pm
  • 2014 UCA Winner, 2014, 2015, 2016 ZapCon Winner
    • forum.arcadecontrols.com/index.php/topic,137636.msg1420628.html
Re: Micro Coleco Donkey Kong Tabletop
« Reply #16 on: May 29, 2015, 03:00:02 pm »
Vwalbridge is my new homeboy. 
***Build what you dig, bro. Build what you dig.***

tomstewdevine

  • Trade Count: (0)
  • Full Member
  • ***
  • Offline Offline
  • Posts: 257
  • Last login:December 21, 2024, 08:45:03 pm
  • Comics, Arcade, Family....... in that order.
    • A Comic Book Look
Re: Micro Coleco Donkey Kong Tabletop
« Reply #17 on: May 29, 2015, 03:04:01 pm »
This is really a cool build, nice work.
Finished: 2 bartops and a cocktail
Not-Finished: 1bartop, 2cocktails, and 2 stand ups.

JimmyU

  • Trade Count: (+1)
  • Full Member
  • ***
  • Offline Offline
  • Posts: 479
  • Last login:April 13, 2025, 05:13:57 pm
  • I believe I can fly!
Re: Micro Coleco Donkey Kong Tabletop
« Reply #18 on: May 29, 2015, 03:40:58 pm »
I like it. I've always thought about putting a microcomputer into one of these.

dmckean

  • Trade Count: (0)
  • Full Member
  • ***
  • Offline Offline
  • Posts: 729
  • Last login:January 13, 2024, 08:50:41 pm
Re: Micro Coleco Donkey Kong Tabletop
« Reply #19 on: May 29, 2015, 03:44:16 pm »
- Windows 8.1 32-bit  (Yes it's bold on purpose, and good luck getting Windows 7 64 bit on it with a 32bit UEFI bios)

Is that the with BING version or did you install another version?

vwalbridge

  • Trade Count: (0)
  • Full Member
  • ***
  • Offline Offline
  • Posts: 2082
  • Last login:July 31, 2021, 12:21:09 pm
  • Don't half-ass two things, whole-ass one thing.
Re: Micro Coleco Donkey Kong Tabletop
« Reply #20 on: May 29, 2015, 04:17:02 pm »
- Windows 8.1 32-bit  (Yes it's bold on purpose, and good luck getting Windows 7 64 bit on it with a 32bit UEFI bios)

Is that the with BING version or did you install another version?

You are correct. It's the BING version. Funny too, that's literally the only difference...it comes with BING as the default search provider in IE.  :laugh2:
If you can read this, it means Photobucket's money grab ruined my signature photos.

vwalbridge

  • Trade Count: (0)
  • Full Member
  • ***
  • Offline Offline
  • Posts: 2082
  • Last login:July 31, 2021, 12:21:09 pm
  • Don't half-ass two things, whole-ass one thing.
Re: Micro Coleco Donkey Kong Tabletop
« Reply #21 on: May 29, 2015, 04:25:45 pm »
If you can read this, it means Photobucket's money grab ruined my signature photos.

yotsuya

  • Trade Count: (+21)
  • Full Member
  • ***
  • Offline Offline
  • Posts: 19958
  • Last login:April 26, 2025, 06:30:57 pm
  • 2014 UCA Winner, 2014, 2015, 2016 ZapCon Winner
    • forum.arcadecontrols.com/index.php/topic,137636.msg1420628.html
Re: Micro Coleco Donkey Kong Tabletop
« Reply #22 on: May 29, 2015, 04:32:16 pm »
Vwalbridge is my new homeboy.


In all seriousness,  I commend you for taking a broken device and breathing new life into it instead of gutting a perfectly working one. Some of us still have fond memories of those.
***Build what you dig, bro. Build what you dig.***

vwalbridge

  • Trade Count: (0)
  • Full Member
  • ***
  • Offline Offline
  • Posts: 2082
  • Last login:July 31, 2021, 12:21:09 pm
  • Don't half-ass two things, whole-ass one thing.
Re: Micro Coleco Donkey Kong Tabletop
« Reply #23 on: May 29, 2015, 04:37:24 pm »
This is really a cool build, nice work.

Thanks tomstewdevine! Appreciate the compliment!
If you can read this, it means Photobucket's money grab ruined my signature photos.

vwalbridge

  • Trade Count: (0)
  • Full Member
  • ***
  • Offline Offline
  • Posts: 2082
  • Last login:July 31, 2021, 12:21:09 pm
  • Don't half-ass two things, whole-ass one thing.
Re: Micro Coleco Donkey Kong Tabletop
« Reply #24 on: May 29, 2015, 04:39:03 pm »
I like it. I've always thought about putting a microcomputer into one of these.

Thanks JimmU!  I wish that I could say I was the first to have this idea but there we a couple of guys that did it before me.   ;)
If you can read this, it means Photobucket's money grab ruined my signature photos.

vwalbridge

  • Trade Count: (0)
  • Full Member
  • ***
  • Offline Offline
  • Posts: 2082
  • Last login:July 31, 2021, 12:21:09 pm
  • Don't half-ass two things, whole-ass one thing.
Re: Micro Coleco Donkey Kong Tabletop
« Reply #25 on: May 29, 2015, 04:44:00 pm »
In all seriousness,  I commend you for taking a broken device and breathing new life into it instead of gutting a perfectly working one. Some of us still have fond memories of those.

Thanks yotsuya! I agree, there was no way I was going to rip apart a perfectly good working unit. That is a "no-no" among collectors. These little guys are part of video game history and I was glad to breath new life into a broken one.
If you can read this, it means Photobucket's money grab ruined my signature photos.

05SRT4

  • Trade Count: (+5)
  • Full Member
  • ***
  • Offline Offline
  • Posts: 1092
  • Last login:May 15, 2025, 05:08:07 am
  • Check out my Pow Pow
Re: Micro Coleco Donkey Kong Tabletop
« Reply #26 on: May 30, 2015, 12:24:23 am »
Sweet build man  :applaud: I have always been a huge fan of the mini builds.

danny_galaga

  • Grand high prophet of the holy noodle.
  • Trade Count: (+1)
  • Full Member
  • ***
  • Offline Offline
  • Posts: 8519
  • Last login:Today at 03:04:52 am
  • because the mail never stops
    • dans cocktail lounge
Re: Micro Coleco Donkey Kong Tabletop
« Reply #27 on: May 30, 2015, 03:09:53 am »

Very tidy, Very jealous.

Top work!


ROUGHING UP THE SUSPECT SINCE 1981

vwalbridge

  • Trade Count: (0)
  • Full Member
  • ***
  • Offline Offline
  • Posts: 2082
  • Last login:July 31, 2021, 12:21:09 pm
  • Don't half-ass two things, whole-ass one thing.
Re: Micro Coleco Donkey Kong Tabletop
« Reply #28 on: May 30, 2015, 09:29:24 am »
Sweet build man  :applaud: I have always been a huge fan of the mini builds.

Thanks for your compliments. I see that you did a micro MK build. Very, very cool. I need to check that out in detail.
If you can read this, it means Photobucket's money grab ruined my signature photos.

vwalbridge

  • Trade Count: (0)
  • Full Member
  • ***
  • Offline Offline
  • Posts: 2082
  • Last login:July 31, 2021, 12:21:09 pm
  • Don't half-ass two things, whole-ass one thing.
Re: Micro Coleco Donkey Kong Tabletop
« Reply #29 on: May 30, 2015, 09:30:15 am »

Very tidy, Very jealous.

Top work!

Thanks for the kind words! Can't wait to show everyone the final product in action.
If you can read this, it means Photobucket's money grab ruined my signature photos.

SpaceHedgehog

  • Trade Count: (0)
  • Full Member
  • ***
  • Offline Offline
  • Posts: 937
  • Last login:October 29, 2024, 02:02:07 pm
  • Almost done ...
Re: Micro Coleco Donkey Kong Tabletop
« Reply #30 on: May 30, 2015, 10:52:17 am »
Wow! What a great and interesting project  :applaud:
Click a pic for a video tour 

dkssprs

  • Trade Count: (0)
  • Full Member
  • ***
  • Offline Offline
  • Posts: 205
  • Last login:February 23, 2023, 01:32:26 pm
    • Bub & Bob's BARTOP
Re: Micro Coleco Donkey Kong Tabletop
« Reply #31 on: May 30, 2015, 11:48:14 am »
Absolutely lovable!!!

The result will be like it was made from a real manufacturer.

Keep up the good work.

Oh and a question i always had. How its called the green with white lines board on your desk? 

Le Chuck

  • Saint, make a poll!
  • Wiki Contributor
  • Trade Count: (+6)
  • Full Member
  • ***
  • Offline Offline
  • Posts: 5509
  • Last login:May 20, 2025, 04:44:57 pm
  • <insert personal text here>
Re: Micro Coleco Donkey Kong Tabletop
« Reply #32 on: May 30, 2015, 12:52:13 pm »
A lot of projects lately haven't been getting me excited.  They're very nice but nothing has been grabbing me.  This project totally has its hooks in and won't let go of me.  Great looking little build, fun execution, and gives me lots of ideas I don't have time for!  All the things a great project should do!! Well done man.

stigzler

  • Trade Count: (0)
  • Full Member
  • ***
  • Offline Offline
  • Posts: 983
  • Last login:March 21, 2025, 06:36:05 am
  • It seemed like a good idea at the time....
    • Mago Arcade
Re: Micro Coleco Donkey Kong Tabletop
« Reply #33 on: May 30, 2015, 02:08:25 pm »
Loving this. Can't wait to see it running. With those specs it could maybe manage PSX/N64 emulation?? Donkey Kong 64 on that badboy :)

« Last Edit: May 30, 2015, 02:10:15 pm by stigzler »

yotsuya

  • Trade Count: (+21)
  • Full Member
  • ***
  • Offline Offline
  • Posts: 19958
  • Last login:April 26, 2025, 06:30:57 pm
  • 2014 UCA Winner, 2014, 2015, 2016 ZapCon Winner
    • forum.arcadecontrols.com/index.php/topic,137636.msg1420628.html
Re: Micro Coleco Donkey Kong Tabletop
« Reply #34 on: May 30, 2015, 09:51:54 pm »
A lot of projects lately haven't been getting me excited.  They're very nice but nothing has been grabbing me.  This project totally has its hooks in and won't let go of me.  Great looking little build, fun execution, and gives me lots of ideas I don't have time for!  All the things a great project should do!! Well done man.
You complete me, bro.
***Build what you dig, bro. Build what you dig.***

vwalbridge

  • Trade Count: (0)
  • Full Member
  • ***
  • Offline Offline
  • Posts: 2082
  • Last login:July 31, 2021, 12:21:09 pm
  • Don't half-ass two things, whole-ass one thing.
Re: Micro Coleco Donkey Kong Tabletop
« Reply #35 on: May 31, 2015, 09:35:21 pm »
Absolutely lovable!!!

The result will be like it was made from a real manufacturer.

Keep up the good work.

Oh and a question i always had. How its called the green with white lines board on your desk?

Thanks for your compliment! I really tried to make it look as much like a real product as I could.

It's an Alvin self-healing cuttin mat. Great surface for projects like these where cutting is frequent. You can find all sizes here:

http://www.amazon.com/Alvin-Professional--Self-Healing-Cutting/dp/B0015AOIYI/ref=sr_1_1?ie=UTF8&qid=1433122408&sr=8-1&keywords=self+healing+cutting+mat
If you can read this, it means Photobucket's money grab ruined my signature photos.

ChanceKJ

  • Trade Count: (0)
  • Full Member
  • ***
  • Offline Offline
  • Posts: 3229
  • Last login:August 07, 2021, 02:52:06 pm
Re: Micro Coleco Donkey Kong Tabletop
« Reply #36 on: June 01, 2015, 10:38:04 pm »
 :notworthy: This thing is fantastic!!

emphatic

  • Trade Count: (0)
  • Full Member
  • ***
  • Offline Offline
  • Posts: 2017
  • Last login:June 08, 2025, 08:55:03 pm
  • -"Suck it, Donny!" -"No, YOU suck it.... more".
    • Emphatic's Video Game Collection
Re: Micro Coleco Donkey Kong Tabletop
« Reply #37 on: June 02, 2015, 12:37:54 am »
Really mindblowing build! :cheers:

vwalbridge

  • Trade Count: (0)
  • Full Member
  • ***
  • Offline Offline
  • Posts: 2082
  • Last login:July 31, 2021, 12:21:09 pm
  • Don't half-ass two things, whole-ass one thing.
Re: Micro Coleco Donkey Kong Tabletop
« Reply #38 on: June 02, 2015, 10:46:35 am »
Loving this. Can't wait to see it running. With those specs it could maybe manage PSX/N64 emulation?? Donkey Kong 64 on that badboy :)


I really tried to get N64 to run. However, it only ran games at about 50fps with some audio stutter. I'm using retroarch with mupen64plus. I might try project 64 later.
If you can read this, it means Photobucket's money grab ruined my signature photos.

vwalbridge

  • Trade Count: (0)
  • Full Member
  • ***
  • Offline Offline
  • Posts: 2082
  • Last login:July 31, 2021, 12:21:09 pm
  • Don't half-ass two things, whole-ass one thing.
Re: Micro Coleco Donkey Kong Tabletop
« Reply #39 on: June 02, 2015, 10:47:49 am »
Really mindblowing build! :cheers:

:notworthy: This thing is fantastic!!

Thanks you both for you kind comments! Really appreciate it! Final photos of the project coming soon.
If you can read this, it means Photobucket's money grab ruined my signature photos.