Main Restorations Software Audio/Jukebox/MP3 Everything Else Buy/Sell/Trade
Project Announcements Monitor/Video GroovyMAME Merit/JVL Touchscreen Meet Up Retail Vendors
Driving & Racing Woodworking Software Support Forums Consoles Project Arcade Reviews
Automated Projects Artwork Frontend Support Forums Pinball Forum Discussion Old Boards
Raspberry Pi & Dev Board controls.dat Linux Miscellaneous Arcade Wiki Discussion Old Archives
Lightguns Arcade1Up Try the site in https mode Site News

Unread posts | New Replies | Recent posts | Rules | Chatroom | Wiki | File Repository | RSS | Submit news


Author Topic: My First Project - Upright MAME based off of a MKII cab  (Read 4379 times)

0 Members and 1 Guest are viewing this topic.

tsukikage

  • Trade Count: (0)
  • Full Member
  • ***
  • Offline Offline
  • Posts: 17
  • Last login:December 20, 2024, 02:32:28 pm
My First Project - Upright MAME based off of a MKII cab
« on: February 07, 2012, 11:26:29 am »
Hello all.  I've been lurking on these forums for a looooong time and I must say the creativity and talent never ceases to amaze me here.  I bought Saint's book about five or six years ago and started making plans and buying stuff for it but I ended up moving and things got put on hold for a while.  Recently a fiend of mine who was a former vendor on here offered me this scratch built MKII replica cab that was mostly gutted to me for free so naturally I jumped on it.  He and his brother are busy making two sweet new ones with rotating monitors and a bunch of stuff that's probably far too advanced for me.  Anyway this is particularly perfect for me since some of my fondest gaming memories were in front of a MKII cab.  :cheers:

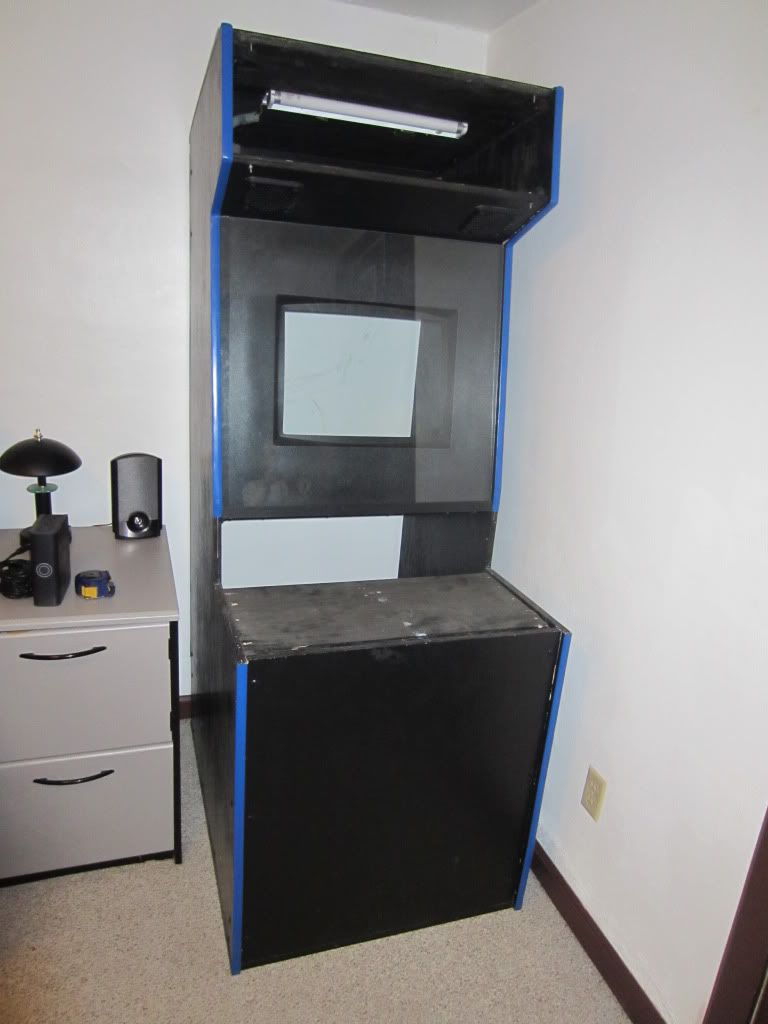
Here it is the day I brought it home.


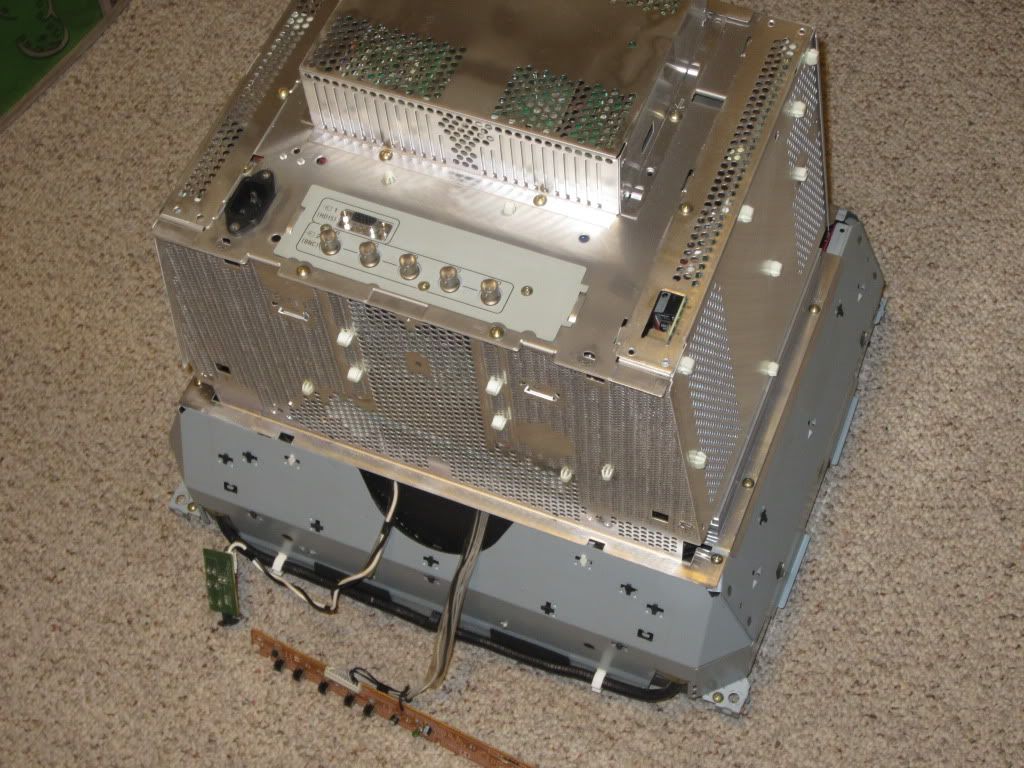
For the monitor I'm using a 21" dell D1626HT which is basically a rebranded Sony Trinitron that I bought off of craigslist five years ago and has been in storage ever since.  Here it is decased.


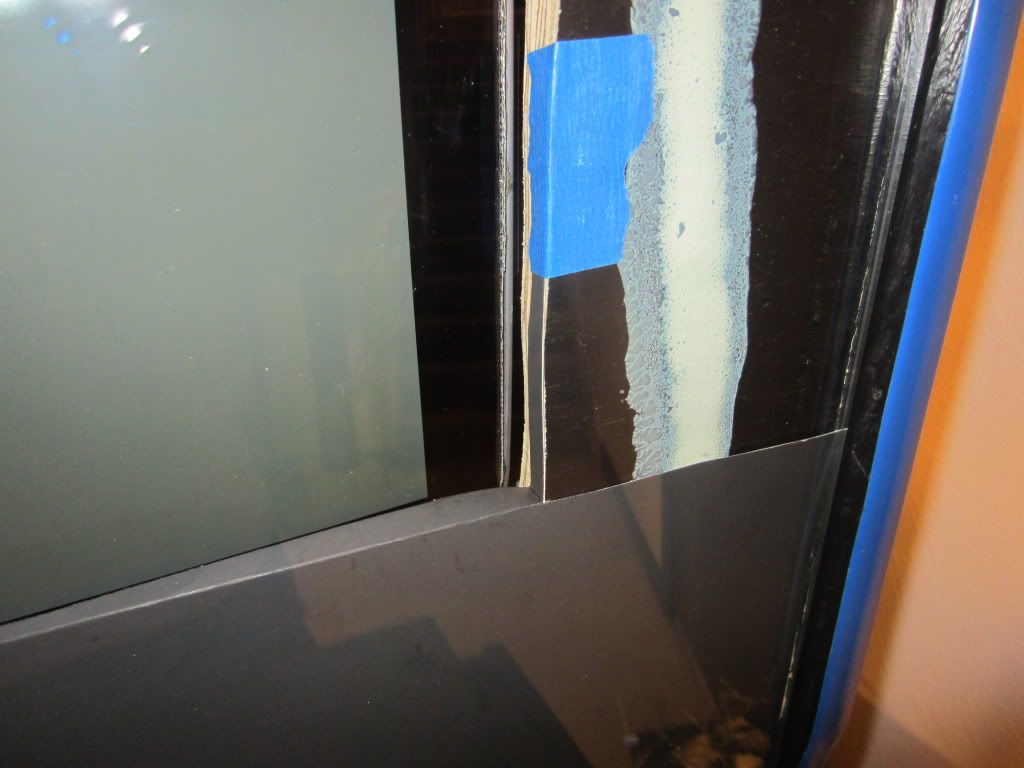
The existing hole for the monitor was a tad too small so I had to cut out about a half inch on all four sides with a jigsaw.  I then ripped a piece of 2x4 to a depth I can't exactly remember and cut 6" pieces that I bolted to the four mounting holes on the corners of the monitor to give it some depth in the cab.  Reason I did this is the 1/4" glass sits flush against where the bezel goes.  Crummy explination I know but it worked out great Here it is mounted in the cab.


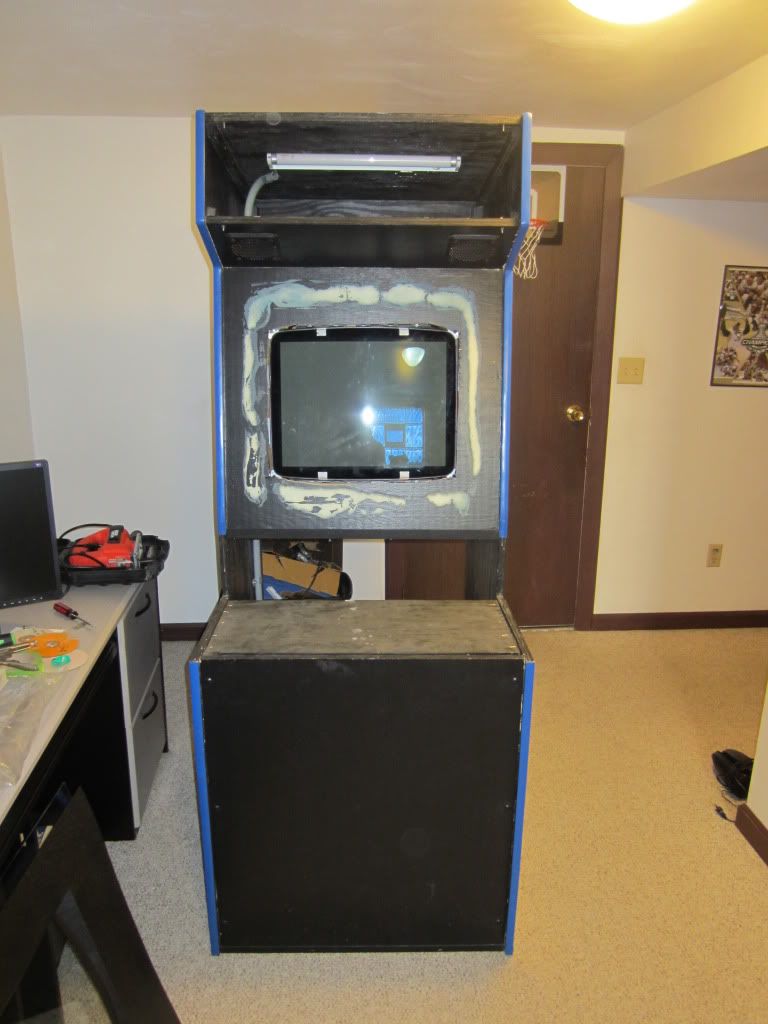
The next issue I came across is the bezel.  The on that I got with the cab was too small and too deep so I did some research and used Tailgunner's idea of making a cheap custom bezel using posterboard found on this thread http://forum.arcadecontrols.com/index.php/topic,17175.0.html  I had to modify his design to make it work for my particular setup but I think it came out pretty good.  This was time consuming as hell but if you're meticulous and patient it will come out great.  It Helped in my case that the sides of my monitor don't have any curve at all to it so those were a lot easier to do then the top and the bottom.  Here is the first piece looking good I think!


And here it is with the bezel completed.  My only complaint is I'm not 100% satisfied with the flat black color of the posterboard... I'll probably end up throwing some artwork on top of it, or painting it, or something but it's doing it's job great for now.


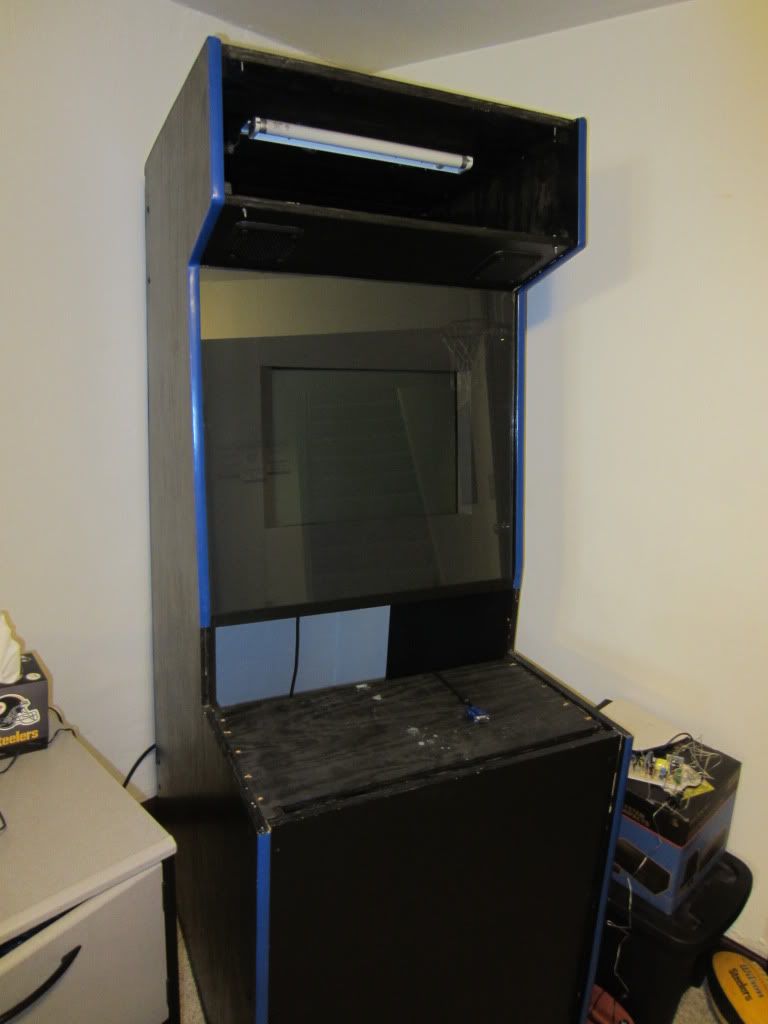
That's where it stands rite now.  Next up for me is the marquee retainer and speakers.  I originally planned on using a set of klipsch promedia 2.1's that Saint suggests using in his book and I actually bought a set a few years back.  Since then they are being used with an xbmc setup in the same room and my wife and son won't give them for my cab.  They will probably be overkill for my particular situation anyway because the XBMC setup is already taking care of my music so I don't need my cab to act as a jukebox.  Also, I would like to use the existing speaker grills and it will be a hard time fitting anything bigger than the 3.5x3.5" square that the bolts make up on the inside.  I'm trying not to spend more than $50.00 for speakers so I'm thinking about this set http://www.amazon.com/Creative-Inspire-Multimedia-Speaker-System/dp/B002DWQU48/ref=sr_1_1?ie=UTF8&qid=1328631080&sr=8-1 Anyone have any experience with these?  I'm going to try and stop by a best buy this weekend to see if they have them to hear in person.

In the meantime I'm trying to get some ideas for artwork and settle on a color scheme.  I'm thinking about switching our the blue and going with red t-molding keeping in tradition with the original MKII cab.  Thanks for looking!

Junai

  • Trade Count: (0)
  • Full Member
  • ***
  • Offline Offline
  • Posts: 45
  • Last login:April 22, 2015, 10:13:24 am
Re: My First Project - Upright MAME based off of a MKII cab
« Reply #1 on: February 07, 2012, 11:44:50 am »
Nice start.  For the bezel, leave as is and get some tinted glass or smoked plexi and you wont even notice it.  I got some 1/4" thick solar grey plexi from tap plastics and it looks outstanding both appearance and picture quality.  Check the vertical retrace cab for a good idea on how awesome a 25 dollar piece of plastic can make a cab look.

tsukikage

  • Trade Count: (0)
  • Full Member
  • ***
  • Offline Offline
  • Posts: 17
  • Last login:December 20, 2024, 02:32:28 pm
Re: My First Project - Upright MAME based off of a MKII cab
« Reply #2 on: February 08, 2012, 07:02:15 am »
Thanks, I kicked the idea around about adding smoked plexi but I'm still not sure about how brite my monitor can be.  I'll have to play around with it when I get some time.  Figure that will be one of the finishing touches when I'm near completing the project.

tsukikage

  • Trade Count: (0)
  • Full Member
  • ***
  • Offline Offline
  • Posts: 17
  • Last login:December 20, 2024, 02:32:28 pm
Re: My First Project - Upright MAME based off of a MKII cab
« Reply #3 on: February 28, 2012, 12:06:58 pm »
Made a little more progress on the cab.  I scored a Dell Optiplex gx620 off of craigslist for $50.00 to power the games.  It has an Intel Pentium D at 3GHZ with 4GB of RAM.  It didn't have a HD and they guy said it was throwing a "voltage error" and he didn't want to be bothered trying to fix it.  I threw in a new CMOS battery and it fired up good as new!  I almost feel guilty about it lol.  So far it runs every game that I really care about with no problem at all.  I decased it and mounted everything on a piece of plywood to allow for easy install/removal if needed.  I used the old cut up Bic pen trick and wood screws to give the components some breathing room.


And here she is mounted in the cab.


For sound I ended up getting a free set of speakers off of my brother.  He had a 10+yr old 2.1 set of Harman Kardon's from a dell computer that he never used anymore and dug it out of his garage for me.  It's a 30w HK395 set that actually sounds really nice and the sub gives enough thump to make me happy.  I pulled the sattellites out of the case, cut two 4-1/4" squares and cut 1-7/8" circles in the middle with a hole saw to mount them on face down.  I also bought some red LED strips from amazon and soldered them up to give the speaker grills a nice warm glow.  They just use 3m tape on the back and stick in place on the plywood where the holes are cut out and ran some thin gauge wire between the seams.  I can't wait to get power to those to see how well they turn out.


I also scored an awesome deal for a coin door off of ebay (about $26.00)


I pulled it apart and cleaned it up real nice with a sos pad.  It did a pretty good job but I'll probably end up painting it eventually.  Guess you can only clean so good after nearly 20years of bar funk build up.  I also whipped up some new lables for the coin inserts in photoshop since the existing ones were all messed up.  I'm liking these better.  What do you think?


I started to create the wire harness for the coin door and led lights but I ran out of time last night.  I'm going to borrow another hole saw from work today so I can get the coin door cut and hopefully wire it up tonight.  Oh by the way my wife said she hates this project, this forum and all of you...  JK... but not really lol.
« Last Edit: March 05, 2012, 08:21:47 am by tsukikage »

Hutt

  • Trade Count: (0)
  • Full Member
  • ***
  • Offline Offline
  • Posts: 174
  • Last login:December 31, 2022, 11:02:48 am
  • I like eggs.
Re: My First Project - Upright MAME based off of a MKII cab
« Reply #4 on: February 29, 2012, 10:18:30 pm »
Looking good, Dude... you're getting there. Probably be done before mine !!!

tsukikage

  • Trade Count: (0)
  • Full Member
  • ***
  • Offline Offline
  • Posts: 17
  • Last login:December 20, 2024, 02:32:28 pm
Re: My First Project - Upright MAME based off of a MKII cab
« Reply #5 on: March 02, 2012, 07:41:39 am »
Thanks, It helps that I have the cab rite there staring me in the face at the bottom of the stairs every time I go to my garage.  Keeps me motivated.  It's probably going to slow down a bit here for a month or two till I can raise some funds and start collecting control panel parts.  Tax season sucks for me  :angry:   It's probably a good time for me to start making some artwork for it.

I have since got the coin door mounted and have the led/coin lights wired up now too.  I just need to take a few seconds to snap a couple of pics of the progress.  I also convinced myself that I'm going to paint the bezel.  I looked into getting some smoked plexy but I'm leary about leaving my 14yr old monitor in torch mode all of the time.  Plus the fact that it would be 75bucks shipped to my house.  I was looking into getting a spray can of plasti-dip to give it a more plastic like look.  Anybody know of someone that tried this before?  It's a popular product in the automotive world so I know it's durable but I'm going to give it a couple of practice runs on some scrap pieces of posterboard first to make sure it will come out good and top it with some clearcoat.

Seith

  • Trade Count: (0)
  • Full Member
  • ***
  • Offline Offline
  • Posts: 402
  • Last login:September 08, 2018, 10:50:41 am
Re: My First Project - Upright MAME based off of a MKII cab
« Reply #6 on: March 02, 2012, 05:54:33 pm »
Gotta love when people get rid of otherwise-expensive things that can be fixed for under 5 bucks.  I got a sweet gaming computer a couple years ago for 1/4 the price when I was working as a repair tech in a big-box store and a customer returned it because the modem wouldn't connect to dialup.

tsukikage

  • Trade Count: (0)
  • Full Member
  • ***
  • Offline Offline
  • Posts: 17
  • Last login:December 20, 2024, 02:32:28 pm
Re: My First Project - Upright MAME based off of a MKII cab
« Reply #7 on: March 05, 2012, 08:10:44 am »
Gotta love when people get rid of otherwise-expensive things that can be fixed for under 5 bucks.  I got a sweet gaming computer a couple years ago for 1/4 the price when I was working as a repair tech in a big-box store and a customer returned it because the modem wouldn't connect to dialup.
Yup, guess it's a perk of the trade.  Nothing like someone getting rid of a whole machine because of one small component acting up.


I got some more accomplished over the weekend.  Finally took care of the bezel that has been bugging me.  I ended up covering the posterboard with spray can plasti-dip.  Put about 7 coats of the stuff with a half hour between each one.  I'm actually pretty impressed on how well it came out.  

First thing I did is got it all masked up and ready to go.  Now there are probably a million tutorials throughout the interwebs about how to use this stuff but I'll point out one major thing to everyone.  It's a good idea to hit the edges with a toothpick or razor blade between each coat!  This stuff is basically liquid rubber and will peel at the edges when you pull the tape off so it's an important step to prevent it from pealing where you don't want it to!


I pulled all of the tape off immediately after the last coat and luckily it all came off without incident.  Gave it a nice vinyl like finish.  I orriginally planned on hitting it with a clearcoat afterwords but it came out nicer than I thought and with the glass over it, it has just the rite amount of shine to it.  It's tough to get a good picture of it but here is the best one I could get.


I also got the coin door lights and leds all wired up, soldered and shrink wrapped to a fan/molex connector.


I also settled on using hyperspin as the front end and began configuring it to my liking.


« Last Edit: March 05, 2012, 08:17:13 am by tsukikage »