Main Restorations Software Audio/Jukebox/MP3 Everything Else Buy/Sell/Trade
Project Announcements Monitor/Video GroovyMAME Merit/JVL Touchscreen Meet Up Retail Vendors
Driving & Racing Woodworking Software Support Forums Consoles Project Arcade Reviews
Automated Projects Artwork Frontend Support Forums Pinball Forum Discussion Old Boards
Raspberry Pi & Dev Board controls.dat Linux Miscellaneous Arcade Wiki Discussion Old Archives
Lightguns Arcade1Up Try the site in https mode Site News

Unread posts | New Replies | Recent posts | Rules | Chatroom | Wiki | File Repository | RSS | Submit news


Author Topic: The Canucks Cocktail Cabinet  (Read 53279 times)

0 Members and 3 Guests are viewing this topic.

Benevolance

  • Trade Count: (0)
  • Full Member
  • ***
  • Offline Offline
  • Posts: 602
  • Last login:June 01, 2024, 02:39:35 pm
Re: The Canucks Cocktail Cabinet
« Reply #160 on: June 17, 2011, 12:16:54 pm »
I spat water on my keyboard thanks to that. :laugh2:

opt2not

  • Trade Count: (+15)
  • Full Member
  • ***
  • Offline Offline
  • Posts: 6173
  • Last login:April 02, 2024, 07:42:30 pm
Re: The Canucks Cocktail Cabinet
« Reply #161 on: June 17, 2011, 12:41:11 pm »
How about this one:  if that kid was Luongo, that smoke grenade would have passed right through his legs!
« Last Edit: June 17, 2011, 12:50:01 pm by opt2not »

Malenko

  • KNEEL BEFORE ZODlenko!
  • Trade Count: (+58)
  • Full Member
  • ***
  • Offline Offline
  • Posts: 14019
  • Last login:June 07, 2025, 09:21:55 am
  • Have you played with my GingerBalls?
    • forum.arcadecontrols.com/index.php/topic,142404.msg1475162.html
Re: The Canucks Cocktail Cabinet
« Reply #162 on: June 17, 2011, 01:26:43 pm »

Great cab!  Love the workmanship.

Too bad they have to lose tonight. 

Its not like we bumped your completed cab thread when the pats lost. Wheres the link to that project thread again?
If you're replying to a troll you are part of the problem.
I also need to follow this advice. Ignore or report, don't reply.

ChadTower

  • Chief Kicker - Nobody's perfect, including me. Fantastic body.
  • Trade Count: (+12)
  • Full Member
  • ***
  • Offline Offline
  • Posts: 38211
  • Last login:October 19, 2022, 12:01:54 pm
Re: The Canucks Cocktail Cabinet
« Reply #163 on: June 17, 2011, 01:36:04 pm »
Its not like we bumped your completed cab thread when the pats lost. Wheres the link to that project thread again?

I'm not really a Patriots fan.   I just live here.  :laugh2:

I stopped posting project threads a long time ago.  I'm a restorer, not a builder.  Several completed projects since then.  Just finishing up a Red Baron right now.  Have a nice weekend.


opt2not

  • Trade Count: (+15)
  • Full Member
  • ***
  • Offline Offline
  • Posts: 6173
  • Last login:April 02, 2024, 07:42:30 pm
Re: The Canucks Cocktail Cabinet
« Reply #164 on: October 27, 2011, 01:24:38 pm »
Bumpin' my old project, again. These things are never really done, are they?

I've been looking for a tube to swap onto my G07 chassis for a little while now. The current one has enough burn-in that I figured it was about time for a fix. Unfortunately, finding a replacement tube hasn't been easy. But, I got lucky and was offered a free working Wells K7689 19" monitor off Craigslist!


The monitor has your standard dirt and grime buildup, but just has some faint burn-in, much better than what my original one has. I didn't see any physical damage to the tube, or chassis, no burns or cracks. The previous owner said it was working when he pulled it from a TMNT cabinet. His cabinet must have been a conversion, since original TMNT cabs were those Midway ones with a 27" monitors and 4P panels. Though, perhaps there is a 2 player TMNT? Anyways, I plan on swapping this in, as well as Jamma wiring the cabinet so I can put swap in real boards here and there. I've been looking at jamma switchers too, so I can permanently have a Mame PC in the cab, but have an optional original board in there as well. Why would I do this?  Well for one, I love real hardware...no fuss no muss when it comes to configuring (especially through Jamma)...you get the right frame-rates, no emulation bugs like sound emulating and the sort. Two: I've been going a bit crazy with buying original boards...some vertical some horizontal. Making this change will give me the most options and flexibility. Mame helps me "sample" games before I pull the trigger to buy them.

edit: here's a comparison shot of the monitor I have with the burn-in. Big difference:
« Last Edit: October 31, 2011, 03:48:20 am by opt2not »

opt2not

  • Trade Count: (+15)
  • Full Member
  • ***
  • Offline Offline
  • Posts: 6173
  • Last login:April 02, 2024, 07:42:30 pm
Re: The Canucks Cocktail Cabinet
« Reply #165 on: October 31, 2011, 03:26:11 am »
Swapped my monitors out tonight, and I'm really happy with the visuals. The image is sharp and bright, but there is a bit of discolouration on one side of the screen. I degaussed it as best I can, but it looks like this thing could use some new caps.
I had to put the new monitor into the cocktail's frame, that was a pain, as well I mounted the remote board onto it too. The old chassis had different mounting screw-holes, so I had to make a few new ones and utilitized the old bracket holes for the remote board.


Here's how it looks without bezel, the tinted plexi and top-glass installed. You can really see the discolouration on one side of the screen:


With it all put together...


Here are a few close-ups of Dragon Blaze's title screen. Very clear bright picture I must say. The scratches are from the top-glass, not the monitor (i'll replace the glass eventually, but I'm in no rush):


It's really nice not having any burn-in staring me in the face, but the final step will be to pull out the chassis board and apply a cap-kit to get rid of the bad colours.
But hey, I'm happy!   ;D

emphatic

  • Trade Count: (0)
  • Full Member
  • ***
  • Offline Offline
  • Posts: 2017
  • Last login:Yesterday at 10:40:59 am
  • -"Suck it, Donny!" -"No, YOU suck it.... more".
    • Emphatic's Video Game Collection
Re: The Canucks Cocktail Cabinet
« Reply #166 on: October 31, 2011, 06:31:26 am »
Lookin' crisp!  :cheers:

Seith

  • Trade Count: (0)
  • Full Member
  • ***
  • Offline Offline
  • Posts: 402
  • Last login:September 08, 2018, 10:50:41 am
Re: The Canucks Cocktail Cabinet
« Reply #167 on: October 31, 2011, 04:35:02 pm »
Sweet pics.   ;D

Entropy42

  • Trade Count: (0)
  • Full Member
  • ***
  • Offline Offline
  • Posts: 56
  • Last login:August 09, 2023, 11:27:44 pm
  • Not a llama.
Re: The Canucks Cocktail Cabinet
« Reply #168 on: November 10, 2011, 01:22:04 pm »
As a hockey fan, gotta say this is an awesome cabinet.  Kinda sad to see an Arkanoid dismantled (I have this same Arkanoid cab at home), but at least you did a top-notch job with the conversion.  Maybe it will motivate me to clean up my own cab a little bit.  Great work, great documentation. 
Did you ever try to buff out the scratches in your top glass?  If so, how?

opt2not

  • Trade Count: (+15)
  • Full Member
  • ***
  • Offline Offline
  • Posts: 6173
  • Last login:April 02, 2024, 07:42:30 pm
Re: The Canucks Cocktail Cabinet
« Reply #169 on: November 10, 2011, 02:50:47 pm »
As a hockey fan, gotta say this is an awesome cabinet.  Kinda sad to see an Arkanoid dismantled (I have this same Arkanoid cab at home), but at least you did a top-notch job with the conversion.  Maybe it will motivate me to clean up my own cab a little bit.  Great work, great documentation.  
Did you ever try to buff out the scratches in your top glass?  If so, how?
Well originally this wasn't an Arkanoid, it was already converted from a Wizard of Wor, so I had no quams with maming a conversion. But like I said, my plans are to update the cabinet to a Jamma set-up so that I can swap original boards in from time to time. A Mame-PC will live permanently in the cabinet (connected via j-pac), but have a jamma switcher to go from original boards to mame. Already have a 2-in-1 en route. There are still some games that mame hasn't emulated perfectly yet, and I've been collecting some original boards here and there.

I haven't done anything with the top glass yet. Later on I'm probably just going to replace it with a newly made one. There is a glass-shop right across the street from me, and I was quoted at $60 for them to replicate the one I have.  I've decided it's cheap enough for me to take that option at a later date.

On another note, I got new Control Panels, and my monitor's cap-kit in the mail today!

Picked these up from Steven over at arcadeshop, multi-cade 2 button panels.
I'll be pulling out the spinners, and only going with a 2-button and joystick set-up. I find I don't play spinner games as much as I thought I would, and the extra CP space is going to be a much added relief when playing. Earlier in the thread you'll notice I was struggling with a layout with the spinners anyways, so the decision was made to just pull 'em. This cabinet mostly sees the classics and shmups played on it, with regular plays of Hat Trick.
I rebuilt those spinners with a new optic board, and will probably put them up for sale when I get around to the CP changes.

Gaaargh

  • Trade Count: (0)
  • Full Member
  • ***
  • Offline Offline
  • Posts: 78
  • Last login:April 20, 2023, 02:27:52 pm
Re: The Canucks Cocktail Cabinet
« Reply #170 on: November 11, 2011, 12:48:51 pm »
Great cabinet!

What did you end up doing for the Midway plate?
2-sided auto tape is a little thick, but carpet tape is wafer-thin.


On the top piece, where did you put the seam in the t-molding?
Kludged together a MAME cab 10 years ago, it got a makeover January 2012

2012 - built a cocktail Pacman near-repro running 60-odd vertical games Link

DillonFoulds

  • Trade Count: (0)
  • Full Member
  • ***
  • Offline Offline
  • Posts: 605
  • Last login:August 27, 2019, 05:04:44 am
Re: The Canucks Cocktail Cabinet
« Reply #171 on: March 08, 2012, 12:31:51 am »
*Bump* I know this one's pretty much finished, but it's a nice read-through from time to time. Really love the work on this one.

Also, interested in the monitor bit. Give us a follow-up!

opt2not

  • Trade Count: (+15)
  • Full Member
  • ***
  • Offline Offline
  • Posts: 6173
  • Last login:April 02, 2024, 07:42:30 pm
Re: The Canucks Cocktail Cabinet
« Reply #172 on: March 08, 2012, 04:39:28 am »
Thanks!  I've actually been meaning to update this thread, but there's a lot to cover so I've been putting it off lazily.

<inhale>

Part 1.
Ok since the last time I posted on this, I just received new CP's and a cap kit. So let's close that off:

Installed my controls into the CP's. I'm going with a Sanwa JLW's because I like the feel of it for classic games, which this cabinet will be primarily used for, and it's tight enough for shmups. The buttons are Sanwa as well. I like them for their light action and quiet operation. I haven't cleaned up those bolt heads yet in this picture, they were pulled during the initial renovation and untouched since because of my first panel having a plexi cover. I'm not going with the plexi now, but instead I'm going to do some art on one of those tough adhesive polylaminate CPO's and apply it to the surface. It'll be cleaner looking, and I never really liked plexi installed on CP's anyway. Shaft cover and dust washer are Qanba, bought from canadianjoysticks, a local parts dealer.


Here's the wiring, 3 bundles with connectors. One for the controls, buttons and p1 start. One for p2 start (I'll explain this one later), and the last one for the panel lighting *note: I'm using the old bulb sockets, properly wired to the cabinet's power rather than feeding off a PC's power supply. People have done wonders with LED bulbs these days, the pinball guys know what's up. Nice and clean wiring now. Also, the JLW's are fitted with octo-gates, and I used the same old method of sandwiching my cut-out pegs of plexi for mounting it a bit lower so that the balltop is sitting at the correct height.

Ready and working to get hooked up, as well as an art treatment. Stay tuned for that.

Ok now the monitor.
Pulled the chassis off that replacement monitor I got. I hate dried up bug carcasses:


Cleaned it up with a little patience and isoprophenol, at the same time replacing caps:


Re-installed onto the frame, lookin' good. Still undecided about the remote board, I have enough slack in the harness to mount it close to the coin door opening, but I haven't figured out where exactly is a good spot to reach to, but not be in the way that it might get accidentally get adjusted. On the frame suits fine for now.


opt2not

  • Trade Count: (+15)
  • Full Member
  • ***
  • Offline Offline
  • Posts: 6173
  • Last login:April 02, 2024, 07:42:30 pm
Re: The Canucks Cocktail Cabinet
« Reply #173 on: March 08, 2012, 04:39:56 am »
Part 2.
Save the Jamma fo yo mamma.

I wanted a cleaner solution for the wiring, and I wanted the versatility of installing boards as well as mame. Jamma is the way to go for this. I also wanted to know more about the jamma converting...
First, prep the Jamma wiring loom.

I followed Bob robert's guide on his site about bundling the connections so that the wires that are relevant to the area they're routing too. So here was my first mess-up, bundling the P2 start button with the P2 Controls instead of the P1 Controls is what forced me to add another connection to P1's CP. I didn't realize it till after the loom was installed and I went to connect the CP. Bob's guide is based around stand-up machines, not cocktails! *smacks forehead*
There are 6 bundles:
        Power
        Audio
        Video
        Coin Door
        Player 1 Controls
        Player 2 Controls

Like I said in Part 1, I want to wire this baby up properly, that means safety's first.

The power cord's lacking of a grounding pin needed to be addressed, so I disconnect the old one from the distribution block, and cut open a spare PC power cord I had and gave it the old connector. It's just a 3-pin molex.

We now have Earth Ground access <phew>.

After that was prep'd, I needed to gut out my old sloppy wiring and PC components out of the cab. Everything's got to go:


Earth Ground was then distributed throughout the cabinet's metal parts). Fan re-installed, the power switch, the Switching Power supply installed behind the cash box area, jamma loom installed and connections fastened to their respected areas. That bundle in the cash box is the coin-door I've yet to wire up. It has wires for the switches, the lighting, and the coin meter connections. PCB's or Mame hardware is going to be mounted on the side wall where my hand is closest to.


Here's the view of the CP's hooked up using Molex connectors. Nice and neat, easy to disconnect at the times of maintenance.


After all the wiring was settled, it was a manner of going around affixing connections, then it was time to power it up and check/adjust voltages. After that, I had to see this thing running so I plugged in a jamma board and gave it a test run.


Pretty cool, but I need a vertical game. Ahhhh Raiden II:
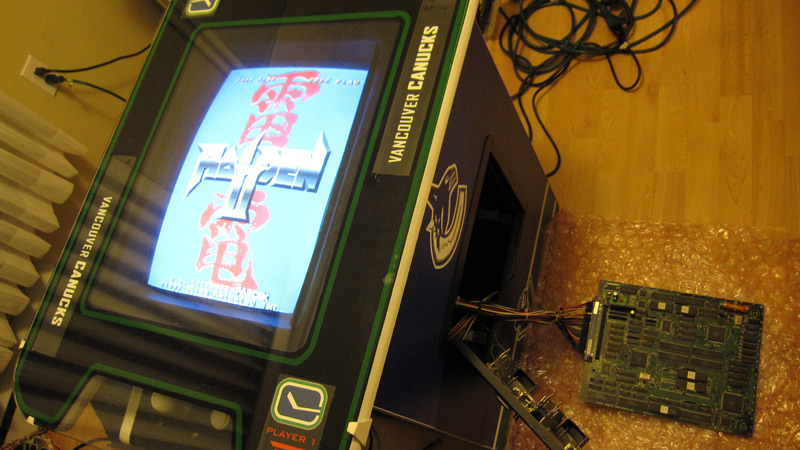
Even though Raiden II is not a cocktail game for two players, it's pretty darn good for one, and I still got to test the controls out for both. Everything works!  :applaud:

The monitor looks bright and crisp, and there's no more discolouration. Cap kits are such a huge bang for the buck and it's just what this monitor needed:


Next up is what I did to improve the audio, but it's late here and I'm going to crash now. Stay tuned for the next part of this Jamma Re-wire! :cheers:

Woodshop Flunky

  • Trade Count: (0)
  • Full Member
  • ***
  • Offline Offline
  • Posts: 681
  • Last login:August 20, 2017, 05:24:57 am
Re: The Canucks Cocktail Cabinet
« Reply #174 on: March 08, 2012, 09:55:39 am »
Your arcade looks great!  :applaud:

Raiden turned out to be my son's favorite game on his cab.  I didn't know about Raiden II... I'll have to check it out.

Complete mini arcade cabinet plans available.

opt2not

  • Trade Count: (+15)
  • Full Member
  • ***
  • Offline Offline
  • Posts: 6173
  • Last login:April 02, 2024, 07:42:30 pm
Re: The Canucks Cocktail Cabinet
« Reply #175 on: March 08, 2012, 12:14:54 pm »
Thanks! Your cab looks great also, I'm a big fan of the American Ace!
Unfortunely Mame does not emulate Raiden II or DX properly in its current state. The work-around without getting the actual PCB's is to get a PSX emulator and run The Raiden Project. It has both games and I've read it runs pretty decent. I also have a DX board as well but it's currently in repair. Great games.
 :cheers:

Woodshop Flunky

  • Trade Count: (0)
  • Full Member
  • ***
  • Offline Offline
  • Posts: 681
  • Last login:August 20, 2017, 05:24:57 am
Re: The Canucks Cocktail Cabinet
« Reply #176 on: March 09, 2012, 12:01:49 am »
Thanks! :)

After I saw your post, I was really excited about Raiden II. :badmood:

Oh well, thanks for the tip.
« Last Edit: March 09, 2012, 12:08:03 am by Woodshop Flunky »

Complete mini arcade cabinet plans available.