Main Restorations Software Audio/Jukebox/MP3 Everything Else Buy/Sell/Trade
Project Announcements Monitor/Video GroovyMAME Merit/JVL Touchscreen Meet Up Retail Vendors
Driving & Racing Woodworking Software Support Forums Consoles Project Arcade Reviews
Automated Projects Artwork Frontend Support Forums Pinball Forum Discussion Old Boards
Raspberry Pi & Dev Board controls.dat Linux Miscellaneous Arcade Wiki Discussion Old Archives
Lightguns Arcade1Up Try the site in https mode Site News

Unread posts | New Replies | Recent posts | Rules | Chatroom | Wiki | File Repository | RSS | Submit news


Author Topic: CP-1 Command Pod: The VR Space exploration project  (Read 63959 times)

0 Members and 1 Guest are viewing this topic.

SpaceHedgehog

  • Trade Count: (0)
  • Full Member
  • ***
  • Offline Offline
  • Posts: 937
  • Last login:October 29, 2024, 02:02:07 pm
  • Almost done ...
Re: CP-1 Command Pod: The VR Space exploration project
« Reply #160 on: December 07, 2014, 05:43:22 am »
Cheers for the positive feedback everyone :cheers:

With the glue having dried overnight, I dry assembled the left side pod. It's not completely perfect but good enough to give me the confidence to start on the second one:


I still have to put the mounting poles in place. These will slide in and out of the side pods to make the HOTAS removable. The main side piece shown in the picture will sit about 3 inches lower. The platform sitting on the poles (4mm aluminium plate which was ordered yesterday) will raise the HOTAS by 2-3 inches from the top surface of the side pods. I'll need to experiment to get the position correct:


Click a pic for a video tour 

yamatetsu

  • Trade Count: (0)
  • Full Member
  • ***
  • Offline Offline
  • Posts: 2724
  • Last login:Today at 01:33:45 am
  • Just because.
Re: CP-1 Command Pod: The VR Space exploration project
« Reply #161 on: December 07, 2014, 06:07:11 am »
Man, what you call "not completely perfect" others would kill for.
                  

SpaceHedgehog

  • Trade Count: (0)
  • Full Member
  • ***
  • Offline Offline
  • Posts: 937
  • Last login:October 29, 2024, 02:02:07 pm
  • Almost done ...
Re: CP-1 Command Pod: The VR Space exploration project
« Reply #162 on: December 07, 2014, 07:56:03 am »
Man, what you call "not completely perfect" others would kill for.

Cheers yamatetsu  :cheers: People can be overly critical of their builds at times - me included. It can be a bit of a curse.

Cut the perimeter pieces for the second pod. I will need to cut the support blocks next:


Just to give an idea of where the side pod will sit relative to the top of the front of the seat:

« Last Edit: December 07, 2014, 08:18:02 am by SpaceHedgehog »
Click a pic for a video tour 

SpaceHedgehog

  • Trade Count: (0)
  • Full Member
  • ***
  • Offline Offline
  • Posts: 937
  • Last login:October 29, 2024, 02:02:07 pm
  • Almost done ...
Re: CP-1 Command Pod: The VR Space exploration project
« Reply #163 on: December 07, 2014, 10:05:16 am »
Rinse and repeat for the second pod.

Support blocks hand cut with holes drilled for the screws.


LED and Neutric holes also drilled:


Click a pic for a video tour 

SpaceHedgehog

  • Trade Count: (0)
  • Full Member
  • ***
  • Offline Offline
  • Posts: 937
  • Last login:October 29, 2024, 02:02:07 pm
  • Almost done ...
Re: CP-1 Command Pod: The VR Space exploration project
« Reply #164 on: December 08, 2014, 06:02:59 am »
More progress and a better view of the fit:


Click a pic for a video tour 

Generic Eric

  • Trade Count: (+2)
  • Full Member
  • ***
  • Offline Offline
  • Posts: 4520
  • Last login:July 15, 2024, 09:18:25 pm
  • Restore! Don't maim for MAME, build from scratch!
    • forum.arcadecontrols.com/index.php/topic,143226.0.html
Re: CP-1 Command Pod: The VR Space exploration project
« Reply #165 on: December 08, 2014, 07:00:17 am »
I'm afraid to touch it.  It's so tight it pinched my finger just looking at it!

SpaceHedgehog

  • Trade Count: (0)
  • Full Member
  • ***
  • Offline Offline
  • Posts: 937
  • Last login:October 29, 2024, 02:02:07 pm
  • Almost done ...
Re: CP-1 Command Pod: The VR Space exploration project
« Reply #166 on: December 08, 2014, 08:12:17 am »
Cheers Generic  :cheers: There are a couple of pads which need attending to slightly but it should be a decent fit. I can start working on the sides again soon.
Click a pic for a video tour 

Superfrog

  • Trade Count: (0)
  • Full Member
  • ***
  • Offline Offline
  • Posts: 393
  • Last login:June 28, 2022, 10:39:08 am
    • My YouTube Channel
Re: CP-1 Command Pod: The VR Space exploration project
« Reply #167 on: December 08, 2014, 09:12:54 am »
Man, what you call "not completely perfect" others would kill for.

That's because you work on it and see every detail what is good or bad.
And you always wanna be as good as possible  :dizzy:

I can tell you all about it....  :censored: It's hard to let it loose  :dizzy:

SpaceHedgehog

  • Trade Count: (0)
  • Full Member
  • ***
  • Offline Offline
  • Posts: 937
  • Last login:October 29, 2024, 02:02:07 pm
  • Almost done ...
Re: CP-1 Command Pod: The VR Space exploration project
« Reply #168 on: December 08, 2014, 05:52:16 pm »
Man, what you call "not completely perfect" others would kill for.

That's because you work on it and see every detail what is good or bad.
And you always wanna be as good as possible  :dizzy:

I can tell you all about it....  :censored: It's hard to let it loose  :dizzy:

Seems you're struck with the same affliction as I am Superfrog   :cheers:
Click a pic for a video tour 

ChanceKJ

  • Trade Count: (0)
  • Full Member
  • ***
  • Offline Offline
  • Posts: 3229
  • Last login:August 07, 2021, 02:52:06 pm
Re: CP-1 Command Pod: The VR Space exploration project
« Reply #169 on: December 08, 2014, 06:30:03 pm »
Count me in too. Affliction is a good word to describe it. I'm really hard on myself with it. Probably why I'm so anal retentive with my planning and construction. "It can always be better" I tell myself :D

SpaceHedgehog

  • Trade Count: (0)
  • Full Member
  • ***
  • Offline Offline
  • Posts: 937
  • Last login:October 29, 2024, 02:02:07 pm
  • Almost done ...
Re: CP-1 Command Pod: The VR Space exploration project
« Reply #170 on: December 09, 2014, 06:38:32 am »
I think these forums are probably littered with like-minded individuals with the length of time frequenting the forums proportional to its severity  ;D

Started on the sides and positioned the HOTAS cases to where they're comfortable. Unfortunately, there are a couple of things wrong here. Firstly, the HOTAS will sit on platforms so will be raised a little thereby making the handling position less comfortable. Secondly, the inside of the seat just isn't a good shape relative to the side pod. There was also an additional minor issue where the sloping angle of the front of the side pod didn't line up with the angle on the side of the seat.

I've fixed both issues by reshaping the lower areas of the sides; it looks much better now I feel. As the front section has been lowered by a few cms, I can also lower the side pods and retain the current height of the HOTAS when they're sitting on their platforms.

The pictures shows the before and after positions with the white arrows indicating where it has been adjusted.

Before:


After:


The lower angle on the side panel doesn't mirror that of the side pod but now that the seat sides have been reshaped, the symmetrical asymmetry (if you know what I mean here), looks better imho.
Click a pic for a video tour 

SpaceHedgehog

  • Trade Count: (0)
  • Full Member
  • ***
  • Offline Offline
  • Posts: 937
  • Last login:October 29, 2024, 02:02:07 pm
  • Almost done ...
Re: CP-1 Command Pod: The VR Space exploration project
« Reply #171 on: December 09, 2014, 09:06:42 am »
I've cloned the main sections for the sides (the tops are over-cut at the moment). I can start to think about the window cut-outs next:

Click a pic for a video tour 

Fursphere

  • Trade Count: (0)
  • Full Member
  • ***
  • Offline Offline
  • Posts: 1266
  • Last login:Yesterday at 10:38:30 am
Re: CP-1 Command Pod: The VR Space exploration project
« Reply #172 on: December 09, 2014, 09:29:38 am »
The thrustmaster setup makes the chair look small...  lol

SpaceHedgehog

  • Trade Count: (0)
  • Full Member
  • ***
  • Offline Offline
  • Posts: 937
  • Last login:October 29, 2024, 02:02:07 pm
  • Almost done ...
Re: CP-1 Command Pod: The VR Space exploration project
« Reply #173 on: December 09, 2014, 09:49:11 am »
The thrustmaster setup makes the chair look small...  lol

Yup, the Warthog is a big piece of kit! The photo doesn't really present a decent perspective of its size relative to the seat though ...
Click a pic for a video tour 

SpaceHedgehog

  • Trade Count: (0)
  • Full Member
  • ***
  • Offline Offline
  • Posts: 937
  • Last login:October 29, 2024, 02:02:07 pm
  • Almost done ...
Re: CP-1 Command Pod: The VR Space exploration project
« Reply #174 on: December 09, 2014, 12:11:09 pm »
Intergalacticat stowaway:


Click a pic for a video tour 

Generic Eric

  • Trade Count: (+2)
  • Full Member
  • ***
  • Offline Offline
  • Posts: 4520
  • Last login:July 15, 2024, 09:18:25 pm
  • Restore! Don't maim for MAME, build from scratch!
    • forum.arcadecontrols.com/index.php/topic,143226.0.html
Re: CP-1 Command Pod: The VR Space exploration project
« Reply #175 on: December 09, 2014, 12:23:39 pm »
Do you intend to use rudder pedals?  Are there room for rudder pedals? 

SpaceHedgehog

  • Trade Count: (0)
  • Full Member
  • ***
  • Offline Offline
  • Posts: 937
  • Last login:October 29, 2024, 02:02:07 pm
  • Almost done ...
Re: CP-1 Command Pod: The VR Space exploration project
« Reply #176 on: December 09, 2014, 12:31:42 pm »
Hey Generic, yes. As shown on the first page, I will use these:


The whole behemoth of a seat is to be mounted on a base which will raise it significantly.
Click a pic for a video tour 

SpaceHedgehog

  • Trade Count: (0)
  • Full Member
  • ***
  • Offline Offline
  • Posts: 937
  • Last login:October 29, 2024, 02:02:07 pm
  • Almost done ...
Re: CP-1 Command Pod: The VR Space exploration project
« Reply #177 on: December 10, 2014, 06:00:31 am »
The artwork arrived today. I've cut the backing board, acrylic and cut out a tester artwork piece:


I will move it down a fraction.
Click a pic for a video tour 

SpaceHedgehog

  • Trade Count: (0)
  • Full Member
  • ***
  • Offline Offline
  • Posts: 937
  • Last login:October 29, 2024, 02:02:07 pm
  • Almost done ...
Re: CP-1 Command Pod: The VR Space exploration project
« Reply #178 on: December 10, 2014, 08:28:43 am »
Both pods done:

Click a pic for a video tour 

BorgDog

  • Trade Count: (0)
  • Full Member
  • ***
  • Offline Offline
  • Posts: 436
  • Last login:August 22, 2021, 02:22:52 pm
  • Not a hipster for over 50 years!
Re: CP-1 Command Pod: The VR Space exploration project
« Reply #179 on: December 10, 2014, 08:40:43 am »
Very impressive work, but the thing that keeps popping up in my mind is that has got to create boat loads of dust.  Do you have a shop you are doing this in? dust collection system?  And where is this going to live when done?
My Projects:
MisSpent Youth a Vigolix bartop,  Little Bastard a rotating tablet/display bartop,
Pin-Dog a mini pin-cab on vpforums.org  Star Wars a wedgehead pincab on vpinball.com

SpaceHedgehog

  • Trade Count: (0)
  • Full Member
  • ***
  • Offline Offline
  • Posts: 937
  • Last login:October 29, 2024, 02:02:07 pm
  • Almost done ...
Re: CP-1 Command Pod: The VR Space exploration project
« Reply #180 on: December 10, 2014, 08:50:58 am »
Yes MDF creates a lot of mess if not addressed. The Trend router has a vacuum attachment for using indoors (garage). I try to work outside if possible.

It's going to go somewhere in my games room. I will need to move some things around to accommodate it though.


« Last Edit: December 10, 2014, 08:53:42 am by SpaceHedgehog »
Click a pic for a video tour 

Generic Eric

  • Trade Count: (+2)
  • Full Member
  • ***
  • Offline Offline
  • Posts: 4520
  • Last login:July 15, 2024, 09:18:25 pm
  • Restore! Don't maim for MAME, build from scratch!
    • forum.arcadecontrols.com/index.php/topic,143226.0.html
Re: CP-1 Command Pod: The VR Space exploration project
« Reply #181 on: December 10, 2014, 04:01:06 pm »
I just noticed the ship manufacturer icons on the elite dangerous website.


I won't pretend to have played the game yet, but perhaps once you settle on a type of ship, you might include the logo on your chair?


Holy crow those are huge
/edit

SpaceHedgehog

  • Trade Count: (0)
  • Full Member
  • ***
  • Offline Offline
  • Posts: 937
  • Last login:October 29, 2024, 02:02:07 pm
  • Almost done ...
Re: CP-1 Command Pod: The VR Space exploration project
« Reply #182 on: December 10, 2014, 05:41:39 pm »
Thanks for the idea Generic - The game allows you to have multiple ships now but I guess I could make something to allow the logos to be swapable  :cheers:
Click a pic for a video tour 

Fursphere

  • Trade Count: (0)
  • Full Member
  • ***
  • Offline Offline
  • Posts: 1266
  • Last login:Yesterday at 10:38:30 am
Re: CP-1 Command Pod: The VR Space exploration project
« Reply #183 on: December 10, 2014, 05:53:55 pm »
Thanks for the idea Generic - The game allows you to have multiple ships now but I guess I could make something to allow the logos to be swapable  :cheers:

USB screens in the pods?  :D

Maybe even as simple of those photo frames with memory cards for photos.  Have them rotate automatically. 

SpaceHedgehog

  • Trade Count: (0)
  • Full Member
  • ***
  • Offline Offline
  • Posts: 937
  • Last login:October 29, 2024, 02:02:07 pm
  • Almost done ...
Re: CP-1 Command Pod: The VR Space exploration project
« Reply #184 on: December 11, 2014, 07:01:49 am »
Thanks for the idea Generic - The game allows you to have multiple ships now but I guess I could make something to allow the logos to be swapable  :cheers:

USB screens in the pods?  :D

Maybe even as simple of those photo frames with memory cards for photos.  Have them rotate automatically.
An excellent idea Fursphere, I will definitely look into that  :cheers:

It doesn't look like much but I have trimmed and cut the angles on all the side pieces - these will have further sections attached to them to cover the top section over the shoulders and have a single seamless piece. I will use bracing/support blocks to keep things sturdy. There will obviously be some filling required but doing it this way ensures that the external and internal bevleing will line up correctly:


Rather than windows for the upper part of the sides. I will create a separate panel with inserts to it so it will sit proud rather than embedded. I will do the same for the top. Whilst adding a bit of interest, this will also get around the problem of securely fastening the side sections to the top/shoulder sections - windowing here would severely limit my ability to create a stable structure.
« Last Edit: December 11, 2014, 07:10:47 am by SpaceHedgehog »
Click a pic for a video tour 

SpaceHedgehog

  • Trade Count: (0)
  • Full Member
  • ***
  • Offline Offline
  • Posts: 937
  • Last login:October 29, 2024, 02:02:07 pm
  • Almost done ...
Re: CP-1 Command Pod: The VR Space exploration project
« Reply #185 on: December 11, 2014, 10:59:24 am »

Draw everything up, drill access holes, rough cut the insides, cut and attach the guides and flush trim. Things are going well. How wrong could I be ...


Aaaaaarrrrrrrrrgggggghhhhhhh. The window is massively overcut, extending down to the side pod.

Options:

a. Stuff it and carry on
b. Do it again

I did it again, correctly:


I'm glad I did.
Click a pic for a video tour 

SpaceHedgehog

  • Trade Count: (0)
  • Full Member
  • ***
  • Offline Offline
  • Posts: 937
  • Last login:October 29, 2024, 02:02:07 pm
  • Almost done ...
Re: CP-1 Command Pod: The VR Space exploration project
« Reply #186 on: December 11, 2014, 01:02:47 pm »
I've routed the inside bevels on the windows and also inserts for both the mesh and the aluminium bars which are now fitted:


I still need to cut the bars for the other side. I'm almost out of mesh - just enough for one side - so will have to order some more of that.
Click a pic for a video tour 

ChanceKJ

  • Trade Count: (0)
  • Full Member
  • ***
  • Offline Offline
  • Posts: 3229
  • Last login:August 07, 2021, 02:52:06 pm
Re: CP-1 Command Pod: The VR Space exploration project
« Reply #187 on: December 11, 2014, 04:14:30 pm »
I still think that you should embroider that winged crest in a silver or gun metal thread on the large seat panel.

...I may know a guy  ;) ;)

rovingmind

  • Trade Count: (+1)
  • Full Member
  • ***
  • Offline Offline
  • Posts: 632
  • Last login:October 17, 2023, 11:13:48 pm
  • If you only knew the POWER of the Dark Side
    • rovingmind
Re: CP-1 Command Pod: The VR Space exploration project
« Reply #188 on: December 11, 2014, 11:36:33 pm »
are you ZOOP sealing those bars so they stay shiny?
AAAAAAAAAAAAAAAAAAAAAAAAAAAAAAAAAAAAAAAAAHHHH!!!!!

SpaceHedgehog

  • Trade Count: (0)
  • Full Member
  • ***
  • Offline Offline
  • Posts: 937
  • Last login:October 29, 2024, 02:02:07 pm
  • Almost done ...
Re: CP-1 Command Pod: The VR Space exploration project
« Reply #189 on: December 12, 2014, 07:44:56 am »
I'd love to see what it looked like Chance but I'm quite digging the plain look of the upholstery :cheers:

It's anodized aluminium rovingmind so it should be good as is. I have it on my R-Pod and it's looking brand new still :)

I completed the vinyl backing and mesh on the right hand side window:


« Last Edit: December 12, 2014, 08:44:56 am by SpaceHedgehog »
Click a pic for a video tour 

Fursphere

  • Trade Count: (0)
  • Full Member
  • ***
  • Offline Offline
  • Posts: 1266
  • Last login:Yesterday at 10:38:30 am
Re: CP-1 Command Pod: The VR Space exploration project
« Reply #190 on: December 12, 2014, 09:11:52 am »
So is that all freehand routing?  Or do you build a lot of jigs? 

Honestly, I'm really curious what you're toolset looks like.

SpaceHedgehog

  • Trade Count: (0)
  • Full Member
  • ***
  • Offline Offline
  • Posts: 937
  • Last login:October 29, 2024, 02:02:07 pm
  • Almost done ...
Re: CP-1 Command Pod: The VR Space exploration project
« Reply #191 on: December 12, 2014, 10:24:40 am »
Yes, all the routing is done freehand. The cutouts I make tend to use simple guides nailed into the back of the MDF:


Tool set is as follows:


Circular saw used very occasionally:


Old Black and Decker drill - does the job:


Small workbench:


A couple of G-Clamps:


That's it really.

Click a pic for a video tour 

Fursphere

  • Trade Count: (0)
  • Full Member
  • ***
  • Offline Offline
  • Posts: 1266
  • Last login:Yesterday at 10:38:30 am
Re: CP-1 Command Pod: The VR Space exploration project
« Reply #192 on: December 12, 2014, 10:52:01 am »
So you basically build a fence on one side, then use a flush trim bit to route it out?   Man, I was over-complicating that in my head.   :dizzy:

I can't cut a straight line to save my life.   :P

thanks for sharing!   :cheers:

SpaceHedgehog

  • Trade Count: (0)
  • Full Member
  • ***
  • Offline Offline
  • Posts: 937
  • Last login:October 29, 2024, 02:02:07 pm
  • Almost done ...
Re: CP-1 Command Pod: The VR Space exploration project
« Reply #193 on: December 12, 2014, 10:57:54 am »
No worries  :cheers:

A quick tutorial on the paneling if anyone's interested. Cut and paste from another forum where someone asked how it was done. Simple stuff really but may be useful for someone.

You will need a router with flush trim, chamfer and rabet bits, a jigsaw, a drill a small workbench and some clamps.

It will describe how I made the outer panel for this and was my first attempt at doing it:


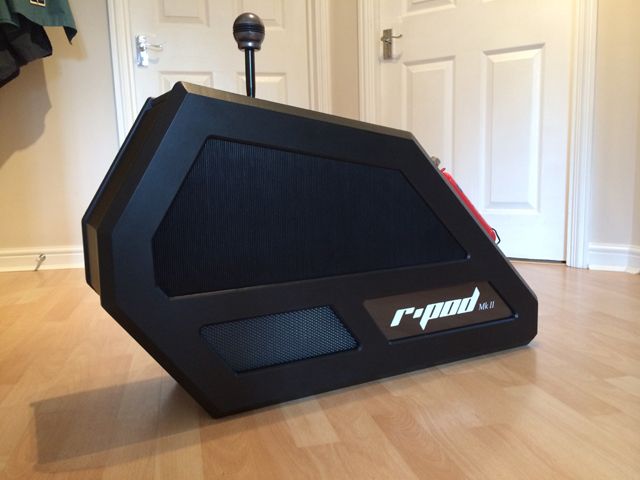
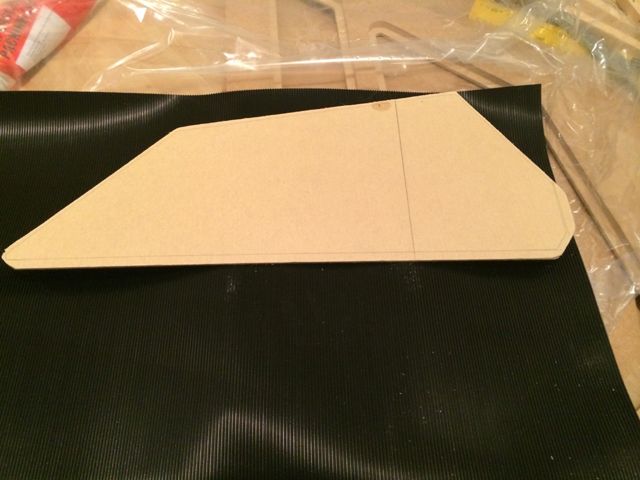
First, cut your basic shape and ensure you have nice clean edges. I use the flush trim router bit against a straight edge (usually another piece of MDF) to achieve this:


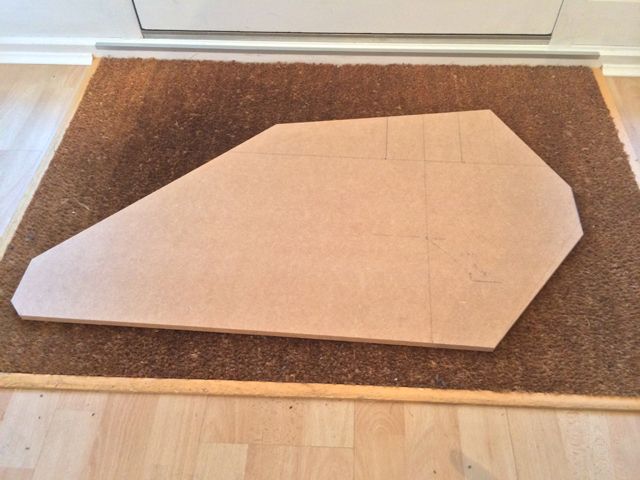
Also cut a second one - this will become the back plate for the panel and hold in the insert (mesh, grill, logo, acrylic etc). Typically, I will use 18mm MDF for the outer panel and 12mm for the inner one. It creates a nice thick (but heavy) piece which adds a nice bit of depth and substance to the projects. You can use the first panel as a template for the second panel. Mark the outline on the second board, rough cut and flush trim.

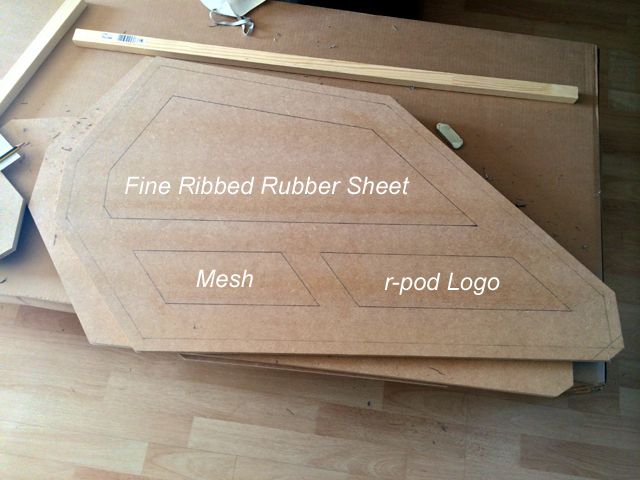
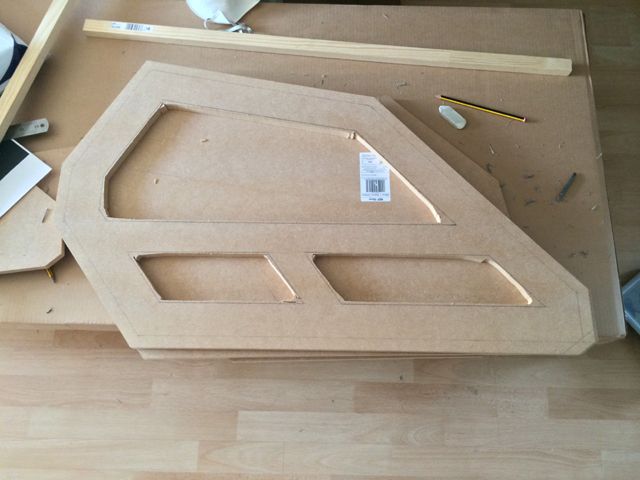
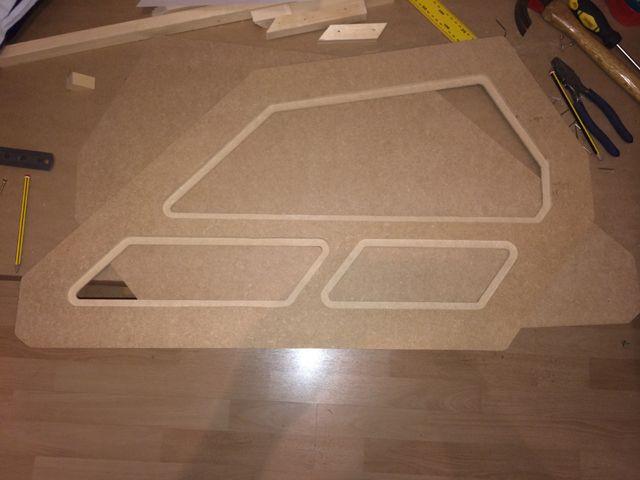
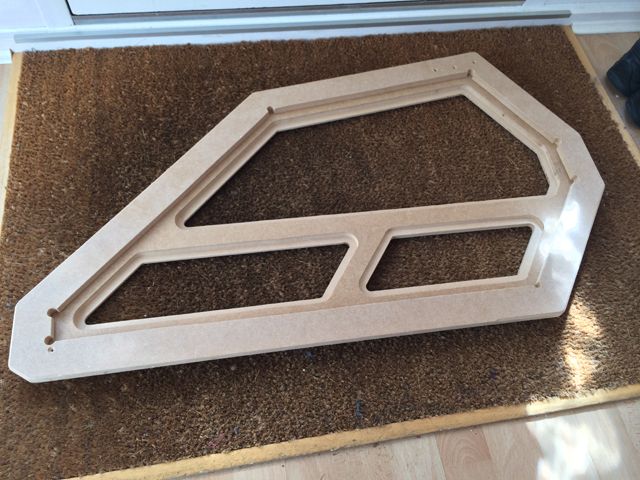
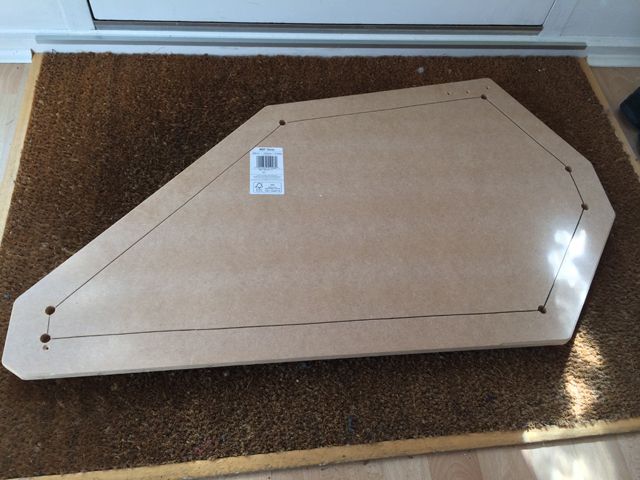
Next, mark out your design. Firstly, I draw out a perimeter which shows where the outer, more aggressive beveling will reach. After that, I draw out a second inner line equidistant from the edge. I used a distance of around 16mm for the first perimeter and added 5cm to that for the inner line. 5cm becomes the distance between each of the frames on the inner windows. This gives you an idea of the original design I came up with for the outer face of the shifter pod:


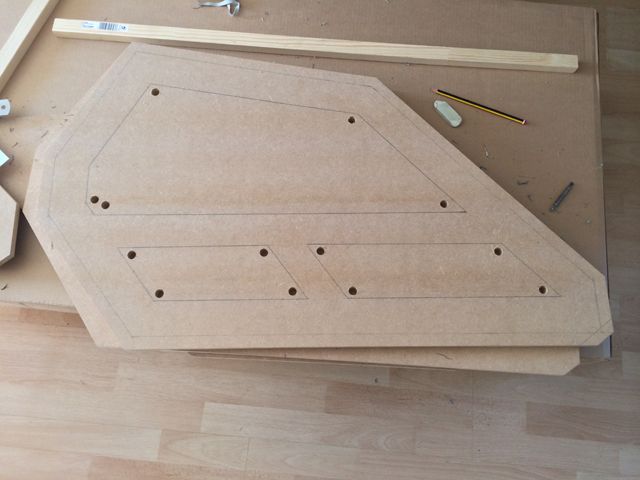
Once done, drill some holes towards the corners of the windows. It's best not to get too close to the corners of very tight angles. I generally use a 12mm spade bit for this:


Next, cut out the windows with a jigsaw. Don't go too near the lines, its much better to under cut rather than over cut considering the work that's required if a mistake is made:


Attach some straight wood strips at the lines marking out the windows:


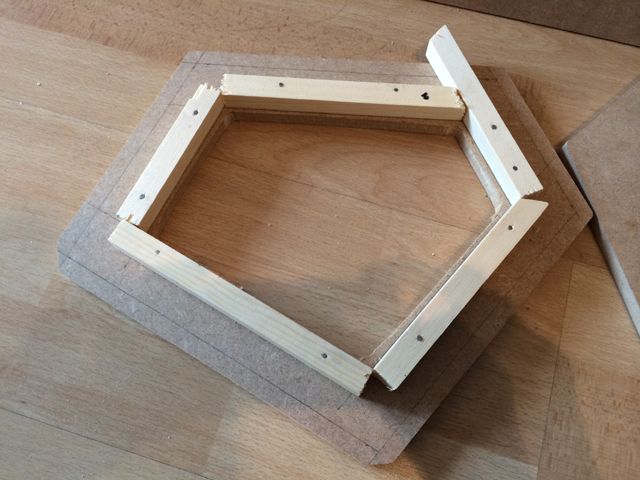
Using the wood strips as a guide you can now use a flush trim router bit to get the edges straight and clean. You will also get a rounded corner which I happen to like:


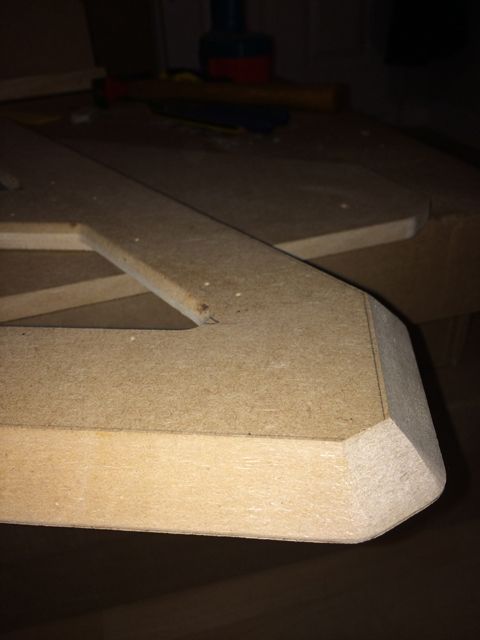
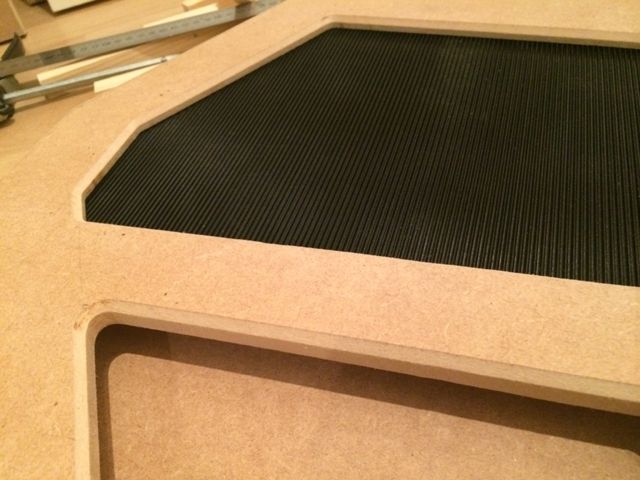
Bevel the outer edges and lightly bevel the inner edges of the windows:


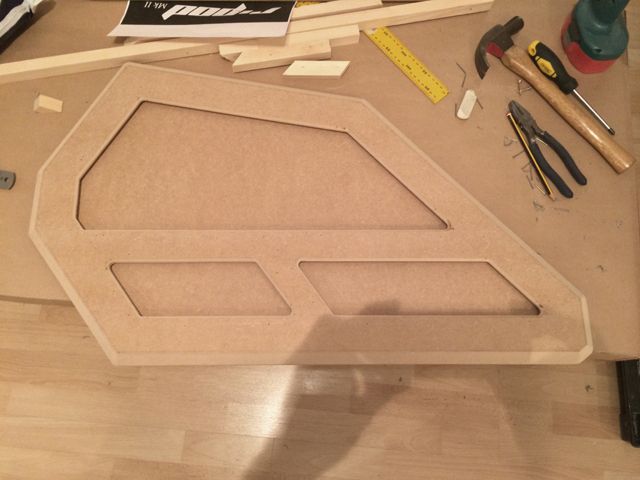
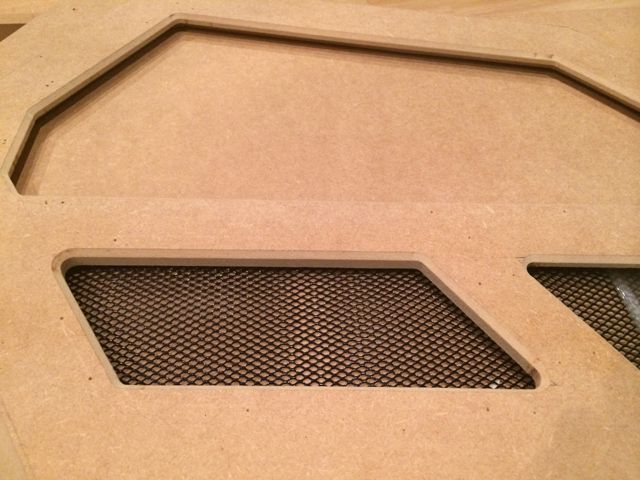
Then use a rabet bit to rout out the inlay areas on the inner side of the panels for the windows. You will need to determine the correct depth to accommodate the inserts. I use about 2mm for mesh and 7mm for acrylic and rubber inlays:


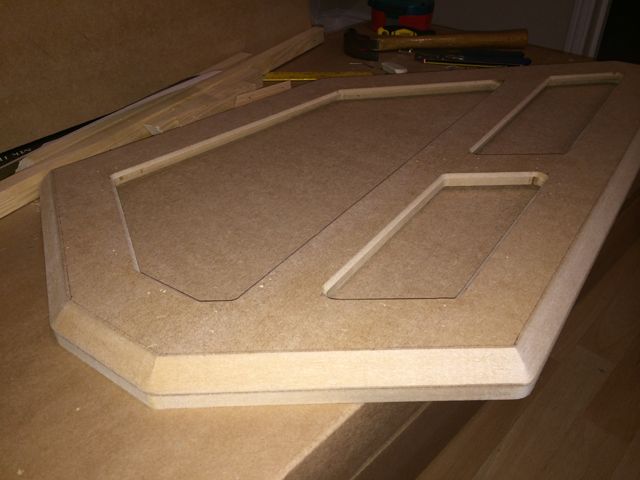
You should now have a panel which looks like this:


Make your inserts for the panels. I used rubber sheet (on backing board). Total thickness around 6mm. Mesh:


Rubber with backing board:


These will slot into the inlays on the main frame. This doesn't show the artwork inlay but the same approach is used as that for the rubber - 3mm cast acrylic was used as a cover with artwork sandwiched between the acrylic and backing board.

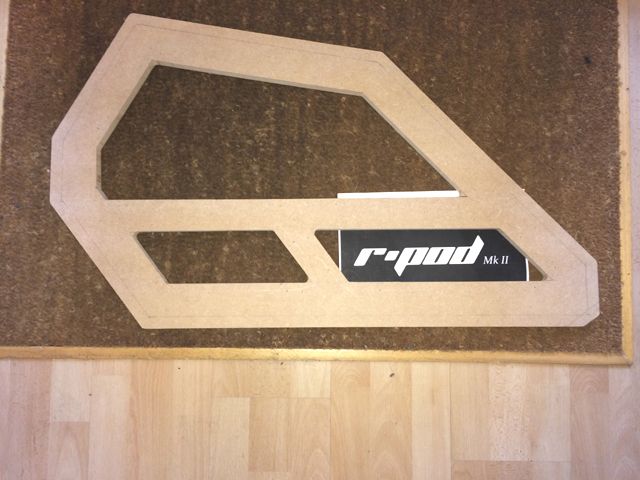
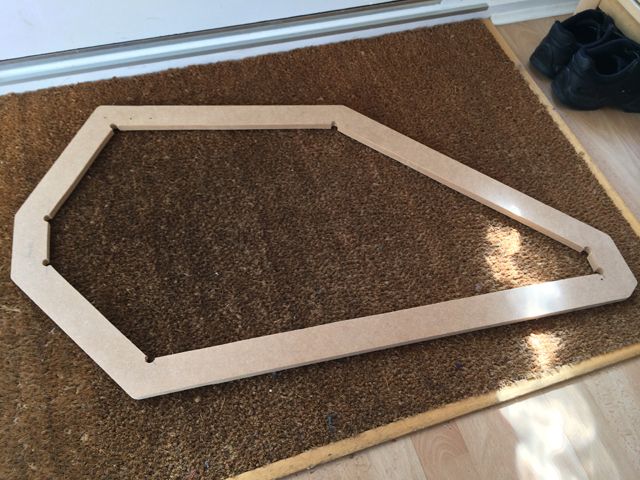
Fit the front and back pieces together and mark out the window position on the backing piece. Draw a line around 2cm from the outer edges of the windows, drill at the corners and try to keep a reasonably straight line. You should end up with a piece which looks like this:


When attached to the outer frame (glued), it will look like this:


You can see that the inner thin piece has clearance for full access to the window inlays. Once the cut section is placed into position, it will look like this:


You now have a panel you can work with. Once painted, the inserts can be put back in and the back panel be glued and screwed into place. For this piece, I was able to use additional screws into the bar in the middle of the outer frame for extra stability.
Click a pic for a video tour 

mpm32

  • Cheesecake Master
  • Trade Count: (0)
  • Full Member
  • ***
  • Offline Offline
  • Posts: 4121
  • Last login:November 20, 2018, 09:25:14 pm
  • I want to Build My Own Arcade Controls!!
Re: CP-1 Command Pod: The VR Space exploration project
« Reply #194 on: December 12, 2014, 11:49:30 am »
I know you've mostly finished the seat but if you haven't I have a few upholstery suggestions.

On the side panels that you were trying to wrap but abandoned, if you had used a hair dryer to warm the vinyl as you were stapling you might have been more successful.

If you want to add some height to the side panels, I would glue multiple pieces of your foam together to make it thicker. Once you have this done, you can cut it to the size of your mdf backing panel and then shape it using a combo of an electric carving knife and a sander as you would sand wood. You can also do this for the panels that make up your lumbar area. Glue foam together and you can shape it to be more half circle shaped as opposed to flat.

Once that's done you can wrap in your vinyl as usual.

Generic Eric

  • Trade Count: (+2)
  • Full Member
  • ***
  • Offline Offline
  • Posts: 4520
  • Last login:July 15, 2024, 09:18:25 pm
  • Restore! Don't maim for MAME, build from scratch!
    • forum.arcadecontrols.com/index.php/topic,143226.0.html
Re: CP-1 Command Pod: The VR Space exploration project
« Reply #195 on: December 12, 2014, 11:59:22 am »

On the side panels that you were trying to wrap but abandoned, if you had used a hair dryer to warm the vinyl as you were stapling you might have been more successful.


I don't know about things, but would that stretch it so much that when it cooled it would lead to tearing? 

mpm32

  • Cheesecake Master
  • Trade Count: (0)
  • Full Member
  • ***
  • Offline Offline
  • Posts: 4121
  • Last login:November 20, 2018, 09:25:14 pm
  • I want to Build My Own Arcade Controls!!
Re: CP-1 Command Pod: The VR Space exploration project
« Reply #196 on: December 12, 2014, 12:16:30 pm »
You're not trying to melt it, just warm it some to give it a little more flex. And that vinyl looks pretty thick, you'd have to try really hard to rip it.


Generic Eric

  • Trade Count: (+2)
  • Full Member
  • ***
  • Offline Offline
  • Posts: 4520
  • Last login:July 15, 2024, 09:18:25 pm
  • Restore! Don't maim for MAME, build from scratch!
    • forum.arcadecontrols.com/index.php/topic,143226.0.html
Re: CP-1 Command Pod: The VR Space exploration project
« Reply #197 on: December 12, 2014, 12:20:49 pm »
You're not trying to melt it, just warm it some to give it a little more flex. And that vinyl looks pretty thick, you'd have to try really hard to rip it.
Ok

Of the long list of things I hope to do is something like this.

But first I'd like to do that Space Invader Sofa.  Do you know about piping?

^Not that any of this has to do with CP-1.   

ChanceKJ

  • Trade Count: (0)
  • Full Member
  • ***
  • Offline Offline
  • Posts: 3229
  • Last login:August 07, 2021, 02:52:06 pm
Re: CP-1 Command Pod: The VR Space exploration project
« Reply #198 on: December 12, 2014, 09:55:09 pm »
I'd love to see what it looked like Chance but I'm quite digging the plain look of the upholstery :cheers:

Just sayin.... 8)


SpaceHedgehog

  • Trade Count: (0)
  • Full Member
  • ***
  • Offline Offline
  • Posts: 937
  • Last login:October 29, 2024, 02:02:07 pm
  • Almost done ...
Re: CP-1 Command Pod: The VR Space exploration project
« Reply #199 on: December 12, 2014, 10:37:17 pm »
Thanks for the info mpm32. If the back needs adjusting for lumbar support, I'll look into this  :cheers:

Chance, that looks freaking awesome. Colour me interested. How much would something like that cost?
Click a pic for a video tour