Main Restorations Software Audio/Jukebox/MP3 Everything Else Buy/Sell/Trade
Project Announcements Monitor/Video GroovyMAME Merit/JVL Touchscreen Meet Up Retail Vendors
Driving & Racing Woodworking Software Support Forums Consoles Project Arcade Reviews
Automated Projects Artwork Frontend Support Forums Pinball Forum Discussion Old Boards
Raspberry Pi & Dev Board controls.dat Linux Miscellaneous Arcade Wiki Discussion Old Archives
Lightguns Arcade1Up Try the site in https mode Site News

Unread posts | New Replies | Recent posts | Rules | Chatroom | Wiki | File Repository | RSS | Submit news


Author Topic: Project Raptor - Vewlix Inspired Modular Console/PC Arcade Cabinet  (Read 31216 times)

0 Members and 1 Guest are viewing this topic.

SpaceHedgehog

  • Trade Count: (0)
  • Full Member
  • ***
  • Offline Offline
  • Posts: 937
  • Last login:October 29, 2024, 02:02:07 pm
  • Almost done ...
Now that I have a dedicated room for games, I need to get it all organised. My Vewlix cab is pretty much done, my gaming desk also nearly done, racing simulator looking ok but needing to be re-styled and my XBOX looking a right mess on a half finished cabinet. Got ---my bottom--- together today and started to rebuild the cabinet. I attempted one before but it didn't come out anything like I hoped so I stopped building it halfway through. This is my second attempt to build one.

Work done so far today:


This is a picture of a previous attempt. I'll be sticking with the poles for the TV mount for this new cab. You get the idea ...


Planning to put a couple of fans on the back for heat exhaust.
« Last Edit: January 12, 2013, 12:04:46 pm by SpaceHedgehog »
Click a pic for a video tour 

SpaceHedgehog

  • Trade Count: (0)
  • Full Member
  • ***
  • Offline Offline
  • Posts: 937
  • Last login:October 29, 2024, 02:02:07 pm
  • Almost done ...
Re: Console Arcade Cabinet
« Reply #1 on: October 28, 2012, 03:16:12 pm »
Last activity for today, Will be picking up again next weekend.


Top will be covered, the sides bevelled, legs added and extra side pieces made.

Doors will be added using some black mesh wrapped around a frame.

« Last Edit: October 28, 2012, 03:23:31 pm by SpaceHedgehog »
Click a pic for a video tour 

CoryBee

  • Trade Count: (+2)
  • Full Member
  • ***
  • Offline Offline
  • Posts: 2093
  • Last login:May 18, 2024, 07:28:48 am
  • Bopity Boopy
Re: Console Arcade Cabinet
« Reply #2 on: October 28, 2012, 03:29:25 pm »
Quite interested in what this will look like completed.... :cheers:

SpaceHedgehog

  • Trade Count: (0)
  • Full Member
  • ***
  • Offline Offline
  • Posts: 937
  • Last login:October 29, 2024, 02:02:07 pm
  • Almost done ...
Re: Console Arcade Cabinet
« Reply #3 on: October 28, 2012, 03:37:37 pm »
Thanks, so am I!! Fancied doing something original.

Edit: The best way I can describe it is a mutant hybrid of a Golden Tee, Showcase and a Vewlix


« Last Edit: October 28, 2012, 03:48:14 pm by SpaceHedgehog »
Click a pic for a video tour 

SpaceHedgehog

  • Trade Count: (0)
  • Full Member
  • ***
  • Offline Offline
  • Posts: 937
  • Last login:October 29, 2024, 02:02:07 pm
  • Almost done ...
Re: Console Arcade Cabinet
« Reply #4 on: October 28, 2012, 04:35:15 pm »
Artists impression (I use the word artist loosely):


Legs will actually be longer and the TV relatively larger.
Click a pic for a video tour 

SpaceHedgehog

  • Trade Count: (0)
  • Full Member
  • ***
  • Offline Offline
  • Posts: 937
  • Last login:October 29, 2024, 02:02:07 pm
  • Almost done ...
Re: Console Arcade Cabinet
« Reply #5 on: November 04, 2012, 05:12:45 am »
Hopefully it will start to resemble the design soon ....


« Last Edit: November 05, 2012, 10:56:54 am by SpaceHedgehog »
Click a pic for a video tour 

SpaceHedgehog

  • Trade Count: (0)
  • Full Member
  • ***
  • Offline Offline
  • Posts: 937
  • Last login:October 29, 2024, 02:02:07 pm
  • Almost done ...
Re: Console Arcade Cabinet
« Reply #6 on: November 04, 2012, 07:48:59 am »
Good old blackboard vinyl - the stuff is great. Covered the inside compartment where the console will sit.

Bottom shelf.


Interior.


Need to decide whether to use T-molding or simply paint the opening. The front has to be filled and sanded now before more vinyl is applied ....

The aperture will be covered by a mesh door anyway though.
« Last Edit: November 04, 2012, 07:50:45 am by SpaceHedgehog »
Click a pic for a video tour 

SpaceHedgehog

  • Trade Count: (0)
  • Full Member
  • ***
  • Offline Offline
  • Posts: 937
  • Last login:October 29, 2024, 02:02:07 pm
  • Almost done ...
Re: Console Arcade Cabinet
« Reply #7 on: November 04, 2012, 11:12:28 am »
Front and sides skinned.


Sides bevelled and filledto give a bit more of an interesting shape.


TV in place (will get a new one at some point with a thinner bezel).


Now need to work on finishing the top and then the cabinet legs and shaped side pieces
« Last Edit: November 05, 2012, 10:59:21 am by SpaceHedgehog »
Click a pic for a video tour 

CoryBee

  • Trade Count: (+2)
  • Full Member
  • ***
  • Offline Offline
  • Posts: 2093
  • Last login:May 18, 2024, 07:28:48 am
  • Bopity Boopy
Re: Console Arcade Cabinet
« Reply #8 on: November 04, 2012, 04:56:48 pm »
Holy tits that thing is crazy

bluemini17

  • Trade Count: (0)
  • Full Member
  • ***
  • Offline Offline
  • Posts: 83
  • Last login:June 06, 2014, 10:26:11 am
    • My Youtube Channel
Re: Console Arcade Cabinet
« Reply #9 on: November 04, 2012, 05:00:40 pm »
that is amazing. are you going to hide the wires inside one of the support tubes? great design, any thoughts on game choice for this bad boy  :afro:

SpaceHedgehog

  • Trade Count: (0)
  • Full Member
  • ***
  • Offline Offline
  • Posts: 937
  • Last login:October 29, 2024, 02:02:07 pm
  • Almost done ...
Re: Console Arcade Cabinet
« Reply #10 on: November 04, 2012, 05:28:33 pm »
Thanks guys. I wanted to do something novel and promised to make my son a cabinet.

Re the wires, there will actually be a 3rd tube for the purpose. It will effectively make a triangle at the base. I was going to drill a hole in the bottom of the table leg and feed the cables through but decided against it. I'm happy the 3 tube approach will look pretty good with the color scheme I'm going for (shaped white panels with artwork on the side if the base unit, white 3rd tube - it will match my Vewlix cab).

On the games front, it will be a multitude - I fancy making a control panel for Pacman CE + DX. This will 'dock' with the base unit and look similar to a Showcase cab. If I don't build a dedicated Electronic Pinball cab, I'm also planning on a pinball control panel. A 2 player panel for fighting games is also on my wishlist.
Click a pic for a video tour 

dextercf

  • Trade Count: (0)
  • Full Member
  • ***
  • Offline Offline
  • Posts: 432
  • Last login:October 05, 2024, 06:30:51 pm
  • [thisispersonal]
Console Arcade Cabinet
« Reply #11 on: November 04, 2012, 06:08:09 pm »
Nice build man!
Only One little note from me, wanna flip those pics 180' for us? 😄

SpaceHedgehog

  • Trade Count: (0)
  • Full Member
  • ***
  • Offline Offline
  • Posts: 937
  • Last login:October 29, 2024, 02:02:07 pm
  • Almost done ...
Re: Console Arcade Cabinet
« Reply #12 on: November 05, 2012, 02:23:39 am »
I'll look into that dextercf. They're displaying the right way up for me though  ???
Click a pic for a video tour 

PL1

  • Global Moderator
  • Trade Count: (+1)
  • Full Member
  • *****
  • Offline Offline
  • Posts: 9664
  • Last login:Today at 01:34:15 am
  • Designated spam hunter
Re: Console Arcade Cabinet
« Reply #13 on: November 05, 2012, 02:42:34 am »
Nice build man!
Only One little note from me, wanna flip those pics 180' for us? 😄

I'll look into that dextercf. They're displaying the right way up for me though  ???

Dextercf, is that an Australian joke?   :duckhunt  (Don't remember where you are at.)


Scott

Edit: Norway -- So much for it being an Aussie joke.   :dizzy:
« Last Edit: November 05, 2012, 04:06:01 am by PL1 »

SpaceHedgehog

  • Trade Count: (0)
  • Full Member
  • ***
  • Offline Offline
  • Posts: 937
  • Last login:October 29, 2024, 02:02:07 pm
  • Almost done ...
Re: Console Arcade Cabinet
« Reply #14 on: November 05, 2012, 11:03:27 am »
I've modified the pics now dextercf. Let me know if the orientation is now correct.
Click a pic for a video tour 

shponglefan

  • Trade Count: (0)
  • Full Member
  • ***
  • Offline Offline
  • Posts: 1600
  • Last login:December 15, 2022, 07:22:35 am
  • Correct horse battery staple
Re: Console Arcade Cabinet
« Reply #15 on: November 05, 2012, 11:29:45 am »
Intriguing build.  I'm curious to see how this one comes out, esp. the control panel part.

DLinkOZ

  • Trade Count: (0)
  • Full Member
  • ***
  • Offline Offline
  • Posts: 125
  • Last login:March 22, 2017, 08:12:46 am
    • The DaveCade
Re: Console Arcade Cabinet
« Reply #16 on: November 05, 2012, 03:41:33 pm »
Are there any concerns about it being top-heavy?  Or is the TV light enough that the weight of the MDF is sufficient to keep it planted?  The first thing I thought of was extending the legs through the middle shelf, and to the floor.  Just to lower the center of gravity.  I've been pondering a similar build, might mix a bit of this into it :)

SpaceHedgehog

  • Trade Count: (0)
  • Full Member
  • ***
  • Offline Offline
  • Posts: 937
  • Last login:October 29, 2024, 02:02:07 pm
  • Almost done ...
Re: Console Arcade Cabinet
« Reply #17 on: November 05, 2012, 04:00:29 pm »
Understandable concerns. The TV has been sat on a partially built previous version for well over a year so I don't think I'll have any issues. That one was taller by about 20cm (the TV was actually too high). This version has a top piece to further stabilise the metal table legs (which are bolted down rather than screwed). The addition of legs at the bottom with self leveling feet will further add to the stability as will the extra weight of the shaped side pieces (30mm thick MDF made from 18 and 12 mm sheets). The base is already quite heavy.

Edit: lowering the legs any further would prevent access to the middle shelf where I intend to put the speakers.

Will be interested to see any design ideas you have  :)
« Last Edit: November 05, 2012, 04:11:21 pm by SpaceHedgehog »
Click a pic for a video tour 

dextercf

  • Trade Count: (0)
  • Full Member
  • ***
  • Offline Offline
  • Posts: 432
  • Last login:October 05, 2024, 06:30:51 pm
  • [thisispersonal]
Console Arcade Cabinet
« Reply #18 on: November 05, 2012, 04:52:33 pm »
I've modified the pics now dextercf. Let me know if the orientation is now correct.
Now they look the right way..
Nice One on the australian joke thing, wrong side og out planet though.. Hehe!


Sent from my iPhonophonoponononon.

SpaceHedgehog

  • Trade Count: (0)
  • Full Member
  • ***
  • Offline Offline
  • Posts: 937
  • Last login:October 29, 2024, 02:02:07 pm
  • Almost done ...
Re: Console Arcade Cabinet
« Reply #19 on: November 06, 2012, 08:01:23 am »
Adjustable feet and 5 m2 of blackboard vinyl have arrived. That should do me for this and a couple more projects.

For anyone with a foot fetish:

Click a pic for a video tour 

SpaceHedgehog

  • Trade Count: (0)
  • Full Member
  • ***
  • Offline Offline
  • Posts: 937
  • Last login:October 29, 2024, 02:02:07 pm
  • Almost done ...
Re: Console Arcade Cabinet
« Reply #20 on: November 10, 2012, 05:57:25 am »
Few things progressed.

Legs cut (will require additional finishing and hardening with adjustable feet fitted)


Second of the three top pieces fitted and glued. Will wait for that to dry and screw it in. The usual body filler and sanding will then be done.


Side view:


Next will be to complete the third top piece. After that, I'll start on the shaped side panels.

It looks like it's shaping up to plan at the moment.
Click a pic for a video tour 

SpaceHedgehog

  • Trade Count: (0)
  • Full Member
  • ***
  • Offline Offline
  • Posts: 937
  • Last login:October 29, 2024, 02:02:07 pm
  • Almost done ...
Re: Console Arcade Cabinet
« Reply #21 on: November 10, 2012, 08:17:55 am »
Completed the third top piece and have started to shape a retaining panel which will be placed on top of the the centre top piece as you can see in the picture.


Rough cut a side piece to check out the angles. This still needs to be trimmed back and then cloned and bevelled.

Click a pic for a video tour 

SpaceHedgehog

  • Trade Count: (0)
  • Full Member
  • ***
  • Offline Offline
  • Posts: 937
  • Last login:October 29, 2024, 02:02:07 pm
  • Almost done ...
Re: Console Arcade Cabinet
« Reply #22 on: November 11, 2012, 04:00:43 am »
Basic shape for the top retaining piece has been cut. This requires some additional router work before it is complete.


The third hole is where a pipe will sit to hide the cables. This will be white.

Side panels have been cloned but still require a bit of trimming with a flush bit.


The side panels will be white.

I would appreciate some input from folks on what to do artwork-wise on the side panels. I want to have it in keeping with the general style on my Vewlix cab. Basically, I feel that this should have white accents rather than a large surface which is plain white. Open to offers!

This is what I put together for the Vewlix cab.

Click a pic for a video tour 

CoryBee

  • Trade Count: (+2)
  • Full Member
  • ***
  • Offline Offline
  • Posts: 2093
  • Last login:May 18, 2024, 07:28:48 am
  • Bopity Boopy
Re: Console Arcade Cabinet
« Reply #23 on: November 11, 2012, 04:02:28 am »
not sure what to do for art. just wanted to say this build has got me very intrigued on the end result  :applaud:

SpaceHedgehog

  • Trade Count: (0)
  • Full Member
  • ***
  • Offline Offline
  • Posts: 937
  • Last login:October 29, 2024, 02:02:07 pm
  • Almost done ...
Re: Console Arcade Cabinet
« Reply #24 on: November 11, 2012, 07:10:57 am »
Thanks CoryDee. Hopefully the idea in my head translates well to reality :)

Sides trimmed and bevelled.


Click a pic for a video tour 

SpaceHedgehog

  • Trade Count: (0)
  • Full Member
  • ***
  • Offline Offline
  • Posts: 937
  • Last login:October 29, 2024, 02:02:07 pm
  • Almost done ...
Re: Console Arcade Cabinet
« Reply #25 on: November 11, 2012, 09:13:10 am »
Shaped the retaining piece and cut the access tube. I actually think this 3rd leg will give it a better view in profile. With the location I have planned for it, it will be directly visible from the side through an open door so the look of the profile is important.


This is the TV I'm thinking of getting when funds allow (provided the input lag isn't a problem):

Click a pic for a video tour 

SpaceHedgehog

  • Trade Count: (0)
  • Full Member
  • ***
  • Offline Offline
  • Posts: 937
  • Last login:October 29, 2024, 02:02:07 pm
  • Almost done ...
Re: Console Arcade Cabinet - Base module progress.
« Reply #26 on: November 17, 2012, 06:55:49 am »
Now on to the bits which take the time - preparation of the wood surfaces which need to be pained/sprayed. Pass 1 of filling/smoothing the MDF edges with car body filler. I'll now check for imperfections, mark them out, fill and sand back again.


Initial doodle for the control panel section.

Click a pic for a video tour 

Woodshop Flunky

  • Trade Count: (0)
  • Full Member
  • ***
  • Offline Offline
  • Posts: 681
  • Last login:August 20, 2017, 05:24:57 am
Re: Console Arcade Cabinet - Base module progress.
« Reply #27 on: November 17, 2012, 09:14:12 am »
This is an interesting build.  Looking forward to seeing your progress.  :cheers:

Complete mini arcade cabinet plans available.

SpaceHedgehog

  • Trade Count: (0)
  • Full Member
  • ***
  • Offline Offline
  • Posts: 937
  • Last login:October 29, 2024, 02:02:07 pm
  • Almost done ...
Re: Console Arcade Cabinet - Base module progress.
« Reply #28 on: November 17, 2012, 10:46:52 am »
Thanks Woodshop Flunky  :cheers: Trying to do something a little different and also modern in terms of the styling.

A few pics of the skinning process for the 'roof' of my 'house cab' as my daughter has started to call it. This bit was pretty tricky but it still beats painting....


Edit:

Sides have been filled and sanded back ready for priming tomorrow.


« Last Edit: November 17, 2012, 04:52:36 pm by SpaceHedgehog »
Click a pic for a video tour 

SpaceHedgehog

  • Trade Count: (0)
  • Full Member
  • ***
  • Offline Offline
  • Posts: 937
  • Last login:October 29, 2024, 02:02:07 pm
  • Almost done ...
Re: Vewlix Inspired Modular Console Arcade Cabinet - Base module progress.
« Reply #29 on: November 18, 2012, 04:45:33 am »
Not sure what's happened to the quality of the pictures I'm taking at the moment - seem to have deteriorated badly. Oh well.

A couple of pics with the TV in place. A bit of work has to be done with getting this all fitted out correctly but you get the idea.


A thinner bezel on the TV will improve the aesthetics, I think.

Edit: I think I may put some PC components in here as well.
« Last Edit: November 18, 2012, 07:12:40 am by SpaceHedgehog »
Click a pic for a video tour 

SpaceHedgehog

  • Trade Count: (0)
  • Full Member
  • ***
  • Offline Offline
  • Posts: 937
  • Last login:October 29, 2024, 02:02:07 pm
  • Almost done ...
Re: Vewlix Inspired Modular Console Arcade Cabinet - Base module progress.
« Reply #30 on: November 18, 2012, 09:05:30 am »
Supporting legs have been prepped and the adjustable feet fitted. I need to paint these before I attach them to the base of the unit.


Click a pic for a video tour 

sharpfork

  • Trade Count: (0)
  • Full Member
  • ***
  • Offline Offline
  • Posts: 618
  • Last login:January 30, 2025, 08:21:36 am
    • KADE
Re: Console Arcade Cabinet
« Reply #31 on: November 18, 2012, 11:16:07 am »
Good old blackboard vinyl - the stuff is great. Covered the inside compartment where the console will sit.

I'm hating on paint at the moment and really like the clean look of this vinyl.  Can you tell us a bit about the product + a link or two?

EDIT-
I googled and it seems that the "good stuff" is this HEXIS product.  Is this what you are using?
http://www.hexis-graphics.com/en/products/view/123

Are you applying it on unprimed MDF?

I like what you are doing so far, nice look!
« Last Edit: November 18, 2012, 11:39:04 am by sharpfork »

SpaceHedgehog

  • Trade Count: (0)
  • Full Member
  • ***
  • Offline Offline
  • Posts: 937
  • Last login:October 29, 2024, 02:02:07 pm
  • Almost done ...
Re: Vewlix Inspired Modular Console Arcade Cabinet - Base module progress.
« Reply #32 on: November 18, 2012, 11:53:39 am »
Yeh, painting really does take a lot of time and results can be inconsistent - just started on the side panels, legs and retaining piece for the cab. It will take a while ...

I get the blackboard vinyl from a sign makers / printers store:

http://www.mdpsupplies.co.uk/productcat.asp?parentcatname=Blackboard%20Vinyl&parentcat=50

It's thicker than standard vinyl and has a very nice texture to it, almost like a grainy powder coating. Here's a close up from a control panel:


I get it off the roll and my source supplies it in 1m widths. I bought 5 continuous meters last time.

For best results, it needs to go onto a completely flat surface. For MDF, if I'm wrapping it round edges, I only prep the rough sides (generally use car body filler, sanded smooth with 180 grit sandpaper). If it's jut a surface, I will apply it directly to the surface and trim the excess.

Like any vinyl, it hates any grit or specs of dirt so the surface must be dusted thoroughly first.

Getting used to applying it can take a little practice, particularly when wrapping around edges - it needs to be pulled taut; I use my thumb to push it around the edges. This makes sure you don't get any air bubbles or 'looseness' when it's applied.

Getting a nice edge is simply a matter of turning the piece over, placing it onto a hard surface (I use scrap MDF) and using a craft knife to cut it.

Hope that helps.

Edit: that looks like the right product to me - can't find a data sheet for the vinyl I get to compare it to though.

Edit 2: I love the stuff, modded my gaming desk using this vinyl too:
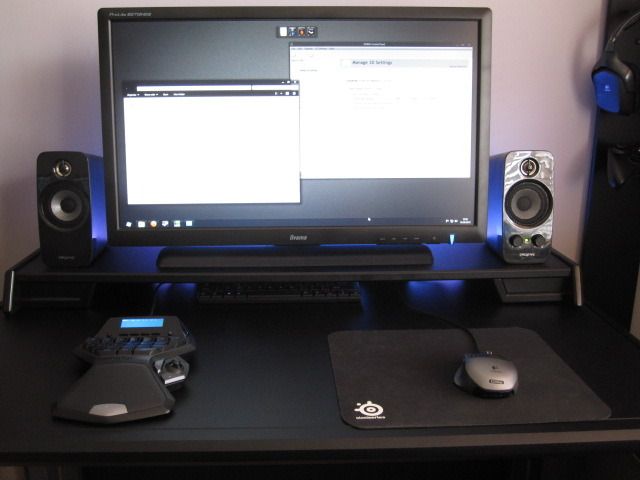
« Last Edit: November 18, 2012, 12:31:39 pm by SpaceHedgehog »
Click a pic for a video tour 

SpaceHedgehog

  • Trade Count: (0)
  • Full Member
  • ***
  • Offline Offline
  • Posts: 937
  • Last login:October 29, 2024, 02:02:07 pm
  • Almost done ...
Re: Vewlix Inspired Modular Console Arcade Cabinet - Base module progress.
« Reply #33 on: November 25, 2012, 09:00:29 am »
Sides, retaining piece and legs primed. Legs and retaining piece will be painted black.


Click a pic for a video tour 

CoryBee

  • Trade Count: (+2)
  • Full Member
  • ***
  • Offline Offline
  • Posts: 2093
  • Last login:May 18, 2024, 07:28:48 am
  • Bopity Boopy
Re: Vewlix Inspired Modular Console Arcade Cabinet - Base module progress.
« Reply #34 on: November 25, 2012, 10:59:45 am »
This is looking awesome!

SpaceHedgehog

  • Trade Count: (0)
  • Full Member
  • ***
  • Offline Offline
  • Posts: 937
  • Last login:October 29, 2024, 02:02:07 pm
  • Almost done ...
Re: Project Raptor - Vewlix Inspired Modular Console Arcade Cabinet
« Reply #35 on: December 01, 2012, 11:42:27 am »
Thanks CoryDee  :)

Making very slow progress due to a nasty cold and cough I picked up but have managed to complete the black base coat (blackboard paint) for the retaining piece and the cabinet legs. I'll be using some matt polyurethane varnish once this has dried thoroughly. I've used this combination before and it generally comes out pretty well and nice and even.


I also ordered a slot cutter and some T-molding to fit to the lower opening in the base module. I figured that it would look much better with T-molding in place.

Just in the process of designing the door panels for the front of the cab and also the artwork for the sides. I'll also be adding a shroud at the back of the display and also a marquee.

I decided to call this the Raptor - I think it'll look quite mean sat on its haunches.
« Last Edit: December 01, 2012, 11:58:36 am by SpaceHedgehog »
Click a pic for a video tour 

shrunkenmaster

  • Trade Count: (0)
  • Full Member
  • ***
  • Offline Offline
  • Posts: 636
  • Last login:August 04, 2024, 02:53:35 am
Re: Project Raptor - Vewlix Inspired Modular Console Arcade Cabinet
« Reply #36 on: December 01, 2012, 02:04:14 pm »
Looking good! You seem very handy with wood, what with all those precise bevels. What do you use for this? Any tips?

SpaceHedgehog

  • Trade Count: (0)
  • Full Member
  • ***
  • Offline Offline
  • Posts: 937
  • Last login:October 29, 2024, 02:02:07 pm
  • Almost done ...
Re: Project Raptor - Vewlix Inspired Modular Console Arcade Cabinet
« Reply #37 on: December 01, 2012, 03:11:10 pm »
Thanks Shrunkenmaster  :)

I invested in a Trend T10 router a few years ago and that was the best purchase I ever made. I would like to buy a smaller one for more intricate work though. Most of the bevels are made with a very large chamfer bit - it's for a 1/2 inch collet - you can't get them in1/4 inch don't believe. The general shapes are rough cut with a jigsaw and then tidied up with a flush trim bit before using the chamfer bit.

Other than that, just the basics really; a circular saw, jigsaw, Makita combi drill and a basic Black and Decker work bench. I just take my time when I'm building and make sure I finish the cut ends of the MDF off, generally using car body filler for the purpose. It's the preparation and the finishing which takes most of the time.
Click a pic for a video tour 

SpaceHedgehog

  • Trade Count: (0)
  • Full Member
  • ***
  • Offline Offline
  • Posts: 937
  • Last login:October 29, 2024, 02:02:07 pm
  • Almost done ...
Re: Project Raptor - Vewlix Inspired Modular Console Arcade Cabinet
« Reply #38 on: December 02, 2012, 04:25:42 am »
Legs and retaining piece have been varnished. Not completely happy with the latter so I may redo it at some point in the future.


Click a pic for a video tour 

SpaceHedgehog

  • Trade Count: (0)
  • Full Member
  • ***
  • Offline Offline
  • Posts: 937
  • Last login:October 29, 2024, 02:02:07 pm
  • Almost done ...
Re: Project Raptor - Vewlix Inspired Modular Console Arcade Cabinet
« Reply #39 on: December 02, 2012, 06:48:31 am »
Completed cutting the slots for the T-molding and have fitted it. I was a couple of mm short where the T-molding joins at the top but never mind, you can't really see it. Both apertures will be covered by doors with a mesh grill anyway.


Mesh for the doors:

Click a pic for a video tour