Main Restorations Software Audio/Jukebox/MP3 Everything Else Buy/Sell/Trade
Project Announcements Monitor/Video GroovyMAME Merit/JVL Touchscreen Meet Up Retail Vendors
Driving & Racing Woodworking Software Support Forums Consoles Project Arcade Reviews
Automated Projects Artwork Frontend Support Forums Pinball Forum Discussion Old Boards
Raspberry Pi & Dev Board controls.dat Linux Miscellaneous Arcade Wiki Discussion Old Archives
Lightguns Arcade1Up Try the site in https mode Site News

Unread posts | New Replies | Recent posts | Rules | Chatroom | Wiki | File Repository | RSS | Submit news


Author Topic: Gutted Sega/Gremlin Carnival cab destined for trash bin Mame build  (Read 18362 times)

0 Members and 1 Guest are viewing this topic.

Mikeosoft

  • Trade Count: (0)
  • Full Member
  • ***
  • Offline Offline
  • Posts: 46
  • Last login:February 27, 2013, 10:38:00 pm
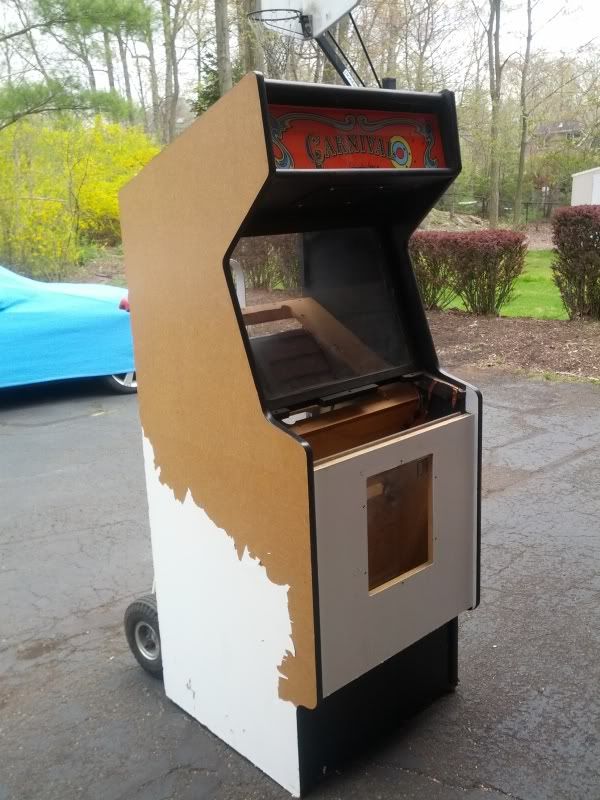
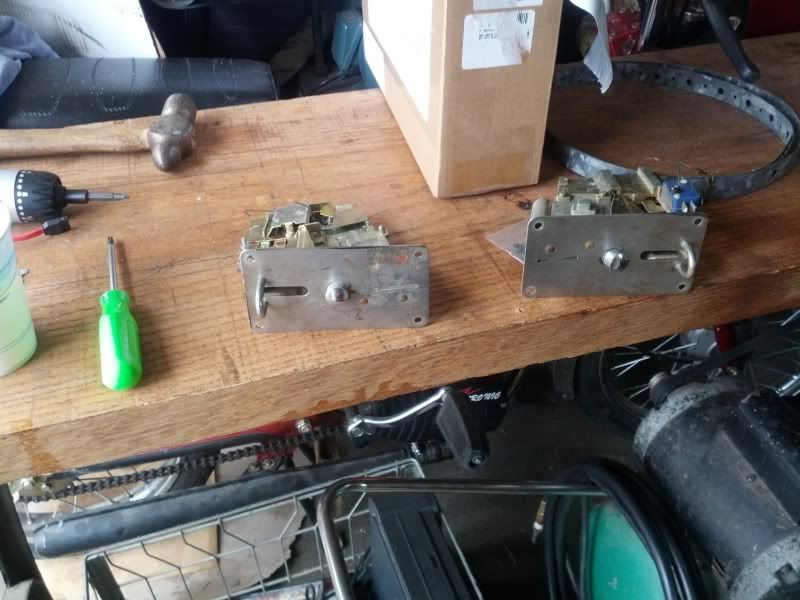
Welp, I picked up this cab last year for free, it was missing a monitor, and was in bad disrepair. The coin door was missing and various parts were gone. Funny enough, the gameboard was still intact, but a wiring nightmare. I spent a week figuring out the wiring, a year trying to source an original working 1980/81 WG k4600 vert monitor with zero luck.

Realizing I'd never be able to find side art repro for this cab, that i don't really enjoy the game, that the roms on the board were shot, and that their was acid damage to the board, I decided on something different.

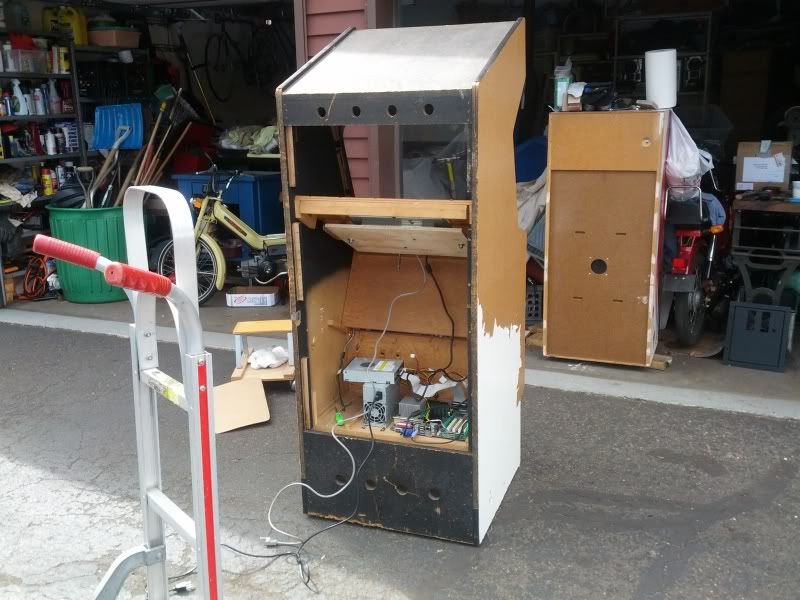
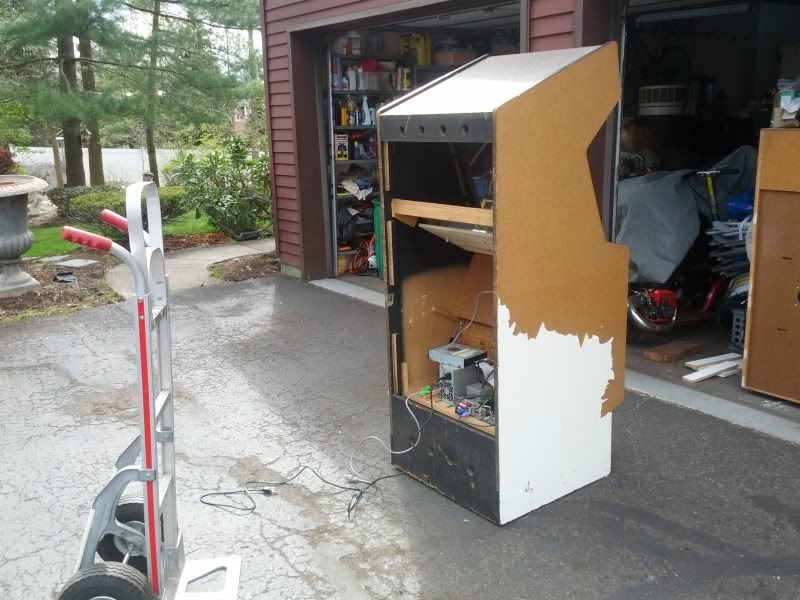
Two days ago i started peeling back the sideart, and found i could expose the base side mdf fairly easy.

Last night i put together some left over old pc parts from an old client i re-did his computers and took the old POS dells. I booted up windows tiny XP in my basement open without a case just to test out the system.

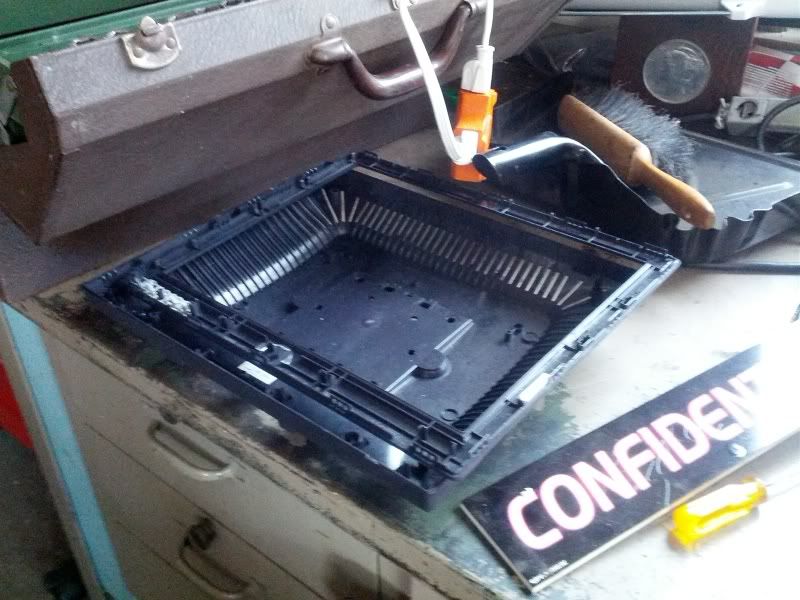
Also today I found a small 4:3 Dell monitor and de-cased it and mounted it in the cab. It looks small but it will do the trick. I haven't decided whether or not to make it a vertical mame machine or a horizontal.


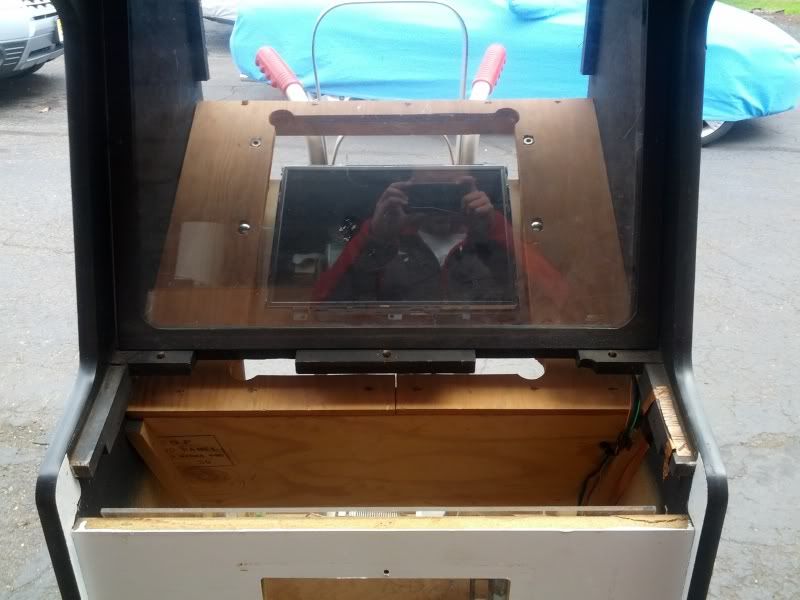
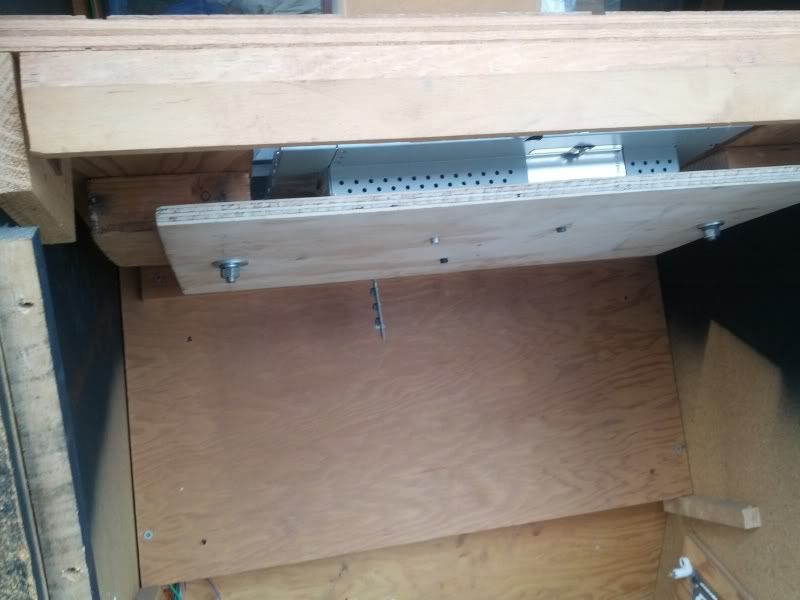
I worked all day on installing the screen and pc.  Once installed, I tried a few different builds of OS's Tiny 7 which was outdated and missing several needed components like .net framework. I eventually settled on MicroXP, no frills, boots ok on this old 2.6gh Dell Optiplex GX270 parts machine.

However, I have a slight problem with the mobo.  In moving the unit into the cab and installing it there, I somehow caused an issue with either the BIOS, CMOS, and or Caps are going to explode.  I cannot get the ---smurfy--- dell mobo to POST after shutting down the unit.  I have tried multiple different power supplys none makes a difference. I've found if i pull out the CR2032 bat and reset the cmos i can get the box to reboot but it gives me errors.  Either way i am spending too much time on this outdated useless watt guzzling p4 dell mobo.  I have found a work around by ripping the power cord out the back and letting the system run out of power. 

it will do for now.

More to come tomorrow.

I need advice on a few things:

1. Formica or Black paint or vinyl  - unsure which path to take. I think i want to go with black for the sides but i would be up to something cool that's custom so long as its within reason (under 200 dollars)

2. Design ideas for cab - like title for machine

3. I think i am going to go with hyperspin, but i might try something else if suggested


404

  • Trade Count: (+3)
  • Full Member
  • ***
  • Offline Offline
  • Posts: 1019
  • Last login:August 04, 2015, 10:19:10 pm
Re: Gutted Sega/Gremlin Carnival cab destined for trash bin Mame build
« Reply #1 on: April 12, 2012, 10:08:38 pm »
Just a word about Dell Optiplex units, a vast majority of them that were issued to companies come with a tamper switch. Make sure yours did not come with one. If you believe it could be the caps, check both the top and bottoms of the caps. I've had a few late 90's-early 2000 units blow caps.

as for the design, i am almost sure i have seen a neo geo conversion with that cab. looked pretty cool.

bigmatty77

  • Trade Count: (0)
  • Full Member
  • ***
  • Offline Offline
  • Posts: 42
  • Last login:December 03, 2013, 08:06:49 am
Re: Gutted Sega/Gremlin Carnival cab destined for trash bin Mame build
« Reply #2 on: April 14, 2012, 08:57:25 am »
Cool project but i would definetely go with a bigger monitor if you can, that one looks lost in there. LCD's only go to about 20" unless you use a widescreen. If i had that cabinet shell i would use a CRT TV which you should be able to pick up for cheap or sometimes even free  :)

Drnick

  • Trade Count: (+2)
  • Full Member
  • ***
  • Offline Offline
  • Posts: 1642
  • Last login:June 21, 2024, 03:32:31 pm
  • Plodding Through Life
Re: Gutted Sega/Gremlin Carnival cab destined for trash bin Mame build
« Reply #3 on: April 14, 2012, 12:34:16 pm »
GX270's are notoriously bad for blown capacitors, are you getting any lights at all, if you just get an orange light (I think it may flash) then check seating of cpu & Ram, check the psu and then finally check the caps towards the back of the board (VGA Socket area etc).  If you were UK I would send you a brand new replacement for the board :) We got a cupboard full of them at work, dell sent us them due to how many were failing. Also if you can get into the Bios there should be an option to disable the tamper switch :)

Mikeosoft

  • Trade Count: (0)
  • Full Member
  • ***
  • Offline Offline
  • Posts: 46
  • Last login:February 27, 2013, 10:38:00 pm
Re: Gutted Sega/Gremlin Carnival cab destined for trash bin Mame build
« Reply #4 on: April 15, 2012, 05:47:15 pm »
thanks guys. I will eventually install a CRT monitor once I get the machine up and running.  I am on the lookout on north jersey NJ craigslist scouting for 27" sony trinitron with 1080i output. right now they can only be found for over 100 dollars and not working.

As for the POS dell. I got what I deserved.  I had these part lying around and I have more.  I am at the point where I know there's a CMOS/BIOS error memory failure that is preventing me from starting the machine.  I have unlocked and disabled the tamper control switch in the bios.  I have also disabled everything possible in the bios. Still the only way to trigger this unit on is by pulling the power and waiting until the yellow status light on the mobo goes out then powering back on the power supply and hoping that when the cpu fan starts it doesnt stop.  Anyways, I will use this until the mobo dies or the cpu sets fire.  Which one will occur first is the question...

Here's a pic of the mobo with raised caps..


resinstalling tiny xp, micro xp ran too slow and cpu was at 100%


I removed the other side vinyl as well.


Sanded and prepped for primer

I am going to spray paint it with thick primer and try some flat black. see my results and decided whether or not to try vinyl or formica

404

  • Trade Count: (+3)
  • Full Member
  • ***
  • Offline Offline
  • Posts: 1019
  • Last login:August 04, 2015, 10:19:10 pm
Re: Gutted Sega/Gremlin Carnival cab destined for trash bin Mame build
« Reply #5 on: April 16, 2012, 08:35:04 am »
thanks guys. I will eventually install a CRT monitor once I get the machine up and running.  I am on the lookout on north jersey NJ craigslist scouting for 27" sony trinitron with 1080i output. right now they can only be found for over 100 dollars and not working.

As for the POS dell. I got what I deserved.  I had these part lying around and I have more.  I am at the point where I know there's a CMOS/BIOS error memory failure that is preventing me from starting the machine.  I have unlocked and disabled the tamper control switch in the bios.  I have also disabled everything possible in the bios. Still the only way to trigger this unit on is by pulling the power and waiting until the yellow status light on the mobo goes out then powering back on the power supply and hoping that when the cpu fan starts it doesnt stop.  Anyways, I will use this until the mobo dies or the cpu sets fire.  Which one will occur first is the question...

Here's a pic of the mobo with raised caps..
Sanded and prepped for primer

I am going to spray paint it with thick primer and try some flat black. see my results and decided whether or not to try vinyl or formica


if you know how to solder, just replace the cap in question. at least it will buy you some time until the rest pop. I've done tons of mobo and graphics card recapping over the years.

Mikeosoft

  • Trade Count: (0)
  • Full Member
  • ***
  • Offline Offline
  • Posts: 46
  • Last login:February 27, 2013, 10:38:00 pm
Re: Gutted Sega/Gremlin Carnival cab destined for trash bin Mame build
« Reply #6 on: April 16, 2012, 01:38:08 pm »
yes will do. i have tons of caps from donor boards lying around.  There's visibly one cap with a sharpie mark on it that is bumped up but not leaking. Either way I will address this with removal and replacement.

In the meantime I have visited home depot and picked up various foam rollers, a few tin paint inserts, a recommended primer/sealer and a small can of semi-gloss black paint.  I will post pics but before I can prep I need to lay a pre-primer can of fillerprimer and bondo the nicks and scratches.  Also I need to drive some family members to Newark Airport at 2:30 which happens to take place right in the middle of all these stages.

I need to do more searching research on applying paint to the sides with rollers.  I have never done this before.

Also is semi-gloss too bright to use with foam rollers? will it show too much? and how should i takle small areas like inside seams and half-inch corners that the roller cannot fit? I have some foam brushes and regular brushes which shoul i use to apply the semi-gloss?

More pics to come later

Mikeosoft

  • Trade Count: (0)
  • Full Member
  • ***
  • Offline Offline
  • Posts: 46
  • Last login:February 27, 2013, 10:38:00 pm
Re: Gutted Sega/Gremlin Carnival cab destined for trash bin Mame build
« Reply #7 on: April 16, 2012, 05:46:59 pm »
back from the airport and getting ready to roll my first time:


This is the stuff I bought. I hope this is the right type of primer to use, the homedepot paint specialist insisted for MDF to use this primer and go with this semi-gloss black.

Preprep pimer filler, and bondo applied and sanded:


Don't ask me how I got this thing on the saw horses by myself, i couldn't tell you.


OK i hope this is correct, i am going to go for the primer roller, with a 9" roller.  Hope it all goes well.


Mikeosoft

  • Trade Count: (0)
  • Full Member
  • ***
  • Offline Offline
  • Posts: 46
  • Last login:February 27, 2013, 10:38:00 pm
Re: Gutted Sega/Gremlin Carnival cab destined for trash bin Mame build
« Reply #8 on: April 17, 2012, 11:54:57 am »
primed the whole thing yesterday:


Need to sand down with 400/320 grit and blow off the dust, apply the semi-gloss today

Mikeosoft

  • Trade Count: (0)
  • Full Member
  • ***
  • Offline Offline
  • Posts: 46
  • Last login:February 27, 2013, 10:38:00 pm
Re: Gutted Sega/Gremlin Carnival cab destined for trash bin Mame build
« Reply #9 on: April 18, 2012, 01:00:04 am »
ok i sanded down the primer, and did a first coat of semi-gloss:


I can see the cross lines where the small roller moves and makes v shapes when i roll.  Also i am unsure of how hard i should be pressing with pressure.

Tomorrow i need to work, but if i get home early i will apply a second coat.

alfonzotan

  • Trade Count: (0)
  • Full Member
  • ***
  • Offline Offline
  • Posts: 553
  • Last login:May 21, 2025, 01:49:38 pm
    • The Cab With No Name
Obligatory "Aw man, Carnival was one of my favorites!" post...
« Reply #10 on: April 18, 2012, 02:09:57 pm »
The old pool hall on Main Street (really) in my hometown had one of those suckers in the early 80's.  I played the hell out of it, with the music annoying the pool players to no end...

Mikeosoft

  • Trade Count: (0)
  • Full Member
  • ***
  • Offline Offline
  • Posts: 46
  • Last login:February 27, 2013, 10:38:00 pm
Re: Gutted Sega/Gremlin Carnival cab destined for trash bin Mame build
« Reply #11 on: April 24, 2012, 01:02:03 pm »
it's been a few days since i last posted but a ton has happened. 

I found the Carnival metal Control Panel that went to the machine:


It needs to be cleaned and i have to remove the sticky stuff that is stuck to the metal.  Any ideas?


And began painting the coindoor:


Came out nice but i want to do a few more coats

But something that was really getting to me about this machine was that small LCD.  At the angle it is at it is impossible to see the image without maxing out all the colors on the lcd and maxing out brightness.  I think this monitor is not the right monitor for me. 

So... I started searching for TVs that make great arcade machine tubes, I came across some Sony Wega threads on this site and others where some people decase them and since they have 4 mounting holes on the sides, make excellent mounting tubes.  Also the flat tube screen is a win win, and the fact that 480p over component only sweetens the deal in my opinion.

So i went on craigslist and picked up 2 tv:

A sony wega 32 inch, which was waaaay too big but i might make a second cab from scratch to fit it, and this 24"


I need to decase this TV and also its probably important to discharge the monitor. I havent done a discharge of an arcade monitor in many years, and never a home tv before.  Anyone have any pointers?


Finally, I got around to cutting a back panel for the cab:

sharpfork

  • Trade Count: (0)
  • Full Member
  • ***
  • Offline Offline
  • Posts: 618
  • Last login:January 30, 2025, 08:21:36 am
    • KADE
Re: Gutted Sega/Gremlin Carnival cab destined for trash bin Mame build
« Reply #12 on: April 24, 2012, 06:54:47 pm »
Cab looks great so far!

A few things about the TV-

Are you sure it is 480p and not 480i?  I have de-cased 3 different TV's with component input and all turned out to be 480i.  I like 480i over component personally because of the scanlines.  I was amazed at how windows 7 handled my 480i tate/vertical TV natively without the ATI drivers or software in place.  Getting it to work in XP was a HUGE chore.  I picked up a crapy ATI Radeon1650 card and it drove a DVI to component dongle (monoprice) with various resolution dip switches perfectly.

I was freaked out when I did my first couple of discharges so I mage a huge PVC chicken stick, discharged it, waited 15 minutes, and discharged it again to be sure.


404

  • Trade Count: (+3)
  • Full Member
  • ***
  • Offline Offline
  • Posts: 1019
  • Last login:August 04, 2015, 10:19:10 pm
Re: Gutted Sega/Gremlin Carnival cab destined for trash bin Mame build
« Reply #13 on: April 24, 2012, 07:58:35 pm »
it's been a few days since i last posted but a ton has happened.  

I found the Carnival metal Control Panel that went to the machine:


It needs to be cleaned and i have to remove the sticky stuff that is stuck to the metal.  Any ideas?

It really depends on how old and how dry the residue is on the metal. You can try acetone, paint remover and similar solvents or a heat gun and a scraper tool.
« Last Edit: April 24, 2012, 09:48:03 pm by 404 »

yotsuya

  • Trade Count: (+21)
  • Full Member
  • ***
  • Offline Offline
  • Posts: 19959
  • Last login:June 16, 2025, 05:43:24 pm
  • 2014 UCA Winner, 2014, 2015, 2016 ZapCon Winner
    • forum.arcadecontrols.com/index.php/topic,137636.msg1420628.html
Re: Gutted Sega/Gremlin Carnival cab destined for trash bin Mame build
« Reply #14 on: April 24, 2012, 08:29:16 pm »
Cab looks great so far!

A few things about the TV-

Are you sure it is 480p and not 480i?  I have de-cased 3 different TV's with component input and all turned out to be 480i.  I like 480i over component personally because of the scanlines.  I was amazed at how windows 7 handled my 480i tate/vertical TV natively without the ATI drivers or software in place.  Getting it to work in XP was a HUGE chore.  I picked up a crapy ATI Radeon1650 card and it drove a DVI to component dongle (monoprice) with various resolution dip switches perfectly.

I was freaked out when I did my first couple of discharges so I mage a huge PVC chicken stick, discharged it, waited 15 minutes, and discharged it again to be sure.


That discharger is awesome!  :cheers:
***Build what you dig, bro. Build what you dig.***

Mikeosoft

  • Trade Count: (0)
  • Full Member
  • ***
  • Offline Offline
  • Posts: 46
  • Last login:February 27, 2013, 10:38:00 pm
Re: Gutted Sega/Gremlin Carnival cab destined for trash bin Mame build
« Reply #15 on: April 25, 2012, 05:14:26 pm »
Cab looks great so far!

A few things about the TV-

Are you sure it is 480p and not 480i?  I have de-cased 3 different TV's with component input and all turned out to be 480i.  I like 480i over component personally because of the scanlines.  I was amazed at how windows 7 handled my 480i tate/vertical TV natively without the ATI drivers or software in place.  Getting it to work in XP was a HUGE chore.  I picked up a crapy ATI Radeon1650 card and it drove a DVI to component dongle (monoprice) with various resolution dip switches perfectly.

I was freaked out when I did my first couple of discharges so I mage a huge PVC chicken stick, discharged it, waited 15 minutes, and discharged it again to be sure.


dude you are spot on, its 480i i am getting mixed up with al these special connectors (component, RGB, VGA) and resolution combinations, not to mention refresh rate syncs, etc. 

It does 480i and i have the exact same tv. 

I have posted a monitor decasing and mounting topic in monitor section specifically asking how to best accomplish this task of fitting this monitor inside the cab as best as possible.

I have some cool answers already. There's a dude who cnc'd custom metal frame and matching harness for his cab.  I wish i had the ability or resources to forge some steel... :dunno

Mikeosoft

  • Trade Count: (0)
  • Full Member
  • ***
  • Offline Offline
  • Posts: 46
  • Last login:February 27, 2013, 10:38:00 pm
Re: Gutted Sega/Gremlin Carnival cab destined for trash bin Mame build
« Reply #16 on: April 26, 2012, 04:41:34 pm »
Yesterday I got to work cleaning up the metal parts and prepping for flat black paint.  I took the bolts, screws, coin door, and metal grill and scuffed up the metal after cleaning with a wire wheel.  I used scotch-bite and brillow pads to scratch up the surface enough to grip the primer and black paint.  

The hope was to paint first thing in the morning however I was sidetracked this morning with recycling old pc parts at the town dump.

So when i got home around 11am I immediately got to work:


I noticed that the speaker panel/underside of the top panel was missing the screws that hold it to the machine, so I painted it like that.  I don't know how I missed that.  So i sourced some recessed wood screws to match flush.

I will need to touch up the missing paint where i thought the unit was seated correctly before painting.  Also I noticed this hole missing a mounting bracket:


Anyone know what used to go here? On/Off switch? What size? Either way the hole itself is 1 inch, if i need to I have located 4 small wood screws and painted flat black, and have one of these to plug the hole:
http://www.homedepot.com/h_d1/N-5yc1v/R-202209535/h_d2/ProductDisplay?catalogId=10053&langId=-1&keyword=hole+plug&storeId=10051

While I was painting that, it started getting cloudy so I know the rain would come soon. It's been raining on and off this whole week so no surprise, just sad.  I quickly got to work marking up the wiring harnesses with black sharpie to mark the direction just in case they weren't keyed and labling the parts from A to H

I was able to remove the yoke from the crt as well as disconnect all the wiring, isolating the tube from the other electronics.  


I am getting closer to mounting this tube into the machine.  I need to figure out what angle to mount it.  I think the current mounting is too low and at too much of an angle.  I think with this size of a monitor it's important to mount it almost vertically.  I figure i can work my way up, until I am satisfied with the angle of the monitor.  Anything I should be aware of as far as angle glare in the glass reflections etc?

I've been getting a ton of help on these forums so thanks everyone for giving me some time.  I wish i had more support from my dad, but he's been trying to delay this project with his own problems he needs help with and I get the feeling he is beyond just disinterested in my hobby.  Oh well his loss too I guess.   When I was younger I was forced against my will to help him repair tons of his pinball machines and now that I am stumbling to build one of these machines I figured it was only right to seek his knowledge and expertise on woodworking, cutting things and wiring just in general.  His help is always along the lines of "just figure it out yourself." "You have it." "I don't have time." To say I am disappointed is true, but in a sense maybe his is trying to let me build my own confidence up.  I don't see it that way...yet.

The next big obstacle on the horizon with this cab is the control panel.  I have realized the placement of the already cut stock button holes do not correspond well to a 6 button street fighter/4 button neo geo layout.  This means I will either have to tackweld on some metal and fill the height differences and hope i can cut thru it, or scratch going with the original metal cp and build a new one out of thin plywood.  

I took some measurements and will try working with google sketch-up although I have never used it before.

I have

Mikeosoft

  • Trade Count: (0)
  • Full Member
  • ***
  • Offline Offline
  • Posts: 46
  • Last login:February 27, 2013, 10:38:00 pm
Re: Gutted Sega/Gremlin Carnival cab destined for trash bin Mame build
« Reply #17 on: April 27, 2012, 09:50:44 pm »
Today I did some more small things to the machine. 

I installed the coin door:


While I was installing the coin door I grabbed a lock mech from my dad's pinball parts bin stash, and I think it's a nice touch.

I also installed the top screws and re-enforced the underpanel for the marquee.  Now it sits correctly and there is some paint touchup work I need to do.

Also I installed the speical piece of metal angle brace I bought from Home Depot and painted black:

It will hide the kicked up rough bottom edge without looking "OCC bling Trashy" as my buddy called it by using diamond kick-plate...

I think it looks good.

Now to attack those pesky ugly dirt ridden coin acceptors...

As I received them:


I figured they were shot, and to look online for new units.  I couldn't source an exact replacement, although i found something close for 120 dollars us per unit.  No thanks! Ebay has some cheap chinese replacements that look like they will fit but are advertised as made for Pachinko machines... 10 a piece plus 10 shipping. 30 usd for a cheap but new look.  Hmm maybe. 

But I figured what the heck to try and waste an hour or so and refurbish these suckers if there's any bit of life left in them.


The tools:

Some MEK, a needle-nose pliers to remove the coin eject button and nuts on the back, 2 types of scotchbrite (big and small), and a razor blade to clean off old dried tape and residue.  I also used a rag to apply and rub the MEK to clean the surface. 


First one is done, here's a comparison!

Both completed:


As a final step I rubbed some of this stuff on there to prevent rust and damage to the remaining chrome finish...


All in all I am very happy with how they came out.  I am missing some parts with one of them, but this isn't a big deal.  I think I will try and restore them both to working order.  This depends if i want to wire the machine to Jamma spec or not. Still a decision up in the air. 

I am going to look at 2 machines tomorrow I have lead on.  They are at an old lady's house and either she's insane or she has a jackpot of cabs and a rolls royce.  That's what she told my father today, he took her number down and told me just before.  We have a time set for tomorrow to check her place out.  I hope she's not crazy  :cheers:

Mikeosoft

  • Trade Count: (0)
  • Full Member
  • ***
  • Offline Offline
  • Posts: 46
  • Last login:February 27, 2013, 10:38:00 pm
Re: Gutted Sega/Gremlin Carnival cab destined for trash bin Mame build
« Reply #18 on: April 28, 2012, 11:48:31 pm »
Today was long and big.  :afro:

In an effort to finish up the coin acceptors, I asked the old man (my dad) if he had some nice rivets, or lockbolts small enough to use to mount the coin mechs to the coin door.  He said "of course"


Here's them installed:


I am very pleased with how it turned out!

While i was doing that I noticed there was a split in the front particle board,  which meant it was time to pull out the wood glue!


Now it was time to finally tackle the damn mounting of the sony wega tv into the cab...


Took tons of measurements. 

Turns out I couldn't have picked a better monitor to use because the clearance of the neck board is within 2 centimeters from the back door...

See pics below.


I used the mount from the old tv since after measuring the cabinet, it is not perfectly square.  This made me feel a tad bit uncomfortable because this is a decision that will be the first time I change something on this cabinet that is irreversible.  But after thinking it through I said it was for the best and went with for it. 

Grabbed the measurements, checked 3 times, and spaced everything best I could.  I thought about changing the angle that the tv sits, but quickly realized if I tilted the monutor more "vertically" the neckboard would petrude thru the back.  My dad said i could cut a hole in the back door and use a siding piece at homedepot, he'd seen it done before... I was seriously thinking of trying that for a moment.  But then I realized there was probably a reason the monitor was built to sit recessed and tilted somewhat flatter like it does in the final pictures. So i went with it.  It worked for the best...


I cut out the frame to fit the tv, and I had to sand a bit more for a snug fit with a rasp. But it came out great.  To reinforce the weight of the tv my dad suggested to use some angle brackets as reverse washers, in other words we would take a long countersunk bolt, put it down through an angle bracket and through the wood and into the metal edge of the frame of the tube.  Behind that would be a lockwasher and a nut.  2 of these each for each of the four corners.  Since the Sony tv already had 3 holes in the vorner brackets I used the spacing and just went through it with a 3/16 drill bit to give a bit more clearance.  I am very pleased with the results.


More to come tomorrow.  First turn on and everything tomorrow.  I have reconnected everything but the tv speakers which will be done tomorrow afternoon.  I will post a video up when i test everything out.

emphatic

  • Trade Count: (0)
  • Full Member
  • ***
  • Offline Offline
  • Posts: 2017
  • Last login:Today at 05:42:59 pm
  • -"Suck it, Donny!" -"No, YOU suck it.... more".
    • Emphatic's Video Game Collection
Re: Gutted Sega/Gremlin Carnival cab destined for trash bin Mame build
« Reply #19 on: April 29, 2012, 04:45:48 pm »
That TV looks great in there!  :cheers:

Mikeosoft

  • Trade Count: (0)
  • Full Member
  • ***
  • Offline Offline
  • Posts: 46
  • Last login:February 27, 2013, 10:38:00 pm
Re: Gutted Sega/Gremlin Carnival cab destined for trash bin Mame build
« Reply #20 on: April 29, 2012, 09:19:11 pm »
That TV looks great in there!  :cheers:

Thanks dude! Glad someone is reading this build log.  :applaud: Thanks for the encouragement.  There's more to come.

Here's a vid of the first time I powered it on today:


Today I checked all the wires and made sure everything was connected correctly.  I soldered in the speakers from the tv right inside the top of the marquee, built a bracket to hold the two speakers as one where the single speaker would sit above the player's head in the marquee area.  I need to source a bigger speaker grill cover since the one I thought was original doesn't cover the hole completely. I will measure out the ellipse tomorrow and find the proper grill online and order it.  

Tomorrow I need to wire back up the POS dell and hope it will boot up.  Also I need to seriously sit down and figure out which path I am going to take with regards to control panel options.  I think I might still try and use the Original Control Panel, since it is a nice piece of steel and has the right dimensions and angles to work nicely.  I just wish it wasn't cut with button holes that predate "common control layouts" like a joystick, which this machine didn't have...


At the same time I am torn between putting a full mame pc with hyperspin front end and just saying hell with it and throwing an xbox 1 running coinops 4...
« Last Edit: April 30, 2012, 12:18:38 am by Mikeosoft »

Mikeosoft

  • Trade Count: (0)
  • Full Member
  • ***
  • Offline Offline
  • Posts: 46
  • Last login:February 27, 2013, 10:38:00 pm
Re: Gutted Sega/Gremlin Carnival cab destined for trash bin Mame build
« Reply #21 on: May 02, 2012, 11:48:10 am »
Yesterday adter the morning rain subsided I got to work on the control panel.

I prototyped two nights before on a piece of cardboard with an 8 button layout.  This one:

Man Slagcoin rocks!

Whe ni was happy with the cardboard layout I dropped it on top of the metal control panel just to see where the buttons would line up.  They were not directly over the existing holes but would come into them. Infact, on player 1 button 2,3 and 6, 7, theexisting holes would make a big open hole between the buttons.  Now I have a MIG welder, and I have used it before, but I am horrible at it and get splatter everywhere.  Also even if I cut small squares of metal to tack weld over existing holes I would have to bondo in the holes, then cut into them again to make the controllers fit.  It would not be pretty.  Finally, doing this method would mean al the work I did thus far with keeping the machine "restorable" to a carnival machine would be for nothing as the control panel would be ruined.


So the second option was to try to build a new Control Panel out of wood:


These long cuts were made by me with a steady hand and a zip saw.  I went slow and got lucky.  I have little to no experience with wood working and the next thing I will do from now on is create a sawboard to help me cut straight lines.  Although I am very pleased with the work I did, I seek perfection.

Now the block of wood under the ply was a piece of scrap wood I found in our wood pile that just so happens was cut to the perfect length.  It also is the perfect height. 3 mm of clearance between the ply and the block.

Here's my plan:

Cut a "round over" in the ply edge with my old man's router. 


Grab a nice piece of plexiglass and cut it to fit the top.  Leave the bottom longer.  Use a heatgun to heat the edge and bend it under and over the lip of the rounded edge.  Cut a short flat piece of plexi to fit in between the 3mm if there's still open room.

Get some LED strips from IKEA or ebay, with mood lights or something, and wire them in to glow from the underside of the control panel....

I hope this is making sense...

More pics:


yotsuya

  • Trade Count: (+21)
  • Full Member
  • ***
  • Offline Offline
  • Posts: 19959
  • Last login:June 16, 2025, 05:43:24 pm
  • 2014 UCA Winner, 2014, 2015, 2016 ZapCon Winner
    • forum.arcadecontrols.com/index.php/topic,137636.msg1420628.html
Re: Gutted Sega/Gremlin Carnival cab destined for trash bin Mame build
« Reply #22 on: May 02, 2012, 12:43:14 pm »
Are you not going to use the metal control panel?
***Build what you dig, bro. Build what you dig.***

Mikeosoft

  • Trade Count: (0)
  • Full Member
  • ***
  • Offline Offline
  • Posts: 46
  • Last login:February 27, 2013, 10:38:00 pm
Re: Gutted Sega/Gremlin Carnival cab destined for trash bin Mame build
« Reply #23 on: May 02, 2012, 02:23:09 pm »
using the original control panel will be more trouble than making a new one. I think that's the biggest reason.  Second, I don't want to cut apart the original panel thus making the possibility of one day restoring the game impossible. 

If I could get a new control panel cut and bent with metal I would chose that option but I have no access to metal fabrication facility, and I do not know anyone who would be willing to help.

Do you think this is a bad idea?

yotsuya

  • Trade Count: (+21)
  • Full Member
  • ***
  • Offline Offline
  • Posts: 19959
  • Last login:June 16, 2025, 05:43:24 pm
  • 2014 UCA Winner, 2014, 2015, 2016 ZapCon Winner
    • forum.arcadecontrols.com/index.php/topic,137636.msg1420628.html
Re: Gutted Sega/Gremlin Carnival cab destined for trash bin Mame build
« Reply #24 on: May 02, 2012, 02:36:03 pm »
No, not at all! You ended up doing what I did.

I DO have access to a metal cutter, so I'm going to try and make metal CPs. But wood works just fine.
***Build what you dig, bro. Build what you dig.***

Mikeosoft

  • Trade Count: (0)
  • Full Member
  • ***
  • Offline Offline
  • Posts: 46
  • Last login:February 27, 2013, 10:38:00 pm
Re: Gutted Sega/Gremlin Carnival cab destined for trash bin Mame build
« Reply #25 on: May 09, 2012, 03:23:21 pm »
Hey sorry for the abrupt stop to updates, but i've been flogged by horrible weather, trying to sell my car, and finding a job across coast while currently living in the other.  To top it off, I pulled out my Porter-Cable  Model 7310 router to find the collet is missing...  :badmood:

11 dollars later I am stuck waiting for 2 day delivery to arrive.  


In the meantime I have sourced 2 controllers and am in the process of wiring the second one up.  I am going to run this cab with an xbox running coinops for now, until I get a decent usb multi-console/pc/360 usb controller unit I can wire up and call it a day.  

So for now I broke open some old xbox 1 controller S's I had from my younger days.


I also purchased a Betabrite for a steal so I think I will mount this to the top of the machine, and when I get hyperspin up and running I will set it up like so using hyperbrite:


yotsuya

  • Trade Count: (+21)
  • Full Member
  • ***
  • Offline Offline
  • Posts: 19959
  • Last login:June 16, 2025, 05:43:24 pm
  • 2014 UCA Winner, 2014, 2015, 2016 ZapCon Winner
    • forum.arcadecontrols.com/index.php/topic,137636.msg1420628.html
Re: Gutted Sega/Gremlin Carnival cab destined for trash bin Mame build
« Reply #26 on: May 09, 2012, 03:42:13 pm »
I have a BetaBrite too, but I'm not hooking it up to my machine because I read there won't be support in HyperSpin v2 for them.

It's a fun device to have, though. Mine is going to cycle the high scores on certain games.
***Build what you dig, bro. Build what you dig.***

Mikeosoft

  • Trade Count: (0)
  • Full Member
  • ***
  • Offline Offline
  • Posts: 46
  • Last login:February 27, 2013, 10:38:00 pm
Re: Gutted Sega/Gremlin Carnival cab destined for trash bin Mame build
« Reply #27 on: May 09, 2012, 09:53:47 pm »
According to BBB from hyperspin forums:

Quote
The reason for no betabrite support in 2.0 is purely due to programming limitations for serial and usb support in my current development softwares. It might come in the future but not right away. Second monitor support in 2.0 isnt just for that one expensive monitor, it can be for any monitor. I have seen other monitors that are smaller and some even similar in shape to the betabrites (long and skinny), would really like to try one of those out myself if I get time.

It's not ruled out.  I haven't seen anything about hyperspin 2, but I love hyperspin 1. I see no reason to dump 1 for 2 especially since I'd be giving up betabrite prism.

The software you are writing, is it for windows? Do you have details?

racecar

  • Trade Count: (0)
  • Full Member
  • ***
  • Offline Offline
  • Posts: 99
  • Last login:June 29, 2012, 01:36:27 am
Re: Gutted Sega/Gremlin Carnival cab destined for trash bin Mame build
« Reply #28 on: May 09, 2012, 10:51:18 pm »
Nice work. Love that your using coinops like myself  ;D

Also try download Coinops 4. Pleanty of new games an plenty of updates.

Your cab is looking very nice. Great TV in there to.

Mikeosoft

  • Trade Count: (0)
  • Full Member
  • ***
  • Offline Offline
  • Posts: 46
  • Last login:February 27, 2013, 10:38:00 pm
Re: Gutted Sega/Gremlin Carnival cab destined for trash bin Mame build
« Reply #29 on: May 12, 2012, 08:58:14 am »
thanks i will definitely be running coinops 4 in this cab once I finish the thing.  I went with 3 for testing purposes because unrar'd 4 comes out to 55GB stock, where my 60GB xbox 1 harddrive has 4 partitions with the biggest left at 45GB.  I heard since BP locked coinops i cannot remove any PSX games to cut the size down. 

But now that coinops Lite 4 is out I might go that route.

boardjunkie

  • Trade Count: (0)
  • Full Member
  • ***
  • Offline Offline
  • Posts: 698
  • Last login:March 05, 2019, 06:05:58 pm
Re: Gutted Sega/Gremlin Carnival cab destined for trash bin Mame build
« Reply #30 on: May 13, 2012, 11:41:17 am »
Now how do you plan to get the PC to put out component video?

Mikeosoft

  • Trade Count: (0)
  • Full Member
  • ***
  • Offline Offline
  • Posts: 46
  • Last login:February 27, 2013, 10:38:00 pm
Re: Gutted Sega/Gremlin Carnival cab destined for trash bin Mame build
« Reply #31 on: May 13, 2012, 03:45:50 pm »
i have an old dell 2000 era ATI RADEON with a composite video out. I might try that and see if there's tons of bleeding/distortion issues.  If I am not satisfied (which I probably will be unsatisfied) I will install a video card with a component out extension.   there's a card i have here that looks like it has an s-video out but smaller and more pins I believe this is one of those boards that originally came with a component cable adaptor out.

boardjunkie

  • Trade Count: (0)
  • Full Member
  • ***
  • Offline Offline
  • Posts: 698
  • Last login:March 05, 2019, 06:05:58 pm
Re: Gutted Sega/Gremlin Carnival cab destined for trash bin Mame build
« Reply #32 on: May 13, 2012, 04:43:19 pm »
Composite sucks. S vid ain't much better. Ideally what you'd want is pure RGB, but that TV won't play ball without extensive hacking. I guess the component with a 480p output is the next best thing. I don't recommend 480i due to loss of color saturation and the slight flicker. My cab is set up with a horizontal monitor and I have a patch in groovymame to display vertical games with a higher vertical line requirement to interlaced. It works to keep the pix size right, but you *do* notice the hit in pix quality and the flicker that goes with it.

Progressive is the only way to go, and thats the way the original game's hardware displayed it.

Mikeosoft

  • Trade Count: (0)
  • Full Member
  • ***
  • Offline Offline
  • Posts: 46
  • Last login:February 27, 2013, 10:38:00 pm
Re: Gutted Sega/Gremlin Carnival cab destined for trash bin Mame build
« Reply #33 on: May 14, 2012, 08:47:21 pm »
Composite sucks. S vid ain't much better.
Progressive is the only way to go, and thats the way the original game's hardware displayed it.

From what I understand this tv cant do progressive scan.  480i only. I am ok with this because the interlaced image introduces scanlines which blend the colors nicely some games.  I do however, want as pure and clean a signal as possible to get from the xbox to the tv.  The best method for this is by splitting up  YPBPR from the source.  Even if that means it is going to feed a 480i (240p) signal, so be it.  In a perfect world I would do anything to get 480p with this, but I'm guessing this isn't possible.  So be it. In the future I will keep my eyes peeled for a legit arcade monitor to toss in this.


I spent the weekend working on the control panel some more.  I bondo'ed some more, sanded extensively. I repeated. I painted some primer thinking i was done, only to find once it was all 1 color that there were tons of imperfections.


All in all i finished with 2 coats of primer, and had some buttons sitting around so I tried them out.  I will probably order some better colored buttons once I have design set, but for now I am very happy.

What you see in brown is the primer. I am going to spray it flat black once the rain stops, and then cover with a control panel vinyl like
 this:


Does anyone know where I can pick one of those up?


Also I need to get some input and advice on sideart and control panel art. Marquee as well. 

I've been playing around in illustrator a bit today but i am completely new to vector stuff and digital stuff. 

404

  • Trade Count: (+3)
  • Full Member
  • ***
  • Offline Offline
  • Posts: 1019
  • Last login:August 04, 2015, 10:19:10 pm
Re: Gutted Sega/Gremlin Carnival cab destined for trash bin Mame build
« Reply #34 on: May 14, 2012, 09:44:50 pm »
the CP looks great. I'm really digging the idea to use that mockup for the cp overlay. In the printing world, that kind of pattern on the cp is called a halftone. In this case, the halftone is fading or receding. you can try looking around some vector clipart sites for some halftone effect and then send it to one of the many vendors that print arcade art. they should be able to easily edit the vector art to any color and size you need in just a matter of a few minutes.

racecar

  • Trade Count: (0)
  • Full Member
  • ***
  • Offline Offline
  • Posts: 99
  • Last login:June 29, 2012, 01:36:27 am
Re: Gutted Sega/Gremlin Carnival cab destined for trash bin Mame build
« Reply #35 on: May 14, 2012, 10:51:30 pm »
thanks i will definitely be running coinops 4 in this cab once I finish the thing.  I went with 3 for testing purposes because unrar'd 4 comes out to 55GB stock, where my 60GB xbox 1 harddrive has 4 partitions with the biggest left at 45GB.  I heard since BP locked coinops i cannot remove any PSX games to cut the size down. 

But now that coinops Lite 4 is out I might go that route.

You can delete the PSX an add another game pack which is much smaller in size an gets you to the required roms you need.

I would just get a bigger Hard drive there is some sweet games you dont want to miss out on  :P

Mikeosoft

  • Trade Count: (0)
  • Full Member
  • ***
  • Offline Offline
  • Posts: 46
  • Last login:February 27, 2013, 10:38:00 pm
Re: Gutted Sega/Gremlin Carnival cab destined for trash bin Mame build
« Reply #36 on: May 15, 2012, 03:13:26 pm »
the CP looks great. I'm really digging the idea to use that mockup for the cp overlay. In the printing world, that kind of pattern on the cp is called a halftone. In this case, the halftone is fading or receding. you can try looking around some vector clipart sites for some halftone effect and then send it to one of the many vendors that print arcade art. they should be able to easily edit the vector art to any color and size you need in just a matter of a few minutes.

Dude I've had extreme difficulties finding this generic design anywhere.  I continue to look. If you know anyone who can mock something up quick as an ai file I'd be grateful if you could pass along the info so i can get ahold of him/her for hire.  

In the meantime I've tried my hand at making vector control panel.  I stole some design elements from the net, but I am not sure what I have here.  Last night at 3am after a day of working on it I awoke today and said "what the hell is this design? a woman? why? what the hell is this theme?


I dont know why it is in black and blue, but in the original ai file it is red, tan background, blue shadow behind the girl and red pattern in the background.  When i exported it in illustrator it looked ok. weird...

Here's the ai file if anyone wants to check it out
.ai vector image download: http://www.filefactory.com/file/346n6f0gawer/n/controlpaneloverlay_ai

I decided this morning to take a break from pretending to be a crappy artist, and head to the basement to do what I do best; wire up control panels and solder.


Man I also need to figure something out for the sides that is similar that blends to black.  
« Last Edit: May 15, 2012, 03:17:17 pm by Mikeosoft »

404

  • Trade Count: (+3)
  • Full Member
  • ***
  • Offline Offline
  • Posts: 1019
  • Last login:August 04, 2015, 10:19:10 pm
Re: Gutted Sega/Gremlin Carnival cab destined for trash bin Mame build
« Reply #37 on: May 15, 2012, 03:40:13 pm »
you can simply search google's image results for 'free halftone vector'. I see quite a few different variations of halftones there that could possibly be used for what you want. Unfortunately I'm years out of practice to help you much.

Doing a quick search, i found this set of Illustrator images that have some of the most common variations of the halftone. You should have little trouble editing one of these to get your desired effect.

http://thinkdesignblog.com/free-vectors-28-halftone-vectors-clean-grunge-versions.htm

GIZMOGAMES

  • Trade Count: (0)
  • Full Member
  • ***
  • Offline Offline
  • Posts: 103
  • Last login:February 28, 2019, 10:33:46 pm
Re: Gutted Sega/Gremlin Carnival cab destined for trash bin Mame build
« Reply #38 on: May 19, 2012, 05:51:03 am »
WoW great way to keep the original cabinet ÖRIGINAL and your doing the RIGHT thing by keeping the old control pannel :)
as said above just upgrade yr xbox hd i think 120 would be ideal but im sure a 160 would be better :) theres some great SMUPS on xbox and that way you could store them also on the drive also you could make a usb/adapter for the memory slot :) giving you some other options :) I do have one quistion tho is the monitor going to stay at that angle or are you going to raise it more along a horizontal style just curious :) PPS love to way your dad is helping to its great to be able to say hey dad got any nutz i can use lol awsome :)
 :burgerking:

and omg why not try the 3d vinyl
http://www.ebay.co.uk/itm/251013817561?ssPageName=STRK:MEWNX:IT&_trksid=p3984.m1439.l2649
gives you FOOD for thought :)
pic attached mined a reddish/purple but from all angles it changes :)
« Last Edit: May 19, 2012, 05:53:47 am by GIZMOGAMES »

Mikeosoft

  • Trade Count: (0)
  • Full Member
  • ***
  • Offline Offline
  • Posts: 46
  • Last login:February 27, 2013, 10:38:00 pm
Re: Gutted Sega/Gremlin Carnival cab destined for trash bin Mame build
« Reply #39 on: May 21, 2012, 06:59:50 pm »
had a garage sale this past weekend, and moved a ton of stuff out of the garage.  I should now have the room I need to get working on this cab the right way. Not to mention more funds to throw into this.  Although, I have to admit I haven't spent much so far. 

In the meantime I managed to work a little more on art designs for this machine, and I need some input on what's the best:

1.


2.