Main Restorations Software Audio/Jukebox/MP3 Everything Else Buy/Sell/Trade
Project Announcements Monitor/Video GroovyMAME Merit/JVL Touchscreen Meet Up Retail Vendors
Driving & Racing Woodworking Software Support Forums Consoles Project Arcade Reviews
Automated Projects Artwork Frontend Support Forums Pinball Forum Discussion Old Boards
Raspberry Pi & Dev Board controls.dat Linux Miscellaneous Arcade Wiki Discussion Old Archives
Lightguns Arcade1Up Try the site in https mode Site News

Unread posts | New Replies | Recent posts | Rules | Chatroom | Wiki | File Repository | RSS | Submit news


Author Topic: Vewlix DIY kits in Australia by arcadeworx  (Read 17599 times)

0 Members and 1 Guest are viewing this topic.

mR_CaESaR

  • Trade Count: (0)
  • Full Member
  • ***
  • Offline Offline
  • Posts: 62
  • Last login:July 04, 2024, 10:40:13 pm
Vewlix DIY kits in Australia by arcadeworx
« on: February 14, 2011, 09:59:58 pm »
After seeing Kray's version of the Vewlix kit, I went on a hunt to find someone in Australia that would do something similar.

As I don't have the woodworking talent to even attempt a complicated design like the vewlix cabinet, the next best thing i could do was get someone to build it for me and then I do the rest, while nowhere near as fun, it was the only way I could get a vewlix :)

Obviously, donovan myers, was one of the first to do these cabs, and ever since I saw his, I've always wanted something similar.

We all saw ericleroi's/spacehedgehog's vewlix slim and that became the inspiration of this design.

I first contacted Troy back in October and we eventually came up with a design that both of us were happy with.

A lot of the design phase can be found here: http://www.ozhadou.net/forum/viewtopic.php?f=31&t=5633

Fast forward to February, I have ordered my 24" vewlix cabinet and I should be receiving it shortly. I opted for a 24" just for the simple fact that there are plans to have two of these head to head or side to side and it's very hard to find a 32" lag free screen here in Australia.

The overall render of the cabinet is as follows


Close up of the CP. I personally opted for the 7 button vewlix layout even though I'm going to be plugging out the 7th button just for closer feeling to the original, probably stupid, but yeah.. I like it :)


And here are a couple of pics that Troy has sent through of the finished CP

Here's the first lot of teaser pics... Direct from the machine, just sent from Troy, I present to you my Control Panel!!!

The CP with the perspex, film sheet still intact :) (The other CP I believe might be aaraonactive's)


Look at those bevels!!! ;D ;D, Troy its a work of art... I'm going from the pics, and I can already tell its great craftsmanship!! :)


The vewlix designs are available from Arcadeworx's and are highly customisable, I dealt with Troy and he's been so good with the whole process.

I will start posting more pics and progress once I get my cab hopefully end of this week or early next week.

emphatic

  • Trade Count: (0)
  • Full Member
  • ***
  • Offline Offline
  • Posts: 2017
  • Last login:Yesterday at 04:54:49 pm
  • -"Suck it, Donny!" -"No, YOU suck it.... more".
    • Emphatic's Video Game Collection
Re: Vewlix DIY kits in Australia by arcadeworx
« Reply #1 on: February 15, 2011, 04:46:20 am »
That looks amazing!  :applaud:

VanillaGorilla

  • Trade Count: (0)
  • Full Member
  • ***
  • Offline Offline
  • Posts: 480
  • Last login:March 08, 2019, 10:23:51 pm
  • Coin detected in pocket
Re: Vewlix DIY kits in Australia by arcadeworx
« Reply #2 on: February 15, 2011, 12:45:36 pm »
Not usually a Viewlix fan, but if a kit like that were available in the US, I might have to give it real thought.  Thats a really nice looking repro. For some reason I thought there was a viewlix where the monitor rotated, depending on the JAMMA cart you had installed.... but that could be some other kind of candy cab,etc. The recent japanese arcade game market is not my strong suit, I'm more of a throwback, but I do like these 'sit-down' designs.

borals

  • Trade Count: (0)
  • Full Member
  • ***
  • Offline Offline
  • Posts: 64
  • Last login:March 07, 2020, 05:51:14 am
Re: Vewlix DIY kits in Australia by arcadeworx
« Reply #3 on: February 15, 2011, 06:28:38 pm »
Awsome, i might pick one of these up also. Will ahve to get rid of a lowboy me thinks..............

SpaceHedgehog

  • Trade Count: (0)
  • Full Member
  • ***
  • Offline Offline
  • Posts: 937
  • Last login:October 29, 2024, 02:02:07 pm
  • Almost done ...
Re: Vewlix DIY kits in Australia by arcadeworx
« Reply #4 on: February 16, 2011, 04:22:41 pm »
Those CP's do look awesome  :applaud: Great to see you on here mR_CaESaR
Click a pic for a video tour 

Gatsu

  • Trade Count: (+3)
  • Full Member
  • ***
  • Offline Offline
  • Posts: 943
  • Last login:November 04, 2017, 08:23:43 am
  • I'm not prejudice. I hate everyone equally.
Re: Vewlix DIY kits in Australia by arcadeworx
« Reply #5 on: February 16, 2011, 06:03:38 pm »
I wonder if he'll do kits of just individual sections. i need that rounded top piece pretty bad. hehe

mR_CaESaR

  • Trade Count: (0)
  • Full Member
  • ***
  • Offline Offline
  • Posts: 62
  • Last login:July 04, 2024, 10:40:13 pm
Re: Vewlix DIY kits in Australia by arcadeworx
« Reply #6 on: February 16, 2011, 07:37:39 pm »
That looks amazing!  :applaud:

I wish I could take the credit for the craftsmanship, but yes, I do agree, it bloody looks amazing :)

Not usually a Viewlix fan, but if a kit like that were available in the US, I might have to give it real thought.  Thats a really nice looking repro. For some reason I thought there was a viewlix where the monitor rotated, depending on the JAMMA cart you had installed.... but that could be some other kind of candy cab,etc. The recent japanese arcade game market is not my strong suit, I'm more of a throwback, but I do like these 'sit-down' designs.

You can order one from Kray, he was the reason i wanted a DIY solution here in Aus.

The original vewlix are screen rotatable for SHUMPs,

Awsome, i might pick one of these up also. Will ahve to get rid of a lowboy me thinks..............

If you do order one, be sure to post all your pics in the Ozhadou thread], I'm trying to centralise it there with everyone that I know of purchasing these and it'll be good to see everyone's version.

Those CP's do look awesome  :applaud: Great to see you on here mR_CaESaR

Yeah I've been a long time lurker here :)

The CP's do look great do don't they!!?? I have to give many thanks to yourself for the button layout, it was the most logical thing to do and I've told you before, but your slim design was the biggest influence for this design :)

I wonder if he'll do kits of just individual sections. i need that rounded top piece pretty bad. hehe

He might be able to sell the CP on its own, however I don't know about the individual sections, it'd be too hard to get the top piece fit for a different build, however you may be able to work something out with Troy, best to give him a yell and ask.. troy@arcadeworx.com.au

borals

  • Trade Count: (0)
  • Full Member
  • ***
  • Offline Offline
  • Posts: 64
  • Last login:March 07, 2020, 05:51:14 am
Re: Vewlix DIY kits in Australia by arcadeworx
« Reply #7 on: February 16, 2011, 09:59:52 pm »

If you do order one, be sure to post all your pics in the Ozhadou thread], I'm trying to centralise it there with everyone that I know of purchasing these and it'll be good to see everyone's version.

Will do!  ;)

mR_CaESaR

  • Trade Count: (0)
  • Full Member
  • ***
  • Offline Offline
  • Posts: 62
  • Last login:July 04, 2024, 10:40:13 pm
Re: Vewlix DIY kits in Australia by arcadeworx
« Reply #8 on: February 22, 2011, 05:29:41 am »
Alright....

so it begins!!! :D :D

I officially hate courier companies!!!

The buggers only sent package 1 of 2!!   :angry:  :angry:  :angry:  and they decide to go on a strike today, so hopefully I get the rest of the cabinet tomorrow.

I did get the CP so, I am now officially in day one of the build.

I purchased some 3m body filler to seal the MDF edges so when painted, it'll be just like the flat surface of the MDF (well that's the plan anyway).

There was absolutely no way the CP could be properly filled the way I want it with the parts loose, I had to leave it assembled and seal where I thought necessary.

As you will see from the next lot of pics, I am far from an expert at this, and I probably caked on waaaaay too much filler, I'm guessing I'm going to be sanding for a very long time :S my mentality was during this process, its better to not see the linesand then sand down, as oppose to seeing all the lines i'm trying to fill.


If I have time tomorrow, I'll start the sanding, I don't see myself working on this again till the weekend, however if the rest of the cabinet arrives tomorrow, I'll try and find time to put that together with the screen... I'll see how I go.

Hopefully I put enough hardener on the filler for it to set properly... I guess we'll find out tomorrow..

SNAAKE

  • Trade Count: (+29)
  • Full Member
  • ***
  • Offline Offline
  • Posts: 3564
  • Last login:July 21, 2025, 12:48:32 pm
  • my joystick is bigger than your joystick !
Re: Vewlix DIY kits in Australia by arcadeworx
« Reply #9 on: February 22, 2011, 02:18:02 pm »
single player cabinet is...cute :burgerking:

mR_CaESaR

  • Trade Count: (0)
  • Full Member
  • ***
  • Offline Offline
  • Posts: 62
  • Last login:July 04, 2024, 10:40:13 pm
Re: Vewlix DIY kits in Australia by arcadeworx
« Reply #10 on: February 22, 2011, 04:03:37 pm »
single player cabinet is...cute :burgerking:

It will eventually be a 2p, when the second cabinet arrives :)

mR_CaESaR

  • Trade Count: (0)
  • Full Member
  • ***
  • Offline Offline
  • Posts: 62
  • Last login:July 04, 2024, 10:40:13 pm
Re: Vewlix DIY kits in Australia by arcadeworx
« Reply #11 on: February 25, 2011, 06:52:38 pm »
So I failed miserably with the bogging :)

HAHAHAHA I didn't put enough hardener, so it's all guey and stuff, now I gotta get out some thinners and scrape off the bog and try again.

I also finally received the rest of the cabinet from the courier and hopefully get a move on the build of the cabinet later on the day if not tomorrow.

Here's some quick pics of the unassembled cab:

All the cams and screws necessary for this cabinet build :)


Bracing supports for installing the monitor


All the pieces for the arches, most of this will be white but will have some black trim


The main component of the cab, the side and the monitor bezel.

Monitor bezel colour will be black, side colour will be white with the black trimming


The base feet parts, colour for this will be black


The bottom side parts, colour for this will be black


mR_CaESaR

  • Trade Count: (0)
  • Full Member
  • ***
  • Offline Offline
  • Posts: 62
  • Last login:July 04, 2024, 10:40:13 pm
Re: Vewlix DIY kits in Australia by arcadeworx
« Reply #12 on: February 27, 2011, 03:40:29 am »
So now on what I'd call day three of the build, I managed to assemble the cabinet today - however, I only built it partially to check out the screen fitting, the CP, and finally to confirm which parts I can paint.

I think I've decided to paint and seal the parts as they are at the moment, this will give me the option of disassembling the cabinet if I ever wanted to, unfortunately, it will leave some seals that I had originally wanted to cover. I'm just not liking the thought of having the cabinet installed, then never be able to change the marquee or the light for the marquee.

The way this cabinet is constructed, the arches have to be installed and if all those arches are "sealed" on the side and at the back, then there's no turning back.

I might change my mind later on the build, but for now, I'll be painting them in different pieces.

Base of the cabinet assembled.


Arches built


Left side of the cabinet with the supports being assembled


Monitor bezel with the mounting braces for the monitor.


Right side with the screws installed for the cams


Test fit without the base


Right side view of the cabinet with monitor installed for test fitting


Front view of the cabinet with monitor installed for test fitting


Left profile view of the cabinet with monitor installed for test fitting


Perfectly fits down to the spec as outlined here

http://www.flickr.com/photos/juliuslagula/5399336323/#in/set-72157625934806998


Rear pic with the pieces of mdf that braces the monitor in to place (I might use a thick MDF, I'm quite scared that it's not thick enough)


Now I have to disassemble again to paint :(

I also have to pick up some speakers which I still don't know which ones to get, Z506 was my original candidate just because its logitech, however, after putting this cabinet together, I'm now wondering about volume control and the Creative T6160 looks tempting just for the simple fat that its got a wired remote, it probably won't sound as good as the logitech's though.

We'll see how it pans out.

Until next update.

mR_CaESaR

  • Trade Count: (0)
  • Full Member
  • ***
  • Offline Offline
  • Posts: 62
  • Last login:July 04, 2024, 10:40:13 pm
Re: Vewlix DIY kits in Australia by arcadeworx
« Reply #13 on: March 02, 2011, 05:07:07 am »
Alright, another day in paradise :)

Day 4 - I have removed most of the bog that I applied wrong and it's looking like it did when I first received the cabinet, now the next step after this is to toughen up the joins with some glue and re-seal the edges (I will be getting my mate to help me this time).


Top view of the control panel, I've kept the protective film on until I've got the proper artwork printed.


Testing the Logitech Z-2300.

The sub is way too big if I have the shelf inside, and the satellites won't properly fit, the Z-2300 is way overkill for this setup.

I will have to look at other options for speakers.


The cabinet 90% assembled with the stick wired up and some duct tape to test out where I will be masking.

I think the top horizontal strip is too thick, I may need to trim that down.

I also think the first angled part is also a little on the thicker side.


Here's the monitor shroud without the bezel trim


Here's the monitor shroud with the bezel trim


I'm still not too sure if I want it without the bezel trim, or with the bezel trim

As for reference, below is a pic of the original vewlix with the bezel trims


Front view of monitor shroud with the bezel trim


First gameplay test, screen looks good, stick works perfectly and sound is nice, but way too overkill :)


I'm now officially back to square one for choosing the speakers, I thought the logitech z2300's would be perfect, however the satellites are way too big to properly fit inside this cab without taking apart the satellites. I also think that paying the price for z2300 is not worth it for this cabinet, while the sound is perfect, I barely nudged the volume.

So it's back to looking for some speakers with a wired remote.

I'll probably just sit and play for a couple of days and then take it apart and start prepping everything for the undercoat.


emphatic

  • Trade Count: (0)
  • Full Member
  • ***
  • Offline Offline
  • Posts: 2017
  • Last login:Yesterday at 04:54:49 pm
  • -"Suck it, Donny!" -"No, YOU suck it.... more".
    • Emphatic's Video Game Collection
Re: Vewlix DIY kits in Australia by arcadeworx
« Reply #14 on: March 02, 2011, 11:57:56 am »
I can recommend the Logitech s220. I have these in both of my cabinets.


They are really cheap, there's an on/off switch on the remote along with microphone input and headphone output(the volume pot doesn't adjust the headphone volume though).

HaRuMaN

  • Supreme Solder King
  • Global Moderator
  • Trade Count: (+45)
  • Full Member
  • *****
  • Offline Offline
  • Posts: 10328
  • Last login:July 23, 2025, 07:04:20 pm
  • boom
    • Arcade Madness
Re: Vewlix DIY kits in Australia by arcadeworx
« Reply #15 on: March 02, 2011, 01:31:38 pm »
 :stupid

I built a cocktail cab with those exact speakers, great sound for a cheap price.

mR_CaESaR

  • Trade Count: (0)
  • Full Member
  • ***
  • Offline Offline
  • Posts: 62
  • Last login:July 04, 2024, 10:40:13 pm
Re: Vewlix DIY kits in Australia by arcadeworx
« Reply #16 on: March 02, 2011, 06:25:54 pm »
Thanks.

I might have to find the equivalent to those speakers, they don't appear to be available in Oz.

I'll compare specs of these to the ones on the Oz logitech site.

mR_CaESaR

  • Trade Count: (0)
  • Full Member
  • ***
  • Offline Offline
  • Posts: 62
  • Last login:July 04, 2024, 10:40:13 pm
Re: Vewlix DIY kits in Australia by arcadeworx
« Reply #17 on: March 07, 2011, 06:50:54 pm »
So another day working on the cabinet... I keep procrastinating with the paint prep as I'm actually quite dreading it, so I ended up doing some test prints on some artwork for the cabinet and I'm actually quite happy that I did some test prints as my prints were EPIC FAIL!! and I'm going to have to do a few more tests to get it 100% (possibly go to different places too)

I'm not sure if it was Officeworks that scaled my CP artwork wrong, or if it was wrong from Photoshop to begin with.

I've been having a lot of problems trying to get a proper 1:1 scale template from the original CAD drawing.

What I thought was proper in photoshop, obviously isn't anywhere near the scale of what it should be.

Back to the drawing boards, however I think I'll try out another print company first, I'm pretty sure my files are to scale, even images that I created turned out "smaller". What a waste of $20!

Also got the AE moves list printed out courtesy of Capcom Japan :) 
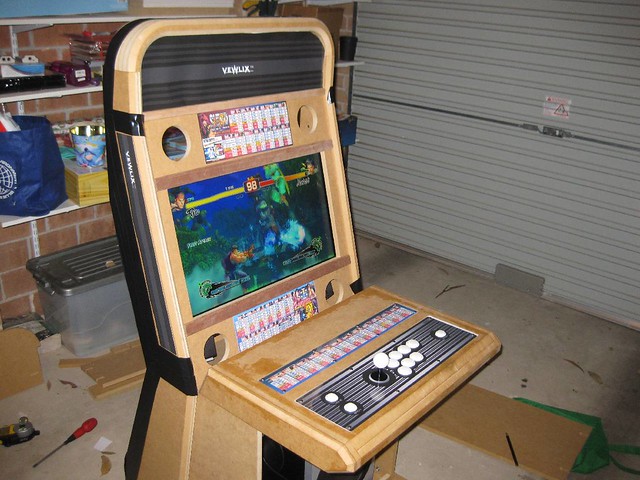
I will eventually install a fluro in that section


I'm not really sure if the joystick hole was the only one that "fit" properly, but if I went for that as the only thing that was proper, the button section needs to be moved by about 5-7mm to the right, who knows..

I really wish I knew if it was me or if it was Officeworks that screwed the scaling up


The left section looks like it needs to be pushed to the left by about 3-5mm. This is so frustrating.


Quite evident how off the artwork is here, from this side, it appears the right section is needs to be pushed over to the right by about 5-7mm.


This will pretty much be how the "final" version will be in terms of placement and the amount of blacks.

The only thing I can see changing will be the artwork - so it matches the CP artwork.


Excuse the off-centred logo, but these are just test print artworks :)

After installing the marquee, I've now come to the conclusion that I will not be sealing the sides, so I can take the top arches off properly for marquee artwork installation.

Had a lot of difficulty wedging the artwork inside the groove for the plexi, so I will have to look at cutting the artwork an extra couple of mm's so I don't wedge the artwork inside the groove.


A front view of the cabinet with a lower profile


A left view of the cabinet with test artwork


That's pretty much it on the artwork side of things, now I just got to fix up the scaling and order a few more things for the "aesthetics" side of of the cabinet (coin slot, speaker grills).

I really need to start prepping for painting, I've just been dreading it so much and I've been "testing" the cabinet too :)

Till the next update.

PS: Most of the pics of the build have been posted in the thread, however there have been a few pics that I didn't bother posting, if you want to see all the pics, visit the Flickr Vewlix Build Set
« Last Edit: March 07, 2011, 06:55:32 pm by mR_CaESaR »

emphatic

  • Trade Count: (0)
  • Full Member
  • ***
  • Offline Offline
  • Posts: 2017
  • Last login:Yesterday at 04:54:49 pm
  • -"Suck it, Donny!" -"No, YOU suck it.... more".
    • Emphatic's Video Game Collection
Re: Vewlix DIY kits in Australia by arcadeworx
« Reply #18 on: March 07, 2011, 07:13:16 pm »
The CPO looks very silvery and shiny, did you do some sort of fades in Photoshop to achieve this effect? I hope you get the scaling perfect, I think you have a WINNER on your hands. :cheers:

mR_CaESaR

  • Trade Count: (0)
  • Full Member
  • ***
  • Offline Offline
  • Posts: 62
  • Last login:July 04, 2024, 10:40:13 pm
Re: Vewlix DIY kits in Australia by arcadeworx
« Reply #19 on: March 07, 2011, 07:17:29 pm »
The CPO looks very silvery and shiny, did you do some sort of fades in Photoshop to achieve this effect? I hope you get the scaling perfect, I think you have a WINNER on your hands. :cheers:

A friend did the artwork, but yes he definitely did some gradient work, not sure if i'm going to keep it or not, still deciding :)

borals

  • Trade Count: (0)
  • Full Member
  • ***
  • Offline Offline
  • Posts: 64
  • Last login:March 07, 2020, 05:51:14 am
Re: Vewlix DIY kits in Australia by arcadeworx
« Reply #20 on: March 07, 2011, 07:42:24 pm »
I can't wait to get one of these.

Need to finish my cocktail first!

Did you get the monitor bezel mdf cut exactly to fit your monitor?

Also, is that the Plexi that is optional, or is it your own?

mR_CaESaR

  • Trade Count: (0)
  • Full Member
  • ***
  • Offline Offline
  • Posts: 62
  • Last login:July 04, 2024, 10:40:13 pm
Re: Vewlix DIY kits in Australia by arcadeworx
« Reply #21 on: March 07, 2011, 07:55:07 pm »
Did you get the monitor bezel mdf cut exactly to fit your monitor?

Yeah I got it cut to exactly my monitor as per the image below (not sure what I will be doing when/if I need to replace the monitor.. .maybe I can ask Troy to re-cut me another monitor shroud when that time arises)


Also, is that the Plexi that is optional, or is it your own?

Nah it was an optional fee that I paid, Troy had a special where it was an additional $50 for the Marquee, control panel and moves overlay plexi (note the moves overlay has two plexi's, an opal one and a clear one), all plexi is 3mm in thickness

mR_CaESaR

  • Trade Count: (0)
  • Full Member
  • ***
  • Offline Offline
  • Posts: 62
  • Last login:July 04, 2024, 10:40:13 pm
Re: Vewlix DIY kits in Australia by arcadeworx
« Reply #22 on: March 22, 2011, 10:41:33 am »
Just a quick update, no pics unfortunately :(

I'll take pics here and there as it's not at my house at the moment.

My mate and I worked on bogging all the edges today on the whole cab except the CP as the glue is still drying on that.

The arch piece looks friggin awesome!!! With bog and sanded down, it looks like it's one piece!

Hopefully we can sand the rest of the cabinet by the end of the week and start the second batch of bog for all the low spots and missed sections.

Once the second batch is done, we should be good to go for spray putty priming which my mate said will also fill in any low spots and imperfections.

Once the priming is done, do a couple of hours worth of sanding with 300/400 and 600 grit and she should be ready for paint :)

If all goes well, she should be finished within two-three weeks (just really depends on my mate, its when he's available)

Exciting times ahead :)

mR_CaESaR

  • Trade Count: (0)
  • Full Member
  • ***
  • Offline Offline
  • Posts: 62
  • Last login:July 04, 2024, 10:40:13 pm
Re: Vewlix DIY kits in Australia by arcadeworx
« Reply #23 on: April 12, 2011, 12:57:17 am »
Time for a long awaited update! :)

Sorry for the crappy pics, I only had my iPhone today, totally forgot to bring my camera.

So it's been a few weeks since my last post, and nothing much has really happened, except sanding, and more sanding after the bog was applied on all edges needing to be sealed (didn't really worry about the stuff at the back)

CP pre-primed, CP sealed with bog.


Hanging the pieces waiting for the primer to dry.


This is what happens when you don't seal MDF and apply primer straight on to it.

Fluffy sections!!

We didn't bog this down as it will not be seen anywhere.


Here's the CP primed before we applied some spot putty

It still needs a fair bit of sanding, as its quite rough, but once the spot putty is done, we will sand it down with some fine grit sand paper and finally mask it out for painting!!

Yay!!


Applied spot putty on sections of the control panel where there were imperfections.


Hanging to dry.......

Literally :)

The CP is hanging on the clothes line waiting for the spot putty to dry.


Here's the arc primed before we applied some spot putty


Applied spot putty to the imperfections of the arc.

Once this is dry, it'll be sanded down and ready for paint!


Applied spot putty to the imperfections of the right side.


The last piece to prime, once this is dry, we will spot putty for imperfections


These parts are properly sanded and ready for paint.

It's sooo smooth :D


Well there it is, the past couple of weeks worth of work...

Depending on my mate's availability, we might be able to start painting this baby this week, if not, it'll be sometime next week, maybe I can give myself an easter present! :)

Hope you guys have enjoyed the update.

Until next time, I'm gonna keep sanding! :)

VanillaGorilla

  • Trade Count: (0)
  • Full Member
  • ***
  • Offline Offline
  • Posts: 480
  • Last login:March 08, 2019, 10:23:51 pm
  • Coin detected in pocket
Re: Vewlix DIY kits in Australia by arcadeworx
« Reply #24 on: April 12, 2011, 01:11:14 am »
 :drool :drool :drool - thats gonna be killer.

emphatic

  • Trade Count: (0)
  • Full Member
  • ***
  • Offline Offline
  • Posts: 2017
  • Last login:Yesterday at 04:54:49 pm
  • -"Suck it, Donny!" -"No, YOU suck it.... more".
    • Emphatic's Video Game Collection
Re: Vewlix DIY kits in Australia by arcadeworx
« Reply #25 on: April 12, 2011, 08:12:40 am »
Nice. :applaud: You seem to have lovely weather as well. Over here =  :badmood:

mR_CaESaR

  • Trade Count: (0)
  • Full Member
  • ***
  • Offline Offline
  • Posts: 62
  • Last login:July 04, 2024, 10:40:13 pm
Re: Vewlix DIY kits in Australia by arcadeworx
« Reply #26 on: June 03, 2011, 12:46:33 am »
Here's a teaser of the semi-completed vewlix cab! (still trying to get the artwork right for the CP though :()


I'll have a worklog update in a few days time, with challenges and lessons learned for the next cab.

Hope you guys enjoy :)

Racerbamf

  • Trade Count: (0)
  • Newbie
  • *
  • Offline Offline
  • Posts: 1
  • Last login:December 18, 2013, 10:23:23 am
  • I'm a llama!
Re: Vewlix DIY kits in Australia by arcadeworx
« Reply #27 on: June 03, 2011, 04:36:32 pm »
A fellow OCAUer. I'm ZXR over there and commented on how nice I think this cab is. Troy has done a great job on this design and I'm sure there will be a lot of people who would agree, yourself included obviously. 

-Racerbamf

mR_CaESaR

  • Trade Count: (0)
  • Full Member
  • ***
  • Offline Offline
  • Posts: 62
  • Last login:July 04, 2024, 10:40:13 pm
Re: Vewlix DIY kits in Australia by arcadeworx
« Reply #28 on: June 05, 2011, 01:19:26 am »
Just in time for AE!!! :D


Had a quick bash online and it seems I need to "re-adjust" myself with the new PCB, some links weren't coming out as well as they did on the TE.