Main Restorations Software Audio/Jukebox/MP3 Everything Else Buy/Sell/Trade
Project Announcements Monitor/Video GroovyMAME Merit/JVL Touchscreen Meet Up Retail Vendors
Driving & Racing Woodworking Software Support Forums Consoles Project Arcade Reviews
Automated Projects Artwork Frontend Support Forums Pinball Forum Discussion Old Boards
Raspberry Pi & Dev Board controls.dat Linux Miscellaneous Arcade Wiki Discussion Old Archives
Lightguns Arcade1Up Try the site in https mode Site News

Unread posts | New Replies | Recent posts | Rules | Chatroom | Wiki | File Repository | RSS | Submit news


Author Topic: My old MAME Cabinet Revision  (Read 9367 times)

0 Members and 1 Guest are viewing this topic.

jimfath

  • Trade Count: (0)
  • Full Member
  • ***
  • Offline Offline
  • Posts: 173
  • Last login:April 20, 2021, 02:58:31 am
  • IT consultant
My old MAME Cabinet Revision
« on: July 06, 2011, 09:41:02 pm »
After looking through the various projects on here, I'm utterly impressed and amazed. I'm revamping my old MAME cabinet so I thought I'd throw it in here as it's technically a project. If I'm wrong let me know and I'll pull it down. I'm not nearly as savy as some of you fine folks.

About 6 years ago I had a MAME cabinet made. The design laid out by the cabinet maker was great. It came apart in 3 pieces as I am an apartment dweller and I am prone to moving for work. I am in the process of putting it back together after a recent 4th move (Chicago to LA) and I am motivated to make some improvements on it while I'm putting it back together and have some $$$ with which to make it happen. Bear in mind that I am not a wood worker and I did none of the control panel wiring though I did Frankenstein the PC together that ran it. So I do have some skill and a willingness to learn and experiment. Actually seeing the various home builds here has given me a lot of ideas.

Here is the machine (It's not a Spy Hunter machine. I just LOVED that game as a kid so I made a marquee for it)


Upgrades I'd like to do:

Marquee:
Illuminate Marquee with an LCD light source
Design original Marquee with various video game elements. Specifically incorporating Kinky Pinky from NARC.

Power
Install a MASTER power switch on top that powers on PC, Speakers, Monitor.
Finally configure PC to auto execute hyperspin upon power up.

Monitor
Replace TV with sharper LCD panel.

Speakers
Install 2 speakers and 1 subwoofer into the cabinet.

Coin Door
Replace door with a coin door.

Marquee
I just installed a lcd light bar. http://www.amazon.com/gp/product/B000IV5PCY.


I'll be working on the actual artwork last.


Power:
I'm not sure what kind of switch to buy. I've seen a few threads here of people saying to use the smart power strip but I'm going to have read up on the best way to get this accomplished. My goal is single power on switch. I believe the FE's have a power down option. I'm currently using Hyperspin.

Monitor:
The cabinet was designed to hold a 27" CRT tv. I'm contemplating getting an LCD monitor. Maybe without having to rotate the orientation of the monitor. I'm still looking at this. I've already seen how MAME can crop the game display. I might be nice to have some of the bezel artwork displayed if it doesn't cost any resolution.

Speakers
I'm looking at finding some decent but not terribly expensive PC speakers and install them in the yellow areas. (Subwoofer at the bottom) I'll have to find a way to get these pieces cut. I don't have a jig saw.


Coin Door:
There is already a door, it's just not attached at the moment. Once I get the machine able to power up from a single flip of a switch (push of a button?) I'll seal off the front with a coin door. It looks like this might be a pricey facade.

« Last Edit: July 08, 2011, 12:49:43 am by jimfath »
@jimfath

drventure

  • Trade Count: (+2)
  • Full Member
  • ***
  • Offline Offline
  • Posts: 4152
  • Last login:April 23, 2024, 06:53:06 pm
  • Laser Death Ray Bargain Bin! Make me an offer!
Re: My humble MAME Cabinet Revision
« Reply #1 on: July 06, 2011, 10:58:43 pm »
You've got a great cab to start with. I can totally see your planned updates.

For power, I'd get a master control powerstrip and then just extend the PC powerbutton out of the cab somewhere.

Or better yet, drill a hole ALMOST all the way through from the inside, put a magnetic alarm switch in it, then you can just wave a magnet over the area to power up the cab. Look ma, no buttons!

Nephasth

  • Guest
  • Trade Count: (0)
Re: My humble MAME Cabinet Revision
« Reply #2 on: July 06, 2011, 11:01:05 pm »
Or better yet, drill a hole ALMOST all the way through from the inside, put a magnetic alarm switch in it, then you can just wave a magnet over the area to power up the cab. Look ma, no buttons!

AWESOME! :drool

drventure

  • Trade Count: (+2)
  • Full Member
  • ***
  • Offline Offline
  • Posts: 4152
  • Last login:April 23, 2024, 06:53:06 pm
  • Laser Death Ray Bargain Bin! Make me an offer!
Re: My humble MAME Cabinet Revision
« Reply #3 on: July 06, 2011, 11:10:46 pm »
You know, I got this wild hair at one point about a year ago to build a control panel with nothing but joysticks sticking out.

All the buttons would be magnetic or better yet, capacitive touch sensors under the overlay.

In the end, I can't imagine much benefit of the design other than the "slick" factor.

But for a power button, or admin buttons, it could be sweet.

kalars123

  • Trade Count: (+4)
  • Full Member
  • ***
  • Offline Offline
  • Posts: 220
  • Last login:August 09, 2019, 12:31:51 pm
Re: My humble MAME Cabinet Revision
« Reply #4 on: July 07, 2011, 12:08:39 am »
get a smart strip "google it" and use that, then for the power button use an arcade button mounted on the top of your cabinet out of site wire the micro-switch to your mobo and your good to go, when you turn on the computer everything else will power on, that's how i got mine set up, the only thing on the CP is joysticks and buttons, no extra anything.

For the LCD if "and only if" you have the money to spend on it consider a WG 9000 26" replacement LCD it has a beautiful picture and will allow you useing groovymame to run games at the correct refresh rate. However it is very much a luxury item and is not needed.

For the speaker's look into a good set of 2.1 speaks with a remote power/volume switch then you can either decase them or just mount them face down, and use a drill to drill speaker holes through the bottom of your marquee make sure you use a drawn layout first to mark your holes so that it looks good, don't want just a bunch of random holes drilled through.

As for the coin door if you already have a real coin-door then it shouldn't be that bad if you have a fake one you could consider wireing up a couple button's there that act like credit buttons... IE  this GGG button http://groovygamegear.com/webstore/index.php?main_page=product_info&products_id=295&zenid=qhiv2ct11lac4jjlnr6fmonrn4


"Edit" a smart strip has a master outlet and 2-6 slave outlets, basically it cuts all power to the slave outlets when it see's that the master outlet as fallen below as certain electrical draw, and conversely it power's on the slave outlets when the draw on the master outlet increases. so when you wire your computer power switch to the top using a normal arcade button+micro-switch, when you turn on your computer a few seconds later everything else will power on as well, and when you shut down your computer a few seconds later everything else turn's off. It literally is the perfect solution for power management for a Mame cabinet

« Last Edit: July 07, 2011, 12:30:52 am by kalars123 »

jimfath

  • Trade Count: (0)
  • Full Member
  • ***
  • Offline Offline
  • Posts: 173
  • Last login:April 20, 2021, 02:58:31 am
  • IT consultant
Re: My humble MAME Cabinet Revision
« Reply #5 on: July 07, 2011, 04:13:42 am »
Or better yet, drill a hole ALMOST all the way through from the inside, put a magnetic alarm switch in it, then you can just wave a magnet over the area to power up the cab. Look ma, no buttons!

This sounds cool but not for me. I wonder if a degauss gun would work in setting it off or on? You could potentially set it off from across the room with some practice. Keep it in a holster. Maybe someone's playing on your arcade machine, then the computer suddenly shuts down. They turn around and see you standing their pretending to blow smoke out of your degaussing gun like a cowboy.

For the LCD if "and only if" you have the money to spend on it consider a WG 9000 26" replacement LCD it has a beautiful picture and will allow you useing groovymame to run games at the correct refresh rate. However it is very much a luxury item and is not needed.
I'm thinking about it. It's pretty $$$ but would be precisely what I'm looking for and would slave up to the smart power strip with ease. I might have to hold off on that for now. I don't know if Groovymame would work for me. I read that I'd need an ATI card and the PC I use is an Intel build.

For the speaker's look into a good set of 2.1 speaks with a remote power/volume switch then you can either decase them or just mount them face down, and use a drill to drill speaker holes through the bottom of your marquee make sure you use a drawn layout first to mark your holes so that it looks good, don't want just a bunch of random holes drilled through.
This is GREAT. I can easily drill out and/or dremmel any number of patterns. Is this a standard practice? I'd love to see some patterns. I'm not even sure what the search terms for looking this up would be. I'm thinking circular lighting of some sort.

"Edit" a smart strip has a master outlet and 2-6 slave outlets, basically it cuts all power to the slave outlets when it see's that the master outlet as fallen below as certain electrical draw, and conversely it power's on the slave outlets when the draw on the master outlet increases. so when you wire your computer power switch to the top using a normal arcade button+micro-switch, when you turn on your computer a few seconds later everything else will power on as well, and when you shut down your computer a few seconds later everything else turn's off. It literally is the perfect solution for power management for a Mame cabinet
For now I will be using the old CRT television. It looks like it will give me trouble. I've read a few threads about trying to slave up a regular TV and, while it does remember the channel it was on after powering off, it will not stay on by holding down the power button. Maybe I should put the TV in the Master Outlet and use the Remote until I get some $$$ for that LCD.

Thanks for the tips so far.

Another thing I'm contemplating doing is housing some classic controllers within the rig. (NES, Atari, Playstation, etc) I'd make that angled panel below the keyboard tray a swinging drawer where the controllers could live. Maybe they'd have retractable recoiled cords. I'm not sure about this yet. I don't know what having those devices hooked up all the time would do to the bus speed. It would require a USB hub and some serious cable management, which is what I do for a living. 

Wait... are those controllers sacrileg on an arcade machine?
@jimfath

kalars123

  • Trade Count: (+4)
  • Full Member
  • ***
  • Offline Offline
  • Posts: 220
  • Last login:August 09, 2019, 12:31:51 pm
Re: My humble MAME Cabinet Revision
« Reply #6 on: July 07, 2011, 09:57:56 am »
nothing is sacrilege on your arcade machine  :laugh2: it's your's do what you want with it. 

as for the wood speaker grills you could draw that pattern on a piece of paper or any pattern you would like then tape it under your marquee and start drilling, or cut the holes out on the paper and tape it up then mark the holes, then take the paper off and start drilling. I wouldn't exactly say it's common practice most people use a Jig saw and cut out the speaker opening then use a speaker grill to cover, but this method would work just as well in your particular case.

for groovy mame yes you need to have a ATI card, but it supports a very wide range of cards, and you would be able to use it in an intel system as long as you have the correct AGP/PCIE expansion slot, the only time ATI/Nvidia cards come into conflict is when you are wanting to Xfire/SLI them, then you need a mobo specific to that application.

you could use the tv as the master, however you would need to set your computer to power on after power loss, it's a setting in your bios, not all computer's have this option but a very large portion of them do.

jimfath

  • Trade Count: (0)
  • Full Member
  • ***
  • Offline Offline
  • Posts: 173
  • Last login:April 20, 2021, 02:58:31 am
  • IT consultant
Re: My old MAME Cabinet Revision
« Reply #7 on: July 08, 2011, 12:49:22 am »
That looks really cool. I hope to have time next week to start cutting into the wood. I need to get my drill back. It's on loan.

How hard is it to replace hardware in the CP? Are the Joystick, spinner, and trackball housings standard? THey look similar but I'm figuring they are not. I was contemplating replacing my existing buttons with LED's and maybe the joysticks and trackball. Below is a pic of what I found when I opened the control panel.

I can manage reconnecting the wires as is, I'd just like to avoid having to rewire the I-pac and the Optipac. I can't really follow all of it as it's laid out. The number scheme is wrong and the color scheme is ignored. Plus I don't have a lot of experience with it.

 I'm hoping LED's have their own power that I could connect and manage separately. If I did get LED's I'd like to employ the LEDwiz or whatever app lets me mess around with the light scheme. Ideally lighting up during games when in play for certain games and flashing around when the machine is powered on and idle. Is that even done?


Gretl says "hi" by the way.
« Last Edit: July 08, 2011, 01:00:07 am by jimfath »
@jimfath

newmanfamilyvlogs

  • Trade Count: (+1)
  • Full Member
  • ***
  • Offline Offline
  • Posts: 1694
  • Last login:June 15, 2022, 05:20:38 pm
    • forum.arcadecontrols.com/index.php/topic,103584.msg1096585.html#msg1096585
    • Newman Family Vlogs
Re: My old MAME Cabinet Revision
« Reply #8 on: July 08, 2011, 06:29:22 am »
There are some regular consumer LCD panels that will work happily with GroovyMame and run at correct refresh rates. I don't think anyone has hammered down a list yet though.

I've got a Dell 19" LCD that ALMOST does it-- I ran several games on it at native refresh rate and they were smooth with no tearing or judder (eg: the "character scroll" in MK1 was totally smooth), BUT it displayed an "unsupported resolution" warning in the middle of the screen the whole time.  :banghead:

As for running intel graphic vs ATI; the cheapest ATI card you can find will work. I'm using a card that current retails for around $30-40. You could probably ebay or craigslist one cheaper.

jimfath

  • Trade Count: (0)
  • Full Member
  • ***
  • Offline Offline
  • Posts: 173
  • Last login:April 20, 2021, 02:58:31 am
  • IT consultant
Re: My old MAME Cabinet Revision
« Reply #9 on: July 22, 2011, 03:19:13 am »
Update: I ripped out the old wiring. I removed superfluous buttons. I received the first of many test LED buttons but there are some issues with getting them seated in the CP. I also decided on a LCD monitor that fit my needs and was within my price range. So the old TV is on it's way out. The Smart Strip is on it's way along with some new wiring and a new PC switch to power on the PC.

I abandoned plans to drill many speaker holes after reading about some sound quality issues and my wife wants me to make this into a juke box as well so the sound needed to be great. The search for good mountable speakers begins.

Buttons

I removed (11) buttons that I felt I would not need anymore.
(4) buttons (2 pair on each side) wired to the optipac serving as L and R mouse buttons. (utter overkill)

(3) buttons hard wired to a modified remote control that used to run the power and volume on the old 27" tv set. With an LCD on the way it was launched.
(4) 7th action buttons from 1-4 players. I will soon remove (2) more buttons from players 3 and 4 as well. I can't think of a reason to have (6) at all 4 players if they are not playing anything but arcade and older console games.


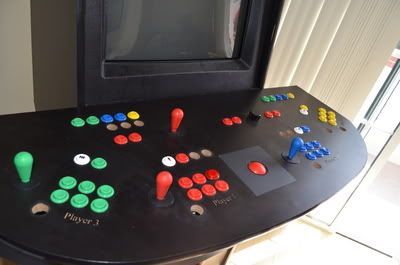
Does a 4-player cab really need all 4 players to have (6) buttons or just players1&2 with (6) and players3&4 with (4) buttons each? I'm not using these controls for anything beyond arcade and early console emulation(NES,Atari, SNES). I'm inclined to think it doesn't. For simple symmetry I can't justify the added expense of extra LED buttons. Not sure if how it will look.

I plan on filling the holes with pieces of wood and wood glue. Towards the end of the project I plan on getting a nice custom overlay to cover it.

There is a row of (10) buttons at the top that I never actually used. They were wired into button #8 on the ipac. I'm not sure how many extra buttons I'm going to need with Hyperspin running the machine. What's buttons will I need besides Esc?

In removing the buttons, I noticed that the holes might not be exactly 1⅛". It took a considerable amount of force to remove them and many of the threads appeared to be smashed.


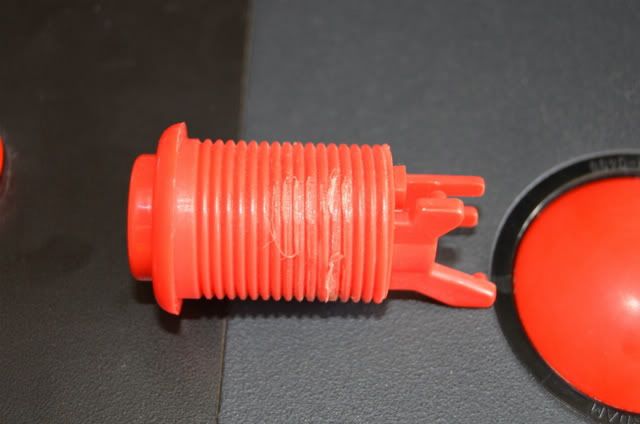
I received a new test LED button from Paradise arcade. It's not wired but I wanted to see how it felt next to my Happs. I have a used Ultralux on order as well. I'm hoping to test some Electric ICe and Nova gems as, based on what I've seen, I am interested in them the most. They appear to have been sold out for a while now.


As you can see, the button doesn't quite fit into the slot. I am not going to smash these in there. I'm going to try redrilling these holes with a basic set of hole saw drill bits that are on order. I'm using them to make make speaker and power button holes in the cab. The set does have a 1⅛" bit. I'm hoping it's as simple as running that bit slowly and evenly through the existing holes edge. Worst case I get a new control top. I'd like to avoid that though. $$$

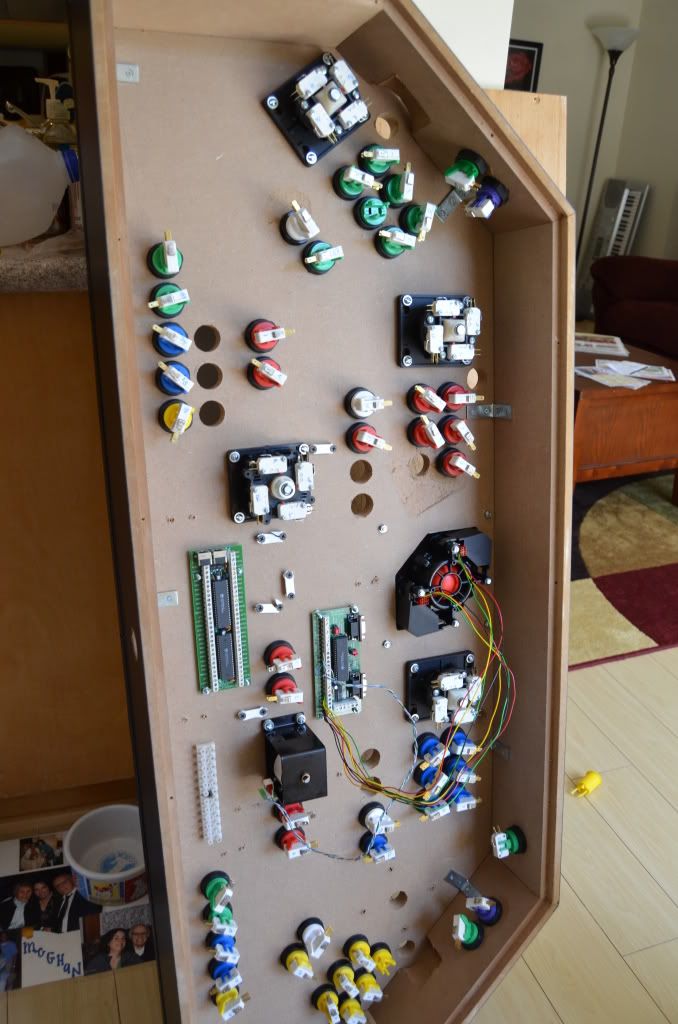
Here is the inside all cleaned out. There is a superficial gouge under player 1's buttons. It was there originally and never affected game play or how the buttons sat.


LCD monitor
After a lengthy search and this reading this thread http://forum.arcadecontrols.com/index.php?topic=112940.0
I settled on a Hanns G that was sale on Newegg.com.

It's widescreen dimensions allow for some of the Bezel artwork to be displayed. After working on the computer on a 23" lcd I found it incredibly hard to work on it looking at a 27"  crt television set.

1080P support, 1920x1200 panel, which is 16:10.  It is also 27.5". 
« Last Edit: July 22, 2011, 03:47:17 am by jimfath »
@jimfath

Donkbaca

  • Our reptillian overlords would be pleased
  • Trade Count: (+1)
  • Full Member
  • ***
  • Offline Offline
  • Posts: 2648
  • Last login:May 09, 2012, 06:28:10 pm
    • Slim built MAME/Xbox cab
Re: My old MAME Cabinet Revision
« Reply #10 on: July 22, 2011, 02:27:42 pm »
Wow, someone finally decides to actually get all the buttons and test them!  Tell us what you think.  I have the paradise arcade buttons, but I have the chrome bezels on them.

Don't use the hole saw, get a file and grind out the holes to make them larger.  I bought a chisel set at Home Depot/lows that had rounded files to file out holes.  It doesn't look like you have to go that much larger...

drventure

  • Trade Count: (+2)
  • Full Member
  • ***
  • Offline Offline
  • Posts: 4152
  • Last login:April 23, 2024, 06:53:06 pm
  • Laser Death Ray Bargain Bin! Make me an offer!
Re: My old MAME Cabinet Revision
« Reply #11 on: July 22, 2011, 02:46:53 pm »
+1 on donkabaca's hole saw comment, That'll be hell getting to to cut right.

One other possibility is to put together a quick router template and use a router to trim out the holes, but really, a file might be quicker and easier.

TopJimmyCooks

  • Trade Count: (+1)
  • Full Member
  • ***
  • Offline Offline
  • Posts: 2097
  • Last login:March 26, 2024, 01:18:39 pm
Re: My old MAME Cabinet Revision
« Reply #12 on: July 22, 2011, 03:48:44 pm »
suggest Dremel rotary tool or even a corded power drill, with a drum sander attachment. 

http://www.dremel.com/en-us/Accessories/Pages/ProductDetail.aspx?pid=438

or similar.  You won't have to take much off.  you can get a dremel knockoff and some attachments at harbor freight for cheeeeeep.

jimfath

  • Trade Count: (0)
  • Full Member
  • ***
  • Offline Offline
  • Posts: 173
  • Last login:April 20, 2021, 02:58:31 am
  • IT consultant
Re: My old MAME Cabinet Revision
« Reply #13 on: July 22, 2011, 04:03:08 pm »
suggest Dremel rotary tool or even a corded power drill, with a drum sander attachment. 

http://www.dremel.com/en-us/Accessories/Pages/ProductDetail.aspx?pid=438

or similar.  You won't have to take much off.  you can get a dremel knockoff and some attachments at harbor freight for cheeeeeep.

Perfect, I actually have an old dremel. I'm 95% sure I have a sander bit that came with it.  I don't have a router otherwise that would have been ideal with a template. I'm not real woodsy.

I just found out about Harbor Freight this week. There is one in the Valley about 20 minutes from where I live.
@jimfath

Donkbaca

  • Our reptillian overlords would be pleased
  • Trade Count: (+1)
  • Full Member
  • ***
  • Offline Offline
  • Posts: 2648
  • Last login:May 09, 2012, 06:28:10 pm
    • Slim built MAME/Xbox cab
Re: My old MAME Cabinet Revision
« Reply #14 on: July 22, 2011, 04:46:09 pm »
Dremel with sander drum, probably best bet!

jimfath

  • Trade Count: (0)
  • Full Member
  • ***
  • Offline Offline
  • Posts: 173
  • Last login:April 20, 2021, 02:58:31 am
  • IT consultant
Re: My old MAME Cabinet Revision
« Reply #15 on: August 10, 2011, 03:36:16 am »
I just got back from a 3 week trip. Weeee...


Monitor arrived. It almost sits perfectly with the old Bezel over it. I'll have some time on Friday to snap some pictures.


Still waiting on GGG to make Novagems and Electric Ice buttons available. Anyone know if these buttons are holy grail as far as availability? I only started researching and looking for LED buttons in June and I have no expectations as far as turn around time as I don't order parts with any regularity.

I'm going to use 24 LED buttons. (6) for players 1&2 (4) for players 3&4 and (4) for the spinner and 4 way controller.

I started sanding out the holes with a dremel to make way for the Ultralux and Paradise LED buttons I currently have to test. I'm going to have to figure out a way to power them without their proprietary harness.

I intend to add new joysticks to the list. I'm leaning towards GGG's Leaf Pro joystick. The Happ one's I currently have make a lot of noise and do that annoying thing where they spring back into place with a lot of noise if you let one of them go. I'm also thinking I might unload the Happ 4 way controller for a top firing flight stick a la Tron or something similar.

If I do end up with GGG electric Ice buttons I plan on upgrading my 3" ball to the EI RGB ball. The upgrade kit is $36.

An artist friend of mine offered to design my speaker hole cover. I was about to use a hole saw and drill a (2) 4" holes. I'll take a stab at letting him design something cool looking and see if I can pull it off. Worse case, it looks like hell and I just cut it out all together.

« Last Edit: August 10, 2011, 03:43:34 am by jimfath »
@jimfath

jimfath

  • Trade Count: (0)
  • Full Member
  • ***
  • Offline Offline
  • Posts: 173
  • Last login:April 20, 2021, 02:58:31 am
  • IT consultant
Re: My old MAME Cabinet Revision
« Reply #16 on: August 15, 2011, 02:49:40 am »
This weekend I removed the rest of the buttons from the CP.

Still waiting on GGG LED buttons to become available again. (Novagems and EI2)  It's just a matter of time until they are. I've gotten a few friendly emails from Randy in that regard. (Thanks Randy)

I'll order a Classx LED button from them as well though I don't believe I want the flat competition styled buttons after trying out the Ultralux and a Red Convex LED button from PA. (just based on feel and tension)  I'm just "all in" for testing the major LED buttons and making a nice, albeit subjective, side by side video showing the buttons in action. (Ultralux, Classx, Illuminated translucent IL buttons from PA, Electric Ice, Nova Gem, and their convex LED button)

Here is my plan for the CP.


The measurements are not EXACT but this is the general idea. That's a drink holder on the left and a flight stick on the right. I've seen fairly inexpensive poker table chrome drink holder inserts in many many colors. Should be a snap to install. I might move the flight stick towards the center and add a 2nd drink holder to the right of it. I used to have a 4 way controller that I almost never used. I've omitted it from the plan but could easily add it back. I just never used it. I also never reached the kill screen on Donkey Kong so maybe I should put it back.

I'm not sure how many system buttons I'll need on the CP. I used to use mame 32 and just used the keyboard. Now I'm hoping to use hyperspin and run it off the CP as much as possible. Anyone know what a good number of buttons on the control panel for the OS is? I'll need one for the Esc key and the Enter ket but what else? Volume?

With all I want to change and the amount of work it will take to fill in the old holes I'm considering making a new CP (top) Additionally, the mdf as lots of cracks in it. The buttons were too small for the holes drilled and I believe the stress of, I'm assuming malleting them in, left cracks and more than a few breaks. Notably one over the Player 1 buttons area. OR it could be the mdf swelled after some time.


I might even make a new cab all together and sell this one. The new LED monitor saves SO much space I should charge rent for the empty space left over. I've been looking through the wood working section and I might invest in a router and some tools if I am brave enough to try. THis is all your fault guys! I was just interested in getting new LED buttons. All your fault for being so amazing and inspiring.

In my query I found this groovy thread about MDF vs Plywood. http://forum.arcadecontrols.com/index.php?topic=102064.0 Having moved this existing MDF cabinet 3 times in 3 different states I'm leaning towards plywood since it's much lighter and I already know I'll be moving in January.


Ultralux, Paradise, HAPP
+1 for the Dremel Idea.  I got my old Demel and, using the sander bit, made the holes wide enough to fit the Ultralux and the PA LED button. I have it along side my old HAPP button. I'll wire them all once I have the remaining buttons installed.


HAPP
Paradise
Ultralux


I'm already doodling new cab profiles. You guys did this to me!


Going on ebay at some point.


« Last Edit: August 15, 2011, 04:00:42 am by jimfath »
@jimfath

BurgerKingDiamond

  • Trade Count: (+4)
  • Full Member
  • ***
  • Offline Offline
  • Posts: 690
  • Last login:July 01, 2021, 11:12:14 am
Re: My old MAME Cabinet Revision
« Reply #17 on: August 17, 2011, 03:24:00 pm »
CRT > LCD
-Welcome to the Fantasy Zone.

jimfath

  • Trade Count: (0)
  • Full Member
  • ***
  • Offline Offline
  • Posts: 173
  • Last login:April 20, 2021, 02:58:31 am
  • IT consultant
Re: My old MAME Cabinet Revision
« Reply #18 on: August 17, 2011, 03:37:21 pm »
CRT > LCD

You bring up a lot of good points.  ;)

My decision to jump from a TV to LCD was based on a lot things. Cab space for one. I'm making plans to shrink the cabinet as my newest apartment is considerably smaller than my 3 previous where the cab resided. Staring at a 27" cathode gun for hours on end wasn't great for my eyes. Power consumption is less. And I was wanting to add newer games and newer platforms (Juke box for the wife) that simply looks a lot better on an LCD. Old school games do suffer. I agree that CRT's are truer and I will miss that aspect.

I am planning on borrowing some wood working tools from a contracting buddy when he is on vacation and I can use them for a week or so.
@jimfath