Main Restorations Software Audio/Jukebox/MP3 Everything Else Buy/Sell/Trade
Project Announcements Monitor/Video GroovyMAME Merit/JVL Touchscreen Meet Up Retail Vendors
Driving & Racing Woodworking Software Support Forums Consoles Project Arcade Reviews
Automated Projects Artwork Frontend Support Forums Pinball Forum Discussion Old Boards
Raspberry Pi & Dev Board controls.dat Linux Miscellaneous Arcade Wiki Discussion Old Archives
Lightguns Arcade1Up Try the site in https mode Site News

Unread posts | New Replies | Recent posts | Rules | Chatroom | Wiki | File Repository | RSS | Submit news


Author Topic: Simpsons restoration  (Read 9643 times)

0 Members and 1 Guest are viewing this topic.

SuperGunGuru

  • Trade Count: (0)
  • Full Member
  • ***
  • Offline Offline
  • Posts: 204
  • Last login:December 10, 2021, 08:14:53 pm
  • Filling up that basement
Simpsons restoration
« on: August 12, 2009, 12:57:57 pm »
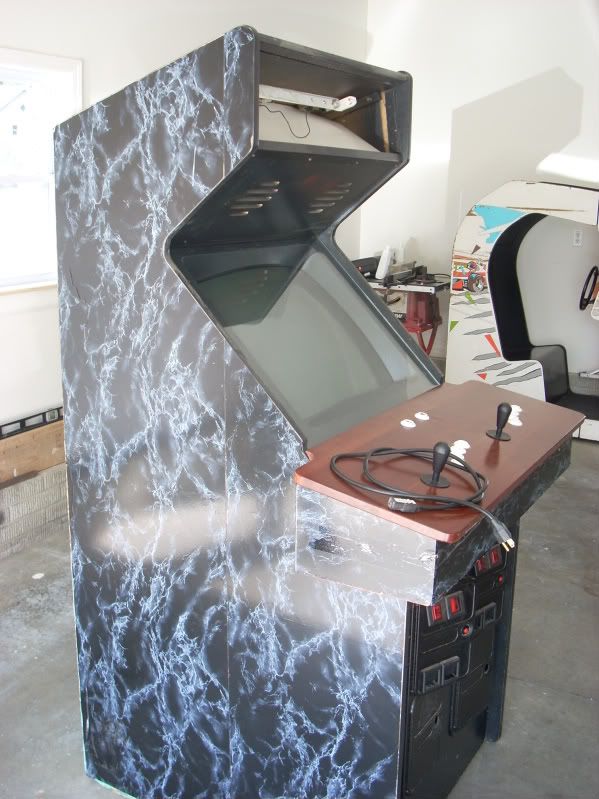
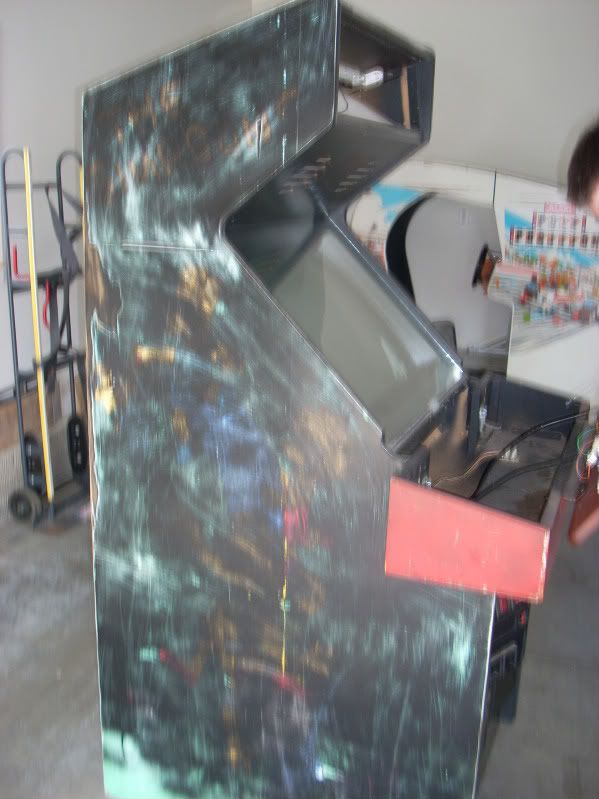
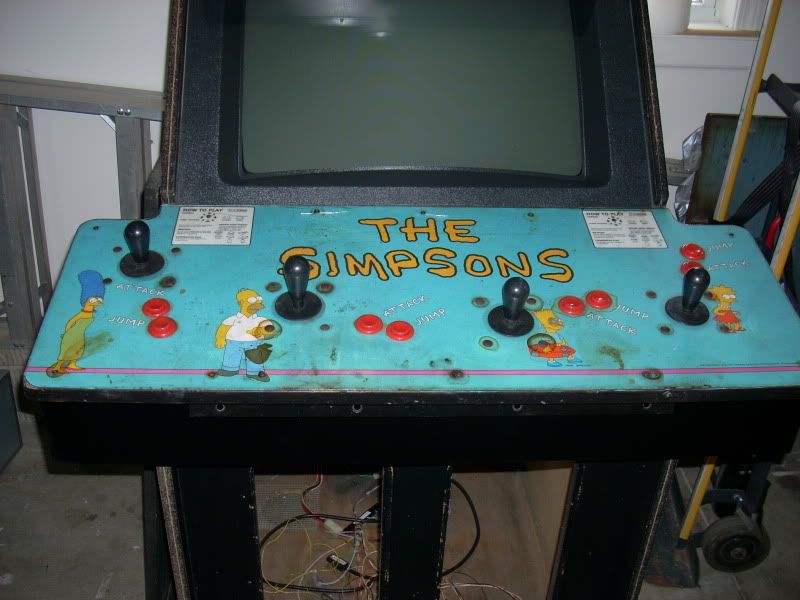
Well, I've posted this at KLOV but wanted to share here as others here have restored some of these "new classics." Anyway, last month I picked up a Simpsons cab that had been converted to a Neo Geo single slot system. The owner had done a really nice job cutting a new control panel out of cherry wood. The sides were covered with marble contact paper and prior to that the cabinet was painted black. The seller said the Simpsons artworkw as still under there, but as far as its condition that was unknown. The first major blow to my hopes of uncovering the art was finding a very large chunk of it missing on the right side.  :angry: 
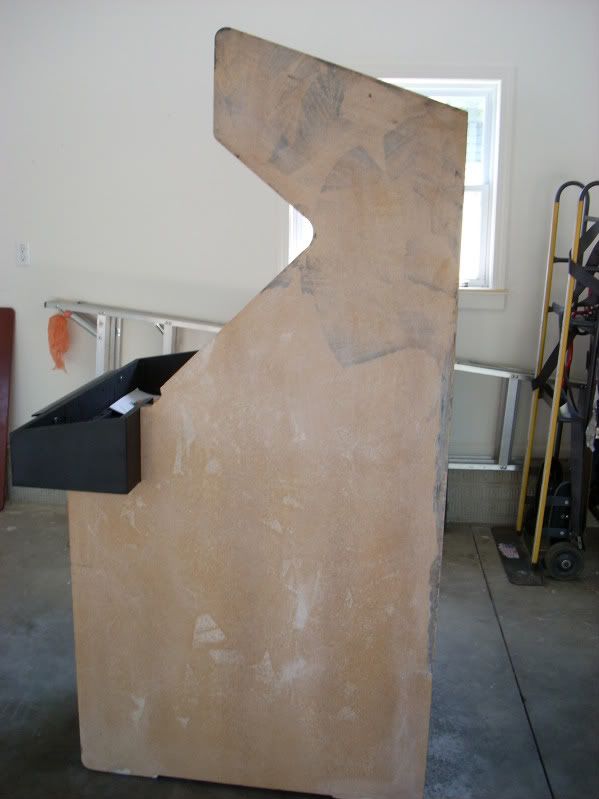
At that point I was pretty certain I'd just remove all of it and go with some replacement art, but I figured I'd try my hand at removing the black paint with Citri Strip. Unfortunately the black paint had been sanded by someone (either to prep for the marble paper or maybe an attempt to uncover the Simpsons artowrk?) and it damaged the artwork which allowed the Citri Strip to seep under the artwork and bubble it up. Not a huge deal considering the art was beat up regardless of how well the paint may have come off. At that point, with the help of my buddy and fellow collector Josh, we began a full no restoration of this Simpsons. Those first few days we got a lot of work done and here's what we've done up to this point

Stripped the remains of the side art, patched up the cab and sanded it

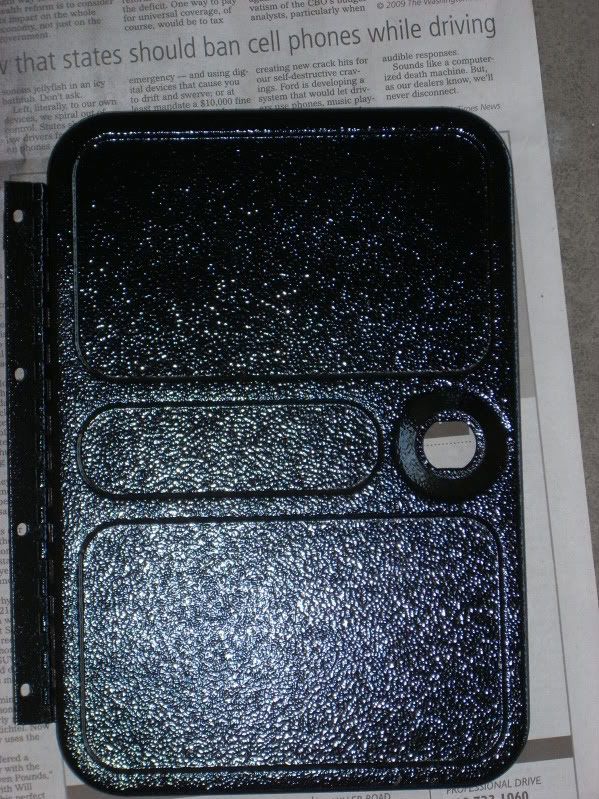
Stripped, patched holes, and repained the control panel box (it had been sprayed red with horrible looking runs)

Patched up and repainted the back door

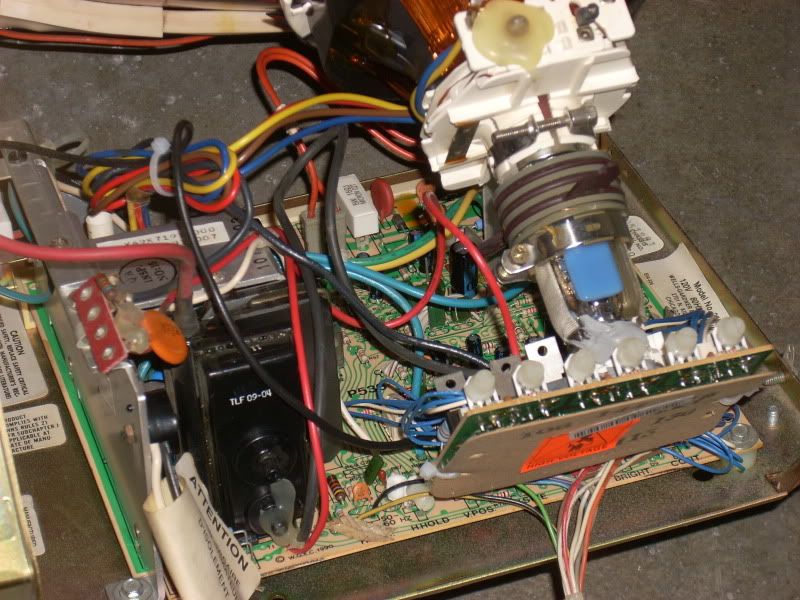
Remove and clean up the original Peter Chow UPS11 style power supply. It's working fine, but I may replace it anyway

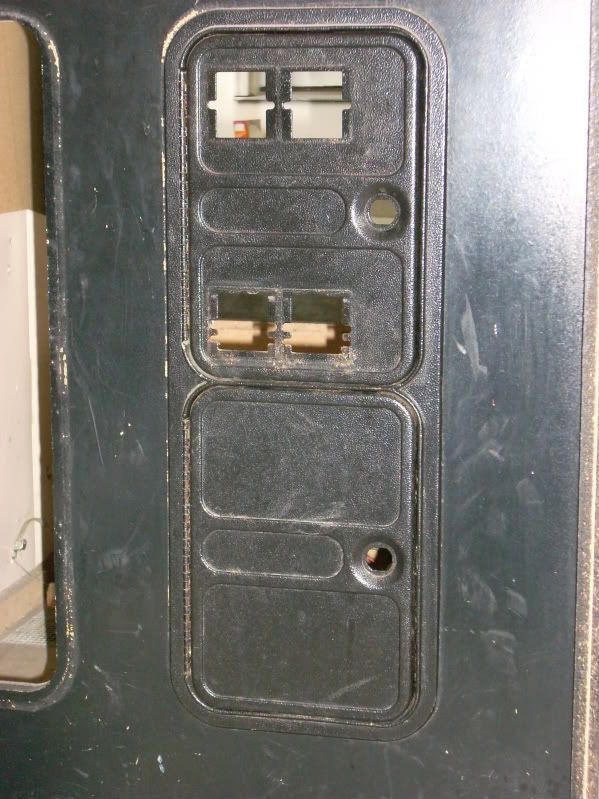
Repaint coin doors and polish all the metal pieces

Patch up and repaint back portion of cabinet

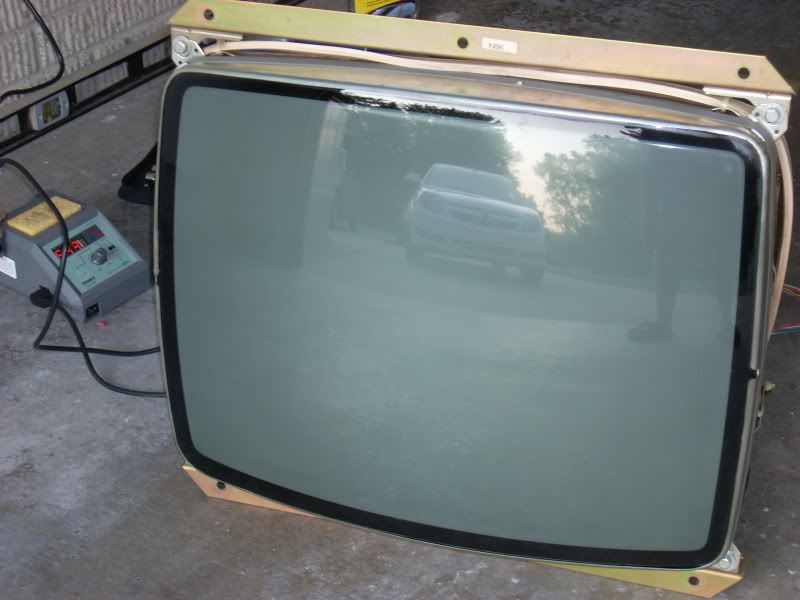
Clean monitor chassis, tube, and install a cap kit

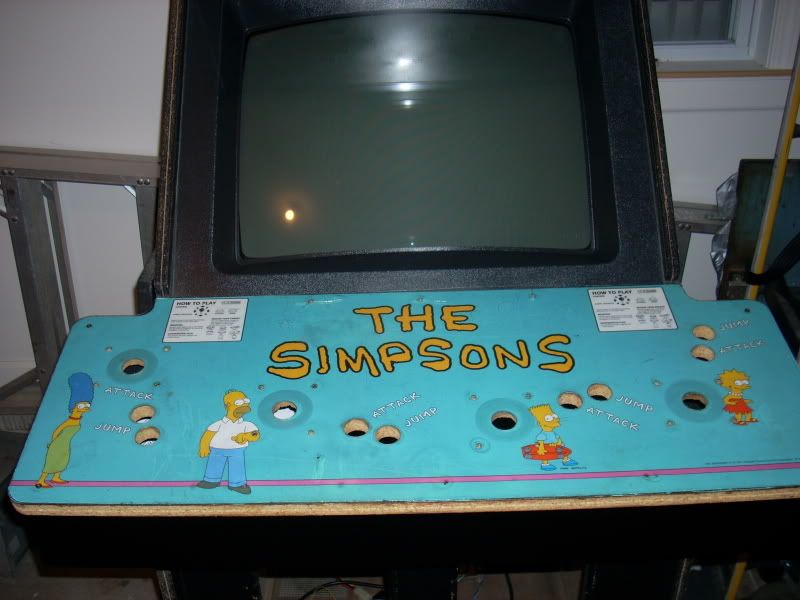
Purchase and then disassemble control panel for cleaning. I'll be installing new buttons and sticks and I'll have to fix a few of the ground braids

General cleaning of the cabinet

Replacement of various bolts and screws with brand new

Repaint control panel hinge and marquee bracket

Begin re-wiring of the JAMMA harness

Phew that's quite a bit of progress so far. Right now I'm trying to touch up the front panel of the cabinet and struggling to get it to look right. I've rattle canned 4 coats of semi-gloss black on and sanded between coats, but I'm having trouble getting a consistent look to it. I'm probably going to try one more coat and then abandon the rattle can in favor a foam roller. Cosmetics have never been my strong suit and this is really the first time I'm going for an all out restore so i want it to look right. If anyone has any tips or advice for painting the front, I'd appreciate it. Here's a few pics.


SuperGunGuru

  • Trade Count: (0)
  • Full Member
  • ***
  • Offline Offline
  • Posts: 204
  • Last login:December 10, 2021, 08:14:53 pm
  • Filling up that basement
Re: Simpsons restoration
« Reply #1 on: August 12, 2009, 09:35:50 pm »
A fifth coat of paint on the front and I'm pretty happy with it. There are a few light streaks near the top, but they aren't horribly obvious. If it truly takes 24 hours for this stuff to fully fry (not just dry to the touch) maybe I'll get lucky and it will even out some more. Overall though it's pretty decent for a rattle can and very smooth too.

« Last Edit: August 19, 2009, 02:02:15 pm by SuperGunGuru »

ZORK2

  • Trade Count: (+1)
  • Full Member
  • ***
  • Offline Offline
  • Posts: 256
  • Last login:May 22, 2010, 11:45:04 pm
Re: Simpsons restoration
« Reply #2 on: August 13, 2009, 09:15:19 pm »
Nice work so far man!
I restored a Simpsons this past spring! It turned out great! You can probably find it on this board if you do a little looking for it. If ya got any question or I can help you with anything, PM me anytime!


SuperGunGuru

  • Trade Count: (0)
  • Full Member
  • ***
  • Offline Offline
  • Posts: 204
  • Last login:December 10, 2021, 08:14:53 pm
  • Filling up that basement
Re: Simpsons restoration
« Reply #3 on: August 14, 2009, 09:34:29 am »
Nice work so far man!
I restored a Simpsons this past spring! It turned out great! You can probably find it on this board if you do a little looking for it. If ya got any question or I can help you with anything, PM me anytime!


Thanks! I've actually viewed your Simpsons resto thread many times. :) It turned out very nice and was the main reason I decided that the mamemarquees sideart would work. Being that mine was not able to be saved, it's pretty much my only choice anyway.

SuperGunGuru

  • Trade Count: (0)
  • Full Member
  • ***
  • Offline Offline
  • Posts: 204
  • Last login:December 10, 2021, 08:14:53 pm
  • Filling up that basement
Re: Simpsons restoration
« Reply #4 on: August 19, 2009, 02:01:08 pm »
Bump for an update!

With the painting completed, I put the coin doors and coin vaults back on to the cabinet. My buddy stopped by with some new locks for me last Saturday and then the game was moved inside on Sunday. I purchased new bolts for the control panel hinge and the joysticks and since my large order with Bob arrived today, I decided to mount the joysticks and buttons in place in preparation for finishing the wiring. I still need to replace the cp plexi, but I couldn't resist seeing how things would look.


SuperGunGuru

  • Trade Count: (0)
  • Full Member
  • ***
  • Offline Offline
  • Posts: 204
  • Last login:December 10, 2021, 08:14:53 pm
  • Filling up that basement
Re: Simpsons restoration
« Reply #5 on: August 23, 2009, 10:57:15 pm »
Hours of work between myself and Josh brings the biggest progress yet to the cabinet. We spent hours and hours crimping wires and re-wiring most of the cabinet. I think our work looks pretty damn good as well as nice and neat. Using my 6 player X-Men as a reference on how Konami did some things, we got it figured out very well. We did have a setback near the end with the JAMMA harness housing not wanting to hold a 5 volt pin in place. A little piece of plastic that grips the barb on the JAMMA pins had broken off and it happened on another one too. We decided to transfer all the wiring to another spare housing. After that it was a matter of hooking up the coin doors and 99% of the wiring is done. The game still needs its test button mounted to one of the coin vaults and the coin counters. Of course with the game ready to play, we had to test it out just to make sure everything works. As expected, player 2's coin input is stuck closed according to the test menu. I think it's a funky resistor pack that will need to be changed to fix that, which is no biggie, but I may have to find a junk Konami board to get it. Also the convergence is still a bit off on the right side of the screen, but we were able to bring the reds more in line horizontally than they were upon first testing the game. At this point it's mostly cosmetics (t-molding, marquee, and side art) to be done. I'd like to get the convergence tweaked a bit more also, but the monitor still has a very nice picture.


« Last Edit: August 23, 2009, 10:59:46 pm by SuperGunGuru »

DeLuSioNal29

  • Global Moderator
  • Trade Count: (+6)
  • Full Member
  • *****
  • Offline Offline
  • Posts: 4779
  • Last login:June 08, 2025, 06:02:40 pm
  • Build the impossible -"There is no Spoon"
    • DeLuSioNaL's YouTube Videos
Re: Simpsons restoration
« Reply #6 on: August 25, 2009, 03:09:00 pm »
I have a spare non-working 6 player X-men board you can use for the resistor pack if you want.

I bought is as a spare for parts, but my other X-men board is functioning perfectly so I haven't used it yet.

DeLuSioNaL29
Stop by my Youtube channel and leave a comment:

SuperGunGuru

  • Trade Count: (0)
  • Full Member
  • ***
  • Offline Offline
  • Posts: 204
  • Last login:December 10, 2021, 08:14:53 pm
  • Filling up that basement
Re: Simpsons restoration
« Reply #7 on: September 01, 2009, 06:35:23 pm »
I have a spare non-working 6 player X-men board you can use for the resistor pack if you want.

I bought is as a spare for parts, but my other X-men board is functioning perfectly so I haven't used it yet.

DeLuSioNaL29
That would be very cool. I suppose I could steal one off my 2 non-working X-Men sets also, but I hate to take one from a somewhat functioning pcb. How's your 6 player coming? I didn't mean to drop off the face of the earth  when I talked about taking pictures of the CP. I did try to take a few but the flash always made them not turn out and I don't have a scanner that could scan the cp either. :(

DeLuSioNal29

  • Global Moderator
  • Trade Count: (+6)
  • Full Member
  • *****
  • Offline Offline
  • Posts: 4779
  • Last login:June 08, 2025, 06:02:40 pm
  • Build the impossible -"There is no Spoon"
    • DeLuSioNaL's YouTube Videos
Re: Simpsons restoration
« Reply #8 on: September 01, 2009, 07:12:46 pm »
I'm finally getting back into the swing of things and I plan to get cracking on that X-player cab again soon.  I may need your help with getting some pics of the wiring inside from your machine.  Mine is in shambles, although I've learned a great deal about Jamma machines since I last tinkered with the X-men machine.

Send me a PM and I can mail you the board.  The Sound chip is cracked and I am getting an error on the board for one of the chips.  I can swap it out with one of my Jamma boards and take a pic of the error if that helps.

D
Stop by my Youtube channel and leave a comment:

SuperGunGuru

  • Trade Count: (0)
  • Full Member
  • ***
  • Offline Offline
  • Posts: 204
  • Last login:December 10, 2021, 08:14:53 pm
  • Filling up that basement
Re: Simpsons restoration
« Reply #9 on: September 01, 2009, 08:34:03 pm »
Let me know what pics or info you need about the 6 player wiring. Mine is mostly original except for the power supply has been changed over to the earlier model style power supply as opposed to the original UPS11 computer style supply. Other than that it's pretty original.

DeLuSioNal29

  • Global Moderator
  • Trade Count: (+6)
  • Full Member
  • *****
  • Offline Offline
  • Posts: 4779
  • Last login:June 08, 2025, 06:02:40 pm
  • Build the impossible -"There is no Spoon"
    • DeLuSioNaL's YouTube Videos
Re: Simpsons restoration
« Reply #10 on: September 02, 2009, 02:09:30 am »
Here's a pic of the error I get on the 6 player X-men board I am sending you.  There is also a crack in the sound chip.  Again, I had it for spare parts.

PM me with your mailing address.

DeLuSioNaL


Stop by my Youtube channel and leave a comment:

SuperGunGuru

  • Trade Count: (0)
  • Full Member
  • ***
  • Offline Offline
  • Posts: 204
  • Last login:December 10, 2021, 08:14:53 pm
  • Filling up that basement
Re: Simpsons restoration
« Reply #11 on: October 04, 2009, 06:57:40 pm »
Okay so finally an update after a month.  :dizzy: The player 2 coin input being stuck closed turned out to be a shorted IC at U21. I had to wait for MCM to get more in stock and then send me the chip. My buddy helped me replace it and now we can play as Homer. Woohoo! Also a big thanks to Delusional again for sending me that 6 player X-Men board. I could have taken the chip off there, but I decided to just get a new one instead of heating an already old chip twice to remove it and re-install. I need to drop that board in the mail this week when I ship another board out from an eBay sale.


SirPeale

  • Green Mountain Man
  • Global Moderator
  • Trade Count: (+23)
  • Full Member
  • *****
  • Offline Offline
  • Posts: 12963
  • Last login:August 04, 2023, 09:51:57 am
  • Arcade Repair in New England
    • Arcade Game and Other Coin-Op Projects
Re: Simpsons restoration
« Reply #12 on: October 04, 2009, 07:00:45 pm »
What do you mean, "heat the chip twice"?  You of course installed a socket in there, right?  :)

SuperGunGuru

  • Trade Count: (0)
  • Full Member
  • ***
  • Offline Offline
  • Posts: 204
  • Last login:December 10, 2021, 08:14:53 pm
  • Filling up that basement
Re: Simpsons restoration
« Reply #13 on: October 04, 2009, 07:14:51 pm »
What do you mean, "heat the chip twice"?  You of course installed a socket in there, right?  :)
The thought had crossed my mind but I guess I forgot about doing it. As long as this chip lasts it won't be a huge deal.

DeLuSioNal29

  • Global Moderator
  • Trade Count: (+6)
  • Full Member
  • *****
  • Offline Offline
  • Posts: 4779
  • Last login:June 08, 2025, 06:02:40 pm
  • Build the impossible -"There is no Spoon"
    • DeLuSioNaL's YouTube Videos
Re: Simpsons restoration
« Reply #14 on: October 04, 2009, 08:35:57 pm »
Glad to hear it!  Success!  Awesome.

Can't wait to see everything once it's all working!

DeLuSioNaL29
Stop by my Youtube channel and leave a comment:

gdilly

  • Trade Count: (0)
  • Full Member
  • ***
  • Offline Offline
  • Posts: 47
  • Last login:April 03, 2025, 01:27:12 pm
  • www.gdilly.com
    • Arcade Ramrod - www.gdilly.com
Re: Simpsons restoration
« Reply #15 on: February 10, 2010, 12:54:09 pm »
I have a simpsons cabinet that I bought off an arcade dealer.  They had previously converted it to many other cabinets.  I'm looking to get it back into its former glory, but it is missing all the t-molding.  What size t-molding does this cabinet use?
Chuck Norris was originally in Street Fighter II, but was removed by Beta Testers because every button caused him to do a roundhouse kick. When asked about this "glitch," Norris replied "What Glitch?"

SuperGunGuru

  • Trade Count: (0)
  • Full Member
  • ***
  • Offline Offline
  • Posts: 204
  • Last login:December 10, 2021, 08:14:53 pm
  • Filling up that basement
Re: Simpsons restoration
« Reply #16 on: April 25, 2010, 09:18:39 am »
A quick bump to this thread to share the final product. It's been a long time since I updated this, but the cab actually sat for a few months before I finally got the side art installed which was the last major hurdle.  Thanks again to DeLuSioNal29  for sending me that X-Men board for the part I was looking for. Enjoy!


SuperGunGuru

  • Trade Count: (0)
  • Full Member
  • ***
  • Offline Offline
  • Posts: 204
  • Last login:December 10, 2021, 08:14:53 pm
  • Filling up that basement
Re: Simpsons restoration
« Reply #17 on: April 25, 2010, 09:20:31 am »
I have a simpsons cabinet that I bought off an arcade dealer.  They had previously converted it to many other cabinets.  I'm looking to get it back into its former glory, but it is missing all the t-molding.  What size t-molding does this cabinet use?
It just uses standard 3/4" wide t-molding. Black is actually the factory color but I saw few cabs where people installed yellow so I decided to go with that instead.

opt2not

  • Trade Count: (+15)
  • Full Member
  • ***
  • Offline Offline
  • Posts: 6173
  • Last login:April 02, 2024, 07:42:30 pm
Re: Simpsons restoration
« Reply #18 on: April 25, 2010, 02:44:39 pm »
Very nice! Good choice on the yellow, I think it looks better than the black.

Great resto overall.  :applaud:

DarkKobold

  • Trade Count: (0)
  • Full Member
  • ***
  • Offline Offline
  • Posts: 1040
  • Last login:June 18, 2013, 11:31:23 pm
Re: Simpsons restoration
« Reply #19 on: April 26, 2010, 06:05:32 pm »
Holy ---steaming pile of meadow muffin---, B, that is awesome.  Strange, I just logged in here for the first time in... 3 years? And you finish that cab?
-------------------------------------
My games: Tapper, Asteroids, Cocktail-MAME, Tron, ROTJ, Tempest, Star Wars (not working)
My wants: Warlords Cocktail

ZORK2

  • Trade Count: (+1)
  • Full Member
  • ***
  • Offline Offline
  • Posts: 256
  • Last login:May 22, 2010, 11:45:04 pm
Re: Simpsons restoration
« Reply #20 on: May 02, 2010, 07:01:33 pm »
Hey nice Job!
Looks as nice as the one I did last year about this time!
I put yellow T moldiong on mine too. Really hi-lights the cabinate I think! Nice work!

SuperGunGuru

  • Trade Count: (0)
  • Full Member
  • ***
  • Offline Offline
  • Posts: 204
  • Last login:December 10, 2021, 08:14:53 pm
  • Filling up that basement
Re: Simpsons restoration
« Reply #21 on: May 03, 2010, 09:16:31 pm »
Hey nice Job!
Looks as nice as the one I did last year about this time!
I put yellow T moldiong on mine too. Really hi-lights the cabinate I think! Nice work!

Thanks! I read through your resto thread numerous times and you did a great job with yours also. The yellow t-molding does look great on it. Too bad they originally used just plain old black, but this is one of those changes you can make that improve a game.

 I had never applied side art this large before but I think it turned out great overall. If I had it to do over again, I would have been even more picky about my cabinet prep. This was my first full blown restoration attempt and like I said I'm happy with it.
« Last Edit: May 03, 2010, 09:18:38 pm by SuperGunGuru »

tinsley

  • Trade Count: (0)
  • Full Member
  • ***
  • Offline Offline
  • Posts: 13
  • Last login:August 04, 2016, 11:59:17 am
Re: Simpsons restoration
« Reply #22 on: May 04, 2010, 12:30:15 pm »
nice job. i almost picked up a simpsons cab yesterday.  needed a lot of work though...

ZORK2

  • Trade Count: (+1)
  • Full Member
  • ***
  • Offline Offline
  • Posts: 256
  • Last login:May 22, 2010, 11:45:04 pm
Re: Simpsons restoration
« Reply #23 on: May 06, 2010, 09:48:35 pm »
Looks like you did a nice job applying that side art!
I'm curious,  how you cut it to fit? I had a pickle of a time getting mine to all fit on there correctly. I ended up having to make a couple cuts. It ended up turning out really nice, but it was a major pain. I think I cronicaled it in my thread.
Can you please describe your process? Just to help out the nexy guy that attempts this one! :)
Plus I am REALLY curious as to how your did it!

SuperGunGuru

  • Trade Count: (0)
  • Full Member
  • ***
  • Offline Offline
  • Posts: 204
  • Last login:December 10, 2021, 08:14:53 pm
  • Filling up that basement
Re: Simpsons restoration
« Reply #24 on: May 07, 2010, 01:11:57 pm »
Looks like you did a nice job applying that side art!
I'm curious,  how you cut it to fit? I had a pickle of a time getting mine to all fit on there correctly. I ended up having to make a couple cuts. It ended up turning out really nice, but it was a major pain. I think I cronicaled it in my thread.
Can you please describe your process? Just to help out the nexy guy that attempts this one! :)
Plus I am REALLY curious as to how your did it!

I ended up having to cut mine to separate the logo from the rest of the art because it wouldn't all fit on the cabinet. What I did was measure 18" down from the top and cut a line across the art with my exacto knife at that point. After that I was able to get it  all to fit. One main difference for me was I used the art file on localarcade.com and had mamemarquees print that instead of what they already had. I think the size of the characters on their scan is a little small so I went with the localarcade.com version. I think if the Simpsons logo was moved over to be more in line with Maggie then it would have all fit. Cutting it did make it easier to apply overall.