Main Restorations Software Audio/Jukebox/MP3 Everything Else Buy/Sell/Trade
Project Announcements Monitor/Video GroovyMAME Merit/JVL Touchscreen Meet Up Retail Vendors
Driving & Racing Woodworking Software Support Forums Consoles Project Arcade Reviews
Automated Projects Artwork Frontend Support Forums Pinball Forum Discussion Old Boards
Raspberry Pi & Dev Board controls.dat Linux Miscellaneous Arcade Wiki Discussion Old Archives
Lightguns Arcade1Up Try the site in https mode Site News

Unread posts | New Replies | Recent posts | Rules | Chatroom | Wiki | File Repository | RSS | Submit news


Author Topic: Ultimarc Servostik undermounting  (Read 5723 times)

0 Members and 1 Guest are viewing this topic.

giantsean

  • Trade Count: (0)
  • Full Member
  • ***
  • Offline Offline
  • Posts: 18
  • Last login:January 24, 2022, 12:14:40 am
  • I want to build my own arcade controls!
Ultimarc Servostik undermounting
« on: August 29, 2021, 02:56:45 pm »
Hey all,

Have been picking away at my converting an old Global VR PGA cabinet to MAME.  I am using the original 3/4" (or maybe 18mm) CP and modding.  I decided on Ultimarc ball-top Servostiks which many know are based on Sanwa JLWs.  I have found bits and pieces of info on the various methods of undermounting Sanwa JLF/JLW but nothing dedicated to the Servostik with it's additional hardware to account for, so figured I'd start this with hopes it can answer questions and also serve as a reference for others.

On my test panel I simply drilled a 1 1/8" hole and wood screwed to the bottom.  The height was not terrible but I knew I'd have to route out at least 1/4" and possibly more.  The current height from deck to ball bottom is about 11/16, and from what I can tell I want about 1".  I will also have 1/8 plexi on top so was thinking of routing to 3/8 and throwing in some brass nutserts (similar to the Ultimarc/GGG kit).  This would still be a little shy of 1" but hopefully good enough.

My other choices are countersinking and bolting or screwing on top, but they seem a much easier routing job, flatter results, and more simple to replace if needed w/ the nutserts. 

I was also considering the Pac-man or other universal mounting plate, but that seemed like overkill to me.  Similarly I know that there are extensions and shaft kits (at least for the JLF... not sure if these work on a JLW) but since I think the feel is perfect I don't want to mess too much w/ the physics of the stick.

Just throwing it out there to see if anyone has done a similar undermount install w/ routing, and the minimum thickness of of the top layer to make for a strong install... or anything else I may not have thought of.

Thanks for any advice!

PL1

  • Global Moderator
  • Trade Count: (+1)
  • Full Member
  • *****
  • Offline Offline
  • Posts: 9674
  • Last login:Today at 05:13:02 am
  • Designated spam hunter
Re: Ultimarc Servostik undermounting
« Reply #1 on: August 29, 2021, 04:54:08 pm »
You might want to look into the "Under mount (support blocks)" method mentioned in the FAQ.
http://wiki.arcadecontrols.com/index.php/FAQ#Joysticks

Here's how Gilrock applied that method to ServoStiks.   ;D
http://forum.arcadecontrols.com/index.php/topic,141437.msg1675685.html#msg1675685


Scott

giantsean

  • Trade Count: (0)
  • Full Member
  • ***
  • Offline Offline
  • Posts: 18
  • Last login:January 24, 2022, 12:14:40 am
  • I want to build my own arcade controls!
Re: Ultimarc Servostik undermounting
« Reply #2 on: August 29, 2021, 11:27:13 pm »
Thanks.. that's an interesting setup.  I've seen another builder attach four small brackets to each mounting hole on the joystick plate, cut a square opening, and attach them to the sides around the opening. 

The FAQ version would work but as the stick already has a plate, it would not gain any height.. unless what you're saying is Gilrock's method moved the plate more toward the bottom.  To my eyes it was more to ensure stability in MDF... luckily I'm blessed with plywood :)

PL1

  • Global Moderator
  • Trade Count: (+1)
  • Full Member
  • *****
  • Offline Offline
  • Posts: 9674
  • Last login:Today at 05:13:02 am
  • Designated spam hunter
Re: Ultimarc Servostik undermounting
« Reply #3 on: August 30, 2021, 02:56:29 am »
I've seen another builder attach four small brackets to each mounting hole on the joystick plate, cut a square opening, and attach them to the sides around the opening. 
That sounds like a variation on the top mount method.
Seems like it would be dfficult to conceal the hardware and make it look good.   :dunno

To my eyes it was more to ensure stability in MDF
Threaded inserts do make it possible to remove/repair/replace joysticks without pulping screw holes in MDF, but the purpose of the "Under mount (support blocks)" method is to mount the stick closer to the surface than you can with this "Under mount (threaded inserts)" method.
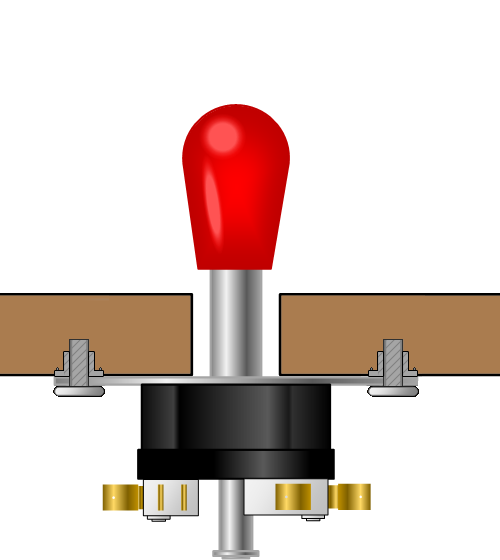
- If you route a pocket for the mount plate you have to leave enough depth for the threaded inserts and screws so the screws don't poke through the surface of the CP.
- If you have a 0.75" CP and route a 0.25" pocket, that leaves 0.5".  The threaded inserts from GGG are 0.4" tall, leaving you with 0.1" from the top of the threaded inserts to the surface of the CP.  That's why the "Under mount (support blocks)" method is the better choice IMHO.


The FAQ version would work but as the stick already has a plate, it would not gain any height.. unless what you're saying is Gilrock's method moved the plate more toward the bottom.
You're missing the whole point of the "Under mount (support blocks)" method.
- The stick does come with a plate, but in this method that's not how you fasten the stick to the CP.

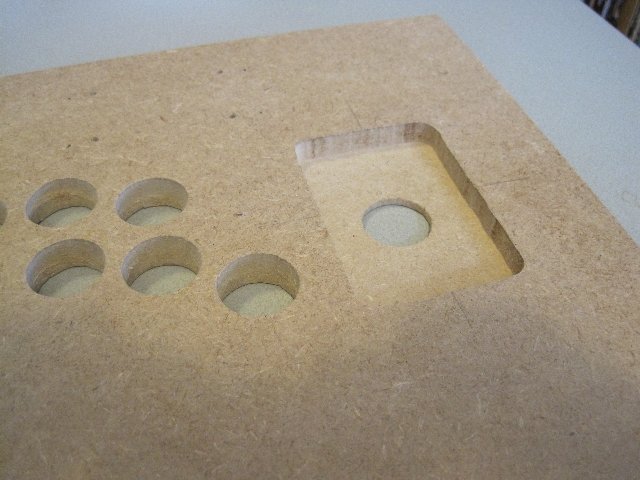
1. Route a pocket for the stick on the underside of the CP.


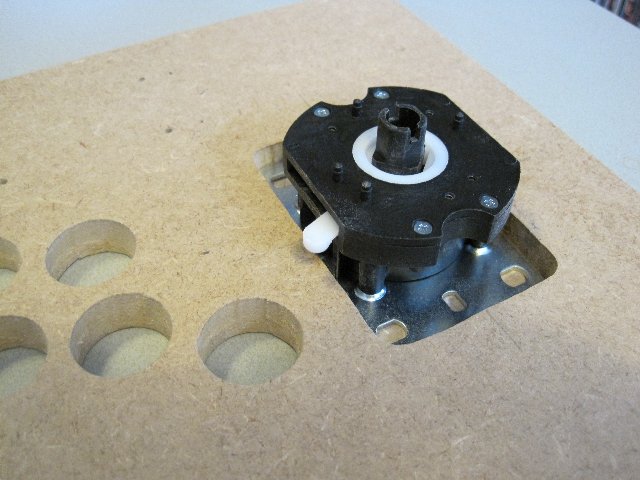
2. Put the stick in the pocket.  It is now closer to the top surface of the CP than it would have been without the pocket and the handle is higher above the CP.  That's what you want, right?


3. Add support blocks (or cylindrical spacers in Gilrock's version) that come level with or slightly past the underside of the CP.


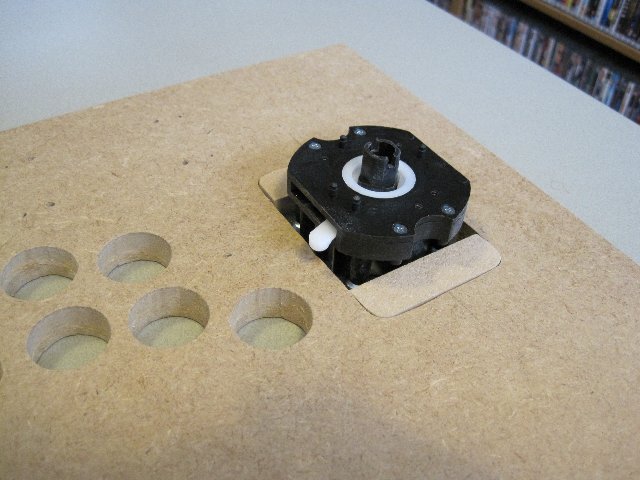
4. Fabricate a plate or flat bars and put the threaded inserts (4 is enough, 10 is overkill ;) ) in the full-thickness part of the CP outside the pocket.  If the pocket is loose, mount the stick to the support blocks and the support blocks to the fabricated plate/bars so the stick doesn't wiggle around in the pocket.


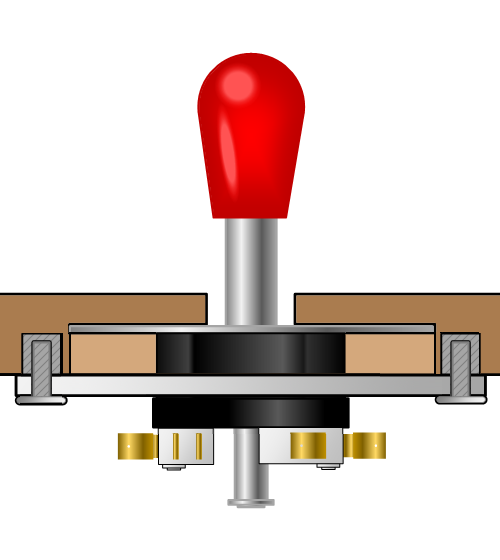
The fabricated plate is the thick one that the screws pass through in this diagram.


Scott

giantsean

  • Trade Count: (0)
  • Full Member
  • ***
  • Offline Offline
  • Posts: 18
  • Last login:January 24, 2022, 12:14:40 am
  • I want to build my own arcade controls!
Re: Ultimarc Servostik undermounting
« Reply #4 on: August 30, 2021, 11:49:23 am »
AH!  Thank you... that is much more clear (I was mistaking the lower plate in the graphic for the main mounting plate, missing that it was sandwiched in there).  I do like this approach.. in fact when trying to visualize this, I was thinking of routing ore gluing a support block w/ a lip (think the "double L" Tetris piece) that could hold in the piece but also ride over the routed hole edge to allow screwing into the CP.  I'm sure a simple pic would explain that way better than my 1000 words :P

Also for anyone interested... here is the aforementioned build w/ the four brackets... https://blondihacks.com/arcade-control-panel/

PL1

  • Global Moderator
  • Trade Count: (+1)
  • Full Member
  • *****
  • Offline Offline
  • Posts: 9674
  • Last login:Today at 05:13:02 am
  • Designated spam hunter
Re: Ultimarc Servostik undermounting
« Reply #5 on: August 30, 2021, 12:28:27 pm »
here is the aforementioned build w/ the four brackets... https://blondihacks.com/arcade-control-panel/
That makes more sense after seeing the pictures.

It's a similar approach with 4 short bars instead of a plate or 2 long bars.
- The downside to this 4-bar approach is that the stick is more likely to wiggle loose during vigorous gameplay.


Scott

giantsean

  • Trade Count: (0)
  • Full Member
  • ***
  • Offline Offline
  • Posts: 18
  • Last login:January 24, 2022, 12:14:40 am
  • I want to build my own arcade controls!
Re: Ultimarc Servostik undermounting
« Reply #6 on: August 31, 2021, 08:10:35 pm »
I would agree it's a bit of a weird approach, unless those bolt heads on the underside of the CP are really dug in and cannot pivot. 

On that note, I kind of like the idea of the support block method, but am I interpreting correctly that the joystick more or less floats there?  Even with the sandwiching pressure of the plate and blocks, I would think you'd have to fit it super tightly to keep it from moving laterally.  Was this method primarily designed with MDF CP's in mind?  Asking because I'm wondering if 3/8" - 1/2 " of real ply wouldn't be sufficient to support the nutserts and screws.  It would be nice to be able to anchor the stick physically to the CP in some fashion... has anyone tried a combination of direct screwing + support blocks?

(if I wasn't already overthinking this... I certainly am now :P)

PL1

  • Global Moderator
  • Trade Count: (+1)
  • Full Member
  • *****
  • Offline Offline
  • Posts: 9674
  • Last login:Today at 05:13:02 am
  • Designated spam hunter
Re: Ultimarc Servostik undermounting
« Reply #7 on: August 31, 2021, 09:43:50 pm »
Was this method primarily designed with MDF CP's in mind?
AFAIK the type of wood was never a consideration.

The sole purpose was to mount the stick higher than possible using the "Under mount (threaded inserts)" method.
- This allows for more handle clearance for a stick with a shorter shaft / throw distance.

Asking because I'm wondering if 3/8" - 1/2 " of real ply wouldn't be sufficient to support the nutserts and screws.
The concern here isn't the strength of the inserts in the panel, it's the wiggle room needed to keep the screws from poking through.

If you put 0.4" tall threaded inserts from GGG into a 3/8" (0.375") control panel using the provided 0.6" screws through a 0.065" thick joystick mounting plate, installing the insert will break through the surface and the screw will be higher than that.
- With a 1/2" panel, the insert might not poke through, but the screw will.


Only way around this is to use shorter inserts, shorter screws, and/or washers.

The other problem with using thinner control panels is the amount of flex unless you add supports -- better to stick with 3/4" for the CP.

It would be nice to be able to anchor the stick physically to the CP in some fashion... has anyone tried a combination of direct screwing + support blocks?
That would be Gilrock's version.   ;)


Scott

giantsean

  • Trade Count: (0)
  • Full Member
  • ***
  • Offline Offline
  • Posts: 18
  • Last login:January 24, 2022, 12:14:40 am
  • I want to build my own arcade controls!
Re: Ultimarc Servostik undermounting
« Reply #8 on: August 31, 2021, 11:00:06 pm »
Yeah... I really ought to read more than those few posts on that one page w/ the picture lol. 

Did I read the last page correctly... he never actually completed it?!?

PL1

  • Global Moderator
  • Trade Count: (+1)
  • Full Member
  • *****
  • Offline Offline
  • Posts: 9674
  • Last login:Today at 05:13:02 am
  • Designated spam hunter
Re: Ultimarc Servostik undermounting
« Reply #9 on: August 31, 2021, 11:59:10 pm »
Even though he apparently hasn't finished that particular cab, you can still learn from his ServoStik mount example.   :cheers:


Scott

Gilrock

  • Trade Count: (0)
  • Full Member
  • ***
  • Offline Offline
  • Posts: 1049
  • Last login:July 27, 2024, 12:15:05 pm
Re: Ultimarc Servostik undermounting
« Reply #10 on: September 01, 2021, 10:31:46 am »
I completed the control panel and the cab is fully operational.  I've just never skinned the wooden frame because I've been working on the artwork.  I've built a Robotron and Joust in between and I've got 200+ hours into the artwork for that Mame cab.

As PL1 says my main goal was to get the the joystick shafts sticking out further so I had to mount them in pockets leaving very little material for bottom side screws.  I have that metal bracket I made somewhere in a DXF file and I had a spreadsheet that calculated all the measurements for my standoffs.  You can see I need 2 different size standoffs to make that work.  I provided everything to PL1 a while back and thought he was going to create a page showing all the measurements but I don't believe that happened yet.

PL1

  • Global Moderator
  • Trade Count: (+1)
  • Full Member
  • *****
  • Offline Offline
  • Posts: 9674
  • Last login:Today at 05:13:02 am
  • Designated spam hunter
Re: Ultimarc Servostik undermounting
« Reply #11 on: September 01, 2021, 12:37:38 pm »
I have that metal bracket I made somewhere in a DXF file and I had a spreadsheet that calculated all the measurements for my standoffs.  You can see I need 2 different size standoffs to make that work.  I provided everything to PL1 a while back and thought he was going to create a page showing all the measurements but I don't believe that happened yet.
You're right, I still haven't made and posted OpenSCAD 3d-printable models for the plate and spacers.   :embarassed:   :banghead:

Here's the info you provided for anyone who wants to fabricate their own.

DXF file: http://www.threebuttes.com/Extras/mame/JoystickPlate.dxf


Scott

Gilrock

  • Trade Count: (0)
  • Full Member
  • ***
  • Offline Offline
  • Posts: 1049
  • Last login:July 27, 2024, 12:15:05 pm
Re: Ultimarc Servostik undermounting
« Reply #12 on: September 01, 2021, 02:23:51 pm »
Nice...you kept better track of my stuff than I did. :)

Gilrock

  • Trade Count: (0)
  • Full Member
  • ***
  • Offline Offline
  • Posts: 1049
  • Last login:July 27, 2024, 12:15:05 pm
Re: Ultimarc Servostik undermounting
« Reply #13 on: September 01, 2021, 02:31:54 pm »
If you use my method you can route the pocket so that the existing metal plate is resting on the bottom of the pocket and the plate I designed is resting on the bottom surface of the control panel.  The spacers are threaded so everything is screwed together really tight.  Its super solid once installed.

bobbyb13

  • Trade Count: (+2)
  • Full Member
  • ***
  • Offline Offline
  • Posts: 1977
  • Last login:July 30, 2025, 05:20:46 am
  • I believe I may need an intervention
Re: Ultimarc Servostik undermounting
« Reply #14 on: September 02, 2021, 01:04:48 am »
This is a really slick solution gentlemen  :cheers:

Props to you both for preserving and sharing- as now I can use it myself  :)
Relax, all right? My old man is a television repairman, he's got this ultimate set of tools! I can fix it.

giantsean

  • Trade Count: (0)
  • Full Member
  • ***
  • Offline Offline
  • Posts: 18
  • Last login:January 24, 2022, 12:14:40 am
  • I want to build my own arcade controls!
Re: Ultimarc Servostik undermounting
« Reply #15 on: September 02, 2021, 03:48:40 pm »
Indeed.. great information here.  Thanks to all for the great interaction!

PL1

  • Global Moderator
  • Trade Count: (+1)
  • Full Member
  • *****
  • Offline Offline
  • Posts: 9674
  • Last login:Today at 05:13:02 am
  • Designated spam hunter
Re: Ultimarc Servostik undermounting
« Reply #16 on: September 02, 2021, 05:48:36 pm »
So far, here's where I'm at with the 3d model.
- The model is parametric so users can customize it by adjusting variable values -- no programming skills required.   ;D
- Adding some features like the echo statements to (hopefully) make it CNC-friendly.

Still needed:
- Two "H-Tabs"
- Two screw holes -- one per tab
- Echo statements for the H-Tab screw hole positions
- Four inside corners -- one per tab -- for strain relief and CNC milling
- Rounded corners for the ServoStik hole to allow larger bits during CNC milling and still have clearance for the ServoStik body


Scott

giantsean

  • Trade Count: (0)
  • Full Member
  • ***
  • Offline Offline
  • Posts: 18
  • Last login:January 24, 2022, 12:14:40 am
  • I want to build my own arcade controls!
Re: Ultimarc Servostik undermounting
« Reply #17 on: September 02, 2021, 05:57:52 pm »
Correct assessment that this is about 15-ish gauge metal?

PL1

  • Global Moderator
  • Trade Count: (+1)
  • Full Member
  • *****
  • Offline Offline
  • Posts: 9674
  • Last login:Today at 05:13:02 am
  • Designated spam hunter
Re: Ultimarc Servostik undermounting
« Reply #18 on: September 02, 2021, 07:14:47 pm »
Correct assessment that this is about 15-ish gauge metal?
According to Gilrock's diagram, the metal he used was 1.65mm = 0.06496063" thick.

That does appear to be about the same thickness as 15 gauge steel, but different metals use different gauge thicknesses so double check the specs.   :banghead:


An even-numbered gauge might be easier to find and less expensive. 


Scott

PL1

  • Global Moderator
  • Trade Count: (+1)
  • Full Member
  • *****
  • Offline Offline
  • Posts: 9674
  • Last login:Today at 05:13:02 am
  • Designated spam hunter
Re: Ultimarc Servostik undermounting
« Reply #19 on: September 06, 2021, 10:03:33 am »
Finished the initial version of the plate and spacer 3d models.


Posted the downloadable files and code in a project thread here and requested testers/feedback.


Scott