Main Restorations Software Audio/Jukebox/MP3 Everything Else Buy/Sell/Trade
Project Announcements Monitor/Video GroovyMAME Merit/JVL Touchscreen Meet Up Retail Vendors
Driving & Racing Woodworking Software Support Forums Consoles Project Arcade Reviews
Automated Projects Artwork Frontend Support Forums Pinball Forum Discussion Old Boards
Raspberry Pi & Dev Board controls.dat Linux Miscellaneous Arcade Wiki Discussion Old Archives
Lightguns Arcade1Up Try the site in https mode Site News

Unread posts | New Replies | Recent posts | Rules | Chatroom | Wiki | File Repository | RSS | Submit news


Author Topic: Control buttons thickness for custom arcade  (Read 4881 times)

0 Members and 1 Guest are viewing this topic.

kataleen

  • Trade Count: (0)
  • Jr. Member
  • **
  • Offline Offline
  • Posts: 3
  • Last login:February 20, 2017, 04:31:54 pm
  • I want to build my own arcade controls!
Control buttons thickness for custom arcade
« on: September 26, 2016, 07:29:40 pm »
Hey guys, I just started building a custom arcade cabinet with an MDF control panel. The thickness of the panel is 3/4. For the controls I wanted to test Sanwa, Seimitsu, IL and Happ, but before that I just need to confirm my fear so far: does anybody know if the Japanese ones can fit such a thickness for the CP? Form the specs I can find on the web it seems that they can only fit to very thin panels (screw buttons not snap in). Am I left with the only choice of Happ/IL?

Thanks in advance.
Stefan

keilmillerjr

  • Trade Count: (+5)
  • Full Member
  • ***
  • Offline Offline
  • Posts: 1847
  • Last login:October 06, 2023, 10:20:39 pm
  • Web Developer.
Re: Control buttons thickness for custom arcade
« Reply #1 on: September 26, 2016, 07:49:40 pm »
What ive seen most people do is route out an area around the buttons and sometimes the joysticks. Take away 1/4". Go through the control panel sticky thread ans you will see what i am talking about.

shaolindrunkard

  • Trade Count: (0)
  • Full Member
  • ***
  • Offline Offline
  • Posts: 570
  • Last login:June 11, 2025, 09:02:25 pm
Re: Control buttons thickness for custom arcade
« Reply #2 on: September 27, 2016, 08:12:30 pm »
The Japanese buttons will not lock into the 3/4 mdf, unless you want to glue them in (which I don't recommend) You could route the underside of the control panel to make it thinner, but that would be a lot of work, the other thing you could do it use a thin sheet of plexiglass on top of the panel and the buttons would lock into the plexi. The Happ/IL buttons wont fit the same hole size as the Japanese either... I highly recommend you test the buttons on a test control panel to choose which ones you like best.

Honestly if you ask me your complicating the issue more than it need be. Japanese buttons are great for fighting games and shooters, most prefer american style buttons if you are playing a variety of arcade games. I prefer Happ over IL. What ever the case, all of the brands work just fine for just about any game, I wouldn't spend too much time worrying about buttons when you have a lot of work to do on the rest of the machine... ;)

JDFan

  • Trade Count: (+1)
  • Full Member
  • ***
  • Offline Offline
  • Posts: 3448
  • Last login:March 03, 2025, 10:29:54 am
  • I want to build my own arcade controls!
Re: Control buttons thickness for custom arcade
« Reply #3 on: September 27, 2016, 11:51:36 pm »
If you cut the holes a bit small for the buttons and sand slightly so that they are a tight fit the buttons will stay in place (figure the Control panel sits so that gravity will hold them in place unless someone tries to pry them out) - the part that snaps onto the metal control panels will press against the side of the hole and provide a pretty tight fit and then to remove them you have to give a good push from the underside to pop them out. I did it this way on my barstick build and have not had problems with them staying in place (just need to be sure not to make the hole too big so that they fall out - which isn't a problem in an upright build that will not be turned upside down but could be a problem for a barstick or small build)

Scassidy24

  • Trade Count: (0)
  • Full Member
  • ***
  • Offline Offline
  • Posts: 183
  • Last login:October 12, 2023, 11:56:34 am
  • I love my Nostalgia Machine
    • forum.arcadecontrols.com/index.php/topic,150379.0.html
Re: Control buttons thickness for custom arcade
« Reply #4 on: October 03, 2016, 12:56:05 am »
Can you get away with a 1/2" thick control panel?  That's what I did. It's plenty sturdy enough


Sent from my iPhone using Tapatalk

UEDan

  • Trade Count: (0)
  • Full Member
  • ***
  • Offline Offline
  • Posts: 104
  • Last login:November 10, 2019, 05:54:08 am
  • I want to build my own arcade controls!
Re: Control buttons thickness for custom arcade
« Reply #5 on: October 03, 2016, 02:11:16 am »
"long" Happ style buttons were just enough to screw on my 3/4" mdf + 1/8 Acrylic.
Anything shorter. Forget about it.

DeLuSioNal29

  • Global Moderator
  • Trade Count: (+6)
  • Full Member
  • *****
  • Offline Offline
  • Posts: 4779
  • Last login:July 11, 2025, 09:17:44 am
  • Build the impossible -"There is no Spoon"
    • DeLuSioNaL's YouTube Videos
Re: Control buttons thickness for custom arcade
« Reply #6 on: October 03, 2016, 04:54:35 pm »
A forum user Franco B created a routing template for just this purpose:
http://forum.arcadecontrols.com/index.php?topic=103416.0

However, to do it on the cheap if you don't have a router it's pretty easy following these steps:  (This is how I do it anyway).
1)  Grab a template here, print it out and tape it to the CP (Make sure it's printed in the correct size of course):  http://slagcoin.com/joystick/layout.html
2)  Drill a small pilot hole in each button hole on the template all the way through from front to back.  Remove the template.
3)  Get a 30mm Forstner bit (I usually order them on Amazon, they are hard to find at Home Depot).  Put the center of the bit in the pilot hole you just made.  Drill 1/4" deep.  Do not go all the way through.  Do this for all button holes.
4)  Flip it over to the back.  Get a 1-1/4" Forstner bit.  Put the center of the bit in the pilot hole you just made.  Drill 1/2" deep.  Do not go all the way through.  The holes on the back should overlap.

The end result should look something like this:
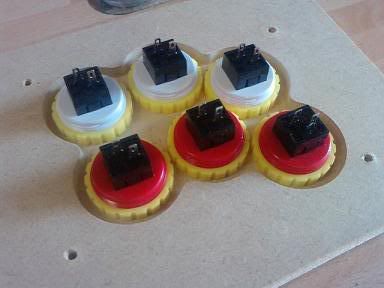

I've used this method on my 1/2" panel as well (I recommend 1/2" if you want to mount Sanwa sticks).  You need to drill 1/4" on each side for that thickness.

Good Luck!

DeL
Stop by my Youtube channel and leave a comment: